1
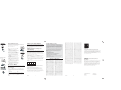
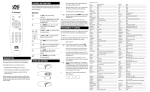
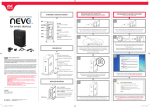
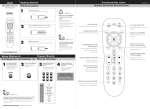
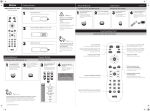
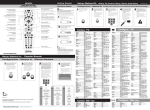
3. Point the remote directly at the front panel of
ENGLISH
Step 1: Install Batteries
your TV. Press the POWER key and wait for the
indicator light to blink. Each time the indicator light
blinks, the remote is testing a code with your TV.
Make sure you keep the remote pointed at your
TV.
Your OARH01B universal remote requires 2 new AAA alkaline batteries (sold
separately).
The Manual Code Search lets you go one-by-one through all the codes for your
TV. When you find the one that operates your TV, you can stop the search and
store that code.
1. Manually turn on your TV.
4. As soon as your TV turns off, press the ENTER
To install the batteries:
1. Turn the unit over, remove screw and remove the battery door compartment
cover.
2. Insert the batteries, matching the batteries to the (+) and (-) marks inside
the battery case.
Battery Precautions:
• Do not mix old and new batteries.
• Do not mix alkaline, standard (carbon-zinc) or rechargable (nickel-cadmium) batteries.
• Always remove old, weak or worn-out batteries promptly and recycle or dispose of them in
accordance with Local and National Regulations.
Step 2: Program the Remote
To use this universal remote with your TV, first you need to program it to control
your TV. There are three ways you can program the universal remote to operate
your TV:
• The Auto Code Search goes automatically through all the codes for your TV.
It’s the easiest method, but it can sometimes take longer than some of the other
programming methods.
Note: If you wait longer than 4 seconds to press ENTER,
the remote goes to the next code—you will need to start
the code search from step 1 again.
The indicator light flashes 8 times and turns off when the
remote has searched all the codes. If this happens, try one
of the other programming methods.
• The Manual Code Search lets you manually go through all the codes for your
TV.
2. Press and hold the CODE SEARCH key until the
indicator light turns on.
Important: Find the ENTER key on your remote (don’t
press it yet). You will need to press this key quickly in step
4 below.
5. Test the remote with your TV to make sure you
can control most of your TV’s functions. If some
features don’t work, try the Direct Code Entry
method.
Direct Code Entry
Direct Code Entry lets you enter a code from the code list at the end of this manual
for your brand of TV. It’s not as easy as the other methods, but it’s potentially the
fastest method.
3. Point the remote directly at the front panel of
your TV. Press the POWER key once every 2-3
seconds until your TV turns off.
Note: Since this remote has hundreds of codes, you may
have to press the POWER key many (perhaps hundreds of)
times using this method.
2. Find the four-digit code for your brand of TV in the
3. Press and hold the CODE SEARCH key until the
indicator light turns on.
The indicator light flashes 8 times and turns off when the
remote has searched all the codes. If this happens, try one
of the other programming methods.
Note: If the indicator light blinks multiple times, you’ve
entered an invalid code. Start from step 2 again.
5. Aim the remote at your TV and press the
POWER key.
If your TV turns off: The remote is programmed
to operate this TV.
If your TV does NOT turn off: Try the next code
for your brand.
Note: If no codes work, or if your brand is not listed, try the
Auto Code Search or Manual Code Search.
2
control most of the TV’s functions. If some features
don’t work, try the Direct Code Entry method.
Accessing Menus
keypad. After the code is entered, the indicator
light turns off.
Important: Find the ENTER key on your remote (don’t
press it yet). You will need to press this key quickly in step
4 below.
2. Press the CODE SEARCH key again. The indicator light turns off.
3. Starting with 0 on the keypad, press the number keys in order (0-9) until the
indicator light turns on. The number that causes the indicator light to light up is
the first digit of your code. Write it down in the space provided below.
4. Repeat step 4 until you have retrieved all four numbers of the code.
ENGLISH
3
This remote supports menu access, navigation and selection for many makes and
models of TV. The amount of menu functionality varies from model to model and
from brand to brand.
ESPAÑOL
Paso 1: Instalar las Baterías
Su control remoto universal OARH01B requiere 2 baterías alcalinas AAA nuevas
(vendidas por separado).
Para instalar las baterías:
To obtain replacement within the terms of this Warranty, the product is to be delivered with proof of
warranty coverage (eg. dated bill of sale), specifications of defect(s), transportation prepaid to the
Company at the address shown below.
1. Voltee la unidad, retire el tornillo y remueva la cubierta del compartimiento de la
puerta de baterías.
U.S.A.: Audiovox Electronics Corporation, 150 Marcus Blvd., Hauppauge, NY 11788
CANADA: Audiovox Return Center, c/o Genco, 6685 Kennedy Road, Unit 3, Door 16,
Mississauga, Ontario L5T 3A5
2. Inserte las baterías, de manera que las baterías coincidan con las marcas (+) y
(-) dentro del compartimiento de baterías.
Care and Maintenance
•
•
•
•
•
•
Keep the remote dry. If it gets wet, wipe it dry immediately.
Use and store the remote only in normal temperature environments.
Handle the remote gently and carefully. Don't drop it.
Keep the remote away from dust and dirt.
Wipe the remote with a damp cloth occasionally to keep it looking new.
Modifying or tampering with the remote's internal components can cause malfunction and
invalidate its warranty.
Precaución con las baterías:
• No mezcle baterías nuevas y viejas.
• No mezcle baterías alcalinas, estándar (carbono-zinc) o recargables (níquel-cadmio).
• Siempre retire prontamente las baterías viejas, descargadas o gastadas y recíclelas o
elimínelas de conformidad con las regulaciones nacionales y locales.
Paso 2: Programar el Control Remoto
Para usar este control remoto universal con su sistema de entretenimiento en
casa, usted primero necesita programarlo para controlar sus equipos. Hay tres
formas en que usted puede programar el control remoto universal para que
funcione con su TV:
• La opción Auto Code Search (Búsqueda Automática de Código) pasa
automáticamente a través de todos los códigos para su TV Éste es el método
más fácil, pero en ocasiones puede tomarse más tiempo que algunos de los
otros métodos de programación.
Note: If you wait longer than 4 seconds to press ENTER,
the remote goes to the next code—you will need to start
the code search from step 1 again.
4. Enter the four-digit code, using the numeric
indicator light turns on.
Once you’ve found the code that works best with your TV, you might want to write
it down so that you can use it if you ever need to program a remote for your TV
again.That’s easy if you used the Direct Code Entry method—just write down the
code you used from the list. However, if you used the Auto Code Search or Manual
Code Search, you will need to go through the following steps to know exactly
which code you’re using.
1. Press and hold the CODE SEARCH key until the indicator light turns on.
5. Test the remote with your TV to make sure you can
2. Press and hold the CODE SEARCH key until the
The INPUT and — (dash) key lets you enter a digital sub-channel number, like
59.1, directly. Use the number keys to enter the main channel number (in this
case, “59”). Then press the INPUT (–) key and press the subchannel number (in
this case, “1”). When you’re not entering channel numbers, the INPUT key toggles
through all the video sources connected to your TV as well.
Audiovox Electronics Corporation warrants that for 90 days from date of purchase, it will
replace this product if found to be defective in materials or workmanship. Return it to the
address below for a replacement with a current equivalent. This replacement is the company’s
sole obligation under this warranty. ANY IMPLIED WARRANTY OF MERCHANTABILITY OR
FITNESS FOR A PARTICULAR USE IS DISCLAIMED. This warranty excludes defects or
damage due to misuse, abuse, or neglect. Incidental or consequential damages are disclaimed
where permitted by law. This warranty does not cover product purchased, serviced or used
outside the United States or Canada.
key within 4 seconds.
Auto Code Search
1. Manually turn on your TV.
90-Day Limited Warranty
4. As soon as your TV turns off, press the ENTER
1. Manually turn on your TV.
code list at the end of this manual.
The Auto Code Search goes automatically through all the codes for your TV. When
you find the one that operates your TV, you can stop the search and store that
code.
Accessing Digital Channels
Retrieving Remote Codes
key within 4 seconds.
• The Direct Code Entry lets you enter a code from the accompanying code
list for your brand. It’s not as easy as the other methods, but it’s potentially the
fastest method.
ENGLISH
Manual Code Search
• La opción Direct Code Entry (Entrada Directa de Código) le permite
ingresar un código de la lista de códigos que le acompaña para la marca de
su equipo. No es tan fácil como los otros métodos, pero potencialmente es el
método más rápido.
Additional Information
This product does not have any user-serviceable parts. Opening the case, except for the battery
cover, may cause permanent damage to your OARH01B Cable Replacement Remote.
• La opción Manual Code Search (Búsqueda Manual de Código) le permite
pasar manualmente a través de todos los códigos para su TV.
• For help via the Internet, visit us at: www.oneforall.com
• For help via our consumer help line, call 1 (800) 315-0990
ONE FOR ALL® is the registered trademark of Universal Electronics Inc. Audiovox Accessories
Corporation is the Licensee of the ONE FOR ALL® brand for North America.
Búsqueda Automática de Código
La Búsqueda Automática de Código pasa automáticamente a través de todos los
códigos para su TV. Cuando usted encuentra el que funciona con su TV, puede
detener la búsqueda y guardar ese código.
© 2011 Universal Electronics Inc. No part of this publication may be reproduced, transmitted,
transcribed, stored in any retrieval system, or translated to any language, in any form or by any
means, electronic, mechanical, magnetic, optical, manual, or otherwise, without prior written
permission of Universal Electronics Inc.
1. Encienda manualmente su TV.
To use the Menu function:
1. Press the MENU key. The menu of your TV is shown. While in Menu Mode the
Red LED will blink until you exit or Menu function times out. the keys on this
remote function as follows:
2. Presione y mantenga presionada la tecla CODE
SEARCH hasta que la luz del indicador se
encienda.
Vol up/ down
Ch +/-
Cursor moves right/left
Cursor moves up/down
Importante: localice la tecla ENTER en su control remoto
(no la presione todavía). Usted necesitará presionar esta
tecla rápidamente en el paso cuatro más adelante
Note: Some functions of some brands may not be fully supported.
2. To exit the menu mode press MENU key on the remote again.
ENGLISH
4
ENGLISH
5
ENGLISH
6
ESPAÑOL
7
ódigo de la lista de códigos
a de TV. Éste no es tan fácil
étodo más rápido.
Búsqueda Manual de Código
Para Accesar Canales Digitales
Garantía Limitada por 90 Días
La Búsqueda Manual de Código le permite ir uno por uno a través de todos los
códigos para su TV. Cuando encuentre el que funciona con su aparato, usted
puede detener la búsqueda y guardar ese código.
La tecla INPUT y — (guión) le permiten ingresar un número de subcanal digital,
como 59.1, directamente. Use las teclas numéricas para ingresar el número de
canal principal (en este caso, “59”). Luego presione la tecla INPUT (–) y presione
el número de subcanal (en este caso, “1”). Cuando usted no esté ingresando
números de canal, la tecla INPUT alterna también a través de todas las fuentes de
video conectadas a su TV.
Audiovox Electronics Corporation garantiza que por 90 días desde la fecha de compra,
reemplazará este producto si se encuentran defectos en materiales o mano de obra. Envíelo de
regreso a la dirección a continuación para un reemplazo con un equivalente actual. Este reemplazo
es la única obligación de la compañía bajo esta garantía. CUALQUIER GARANTÍA IMPLÍCITA
DE COMERCIALIZACIÓN O IDONEIDAD PARA UN USO EN PARTICULAR ES RENUNCIADA.
Esta garantía excluye defectos o daños debido a mal uso, abuso, o negligencia. Los daños
consecuenciales o incidentales son renunciados donde sea permitido por la ley. Esta garantía no
cubre el producto comprado, que haya recibido servicio o haya sido usado fuera de los Estados
Unidos o Canadá.
1. Encienda manualmente su TV
2. Presione y mantenga presionada la tecla CODE
SEARCH hasta que la luz del indicador se
encienda
Importante: localice la tecla ENTER en el control remoto
(no la presione todavía). Usted necesitará presionar esta
tecla rápidamente en el paso 4 más adelante|.
3. Apunte el control remoto directamente al panel
frontal de su TV. Presione la tecla POWER una vez
cada 2-3 segundos hasta que su TV se apague.
Nota: puesto que este control remoto tiene cientos de
códigos, puede ser que usted tenga que presionar la
tecla POWER muchas veces (quizás cientos) usando este
método.
4. Tan pronto como su TV se apague, presione la
tecla ENTER en 4 segundos.
Nota: si usted espera más de 4 segundos para presionar
ENTER, el control remoto pasa al siguiente código - usted
necesitará comenzar la búsqueda de códigos desde el
paso 1 otra vez.
La luz del indicador parpadea 8 veces y se apaga cuando
el control remoto ha buscado todos los códigos. Si esto
ocurre, intente unos de los otros métodos de programación
Para Recuperar los Códigos del
Control Remoto
EE.UU.: Audiovox Electronics Corporation, 150 Marcus Blvd., Hauppauge, NY 11788
Una vez que usted haya encontrado el código que funcione mejor con su TV,
quizás desee anotarlo de manera que pueda utilizarlo en el caso de que necesitara
volver a programar un control remoto para su TV. Eso es fácil si usted usó el
método de Entrada Directa de Código - sólo tome nota del código que usó de
la lista. Sin embargo, si usted utilizó la Búsqueda Automática de Código o la
Búsqueda Manual de Código, usted necesitará ir a través de los pasos siguientes
para saber exactamente cuál código está usando.
1. Presione y mantenga presionada la tecla CODE SEARCH hasta que la luz del
indicador se ilumine.
2. Presione la tecla CODE SEARCH otra vez. La luz del indicador se apaga.
hasta que la luz del indicador se ilumine. El número que cause que la luz del
indicador se encienda es el primer dígito de su código. Anótelo en el espacio
provisto a continuación.
4. Repita el paso 4 hasta que usted haya recuperado los cuatro números del
código.
asegurarse de que puede controlar la mayoría de
las funciones de la TV. Si algunas características
no funcionan, intente con el método de Entrada
Directa de Código.
Este control remoto soporta el acceso a menú, navegación y selección de muchas
marcas y modelos de TV. La cantidad de funcionalidad de menú varía de modelo a
modelo y de marca a marca.
Para usar la función Menú:
1. Presione la tecla MENU. El menú de su TV es mostrado. Mientras esté en
modo Menú el LED Rojo parpadeará hasta que usted salga o la función de
Menú se apague. Las teclas en este control remoto funcionan de la manera
siguiente:
Vol up/ down
Ch +/-
Información Adicional
Este producto no tiene partes que requieran servicio por parte del usuario. Abrir el estuche,
excepto la cubierta para baterías, puede causar daño permanente a su Control Remoto de
Reemplazo para Cable OARH01B.
• Para ayuda a través de Internet, visítenos en: www.oneforall.com
• Para asistencia a través de la línea de ayuda al consumidor, llame al 1 (800) 315-0990
ONE FOR ALL® es marca registrada de Universal Electronics Inc. Audiovox Accessories
Corporation es el Licenciatario de la marca ONE FOR ALL® para América del Norte.
© 2011 Universal Electronics Inc. ninguna parte de esta publicación puede ser reproducida,
transmitida, transcrita, almacenada en algún sistema de recuperación, o traducida a algún
idioma, en alguna forma o por algún medio, electrónico, mecánico, magnético, óptico, manual, o
de otra forma, sin el permiso previo por escrito de Universal Electronics Inc.
El cursor se mueve a derecha/izquierda El cursor se mueve arriba/abajo
Nota: algunas funciones de algunas marcas pueden no estar completamente soportadas.
2. Para salir del modo menú presione la tecla MENU en el control remoto otra
vez.
ESPAÑOL
9
CANADÁ: Audiovox Return Center, c/o Genco, 6685 Kennedy Road, Unit 3, Door 16,
Mississauga, Ontario L5T 3A5
Cuidado y Mantenimiento
•
•
•
•
•
Mantenga el control remoto seco. Si se moja, séquelo de inmediato
Use y guarde el control remoto sólo en ambientes a temperatura normal.
Maneje con suavidad y cuidado el control remoto. No lo tire.
Mantenga el control remoto lejos del polvo y la suciedad.
Limpie el control remoto con un paño húmedo ocasionalmente para mantenerlo con una
apariencia de nuevo.
• Modificar o alterar los componentes internos del control remoto puede causar mal
funcionamiento e invalidar su garantía.
3.Comenzando con 0 en el teclado, presione las teclas numéricas en orden (0-9)
5. Pruebe el control remoto con su TV para
Acceso a los Menús
Para obtener reemplazo dentro de los términos de esta Garantía, el producto debe ser entregado
con cobertura de la prueba de garantía (por ejemplo, nota de venta fechada), especificaciones de
defectos, transporte pagado a la Compañía a la dirección que se muestra a continuación.
ESPAÑOL
10
TV Codes / Códigos de TV
Admiral ....................................... 0093, 0463
Advent .................................................. 0761
Akai ........................ 0812, 1675, 0702, 1935
AOC ............. 1365, 1589, 2014, 2087, 2479
Apex Digital ............ 0748, 0765, 1217, 2397
Audiovox ......................... 0451, 0802, 1766,
......................................... 1769, 1868, 2121
Aventura ............................................... 0171
Broksonic ................................... 0463, 1935
Carver .................................................. 0054
Celebrity ............................................... 0001
Celera................................................... 0765
Changhong .......................................... 0765
Citizen ........................................ 0060, 1935
Coby .. 1634, 2306, 2315, 2344, 2345, 2348
Commercial Solutions ................. 1447, 0000
Crosley ....................................... 0001, 0054
Curtis.......................................... 2352, 2466
Curtis Mathes ........ 0000, 0054, 0451, 0093,
............................... 0060, 0702, 0145, 1661
Daewoo ...................................... 0451, 1661
Dell ....................................................... 1264
Denon .................................................. 0145
Dumont ................................................ 0017
Durabrand ........................ 0463, 0178, 0171
Dynex ............................... 1463, 2049, 2184
Electroband .......................................... 0001
Electrograph ......................................... 1755
Electrohome ............................... 0463, 1670
Element ............................ 1687, 1886, 2183
Emerson ................ 1864, 0451, 0463, 0178,
..................... 0171, 1661, 1394, 1665, 1963
Emprex ................................................. 1422
Envision .................. 1365, 1589, 2014, 2087
ESA .................................. 0812, 0171, 1963
ESPAÑOL
Funai ................................ 0001, 0171, 1963
Gateway ............................................... 1755
GE ...... 1547, 1447, 0000, 0051, 0451, 0178
GFM ....................... 0171, 1665, 1963, 2167
Gibralter ............................................... 0017
GoldStar ............................................... 0178
Haier ................................ 1748, 1749, 2309
Hallmark ............................................... 0178
Hannspree ............................................ 1348
Harman/Kardon .................................... 0054
Havermy ............................................... 0093
Hello Kitty ............................................. 0451
Hisense .................. 0748, 1660, 2098, 2355
Hitachi ........................................ 1643, 0145
iLo .................................... 1394, 1665, 1684
Infinity ................................................... 0054
Insignia .................. 1423, 1564, 0463, 0171,
..................... 1660, 1710, 1892, 1963, 2049
Inteq ..................................................... 0017
JBL ...................................................... 0054
JCB ...................................................... 0001
Jensen ................................................. 0761
JVC .... 0463, 0053, 1253, 1601, 1774, 2264
KDS ........................................... 1498, 1687
KLH ...................................................... 0765
LG ...... 1423, 1447, 0017, 0178, 2358, 2424
LXI .......................... 0000, 0054, 0156, 0178
MAG........................................... 1498, 1687
Magnavox.... 1454, 1866, 1755, 0054, 0051,
.......... 0171, 0802, 1365, 1856, 1963, 2372
Marantz ...................................... 1454, 0054
Matsushita ............................................ 0250
Maxent ................................................. 1755
MB Quart.............................................. 1868
Megatron .................................... 0178, 0145
11
11
Memorex ...... 0463, 0150, 0178, 1670, 1892
MGA........................................... 0150, 0178
Midland ............................ 0000, 0017, 0051
Mitsubishi ............... 1250, 0093, 0150, 0178
Motorola ............................................... 0093
MTC ..................................................... 0060
NAD ........................................... 0156, 0178
NEC ..................................................... 1797
NetTV ................................................... 1755
Nexus Electronics ................................. 2183
Nikko .................................................... 0178
Norcent ............................ 0748, 1365, 1589
Olevia ............................... 1610, 1240, 1331
Optimus ............................................... 0250
Optoma ................................................ 1348
Optonica .............................................. 0093
Orion .......................................... 0463, 1463
Panasonic ....................... 1480, 0250, 1457,
......................................... 0051, 1291, 2264
PARK.......................................... 2104, 2194
Penney ......... 0000, 0156, 0051, 0060, 0178
Petters.................................................. 1523
Philco ........... 0054, 0171, 1394, 1665, 1963
Philips.................... 1454, 1866, 0054, 1744,
......................................... 1856, 2372, 2374
Pioneer ................................................. 1457
Polaroid ................. 1523, 0765, 1276, 1498,
............................... 1687, 1766, 1769, 2121
Portland...................................... 0451, 1661
Prima.................................................... 0761
Prism .................................................... 0051
Proscan ............................ 1447, 0000, 2256
Proton .................................................. 0178
Proview ...................................... 1498, 1687
Pulsar ................................................... 0017
Quasar ....................................... 0250, 0051
RadioShack ................................ 0000, 0178
RCA ............ 1547, 1447, 0000, 0051, 0093,
..................... 1661, 1781, 2187, 2247, 2434
Realistic ................................................ 0178
Runco .................................................. 0017
Sampo ................................................. 1755
Samsung ......................... 0812, 0060, 0702,
......................................... 0178, 1060, 2051
Sansui .......... 0463, 0171, 1670, 1892, 1935
Sanyo ......................................... 0054, 1142
Sceptre ........ 0878, 1217, 1360, 1599, 2506
Scotch.................................................. 0178
Scott .......................................... 0178, 1711
Sears ............ 0000, 0054, 0156, 0178, 0171
Sharp ......................................... 0818, 0093
Sheng Chia........................................... 0093
Signature .............................................. 0054
Sony ........................................... 0810, 0001
Soundesign .......................................... 0178
Soyo..................................................... 1826
Spectroniq .................................. 1498, 1687
Squareview........................................... 0171
Superscan ............................................ 0093
Supreme .............................................. 0001
SVA ............................................ 0748, 1963
Sylvania ........................... 1864, 0054, 0171,
............................... 1394, 1665, 1886, 1963
Symphonic ........................................... 0171
Syntax .............................. 1610, 1240, 1331
Tandy ................................................... 0093
Technics ..................................... 0250, 0051
Techwood............................................. 0051
Teknika ............................. 0054, 0150, 0060
Telefunken ............................................ 0702
TMK ..................................................... 0178
TNCi ..................................................... 0017
Toshiba1524, 0156, 0060, 1291, 1935, 2006
TVS ...................................................... 0463
Victor .................................................... 0053
Vidikron ................................................ 0054
Vidtech ................................................. 0178
Viewsonic .... 1755, 0885, 1330, 1365, 1578,
........... 1627, 1640, 1742, 2014, 2087, 2277
Viore ................................. 1684, 2104, 2352
Vizio ........................................... 1758, 0885
Wards .......... 0001, 0000, 0054, 0017, 0156,
......................................... 0051, 0060, 0178
Waycon ................................................ 0156
Westinghouse......... 1712, 0451, 0885, 1217
White Westinghouse ................... 0463, 1661
Wyse .................................................... 1365
Zenith .................... 0001, 1423, 0000, 0017,
..................... 0463, 0178, 0145, 1661, 1365
OARH01B
1-Device Universal Remote Control User’s Guide
Congratulations on your purchase of the OARH01B. This 1-Device Remote Control
does just what a basic remote should: simplify! Made for streamlined 1-device TV,
this remote is the ultimate in de-cluttering, leaving you just the buttons you need
and none of the ones you don't. Like all One For All remotes, this 1-Device Remote
is easy to program, with support for over 210 brands* of TVs.
* May not operate all models of all brands.
OARH01B
Guía del Usuario del Control Remoto Universal
para 1 Aparato
Felicitaciones por la compra del OARH01B. Este Control Remoto para 1 Aparato
hace justo lo que un control remoto básico debería hacer: ¡simplificar! Fabricado
para configuraciones de 1 TV, este control remoto es lo más avanzado en
sencillez, dejándole sólo los botones que usted necesita y ninguno de los que
usted no requiere. Y con señales táctiles en las teclas de volumen y canal, todo
lo que precisa es un toque para saber lo que está haciendo. Como todos los
controles remotos One for All, este control remoto para 1 aparato es fácil de
programar, con soporte para más de 210 marcas* de TVs.
* Puede no funcionar en todos los modelos de todas las marcas.
©2011 Audiovox Accessories Corporation
111 Congressional Blvd., Suite 350
Carmel, IN 46032
Made in China
Hecho en China
ESPAÑOL
12
12
OARH01B NA IB 00
UEI 16K Codes 2011 00
Trademarks ® Registered.
Marcas registradas ®.