1
To Install
1
2
3
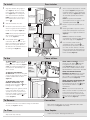
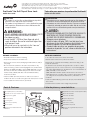
Align door bracket along edge of
door (Figure 1). Be sure to install
lock at least 60” (152.4 cm) from
floor (Figure 1a). The locking arm
must point toward the doorjamb.
NOTE: If your door is too thick to
fit in bracket pull to remove door
spacer G .
Slide door bracket onto door.
Para instalar
1
1
G
Doorjamb
Marco vertical
1a
2
Hold lock in place and use the allen
wrench to tighten the door bracket,
but do not over-tighten (Figure 2).
60” (152.4 cm)
from floor
60 pulg. (152.4
cm) del piso
NOTE: When properly installed, the
door should not open more than
2.75” (7 cm) (Figure 2).
2
3
4 The doorjamb spacer
A can be
removed to allow the door to open
farther if needed. Locate tab at the
back of the locking arm. Squeeze
tab and push out toward the front of
the locking arm (Figure 3).
TO UNLOCK FOR PERIODS
OF NON-USE: Push the locking arm
out of the way until it locks in place.
It will be parallel with the door
(Figure 6).
TO RE-ENGAGE LOCK AFTER
PERIODS OF NON-USE: Slide
periods of non-use button B until
locking arm re-engages.
NOTE: If finger pinch guard is pushed
in, the locking arm will not stay in
“periods of non-use” position. If the
finger pinch guard is pushed in, press
one of the override buttons H to
release (Figure 5).
4
5
C
Press to
unlock
Presione
para
destrabar
B
C H
6
CÓMO ABRIR LA PUERTA: Presione
el protector de dedos C hasta que
se enganche o retire el brazo de
traba (Figuras 4 y 5). Una vez que la
puerta esté cerrada, la traba volverá
automáticamente a la posición de traba.
CÓMO DESTRABAR DURANTE
PERÍODOS SIN USO: Empuje el brazo
de traba fuera de su posición hasta
que se trabe en su lugar. Debe quedar
paralelo a la puerta (Figura 6).
CÓMO VOLVER A TRABAR DESPUÉS
DE PERÍODOS SIN USO: Deslice el
botón para períodos sin uso B hasta
que el brazo de traba se enganche
nuevamente.
NOTA: Si se presiona el protector de
dedos, el brazo de traba no permanecerá
en la posición de períodos sin uso. Si
el protector de dedos está presionado,
apriete uno de los botones de seguridad
H para liberarlo (Figura 5).
Para retirar
To remove the lock, loosen bracket using the 2mm allen
wrench (see Figure 2 above).
To Clean
NOTA: Si la traba se ha instalado
correctamente, la puerta no debe abrirse
más de 2.75 pulg. (7 cm) (Figura 2).
Cómo utilizar
To Remove Mantenga la traba en posición y utilice
la llave Allen para ajustar el soporte de
puerta, pero no lo haga excesivamente
(Figura 2).
espaciador de marco vertical A
para permitir que la puerta se abra un
poco más. Localice la aleta en la parte
posterior del brazo de traba. Apriétela
y empújela hacia la parte delantera del
brazo de traba (Figura 3).
3
To Use TO OPEN DOOR: Press finger pinch
guard C until it catches or pull
locking arm out of the way (Figures
4 & 5). Lock will spring back to the
locked position automatically once
door is closed.
Deslice el soporte de puerta sobre la
puerta.
4 Si es necesario, puede retirar el
2.75”
7 cm
A
Alinee el soporte de puerta con el borde
de la puerta (Figura 1). Asegúrese de
instalar la traba a no menos de 60 pulg.
(152.4 cm) del piso (Figura 1a). El brazo
de traba debe quedar hacia el marco
vertical.
NOTA: Si la puerta es demasiado
gruesa para colocar el soporte, tire del
espaciador para retirarlo G .
Para retirar la traba, afloje el soporte utilizando la llave Allen
de 2 mm (vea la Figura 2 más arriba).
Para limpiar
Wipe clean. Keep lock dry.
2
Limpie con un paño. Mantenga la traba seca.