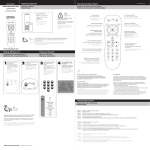
1
Enjoy your
XFINITY® TV
right away!
Program your remote to
get started.
It’s simple to program your XFINITY Remote to control your
TV and Audio Video Receiver.
Your XFINITY Remote is already programmed
to control your set-top box or Digital Transport
Adapter (DTA). To program the remote for control of Power, Volume, Mute and TV Input
on your TV or Power, Volume, and Mute on
your audio video receiver (AVR), including a
soundbar, follow the steps below.
Note: A soundbar is a type of AVR.
Here’s how to program your
remote for control of a TV or
TV and AVR:
1. Install the remote control batteries and
make sure your TV, AVR and set-top box or
DTA are powered on.
2. Refer to the “Setup Codes for TVs” and
“Setup Codes for AVRs and Soundbars”
sections on the back of this guide to find
the manufacturers of your TV and AVR.
3. Press and hold the Setup button on your
remote until the status LED changes from
red to green.
4. Enter the first code listed for the TV manufacturer. The status LED should flash green
twice when the code is entered.
XFINITY
XR2v3-RXR2
Remote Control
USER’S GUIDE
¡Disfruta de su
XFINITY® TV
de inmediato!
Programa el control
remoto para comenzar.
Note: To program your remote for simultaneous control of both a TV and AVR, the TV
must be programmed before the AVR.
7. Press and hold the Setup button on your
remote until the status LED changes from
red to green.
8. Enter the first code listed for the AVR
manufacturer. The status LED should flash
green twice when the code is entered.
9. Press the All Power button on the remote.
If the AVR turns off, you have successfully
programmed your remote. Turn the AVR
back on and press the VOL +/- and Mute
buttons to confirm they control the volume
of your device. If so, you’re all set!
10.If the AVR does not turn off or the VOL +/and Mute buttons do not work, repeat the
steps above using the next code listed for
your AVR manufacturer.
Here’s how to program your
remote for only AVR control:
1. Install the remote control batteries and
make sure your AVR and set-top box or
DTA are powered on.
2. Find the manufacturer of your AVR on the
back of this guide.
3. Press and hold the Setup button on your
remote until the status LED changes from
red to green.
4. Enter the first code listed for the AVR
manufacturer. The status LED should
flash green twice when the code is
entered.
5. Press the TV Power button on the
remote. If the AVR turns off, you have
successfully programmed your remote.
Turn the AVR back on and press the VOL
+/- and Mute buttons to confirm they
control the volume of your device. If so,
you’re all set!
6. If the AVR does not turn off or the VOL
+/- and Mute buttons do not work, repeat
the steps above using next code listed for
the device manufacturer. You may need
to try several codes to find the one that
works for your device.
CAN’T FIND YOUR CODE?
If you can’t program your remote for TV
and/or AVR control using the codes on the
back of this guide, follow the steps below to
search for your code.
1. Turn on your TV and AVR.
2. Press and hold the Setup button on your
remote until the status LED changes from
red to green.
3. To search for a TV code, enter 9-9-1 on
the remote. To search for an AVR code,
enter 9-9-2. The status LED should flash
green twice.
1. Coloque las baterías al control remoto y
asegúrese de que su televisor, AVR y decodificador o DTA estén encendidos.
2. Consulte las secciones “Códigos de
configuración para televisiones” y “Códigos
de configuración para AVR y Sistema
Soundbar” en la parte posterior de esta
guía para encontrar a los fabricantes de su
televisor y AVR.
3. Mantenga presionado el botón Setup
(Configurar) de su control remoto hasta
que la luz LED de estado cambie de color
rojo a verde.
XR5v2-R
4. Ingrese el primer código de la lista del fabricante del televisor. La luz LED de estado
debe parpadear en color verde dos veces
cuando se ingresa el código.
5. Presione el botón TV Power (Encendido
de televisor) del control remoto. Si el
Here’s what your remote can do.
QQ: Why does the status LED flash red then
green while I am entering the code on
my remote?
Esto es lo que tu control remoto puede hacer.
AA: You may have entered an incorrect code.
Check the code and try re-entering it.
QQ: Why does the status LED flash red,
but there is no response when I press
a key?
AA: Make sure the remote is aimed at your
TV or AVR and is no farther than 15 feet
away. Also, make sure your set-top box
or DTA is powered on and in plain sight.
4. Press the CH ^ button repeatedly to
search through the manufacturer codes
until the device you are programming
turns off.
Helpful Tip: Additional remote control programming support, including code lookup
tool and frequently asked questions, can be
found at xfinity.com/remotes.
5. After the device turns off, press Setup.
The status LED on your remote should
flash green twice. Press the TV Power
button on the remote. If the device turns
on, your have successfully programmed
your remote.
Additional Feature: Aim Anywhere Control
See the back of this user guide to learn how
to pair your remote and set-top box or DTA*
for Aim Anywhere control, allowing you to
control your devices even when they are
placed behind your TV or in another room
(up to 50 feet away).
*Aim Anywhere control is not supported by
all set-top boxes.
televisor se apaga, usted ha programado satisfactoriamente el control remoto.
Vuelva a encender el televisor y presione
los botones VOL +/- y Mute (Silenciar)
para confirmar que controlan el volumen
de su equipo.
6. Si el televisor (o el AVR) no se apaga o
los botones VOL +/- y Mute (Silenciar)
no funcionan, repita los pasos anteriores
utilizando el código siguiente de la lista del
fabricante de su televisor.
Si solamente quiere programar el control
remoto para que controle el televisor, ya
terminó.
Continúe con los pasos siguientes con el fin
de programar su control remoto para control
de un AVR.
Nota: Si desea programar su control remoto
para que controle simultáneamente un televisor y un AVR, debe programar el televisor
antes que el AVR.
7. Mantenga presionado el botón Setup
(Configurar) del control remoto hasta que
la luz LED de estado cambie de color rojo
a verde.
8. Ingrese el primer código de la lista del
fabricante del AVR. La luz LED de estado
debe parpadear en color verde dos veces
cuando se ingresa el código.
9. Presione el botón All Power (Todo encendido) del control remoto. Si el AVR se
apaga, usted ha programado satisfactoriamente el control remoto. Vuelva a encender
el AVR y presione los botones VOL +/- y
Mute (Silenciar) para confirmar que
controlan el volumen de su equipo. Si es
así, ya terminó.
10.Si el AVR no se apaga o los botones VOL
+/- y Mute (Silenciar) no funcionan, repita
los pasos anteriores utilizando el código
siguiente de la lista del fabricante de su
AVR.
Instrucciones para programar
su control remoto para que
controle solamente un AVR:
1. Coloque las baterías al control remoto y
asegúrese de que su AVR y decodificador o
DTA estén encendidos.
2. Busque el fabricante de su AVR en la parte
posterior de esta guía.
3. Mantenga presionado el botón Setup
(Configurar) del control remoto hasta que
la luz LED de estado cambie de color rojo
a verde.
Solución de
problemas
¿NO PUEDE ENCONTRAR
EL CÓDIGO?
Si no puede programar su control remoto
para que controle un televisor y/o un AVR con
los códigos que aparecen en la parte posterior de esta guía, siga los pasos a continuación
para buscar su código.
1. Encienda su televisor y AVR.
2. Mantenga presionado el botón Setup
(Configurar) del control remoto hasta que
la luz LED de estado cambie de color rojo
a verde.
3. En caso de buscar un código para televisor, ingrese 9-9-1 en el control remoto.
En caso de buscar un código para AVR,
ingrese 9-9-2. La luz LED de estado debe
parpadear en color verde dos veces.
4. Ingrese el primer código de la lista del
fabricante del AVR. La luz LED de estado
debe parpadear en color verde dos veces
cuando se ingresa el código.
4. Presione el botón CH ^ reiteradamente
para buscar entre los códigos del
fabricante hasta que el equipo que está
programando se apague.
5. Presione el botón TV Power (Encendido
de televisor) del control remoto. Si el AVR
se apaga, usted ha programado satisfactoriamente el control remoto. Vuelva a
encender el AVR y presione los botones
VOL +/- y Mute (Silenciar) para confirmar
que controlan el volumen de su equipo. Si
es así, ya terminó.
5. Una vez que el equipo se apague,
presione Setup (Configurar). La luz
LED de estado del control remoto debe
parpadear dos veces en color verde.
Presione el botón TV Power (Encendido
de televisor) del control remoto. Si el
equipo se enciende, usted ha programado
satisfactoriamente el control remoto.
6. Si el AVR no se apaga o los botones VOL
+/- y Mute (Silenciar) no funcionan, repita
los pasos anteriores utilizando el siguiente
código de la lista del fabricante del equipo.
Es posible que deba probar varios códigos
hasta encontrar el que funciona con su
equipo.
PP. ¿Por qué la luz LED de estado parpadea
en color rojo y luego en verde mientras
ingreso el código en el control remoto?
RR: Es posible que haya ingresado un código
incorrecto. Verifique el código y pruebe
volver a ingresarlo.
PP. ¿Por qué la luz LED de estado parpadea
en rojo, pero no hay respuesta cuando
presiono alguna tecla?
RR: Asegúrese de que el control remoto apunte
al televisor o AVR y no esté a más de 15
pies de distancia. Además, cerciórese de
que su decodificador o DTA esté encendido y a plena vista.
Consejo útil: Puede encontrar más soporte
para programar el control remoto, como la
herramienta de búsqueda de código y las
preguntas frecuentes, en xfinity.com/remotes.
Función adicional: Control Aim Anywhere
Consulte en la parte posterior de esta guía del
usuario para averiguar cómo sincronizar su
control remoto y decodificador o DTA* para el
control Aim Anywhere, que permite controlar
equipos aunque estén detrás del televisor o
en otra habitación (a una distancia de hasta
50 pies).
*No todos los decodificadores son compatibles con el control Aim Anywhere.
TV Power: Turns your TV on/off.
Vol +/–: Controla el volumen del DTA o el
decodificador. Una vez que se programa
el control remoto para que controle un
televisor y/o un AVR, estas teclas controlan el volumen del televisor o el AVR.
All Power: One button to turn the TV,
AVR and DTA or set-top box on/off.
Vol +/–: Controls the volume on the
DTA or set-top box. After your remote is
programmed, these keys control the TV
or AVR’s volume.
CH ^/v: Selecciona el siguiente canal más
alto o más bajo.
Mute (Silenciar): Enciende y apaga el
sonido.
CH ^/∨: Selects the next higher or next
lower channel.
TV Input (Entrada de televisión): Cambia
a la siguiente entrada disponible del
televisor.
Mute: Turns the sound on and off.
TV Input: Changes to the next available
input on your TV.
Nota: Algunas de las funciones mencionadas requieren que el control remoto se
programe para controlar un televisor y/o
un AVR.
Note: Some features above require
programming the remote for control of a
TV and/or AVR.
Controles de video: Controlan la visualización de contenido on demand o de una
videograbadora digital; Play (Reproducir), Pause (Pausar), Fast-Forward
(Avanzar), Rewind (Retroceder) y Stop
(Parar).
Video Controls: Controls On Demand
or DVR viewing, Play, Pause, Fast-Forward, Rewind, and Stop.
Search: Search for content by channel,
program, or key words.
Search (Buscar): Busca contenido por
canal, programa o palabras clave.
Rec (Grabar): Graba el contenido que se
está viendo en ese momento.
Nota: Algunas de las funciones mencionadas requieren un decodificador
con videograbadora digital y/o acceso a
programación on demand.
XFINITY/Menu (XFINITY/Menú): Ingresa
al menú XFINITY para dar acceso a la
guía, programas almacenados, programación on demand y aplicaciones.
XFINITY/Menu: Enters the on-screen
guide menus.
Guide: Shortcut to TV listings.
Guide (Guía): Atajo a los listados de
televisión.
OK: Selects the highlighted item within
the guide.
This equipment has been tested and found
to comply with the limits for a Class B digital
device, pursuant to part 15 of the FCC
rules. These limits are designed to provide
reasonable protection against harmful
interference in a residential installation.
This equipment generates, uses, and can
radiate radio frequency energy and, if not
used in accordance with the instructions,
may cause harmful interference to radio
communications.
There is no guarantee that interference will
not occur in a particular installation. If this
equipment does cause harmful interference
to radio or television reception, the user is
encouraged to try to correct the interference
by one or more of the following measures:
•
•
•
•
•
Reorient or relocate the receiving
antenna.
Increase or decrease the separation
between the equipment and receiver.
Connect the equipment into an outlet
on a circuit different from that which
the receiver is connected.
Consult the dealer or an experienced
remote control/TV technician for help.
It is strongly recommended that the
TV be plugged into a separate wall
outlet.
The user is cautioned that changes and
modifications made to the equipment
without the approval of the manufacturer
could void the user’s authority to operate
this equipment.
This device complies with part 15 of the
FCC rules. Operation is subject to the
following two conditions: (1) This device
may not cause harmful interference, and (2)
this device must accept any interference
received, including interference that may
cause undesired operation.
“CAUTION” : Exposure to Radio Frequency
Radiation. Antenna shall be mounted in
such a manner to minimize the potential for
human contact during normal operation.
The antenna should not be contacted during
operation to avoid the possibility of exceeding the FCC radio frequency exposure limit.
OK (Seleccionar): Selecciona el elemento resaltado dentro de la guía.
Last: Returns to the previous channel or
guide screen.
Last (Último): Regresa al canal o a la
guía anterior.
Exit: Exits guide screens and returns
you to TV viewing.
Exit (Salir): Sale de las pantallas de guía
y regresa a la visualización de televisión.
Info: Provides a program description.
Info (información): Brinda una descripción
del programa.
Fav: Setup favorites lists for quick
access to your favorite channels.
Fav (Favoritos): Configure sus listas de
favoritos para obtener rápido acceso a
sus canales favoritos.
Setup: Programs your remote control to
your TV, AVR, set-top box or DTA.
Setup (Configurar): Se usa a fin de
programar el control remoto para que
controle un televisor, AVR, decodificador
o DTA.
A, B, C, D: Context-sensitive control
keys.
Note: Some features above require
an on-screen programming guide not
available with all devices.
A, B, C, D: Teclas de control sensibles al
contexto.
Nota: Algunas de las funciones
mencionadas requieren una guía de
programación en pantalla que no está
disponible con todos los equipos.
Keypad (0-9): Select the channel you
want to view (e.g., 0-9 or 0-2-6).
Teclado (0-9): Seleccione el canal que
quiere ver (p. ej., 0-9 o 0-2-6).
Setup: Programs your remote control to
your TV, AVR, set-top box or DTA.
Swap: Change to the channel currently
available on the tuner not being viewed.
xfinity.com/remotes
TV Power (Encendido de televisor):
Enciende y apaga el televisor.
All Power (Todo encendido): Un botón
para apagar y encender el televisor, el
AVR y el DTA o el decodificador.
Note: Some features above require a
DVR set-top box and/or access to On
Demand programming.
xfinity.com/remotes
Programar el control remoto XFINITY para que controle su
televisor y receptor de audio y video es muy sencillo.
El control remoto XFINITY ya está programado
para controlar su decodificador o adaptador
de transporte digital (Digital Transport Adapter,
DTA). A fin de programar el control remoto
para el control de Power (Encendido), Volume
(Volumen), Mute (Silenciar) y TV Input (Entrada
de televisión) de su televisor, o bien Power (Encendido), Volume (Volumen) y Mute (Silenciar)
en su receptor de audio y video (audio video
receiver, AVR), inclusive un sistema soundbar,
siga los pasos a continuación.
Troubleshooting
Rec: Records content currently being
viewed.
6. If the TV (or AVR) does not turn off or the
VOL +/- and Mute buttons do not work,
repeat the steps above using the next code
listed for your TV manufacturer.
Instrucciones para programar
su control remoto para que
controle un televisor o televisor
y AVR:
XFINITY
XR2v3-RXR2
Continue with the following steps to program
your remote for AVR control.
5. Press the TV Power button on the remote.
If the TV turns off, you have successfully
programmed your remote. Turn the TV
back on and press the VOL +/- and Mute
buttons to confirm they control the volume
XR5v2-R
of your device.
Nota: Un sistema soundbar es un tipo de
AVR.
Control remoto
GUÍA DEL USUARIO
If you only want to program your remote for
TV control, you’re all set!
FCC Compliance Statement
XR2v3-R
Setup (Configurar): Se usa a fin de
programar el control remoto para que
controle un televisor, AVR, decodificador
o DTA.
XR5v2-R
Swap (Alternar): Cambie al canal actualmente disponible en el sintonizador que
no se está viendo.
Cybervision12253
Cytron
11326, 12003
Daewoo
10451, 10092, 10019, 10066, 11661, 10623, 10067,10091,
3M
10737, 11616, 11655
10661,10672,11909,11928, A-Mark10003
12268, 12284
Abex10032
Daytron
10019, 12284
Accurian11803
Dell
11264, 11080, 11178, 11403
Acer
12244, 12245
Delta11369
Action10873
Denon
10145, 10511
ADC12246
Denstar10628
Admiral
10093,10463, 12246, 12258, Diamond Vision
11801, 11996, 12288
12286
Digistar
11565, 12267
Advert
10761,10783, 10815, 10817, Digital Lifestyles
11765, 11822
10842, 11933, 12267
Digital Projection 11482, 11725, 11726, 11750
Adventura10046
Inc.
Aftron10891
Dimensia12293
Aiko10092
Disney
12258, 12259
Aiwa
10701, 11914, 12248, 12270
Dream Vision
11297
Akai
10030,10060, 10098, 10672,
Dukane12251
10702,10812,11207,11385,
Dumont10017
10030,10060,10098,10672, Durabrand
10463, 10180, 10178, 10171, 10702, 10812,11207, 11385, 10003, 11034, 12258
11675, 11676, 11688, 11689, Dwin
10093, 10747, 10774
11692, 11903, 11935
Dynatech10049
Alaron
10179, 10183, 10216
Dynex
11463, 11780, 11785
Albatron
10700, 10843
Elki10735
Amark12286
Electroband
10000, 12287
Ambassador10177
Electrograph
11755, 11623
American Action
10180
Electrohome
10463, 10446, 11570, 11670, Ampro10751
11672, 11760, 11761, 12284
Anaba12249
Elektra12246
Anam10180
Element
11687, 12260
Anam National
10055
Emerson
10154, 10451, 10236, AOC
10030, 12250, 12268, 12284, 10463, 10180, 10178, 10171, 12287, 11590, 11365
11963, 11928, 11913, 11911, Aomni11623
11909, 11905, 11665, 10282, Apex Digital
10156, 10748, 10879, 10765, 10280, 10270, 10183, 10181, 10767, 10879, 10890, 11991
10179, 10177, 10038, 10019, Archer
10003, 12286
10623, 11963, 12248, 12258, Aspect12251
12270, 12284, 12285, 12288
Astar
11531, 11738
Emprex
11422, 11546, 11765
Audiovox
10451, 10180, 10092, 10003, Envision
10030, 10813, 11365, 12250, 10623, 10802, 10846, 10875, 12284
11284, 11951, 11952
Epson
11122, 11290
Aurora Systems
10801
Erae11222
Aventura10171
ESA
10812, 10171, 11963
Bang & Olufsen
12252
Fisher
10154, 10159
Belcor
10019, 12284
Fujitsu
10179, 10186, 10683, 10853, Bell & Howell
10154, 10016, 12246, 12293
12008, 10809
BenQ
11032, 11315
Funai
10180, 10171, 10179, 11904, BlueSky
12253, 12254
11963, 11271, 12248, 12270
Bradford10180
Futuretech10180
Brillan
11007, 11257, 11258
Gateway
11755, 11756
Brockwood10019
GE
11447, 10047, 10051, 10451, Broksonic
10236, 10463, 12258
10178, 10021, 10027, 10029, Brokwood12284
10055, 10135, 10279, 10282, Bush10355,
10747, 11907, 11919, 11922, Byd:sign11309
11347, 12284, 12290, 12293
Cadia11283
Gibralter
10017, 10030, 10019, 12284
Candle
10030, 10046, 10056, 10186, Go Video
10886, 11823, 11831
12284
GoldStar
10178, 10030, 10002, 10019, Canon
10793, 11396
12248, 12268, 12269, 12270, Carnivale10030
12271, 12284
Carver
10054, 10170
Goodmans10360
Casio
10611, 11205
Gradiente
10392, 12284
CCE
10217, 10329
Grundig10683
Celebrity10000
Grunpy
10180, 10179
Celera10765
H & B
11366
Centrios12255
Haier
11034, 10768, 11009, 12295
Changhong10765
Hallmark
10178, 12284
Cineral12253
Hanns.G11783
Cinego11986
Hannspree
11348, 11745, 11783, 12261
Citizen
10060, 10030, 10092, 10046, Harley Davidson
10043, 10179, 11904
10056, 10186, 10280, 10561, Harman/Kardon
10054, 10078
11669, 11671, 11672, 11928 Harvard
10180, 10068
11935, 12246, 12258, 12284, Hauppauge12262
12287
Havermy10093
Clarion10180
Helios10865
Classic11984
Hello Kitty
10451
CLP Classic
12284
Hewlett Packard
11494, 11502, 11088, 11089, Coby
12017, 12256, 12257
11101
Colortyme12284
Hisense
10748, 11660, 12296
Commercial
11447, 10047
Hitachi
11145, 10145,12243,12143, Solutions
11904, 11345, 10797, 10737, Compaq10749
10724,10723,10413,10279,
Concerto
10056, 12284
10227, 10173, 10151, 10097, Contec
10180, 12287
10095, 10056, 10038, 10032, Craig10180
10016, 11960, 12246, 12248, Crosley10054
12251, 12270, 12284
Crown10180
Hyundai
10849, 11219, 11294
CTX12286
I-Inc11746
Curtis Mathes
10047, 10054, 10154, 10451, iLo
11286, 11603, 11665, 11684, 10093, 10060, 10702, 10030, 11990
10145, 10166, 10016, 10056, Infinity
10054, 12275
10466, 10747, 11147, 11347, InFocus
10736, 10738, 10741, 10781, 11919, 12246, 12284, 12293
11516, 12293
CXC10180
Initial11990
CyberHome10794
Insignia
10171, 11780, 11892, 11204, SETUP CODES FOR TVs
CÓDIGOS DE CONFIGURACIÓN PARA
TELEVISORES
11326, 11517, 11641, 11963, 12002, 12258, 12263, 12264, 12267
Inteq10017
IX10877
Janeil10046
JBL10054
JCB10000
JC Penney
12268, 12284, 12293
Jensen
10761, 10050, 10815, 10817, 11299, 11933, 12284
JVC
10053, 10036, 10160, 10169, 10731, 11349, 11253, 12265
Kamp10216
Kawasaki12266
Kawasho
10216, 10308, 12284
Kaypani10052
KDS11687
KEC10180
Kenwood
10030, 10019, 12284
KLH
10765, 10767
Kloss
10024, 10046, 10078
Knoll Systems
10781
Konka
10628, 10632, 10638, 10707, 11385, 11831, 11939
Kost
11262, 11483
Kreisen
10876, 11474
KTV
10180, 10030, 10183, 10217, 10280, 12274, 12287
Kurazai
12246
Lasonic12288
Legend12267
LG
11265, 10178, 10700, 10442, 10856, 11178, 11530, 11637, 11758, 11934, 11993, 12248, 12268, 12269, 12270, 12271, 12284
Llyod’s11904
Lodgenet
12246, 12293
Loewe10136
Logik
10016, 12246, 12293
Luce
10837, 11031
Luxman
10056, 12284
LXI
10047, 10054, 10154, 10156, 10178, 10747, 12248, 12270, 12284, 12293
Magnavox
11454, 11866, 10054, 10030, 10706, 11990, 11963, 11913, 11904, 11525, 11365, 11198, 11254, 10386, 10802, 10230, 10187, 10186, 10179, 10096, 10036, 10028, 10024, 10020, 12275, 12284
Magnin11907
Majestic
10015, 10016, 12246, 12293
Marantz
10054, 10030, 10704, 10854, 10855, 11398, 11554, 12284
Matsushita
10250, 10650
Maxent
11755, 11757
MB Quart
11868
Medion12259
Megapower10700
Megatron
10178, 10145, 10003, 12251, 12284
MEI12287
Memorex
10154, 10463, 10150, 10178, 10016, 10179, 10877, 11570, 11911, 11920, 12246, 12258, 12284, 12293
MGA
10150, 10178, 10030, 10019, 10155, 11907, 12268, 12284
Micro11436
Midland
10047, 10017, 10051, 10032, 10747
Mintek
11990, 11603
Minutz
10021
Mitsubishi
11250, 10093, 10150, 10178, 10014, 10019, 10098, 10155, 10331, 10358, 10592,10836, 10868, 11278, 11392, 12268, 12284
Monivisoin
10700, 10843
Montgomery Ward 12246, 12293
Motorola
10093, 10055, 10835, 12286
Moxell10835
MTC
10060, 10030, 10019, 10049, 10056, 10091, 10216, 12268, 12284, 12287
Multitech
10180, 10049, 10217
Myron & Davis
12289
NAD
10156, 10178, 10866, 10037, 10056, 12284
Nakamichi11493
Naxa11998
NEC
10030, 10019, 10036, 10056, 10170, 10434, 10455, 10497, 10882, 11398, 11704, 11797, 12026, 12268, 12284
NetTV11755
Nikko
10178, 10030, 10092, 12284
Niko11581
Noblex10430
Norcent
10748, 10824, 11089, 11365, 11590, 11591
Norwood Micro
11286, 11296, 11303
Noshi10018
NTC10092
NuVision11657
Olevia
11144, 11240, 11331, 12272
Olympus11342
Onwa10180
Optimus
10154, 10250, 10166, 10650, 11913, 12273
Optoma
10887, 11348, 11674
Optonica
10093, 10165, 12286
Orion
10236, 10463, 11463, 10179, 11905, 11911, 12258
Panasonic
10250, 10051, 10055, 10650, 11291, 11941, 10162, 10226, 10375, 11310, 11410, 11919, 12273, 12274
Penney
10047, 10156, 10051, 10060, 10178, 10030, 11919, 11907, 10747, 10309, 10149, 10032, 10027, 10021, 10019, 10018, 10003, 10002, 11347
Petters11523
Philco
10054, 10030, 10019, 10020, 10028, 10096, 10302, 12268,
12284
Philips
11454, 10054, 10037, 10690, 11483, 12275, 12284
Phillips-Magnavox12275
Pilot
10030, 10019, 12284
Pioneer
10166, 10679, 10866, 10038, 10172, 11398, 12284
Piva
12277, 12276
Planar11496
Polaroid
10765, 12063, 12002, 11991, 11962, 11769, 11767, 11766, 11762, 11687, 11565, 11538, 11523, 11385, 11341, 11328, 11327, 11326, 11316, 11314, 11286, 11276, 11262, 10865, 12267
Portland
10092, 10019, 12268, 12284
Prima
10761, 10815, 10817, 11389, 11785, 11933, 10783, 12267
Princeton
10700, 10717
Princeton Graphics 12286
Prism10051
Proscan
11447, 10047, 11347, 10466, 10747, 11922, 12291, 12293
Proton
10178, 10003, 10031, 10052, 10466, 12284
Protron
11320, 11323
Proview
10835, 11687
Pulsar
10017, 10019, 12284
Puneet11546
Pvision11222
Quasar
10250, 10051, 10055, 10165, 10650, 10219, 11919, 12273, 12274
RadioShack
10047, 10154, 10180, 10178, 10030, 10165, 12248, 12270, 12284, 12290, 12293
RCA
11447, 10047, 12002, 11953, 11948, 11922, 11919, 11907, 11781, 10747, 10278, 10254, 10090, 10679, 11047 11147, 11247, 11347, 11547, 11958, 10038, 10029, 10019, 10018, 12268, 12284, 12290, 12291, 12292, 12293
Realistic
10154, 10180, 10178, 10030, 10165, 10019, 10032, 10056, 12248, 12270, 12284, 12293
RevolutionHD11623
Rhapsody
10183, 10216, 12287
Runco
10017, 10030, 10497, 10612, 11398, 11629
Sampo
10030, 11755, 10032, 10052, 11597, 12284
Samsung
10812, 10702, 10178, 10030, 11959, 11632, 11575, 11060, 10814, 10766, 10587, 10482, 10427, 10408, 10329, 10217, 10056, 10032, 10019, 11903, 12268, 12280, 12281, 12284
Sansui
10463, 11409, 11904, 11911, 11935, 12258, 12282
Sanyo
10154, 10088, 10159, 10232, 10484, 10735, 10798, 10799, 11907, 12284
Sceptre
10878, 11360, 11599
Scimitsu10019
Scotch
10178, 12284
Scott
10236, 10180, 10178, 10019, 10179, 10309, 11711, 12284
Sears
10047, 10054, 10154, 10156, 10178, 10171, 10015, 10149, 10159, 10168, 10179, 10747, 11007, 11904, 10056, 12284, 12293
Seleco
10737, 11297
Selectron12283
Sharp
10093, 10153, 10165, 10386, 11602, 10491, 10851, 12284, 12285, 12286
Sharper Image
11950
Sheng Chia
10093
Sherwood11399
Shogun
10019, 12284
Signature
10016, 12246, 12293
Signet
10800, 10844, 11262
SIM2 Multimedia 11297
Simpson
10186, 10187
Skyworth11799
Solarism11220
Sole
10813, 11031, 11366, 11377, 11483, 11530, 11623, 12075, 12076
Sonic12287
Sony
11100, 10000, 10011, 10353, 10834, 11317, 11400, 11685, 11786, 11791, 11904, 11925
Soundesign 10180, 10178, 10179, 10186, 12284
Sova
11320, 11952
Soyo
11546, 11746, 11824, 11826, 11828, 11830, 11831
Spectra12288
Spectricon 10003
Spectroniq11687
Squareview 10171
SSS
10180, 10019, 12284
Starlite10180
Studio Experience 10843
SunBrite
11420, 11435
Superscan
10093, 10864
Supra12284
Supre-Macy10046
Supreme10000
SVA
10748, 10587, 10768, 10865, 10870, 10871, 10872, 12289
Sylvania
11864, 10054, 10030, 10171, 11271, 10020, 10028, 10065, 10096, 11314, 11665, 11963, 12248, 12258, 12270, 12284
Symphonic
10180, 10171, 11904, 11913, 12248, 12270
Syntax
11144, 11240, 11331,11610
Tandy
10093, 10218, 12286
Tashiko10588
Tatung
10003, 10049, 10055, 11101, 11286, 11287, 11288, 11361, 11503, 11756
TCL
12290, 12291, 12292, 12293
Technics
10250, 10051
Technol Ace
10179
Techview
10847, 12004
Techwood
10051, 10003, 10056, 12284
Teknika
10054, 10180, 10150, 10060, 10092, 10016, 10019, 10056, 10175, 10179, 10186, 10312, 12246, 12268, 12284, 12293
Telefunken
10702, 10056, 10101
Telemagic10735
Telernet
12246, 12293
Tera
10031, 12284
Thomas11904
Thomson
10209, 10210, 10625
TMK
10178, 10056, 10177, 12284
TNCi10017
Toshiba
10154, 11256, 10156, 10060, 10036, 10650, 10845, 10149, 10736, 10832, 11343, 11369, 11704, 11935, 11156, 11356, 11656, 11265, 12294
TruTech
11723, 12066
TVS10463
Ultra
10391, 11323
Universal10027
US Logic
11286, 11303
Vector Research
10030
Venturer11865
VEOS11007
Victor10053
Video Concepts
10098
Vidikron
10054, 10242, 11398, 11629
Vidtech
10178, 10019, 10036, 12268, 12284
Viewsonic
11755, 12014, 10724, 10775, 10797, 10857, 10864, 10885, 11330, 11342, 11578, 11627, 11742
Viking
10046, 10312
Viore
11207, 11684, 12278, 12279
Visart11336
Vizio
11758, 10864, 10885, 11756, 12247
Wards
10054, 10178, 10030, 10016, 10019, 10020, 10021, 10027, 10028, 10029, 10056, 10096, 10165, 10179, 10866, 11156, 12246, 12268, 12284, 12293
Waycon10156
Westinghouse
10000, 10451, 10885, 10889, 10890, 11282, 11577
White Westinghouse10463, 10623, 11909, 12248, 12270
WinBook
11381, 11503
Wyse11365
Xoceco11469
Yamaha
10030, 10019, 10797, 11407, 12268, 12284
Zenith
10017, 10463, 11265, 10178, 10092, 10016, 11904, 11909, 11911, 12246, 12248, 12251, 12285, 12258, 12265, 12270, 12271, 12275, 12284
Zonda10003
SETUP CODES FOR AVRs &
SOUNDBARS
CÓDIGOS DE CONFIGURACIÓN PARA
AVR Y SISTEMA SOUNDBAR
ADC30531
Aiwa
31964, 30158, 30189
Bose
31934, 31935, 31229, 31933
Boston Acoustics 31944
B&W
31940, 31941
Capetronic30531
Carver30189
Coby31946
Definitive
31936
Denon
31961, 31104, 31360
GE30078
Harman/Kardon
30110, 30189, 31955
Ilive31957
Insignia31960
Integra30135
JBL
31958, 30110
JVC
30074, 30331
Kenwood
30027, 31027, 31313,31570
KHL31967
LG31953
Linn30189
Magnavox
30189, 30531
Marantz
31972, 30189
NAD
31973, 31974
Onkyo
31965, 30135
Optimus
30531, 31023
Panasonic
31959, 31308, 31518
Philips
31945, 31962, 30189, 31266
Pinnacle
31954, 31971
Pioneer
31963, 30531, 31023, 31384
Polk Audio 31951, 31952, 30189
Proscan31254
RCA
30531, 31023, 31254
Regent
31968, 31969
Rio31970
Samsung
31949, 31950
Sansui30189
Sharp
31942, 31956
Sony
31938, 31939, 30158, 31758, 31759
Soundesign30078
Stereophonics31023
Sunfire
31313
Technics
31959, 31308, 31518
Thomson31254
Victor
30074, 30331
Vizio
31937, 31975
Wards
30078, 30158, 30189
Yamaha
31947, 31948, 30176, 30354, 31176
ZVox31943
Pairing your XFINITY Remote for
Aim Anywhere control.
Your XFINITY Remote can be paired with Aim
Anywhere devices, including select set-top
boxes and DTAs, allowing you to control your
devices even when they are placed out of
line-of-sight (for example, in an entertainment
center or behind your TV). XFINITY Remotes
can be identified by a model number beginning with “XR” on the back of the remote.
Some set-top boxes and DTAs directly support Aim Anywhere technology, while others
may require the Aim Anywhere Adapter to be
paired with XFINITY Remotes.
If your set-top box or DTA directly supports
Aim Anywhere technology or is compatible
with the Aim Anywhere Adapter, follow the
steps below to pair your XFINITY Remote with
the device.
Aim Anywhere Pairing:
1. Press and hold the Setup button for 3
seconds, until the status LED changes
from red to green.
2. Press the XFINITY button on the remote.
Your TV should display on-screen
instructions to enter a 3-digit code. If
the instructions do not appear, press the
XFINITY button again - up to 2 more
times.
3. Follow the on-screen instructions to
enter the 3-digit code that appears.
4. Once the code is correctly entered,
your XFINITY Remote is paired with the
device.
To pair your Aim Anywhere Adapter (XR8) and
XFINITY Remote:
1. Make sure your TV and set-top box or
DTA are powered on.
2. Plug the adapter into the IR input port
located on the rear panel of your set-top
box or DTA.
3. Wait 3-5 seconds for the solid red LED
on top of the adapter to turn off.
4. Press and release the PAIR button on
the back of the adapter. The LED on top
of the adapter will turn on when the PAIR
button is pressed.
5. Press and hold the Setup button on your
XFINITY Remote until the status LED
changes from red to green. Then, press
and release the XFINITY button.
Algunos decodificadores y DTA son directamente compatibles con la tecnología Aim Anywhere, mientras que otros pueden necesitar
que el adaptador Aim Anywhere se sincronice
con los controles remotos XFINITY.
3. Espere 3-5 segundos a que se apague
la luz LED roja fija que está arriba del
adaptador.
Sincronización de Aim
Anywhere:
1. Mantenga presionado el botón Setup
(Configurar) durante 3 segundos hasta que
la luz LED de estado cambie de color rojo
a verde.
2. Presione el botón XFINITY del control
remoto. El televisor debería mostrar en
pantalla las instrucciones para ingresar
un código de 3 dígitos. Si no aparecen las
instrucciones, presione el botón XFINITY
otra vez, hasta 2 veces más.
4. Una vez que el código se haya ingresado
en forma correcta, el control remoto XFINITY queda sincronizado con el equipo.
QQ: Why does the status LED flash red then
green then red during pairing?
AA: The set-top box or DTA you are attempting to pair may not be powered on, or may
not support Aim Anywhere control. If the
on screen instructions to enter a 3-digit
code do not display on your TV when attempting to pair, your set-top box or DTA
does not support Aim Anywhere control.
If you would like to use your remote to control
multiple XFINITY set-top boxes or DTAs
simultaneously, you can remove Aim Anywhere
pairing by following the steps below.
1. Press and hold the Setup button on the
remote until the status LED changes from
red to green.
2. Press A on the remote. If the status LED
blinks green twice, you have successfully
removed Aim Anywhere control.
You can now use your remote to control other
Comcast set-top boxes or DTAs simultaneously.
Para sincronizar el adaptador Aim Anywhere
(XR8) y el control remoto XFINITY:
1. Asegúrese de que su televisor y decodificador o DTA estén encendidos.
2. Conecte el adaptador al puerto de entrada
IR que está ubicado en el panel posterior
del decodificador o DTA.
4. Presione y suelte el botón PAIR (SINCRONIZAR) que está en la parte posterior
del adaptador. La luz LED que está arriba
del adaptador se encenderá cuando presione el botón PAIR (SINCRONIZAR).
5. Mantenga presionado el botón Setup
(Configurar) del control remoto XFINITY
hasta que la luz LED de estado cambie de
color rojo a verde. A continuación, presione
y suelte el botón XFINITY.
Nota: Debe presionar el botón PAIR (SINCRONIZAR) del adaptador antes de presionar
el botón XFINITY del control remoto.
6. Si la luz LED de estado del control remoto
XFINITY parpadea dos veces en color
verde, la sincronización se realizó satisfactoriamente. Presione CH^ para verificar que
el decodificador o el DTA responden según
lo esperado.
7. Si la luz LED del control remoto XFINITY
parpadea en color rojo, luego verde y
después rojo, la sincronización no fue satisfactoria. Fíjese en la guía del usuario del
adaptador si su equipo es compatible.
QQ: When paired, why does the status LED
flash green then red when pressing a
button on the remote?
AA: The set-top box or DTA that is paired
with your remote may not be powered
on or may be out of range. If your device
is powered on and within 50 feet of the
remote, try re-pairing your remote.
QQ: Can I pair more than one XFINITY
Remote with the Aim Anywhere Adapter
(XR8)?
AA: Yes, the XR8 supports pairing with up to
five XFINITY Remotes.
QQ: Why can’t I use my other remotes after
pairing with the Aim Anywhere Adapter
(XR8)?
AA: Some set-top boxes only support XFINITY
Remotes when using the XR8. You can
replace your other remote with an XFINITY
Remote and pair with the XR8.
7. If the LED on your XFINITY Remote
blinks red, then green, and then red,
pairing was unsuccessful. Check the
adapter’s user guide to verify your device
is compatible.
Sincronización con el
adaptador Aim Anywhere:
su control remoto XFINITY con el equipo.
Once your remote control is paired to your
set-top box or DTA, it is uniquely paired and
will not control any other set-top box or DTA
in your home unless you pair it with another
device.
6. If the status LED on the XFINITY Remote
blinks green twice, pairing was successful. Press CH ^ to verify that your set-top
box or DTA responds as expected.
Su control remoto puede sincronizarse
con equipos con Aim Anywhere, incluidos
decodificadores y DTA selectos, lo que le
permite controlar sus equipos aun cuando
están ubicados fuera de la línea de visión (por
ejemplo, en un centro de entretenimiento o
detrás del televisor). Los controles remotos
XFINITY pueden identificarse por el número de
modelo que comienza con “XR” que tienen en
la parte posterior.
Si su decodificador o DTA es directamente
compatible con la tecnología Aim Anywhere o
es compatible con el adaptador Aim Anywhere,
siga los pasos a continuación para sincronizar
Frequently Asked Questions
about Aim Anywhere Control:
Note: You must press the PAIR button on
the adapter before you press the XFINITY
button on your remote.
Cómo sincronizar su control remoto
Xfinity para control Aim Anywhere.
3. Siga las instrucciones en pantalla para
ingresar el código de 3 dígitos que aparece.
© Comcast Corporation. All rights reserved.
© Comcast Corporation. Derechos Reservados.
Pairing with the Aim Anywhere Adapter:
Need to Remove
Aim Anywhere Control?
QQ: Why is the Aim Anywhere Adapter (XR8)
not responding to button presses from
my XFINITY Remote?
AA: If the XR8 stops responding to an already
paired XFINITY Remote, unplug the XR8
and plug it back in. If this does not fix the
issue, follow the steps to re-pair the XR8
and XFINITY Remote.
Preguntas frecuentes sobre el control
Aim Anywhere:
PP. ¿Por qué la luz LED de estado parpadea
en color rojo, luego en verde y después
en rojo durante la sincronización?
RR: Es posible que el decodificador o el DTA
que intenta sincronizar no esté encendido
o no sea compatible con el control Aim
Anywhere. Si las instrucciones en pantalla
para ingresar un código de 3 dígitos no
aparecen en su televisor cuando intenta
hacer la sincronización, su decodificador o
DTA no admite el control Aim Anywhere.
PP. Tras la sincronización, ¿por qué la luz
LED de estado parpadea en verde y luego en rojo cuando presiono algún botón
del control remoto?
RR: El decodificador o DTA que está sincronizado con el control remoto puede estar apagado o fuera de alcance. Si el equipo está
encendido y a menos de 50 pies del control
remoto, pruebe volviendo a sincronizar el
control remoto.
PP. ¿Puedo sincronizar más de un control
remoto XFINITY con el adaptador Aim
Anywhere (XR8)?
RR: Sí, XR8 es compatible con la sincronización
con hasta cinco controles remotos XFINITY.
PP. ¿Por qué no puedo utilizar mis otros
controles remotos después de la
sincronización con el adaptador Aim
Anywhere (XR8)?
RR: Algunos decodificadores solo son compatibles con los controles remotos XFINITY
cuando se utiliza el XR8. Puede cambiar
el otro control remoto por uno XFINITY y
sincronizarlo con el XR8.
PP. ¿Por qué el adaptador Aim Anywhere
(XR8) no responde cuando presiono los
botones del control remoto XFINITY?
RR: Si el XR8 deja de responder a un control
remoto XFINITY con el que ya estaba
sincronizado, desenchufe el XR8 y vuelva a
enchufarlo. Si esto no soluciona el problema, siga los pasos para volver a sincronizar
el XR8 y el control remoto XFINITY.
¿Necesita eliminar el control
Aim Anywhere?
Una vez que su control remoto esté sincronizado con su decodificador o DTA, esta
sincronización es única y no controlará ningún
otro decodificador o DTA de su hogar hasta
que lo sincronice con otro equipo.
Si le gustaría usar su control remoto para
controlar varios DTA o decodificadores
XFINITY en forma simultánea, puede eliminar
la sincronización Aim Anywhere siguiendo los
pasos a continuación.
1. Mantenga presionado el botón Setup
(Configurar) del control remoto hasta que
la luz LED de estado cambie de color rojo
a verde.
2. Presione A en el control remoto. Si la luz
LED de estado parpadea dos veces en
color verde, eliminó satisfactoriamente el
control Aim Anywhere.
Ahora puede usar su control remoto para controlar otros DTA o decodificadores Comcast en
forma simultánea.