1
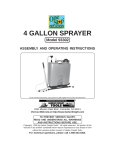
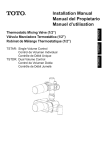
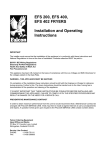
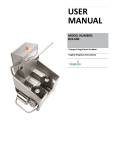
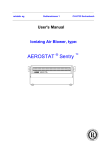
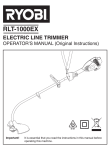
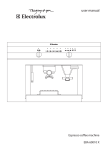
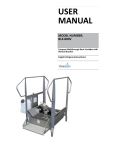
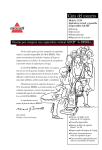
IMPORTANT SAFEGUARDS
When using electrical appliances,basic safety precautions should always be followed,
including the following:
1. Read all instructions.
2. Make sure that your outlet voltage corresponds to the voltage stated on the vacuum
cleaner’s rating label.
3. Do not leave vacuum cleaner unattended when is plugged in. Unplug from outlet when
not in use and before servicing.
4. For indoor use only, to reduce the risk of electric shock, do not use outdoors or on wet
surfaces.
5. Close adult supervision is necessary when this appliance is used near children. Children
should not use this appliance.
6. Use only as described in this manual.Use only manufacture’s recommended
attachments.
7. Do not use with a damaged cord or plug, if vacuum cleaner is not working as it should,
has been dropped, damaged, left outdoors, or dropped into water, ask for service in an
authorized service center.
8. Do not do any following actions: pull or carry on from the cord, use cord as a handle,
close a door on cord, or pull cord around sharp edges or corners. Do not run vacuum
cleaner over cord. Keep cord away from hot surfaces.
9. Do not unplug by pulling on cord. To unplug, grasp the plug instead of cord.
10. Do not handle plug or vacuum cleaner with wet hands.
11. Do not put any object into openings. Do not use with any opening blocked. Keep free
of dust, lint, hair and anything that may reduce airflow.
12. Turn off all controls before unplugging.
13. Use extra care when cleaning on stairs.
14. Hold plug when rewinding onto cord reel. Do not allow plug to whip when rewinding.
15. Unplug before connecting the hose.
16. Do not pick up anything that is burning or smoking, such as cigarettes, matches, or hot
ashes.
17. Do not use without dust bag and/or filter in place.
18. If the supply cord is damaged, it must be replaced by the manufacturer or its service
1
agent or a similarly qualified person in order to avoid any hazard.
19. Do not place an appliance on or near a hot gas or on a heated oven.
20. Assure that the ventilation slits of the appliance are not covered or blocked.
21. Keep hair, loose clothing, fingers and all parts of body away from openings and
moving parts.
22. Do not use to pick up flammable or combustible liquids, such as gasoline, and do not
use in areas where they may be present.
23. The use of accessories not recommended by the manufacturer may cause injuries to
persons.
24. Keep the appliance and its cord out of reach of children.
25. Do not operate the appliance for other than its intended use.
26. Save these instructions.
SAVE THESE INSTRUCTIONS
FOR HOUSEHOLD USE ONLY
2
SCHEME OF PARTS
+RVH
+DQGOHERG\
+DQGOHSXVKEXWWRQV
3ODVWLFBSLSH
3RZHU6ZLWFK
$LU,QWDNH
%RG\+DQGOH
)ODW6XFWLRQ6SRXW
)ORRU%UXVK
%LJ:KHHO
/RFN%ORFN
Front Cover
Filter
(within cover)
3
HOW TO USE
Always remove the plug from the power socket before fitting or removing accessories!
1. Attach plastic pipe to hose handle (see fig.1).
Plastic pipe
Fig.1
2. Fit floor brush to plastic pipe (see fig.2).
3ODVWLFBSLSH
)ORRU%UXVK
Fig.2
NOTE: Vacuum with fitting floor brush is ideal for daily cleaning of carpets and hard
floors (see fig.3).
Fig.3
3. To fit the extension hose, insert extension hose into the air intake on the top of
appliance. Press until it clicks into position (see fig.4).
4
Fig.4
NOTE:
1) To remove the extension hose, unplug from the power socket, then release the
extension hose from the air intake.
2) Do not use the hose to suck up water.
3) Do not immerse the hose in water for cleaning.
4) Hose should be checked regularly and must not be used if damaged.
4. Before using appliance, pull a sufficient length of cable from the appliance and insert
the plug into the power socket. A yellow mark on the power cable shows the ideal cable
length. Do not expand the cable beyond the red mark.
NOTE:
To rewind the power cable, press the rewind button beneath the body handle with one
hand and guide the cable with the other hand to ensure that it does not whip causing
damage.
Cord rewind button
5
5. Turn power Button ON to start the appliance and control dust suction.
ON/OFF Button
The flat suction spout can be used for radiators, crevices, corners, baseboards and
between cushions (see fig.5).
Fig.5
PRECAUTIONARY MEASUREMENT
If the opening that sucks in the air, the suction pipe or the telescopic wand stick on pipe is
blocked, you should switch off the vacuum cleaner immediately and clear the blocked part
before you attempt to start the vacuum cleaner again.
1. Do not operate the vacuum cleaner too close to heaters or radiators, cigarette butts etc
(see fig.6).
6
Fig.6
2. Before you insert the plug into the wall socket, make sure your hand is dry (see fig.7).
Fig.7
3. Before you start using the vacuum cleaner using floor brush, please remove large or
sharp objects from the floor in order to prevent any damage to the paper filter (see
fig.8).
Fig.8
4. When you want to pull the plug from the wall socket, grab the plug, never the power
cable (see fig.9).
Fig.9
7
NOTE: If anything gets damaged, both the plug and the cable must be repaired by a
qualified repairman or electrician.
CLEANING AND MAINTENANCE
To change the dust bag
NOTE:
1) Always operate the cleaner with dust bag installed.
2) If you forget to attach a dust bag or install it incorrectly, the front cover may not close
completely.
Follow these steps (see fig.10):
ķ Open the front cover by pushing the lock block upward.
ĸRemove the dust bag from the bag support.
ĹReplace paper bag when it is full of dirt.
ĺ Place a new paper bag into the unit.
ĻClose the cover by pushing down until it is locked.
Fig.10
To clean filter
NOTE:
1) Filter should be cleaned at least twice a year or when it becomes visible soiled.
2) Always operate the cleaner with filter installed.
3) Otherwise, reduced suction or motor damage may be caused.
4) Disconnect from electrical outlet, before cleaning filter.
8
5) Do not use a washing machine to rinse filter.
6) Do not use hair drier to dry it.
Follow these steps (see fig.11):
ķ Pull dust bag upward.
ĸ Remove filter.
Ĺ Rinse filter in lukewarm water and air-dry filter completely.
ĺ Place filter back in position.
Fig.11
To change the micro-exhaust filter
Follow these steps (see fig.12):
ķ Open the Air-Outlet Cover.
ĸ Take the soiled filter out and change for a new one.
Ĺ Close the Air-Outlet Cover.
Fig.12
9
ENVIRONMENT-FRIENDLY DIPOSAL
You can help protect the environment!
Please remember to respect the local regulations:
Hand in the non-working electrical equipments to
an appropriate waste disposal centre.
10
ASPIRADORA
MANUAL DE
INSTRUCCIONES
MODELO: PVC1402
LEA ESTE MANUAL COMPLETAMENTE ANTES DE USAR LA ASPIRADORA Y
GUÁRDELO PARA REFERENCIAS FUTURAS
PRECAUCIONES IMPORTANTES
Cuando se utilizan aparatos eléctricos, se deben seguir precauciones básicas de seguridad,
incluyendo las siguientes:
1. Lea todas las instrucciones.
2. Asegúrese que el voltaje de su circuito eléctrico coincide con el voltaje nominal del
aparato.
3. No deje el aparato desatendido mientras se encuentre conectado. Desenchufe del
tomacorriente cuando no esté en uso o antes de hacerle mantenimiento.
4. Para uso en interiores únicamente. Para reducir el riesgo de choque eléctrico no utilice
la aspiradora sobre superficies húmedas ni en exteriores.
5. Se requiere atenta supervisión cuando se usa la aspiradora cerca a niños pequeños. Este
aparato no debe ser utilizado por niños.
6. Utilice la aspiradora únicamente como se muestra en este manual.Use sólo accesorios
recomendados por el fabricante.
7. No utilice la aspiradora con el cable o enchufe en malas condiciones, si no está
funcionando bien, si se ha caído, dañado, dejada en exteriores o si se ha mojado.
Llévela un centro de servicio autorizado para su revisión o correspondiente reparación.
8. No haga ninguna de las siguientes acciones: jalar o levantar del cable, usar el cable
como manija, cerrar una puerta sobre el cable, dejar que cable se presione contra una
esquina, pasar la aspiradora sobre el cable. Mantenga el cable alejado de superficies
calientes.
9. No desconecte halando el cable, utilice el enchufe.
10. No manipule el enchufe, el cable o la aspiradora con las manos húmedas.
11. No inserte ningún objeto dentro de las ranuras. No utilice si hay alguna ranura
bloqueada. Mantenga limpia y libre de polvo, pelusas, cabello o cualquier material que
pueda bloquear el paso del aire.
12. Apague todos los controles antes de desenchufar.
13. Ponga extrema atención cuando limpie escaleras.
14. Sostenga el cable mientras se rebobina para evitar que se enrede.
15. Desenchufe antes de conectar la manguera.
16. No aspire ningún material que se esté quemando o emanando humo como cigarrillos,
fósforos o cenizas calientes.
1
17. Nunca utilice la aspiradora sin bolsa de polvo o sin filtro.
18. Si en cable o enchufe sufren algún daño deben ser reemplazados en uno de los Servicios
Técnicos Autorizados UMCO.
19. No coloque el aparato cerca de gas caliente o un horno caliente.
20. Asegúrese que las ranuras de ventilación estén libres.
21. Mantenga el cabello, ropa, dedos y demás partes del cuerpo alejadas de las ranuras y
partes móviles.
22. No emplee esta aspiradora para recoger líquidos inflamables o combustibles como
gasolina, ni aspire superficies donde pueda haber residuos de los mismos.
23. El uso de accesorios no recomendados por el fabricante pueden ocasionar daños a las
personas.
24. Mantenga este aparato fuera del alcance de los niños.
25. No utilice este aparato para otro fin diferente del indicado.
26. Guarde estas instrucciones.
GUARDE ESTAS INSTRUCCIONES
PARA USO DOMÉSTICO ÚNICAMENTE
2
ESQUEMA DE COMPONENTES
I
3
MODO DE EMPLEO
¡SIEMPRE DESENCHUFE ANTES DE INSERTAR O QUITAR ACCESORIOS!
1. Conecte el tubo de plástico al mango de la manguera (vea fig.1).
2. Ajuste el cepillo del piso al
Fig.1
tubo plástico (vea fig.2).
Fig.2
NOTA: Aspirar con el cepillo de piso es ideal para la limpieza y cuidado diario de tapetes
o pisos de madera (vea fig.3).
Fig.3
3. Para ajustar la extensión de manguera, insértela en la entrada de aire en la parte
superior del aparato. Presione hasta que encaje en su posición (vea fig.4).
4
Fig.4
NOTA:
1) Para retirar la extensión de manguera, desenchufe del tomacorriente, luego saque la
extensión del la entrada de aire.
2) No use la manguera para succionar agua o ningún líquido.
3) no sumerja la manguera en agua para limpiarla.
4) la manguera se debe inspeccionar regularmente en busca de daños o fisuras.
4. Antes de usar el aparato, jale suficiente cable y conecte el enchufe a un tomacorriente.
Una marca amarilla indica la cantidad de cable ideal, nunca sobrepase la marca roja.
NOTA:
Para rebobinar el cable, presione el botón de rebobinar debajo de la manija de la
unidad con una mano y con la otra mano guie el cable para que no se enrede
Botón de rebobinar
5
y dañe.
5. Oprima el botón de encendido (ON/OFF) para iniciar la operación y controlar la
succión.
Botón ON/OFF
La boquilla plana se puede emplear para la limpieza de radiadores, grietas, esquinas,
zócalos y entre cojines (vea fig.5).
Fig.5
MEDIDAS DE PRECAUCIÓN
Si la abertura que aspira el aire, la tubería de succión o el tubo telescópico está bloqueado,
debe apagar la aspiradora y limpiar inmediatamente la parte bloqueada antes de intentar
encender la aspiradora de nuevo.
1. No opere la aspiradora demasiado cerca de estufas, radiadores, colillas de cigarrillo etc.
(vea fig.6).
6
Fig.6
2. Antes de introducir el enchufe en el tomacorriente, asegúrese de que su mano está seca
(vea fig.7).
Fig.7
3. Antes de usar la aspiradora con el cepillo para pisos, retire los objetos grandes o agudos
del piso con el fin de evitar cualquier daño en el filtro de papel (vea fig.8).
Fig.8
4. Cuando desee sacar el enchufe del tomacorriente, jale del enchufe, nunca del cable de
alimentación (vea fig.9).
Fig.9
7
NOTA: Si algo se estropea, como el enchufe, el cable u otro elemento deben ser
reparados en uno de los Centros de Servicio Técnico Autorizado UMCO.
LIMPIEZA Y MANTENIMIENTO
Para cambiar la bolsa de polvo
NOTA:
1) Siempre opere la aspiradora con bolsa de polvo instalada.
2) Si usted olvida instalar una bolsa de polvo o la instala de forma incorrecta, la cubierta
delantera no se cerrará completamente.
Siga los siguientes pasos (vea fig.10):
1 Abra la cubierta frontal empujando el cierre de bloqueo hacia arriba.
2 Quite la bolsa de polvo del soporte.
3 Reemplace la bolsa cuando esté llena.
4 Coloque una bolsa nueva en el soporte
5 Cierre la cubierta presionando hacia abajo hasta que encaje.
Fig.10
Para limpiar el filtro
NOTA:
1) El filtro debe limpiarse por lo menos dos veces al año o cuando este notablemente
sucio.
2) Siempre opere la aspiradora con un filtro instalado.
8
3) De lo contrario se puede reducir la capacidad de succión y el motor puede dañarse.
4) Desenchufe antes de retirar el filtro para limpiarlo.
5) No limpie el filtro en una lavadora.
6) No seque el filtro con un secador de pelo.
Siga los siguientes pasos (vea fig.11):
1 Jale la bolsa de polvo hacia arriba.
2 Retire el filtro.
3 Enjuague el filtro con agua tibia y deje secar al aire por completo.
4 Coloque el filtro en su lugar.
Fig.11
Para cambiar el micro filtro de escape
Siga los siguientes pasos (vea fig.12):
1 Abra la tapa de salida de aire.
2 Retire el filtro sucio y reemplácelo con uno nuevo.
3 Cierre la tapa de salida de aire.
Fig.12
9
DESECHO FAVORABLE CON EL AMBIENTE
¡Usted puede ayudar a proteger el ambiente!
Recuerde siempre respetar las regulaciones de su
ciudad.
Lleve los aparatos eléctricos que vaya a desechar
a centros especiales de manejo de basuras.
10