1
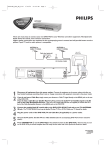
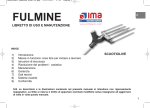
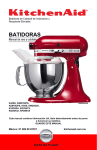
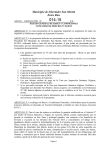
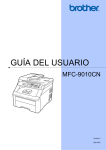
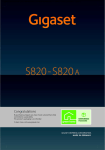
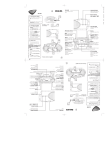
H9820UD_QUG_EN_0209 2/9/05 10:07 AM Page 1
DVP3050V
-
There are many ways to connect your new DVD / VCR to your Television and other equipment.This Quick-Use
Guide shows the easiest, most common connection.
Higher quality connections are explained in the accompanying owner’s manual and will provide better sound or
picture if your TV and/or audio system is compatible.
CABLE BOX
(Optional)
IN
OUT
OR
ANTENNA or
CABLE TV SIGNAL
CABLE TV SIGNAL
2
Antenna or Cable TV Signal to ANT-IN Jack
REAR OF TV
(EXAMPLE ONLY)
3
4
5
RF COAXIAL CABLE
ANTENNA IN
AUDIO IN
Audio Cables
L
R
Video Cable
VIDEO IN
Audio and Video IN Jacks on TV
1
2
3
4
5
6
7
8
Disconnect all equipment from the power outlets. Connect the equipment to the power outlets only after you
have finished hooking up everything. Never make or change connections with equipment connected to the power outlet.
Connect your Antenna TV signal or, if you have a Cable Box/Satellite Receiver, the OUT jack of your Cable
Box/Satellite Receiver to the ANT-IN jack on the rear of the DVD/VCR using the supplied RF coaxial cable.
Connect another RF coaxial cable (not supplied) to the DVD / VCR’s ANT-OUT jack and to your TV’s
ANTENNA IN jack. The TV’s ANTENNA IN jack may be labelled 75-ohm,TV IN, or RF IN. Check your TV manual for details.
Connect the red and white audio cables (supplied) to the red and white DVD/VCR AUDIO OUT jacks on
the DVD/VCR and to the red and white AUDIO IN jacks on the TV.
Connect the yellow video cable (supplied) to the DVD/VCR VIDEO OUT jack on the DVD/VCR and to
the VIDEO IN jack on the TV. The VIDEO IN jack on the TV is usually yellow and may be labelled CVBS, Composite,
or Baseband video.
Plug the power cords of the DVD / VCR and the TV into an active power outlet.
Turn on the TV and set it to the correct Audio/Video In channel.
Press STANDBY-ON y on the DVD / VCR or its remote control to turn on the DVD / VCR. The first
time you turn on the DVD / VCR, you should complete the First-time DVD/VCR Setup. See the other side
of this Quick-Use Guide for details.
H9820UD_QUG_EN_0209 2/9/05 10:07 AM Page 2
Quick-Use Guide (cont’d)
First-Time DVD/VCR Setup
1
2
1
Turn on the TV and set it to the correct Audio/Video In
channel.
Press VCR, then press STANDBY-ON y. VCR light will appear on
the front of the DVD/VCR. The TV display shown below will appear.
STANDBY-ON
SEARCH
MODE
2
DISPLAY
REPEAT REPEAT
LANGUAGE SELECT
B ENGLISH
FRANCAIS
ESPAÑOL
AUDIO
A-B
SKIP / CH
SUBTITLE
ZOOM
RETURN
TITLE CLEAR/RESET SLOW
ANGLE
[ON]
PUSH B
3
4
Turn on the TV and set it to the
correct Audio/Video In channel.
VCR
VCR/TV
DVD
DISC/VCR
SYSTEM
MENU
MENU
Press K or L to select ENGLISH, FRANCAIS (French), or
ESPAÑOL (Spanish) as the language for VCR on-screen
displays. Then, press B.
3-4
OK
The AUTO SET UP message will appear. Press B to set up TV
channels for the VCR. When setup is complete, the lowest TV
channel will appear on the TV.
STOP
PLAY
PAUSE
TIMER SET
MARKER
RECORD
SPEED
AUTO SET UP
1
2
3
4
5
6
7
8
9
0
+10
PUSH B
3
Playing a Disc
1
2
3
Turn on the TV and set it to the correct Audio/Video In
channel.
With the TV and DVD / VCR turned on, press DVD to put
the DVD / VCR in DVD mode.
STANDBY-ON
Press OPEN / CLOSE A to open the disc tray.
Put a Disc in the tray with the label facing up and the shiny side
facing down.
Press PLAY B to close the disc tray.
4
Playback may start automatically. If not, press PLAY B.
If a DVD Disc menu appears, use the s BKL, OK, or Number
buttons to select features or start playback. Follow the
instructions in the menu.
5
To stop playing a Disc, press STOP C.
SEARCH
MODE
DISPLAY
REPEAT REPEAT
AUDIO
A-B
SKIP / CH
SUBTITLE
ZOOM
RETURN
TITLE CLEAR/RESET SLOW
VCR
ANGLE
VCR/TV
DVD
DISC/VCR
SYSTEM
MENU
MENU
2
OK
Playable Discs
The DVD Player of the DVD /VCR will play the following Discs.
5
STOP
PLAY
PAUSE
TIMER SET
MARKER
RECORD
4
is a trademark of DVD Format/Logo Licensing Corporation.
Windows Media is a trademark of Microsoft Corporation.
ALL
1
DVDs must have a Region Code of ALL regions or Region 1.
DVDs must be recorded in either the NTSC or PAL color system.
Your TV must also have the NTSC or PAL color system.
8239 300 38902
1VMN20422A/H9820UD/H982AUD****
NEED HELP! Visit our website at www.philips.com/support
H9820UD_QUG_FR_0208 2/8/05 7:12 PM Page 1
DVP3050V
-
Il existe plusieurs façons de raccorder votre nouveau lecteur DVD / magnétoscope à votre téléviseur et à
d’autres appareils. Ce guide d’utilisation rapide vous indique la connexion la plus rapide et la plus fréquemment
utilisée.
Des connexions de meilleure qualité sont détaillées dans le manuel d’utilisation joint. Elles vous permettront
d’obtenir une meilleure qualité d’image ou de son si votre téléviseur et/ou système audio sont compatibles.
Boîtier du service
du câble
(facultatif)
IN
OUT
OU
Signal du service du câble
2
Signal d’antenne
ou du service ducâble
Signal d’antenne ou du service du câble
à la prise ANT-IN
Arrière du téléviseur
(exemple seulement)
3
4
5
Câble RF coaxial
Câbles audio
ANTENNA IN
AUDIO IN
L
Câble vidéo
R
VIDEO IN
Prises d’entrée audio et vidéo
sur le téléviseur
1
2
3
4
5
6
7
8
Débranchez tous les appareils des prises d’alimentation. Ne les rebranchez qu’une fois la connexion du système
entièrement terminée. Ne jamais effectuer ou modifier une connexion sur un appareil reliés à une prise de courant.
Utilisez le câble coaxial RF fourni pour raccorder le signal d’antenne, ou, si vous possédez un boîtier du
système du câble/système RDS, la prise OUT de votre boîtier du câble ou décodeur satellite, à la prise
ANT-IN du lecteur DVD/magnétoscope.
Raccordez à l’aide d’un deuxième câble coaxial RF (non fourni) la prise ANT-OUT du lecteur
DVD / magnétoscope à la prise ANTENNA IN de votre téléviseur. La prise ANTENNA IN du téléviseur peut porter
les mentions 75-ohm,TV IN ou RF IN. Consultez le manuel de votre téléviseur pour plus d’informations.
Connectez les câbles audio rouge et blanc (fournis) aux prises rouge et blanche DVD/VCR AUDIO OUT
du lecteur DVD/magnétoscope et aux prises rouge et blanche AUDIO IN du téléviseur.
Connectez le câble vidéo jaune (fourni) à la prise DVD/VCR VIDEO OUT du lecteur DVD/magnétoscope
et à la prise VIDEO IN du téléviseur. La prise VIDEO IN du téléviseur est habituellement de couleur jaune et peut
comporter les mentions CVBS, Composite ou Baseband video.
Branchez les cordons d’alimentation du lecteur DVD / magnétoscope et du téléviseur dans des prises
murales actives.
Allumez le téléviseur et réglez-le sur le canal Audio/Video In approprié.
Appuyez sur STANDBY-ON y du lecteur DVD / magnétoscope ou de la télécommande pour mettre le
lecteur DVD / magnétoscope sous tension. Si c’est la première fois que vous allumez le lecteur
DVD / magnétoscope, vous devez effectuer la configuration initiale de l’appareil. Consultez le verso de ce
guide pour plus d’informations.
H9820UD_QUG_FR_0208 2/8/05 7:12 PM Page 2
Guide rapide d’utilisation (suite)
Configuration initiale du lecteur DVD/magnétoscope
1
2
STANDBY-ON
Appuyez sur VCR, puis sur STANDBY-ON y. Le voyant VCR
s’allume sur le devant du lecteur DVD/magnétoscope. L’affichage
ci-dessous apparaît sur le téléviseur.
SEARCH
MODE
AUDIO
A-B
[ON]
SKIP / CH
SUBTITLE
ZOOM
RETURN
TITLE CLEAR/RESET SLOW
VCR
PUSH B
3
4
2
DISPLAY
REPEAT REPEAT
LANGUAGE SELECT
B ENGLISH
FRANCAIS
ESPAÑOL
Allumez le téléviseur et réglez-le
sur le canal Audio/Video In
approprié.
1
Allumez le téléviseur et réglez-le sur le canal Audio/Video
In approprié.
ANGLE
VCR/TV
DVD
DISC/VCR
SYSTEM
MENU
MENU
Appuyez sur K ou L pour sélectionner ENGLISH, (Anglais),
FRANCAIS ou ESPAÑOL(Espagnol) comme langue des écrans
d’affichage du magnétoscope. Appuyez ensuite sur B.
3-4
OK
Le message REGLAGE AUTO apparaît. Appuyez sur B pour
régler les chaînes de télévision pour le magnétoscope.
Lorsque le réglage est terminé, la chaîne la plus basse s’affiche sur le
téléviseur.
STOP
PLAY
PAUSE
TIMER SET
MARKER
RECORD
SPEED
REGLAGE AUTO
1
2
3
4
5
6
7
8
9
0
+10
3
APPUYER SUR B
Lecture d’un disque
1
2
3
4
5
Allumez le téléviseur et réglez-le sur le canal Audio/Video
In approprié.
Une fois le téléviseur et le lecteur DVD / magnétoscope
sous tension, appuyez sur DVD pour mettre le lecteur
en mode DVD.
Appuyez sur le bouton OPEN / CLOSE A pour ouvrir le
tiroir disque.
Placez un disque dans le tiroir, face imprimée vers le haut et face
brillante vers le bas.
Appuyez sur PLAY B pour fermer le tiroir disque.
Il est possible que la lecture commence
automatiquement. Si ce n’est pas le cas, appuyez sur
PLAY B.
Si un menu de disque DVD apparaît, utilisez les boutons s B K L,
OK ou les touches numérotées pour choisir une fonctionnalité ou
commencer la lecture. Suivez les instructions sur le menu.
Pour interrompre la lecture, appuyez sur STOP C.
Disques lisibles
STANDBY-ON
SEARCH
MODE
DISPLAY
REPEAT REPEAT
AUDIO
A-B
SKIP / CH
SUBTITLE
ZOOM
RETURN
TITLE CLEAR/RESET SLOW
VCR
ANGLE
VCR/TV
DVD
DISC/VCR
SYSTEM
MENU
MENU
OK
5
STOP
PLAY
PAUSE
TIMER SET
MARKER
RECORD
Le lecteur DVD de votre appareil lit les disques suivants :
est une marque de DVD Format/Logo Licensing Corporation.
Windows Media est une marque déposée de Microsoft Corporation.
ALL
1
2
Les DVD doivent être encodés pour toutes les régions (ALL) ou la région 1.
Les DVD doivent être enregistrés suivant le système de couleur NTSC ou PAL.
Votre téléviseur doit également être compatible PAL ou NTSC.
Besoin d’assistance ? Visitez notre site www.philips.com/support
4
H9820UD_QUG_SP_0208 2/8/05 7:13 PM Page 1
DVP3050V
-
Hay muchas maneras de conectar su nuevo DVD / VCR a su televisor y a otros equipos. Esta Guía para uso
rápido le mostrará la conexión más sencilla y más común.
Las conexiones de mayor calidad están explicadas en el manual del propietario que se adjunta y le proveerán
mejor sonido o imagen siempre y cuando que su televisor y/o sistema de audio sean compatibles.
Caja de TV por cable
(opcional)
IN
OUT
O
Señal de antena o
TV por cable
Señal de TV por cable
2
Señal de antena o TV por cable a
conector hembra ANT-IN
La parte de atrás
del televisor
(ejemplo solamente)
3
4
5
Cable coaxial de RF
Cables de audio
ANTENNA IN
AUDIO IN
L
Cable de video
R
VIDEO IN
Conectores hembra ENT
de Audio y Video en el televisor
1
2
3
4
5
6
7
8
Desenchufe todos los equipos de sus tomacorrientes. Conecte los equipos a sus tomacorrientes sólo después de
que haya terminado de interconectar todo. Nunca efectúe o modifique conexiones con los equipos conectados a sus
tomacorrientes.
Conecte la señal de TV proveniente de su antena o, si usted tiene una caja de TV por cable o un receptor
satelital, la del conector hembra OUT de su caja de TV por cable o receptor satelital, al conector hembra
ANT-IN ubicado en la parte trasera del DVD/VCR utilizando el cable coaxial de RF provisto.
Conecte otro cable coaxial de RF (no provisto) al conector hembra ANT OUT del DVD / VCR y al conector
hembra ANTENNA IN de su televisor. El conector hembra ANTENNA IN de su televisor puede estar rotulado 75
ohmios,TV IN o RF IN. Para obtener detalles consulte el manual de su televisor.
Conecte los cables de audio rojo y blanco (provistos) a los conectores hembra rojo y blanco AUDIO
OUT del DVD/VCR y a los conectores hembra rojo y blanco AUDIO IN del televisor.
Conecte el cable amarillo de video (provisto) al conector hembra VIDEO OUT del DVD/VCR y al
conector hembra VIDEO IN del televisor. El conector hembra VIDEO IN del televisor es generalmente amarillo y
puede estar rotulado CVBS, Composite o Baseband video.
Enchufe el DVD / VCR y el televisor a un tomacorriente activo.
Encienda el televisor y sintonícelo al canal correcto de Audio/Video In.
Presione STANDBY-ON y en el DVD / VCR o en su control remoto para encender el DVD / VCR. La
primera vez que usted encienda el DVD / VCR, deberá completar la configuración inicial del mismo.
Obtendrá detalles adicionales en la otra cara de esta Guía de uso rápido.
H9820UD_QUG_SP_0208 2/8/05 7:13 PM Page 2
Guía para uso rápido (continuación)
Configuración inicial del DVD/VCR
1
2
1
Encienda el televisor y sintonícelo al canal correcto de
Audio/Video In.
Presione VCR, y luego presione STANDBY-ON y. En el frente del
DVD/VCR aparecerá la luz del VCR. Aparecerá la pantalla de TV
mostrada a continuación.
Encienda el televisor y sintonícelo al
canal correcto de Audio/Video In.
STANDBY-ON
SEARCH
MODE
REPEAT REPEAT
LANGUAGE SELECT
B ENGLISH
FRANCAIS
ESPAÑOL
AUDIO
A-B
SKIP / CH
SUBTITLE
ZOOM
RETURN
TITLE CLEAR/RESET SLOW
ANGLE
[ON]
VCR
PUSH B
3
4
2
DISPLAY
Presione K o L para seleccionar ENGLISH, (Inglés),
FRANCAIS (Francés) o ESPAÑOL como idioma de
exhibición en la pantalla del VCR. Luego presione B.
Aparecerá el mensaje de AJUSTE AUTO. Presione B para
configurar los canales de TV para el VCR. Cuando la
configuración esté completa, en el televisor aparecerá el canal más
bajo de TV.
VCR/TV
DVD
DISC/VCR
SYSTEM
MENU
MENU
3-4
OK
STOP
PLAY
PAUSE
TIMER SET
MARKER
RECORD
SPEED
AJUSTE AUTO
1
2
3
4
5
6
7
8
9
0
+10
PULSE B
3
Reproducción de un disco
1
2
3
4
5
Encienda el televisor y sintonícelo al canal correcto de
Audio/Video In.
Con el televisor y el DVD / VCR encendidos, presione DVD
para poner el DVD / VCR en el modo DVD.
STANDBY-ON
Presione OPEN / CLOSE A para abrir la bandeja de
discos.
Coloque un disco en la bandeja con la etiqueta hacia arriba y la
cara brillante hacia abajo.
Presione PLAY B para cerrar la bandeja de discos.
La reproducción podrá iniciarse automáticamente. Si no
lo hiciera, presione PLAY B.
Si apareciera un menú del disco DVD, para seleccionar funciones o
iniciar la reproducción utilice los botones s B K L, OK o los
botones numéricos. Siga las instrucciones presentes en el menú.
Para dejar de reproducir un disco, presione STOP C.
Discos reproducibles
SEARCH
MODE
DISPLAY
REPEAT REPEAT
AUDIO
A-B
ZOOM
RETURN
TITLE CLEAR/RESET SLOW
VCR
ANGLE
SKIP / CH
SUBTITLE
VCR/TV
DVD
DISC/VCR
SYSTEM
MENU
MENU
2
OK
5
STOP
PLAY
PAUSE
TIMER SET
MARKER
RECORD
4
El reproductor de DVD del DVD /VCR reproducirá los siguientes discos.
es una marca registrada de la empresa otorgante de la licencia del formato/logotipo del DVD.
Windows Media es una marca registrada de Microsoft Corporation.
ALL
1
Los discos DVD deben tener un código de región correspondiente a TODAS las regiones o la región 1.
Los discos DVD deben estar grabados ya sea en el sistema de color NTSC o en el PAL.
Su televisor debe asimismo tener el sistema de color NTSC o PAL.
¿NECESITA AYUDA? Visite nuestro sitio Web en www.philips.com/support