1
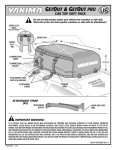
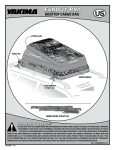
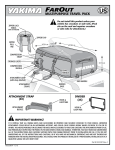
GetOut & GetOut pro
ROOFTOP CARGO BAG
ZIPPER FLAP
31”/79 cm
43”/109 cm
ATTACHMENT
LOOPs
18”/46 cm
Hook
(x4)
grab handle
COMPRESSION
STRAP (x4)
COMPRESSION
buckle (x4)
ATTACHMENT
STRAP (x4)
OF
NT LE)
O
(FR EHIC
V
Naked roof STRAP (2X)
IMPORTANT WARNING
IT IS CRITICAL THAT ALL YAKIMA RACKS AND ACCESSORIES BE PROPERLY AND SECURELY ATTACHED TO YOUR VEHICLE. IMPROPER
ATTACHMENT COULD RESULT IN AN AUTOMOBILE ACCIDENT, AND COULD CAUSE SERIOUS BODILY INJURY OR DEATH TO YOU OR
TO OTHERS. YOU ARE RESPONSIBLE FOR SECURING THE RACKS AND ACCESSORIES TO YOUR CAR, CHECKING THE ATTACHMENTS
PRIOR TO USE, AND PERIODICALLY INSPECTING THE PRODUCTS FOR ADJUSTMENT, WEAR, AND DAMAGE. THEREFORE, YOU MUST READ AND
UNDERSTAND ALL OF THE INSTRUCTIONS AND CAUTIONS SUPPLIED WITH YOUR YAKIMA PRODUCT PRIOR TO INSTALLATION OR USE. IF YOU
DO NOT UNDERSTAND ALL OF THE INSTRUCTIONS AND CAUTIONS, OR IF YOU HAVE NO MECHANICAL EXPERIENCE AND ARE NOT THOROUGHLY
FAMILIAR WITH THE INSTALLATION PROCEDURES, YOU SHOULD HAVE THE PRODUCT INSTALLED BY A PROFESSIONAL INSTALLER.
Part #1033577 Rev. B
1033577B - 1/12
clear away dirt and debris
from car’s roof.
a
Unfold the BAG.
• Completely unzip the zipper.
• Keep the bag closed.
Select correct Bag position on your car’s roof
(for installation without roof rack proceed to step 3b).
CROSSBARS:
SIDE-RAILS:
In a BASKET:
All 4 straps should be
attached to the crossbars or
towers (2 front, 2 rear).
Straps attach to either
side of the center post.
Install front straps to front
of basket, and rear straps to
rear of basket.
front of car
front of car
front of car
INSTALL the bag between the rails or bars, NOT ABOVE THE BARS!
IMPORTANT! NEVER INSTALL bag SIDEWAYS on vehicle—
and— the top flap must unfold towards the front of the vehicle!
b
For installation on a naked roof
(installation on vehicle with no rack system).
Hooks may be inside, or outside car
depending on vehicle size.
1033577B - 2/12
• Set bag on car.
• Attach roof strap to one hook.
• Do not route strap through door frame.
• Thread roof strap through open car doors.
• Attach to other hook.
• Pull hook straps and/or roof straps
• Tighten to secure bag.
• Secure strap ends.
• REPEAT FOR REAR STRAP.
secure each strap to the racks.
• Pull the strap ends to
tighten the BAG to the
racks.
• Tuck the end of the strap back
into the buckle to prevent the
strap from loosening.
• Secure strap ends with hook
and loop fastener tabs.
Always use the hook and loop
tabs to secure surplus strap.
open the BAG.
Fold back the unzipped
top and gently rest the
flap on the windshield.
The top must unfold
towards the front
of the vehicle!
Load your gear.
Do not exceed the capacity of
your vehicle’s roof.
Refer to your vehicle owner's
manual for limitations.
Distribute the contents evenly.
DO NOT over-stuff the BAG!
Close the bag.
• Replace the top cover flap.
• Close the zipper completely.
If there is any resistance,
check for overstuffing.
CONNECT COMPRESSION
STRAP BUCKLES.
1033577B - 3/12
• Tighten all four
compression straps.
• Pull strap ends against
bag contents.
• Align zippers at the center-back.
Before driving away
Check the Load!
Pull and push the
loaded bag.
• Bag must be closed and attached to
crossbars or siderails.
• Check straps, buckles, and zipper
before traveling.
• Keep straps and bag from making
contact with sharp metal edges.
• If there is strap movement,
tighten where needed.
• Check the straps as you travel
and tighten if necessary!
WARNINGS
TRAVEL WARNING
You must tighten all straps
after extended travel, and
periodically during travel.
Failure to check straps before
and during travel can result
in property damage, personal
injury or death.
• Do not use in severe winds.
• Position bag to minimize wind loads under bag.
• 75 mph (120 km/h) maximum speed.
• Bag should be straight, never crooked.
• Not for use with fragile, sharp, or heavy objects.
• Remove bag before driving into garages or under
low hanging objects.
• Do not drive with unloaded bag.
WEIGHT LIMITS
Rack System
(if appropriate)
GetOut 4.1 lbs. / 1.9 kg
GetOut Pro 7.2 lbs. / 3.3 kg
=
Contents
Not more than 100
lbs. (45 kg) unless
otherwise noted.
OR
the capacity of your roof as stated by the vehicle manufacturer.
If this information is not available, DO NOT USE THIS PRODUCT.
Do not leave your loaded BAG on the vehicle
unattended. A closed zipper is not theft-proof.
Storing the BAG
PACK USAGE
• Do not drive off-road.
• Do not install onto trailers,
campers, RVs unless a rack is
installed. Although this product has
padding, it will not prevent dents
caused by over loading, under
securing, or off-road driving.
• Replace any straps that appear
worn or frayed.
• Remove bag before entering an
automatic car wash.
• Do not over stuff bag.
• Do not leave the empty bag mounted to the vehicle.
• Securing an empty bag to a moving vehicle could cause damage to the
vehicle roof.
• Always clean the bag after travel using a damp sponge with mild
detergent containing no additives (such as alcohol, chlorine or
ammonia) and air dry completely.
• Once bag is dry, it can be rolled and stored.
• Store out of direct sunlight and harsh weather.
When fully loaded, it is recommended to get
assistance removing bag from roof to avoid
personal injury, or damage to the vehicle.
Weather resistance
• Always encase anything that must remain dry inside
water-proof material before loading into the pack.
• Keep zipper flap flat during travel.
• When using the Naked Roof Strap wicking of moisture
into the car may occur in very wet conditions.
1033577B - 4/12
Maintenance
Use a damp sponge with mild detergent
containing no additives (such as
alcohol, chlorine or ammonia) to clean
your bag. Air dry completely.
K EE P T HESE I N S T R U C T I O N S
GetOut & GetOut pro
SAC À CHARGER SUR LE TOIT
RABAT DE GLISSIÈRE
31”/79 cm
43”/109 cm
PASSANT
D’ARRIMAGE
18”/46 cm
CROCHET
(x4)
POIGNÉE
SANGLE DE
COMPRESSION (x4)
BOUCLE DE
COMPRESSION (x4)
SANGLE
D’ARRIMAGE (x4)
U
T D E)
N
A
L
(AV HICU
VÉ
SANGLE POUR TOIT NU (x 2)
AVERTISSEMENT IMPORTANT:
IL EST IMPÉRATIF QUE LES PORTE-BAGAGES ET LES ACCESSOIRES YAKIMA SOIENT CORRECTEMENT ET SOLIDEMENT
FIXÉS AU VÉHICULE. UN MONTAGE MAL RÉALISÉ POURRAIT PROVOQUER UN ACCIDENT D’AUTOMOBILE, QUI POURRAIT
ENTRAÎNER DES BLESSURES GRAVES OU MÊME LA MORT, À VOUS OU À D’AUTRES PERSONNES. VOUS ÊTES
RESPONSABLE DE L’INSTALLATION DU PORTE-BAGAGES ET DES ACCESSOIRES SUR VOTRE VÉHICULE, D’EN VÉRIFIER
LA SOLIDITÉ AVANT DE PRENDRE LA ROUTE ET DE LES INSPECTER RÉGULIÈREMENT POUR EN CONTRÔLER L’ÉTAT, L’AJUSTEMENT ET
L’USURE. VOUS DEVEZ DONC LIRE ATTENTIVEMENT TOUTES LES INSTRUCTIONS ET TOUS LES AVERTISSEMENTS ACCOMPAGNANT
VOTRE PRODUIT YAKIMA AVANT DE L’INSTALLER ET DE L’UTILISER. SI VOUS NE COMPRENEZ PAS TOUTES LES INSTRUCTIONS ET
TOUS LES AVERTISSEMENTS, OU SI VOUS N’AVEZ PAS DE COMPÉTENCES EN MÉCANIQUE ET NE COMPRENEZ PAS PARFAITEMENT
LA MÉTHODE DE MONTAGE, VOUS DEVRIEZ FAIRE INSTALLER LE PRODUIT PAR UN PROFESSIONNEL.
1033577B - 5/12
BIEN ESSUYER LE TOIT DU
VÉHICULE.
a
DÉROULER LE SAC.
• Ouvrir la glissière complètement.
• Garder le sac fermé.
CHOISIR LA POSITION DU SAC CONVENANT AU TOIT DU VÉHICULE
(S'IL N'Y A PAS DE PORTE-BAGAGE SUR LE TOIT, PASSER À L'OPÉRATION 3b).
BARRES TRANSVERSALES :
LONGERONS :
DANS UN PANIER :
Arrimer les 4 sangles aux barres
transversales ou à leurs pieds (2
devant, 2 derrière)
Arrimer les sangles de
part et d’autre du support
central.
Arrimer les sangles avant à
l’avant du panier et les sangles
arrière à l’arrière du panier.
avant du
véhicule
avant du
véhicule
avant du
véhicule
POSER LE SAC ENTRE LES LONGERONS OU LES BARRES, PAS PAR-DESSUS DES BARRES !
IMPORTANT ! NE JAMAIS MONTER LE SAC EN TRAVERS du véhicule — ET — le dessus du sac
doit se rabattre vers l’avant du véhicule !
b
ARRIMAGE SUR UN TOIT NU
(POSE SUR UN VÉHICULE SANS PORTE-BAGAGE).
Les crochets pourront se trouver à l'intérieur
ou à l'extérieur, selon la taille du véhicule.
1033577B - 6/12
• Déposer le sac sur le toit.
• Accrocher une sangle pour toit nu à un crochet.
• Ne pas enfiler la sangle à travers la portière.
• Enfiler la sangle par les portières ouvertes.
• Accrocher la sangle à l'autre crochet.
• Tendre les sangles de crochet et/ou de toit.
• Bien serrer pour arrimer le sac.
• Attacher l'excédent des sangles.
• PROCÉDER DE LA MÊME MANIÈRE POUR LA
DEUXIÈME SANGLE.
ARRIMER CHAQUE SANGLE AUX BARRES.
• TIRER SUR LE BOUT DES
SANGLES POUR SERRER LE SAC
CONTRE LES BARRES.
• Ramener le bout des sangles
dans leur boucle pour empêcher
les sangles de se détendre.
• Attacher l’excédent avec les
bandes velcro.
Toujours employer les bandes velcro
pour ranger l’excédent des sangles.
OUVRIR LE SAC.
Rabattre délicatement
le dessus du sac sur le
pare-brise.
Le dessus du sac
doit se rabattre vers
l’avant du véhicule !
CHARGER LE MATÉRIEL.
Ne pas dépasser la capacité du
toit du véhicule.
Consulter le manuel du véhicule
pour connaître cette capacité.
Répartir les objets sur toute
la surface. NE PAS TROP
REMPLIR LE SAC !
REFERMER LE SAC.
• Rabattre le dessus du sac.
• Fermer la glissière
complètement.
S’il y a de la résistance, vérifier
que le sac n’est pas trop rempli.
RÉUNIR LES BOUCLES
DES SANGLES DE
COMPRESSION.
1033577B - 7/12
• SERRER LES QUATRE SANGLES
DE COMPRESSION.
• Tendre les sangles contre le
contenu du sac.
Aligner les curseurs de la
glissière à l’arrière, au centre.
AVANT DE PRENDRE LA ROUTE
VÉRIFIER LE CHARGEMENT !
• Le sac doit être fermé et arrimé aux
barres transversales ou aux longerons.
Tirer et pousser sur le
sac une fois chargé.
• Vérifier les sangles, les boucles et la
glissière avant de partir.
• Si une sangle bouge, la serrer.
• Vérifier les sangles durant le
trajet et les resserrer au besoin !
• Empêcher les sangles et le sac d’entrer
en contact avec des arêtes métalliques
vives.
• Ne pas employer si les vents sont violents.
• Positionner le sac de manière à diminuer le passage
du vent sous le sac.
• Vitesse maximale : 120 km/h (75 mi/h).
• Le sac doit être dans l'axe, jamais de biais.
• Ne pas employer pour transporter des objets fragiles,
tranchants ou lourds.
• Enlever le sac avant d'entrer dans un garage ou de
passer sous des objets bas.
• Ne pas conduire avec le sac s'il est vide.
Il faut obligatoirement serrer
les sangles après avoir fait une
longue route, et périodiquement
au cours du trajet. Si l'on ne
vérifie pas les sangles avant et
durant le trajet, on risque de
provoquer des dommages, des
blessures ou même la mort.
ATTENTION
AVERTISSEMENT
LIMITES DE POIDS :
poids du porte-bagages
(le cas échéant)
GetOut 4.1 lbs. / 1.9 kg
GetOut Pro 7.2 lbs. / 3.3 kg
OU
contenu de
la caisse
=
pas plus de 45 kg
(100 lb) à moins
d'indication
contraire.
la capacité du toit indiquée par le fabricant du véhicule.
SI CE RENSEIGNEMENT N’EST PAS DISPONIBLE, NE PAS EMPLOYER CE PRODUIT.
NE PAS LAISSER LE SAC CHARGÉ SUR LE VÉHICULE SANS SURVEILLANCE.
UNE GLISSIÈRE FERMÉE N’EST PAS À L’ÉPREUVE DU VOL.
UTILISATION DU SAC
• Ne pas conduire hors-route.
• Ne pas installer sur une remorque, une
autocaravane, un véhicule récréatif à
moins qu’il y ait un porte-bagage. Même
si ce sac est rembourré, il n’empêchera
pas les dommages au toit provoqués par
la surcharge, un mauvais arrimage ou la
conduite hors-route.
• Remplacer les sangles qui semblent
usées ou élimées.
• Enlever le sac avant d’entrer dans un
lave-auto automatique.
• Ne pas surcharger le sac.
ENTREPOSAGE DU SAC
• Ne pas laisser le sac vide monté sur le véhicule.
• Si l’on roulait avec le sac vide monté sur le toit, on pourrait
endommager le véhicule.
• Toujours nettoyer le sac après usage avec une éponge humide et un
savon doux ne renfermant pas d’additifs comme de l’alcool, du chlore
ou de l’ammoniaque, et le laisser sécher à l’air complètement.
• Une fois le sac bien sec, on peut le rouler et l’entreposer.
• Entreposer le sac à l'abri du soleil et des intempéries.
Si le sac est complètement rempli, il est
recommandé d'obtenir de l'aide pour l'enlever du
toit, car on risquerait de provoquer des blessures ou
d’endommager le véhicule.
RÉSISTANCE AUX INTEMPÉRIES
• Si un objet doit impérativement rester au sec, toujours l’emballer
dans un matériau imperméable avant de le charger dans le sac.
• Garder le rabat de la glissière à plat lors des déplacements.
• Quand on se sert des sangles pour toit nu, il est possible que de
l'eau suinte à l'intérieur du véhicule par pluie très forte.
ENTRETIEN
Nettoyer le sac avec une éponge
humide et un savon doux ne renfermant
pas d’additifs comme de l’alcool, du
chlore ou de l’ammoniaque, et le laisser
sécher à l’air complètement.
C O N SE R VE R CES I N S T R U C T I O N S !
1033577B - 8/12
GetOut & GetOut pro
MALETA PORTAEQUIPAJES PARA TECHO
SOLAPA PARA CIERRE
DE CREMALLERA
31”/79 cm
43”/109 cm
BUCLES DE
AMARRE
18”/46 cm
GANCHO
(x4)
MANIJA
CORREA DE
COMPRESIÓN (x4)
HEBILLA DE
COMPRESIÓN (x4)
CORREA DE
SUJECIÓN (x4)
DEL)
E
T
LO
EN
(FR EHÍCU
V
CORREA PARA TECHO SIN
PORTAEQUIPAJES (X2)
AVISO IMPORTANTE
ES FUNDAMENTAL QUE TODOS LOS PORTAEQUIPAJES Y ACCESORIOS YAKIMA ESTÉN FIJADOS DE MANERA CORRECTA Y SEGURA
AL VEHÍCULO. UNA INSTALACIÓN DEFICIENTE PODRÍA CAUSAR UN ACCIDENTE DE AUTOMÓVIL PROVOCANDO HERIDAS GRAVES O,
INCLUSO, SU MUERTE O LA DE TERCEROS. USTED ES RESPONSABLE DE INSTALAR DE MANERA SEGURA LOS PORTAEQUIPAJES Y
ACCESORIOS AL VEHÍCULO, DE VERIFICAR LA SOLIDEZ DE LAS FIJACIONES ANTES DE PARTIR Y DE INSPECCIONAR PERIÓDICAMENTE EL AJUSTE DE
LOS PRODUCTOS, ASÍ COMO SU DESGASTE Y POSIBLES DAÑOS. POR LO TANTO, USTED DEBE LEER Y COMPRENDER TODAS LAS INSTRUCCIONES Y
ADVERTENCIAS QUE VIENEN CON LOS PRODUCTOS YAKIMA ANTES DE INSTALARLOS O USARLOS. SI NO COMPRENDE TODAS LAS INSTRUCCIONES
Y ADVERTENCIAS, O SI NO TIENE EXPERIENCIA EN MECÁNICA O NO ESTÁ FAMILIARIZADO CON LOS MÉTODOS DE INSTALACIÓN, HAGA INSTALAR
EL PRODUCTO POR UN INSTALADOR PROFESIONAL.
1033577B - 9/12
DESENROLLE LA MALETA
PORTAEQUIPAJES.
RETIRE LA SUCIEDAD Y POSIBLES
DESECHOS DEL TECHO DEL VEHÍCULO.
• Abra completamente
el cierre de
cremallera.
• Mantenga la maleta
cerrada.
a
ESCOJA LA UBICACIÓN CORRECTA DE LA MALETA EN EL TECHO DEL VEHÍCULO
(PARA INSTALACIÓN SOBRE TECHOS SIN PORTAEQUIPAJES, CONSULTE LA ETAPA 3b).
BARRAS TRANSVERSALES:
RIELES LATERALES:
EN UNA CANASTA:
Las 4 correas deberán sujetarse a
las barras transversales o torres
(2 adelante y 2 atrás).
Las correas se sujetan a cada
lado del soporte central.
Instale las correas delanteras en
la parte frontal de la canasta y las
traseras en la parte posterior.
frente del
vehículo
frente del
vehículo
frente del
vehículo
INSTALE LA MALETA PORTAEQUIPAJES ENTRE LOS RIELES O BARRAS. ¡NUNCA ENCIMA DE LAS BARRAS!
¡IMPORTANTE! NUNCA INSTALE LA MALETA EN FORMA TRANSVERSAL al vehículo – Y - ¡La
cubierta superior debe extenderse hacia el frente del vehículo!
b
PARA INSTALACIÓN SOBRE TECHOS SIN
PORTAEQUIPAJES (INSTALLACIÓN SOBRE
VEHÍCULOS SIN BARRAS NI RIELES EN EL TECHO).
Los ganchos pueden quedar al interior o al
exterior, dependiendo del tamaño del vehículo.
1033577B - 10/12
• Coloque la maleta sobre el techo del vehículo.
• Fije la correa para techo a uno de los ganchos.
• No pase la correa por las ventanas de las puertas.
• Pase la correa por el marco con las puertas abiertas.
• Fije la correa al otro gancho.
• Tire de las correas con gancho y/o de las correas
para techo.
• Apriete para asegurar la maleta.
• Asegure los extremos de la correa.
• REPITA LA OPERACIÓN PARA LA CORREA TRASERA.
ASEGURE CADA CORREA A LAS BARRAS.
• TIRE DE LOS EXTREMOS DE LAS
CORREAS PARA AJUSTAR LA
MALETA PORTAEQUIPAJES A
LAS BARRAS.
• Introduzca el extremo de la
correa en el bucle para evitar
que la correa se afloje.
• Introduzca el extremo de la
correa en el bucle para evitar
que la correa se afloje.
Utilice siempre el gancho y las bandas “velcro”
para asegurar la correa sobrante.
ABRA LA MALETA
PORTAEQUIPAJES.
Abra la maleta y despliegue
con cuidado la cubierta
superior sobre el parabrisas.
¡La cubierta
superior se debe
desplegar hacia el
frente del vehículo!
CARGUE EL EQUIPAJE.
No exceda la capacidad de carga
del techo de su vehículo.
Remítase al manual del propietario
del vehículo para informarse sobre
los límites de carga.
Distribuya el contenido de
manera uniforme.
¡NO SOBRECARGUE LA MALETA
PORTAEQUIPAJES!
CIERRE LA MALETA PORTAEQUIPAJES.
• Vuelva a colocar la cubierta
superior de la maleta.
• Cierre la maleta
completamente.
Si el cierre ofrece cierta resistencia,
verifique que la maleta no esté sobrecargada.
UNA LAS HEBILLAS DE LAS
CORREAS DE COMPRESIÓN.
1033577B - 11/12
• APRIETE LAS CUATRO
CORREAS DE COMPRESIÓN.
• Tire de los extremos de las
correas contra el contenido
de la maleta.
Alinee los cierres en el centro de
la parte posterior de la maleta.
ANTES DE SALIR DE VIAJE:
¡VERIFIQUE LA CARGA!
• La maleta debe estar cerrada y sujeta a
las barras transversales o a los rieles
laterales.
• Antes de partir, revise las correas,
hebillas y cierres.
• Mantenga las correas y las paredes de
la maleta alejadas de bordes de metal
cortantes.
Tire y empuje la maleta
portaequipajes cargada.
• Si alguna correa se mueve,
ajuste donde sea necesario.
• Verifique las correas durante su
viaje y apriételas si es necesario.
ADVERTENCIAS
ADVERTENCIA PARA EL VIAJE
Usted debe ajustar todas
las correas periódicamente
durante un viaje largo y al
finalizarlo. De no hacerlo,
puede ocasionar daños a la
propiedad, lesiones o incluso
la muerte.
• No utilice la maleta cuando soplan vientos muy fuertes.
• Posiciónela de manera que se reduzca al mínimo la
acción del viento debajo de la maleta.
• La velocidad máxima aceptada es 120 km/h (75 mph).
• La maleta debe estar derecha, nunca torcida.
• No la use con objetos frágiles, puntiagudos o pesados.
• Baje la maleta antes de entrar en garajes muy bajos o
cuando circule debajo de objetos que cuelgan a baja
altura.
• No conduzca con la maleta descargada.
LÍMITES DE PESO
peso del portaequipaje
(si se aplica)
GetOut 4.1 lbs. / 1.9 kg
GetOut Pro 7.2 lbs. / 3.3 kg
=
Contenido de
la caja
El peso máximo
permitido es 45 kg (100
lb), a menos que se
indique lo contrario.
O
la resistencia del techo del vehículo, según las especificaciones del fabricante.
SI NO DISPONE DE ESTA INFORMACIÓN, NO UTILICE ESTE PRODUCTO.
NO DESCUIDE SU MALETA CARGADA. UN CIERRE CERRADO
NO GARANTIZA UNA PROTECCIÓN CONTRA ROBOS.
USO CORRECTO DE LA MALETA PORTAEQUIPAJES
ALMACENAJE DE LA MALETA PORTAEQUIPAJES
• No maneje fuera de las carreteras.
• No instale la maleta en remolques, casas
rodantes y vehículos recreativos, a menos
que tengan un portaequipajes instalado.
Si bien el producto tiene un acolchado
protector, esto no evitará las abolladuras
causadas por cargar excesivamente la
maleta, asegurarla deficientemente o
manejar fuera de la carretera.
• Reemplace todas las correas gastadas o
deshilachadas.
• Retire la maleta antes de entrar en un
lavadero automático de vehículos.
• No cargue la maleta excesivamente.
• No deje la maleta vacía instalada en el vehículo.
• Una maleta vacía sobre un vehículo en movimiento, podría causar daños al techo.
• Límpiela siempre, luego de cada viaje, con una esponja húmeda y detergente
suave sin aditivos (como alcohol, cloro o amoniaco) y séquela completamente al
aire.
• Una vez seca, podrá enrollarla y guardarla.
• Almacene la maleta al abrigo de la luz solar directa y de condiciones
atmosféricas extremas.
Se recomienda pedir ayuda para bajar la maleta del
techo cuando está cargada completamente con el
fin de evitar lesiones corporales o daños al vehículo.
RESISTENCIA AL CLIMA
• Cubra siempre con material impermeable todo objeto que necesite
mantenerse seco, antes de colocarlo dentro de la maleta portaequipajes.
• Mantenga la solapa del cierre de cremallera bajada durante el viaje.
• En días lluviosos, es posible que la sección de la correa para techos sin
portaequipajes que se encuentra dentro del vehículo se humedezca por
capilaridad.
1033577B - 12/12
MANTENIMIENTO
Utilice una esponja húmeda y
detergente suave sin aditivos (como
alcohol, cloro o amoniaco) para limpiar
la maleta portaequipajes. Séquela
completamente al aire.
K EE P T HESE I N S T R U C T I O N S