1
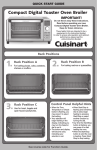
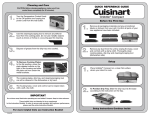
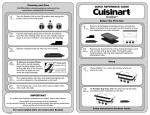
All products are trademarks of Nostalgia Products Group, LLC.
Worldwide design & utility patented or patents pending.
© 2010 Nostalgia Products Group, LLC.
www.nostalgia electrics.com
(rev. 07/21/10)
EQM200
Electric Quesadilla Maker
Instructions and Recipes
1
ENGLISH
CONTENTS
IMPORTANT SAFEGUARDS . . . . . . . . . . . . . . . . . . . 3
INTRODUCTION . . . . . . . . . . . . . . . . . . . . . . . . . 4
PARTS & ASSEMBLY . . . . . . . . . . . . . . . . . . . . . . . 5
HOW TO OPERATE . . . . . . . . . . . . . . . . . . . . . . . . 5
HELPFUL TIPS . . . . . . . . . . . . . . . . . . . . . . . . . . 7
CLEANING & MAINTENANCE . . . . . . . . . . . . . . . . . . 8
RECIPES . . . . . . . . . . . . . . . . . . . . . . . . . . . . . 9
RETURNS & WARRANTY . . . . . . . . . . . . . . . . . . . . 12
SAFETY
Your safety and the safety of others is very important.
We have provided many important safety messages in this manual and
on your appliance. Always read and obey all safety messages.
This is the safety alert symbol.
This symbol alerts you to potential hazards
that can kill or hurt you and others.
All safety messages will follow the safety alert symbol.
All safety messages will tell you what the potential hazard
is, tell you how to reduce the chance of injury, and tell you
what can happen if the instructions are not followed.
Appliance Specifications:
8” (20.3CM) : 120 Volts , 60 Hz, 900 Watts
2
ENGLISH
IMPORTANT PRECAUTIONS . . . . . . . . . . . . . . . . . . 3
ENGLISH
IMPORTANT PRECAUTIONS
1.
NEVER immerse appliance or cord in water.
2.
NEVER use near water.
3.
NEVER use an abrasive sponge or cloth on the exterior of the appliance.
4.
NEVER leave appliance unattended while in use.
5.
NEVER place anything other than what is intended to be cooked in the appliance.
6.
Always use ELECTRIC QUESADILLA MAKER with Drip Tray in place.
7.
Unplug appliance from outlet when not in use and when cleaning.
8.
DO NOT place appliance in dishwasher.
9.
Keep out of reach of children.
10. This appliance is NOT A TOY.
11. This appliance is not intended for use by young children nor
the cognitively challenged without supervision.
12. Young children should be supervised to ensure that
they do not play with the appliance.
IMPORTANT SAFEGUARDS
When using electrical appliances, basic safety precautions
should always be followed, including:
1. Read all instructions before operating this appliance.
2.
DO NOT touch hot surfaces. Use Handles.
3.
DO NOT use outdoors. FOR HOUSEHOLD USE ONLY.
4.
To protect against risk of electrical shock, do not immerse
cord, plugs nor appliance in water or any other liquid.
5.
DO NOT operate any appliance with a damaged cord or plug, after the
appliance malfunctions, or if it is dropped or damaged in any manner.
Return the appliance to the nearest authorized service facility for
examination, or to a repair shop for electrical or mechanical adjustment.
6.
The appliance manufacturer does not recommend the use of accessory
attachments other than what is supplied with the unit. They may cause injuries.
7.
When any appliance is used by or near children, adult
supervision is strongly recommended.
8.
DO NOT place on or near a hot gas or electric burner, nor in a heated oven.
9.
DO NOT overload wall outlet, extension cords, or integral convenience
receptacles as this can result in a risk of fire or electric shock.
10. This appliance should not be used for purposes other than
stated in the instructions accompanying this appliance.
3
11. DO NOT leave unit unattended while in use or when plugged into an outlet.
13. To reduce the risk resulting from becoming entangled or tripping
over a long cord, a short power supply cord is provided.
14. Extreme caution should be used when moving an appliance with hot food.
15. The marked electrical rating of an extension cord should be at
least as great as the electrical rating of the appliance. Electrical
extension cords can be used if care is exercised in their use.
16. Do not attempt to service this appliance yourself, as opening or
removing covers may expose you to dangerous voltage or other
hazards. Refer all servicing to qualified service personnel.
17. Extreme caution must be used when opening and closing the Lid on this unit. Use
an oven mitt or potholder when opening and closing the Lid for additional safety.
18. Check the Drip Tray frequently during cooking sessions to prevent overflow.
19. SAVE THESE INSTRUCTIONS!
INTRODUCTION
Thank you for purchasing the ELECTRIC QUESADILLA MAKER!
We are confident that you, your family and friends will enjoy
the fun food experience of creating unique and delicious
quesadillas with your ELECTRIC QUESADILLA MAKER.
•
Delight in using a variety of meats, cheeses and vegetables in your quesadilla
•
Enjoy your quesadillas crispy on the outside and hot ‘n juicy on the
inside! (not soft and soggy like the type made in the microwave)
•
Unique plate design has pockets that create sectional
pieces to seal in the flavorful ingredients
•
Red Power Light (on/off) and Green Ready Light
•
Nonstick coating
•
Removable Drip Tray
•
Stand on edge storage
•
Recipes (Included)
•
Cook time is only 3-7 minutes
•
Easy to use, easy to clean
4
ENGLISH
12. Unplug from outlet when not in use and before removing parts for cleaning. Allow
to cool before putting on or taking off parts and before cleaning the appliance.
ENGLISH
PARTS & ASSEMBLY
Locking Lid
Nonstick Cooking Surface
Drip Tray
HOW TO OPERATE
1.
Before first use, wipe down all surfaces with a damp cloth and dry.
2.
The Cooking Surface should be lightly coated with a small amount
of vegetable oil. This can be applied with a paper towel. The
oil will help protect the Nonstick Cooking Surface. This should
be done periodically to maintain the non-stick quality.
3.
Find a dry, suitable, level surface near an electrical outlet.
4.
Preheat the appliance by closing the Lid and plugging into an electrical outlet.
5.
When the power is on, the Red Power Light will come on. The Green
Ready Light will stay off while the appliance is preheating.
6.
While the appliance is preheating, you may prepare the
ingredients for your homemade quesadilla.
7.
When the appliance is hot and ready to cook your
quesadilla, the Green Ready Light will come on.
8.
REMINDER: NEVER leave the appliance unattended.
5
9.
ENGLISH
The appliance should preheat for a minimum of 3-7 minutes. During this
time, you may notice slight smoking or a slight odor; this is normal with
most new appliances. The smoking and odor is caused by the residues
burning off the Cooking Surface and the Heating Element. Allow the
appliance to preheat until smoke and odor no longer exists. The Green
Ready Light will turn on when the appliance is ready to cook.
10. Slide the Drip Tray under the front of the appliance.
11. Raise the quesadilla maker Lid, always using the front
Handle to prevent accidental burns. For additional safety
use an oven mitt or a potholder to open the Lid.
12. Place a tortilla, centered, on the lower Cooking Surface.
13. Add desired ingredients evenly on top of the bottom tortilla. When
all ingredients have been added, top with the second tortilla.
14. Close the Lid using a potholder or oven mitt.
15. Lock the Lid after lowering.
16. There are two locking positions for the Lid:
POSITION 1
POSITION 2
17. Lock Lid in Position 1 for thinner quesadillas. Lock Lid in
Position 2 for more thickly stuffed quesadillas.
18. DO NOT force the Lid to lock.
19. Steam may be released from appliance during cooking. For your safety,
avoid contact with steam, as it is very hot and can cause burns.
20. The cooking time will range between 3-7 minutes, depending
on the type of fillings, the amount of fillings and personal taste.
DO NOT overcook! This will cause the cheese and other food
fillings used to melt excessively and run out of tortillas.
21. Once the quesadilla has completed cooking, raise the Lid with a
potholder or oven mitt. Remove the quesadilla from the Cooking Surface
with a flat plastic or wooden utensil. DO NOT use metal utensils, as
they may scratch and damage the Nonstick Cooking Surface.
22. If cooking more than one quesadilla in a session, after removal of the first
quesadilla, lower the Lid to maintain heat until ready to cook the next quesadilla.
23. After unplugging the appliance, make sure the Red Power
Light is off to prevent any sparking from the outlet.
24. Once the appliance is cool, remove the Drip Tray to empty and clean.
6
ENGLISH
HELPFUL TIPS
NEVER leave the unit unattended while operating.
1.
Tortillas are recommended for use in your ELECTRIC QUESADILLA
MAKER. Make sure they are fresh tortillas, not old nor stale.
2.
Make sure fillings are evenly distributed on the bottom tortilla
to about ½ inch from the edge, so that the edges of the tortilla
can seal together and ingredients stay inside of tortillas.
3.
Use soft ingredients: shredded cheeses, prepared salsa, and thinly cut or
shredded cooked meat, chicken and vegetables. Never use anything with bones
or pits included, nor anything uncooked such as raw meats, chicken, etc.
4.
Avoid processed cheeses as they liquefy quickly
and will drain out of the quesadilla.
5.
Do not use more than ¼ cup of shredded cheese or ½ cup of
salsa, as they will leak out while cooking your quesadilla.
6.
The average time for cooking a quesadilla, if not overfilled, is 3-7 minutes.
7.
Crisping of the tortilla occurs while cooking. Therefore,
less time cooked = less crisping.
8.
Longer cooking will create a crispier quesadilla. DO NOT overcook quesadilla.
9.
NEVER force the Lid to lock, this could result in damage to the hinge of the Lid.
10. Always have the Drip Tray in place when cooking a quesadilla. Check the
Drip Tray frequently during cooking sessions to prevent overflow.
11. Should melting occur that causes leakage of the tortillas,
gently wipe up melted cheese, etc. from the Nonstick Cooking
Surface before cooking the next quesadilla. This will prevent
burning or scorching of previously melted cheeses, etc.
12. You can reheat previously cooked quesadillas by placing the quesadilla
on the preheated unit, lining up the grill marks on the quesadilla with
the Plate Pockets, lowering the Lid, and reheating for 1-3 minutes.
13. Always allow the appliance to cool before removing the
Drip Tray and wiping out the interior for cleaning.
14. Your quesadilla has been overtsuffed if it looks like this:
No Indentation
From Plate
Pockets
Tortillas Do
Not Seal
7
15. To prevent overstuffing, make sure that you do not fill
tortilla on lower plate past the inner rim:
ENGLISH
Inner
Rim
Do Not Fill to
This Point
16. Also, make sure that Lid is locked in correct position (see How
To Operate) to ensure that tortillas seal properly.
CLEANING & MAINTENANCE
Please take care of your ELECTRIC QUESADILLA MAKER by following
these simple instructions and precautions. Cleaning is a snap.
•
Disconnect from the electrical outlet by unplugging the appliance.
•
Make sure the appliance is cool before removing the Drip Tray.
•
Empty the Drip Tray, then clean it in hot or warm, soapy water. Rinse and dry.
•
Wipe the Nonstick Cooking Surface with a damp, nonabrasive cloth or paper towel and dry.
•
Wipe the exterior with a damp, non-abrasive cloth and dry.
It is that simple. Remember to periodically coat the Cooking Surface with
vegetable oil to preserve the non-stick finish. This also helps the crisping process.
8
ENGLISH
RECIPES
With The ELECTRIC QUESADILLA MAKER, you can use your imagination and
choose your favorite ingredients to create your very own homemade quesadilla.
You can even create two different types of quesadillas at the same time by
adding your favorite ingredients to one half of a tortilla and folding it. Then
add ingredients to one half of a second tortilla and fold it. Place the two halved
tortillas on the Cooking Surface, filling out the space of one whole tortilla.
Close the Lid and cook for 3 - 5 minutes. When done, separate the two halves
and serve. Be creative and ENJOY your ELECTRIC QUESADILLA MAKER!
BASIC CHEESE QUESADILLA
•
2 Flour Tortillas
•
¼ Cup finely
shredded Cheese
(Cheddar,
Monterey Jack or
your preference)
•
•
½ Cup prepared
Salsa (Note:
You may want to
drain off some of
liquid if runny)
Guacamole or
small chunks of
Avocado (optional)
Preheat the ELECTRIC QUESADILLA
MAKER as directed.
Place 1 tortilla on the lower Cooking Surface.
Evenly distribute your choice of cheese(s) on
tortilla (up to a ½ inch from the edge of the tortilla).
Top with salsa, spreading evenly over cheese.
Add guacamole or avocado, if desired, by
spreading evenly over cheese and salsa.
Top with the second tortilla.
Close the Lid and cook for 3-7 minutes, depending
on desired crispness and thickness of fillings.
Open Lid with a pot holder or oven mitt.
Remove with wooden or plastic utensil. Place
on plate and serve with additional salsa,
if desired, and top with sour cream.
BREAKFAST QUESADILLA
•
2 Tortillas
•
¼ Cup scrambled
Eggs
•
¼ Cup precooked
and chopped
Breakfast Sausage
•
¼ Cup Salsa
Spread scrambled eggs evenly to within ½ inch
of the edge of the tortilla. Evenly distribute
sausage bits. Spread salsa evenly, and top by
sprinkling the Cheddar cheese evenly over all.
•
¼ Cup finely
shredded Cheddar
Cheese
Place the other tortilla on top and close the Lid. Cook
as directed for 3-7 minutes. Open Lid with pot holder
or oven mitt; serve with salsa or picante sauce.
9
Preheat the ELECTRIC QUESADILLA
MAKER as directed.
Place one tortilla on the lower Cooking Surface.
BASIC QUESADILLA PLUS
2 Flour Tortillas
•
¼ Cup finely
shredded Cheese
(Cheddar,
Monterey Jack or
your preference)
•
•
•
¼ Cup cooked
Chicken, Beef
or your favorite
Meat torn into thin
shreds or pieces.
¼ Cup prepared
Salsa
Guacamole or
small chunks of
Avocado (optional)
Preheat the ELECTRIC QUESADILLA
MAKER as directed.
Place 1 tortilla on the lower Cooking Surface. Evenly
distribute your choice of cheese(s) on the tortilla
(up to a ½ inch from the edge of the tortilla).
Top with an evenly distributed
amount of meat or chicken.
Evenly distribute guacamole or avocado,
if desired, over cheese and salsa.
Top with second tortilla.
Close the Lid and cook for 3-7 minutes, depending
on desired crispness and thickness of fillings.
Open Lid with a potholder or oven mitt.
Remove with wooden or plastic utensil.
Place on plate and serve with additional
prepared salsa, and sour cream.
VEGGIE QUESADILLA
•
2 Tortillas
•
¼ to ½ Cup
precooked or
thawed frozen Bell
Pepper, Onions or
any combination
of your favorite
Vegetable.
•
½ tsp. Mexican or
Fajita seasonings.
•
¼ Cup shredded
Cheddar Cheese
and/or prepared
Salsa.
Preheat the ELECTRIC QUESADILLA
MAKER as directed.
Combine the vegetables and the
seasonings in a bowl.
Place one tortilla on the lower Cooking Surface.
Evenly spread the combined vegetables
and seasoning, up to a ½ inch from
the edge of the tortilla.
Close the Lid and cook for 3-7 minutes depending
on desired crispness and thickness of fillings.
Cut into triangles; serve with sour cream and salsa.
10
ENGLISH
•
ENGLISH
PB & J QUESADILLA
•
2 Tortillas
•
2 Tbsp Peanut
Butter
•
1-2 Tbsp Jam or
Fruit Preserves
Preheat the ELECTRIC QUESADILLA
MAKER as directed.
Evenly spread a thick layer of peanut butter onto
one tortilla and an even layer of your choice of
either jam or fruit preserves onto the other tortilla.
Carefully place first tortilla on the lower
cooking surface, peanut butter side up.
Place the other tortilla on top, jam side down.
Close the cover and cook for 3-7 minutes
depending on the thickness, and preference
of crispness desired. Cut into triangles; serve
with a drizzle of honey for extra sweetness.
Feel free to add slices of fruit, such as
bananas, if you wish to be creative.
DELICIOUS DESSERT QUESADILLA
•
2 Tortillas
•
2 Tbsp Nutella®
•
¼ Cup thinly
sliced Bananas
•
½ Cup
Strawberries
•
1 Tsp Powdered
Sugar
Preheat the ELECTRIC QUESADILLA
MAKER as directed.
Spread a thick layer of Nutella® onto one tortilla.
Carefully place tortilla with Nutella® onto the
lower Cooking Surface, Nutella® side up.
Spread banana slices evenly to within
½ inch of the edge of the tortilla.
Place the other tortilla on top and close the
Lid. Close the Lid and cook for 3-7 minutes.
Open Lid with potholder or oven mitt.
Garnish with strawberries and sprinkle
lightly with powdered sugar.
11
RETURNS & WARRANTY
ENGLISH
SHOULD YOUR UNIT NOT WORK OR IS DAMAGED WHEN
YOU FIRST TAKE IT OUT OF THE BOX, PLEASE RETURN
IT TO THE PLACE OF PURCHASE IMMEDIATELY.
ELECTRIC QUESADILLA MAKER / EQM200
Should you have any questions, please contact us via email or at the
customer service number listed below between the hours of 8:00 AM
and 5:00 PM, Monday through Friday, Central Standard Time.
Distributed by:
Nostalgia Products Group LLC
1471 Partnership Dr.
Green Bay, WI 54304-5685
Customer Service
Phone: (920) 347-9122
Web: www.nostalgiaelectrics.com
Customer Service Inquiry
To submit a Customer Service inquiry, go to www.nostalgiaelectrics.com and
fill out the Customer Service Inquiry form and click the Submit button.
A representative will contact you as soon as possible.
This appliance is designed and built to provide many years of satisfactory
performance under normal household use. The distributor pledges to the
original owner that should there be any defects in material or workmanship
during the first 90 days of purchase, we will repair or replace the unit at
our option. Our pledge does not apply to damages caused by shipping,
mishandling or unit being dropped. A product deemed defective either from
manufacturing or being mishandled is up to the distributor’s discretion.
In order to obtain service under this warranty, please contact Nostalgia
Products Group, LLC at the telephone number listed above or by filling
out the Customer Service Inquiry Form located at www.nostalgiaelectrics.
com. This warranty does not apply to re-manufactured merchandise.
Please read these instructions carefully. Failure to comply with these instructions,
damages caused by improper replacement parts, abuse or misuse will void this
pledge to you and is being made in place of all other expressed warranties.
12