1
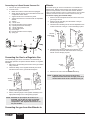
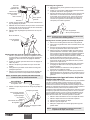
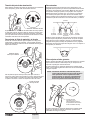
Converting to a Single Pin Trigger
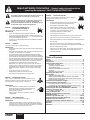
Note: Insert the check valve into the air tube so that the
arrow on the valve points toward the gun.
GuN
The trigger on your HVLP spray gun can be converted to a
single pin setup for a softer pull. Trigger pull is reduced by
removing the upper trigger pin and operating the gun with only
the lower trigger pin in place. This setup reduces finger fatigue
and provides greater control when spraying thin, light viscosity
materials such as stains, varnishes, and sealers.
Valve Seal
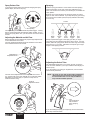
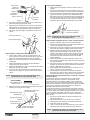
1. Remove the retaining clip
on the upper trigger pin
by placing the flat edge
of a screwdriver between
the clip and the pin and
gently prying it off.
2. Pull the trigger pin out
from the opposite side of
the gun.
Using a Pressure
Feed System
Air Tube
Check Valve
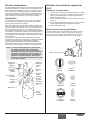
To increase spray time between material refills, your HVLP spray
gun can be connected to a larger material pressure pot and air
compressor.
Air Tube
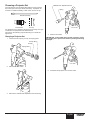
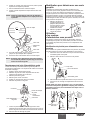
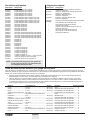
Converting the Gun to Pressure Feed
Before using a pressure feed system, the spray gun must be
converted to a pressure fed gun.
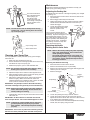
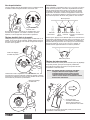
1. Loosen the retaining nut using a wrench and remove the
one quart cup assembly.
2. Pull the air tube off of the air tube fitting on the spray gun.
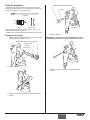
9. If the lower air tube is too long, trim the tube so that it fits
the gun.
10. Push the lower air tube onto the bottom of the check valve.
Note: Make sure to attach the shorter air tube to the
gun fitting and the longer air tube to the cup lid
air nipple.
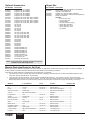
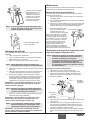
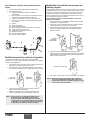
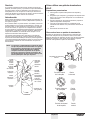
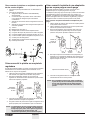
Replacing the Cup Gasket
The cup gasket must be replaced periodically due to normal wear.
It is important to inspect the cup gasket during each cleaning.
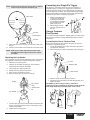
1. Release the cup locking lever.
2. Hold the cup and twist the spray gun in the direction
indicated by the arrows on the bridge.
3. Lift the spray gun away from the cup.
4. Pull the worn cup gasket out of the lid.
5. Press a new cup gasket into the lid.
6. Place the spray gun onto the top of the cup.
Air Tube
Retaining Nut
Cup Assembly
3. Remove the air tube fitting using a wrench.
4. Thread the set screw into the air tube fitting location and
tighten into place.
Optional (in place of steps 3 and 4): If desired, a
temporary cap (also included) can be used to close off the air
tube fitting rather than performing steps 3 and 4 above.
Bridge
Cup Locking
Lever
Cup Gasket
Swivel Lever
Lid
Air Tube
Fitting
7. Turn the spray gun opposite the direction indicated by the
arrows on the bridge until the pegs on the cup are in the
notches of the bridge.
8. Tighten the cup locking lever.
© Titan Tool Inc. All rights reserved.
Set
Screw
7
Air Tube
Cap
English