1
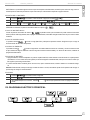
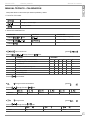
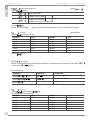
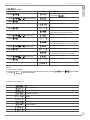
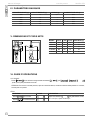
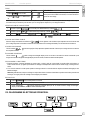
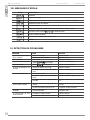
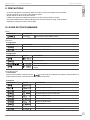
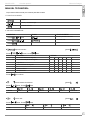
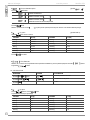
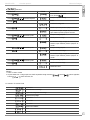
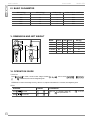
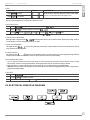
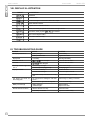
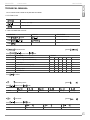
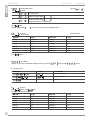
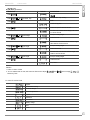
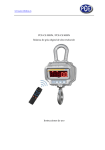
Manual de usuario
Manuel d’usager
User’s guide
STR
Gancho pesador
Crochet peseur
Crane scale
INDEX GÉNÉRALE
GENERAL INDEX
ÍNDICE
I.
Guía de seguridad
4
II.
Características del producto
5
III.
Especificaciones
5
IV.
Parámetros básicos
6
V.
Dimensiones y peso neto
6
VI.
Guía de operaciones
6
VII.
Diagrama eléctrico principal
7
VIII.
IIlustración de la pantalla
8
IX.
Detección de problemas
8
X.
Precauciones
8
XI.
Guía de control remoto
9
Manual técnico
11
I.
Guide de sécurité
14
II.
Caractéristiques du produit
15
ENG FR
ES
ÍNDICE GENERAL
INDEX
III.
Spécifications
15
IV.
Paramètres basiques
16
V.
Dimensions et poids net
16
VI.
Guide d’operations
16
VII.
Diagramme électrique principal
17
VIII.
Illustration d’écran
18
IX.
Détection de problèmes
18
X.
Précautions
19
XI.
Guide de télecommande
19
Manuel technicien
21
I.
Safety guide
24
II.
Product characteristics
25
III.
Main technical data
25
IV.
Basics parameters
26
V.
INDEX
Dimension and net weight
26
VI.
Operation guide
26
VII.
Electrical circuit diagram
27
VIII.
Display illustration
28
IX.
Troubleshooting guide
28
X.
Precaution
29
XI.
Remote controller guide
29
Technical manual
31
Declaración de conformidad
Déclaration de conformité
Declaration of conformity
34
3
ENG FR
ES
Manual de usuario
Gancho pesador
Modelo STR
I. GUÍA DE SEGURIDAD
Lea atentamente las siguientes instrucciones y consejos antes de utilizar esta balanza.
▪ El instrumento con garantia NO PUEDE SER ABIERTO POR EL USUARIO, bajo ningún motivo. Cada tentativa de reparación o modificación de la unidad puede exponer al usuario a peligro de descarga eléctrica y anulará toda aplicación de la garantía. Cualquier
problema con la unidad o el sistema debe ser notificado al fabricante o al distribuidor donde ha sido comprado.
▪ El dinamómetro se debe utilizar exclusivamente para mesurar a tracción. Las cargas móviles que puedan provocar tensiones y torsiones deben ser suspendidas con elementos flexibles o giratorios.
▪ Coloque la carga sin provocar impacto.
▪ No pasar ni detenerse debajo de las cargas suspendidas.
▪ No exponerlo ni utilizarzo en caso de lluvia o humedad.
▪ No derramar líquidos sobre el indicador.
▪ No utilizar disolventes para limpiar el indicador.
▪ No exponer el instrumento a la luz directa del sol o cerca de fuentes de calor.
▪ No instalarlo en atmósferas con riesgo de explosión.
▪ No exponer a campos magnéticos o eléctricos.
▪ No tirar las baterías al fuego porqué pueden explotar.
▪ No dispersar las baterías a la atmósfera.
▪ Está completamente prohibido sobrecargar el aparato.
▪ Evitar las pesadas largas, para evitar un uso excesivo de la célula de carga. El uso excesivo de la célula de carga puede reducir la
durada de la vida y el buen funcionamiento del gancho y también puede disminuir la precisión del gancho.
▪ Revisar periódicamente los anclajes del gancho y el gancho.
▪ Para obtener un uso máximo de la batería recárguela periódicamente, aunque no haya sido utilizada durante mucho tiempo.
▪ No intente reparar este aparato usted mismo.
▪ Utilice únicamente el cargador de batería suministrado con la balanza.
▪ Verifique el nivel de carga de la batería antes y después de la utilización y recárguela antes de utilizar el gancho pesador.
4
Gancho pesador
Manual de usuario
II. CARACTERÍSTICAS DEL PRODUCTO
MODELO
PANTALLA
CARACTERÍSTICAS
STR
LED 30mm (1.2”)
Usos generales.
ENG FR
ES
Modelo STR
Alta calidad: El proceso de gestión se realiza siguiendo la regulación OIML R76 , GB/T11883-2002 y con la obtención del certificado
europeo (CE)
Instalación de seguridad: Carcasa de aluminio fundido, gancho y grilletes de alta intensidad, célula de carga especial para la instalación de seguridad.
Alta fiabilidad: Uso de componentes altamente cualificados en PCB para asegurar una perdurable estabilidad.
Extensas aplicaciones: pantalla de carácteres de 30mm de alto, tiro de vista distancia de 25m, uso apto para industria de almacenaje, industria textil, industria metalúrgica, etc.
Operaciones simples: revisa la potencia de batería automáticamente, control remoto sin cable, espacio separado para batería,
volumen reducido, y portátil.
Funciones completas: Conversión Kg/lb, Hold, Tara, opción de división, regulación de estabilidad, acumulación/ búsqueda, conversión peso bruto/neto, parámetro de regulación etc.
III. ESPECIFICACIONES
Clase de precisión
Pantalla
Rango de tara
Tiempo estable
Indicación de sobrecarga
OIML clase III
5 dígitos LCD/LED de 30mm (1.2”)
Capacidad completa
≤ 10 segundos
100% capacidad máxima +9e
Carga máxima de seguridad
125% capacidad máxima
Carga final
400% capacidad másima
Duración batería
Tipo de batería (STR - A / B / G)
Adaptador
Temperatura de funcionamiento
Humedad de funcionamiento
Distancia de control remoto
Batería de control remoto
≤ 80 horas
Batería de ácido de plomo completamente sellada, 6V/10Ah
DC9V/1500mA
-10ºC ~ +40ºC
≤ 90% RH bajo 20ºC
Min. 10m
5# baterías, 1.5V x 2
5
ENG FR
ES
Manual de usuario
Gancho pesador
Modelo STR
IV. PARÁMETROS BÁSICOS
CAPACIDAD MÁXIMA (kg)
1000
3000
5000
10000
15000
CAPACIDAD MÍNIMA (kg)
10
20
40
100
100
DIVISIÓN (kg)
0,5
1
2
5
5
CUENTAS TOTALES PANTALLA (n)
2000
3000
2500
2000
3000
V. DIMENSIONES Y PESO NETO
MODELO
A (mm) B (mm) C (mm) PESO NETO (kg)
STR1000
420
65
35
12
STR3000
STR5000
600
80
45
14
730
100
55
24
STR10000
850
120
70
44
STR15000
900
140
70
60
VI. GUÍA DE OPERACIONES
ENCENDIDO
Presionar
-
en la balanza, mostrará la potencia actual de la batería
hasta este momento, la balanza puede pesar los productos.
, después mostrará
-
ATENCIÓN: Para asegurar una alta precisión, después de encender la balanza, mantenga la balanza estable durante 3 a 5 minutos,
después pese los productos.
CERO
OPERACIÓN
Presione
Presione
PANTALLA
ILUSTRACIÓN
Después de encender, generalmente muestra
sino para mostrar
opere de este modo.
en la balanza.
en el control.
,
TARA
OPERACIÓN
6
PANTALLA
Presione
en la balanza.
Presione
en el control.
ILUSTRACIÓN
Presione este botón para deducir el peso del recipiente, mientras la luz “TARE” esté encendida, la balanza mostrará el peso
neto de la carga.
Gancho pesador
Manual de usuario
NOTA: Debido a que la balanza gancho deduce el peso del recipiente automáticamente, mostrará el peso neto de la carga, usted no
necesita presionar esta tecla para obtener el peso neto hasta que usted cambie el recipiente o apague la balanza.
REVISIÓN DE LA BATERÍA
I
Presione
II
Presione
III
Presione
en la balanza, cuando encienda o apague, le mostrará
en control remoto, cuando apague, mostrará
, le mostrará
, presione
.
.
, le mostrará
ATENCIÓN: normalmente, la potencia de la batería debe ser superior a
ENG FR
ES
Modelo STR
, presione
para regresar.
.
AVISO DE BATERÍA BAJA
Cuando la potencia de la batería es inferior a
, la pantalla vacilará, pero la balanza aún puede continuar funcionando
hasta la potencia más baja permitida, ella se apagará automáticamente, usted debe recargar la batería otra vez para volver a utilizar
la balanza.
AVISO DE SOBRECARGA
La pantalla mostrará
cuando la carga (Neto+Tara) sobrepase la capacidad máxima. Asegúrese de que la carga se
encuentra dentro de los límites de capacidad.
AHORRO DE ENERGÍA
La pantalla mostrará
cuando la carga esté en un estado estable con exceso de 15 minutos y volverá a la lectura normal
de peso mientras la carga es cambiada. Cuando la carga se encuentra en estado estable y con exceso de 60 minutos, la balanza se
apagará automáticamente.
RECARGA DE BATERÍA
1. Apague la balanza, conecte el adaptador con potencia suplente 220V AC, inserte también el enchufe situado en la parte posterior
de la balanza. La luz se vuelve verde, ello significa que se está recargando automáticamente, hasta que la luz verde se vuelve roja.
Ello significa que la recarga ha terminado.
2. Cuando necesite utilizar la balanza gancho hora tras hora, quite la cobertura trasera, cambie la batería con una batería recargada.
Atención: Generalmente, el tiempo de recarga no debe ser inferior a 8 horas, esta balanza posee función protectora de recarga, un
período largo de recarga no dañará la batería.
APAGADO
I
Presione
II
Presione
III
Se estabiliza después de 15 minutos, mostrará
mente.
en la balanza durante 3 segundos.
en el control durante 3 segundos.
cuando hayan pasado 60 minutos se apagará automática-
VII. DIAGRAMA ELÉCTRICO PRINCIPAL
7
ENG FR
ES
Manual de usuario
Gancho pesador
Modelo STR
VIII. ILUSTRACIÓN DE PANTALLA
PANTALLA
ILUSTRACIÓN
Calibración.
Alarma de sobrecarga.
Célula de carga dañada o error de conexión, durante uso o reparación.
Entrar situación de calibración.
Examine, ocurre en la situación de la calibración.
Borrado, ocurre cuando usted opera acumulación a través de control.
Conversión, cuando usted presiona
en control remoto.
Estado actual del voltaje de la batería.
Final, cuando el parámetro de ajuste es correcto.
Apagar.
IX. DETECCIÓN DE PROBLEMAS
PROBLEMA
RAZÓN
SOLUCIÓN
Nada en la pantalla cuando
enciende la balanza.
Batería dañada.
Compruebe batería.
Contacto con la batería perdido.
Apriete el contacto.
Pantalla vacilante.
Batería baja.
Recargue la batería.
No puede encender/apagar.
Botón
No puede tarar.
Botón
La luz indicadora de recarga
no se enciende.
Cargador de batería dañado.
Compruebe el cargador.
El cargador no se ha conectado correctamente.
Inserte el enchufe otra vez.
La pantalla no se encuentra
estabilizada.
La carga es inestable.
Estabilice la carga.
El cable de célula de carga está dañado.
Compruebe y cambie la célula de carga.
La balanza se ha dejado durante un largo periodo de tiempo en ambiente húmedo.
Sitúe la balanza en un ambiente seco.
Tiempo insuficiente de calentamiento después
de encenderla.
Después de encenderla, calentarla 3-5
minutos.
Situar la balanza sobre el suelo un largo periodo
de tiempo.
La balanza debe ser colgada.
El error es grande.
La balanza no ha sido colgada adecuadamente.
Compruebe la balanza y anclaje.
La batería no se puede
recargar.
Batería dañada.
Outlet dañado.
Cambie la batería.
Cambie Outlet.
Distancia remota más corta.
La ventana del receptor está sucia.
Compruebe y limpie.
La batería del control remoto está baja.
Cambie la batería del control remoto.
La pantalla no muestra 0
cuando se retira la carga.
dañado.
dañado.
Compruebe y limpie el botón.
Compruebe y limpie el botón.
X. PRECAUCIÓN
▪ La balanza gancho es un tipo de instrumento de pesado preciso, realice con atención su uso y mantenimiento.
▪ Gire la carga y no la balanza gancho cuando sea necesario para la operación.
▪ Deje de utilizar la balanza cuando haya tormenta y lluvia
▪ Compruebe periódicamente que los clips/pins y los tornillos de la balanza gancho no estén sueltos o rotos antes de utilizarla.
▪ Cuando muestre batería baja y el LED de recarga esté rojo, por favor, compruebe la batría para ver si está dañada y cambiela con
una batería del mismo tipo.
▪ Guarde la balanza cuando ésta no sea utilizada para prevenir cargas innecesarias en el sensor de pesaje.
8
Manual de usuario
XI. GUÍA DE CONTROL REMOTO
CERO
OPERACIÓN
ILUSTRACIÓN
Muestra
ES
Gancho pesador
ENG FR
Modelo STR
sin carga, se enciende la luz “ZERO”.
TARE
1. Tara directa
OPERACIÓN
ILUSTRACIÓN
La pantalla muestra el peso neto, luces “TARE” encendidas.
La pantalla muestra el peso bruto, luces “TARE” apagadas.
2. Seleccionar el peso tara por adelantado
OPERACIÓN
PANTALLA
ILUSTRACIÓN
Peso tara actual.
Información de peso tara.
Salida, luces “TARE” encendidas, mostrará el peso neto automáticamente durante
el pesado.
Borra el peso tara.
ACUMULACIÓN
1. Acumulación
Cuando la luz “STEADY” esté encendida, presione
, puede memorizar el peso actual automáticamente y mostrar el valor
actual de acumulación, después de tres segundos, vuelve a la posición de pesado automáticamente.
2. Búsqueda
OPERACIÓN
PANTALLA
ILUSTRACIÓN
Veces de acumulación actuales.
4 dígitos frontales de peso acumulado actual.
4 dígitos traseros de peso acumulado actual.
Número de serie de pesado actual.
Vez de peso actual.
Número de serie de la última vez de pesado.
Última pesada.
-----------Buscar final y volver a la situación de pesado.
9
ENG FR
ES
Manual de usuario
Gancho pesador
Modelo STR
ATENCIÓN
1. Peso total =
kg.
2. Presione
para buscar anteriores, presione
para buscar finalización.
3. El valor acumulativo será mantenido automáticamente cuando la potencia eléctrica se detiene, por favor presione
antes
de la acumulación, para borrar el valor acumulativo antiguo, en caso de error.
4. Después de que usted retire los productos, por favor espere hasta que la balanza muestre
, a continuación opere la
próxima acumulación. De otra manera, la acumulación no és válida.
HOLD
OPERACIÓN
ILUSTRACIÓN
Mantiene el peso, luz “HOLD” encendida.
Cambiar a situación de pesado, luz “HOLD” apagada.
BORRADO
OPERACIÓN
ILUSTRACIÓN
Muestra
Confirmar borrado.
Cancelar borrado.
PANTALLA DE POTENCIA
OPERACIÓN
PANTALLA
ILUSTRACIÓN
Muestra la potencia actual de la batería.
Regresa a la situación de pesado.
CONVERSIÓN DE UNIDADES KG/LB
OPERACIÓN
ILUSTRACIÓN
Mostrará nueva unidad (por ejemplo: lb).
Volver a la vieja unidad (por ejemplo: kg).
APAGADO
OPERACIÓN
PANTALLA
ILUSTRACIÓN
Presine la tecla
hasta que muestre
.
ATENCIÓN
1. Por favor vigile que el control remoto no sufra ningún golpe.
2. Por favor, cambie la batería del control si la distancia válida entre el control y la balanza es inferior a 6 metros.
3. Por favor, limpie la ventana del recibidor debajo de la pantalla de la balanza periódicamente para que no acumule suciedad en
ella.
10
Gancho pesador
Manual de usuario
ES
Modelo STR
ENG FR
MANUAL TÉCNICO : CALIBRACIÓN
Usted puede utilizar el control remoto para instalar el parámetro y calibrar.
I. FUNCIÓN TECLADO
Mover →..
Escoger ↑ introducir dígito.
Entrar y confirmar.
II. ESCOGER PARÁMETRO
OPERACIÓN
PANTALLA
Presionar
ACLARACIÓN
Presionar durante 5 segundos.
juntos
Introducir código.
Presionar
Enter
Presionar
■
Opción de area cero
Presionar
(general
Escoger, Presionar
Enter.
FUNCIÓN
OPCIONES
A
Escoger el rango cero manualmente
0
1
2
3
4
5
B
Escoger rango cero automáticamente
0
1
2
3
4
5
Cap máx. %
0
2
4
10
20
100
Escoger búsqueda de rango cero
0
1
2
3
4
5
d
0
0.5
1
1.5
2
2.5
Velocidad pantalla
0
1
2
Tiempo/Segundos
6
12
22
C
D
Presionar
■
para confirmar.
Escoger oscilación de resistencia
Presionar
Resultado
■
)
Escoger, Presionar
Pequeño
(general
Enter.
General
General
Fuerte
Escoger unidad
Fuerte
Más fuerte
(general
Presionar
Escoger, Presinar
Unidad
kg
)
)
Enter.
lb
Otras
11
Gancho pesador
Modelo STR
ENG FR
ES
Manual de usuario
■
Presione
Cerrar método de opciones
Opciones,
(general
Cerrar manualmente.
Estable 15 minutos, pantalla
.
Estable 15 minutos, pantalla
.
Estable 60 minutos cerrar automáticamente..
Presionar
Enter.
Atención: cuando la pantalla
■
Presionar
, usted puede presionar cualquier tecla para volver a la situación inicial de pesado.
: (d) opción
para escoger la división.
(general OIML III)
CAP MAX
d (kg)
CAP MAX
d (kg)
100 kg
0.02/0.05
3000 kg
0.5/1
200 kg
0.05/0.1
5000 kg
1/2
300 kg
0.05/0.1
10000 kg
2/5
500 kg
0.1/0.2
15000 kg
5/10
1000 kg
0.2/0.5
20000 kg
5/10
2000 kg
0.5/1
30000 kg
5/10
Presionar
Entrar
■
: Final, Volver
Atención: Si usted necesita finalizar el parámentro de instalación con anterioridad, presione durante unos segundos
, cuando aparezca
, libere.
III.CALIBRACIÓN
OPERACIÓN
Presionar
PANTALLA
ELUCIDACIÓN
Presione durante 5 segundos
juntos
Introduzca la contraseña
Presionar
Enter
Presionar
■
: (e) opción
Presione
Opciones, Presione
La especificación de cada capacidad (e).
12
Enter.
CAP MAX
d (kg)
CAP MAX
d (kg)
100 kg
0.05
3000 kg
1
200 kg
0.1
5000 kg
2
300 kg
0.1
10000 kg
5
500 kg
0.2
15000 kg
5
1000 kg
0.5
20000 kg
10
2000 kg
1
30000 kg
10
)
Gancho pesador
Manual de usuario
ES
Modelo STR
Calibración
OPERACIÓN
PANTALLA
ELUCIDACIÓN
Pantalla mostrará Cap original
Si ok, Presione
Presionar
Presionar
ENG FR
■
, Introduzca Cap Max.
Ejemplo: Cap Max. 5000kg
Entrar
Presionar
Confirme la carga vacía
Comprueve el punto cero durante varios segundos
Presionar
La primera carga, cargue el peso estándard, después estabilice durante varios segundos.
Presionar
Introduzca Peso
Ejemplo: 1000kg de peso
Comprueve primero la carga
Presionar
La segunda carga, cargue el segundo peso estándard, después estabilice durante varios segundos.
Presionar
Introduzca peso
Ejemplo: 3000kg de peso
Comprueve la segunda carga
Presionar
La tercera carga, cargue el tercer peso estándard,
después estabilice durante varios segundos.
Presionar
Introduzca peso
Ejemplo: 5000kg de peso
Comprueve tercera carga
Presionar
Vuelva a final
Atención:
1. LOAd1 < LOAd2 < LOAd3
2. Usted puede calibrar con 1 carga, después de comprobar la primera carga y mostrar
en pantalla
, libere la tecla, finalice.
presinar
, cuando aparezca
IV. SEÑAL ELUCIDACIÓN
Ajustes
Aviso de sobrecarga
Célula de carga dañada
Introducir los ajustes
Ajustes
Borrado
Conversión
Potencia batería
Final
Cerrar
13
ENG FR
ES
Manuel d’usager
Crochet peseur
Modèle STR
I. CONSIGNES DE SÉCURITÉ
Lire attentivement les suivantes instructions et conseils avant d’utiliser cette balance.
▪ L’instrument sous garantie NE PEUT PAS ÊTRE OUVERT PAR L’UTILISATEUR, sous aucun motif. Chaque tentative réparation ou
modification de l’unité peut exposer l’utilisateur au danger de décharge électrique et annulera toute application de la garantie. Tout
problème avec l’unité ou avec le système doit être notifié au fabricant ou au distributeur où il a été acheté.
▪ Le dynamòmeter doit exclusivement être utilisé pour mesurer la traction. Des charges mobiles qui peuvent provoquer des tensions et
des torsions doivent être suspendues avec des éléments flexibles ou giratoires.
▪ Placer la charge sans provoquer impact.
▪ Ne pas passer ni être arrêté sous la charge suspendue.
▪ Ne pas exposer ou utiliser en cas de pluie ou d’humidité.
▪ Ne pas renverser de liquides sur l’indicateur.
▪ Ne pas utiliser de solvants pour nettoyer l’indicateur.
▪ Ne pas exposer l’instrument à la lumière directe du soleil ou près de sources de chaleur.
▪ Ne pas installer dans des atmosphères au risque d’explosion.
▪ Ne pas exposer à des champs magnétiques ou de forts électriques.
▪ Ne pas jeter les batteries au feu puisqu’ils pourraient exploser.
▪ Ne pas disperser les batteries dans l’atmosphère.
▪ Il est strictement interdit de surcharger cet appareil.
▪ Éviter les longues durées du pesage, pour éviter une usure excessive du capteur. L’usure excessive du capteur peut réduire la durée
de vie et le bon fonctionnement du crochet et il peut aussi diminuer la précision du crochet.
▪ Vérifier périodiquement les liens et le crochet.
▪ Pour obtenir une utilisation maximale de la batterie rechargez-les périodiquement, même si elles n’ont pas été utilisées pendant
longtemps.
▪ N’essayer pas de réparer cet appareil vous-même.
▪ Utiliser exclusivement le chargeur de batterie joint avec la b alance.
▪ Vérifier le niveau de recharge de la batterie avant et après l’utilisitation et recharger avant d’utiliser le crochet peseur.
14
Manuel d’usager
ES
Crochet peseur
II. CARACTÉRISTIQUES DU PRODUIT
MODÈLE
ÉCRAN
CARACTÉRISTIQUES
STR
LED 30mm (1.2”)
Utilisation générale
ENG FR
Modèle STR
Haute qualité: Le procès de gestion sont validé OIML R76, GB/T11883-2002 et avec l’obtention du certificat européen (CE)
Sécurité: Carcasse aluminium fondu, crochet et manilles de grande intensité, capteur spécial sécurité.
Haute fiabilité: Utilisation des composants hautement qualifiés en PCB pour assurer une stabilité durable.
Spécificité: écran de caractères de 30mm de hauteur, distance de vue approximativement 25m, utilisation pour industrie de magasinage, industrie textile, industrie métallurgique, etc.
Opérations simples: il interroge automatiquement la puissance de la batterie, télécommande sans câble, espace séparé pour batterie, volume réduit, et portatif.
Fonctions complètes: Conversion Kg/lb, Hold, tare, option de division, régulation de stabilité, accumulation / recherche, conversion
pèse brut/net, paramètre de régulation etc.
III. SPÉCIFICATIONS
Classe de précision
Écran
Champs de tarage
Temps stable
Indication de surcharge
OIML clase III
5 chiffres LCD/LED de 30mm (1.2”)
Capacité nominale
≤ 10 secondes
100% de la capacité nominale + 9e
Charge maximale de sécurité
125% de la capacité nominale
Charge finale
400% de la capacité nominale
Autonomie de la batterie
Type de batterie
Adaptateur
Température de fonctionnement
≥ 80 heures
Batterie scellée au plomb et acide, 6V/10Ah
DC9V/1500mA
-10ºC ~ +40ºC
Humidité de fonctionnement
≤ 90% RH à 20°C min.
Distance de télécommande
10m
Batterie de télécommande
5# batteries, 1.5V x 2
15
ENG FR
ES
Manuel d’usager
Crochet peseur
Modèle STR
IV. PARAMÈTRES BASIQUES
CAPACITÉ MAXIMALE (kg)
CAPACITÉ MINIMALE (kg)
DIVISION (kg)
NOMBRE D’ÉCHELONS (n)
1000
10
0,5
2000
3000
20
1
3000
5000
40
2
2500
10000
100
2
2000
15000
100
5
3000
V. DIMENSIONS ET POIDS NETS
MODÈLE
A (mm) B (mm) C (mm) POIDS NETS (kg)
STR1000
420
65
35
12
STR3000
600
80
45
14
STR5000
730
100
55
24
STR10000
850
120
70
44
STR15000
900
140
70
60
VI. GUIDE D’OPERATIONS
ALLUMAGE
Presser
, l’écran affichera la charge actuelle de la batterie
, après quoi les poids peuvent être accrochés.
, puis
-
-
ATTENTION: Pour assurer une haute précision, après avoir allumé la balance, maintenez la balance stable pendant 3 à 5 minutes,
avant de peser vos produits.
ZÉRO
OPERATION
16
ECRAN
Presser
sur le crochet.
Pressez
sur la télécommande.
INFORMATION
Après avoir allumé, le
est généralement montré;
S’il ne l’est pas, opérez de cette façon.
Crochet peseur
Manuel d’usager
TARE
OPERATION
Presser
ECRAN
INFORMATION
Pousser cette touche pour déduire le poids du récipient, pendant que la lumière “TARE” est allumée, le crochet montrera le
poids net de la charge.
sur le crochet.
Pressez
sur la télécommande.
NOTE: étant donné que le crochet déduit automatiquement le poids du récipient, il montrera le poids net de la charge. Inutile de presser cette touche pour obtenir le poids net tant qu’on ne change pas le récipient ou qu’on éteigne la balance.
ENG FR
ES
Modèle STR
VERIFICATION DE LA BATTERIE
I
Quand on presse
II
Quand on presse
sur le crochet pour l’éteindre/allumer, s’affiche
sur la télécommande pour éteindre, s’affiche
III
Pressez
, l’écran affiche
, pressez
, puis s’affiche
.
ATTENTION : normalement, la tension de batterie doit être supérieure à
.
.
, pressez
pour retourner
AVIS DE BATTERIE FAIBLE
Quand la charge de la batterie est inférieure à
, l’écran clignotera mais la balance peut cependant encore fonctionner tant
que le voltage le permet. Puis la balance s’éteindra automatiquement. Il faut recharger la batterie pour faire refonctionner la balance.
AVIS DE SURCHARGE
L’écran montrera
de la capacité maximale.
quand la charge (Net +Tare) dépasse la capacité maximale. S’assurer que la charge se trouve en dessous
ÉCONOMIE D’ENERGIE
L’écran montrera
quand la charge est inchangée depuis plus de 15 minutes. Il retournera à la lecture normale dès que la
charge varie. Quand la charge est inchangée depuis plus de 60 minutes, la balance s’éteint automatiquement.
RECHARGER LA BATTERIE
1. Éteindre la balance, connecter l’adaptateur au secteur 220V~, insérer la prise de courant située à la partie arrière de la balance. La
lumière devient verte ce qui signifie que la batterie se recharge automatiquement. Quand le témoin devient rouge, la recharge est terminée.
2. Si on a besoin d’utiliser le crochet peseur pendant la recharge, enlever le couvercle arrière et remplacer la batterie déchargée par une
batterie rechargée.
Attention: généralement, le temps de recharge ne doit pas être inférieur à 8 heures. Cette balance possède une fonction protectrice de
surcharge: une longue période de recharge n’endommagera pas la batterie.
EXTINCTION
I
Presser
sur le crochet pendant 3 secondes
II
Pressez
sur la télécommande pendant 3 secondes
III
L’écran montrera
quand la charge est inchangée depuis plus de 15 minutes. Quand la charge est inchangée
depuis plus de 60 minutes, la balance s’éteint automatiquement.
VII. DIAGRAMME ÉLECTRIQUE PRINCIPAL
17
ENG FR
ES
Manuel d’usager
Crochet peseur
Modèle STR
VIII. MESSAGES D’ÉCRAN
ECRAN
DESCRIPTION
Calibration
Alarme de surcharge
Capteur de poids endommagé ou erreur de connexion, pendant l’utilisation ou la réparation
Entrée dans le menu de calibration
Vérifier la calibration
Effacer, peut apparaître quand on accumule les poids à l’aide de la télécommande
Conversion quand on presse
sur la télécommande
Tension actuelle de la batterie
Fin, quand le paramètre d’ajustement est correct.
Extinction
IX. DÉTECTION DE PROBLÈMES
PROBLÈME
SOLUTION
Batterie endommagée
Vérifier la batterie
Contact perdu avec la batterie
Serrer le contact
Écran clignotant
Batterie faible
Recharger la batterie
Impossible d’allumer/éteindre
Touche
Impossible de tarer
Touche
Le témoin de recharge ne s’allume pas
Chargeur de batterie endommagé.
Vérifier le chargeur.
Le chargeur n’est pas connecté correctement.
Insérer une autre fois la prise de courant.
L’écran ne se stabilise pas
La charge est instable.
Stabiliser la charge
Le câble du capteur de poids est endommagé.
Vérifier et changer le capteur de poids
La balance est restée longtemps dans
l’humidité.
Situer la balance dans un environnement
sec.
Temps insuffisant de chauffage après l’avoir
allumée.
Après l’avoir allumé, laisser chauffer 3-5
minutes.
La balance est restée longtemps au sol.
La balance doit être suspendue.
La batterie ne peut pas être
rechargée
Batterie endommagée.
Fiche endommagée.
Changer la batterie.
Changer la fiche.
La télécommande ne fonctionne pas de loin
La fenêtre du récepteur est sale.
Vérifier et nettoyer
La batterie de la télécommande est faible.
Changer la batterie de la télécommande.
L’écran ne revient pas à zéro
quand on retire la charge
18
CAUSE
L’écran reste sombre quand on
allume la balance.
endommagée.
endommagée.
Vérifier et nettoyer la touche
Vérifier et nettoyer la touche
Manuel d’usager
ES
Crochet peseur
X. PRÉCAUTIONS
▪ Le crochet de pesage est un instrument de précision. Prendre soin lors de son utilisation et de son entretien.
▪ Tourner la charge et non le crochet lors des opérations de pesé.
▪ Ne pas utiliser le crochet en cas de vent et de pluie.
▪ Vérifier avant l’usage que les clips/pins et les visses du crochet ne soient pas libres ou cassées.
▪ Si le signal de batterie baisse et le témoin LED apparaît en vert pendant qu’elle se charge, vérifier la batterie.
▪ Dépendre le crochet peseur quand il n’est pas utilisé.
ENG FR
Modèle STR
XI. GUIDE DE TÉLECOMMANDE
ZÉRO
OPÉRATION
INFORMATION
Il montre
sans charge, le témoin “ZERO” s’allume
TARAGE
1. Tarage directe
OPÉRATION
INFORMATION
L’écran montre le poids net, témoin “TARE” allumée
L’écran montre le poids brut, témoin “TARE” éteint
2. Tarage directe
OPÉRATION
ECRAN
INFORMATION
Poids tare actuel.
Information de poids tare.
Sortie, témoins “TARE” allumés, la tare est automatiquement déduite pendant le
pesage.
ACCUMULATION
1. Accumulation
Quand la lumière “STEADY” est allumée, presser
. Le poids actuel est accumulé et l’écran affiche la valeur actuelle d’accumulation. Après 3 secondes, l’écran retourne automatiquement au poids actuel.
2. Recherche
OPÉRATION
ÉCRAN
INFORMATION
Nombre de poids accumulés
4 premiers chiffres du poids accumulé actuel
4 derniers chiffres du poids accumulé actuel
Numéro du pesage actuel
Nombre de pesées actuels
Numéro du dernier pesage
Dernière pesée
-----------Chercher la fin et retourner à la situation de pesage
19
ENG FR
ES
Manuel d’usager
Crochet peseur
Modèle STR
ATTENTION
1. Le poids total =
kg.
2. Presser
pour retourner en arrière,
pour avancer vers le dernier.
3. Le poids accumulé peut être gardé en mémoire automatiquement quand la batterie est retirée. Presser
avant de démarrer une nouvelle accumulation pour effacer le cumul actuel.
4. Attendre entre 2 accumulations que l’écran soit revenu à
, sans quoi l’accumulation ne sera pas exécutée.
HOLD
OPÉRATION
INFORMATION
Maintient le poids, témoin “HOLD” allumé
Retour au pesage normal, témoin “HOLD” éteint
EFFACER
OPÉRATION
INFORMATION
L’écran montre
.
Confirmer l’effacement.
Annuler l’effacement.
CHARGE DE BATTERIE
OPÉRATION
ECRAN
INFORMATION
Montre la tension actuelle de la batterie.
Retourner au pesage normal.
CONVERSION kg/lb
OPERATION
INFORMATION
Montre le poids dans la nouvelle unité de pesage (par ex.: lb).
Retourner à l’unité de pesage initiale (par ex.: kg).
EXTINCTION
OPERATION
ECRAN
INFORMATION
Presser la touche
jusqu’à ce qu’il montre
ATTENTION
1. Éviter que la télécommande ne subisse des coups.
2. Renouveler la batterie de la télécommande si son rayon d’action diminue à moins de 6 mètres.
3. Nettoyer régulièrement la fenêtre de réception sous le crochet peseur pour qu’elle ne devienne pas opaque.
20
.
Crochet peseur
Manuel d’usager
ES
Modèle STR
ENG FR
MANUEL TECHNICIEN:
On peut utiliser la télécommande pour installer le paramètre et calibrer.
I. FONCTION CLAVIER
Déplacer →.
Choisir ↑ introduire le digit.
Entrer et confirmer.
II. CHOISIR PARAMÈTRE
OPÉRATION
ÉCRAN
Pousser
ÉCLAIRCISSEMENT
Pousser pendant 5 secondes.
joints
Introduire code.
Pousser
Enter
Pousser
■
Option de area zéro
Pousser
(général
Choisir, Pousser
OPTIONS
A
Choisir manuellement le rang zéro
0
1
2
3
4
5
B
Choisir automatiquement le rang zéro
0
1
2
3
4
5
Cap máx. %
0
2
4
10
20
100
Choisir recherche du rang zéro
0
1
2
3
4
5
d
0
0.5
1
1.5
2
2.5
Vitesse de l’écran
0
1
2
Temps/Seconds
6
12
22
D
Pousser
pour confirmer.
■
Choisir oscillation de résistance
Résultat
■
Enter.
FONCTION
C
Pousser
Choisir, Pousser
(général
Unité
)
Enter.
Petit
Général
Général
Fort
Choisir unité
Pousser
)
Fort
Plus de fort
(général
Choisir, Pousser
)
Enter.
kg
lb
Les autres
21
Crochet peseur
Modèle STR
ENG FR
ES
Manuel d’usager
■
Pousser
Fermer méthode d’options
OPTIONS,
(général
)
Fermer manuellement.
Stable 15 minutes, écran
.
Stable 15 minutes, écran
.
Stable 60 minutes fermer automatiquement.
Pousserr
Enter.
Attention: quand l’écran montre
■
Pousser
, on peut pousser quelconque touche pour retourner a la situation initiale de pesage.
: (d) option
pour choisir la division.
(général OIML III)
CAP MAX
D (KG)
CAP MAX
D (KG)
100 kg
0.02/0.05
3000 kg
0.5/1
200 kg
0.05/0.1
5000 kg
1/2
300 kg
0.05/0.1
10000 kg
2/5
500 kg
0.1/0.2
15000 kg
5/10
1000 kg
0.2/0.5
20000 kg
5/10
2000 kg
0.5/1
30000 kg
5/10
Pousser
pour entrer.
■
: Final, Retourner
Attention: Si on a besoin de finir précédemment le paramètre d’installation, pousser pendant quelques secondes
il apparaîtra
, libérer.
III. CALIBRATION
OPÉRATION
Pousser
ÉCRAN
ELUCIDATION
Pousser pendant 5 secondes
joints
Introduire le mot de passe
Pousser
Enter
Pousser
■
: (e) option
Pousser
Options, Pousser
La spécification de chaque capacité (e).
22
Enter.
CAP MAX
d (kg)
CAP MAX
d (kg)
100 kg
0.05
3000 kg
1
200 kg
0.1
5000 kg
2
300 kg
0.1
10000 kg
5
500 kg
0.2
15000 kg
5
1000 kg
0.5
20000 kg
10
2000 kg
1
30000 kg
10
. Quand
Crochet peseur
Manuel d’usager
ES
Modèle STR
Calibration
OPÉRATION
ÉCRAN
ELUCIDATION
Écran montrera Cap original
Si ok, Pousser
Pousser
Pousser
ENG FR
■
, Introduire Cap Max.
Exemple: Cap Max. 5000kg
Entrer
Pousserr
Confirmer la charge vide
Vérifier le point zéro pendant quelques secondes
Pousser
La première charge, charger le poids standard,
après stabiliser pendant quelques secondes.
Pousser
Introduire le poids
Exemple: 1000kg de poids
Vérifier premier la charge
Pousser
La deuxième charge, charger le deuxième poids
standard, après stabiliser pendant quelques secondes.
Pousser
Introduire le poids
Exemple: 3000kg de poids
Vérifier la deuxième charge
Pousser
La troisième charge, charger le troisième poids
standard, après stabiliser pendant quelques secondes.
Pousser
Introduire le poids
Exemple: 5000kg de poids
Vérifier la troisième charge
Pousser
Retourner au final
Attention:
1. LOAd1 < LOAd2 < LOAd3
2. On peut calibrer avec 1 charge, après avoir vérifier la première charge et montrer
à l’écran
, lâcher la touche, finir.
pousser
, quand il apparaîtra
IV. SIGNAL ELUCIDATION
Ajustement.
Avertissement de surcharge.
Capteur de chargement endommagé.
Introduire les ajustages.
Ajustement.
Effacement.
Conversion.
Potence de la batterie.
Final.
Fermer.
23
ENG FR
ES
User’s Guide
Crane scale
Model STR
I. SAFETY GUIDE
Read carefully the following instruction and advice before using this scale.
▪ The instrument under guarantee cannot BE OPEN BY THE USER, under none motive. Each tentative of repair or modification of the
unit can expose the user to an electric discharge danger and can annul all application of the guarantee. All problem with the unit or with
the system must be notified to the manufacturer or the distributor where it has been bought.
▪ The dynanometer must be used exclusively to measure traction. The mobile loads that can cause tensions and torsions must be suspended with flexible or gyrating elements.
▪ To place the load without causing impact.
▪ Not to pass and not to be stopped under the suspended load.
▪ Not to expose or to use in case of rain or humidity.
▪ Not to reverse any liquids on the indicator.
▪ Not to use any solvents to clean the indicator.
▪ Not to expose the instrument to the direct light of the sun or near to sources of heat.
▪ Not to install in atmospheres with explosion risk.
▪ Not to expose to strong magnetic fields or electric fields.
▪ Not to throw the batteries to fire because they could explode.
▪ Not to disperse the batteries in the atmosphere.
▪ It is forbiden strictly overloading this device.
▪ To avoid the long lengths of the weighing, to avoid an excessive use of the load cell. The excessive use of the load cell can reduce the
life span and the good working of the hook and it can also decrease the precision of the hook.
▪ To verify the straps and the hook periodically.
▪ To get a maximal use of the battery reload it periodically, even though they have not been used during a long time.
▪ Not to try to repair this device yourself.
▪ To use the joined battery charger exclusively with the scale.
▪ To verify the level of the battery before and after the utilisitation and to reload before using the crane scale.
24
User’s Guide
ES
Crane scale
II. PRODUCT CHARACTERISTICS
MODEL
DISPLAY
CHARACTERISTICS
STR
LED 30mm (1.2”)
General purposes
ENG FR
Model STR
High quality: The process management is operated according to OIML R76, GB/T11883-2002, and get the European CE certificate.
Safty installation: Aluminium casting case, high intensity hook and shackle, special loadcell for safty installation.
High reliability: PCB use high quality components to insure long time stability.
Broad applicability: 30 mm high character display, 25M distance eyeshot, can be used in storage industry, textile industry, metallurgy
industry etc.
Simple operation: Check battery voltage automatically, wireless remote controller, separate battery space, small volume, easy to
bring.
Complete function: Special remote controller, kg/lb conversion, hold, tare, division choice, stability regulation, accumulation/search,
gross/net conversion, parameter regulation etc.
III. MAIN TECHNICAL DATA
Accuracy Class
Display
OIML class III
30mm (1.2”) 5 digits LCD/LED
Tare Range
Full capacity
Stable Time
≤ 10 seconds
Overload Indication
100% Max. capacity + 9e
Max. Safety Load
125% Max. capacity
Ultimate Load
400% Max. capacity
Battery Life
Battery Type
Charger
Operating Temp.
Operating Humidity
Remote controller operating distance
Battery of Remote Controller
≥ 80 hours
Fully sealed lead-acid battery, 6V/10Ah
DC9V/1500mA
-10ºC ~ +40ºC
≤ 90% RH under 20°C.
10m
5# battery, 1.5V x 2
25
ENG FR
ES
User’s Guide
Crane scale
Model STR
IV. BASIC PARAMETER
MAX. CAP (kg)
MIN. CAP (kg)
DIVISION (kg)
TOTAL DISPLAY COUNTS (n)
1000
10
0,5
2000
3000
20
1
3000
5000
40
2
2500
10000
100
2
2000
15000
100
5
3000
V. DIMENSION AND NET WEIGHT
MODEL
A (mm) B (mm) C (mm)
N.W. (kg)
STR1000
420
65
35
12
STR3000
600
80
45
14
STR5000
730
100
55
24
STR10000
850
120
70
44
STR15000
900
140
70
60
VI. OPERATION GUIDE
TURN ON
Press
on scale, it shows current voltage of battery
, until this time, the scale can weight the goods.
, then it shows
-
-
ATTENTION: In order to assure high accuracy, after turn on, keep the scale stable for 3-5 minutes, then weight the goods.
ZERO
OPERATION
Press
Press
26
DISPLAY
on scale.
on controller.
ILLUSTRATION
After turn on, generally display
can operate like this.
, if not for
Crane scale
User’s Guide
TARE
OPERATION
Press
DISPLAY
on scale.
ILLUSTRATION
Press this key to deduct the weight of container, while “TARE”
light on, the scale will show the net weight of load.
Press
on controller.
NOTE: As crane scale deduct the weight of container automatically, so it will show the net weight of load every time, you needn’t press
this key to get net weight until you change the container or turn off.
ENG FR
ES
Model STR
CHECK BATTERY
I
Press
II
Press
on scale, when turn on or turn off, it shows
on controller, when turn off, it shows
.
.
III
Press
, it shows
, press
, it shows
ATTENTION : normally, the voltage of battery should be higher than
.
, press
return.
LOW BATTERY WARNING
When the battery voltage lower than
, the display flash, but the scale can still work until to permit lowest voltage, it will turn
off automatically, you need to recharge the battery to use again.
OVERLOAD WARNING
The display will show
, once the load (Net+Tare) exceeds Max, Capacity. Make sure that the load arte within the capacity
range, otherwise it’s very dangerous.
POWER SAVING
The display will show
when the load are at stable in excess of 15 minutes and revert to normal weighing readings while load
changes. When the load are at stable status in excess of 60 minutes, the scale will turn off automatically.
RECHARGING BATTERY
1. Turn off, connect the adapter with 220V AC power supply, also insert the plug in the socket which located in the rear of scale. The light
become green, it means it’s recharging automatically, until the green light become red, that means recharging is finished.
2. When you need to use crane scale hour after hour, take off the rear cover, change the battery with rcharged battery.
Attention: Generally, the time of recharging should not lower than 8 hours, this scale have recharging protection function, long time recharging will not damage the battery.
TURN OFF
I
Press
on scale 3 seconds.
II
Press
on controller 3 seconds.
III
Stable after 15 minutes, it shows
, after 60 minutes, it turn off automatically.
VII. ELECTRICAL PRINCIPLE DIAGRAM
27
ENG FR
ES
User’s Guide
Crane scale
Model STR
VIII. DISPLAY ILLUSTRATION
DISPLAY
ILLUSTRATION
Calibration
Overload alarm
Loadcell damaged or connect error, when use or repair.
Enter calibration situation.
Inspect, occur in calibration situation.
Clear, occur when you operate «accumulation» through controller.
Conversion, when you press
on controller.
The current voltage of battery.
End, when calibration ready.
Turn off.
IX. TROUBLESHOOTING GUIDE
TROUBLE
No display when turn on
Display flash
Can’t turn on & off
Can’t tare
SOLUTION
Battery damaged
Check battery
Battery contact loosed
Tighten the contact
Low battery
Recharge the battery
buttun damaged.
buttun damaged.
Check & clean the buttun.
Check & clean the buttun.
Recharge indicator light can’t
turn on
The recharger damaged.
Check the recharger.
The recharger isn’t plugged ready.
Insert plug again.
Display isn’t stable
The loads is unsteady.
Stablize the load.
Loadcell cable damaged.
Check and replace loadcell.
The scale in damp environment for a long
time.
Put the scale in dry environment.
No enough time for heating the scale after
turn on.
After turning on, heating 3-5 minutes.
Put the scale on ground fer too long time.
Scale should be hung.
Battery can’t recharge
Battery damaged.
Outlet damaged.
Replace battery.
Replace the outlet.
Remote distance shortened
Receiver window is too dirty.
Check and clean.
Low battery of controller.
Replace controller battery.
The display don’t show «0»
when empty load
28
REASON
User’s Guide
ES
Crane scale
X. PRECAUTION
▪ The crane scale is a kind of precise weighing instrument, pay attention on operation and maintenance.
▪ Rotate the load instead of machine itself if necessary for operation.
▪ Stop using the machine under the circumstances of thunder & rain.
▪ Check periodicty to see if the clips/pins and screws of the machine are loose or broken.
▪ When displaying low battery and recharging light shows red, please check the battery to see if it’s damaged and change with the
same model battery in time.
▪ Hang the machine instead for storage while not in use in order to prevent from unnecessary load on the weight sensor inside.
ENG FR
Model STR
XI. REMOTE CONTROLLER GUIDE
ZERO
OPERATION
ILLUSTRATION
Display
when no load.
TARE
1. Tare directly
OPERATION
ILLUSTRATION
Display shows net weight, “TARE” light on.
Display shows gross weight, “TARE” light off.
2. Set tare weight in advance
OPERATION
DISPLAY
ILLUSTRATION
Current tare weight.
Input the tare weight.
Tare weight, “TARE” light on, it will show net weight automatically when weighing.
ACCUMULATION
1. Accumulation
When «STEADY» light on, press
, it can memorize current weight automatically and show current accumulation value, after
3 seconds, it returns to weighing situation automatically.
2. Search
OPERATION
DISPLAY
ILLUSTRATION
Accumulative weighing times.
Front four digit of current acumulative weight.
Rear fur digit of current accumulative weight.
Current weighing serial number.
Current time weight.
Last time weighing serial number.
Last time weight.
-----------Search end and return to weigh situation.
29
ENG FR
ES
User’s Guide
Crane scale
ATTENTION
1. Total weight =
kg.
2. Press
search backward, press
search end.
3. The accumulative value can keep automatically when stop the electrical power, please press
before accumulation, to
clear old accumulative value, in case error.
4. After you take the goods off, please wait until the scale show
, then operate next accumulation. Otherwise, the
accumulation isn’t valid.
HOLD
OPERATION
ILLUSTRATION
Hold the weight, “HOLD” light on.
Convert to weighing situation, “HOLD” light off.
EFFACER
OPERATION
ILLUSTRATION
Show
.
Confirm deletion.
Cancel deletion.
CHARGE DE BATTERIE
OPERATION
DISPLAY
ILLUSTRATION
Display show current voltage of the battery.
Return to weigh situation.
CONVERSION kg/lb
OPERATION
ILLUSTRATION
Show new unit (for example: lb)
Come back to hold unit (for example: kg)
EXTINCTION
OPERATION
DISPLAY
ILLUSTRATION
Press key until shows
.
ATTENTION
1. Please keep remote controller without knock, hit.
2. Please change the battery of controller if valid distance between controller and scale are lower than 6 meters.
3. Please clean the receiver window under the display of scale periodically, in case some dirty on it.
30
Model STR
Crane scale
User’s Guide
ES
Model STR
ENG FR
TECHNICAL MANUAL:
You can use the remote controller to set parameter and calibrate.
I. KEY FUNCTION
Move →.
Choice ↑ input digit.
Enter & confirm.
II. THE PARAMETER CHOICE
OPERATION
DISPLAY
Press
ELUCIDATION
Press down 5 seconds
together
Input the password.
Press
Enter
Press
■
Zona area choice
Press
Choice, Press
A
Choose range of zero by hand
0
1
2
3
4
5
B
Choose range of zero automatically
0
1
2
3
4
5
Max. Cap %
0
2
4
10
20
100
Choose the zero tracking range
0
1
2
3
4
5
d
0
0.5
1
1.5
2
2.5
Display speed
0
1
2
Time/second
6
12
22
to confirm.
■
Resist swing choice
Press
Choice, Press
(general
Unit choice
Press
Choice, Press
)
Enter.
Small
■
Unit
Enter.
CHOICE
D
Result
)
FUNCTION
C
Press
(general
General
General
Strong
Strong
Stronger
(general
)
Enter.
kg
lb
Other
31
Crane scale
Model STR
ENG FR
ES
User’s Guide
■
Press
Close method choice
CHOICE,
(general
Turn off by hand.
Stable 15 minutes, display
.
Stable 15 minutes, display
.
Stable 60 minutes turn off automatically.
Press
Enter.
Attention: When display
■
Press
, you can press any key to return weighing situation.
: (d) Choice
to choice division.
(general OIML III)
MAX CAP
d (kg)
MAX (CAP)
d (kg)
100 kg
0.02/0.05
3000 kg
0.5/1
200 kg
0.05/0.1
5000 kg
1/2
300 kg
0.05/0.1
10000 kg
2/5
500 kg
0.1/0.2
15000 kg
5/10
1000 kg
0.2/0.5
20000 kg
5/10
2000 kg
0.5/1
30000 kg
5/10
Press
entrer.
■
: End, Return
Attention: If you need to end parameter setting in advance, press down
.when it displays
, release.
III. CALIBRATION
OPERATION
Press
DISPLAY
ELUCIDATION
Press down 5 seconds
together
Input the password
Press
Enter
Press
■
: (e) choice
Press
Choice, Press
Enter.
The specification of each capacity (e).
32
MAX CAP
d (kg)
MAX CAP
d (kg)
100 kg
0.05
3000 kg
1
200 kg
0.1
5000 kg
2
300 kg
0.1
10000 kg
5
500 kg
0.2
15000 kg
5
1000 kg
0.5
20000 kg
10
2000 kg
1
30000 kg
10
)
Crane scale
User’s Guide
ES
Model STR
Calibration
OPERATION
DISPLAY
ENG FR
■
ELUCIDATION
Press
Press
, Input Max. Cap.
Example: Max. Cap. 5000kg
Enter
Press
Confirm empty load
Check zero point for several seconds
Press
The first load, load the standar weight, after stable
for several seconds
Press
Inpunt weight
Example: 1000kg weight
Check first load
Press
The second load, load the second standar weight,
after stable for several seconds
Press
Input weight
Example: 3000kg weight
Check second load
Press
The third load, load the third standar weight, after
stable for several seconds
Press
Input weight
Example: 5000kg weight
Check third load
Press
End, Return
Attention:
1. LOAd1 < LOAd2 < LOAd3
2. You can calibrate with one load, after check the first load and display
release key, finish.
press
, when it display
,
IV. SIGN ELUCIDATION
Adjusts.
Overload the warning.
Load cell damage.
Enter the adjustment.
Adjusts.
Clearance.
Conversion.
Battery voltage.
End.
Close.
33
ES
ENG FR
DECLARACIÓN DE CONFORMIDAD
DECLARATION OF CONFORMITY
DÉCLRATION DE CONFORMITÉ
Nosotros:
We / Nos:
BAXTRAN S.L.
Pol. Empordà Internacional
C/F. Parcela 15-16
E-17469 VILAMALLA (Girona)
- SPAIN Declaramos bajo nuestra responsabilidad que el producto denomidado:
Declare under our responsibility that the denomitated product:
Nous déclarons sous notre responsabilité que le produit ci-dessous nommé:
Gancho pesador.
Electronic crane scale.
Crochet peseur.
Modelo: STR
Type:
Modèle:
A la cual se refiere la presente declaración, es conforme a las siguientes normas o documentos:
To wich this déclaration refers to, conform wich the followings standards or other normative documents:
A la quelle se refaire la présente déclaration, et conforme aux normes suivantes ou documents:
Conformidad CE:
CE conformity / Conformité CE:
89/336/CE Directiva sobre la compatibilidad electromagnética.
89/339/CE Directive on the electromagnetic compatibility.
89/339/CE Directive sur la compatibilité electromagnétique.
77/23/CE Directiva sobre baja tensión.
77/23/CE Low tension directive.
77/23/CE Directive sur les baisses tensions.
98/37/CE Directiva sobre máquinas.
98/37/CE Machinery directive.
98/37/CE Directive sur les machines.
Jordi Ribalta.
Director General
General Manager
34
marca propiedad de /
marque propriété de /
trade mark propiety of:
Pol. Empordà Internacional
Calle F. Parcela 15-16
17469 VILAMALLA
(Girona) SPAIN
T. (34) 972 527 212
F. (34) 972 527 211