Transcript
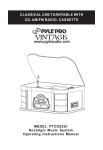
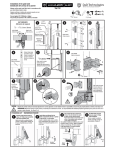
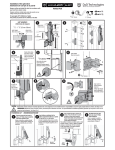
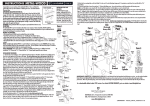
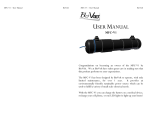
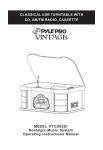
INSTALLATION INSTRUCTIONS
INSTRUCCIONES PARA LA INSTALACIÓN
for most “TCA” and “TCHD” models
Adjustable, Self-Closing Gate Hinges
Tools required: Electric or cordless drill with #2 Phillips-head driver, Phillips head #2 hand screwdriver, large slot-head hand screwdriver.
For “TCA” models, use 10 gauge screws (pre-drill with 5/32" [4mm] drill bit). Use 12-gauge screws for all “TCHD” models (pre-drill with 11/64" [4.5mm] drill bit).
Hinge RANGE
Maximum Self-Closing Weight
Maximum Gate Dimensions
REGULAR RANGE
55lb (25kg) per pair
**5'Hx3'W (1524x915mm)
HEAVY DUTY RANGE
132lb (60kg) per pair
**6'Hx4'W (1830x1220mm)
**Always space the hinges as far apart from each other as possible for maximum holding strength.
NOTE: This adjustment
procedure represents the
procedure for all Tru•Close
tension-adjustable hinges
Maintenance Requirements
Note: The hinges will operate properly, and warranty is valid, only if installed in accordance with the instructions
and specifications shown herein.
• Use only two (2) Tru-Close hinges on any one gate.
QUICK & EASY
• Remove all other types of hinges and self-closing devices.
TENSION
• Each hinge must have equal tension at all times.
ADJUSTMENT!
• Ensure the gate does not swing through the line of the fence. Use a “gate stop” or
a latch (with striker) to prevent this.
• Do not lubricate these hinges with petroleum-based lubricants at any time. Use only powdered graphite.
• Ensure the hinges are kept free of sand, ice and other debris that could impair effective operation.
• Do not disassemble these hinges at any time.
• Do not paint or apply an additional finish to the hinges.
• Never remove hinges from gate until spring tension is released.
• Do not physically cut, drill, countersink, machine or grind any part of the hinge leaves.
• For safety, remove protruding bolts/screws after installation by cutting, grinding and/or filing.
INSTALLATION PROCEDURE
1. Where possible, the “adjustable” end of the hinge should be pointed upwards to allow for easy tension
adjustment. This may determine the direction in which your gate will swing. Determine the location of the
hinges on the gate and fence post. Remember to space the hinges as far apart from each other as possible
for maximum holding strength. A “GATE STOP” MUST BE INSTALLED to prevent the gate/hinges closing back
through the line of the fence – do not operate gate without a gate stop.
2. Install the hinges using the screws provided. If screws were not supplied with
your hinge model, consult your local hardware expert for the proper fasteners.
Do not use countersinking screws/bolts and do not countersink the screw holes on the hinges. Ensure the gate
and hinges are level at all times.
3. Once hinges have been installed, close the gate. Follow the tension adjustment procedure (shown at right). For
optimal, long-lasting performance, each hinge must have equal tension at all times. After adjusting tension, replace
the endcaps using a #2 Phillips heads screwdriver.
4. Replace endcaps. Hand-tighten the end-cap screws; do not use screw gun.
The gate is now ready for use. Check tension regularly, adjusting
as required to ensure reliable gate closure.
TWO EASY STEPS
1. Use Phillips screwdriver to
remove screw & endcap from the
top of hinge.
2. Important: For heavier gates
over 33lb (15kg), support the
weight of the gate during tension
adjustment to ensure the hinge's
internal adjustor rises back into
position.
Using a large slot-head
screwdriver, depress and
rotate the spring-loaded
adjustor as shown, allowing
the adjustor to rise back into
the desired location within
the hexagonally shaped
sleeve.
Ensure equal tension in both
hinges.
WARRANTY & LIMITATION OF LIABILITY
D&D Technologies (“D&D”) products are warranted to be free of defects in materials and workmanship to the original purchaser for as long as he/
she owns the product. This product will operate properly, and warranty is valid, only if installed in accordance with the instructions and specifications
shown. If a structural defect appears, the original purchaser may return the item, freight prepaid, together with proof of purchase to D&D or its
approved international agents. D&D or its agent will, at their discretion, repair or replace the defective item or part without charge to the purchaser.
THIS WARRANTY SHALL NOT APPLY WHEN the product has been tampered with, when repairs or attempted repairs have been made by unauthorized
persons, where the item has been subjected to misuse, abuse, accident or damage in transit, or where the installer has not followed the instructions
set out during installation, operations, or Maintenance Requirements.
IN NO EVENT SHALL THE COMPANY BE LIABLE FOR ANY INCIDENTAL OR CONSEQUENTIAL DAMAGES. No warranty is given other than that set out above. No other express or implied warranties
(including statutory warranties) apply, other than warranties which may not be legally excluded.
7731 Woodwind Drive, Huntington Beach CA 92647
4-6 Aquatic Drive, Frenchs Forest NSW 2086
www.ddtechglobal.com
Para la mayoría de los modelos “TCA” y “TCHD”
Herramientas necesarias: Taladro eléctrico o inalámbrico con mecha No. 2 Phillips, destornillador manual Phillips de punta No.2, destornillador manual grande de punta con
ranura. Para los modelos “TCA”, usar tornillos calibre 10 (pre-taladrar con mecha 5/32"/4mm). Usar tornillos calibre 12 para todos los modelos “TCHD” (pre-taladrar con
mecha 11/64"/4.5mm).
Grado de abertura de la bisagra
Peso máximo de autocierre
Dimensiones máximas de la puerta
Variación regular
55lb (25kg) por par
**5'Hx3'W (1524x915mm)
Grado de abertura reforzado
132lb (60kg) por par
**6'Hx4'W (1830x1220mm)
**Siempre separar las bisagras lo más posible una de otra para obtener la máxima resistencia de sostenimiento.
Requisitos de mantenimiento
Observación: Las bisagras funcionarán correctamente y la garantía será válida únicamente si su instalación
se realiza de acuerdo con las instrucciones y especificaciones aquí descritas.
AJUSTE DE TENSIÓN
• Usar únicamente dos (2) bisagras Tru-Close por puerta.
• Retirar cualquier otro tipo de bisagra existente y aparatos de autocierre.
RÁPIDO Y FÁCIL
• Cada bisagra deberá tener la misma tensión en todo momento.
• Asegurarse de que la puerta no se balancee a través de la línea de la cerca. Usar un tope para puertas o cerrojo
(con cerradura hembra) para evitar que esto ocurra.
• No lubricar estas bisagras con lubricantes a base de petróleo, en ningún momento. Usar únicamente grafito en polvo.
• Asegurarse de mantener las bisagras sin arena, hielo ni ningún otro tipo de escombro que podría dificultar la
efectividad de la operación.
• No desarmar estas bisagras en ningún momento.
• No pintar ni aplicar acabados sobre estas bisagras.
• No retirar nunca las bisagras de la puerta hasta que se suelte la tensión del resorte.
• No cortar, perforar, hacer un avellanado, usar una máquina ni esmerilar físicamente ninguna parte de las hojas
de las bisagras.
• Por razones de seguridad, retirar los pernos o tornillos sobresalientes después de la instalación mediante su corte,
esmerilado o limado.
PROCEDIMIENTOS DE INSTALACIÓN
1. Cuando sea posible, el extremo “ajustable” de la bisagra deberá encontrarse en posición hacia
arriba permitiendo el ajuste fácil de tensión. Esto puede determinar la dirección del balanceo
de su puerta. Escoger la ubicación de las bisagras sobre la puerta y el poste de la cerca.
Recuerde espaciar las bisagras lo más posible una de otra para obtener la máxima resistencia de
sostenimiento. DEBERÁ INSTALARSE UN “TOPE PARA PUERTAS” para evitar que la puerta/bisagras
se cierren a través de la línea de la cerca. No usar la puerta sin el tope para puertas.
2. Instalar las bisagras usando los tornillos suministrados. Si los tornillos no se encuentran en el
paquete de su modelo de bisagras, consulte con un experto en su ferretería local para obtener los
sujetadores adecuados. No usar tornillos ni pernos avellanados y no hacer un avellanado de los
agujeros del tornillo sobre las bisagras. Asegurarse de que la puerta y las bisagras se encuentren a
nivel en todo momento.
3. Después de la instalación de las bisagras, cerrar la puerta. Seguir el procedimiento para el ajuste de tensión
(indicado a la derecha). Para un funcionamiento óptimo, de larga duración, cada bisagra deberá tener la misma
tensión en todo momento. Después del ajuste de tensión, reemplazar los tapones usando un destornillador Phillips
con cabeza No. 2.
4. Reemplazar los tapones. Ajustar manualmente los tornillos de los tapones; no usar una pistola para tornillos.
Ahora la puerta está lista para usar. Revisar la tensión regularmente ajustándola, si fuera necesario, para
garantizar el buen cierre de la puerta.
OBSERVACIÓN: Este procedimiento de
ajuste representa el procedimiento para
todas las bisagras de tensión ajustable
Tru•Close
DOS PASOS FÁCILES
1. Usar destornillador Phillips para retirar
el tornillo y tapón de la parte superior de la
bisagra.
2. Importante: para puertas más pesadas,
mayores de 33lb (15kg), sostener el peso de
la puerta durante el ajuste de tensión para
garantizar el levantamiento del regulador
interno de la bisagra nuevamente a su
posición.
Con un destornillador de cabeza
con ranura grande, soltar y rotar el
regulador a resorte, como se indica
en el diagrama, permitiendo que el
regulador se eleve nuevamente al sitio
deseado dentro de la funda con forma
hexagonal. Asegurarse de que ambas
bisagras tengan la misma tensión.
GARANTÍA Y LIMITACIÓN DE LA RESPONSABILIDAD
Los productos de D&D Technologies (“D&D”) llevan una garantía al comprador original, de que están libres de defectos de materiales y mano de obra,
mientras el producto pertenezca a dicha persona. Este producto funcionará bien, y la garantía será válida, sólo si se instala de acuerdo con las instrucciones y
especificaciones que aparecen en este documento. Si aparece un defecto estructural, el comprador original podrá devolver el artículo, previo pago de flete, junto
con evidencia de compra, a D&D o sus agentes internacionales aprobados. D&D o su agente, a su discreción, repararán o reemplazarán el artículo defectuoso
o parte defectuosa en forma gratuita.
ESTA GARANTÍA NO TENDRÁ APLICABILIDAD CUANDO se haya modificado el producto; cuando personas no autorizadas lo hayan reparado o intentado repararlo;
cuando el artículo haya sido objeto de uso incorrecto, abuso, o haya sufrido accidentes o daños en tránsito; o cuando la persona que lo haya instalado no haya
seguido, durante la instalación o funcionamiento, las instrucciones o los Requisitos de Mantenimiento que se establecen. EN NINGÚN CASO LA EMPRESA SE HARÁ RESPONSABLE DE DAÑOS INCIDENTALES
O EMERGENTES. No se otorga ninguna otra garantía que la que se establece más arriba. No se aplica ninguna otra garantía, expresa o implícita (incluidas las garantías estatutarias), a menos que se
trate de garantías que por ley no puedan excluirse.
7731 Woodwind Drive, Huntington Beach CA 92647
4-6 Aquatic Drive, Frenchs Forest NSW 2086
www.ddtechglobal.com
• TCINSTR0015PA 12 2 10