1
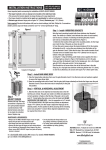
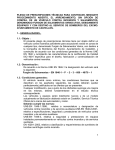
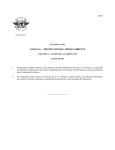
INSTRUCTIONS
METAL–WOOD
Congratulations on your purchase of the LokkLatch PRO-SL. We are confident this
INSTALLING THE POST
POST BRACKET
product will provide you with a lifetime of reliable gate closure. See limited Lifetime
BRACKET:
Warranty below.
First determine the correct
OPERATING THE LOKKLATCH PRO-SL:
handing. LokkLatch PRO-SL fits
The LokkLatch PRO-SL automatically locks when the gate is closed and the latch fully
both right & left-handed gates. To
engages the Striker Body. To unlock from either side of the gate, simply turn the key in
determine handing, the Latch Body
the direction of the arrows until the latch unlocks (See Figure 1), then push the gate open.
must be mounted to the Fence Post
You do not need to push the button on the External Access Kit (EAK) to operate this latch.
and to the same side of the gate as
Remove the key at the 12 o’clock position. When using self-closing hinges, set the
the hinges. Insert the four short
tension on both hinges to the appropriate setting to ensure the latch fully
Determine the correct
screws as indicated by the drawing.
locks when the gate self-closes.
handing
WARNING: Using LokkLatch PRO-SL on pool gates is permissible North America only.
Figure 1
RE-KEYING:
The LokkLatch PRO-SL can be re-keyed to other locks at your property. If this is desirable, DO NOT install this
UNLOCK
product until after you have re-keyed both locks. Use only an authorized locksmith to re-key the LokkLatch PRO-SL.
Contact D&D Technologies for assistance if needed.
Lock at
BEFORE YOU PROCEED:
bottom
• The External Access Kit (EAK) must be installed before the Latch Body.
• Install the Post Bracket to the Latch Body. See “Installing the Post Bracket” above.
Figure 2
• Ensure Gate Frame and Fence Post are in alignment (no offset). See dotted line X (Figure 7).
• Visible gap between Fence Post and Gate Frame must be between 1/2" (13mm) and 1 1/2” (38mm). 1" (25mm) is ideal.
LOCK TAIL
• The LokkLatch PRO-SL for metal and wood gates can be fitted to Fence Posts ranging from 11/2” to 6” (38-150mm)
Firmly seat
in depth.
Push Rod against
NOTE: If installing the LokkLatch PRO-SL to a gate leading to a swimming pool or spa (see WARNING above), consult
Lock tail
your local building official for Code requirements in your area. The lock cylinder on the Latch Body (Figure 7) should be
used to determine legal latch height on swimming pool/spa gates.
EAK
TOOLS REQUIRED: Pencil, power drill, 3 1/2" (89mm) # 2 Phillips-head driver bit, # 2 Phillips-head hand
screwdriver, 5/32” (4mm) and 1/2" (13mm) drill bits, 5/8” (16mm) spade (speed) bit and a hacksaw.
10. Mark the four mounting holes on the Latch Body (2 on face, and 2 on side-fixing legs) using pencil. If mounting to a metal Fence Post, pre-drill with the 5/32”
(4mm) drill bit.
11. Secure the Latch Body to Fence Post using four 1” (25mm) self-drilling screws. Be sure the Latch does not shift from position while inserting screws.
NOTE: Do not fully tighten screws using the drill. Use the hand-held screwdriver to firmly tighten so as not to strip the thread.
12. Position Striker Body onto Gate Frame. Close gate and allow Latch Body to engage Striker Bolt. Align Striker Bolt so that it's in the center of the Tongue slot (see
figure 7). Holding the Striker Body firmly against the corner of the Gate Frame, mark the center of the four slots using pencil. Be sure the screws are inserted into the
center of the slots to allow for vertical adjustment. If mounting to a metal Gate Frame, pre-drill with the 5/32” (4mm) drill bit.
13. Secure Striker Body to Gate Frame by using the four remaining 1” (25mm) screws. Be sure the Striker Body does not shift from position while inserting screws.
NOTE: Do not fully tighten screws using the drill. Use the hand held screwdriver to firmly tighten.
14. Check latching operation to ensure smooth, reliable operation. If a vertical adjustment of the Striker Body is required, loosen the four screws using the hand-held
screwdriver. Re-align the Striker Body with the Rivet and tighten firmly by hand.
15. The LokkLatch PRO-SL comes with six Dress Caps to cover the screw holes. Each Dress Cap is shaped to fit its exact screw hole. Firmly slide each Dress Cap into place.
Be sure that they are properly aligned before completing insertion. Note: If you plan on re-keying both locks, do so BEFORE installation and BEFORE inserting the Dress
Caps!
EAK
Figure 7
Gate
Frame
/"
5 8
)
(16
Cut tail flush
with Fitting Jig
X
Dress Caps
Push
Rod
latch
ame &
t)
gate fred (no offse
e
r
u
s
En e align
r
a
t
s
po
Dress
Cap
Figure 8
Push Rod
Figure 3
INSTALLATION PROCEDURE:
1. Determine the proper handing (i.e. left or right-hand) of the External Access Kit (EAK). The EAK must be installed onto the
Fence Post on the opposite side of the gate as the hinges. The lock cylinder must be at the bottom of the EAK (See
Figure 1). If the factory set handing is incorrect, remove the two small screws and EAK Bracket at the rear and reverse the
BUTTON
Button and Bracket 180˚ (see Figure 3). The circular hole in the EAK Bracket must be positioned over the Lock Tail (Figure 2).
EAK BRACKET
Re-insert the Button and EAK Bracket into the EAK Body. Re-insert the two screws using only the hand screwdriver.
Figure 4
2. Mark the appropriate height on the Fence Post using the pencil. This is determined by the Lock Cylinder on the Latch Body
Hole 1
(Figure 7). Position Fitting Jig onto Fence Post so that Hole 1 is at same height as the mark you just made with pencil. Hold
Jig firmly against corner of Fence Post so that Hole 1 is on the front of the Fence Post and the long side of the Fitting Jig is
between Fence Post and Gate Frame. Mark Hole 1 using pencil (Figure 4). Draw a line across top of the Fitting Jig.
NOTE: Hole 2 is only used on wood fence posts for mortising, which allows the side-fixing leg to be flush with post.
Fro
Draw Line
Fennt of Fitting Jig
3. If your post is deeper than the Fitting Jig, turn the Fitting Jig 180˚ so that the line drawn across the post is aligned with the
c
e
Pos
t
top of Jig. Finish the line with pencil to extend across entire Fence Post.
4. Firmly position Fitting Jig against the corner using the Pencil Line as a guide. Mark Hole 1 on the opposite side so that it is
directly opposite the first marked hole (see Figure 5).
Fitting Jig
Hole 1
5. Drill through both sides of the Fence Post using the 1/2” (13mm) drill bit for metal posts and the 5/8” (16mm) spade
Figure 5
(speed) bit for wood posts. Note: Be sure to drill level on wood posts so that both holes meet in the center.
6. The Push Rod should be firmly seated into EAK (Figure 2). Insert Push Rod through post and firmly place the EAK against
the corner of the post. Position EAK so that Push Rod is in center of hole and not rubbing against the edge of the hole. This
Align
allows the Push Rod to move freely. Mark four holes for drilling using the pencil (Figure 6).
to line
7. For metal Fence Posts, pre-drill using the 5/32” (4mm) drill bit. Fix the EAK to the Fence Post using four 1” (25mm) selfof
Rear Post
drilling screws. Do not allow the EAK to move out of position when inserting screws. Hand tighten screws with screwdriver.
Fence
8. Use the Fitting Jig to determine correct length of Push Rod: Slide Fitting Jig over Push Rod as indicated in Figure 6. Draw
a line across the Push Rod at the edge of the Jig. Cut to length using the hacksaw. NOTE: Removing the Push Rod to cut is
Figure 6 EAK
acceptable. Be sure to firmly re-seat Push Rod over Lock Tail when done (Figure 2).
Push Rod must
protrude by 5/8"
The Push Rod should protrude by 5/8” (16mm) from Fence Post when firmly seated into the EAK.
(16mm) after
9. Turn the Push Rod so that it is at the same angle as the square hole in the back of the Latch Body (Figure 8). Slide Latch
cutting
Body over Push Rod. Position Latch Body so that the Push Rod is in the center of the hole going through the post. Do not
allow the Push Rod to rub against edge of the hole, as this may impede performance.
Fitting Jig
Fence
Post
(External
Access Kit)
Striker
Body
STRIKER
BOLT
C
Latch
Body
Tongue
Slot
Dress
Cap
Post
Bracket
C
Dress
Caps
Lock
Cylinder
Align Push Rod
to match angle
of square hole
MAINTENANCE: REMOVE KEY/S FROM LOCK/S AFTER USE. Do not lubricate the latch with petroleum-based lubricants at any time - use only powdered graphite.
Ensure all screws are tightened firmly and that the Latch Body and/or External Access Kit are kept free of dirt, sand and other debris which could impair reliable
performance. When using self-closing hinges, set the tension equally on both hinges to the appropriate setting to ensure the latch locks fully when the gate self-closes.
For a downloadable Adobe Acrobat (.PDF) version of our Limited LIFETIME WARRANTY, go to our website at www.ddtechglobal.com
AUSTRALIA: Unit 6, 4-6 Aquatic Dr, Frenchs Forest NSW 2086
USA: 7731 Woodwind Drive, Huntington Beach, CA 92647
www.ddtechglobal.com
LLINSTR0030PA •instruct_LLPRO-SL_metal/wood 5 3 12
INSTRUCCIONES PARA
METAL-MADERA
9. Girar el pasador de empuje de manera que se encuentre en el mismo ángulo que el agujero cuadrado en la parte trasera de la caja del cerrojo (Ilustración 8). Deslizar
la caja del cerrojo por encima del pasador de empuje. Colocar en posicion la caja del cerrojo de manera que el pasador de empuje se encuentre en el centro del agujero a
través del poste. No dejar que el pasador de empuje roce contra el borde del agujero porque podría impedir el funcionamiento.
10. Marcar los cuatro agujeros de montaje en la caja del cerrojo (2 en la cara y 2 en las patas laterales de fijación) usando un lápiz. Si se monta a un poste para cerca de
metal, pre-perforar con una mecha de 5/32" (4mm).
11. Asegurar la caja del cerrojo al poste de la cerca usando cuatro tornillos autoroscantes de 1” (25mm). Asegurarse de que el cerrojo no cambie de posición al insertar
los tornillos.
Observación: No ajustar completamente los tornillos usando el perforador. Usar el destornillador manual para ajustar firmemente y no arruinar la rosca.
12. Colocar en posición la caja de la cerradura hembra en el marco de la puerta. Cerrar la puerta y dejar que la caja del cerrojo trabe el tornillo de la cerradura hembra.
Alinear el tornillo de la cerradura hembra de manera que se encuentre en el centro de la ranura de la lengua (ver ilustración 7). Sostener la caja de la cerradura hembra
firmemente contra la esquina del marco de la puerta, marcar el centro de las cuatro ranuras usando un lápiz. Asegurarse de que los tornillos se inserten en el centro de
las ranuras permitiendo el ajuste vertical. Si se monta a un marco de puerta metálico, pre-perforar con una mecha de 5/32” (4mm).
13. Asegurar la caja de la cerradura hembra al marco de la puerta usando el resto de los tornillos (4) de 1” (25mm). Asegurarse de que la caja de la cerradura hembra
no se mueva de posición al insertar los tornillos. Observación: No ajustar los tornillos completamente usando el perforador. Usar el destornillador manual para ajustar
firmemente.
14. Revisar la operación del sujetador para que se desarrolle sin dificultades. Si es necesario el ajuste vertical de la caja de la cerradura hembra, aflojar los cuatro tornillos usando el destornillador manual. Volver a alinear la caja de la cerradura hembra con el remache y ajustar firmemente de manera manual.
15. El LokkLatch PRO-SL se presenta con seis tapones de recubrimiento. Cada uno de ellos tiene la forma para encajar su agujero para tornillos correspondiente. Deslizar
firmemente cada tapón de recubrimiento en su lugar. Asegurarse de que se encuentren alineados correctamente antes de completar la inserción.
Observación: Si usted desea cambiar la combinación de ambas cerraduras, ¡hágalo ANTES la instalación y ANTES de la inserción de los tapones de recubrimiento!
Gracias por haber comprado el LokkLatch PRO-SL. Confiamos en que este producto
SOPORTE DEL POSTE
INSTALACIÓN DEL SOPORTE
le ofrecerá una vida operativa confiable para el cierre de su puerta. Ver la Garantía
PARA EL POSTE:
de vida limitada abajo mencionada.
Determinar la dirección correcta.
FUNCIONAMIENTO DEL LOKKLATCH PRO-SL: El LokkLatch PRO-SL se cierra
LokkLatch PRO- SL se puede usar en
automáticamente cuando la puerta está cerrada y el cerrojo traba completamente la
puertas con dirección derecha o
caja de la cerradura hembra. Para destrabar desde el otro lado de la puerta simplemente
izquierda. Para determinar la dirección,
girar la llave en la dirección de las flechas hasta que el cerrojo se destrabe (ver Ilustración 1),
la caja del cerrojo deberá montarse al
luego empuje la puerta para abrir. Usted no tiene que empujar el botón del Juego de acceso
poste de la cerca y en el mismo lado
exterior (JAE) para hacer funcionar este cerrojo. Retirar la llave en la posición de las 12.
de la puerta en que se encuentran las
Cuando se usan bisagras de auto-cierre,ajustar la tensión adecuada en ambas bisagras para
bisagras. Insertar los cuatro tornillos
Determinar la dirección
garantizar que el cerrojo se trabe completamente cuando la puerta se cierre por sí misma.
cortos como se indica en la ilustración.
correcta
ADVERTENCIA: El uso de LokkLatch PRO-SL en las puertas de las piscinas o albercas está
permitido únicamente en América del Norte.
CAMBIAR COMBINACIÓN: El LokkLatch PRO-SL puede cambiarse para instalar llaves nuevas en otras cerraduras de su
Ilustración 1
propiedad. Si desea hacerlo, NO instalar este producto hasta que no haya cambiado la combinación en ambas cerraduras.
Usar únicamente un cerrajero autorizado para cambiar la combinación del LokkLatch PRO-SL. Comunicarse con
DESTRABAR
D&D Technologies, si necesita asistencia.
Cerrar en
ANTES DE CONTINUAR:
la base
• El JAE deberá ser instalado antes de la caja del cerrojo.
• Instalar el soporte del poste a la caja del cerrojo. Ver “Instalación del soporte del poste” (arriba mencionada).
Ilustración 2
• Asegurarse de que el marco de la puerta y el poste de la cerca se encuentren alineados (no desviados). Ver raya entrecortada X.
Ilustración 7
• El espacio visible entre el poste de la cerca y el marco de la puerta deberá ser de entre 1/2" (13mm) y 1 1/2" (38mm).
1” (25mm) es el espacio ideal.
EXTREMO DEL CERROJO
Tapones de
• El LokkLatch PRO-SL para puertas metálicas o de madera puede encajarse en postes para cercas de entre 1 1/2" y 6”
recubrimiento
Asentar firmemente
Marco
de
la
(38-150mm) de profundidad.
el pasador de empuje
OBSERVACIÓN: Si se instala el LokkLatch PRO-SL a una puerta para piscina o alberca o spa (ver ADVERTENCIA arriba
puerta
contra el extremo del
mencionada), consultar a su autoridad oficial local para la construcción sobre los requisitos para los códigos en su área.
cerrojo
a
JUEGO DE ACCESO
la puert
El cilindro de la cerradura en la caja del cerrojo (Ilustración 7) deberá usarse para determinar la altura legal del cerrojo
arco de en
EXTERIOR
m
l
e
e
en las puertas de piscinas o spas.
qu
entr
(JAE)
rse de
e encu
Asegura del cerrojo s
HERRAMIENTAS NECESARIAS: Lápiz, perforador eléctrico, mecha de 3 1/2" (89mm) # 2 Phillips, destornillador manual
)
te
s
s
o
o
d
p
y el
desvia
Pasador de empuje
# 2 Phillips, mechas de 5/32" (4mm) y 1/2" (13mm), mecha plana tipo pala de 5/8" (16mm) y sierra para metales.
os (no
alinead
PROCEDIMIENTO PARA LA INSTALACIÓN:
Juego
de acceso
exterior
(JAE)
Poste de la
cerca
Pasador
de empuje
Tapones de
recubrimiento
Remache
Ilustración 3
/"
5 8
1. Determinar la dirección correcta (es decir, izquierda o derecha) del Juego de acceso exterior (JAE). El JAE deberá ser
instalado al poste de la cerca en el lado opuesto de la puerta como las bisagras. El cilindro de la cerradura deberá estar en la
BOTÓN
parte inferior del JAE (ver Ilustración 1). Si la dirección establecida en fábrica es incorrecta, retirar los dos tornillos pequeños
Soporte del JAE
y el soporte JAE en la parte trasera y revertir el botón y soporte 180˚ (ver Ilustración 3). El agujero circular en el soporte JAE
deberá estar en posición sobre el extremo de la cerradura (Ilustración 2). Volver a insertar el botón y el soporte del JAE en la
Ilustración 4
Agujero 1
caja del JAE. Volver a insertar los dos tornillos usando únicamente el destornillador manual.
2. Marcar la altura adecuada en el poste de la cerca usando un lápiz. Esto se determina mediante el cilindro de la cerradura
en la caja del cerrojo (Ilustración 7). Colocar en posición la guía de encaje en el poste de la cerca de manera que el agujero 1
se encuentre a la misma altura que la marca hecha recientemente con un lápiz. Sostener la guía firmemente contra la esquina
del poste de la cerca de manera que el agujero 1 se encuentre en frente del poste de la cerca y el lado largo de la guía de encaje
Trazar una raya
Guía de encaje
se encuentre entre el poste de la cerca y el marco de la puerta. Marcar el agujero 1 usando un lápiz (Ilustración 4). Trazar una
Fre
raya a través de la parte superior de la guía. Observación: El agujero 2 se usa únicamente en postes para cercas de madera
nte
pos del
para fresar, lo cual permite que la pata lateral de fijación se encuentre nivelada con el poste.
t
cerc e de la
3. Si su poste es más profundo que la guía de encaje, girar ésta 180˚ de manera que la raya trazada a través del poste se
a
Guía de
encuentre alineada con la parte superior de la guía. Terminar la raya con lápiz para que alcance a través de todo el poste
encaje
de la cerca.
Agujero 1 Ilustración 5
4. Colocar firmemente en posición la guía contra la esquina usando la raya del lápiz como guía. Marcar el agujero 1 en el lado
opuesto que se encuentra directamente opuesto al primer agujero marcado (ver Ilustración 5).
5. Perforar atravesando ambos lados del poste de la cerca usando una mecha de 1/2" (13mm) para postes metálicos y la mecha
Alinear
plana tipo pala de 5/8" (16mm) para postes de madera. Observación: Asegurarse de nivelar el perforador en los postes de
con la raya
madera de modo que ambos agujeros se encuentren en el centro.
l
ra de
trase
6. El pasador de empuje deberá estar asentado firmemente en el JAE (Ilustración 2). Insertar el pasador de empuje a través del
Parte e la cerca
d
poste y colocar el JAE firmemente contra la esquina del poste. Colocar en posición el JAE de manera que el pasador de empuje se
poste
JUEGO DE
encuentre en el centro del agujero sin rozar contra el borde del mismo. Esto permite el movimiento libre del pasador de empuje.
Ilustración 6 ACCESO
Marcar cuatro agujeros para perforar usando un lápiz (Ilustración 6).
El pasador de
EXTERIOR
5
7. Para los postes metálicos para cerca pre-perforar usando una mecha de /32" (4mm). Fijar el JAE al poste de la cerca usando empuje debe
cuatro tornillos de autoperforación de 1” (25mm). No dejar que el JAE se mueva de posición al insertar los tornillos. Ajustar los sobresalir 5/8”
(16mm) después
tornillos manualmente con un destornillador.
8. Usar la guía de encaje para determinar el largo correcto del pasador de empuje. Deslizar la guía por encima del pasador de de cortar
empuje como se indica en la Ilustración 6. Trazar una raya a través del pasador de empuje en el borde de la guía. Cortar el
Cortar el extremo a
Guía de
largo deseado usando la sierra para metales. Observación: Se puede retirar el pasador de empuje para cortar. Asegurarse de
nivel con la guía de
encaje
volver a acomodar firmemente el pasador de empuje por encima del extremo de la barra cuando termina (Ilustración 2).
encaje
5
El pasador de empuje deberá sobresalir /8" (16mm) del poste de la cerca cuando se asienta firmemente en el JAE.
X
Tomillo de la
cerradura hembra
Ilustración 8
C
Caja del
cerrojo
Caja de la
cerradura hembra
Tapones de
recubrimiento
Soporte
del poste
C
Ranura de la
lengua
Tapones de
recubrimiento
Cilindro del
cerrojo
Alinear el pasador de
empuje para homologarse
con el ángulo de agujero
cuadrado
Para un version de nuestra garantia limitada de por vida descargable en Adobe Acrobat (.pdf), vaya a nuestro sitio
Web en www.ddtechglobal.com
AUSTRALIA: Unit 6, 4-6 Aquatic Dr, Frenchs Forest NSW 2086
USA: 7731 Woodwind Drive, Huntington Beach, CA 92647
)
(16
www.ddtechglobal.com
LLINSTR0030PA •instruct_LLPRO-SL_metal/wood 5 3 12