1
INSTALLATION MANUAL
Cab Command Center
VAN STORAGE SOLUTIONS
FOR THE WAY YOU WORK
Model Number 9012-3-01
WWW.WEATHERGUARD.COM
TM
ATTENTION: PLEASE READ AND UNDERSTAND ALL INSTRUCTIONS AND WARNINGS
BEFORE ASSEMBLING, INSTALLING OR USING THIS PRODUCT.
3
1
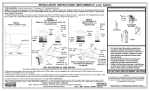
INSTALLING BLIND FASTENERS
5
Place a drop of oil on the black oxide
6
bolt before assembling as shown on
right. Place the Blind Fastener in the
7/16 Wrench
(Or 7/16 Socket)
hole and use a 7/16 wrench to tighten
black hex bolt until the Blind Fastener
is fully seated. When setting black hex
2
bolt, it will start out hard. As the Blind
Fastener “bulbs” out it will get easier,
Black Oxide Bolt
Flat Washer
until it bottoms out or sets. Make sure
the Blind Fastener and Installation
7
Tool do not turn during installation.
9/16 Wrench
Installation Tool
Blind Fastener
6
8
WARNING
Prior to drilling, check under vehicle for fuel tanks,
fuel lines, brake lines, electric wires, etc. to avoid
cutting or puncturing them. Do not use Blind
Fasteners in these areas.
7
INSTALLATION STEPS
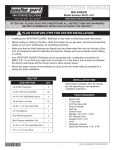
STEP 1. When assembling mounting base, position the support braces between the mounting feet and the mounting
plate.
STEP 2. Assemble mounting base legs to mounting base with 1/4-20 x 1/2" Tamper-resistant Torx® mounting Screws
or the 1/4-20 x 3/4" Bolts.
STEP 3. After assembling the support braces and mounting feet to each end of the mounting plate, cut the adhesive
backed foam strip into 2” pieces and attach a piece to each end of the support braces.
STEP 4. Locate mounting bracket between seats and mark the location for the mounting bolts. Allow clearance front to
back and side to side.
STEP 5. Install four blind fasteners. Refer to the Instructions for Installing Blind Fasteners section.
STEP 6. Attach mounting bracket to van floor using the tamper-resistant Torx® bolts or the 1/4-20 x 1-1/4" Bolts.
STEP 7. Attach Cab Command Center to mounting base by slipping mounting tab on base into slot in Cab Command
Center, align the latch tab from the base through the floor of the Cab Command Center and latch it to the base.
STEP 8. Attach map holder to the front of the Cab Command Center with three 1/4-20 mounting bolts and lock nuts.
2
Part No. 24-0303 REV. D ECN 5305 04/13