1
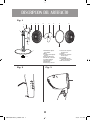
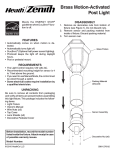
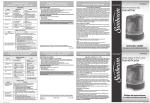
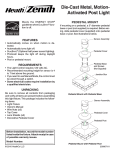
MODEL/MODELO
SF1600
Instruction Manual
16” STAND FAN
PLEASE READ ALL INSTRUCTIONS BEFORE USING
Manual de Instrucciones
VENTILADOR DE PEDESTAL DE 40,6 CM
LEA TODAS LAS INSTRUCCIONES ANTES DE USAR
00SF1600-LA813_13ESM1.indd 1
4/3/13 4:50 PM
IMPORTANT SAFEGUARDS
When using electrical appliances, basic safety precautions should always be taken
including the following:
READ ALL INSTRUCTIONS BEFORE USING THE APPLIANCE.
• Use fan only for purposes described in the instruction manual.
• To protect against electrical shock do not immerse unit, plug or cord in water or spray
with liquids. Plug the appliance directly into an electrical outlet of the same voltage as
that of the rating plate in the unit.
• Close supervision is necessary when any appliance is used by or near children.
• Unplug from outlet when not in use, when moving fan from one location to another,
before putting on or taking off parts and before cleaning.
• Avoid contact with moving parts.
• DO NOT operate in the presence of explosives and/or flammable fumes.
• To avoid fire hazard, NEVER place the cord under rugs or any parts near an open
flame, cooking or other heating appliance.
• DO NOT operate any appliance with a damaged cord or plug or after the appliance
malfunctions or has been damaged in any manner. Return this appliance only to the
nearest Authorized Oster® Service Center for examination, repair or adjustment.
• The use of attachments not recommended or sold by the appliance manufacturer may
cause hazards.
• DO NOT use outdoors.
• DO NOT let the cord hang over the edge of a table, counter or come in contact with
hot surfaces or leave exposed to high traffic areas.
• To disconnect, grip plug and pull from wall outlet. Never yank on cord.
• Always use on a dry, level surface.
• DO NOT operate fan until fully assembled with all parts properly in place.
• This product is intended for household use ONLY and not for commercial or industrial
applications.
SAVE THESE INSTRUCTIONS
1
00SF1600-LA813_13ESM1.indd 2
4/3/13 4:50 PM
DESCRIPTION OF THE APPLIANCE
Fig. 1
4
7
5
8
9
10
11
12
13
15
1
6
14
2
3
1. Height Adjustment Collar
2. Base
3. Base Securing Screw
4. Motor Housing
5. Oscillation Knob
6. Thumbscrew
7. Motor Shaft
8. Handle
9. Rear Guard
Fig. 2
10. Guard Retaining Nut
11. Fan Blade
12. Blade Retaining Nut
13. Shroud
14. Guard Locking
Screw/Nut
15. Front Guard
Fig. 3
2
00SF1600-LA813_13ESM1.indd 3
4/3/13 4:50 PM
INSTRUCTIONS FOR USE
BEFORE USING FOR THE FIRST TIME
Read and follow all the instructions for this section on use and care and find a place to
keep this instruction manual ready for future reference.
For your convenience, record the complete model number (located at the bottom of the
motor) and the date you received the product, together with your purchase receipt and
attach to the warranty and service information. Retain in the event that the warranty
service is required.
NOTE: The use of attachments not recommended or sold by Sunbeam Products, Inc.
may cause fire, electrical shock, injury or damage to the product.
ASSEMBLY INSTRUCTIONS (see Figure 1)
1. Attach the lower pole to the base, insert the base securing screw and tighten the
screw into the base. Make sure to align the slot on the lower pole with the rib on the
base.
2. Pull out the inner extension tube and refit/tighten the collar. CAUTION: The collar
must be fully tightened before assembling the motor section to the pedestal
stand.
3. Loosen the thumbscrew on the rear of the motor assembly. Fit the motor assembly to
the inner extension tube and tighten the thumbscrew. CAUTION: The thumbscrew
must be fully tightened before the fan is operated.
4. Remove the blade retaining nut (turning clockwise) while holding motor shaft. Remove
the guard retaining nut (turning counter-clockwise) while holding motor housing. Take
off the motor shaft sleeve protector and discard.
5. Set the rear guard in the proper position (carry handle up) on the motor assembly.
Then screw on the guard retaining nut (turning clockwise) until tight.
6. Install the blade onto the shaft of the motor assembly and screw on the blade retaining
nut (turning counter-clockwise while holding the blade) until tight.
7. Loosen, but do not remove the guard locking screw/nut from shroud. Place the shroud
on the rear guard with the guard locking screw/nut at the bottom. Assemble the front
guard into shroud so that all sides snap. Rotate the front guard until the Oster® logo is
upright.
8. Secure both guards firmly by fitting and tightening the guard locking screw/nut located
at the two ends of the shroud. CAUTION: Do not over-tighten.
3
00SF1600-LA813_13ESM1.indd 4
4/3/13 4:50 PM
OPERATING INSTRUCTIONS
1. Once unit is fully assembled (see Assembly Instructions section) place unit on flat
level surface and plug it into an appropriate electrical outlet.
2. Press the appropriate button to select the desired fan speed or to turn it off. “0” for
“OFF”, “1” for Low Speed, “2” for Medium Speed and “3” for High Speed (see Figure
2).
3. To make the fan head oscillate, push the oscillation knob DOWN. To stop the
oscillation, pull the oscillation knob UP (see Figure 3).
4. Adjust the tilt of the fan head to the desired angle by pushing gently up or down on
the fan guard, while holding the fan by the motor assembly/control panel.
CAUTION: The fan should be switched off before making this adjustment.
Please note that the head will not latch into the low or mid position unless the guard
and blade have been fitted to the motor.
5. To adjust the height of the pedestal fan, loosen the height adjustment collar. Carefully
raise or lower the fan and firmly re-tighten the height adjustment collar.
CAUTION: The fan should be switched off before making this adjustment.
MAINTENANCE AND CLEANING
Follow these instructions to correctly and safely care for your fan. Please remember:
• Always unplug the fan before cleaning.
• Do not allow water to drip on or enter into fan housing.
• Be sure to use a soft cloth moistened with a mild soap solution.
• Do not use any of the following as a cleaner: gasoline, thinner, or benzene.
FAN CLEANING
Clean the fan grill, housing and base with a soft, damp cloth. DO NOT ATTEMPT TO
REMOVE THE FAN BLADE. Please use caution around the motor housing area. Do not
allow the motor or other electrical components to be exposed to water.
FAN STORAGE
When storing your fan in the off season, it is important to keep it in a safe dry location. It
is important to protect the fan head from dust. WE STRONGLY RECOMMEND USING
THE ORIGINAL BOX FROM PURCHASE.
4
00SF1600-LA813_13ESM1.indd 5
4/3/13 4:50 PM
PRECAUCIONES IMPORTANTES
Para reducir el riesgo de incendio, descarga eléctrica o daños personales, siempre se
deben seguir precauciones de seguridad cuando se utiliza cualquier artefacto eléctrico,
incluyendo las siguientes:
LEA TODAS LAS INSTRUCCIONES ANTES DE UTILIZAR SU VENTILADOR DE PEDESTAL.
• Utilice este Ventilador de Pedestal sólo para los propósitos descritos en este manual.
• Para protegerse de descargas eléctricas, no sumerja la unidad, enchufe o cordón en
agua ni rocíe con ningún líquido, y enchúfela en un tomacorriente del mismo voltaje que
el que está indicado en la placa de características eléctricas del artefacto.
• Es necesaria una supervisión cercana cada vez que un artefacto eléctrico es utilizado
por niños o cerca de ellos.
• Desenchufe el cable del tomacorriente cuando no esté utilizando su Ventilador de
Pedestal, cuando lo mueva de un lugar a otro, antes de colocarle o retirarle piezas o
antes de limpiarlo.
• Evite el contacto con piezas en movimiento.
• NO opere en presencia de explosivos y/o gases inflamables.
• Para evitar el riesgo de incendios, NUNCA coloque el cable debajo de alfombras o ninguna
de las partes cerca de una llama, cocina o cualquier otro artefacto que se caliente.
• NO opere ningún artefacto con un cordón o enchufe dañados, después de que el
artefacto haya fallado o si se cae al suelo o se daña de cualquier otra manera. Regrese
el artefacto al Centro de Servicio Oster® Autorizado más cercano para examinarlo,
repararlo o para ajustarlo mecánica o eléctricamente.
• El uso de accesorios no recomendados o vendidos por el fabricante podría llegar a ser
peligroso.
• NO permita que el cable cuelgue del borde de la mesa o mostrador, ni lo deje expuesto
a áreas de alto tráfico.
• NO utilice este artefacto al aire libre.
• Para desconectarlo, tome el enchufe y retírelo del tomacorriente de la pared, NUNCA
hale el cable.
• Utilice siempre su Ventilador de Pedestal sobre una superficie seca y plana.
• NO opere el ventilador hasta que se encuentre completamente armado con todas las
piezas en su lugar.
• Este artefacto es SOLO para uso doméstico y no debe de utilizarse para ningún
propósito comercial o industrial.
CONSERVE ESTAS INSTRUCCIONES
5
00SF1600-LA813_13ESM1.indd 6
4/3/13 4:50 PM
DESCRIPCION DEL ARTEFACTO
Fig. 1
4
7
5
8
9
10
11
12
13
15
1
6
14
2
3
1. Arandela de ajuste
de la altura
2. Base
3. Tornillo para apretar
la base
4. Carcasa del motor
5. Perilla de oscilación
6. Tornillo manual
7. Eje del motor
8. Agarradera
9. Protector posterior
Fig. 2
10. Tuerca de sujeción
del protector
11. Aspas
12. Tuerca de sujeción
de las aspas
13. Carenado
14. Tornillo/tuerca de
apriete del protector
15. Protector frontal
Fig. 3
6
00SF1600-LA813_13ESM1.indd 7
4/3/13 4:51 PM
INSTRUCCIONES DE OPERACION
ANTES DE UTILIZAR SU VENTILADOR DE PEDESTAL POR PRIMERA VEZ
Lea y siga todas las instrucciones de operación y seleccione un lugar para conservar
este manual de instrucciones listo para referencia futura.
Para su conveniencia, escriba el número de modelo completo (ubicado en la parte
trasera del motor) y la fecha en que usted recibió el producto, junto con el recibo de
compra y préndalo en la información de servicio y garantía. Guárdelo en caso de que
sea necesario obtener servicio bajo garantía.
NOTA: El uso de dispositivos no recomendados o vendidos por Sunbeam Products, Inc.
podrían causar un incendio, descarga eléctrica, heridas o daños al producto.
INSTRUCCIONES PARA ENSAMBLAR (ver Figura 1)
1. Fije el poste inferior a la base, inserte el tornillo para apretar la base. Asegúrese de
alinear la guía del tubo cilíndrico con la guía de la base.
2. Hale el tubo de extensión interno y vuelva a ajustar/apretar la arandela.
PRECAUCIÓN: la arandela debe estar bien apretada antes de ensamblar la
sección del motor en el pedestal.
3. Afloje el tornillo manual que se encuentra en la parte posterior del ensamble del
motor. Acople el ensamble del motor en el tubo de extensión interno y apriete el
tornillo manual.
PRECAUCIÓN: el tornillo manual debe estar bien apretado antes de hacer
funcionar el ventilador.
4. Saque la tuerca de sujeción de las aspas (girándola hacia la derecha), mientras
sujeta el eje del motor. Saque la tuerca de sujeción del protector (girándola hacia la
izquierda), mientras sujeta la carcasa del motor. Retire la cubierta protectora del eje
del motor y deséchela.
5. Coloque el protector posterior en la posición correspondiente (con la agarradera
hacia arriba) en el ensamble del motor. A continuación, enrosque la tuerca de
sujeción del protector (girándola hacia la derecha) hasta que quede apretada.
6. Instale las aspas en el eje del ensamble del motor y enrosque la tuerca de sujeción
de las aspas (girándola hacia la izquierda mientras sujeta las aspas) hasta que quede
apretada.
7. Afloje sin llegar a sacar del carenado el tornillo/tuerca de apriete del protector.
Coloque el carenado en el protector posterior con el tornillo/tuerca de apriete del
protector en la parte inferior. Ensamble el protector frontal en el carenado de modo
que todos los lados encajen. Gire el protector frontal hasta que el logotipo de Oster®
quede en posición vertical.
8. Fije bien ambos protectores ajustando y apretando el tornillo/tuerca de apriete del
protector que se encuentra a ambos extremos del carenado.
PRECAUCIÓN: no apriete en exceso.
7
00SF1600-LA813_13ESM1.indd 8
4/3/13 4:51 PM
INSTRUCCIONES PARA EL FUNCIONAMIENTO
1. Una vez que la unidad esté completamente ensamblada (consulte la sección de
Instrucciones para ensamblar) coloque la unidad en una superficie plana y nivelada, y
enchúfela en un tomacorriente adecuado.
2. Oprima el botón correspondiente para seleccionar la velocidad deseada o para
apagar el ventilador. “0” para “apagado”, “1” para baja velocidad, “2” para velocidad
media y “3” para alta velocidad (ver Figura 2).
3. Para hacer que el cabezal del ventilador oscile, oprima la perilla de oscilación. Para
detener la oscilación, hale la perilla de oscilación (ver Figura 3).
4. Ajuste la inclinación del cabezal del ventilador al ángulo deseado tirando levemente
del protector del ventilador hacia arriba o hacia abajo mientras sujeta el ventilador por
el ensamble del motor/panel de control.
PRECAUCIÓN: se debe apagar el ventilador antes de realizar este ajuste.
Tenga en cuenta que el cabezal no se mantendrá en la posición baja o media a
menos que el protector y las aspas estén fijadas al motor.
5. Para ajustar la altura del pedestal del ventilador, afloje la arandela de ajuste de la
altura. Alce o baje cuidadosamente el ventilador y vuelva a apretar firmemente la
arandela de ajuste.
PRECAUCIÓN: se debe apagar el ventilador antes de realizar este ajuste.
MANTENIMIENTO Y LIMPIEZA
Siga las siguientes instrucciones para un correcto y seguro cuidado de su Ventilador de
Pedestal, por favor recuerde:
• Siempre desenchufe el Ventilador antes de limpiarlo o desarmarlo.
• No permita que gotee agua en la Caja del Ventilador.
• Asegúrese de utilizar una toalla suave y humectada con una solución de jabón delicada.
• No utilice ninguno de los siguientes productos como limpiadores: gasolina, disolvente,
bencina.
LIMPIEZA DEL VENTILADOR
Limpie las Rejillas del Ventilador, la Caja del Motor y la Base con una toalla suave y
húmeda con una solución jabonosa delicada. NO INTENTE REMOVER LAS ASPAS
DEL VENTILADOR. Por favor tenga cuidado alrededor del área de la Caja del Motor. No
permita que el motor o cualquier otro componente eléctrico estén expuestos al agua.
ALMACENAJE
Cuando desee guardar su Ventilador de Pedestal es importante mantenerlo en un sitio seguro
y seco. Es importante proteger del polvo el Cabezal del Ventilador. RECOMENDAMOS EN
GRAN MANERA UTILIZAR LA CAJA ORIGINAL DEL PRODUCTO.
8
00SF1600-LA813_13ESM1.indd 9
4/3/13 4:51 PM
1 – YEAR LIMITED WARRANTY
Sunbeam Products, Inc. and its affiliates and its subsidiaries warrant that for a period of
ONE year from the date of purchase, this product will be free from defects in material and
workmanship. Sunbeam Products, Inc. and its affiliates and its subsidiaries at its choice
will repair this product or any component of the product found to be defective during the
warranty period.
This warranty is valid for the original retail purchaser from the date of initial retail
purchase and is not transferable (Not applicable for Mexico). For this warranty to be
honored it will be necessary to present the product, the purchase receipt (except Mexico
and Venezuela) and this policy filled out, sealed and dated by the retailer who sold the
product, in any Authorized Service Center listed in this certificate.
Oster® dealers, Authorized Oster® Service Centers, or retail stores selling Oster® products
do not have the right to alter, modify, or any way change the terms and conditions of
this warranty. It includes the repair or free replacement of any faulty accessory, part or
component and the labor required to check, diagnose and repair the product. It also
includes any expenses related to the transportation of the product needed to fulfill this
policy from the date it is received within the Network of Authorized Service Centers.
This certificate is only effective to the USER as long as the appliance is used for
HOUSEHOLD USE only.
Sunbeam Products, Inc. and its affiliates and its subsidiaries will not cover under warranty
the following cases:
Applicable to Latin America:
a) If product was used in any manner other than the intended one.
b) If product has not been used according to the instruction manual included with the
product.
c) If product was altered or repaired by anyone other than those authorized by the
national manufacturer, importer or respective merchant.
Applicable to Central and South America:
d) Use of incorrect current or voltage or faulty electric power supply.
e) Normal wear and tear of parts and accessories resulting from regular use.
f) Damages resulting from transportation or handling of appliance.
g) Glass containers, light bulbs and accessories.
h) Industrial or commercial use of appliance.
The authorized Oster® service centers will continue at your disposal to grant you the
service you deserve with the trust of the Oster® brand.
9
00SF1600-LA813_13ESM1.indd 10
4/3/13 4:51 PM
1 AÑO DE GARANTIA LIMITADA
Sunbeam Products, Inc. y sus afiliadas y sus subsidiarias garantiza que este producto
estará libre de defectos en material o mano de obra por un periodo de UN año a partir
de la fecha de la compra. Sunbeam Products, Inc. y sus afiliadas y sus subsidiarias, a su
elección, reparará este producto o cualquier componente del producto que se encuentre
defectuoso durante el período de garantía.
Esta garantía es válida para el comprador original al detalle desde la fecha de compra
original al detalle y no es transferible (No aplica para México). Para hacer efectiva
esta garantía no deben exigirse mayores requisitos que la presentación del producto,
la factura de compra (excepto para México y Venezuela) y esta póliza, debidamente
llenada, sellada y fechada por el establecimiento que lo vendió, en cualquiera de los
Centros de Servicio Autorizado que se indicaran en este certificado.
Los concesionarios Oster®, Centros de Servicio Oster® Autorizados, o almacenes
de ventas al detalle de productos Oster® no tienen el derecho de alterar, modificar o
cambiar, de manera alguna, los términos y condiciones de esta garantía. Incluye la
reparación gratuita de cualquier parte, pieza o componente que eventualmente fallara,
y la mano de obra necesaria para su revisión, diagnóstico y reparación, así como los
gastos de transportación del producto, a partir de la fecha de su recepción dentro de la
Red de los Centros de Servicio Autorizado, derivados del cumplimiento de esta póliza.
El presente certificado ampara únicamente al USUARIO, siempre y cuando el artecfacto
sea aplicado al USO DOMESTICO.
Sunbeam Products, Inc. y sus afiliadas y sus subsidiarias se exime de hacer efectiva
esta garantía sólo en los siguientes casos:
Aplicables para Latinoamérica:
a) Cuando el producto se hubiese utilizado en condiciones distintas a las normales.
b) Cuando el producto no hubiese sido operado de acuerdo con el instructivo de uso
que se le acompaña.
c) Cuando el producto hubiese sido alterado o reparado por personas no autorizadas
por el fabricante nacional, importador o comercializador responsable respectivo.
Aplicables para Centroamérica y Suramérica:
d) Uso en voltaje o corriente incorrecta, o fallas en el suministro eléctrico.
e) Desgaste normal de partes y piezas por efecto de uso.
f) Daños ocasionados por transporte o manipulación del artefacto.
g) Recipiente de vidrio, focos y accesorios.
h) Uso industrial o comercial del artefacto.
Los centros de servicio Oster® autorizados, seguirán a sus órdenes para brindarle el
servicio que usted se merece, siempre con la confianza de la marca Oster®.
10
00SF1600-LA813_13ESM1.indd 11
4/3/13 4:51 PM
Producto/Product:
SELLO
STAMP
Marca/Brand:
Modelo/Model:
Día/Day: Mes/Month:
Año/Year:
La presente póliza de garantia contará a partir de la fecha de entrega del producto.
This warranty policy will be will be effective from the date the product is delivered.
SELLO
STAMP
TIMBRE
SEAL
SELLO DEL ESTABLECIMIENTO
STAMP OF THE MERCHANT
Firma del establecimiento vendedor/ Signature from the selling merchant
©2013 Sunbeam Products, Inc. All rights reserved. Distributed by Sunbeam Latin America,
LLC, 5200 Blue Lagoon Drive, Suite 470, Miami, FL 33126.
©2013 Sunbeam Products, Inc. Todos los derechos reservados. Distribuido por Sunbeam
Latin America, LLC, 5200 Blue Lagoon Drive, Suite 470, Miami, FL 33126.
Printed in Venezuela.
P.N. 157796 Rev. A
00SF1600-LA813_13ESM1.indd 12
www.oster.com
00SF1600-LA813_13ESM1
Impreso en Venezuela.
GCDS-OST29191-ZZ
4/3/13 4:51 PM