1
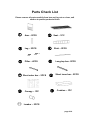
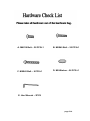
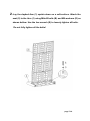
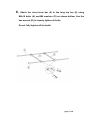
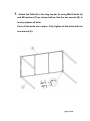
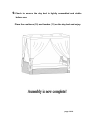
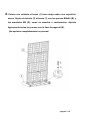
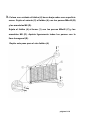
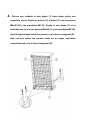
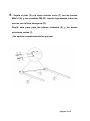
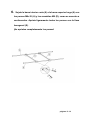
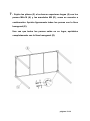
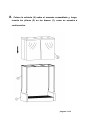
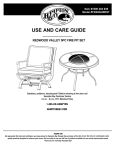
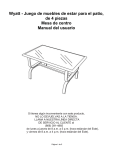
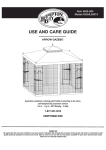
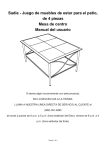
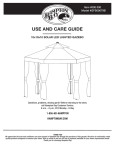
NAPLES DAY BED
HDC#:TBD
MFG#:FBS60408
Please read over this instruction manual as it will save time in the
assembly of this product.
Note:
Prior to assembly, please open and lay parts out on a clean, soft
flat surface to avoid any damages to the product’s finish.
page 1-14
Caution:
The Naples Day bed was made for the explicit purpose of providing
outdoor functions and is not to be used as a toy. This product is not
intended for inclement/severe weather in any form including, but not
limited to: rain, hail, sleet, snow and/or wind. Manufacturer recommends
that with formidable weather approaching you store and/or cover this
day bed. Do not locate product near any open flame. Do not use product
as a support. Do not shake, lean or climb on product. Children under age
of 10, near the product, should be supervised by a competent adult at all
times. This product is NOT intended for commercial use and will void the
warranty.
WARRANTY
Yotrio Corporation, City of Industry, CA. 91748, extends two years frame
and two years fabric limited warranty to the original purchaser as a sign
of our dedication to the highest possible quality standards. The warranty
is designed to cover the daybed under normal residential use. This
Warranty is non-transferable and void if the furniture is used in
non-residential environment and/or has been abused. The warranty also
becomes void in the event the daybed has been damaged by acts of God,
calamity or misuse. This warranty does not cover in the event of
inclement weather such as rain, hail, sleet, snow or wind. We reserve the
right to make substitutions with similar merchandise, if the model in
questions is no longer in production. The manufacturer recommends
that with ANY formidable weather approaching you cover and store your
day bed in a safe location.
CARE AND MAINTENANCE:
For best results, clean the frame with damp cloth and dry thoroughly.
This will help prevent mildew by removing dirt particles that may
accumulate. Do not use abrasive materials or cleaners. Cushions may be
cleaned by hand with mild soap and water. Rinse cushions thoroughly
and allow drip-drying. Do not machine wash or tumble dry as cushions
may shrink. Do not use bleach or solvents on fabric. In order to prolong
the life of your day bed, when not in use or in inclement weather (rain,
hail, sleet, snow, wind), fire, extreme heat and freezing conditions, the
day bed needs to be stored in a dry, sheltered place.
page 2-14
DO NOT RETURN TO RETAILER
IF YOU HAVE ANY QUESTIONS OR CONCERNS
PLEASE VISIT OUR WEBSITE AT:
www.homedecorators.com
OR TOLL FREE AT:
1-800-245-2217
MONDAY-FRIDAY 8:30 AM TO 5:00 PM PACIFIC STANDARD TIME / 11:30
AM TO 8:00PM EASTERN STANDARD TIME
Warranty Coverage Requirements:
1. Copy of your Original Store Receipt.
2. Pictures of the damaged parts.
3. You must know the name of your product and any corresponding
item numbers as well as the name of the store where you
purchased the item.
4. Please gather all of this information BEFORE you call customer
service.
page 3-14
Parts Check List
Please remove all parts carefully from box and lay out on clean, soft
surface to protect product’s finish.
①
Arm – 2PCS
②
Seat – 1PC
③
Leg – 2PCS
④
Skirt – 2PCS
⑤
Pillar – 4PCS
⑥
⑦
Short outer bar – 2PCS
⑨
Canopy – 1PC
⑪
Lumber – 2PCS
⑧
⑩
Long top bar– 2PCS
Short inner bar – 2PCS
Cushion – 1PC
page 4-14
A. M6X18 Bolt – 28 PCS+1
B. M6X40 Bolt – 20 PCS+1
C. M6X45 Bolt – 8 PCS+1
D. M6 Washer – 56 PCS+1
E. Hex Wrench – 2PCS
page 5-14
1.
Lay the daybed Seat (2) upside down on a soft surface.
Attach the daybed leg (3) to the seat (2) using M6x18 bolts
(A) and M6 washers (D). Use the hex wrench (E) to fully
tighten all the bolts. Repeat this step for the other daybed
leg(3).
page 6-14
2. Lay the daybed Arm (1) upside down on a soft surface. Attach the
seat (2) to the Arm (1) using M6x40 bolts (B) and M6 washers (D) as
shown bellow. Use the hex wrench (E) to loosely tighten all bolts.
Do not fully tighten all the bolts!
page 7-14
3. Lay the daybed skirt (4) upside down on a soft surface. Attach the
seat (2) to the skirt (4) using M6x40 bolts (B) and M6 washers (D).
Attach the Seat (2) to the Arm (1) using M6x45 bolts(C) and M6
washers(D). Use the hex wrench (E) to loosely tighten all bolts.
Repeat this step for the other daybed skirt (4).
Do not fully tighten all the bolts!
page 8-14
4.
Lay the other daybed arm (1) upside down on a soft surface.
Attach the seat (2) to the arm (1) using M6x40 bolts (B) and M6
washers (D). Attach the other arm (1) to the two skirts (4) using
M6x45 bolts (C) and M6 washers(D). Use the hex wrench (E) to
loosely tighten all bolts.
Once all the bolts are in place. Fully tighten all the bolts with the
hex wrench (E).
page 9-14
5.
Attach the Pillar (5) to the short outer bar (7) using M6x18 bolts
(A) and M6 washers (D). Use the hex wrench (E) to loosely tighten
all bolts.
Repeat this step for the remaining pillars(5) and the other short
outer bar(7).
Do not fully tighten all the bolts!
page 10-14
6.
Attach the short inner bar (8) to the long top bar (6) using
M6x18 bolts (A) and M6 washers (D) as shown bellow. Use the
hex wrench (E) to loosely tighten all bolts.
Do not fully tighten all the bolts!
page 11-14
7.
Attach the Pillar (5) to the long top bar (6) using M6x18 bolts (A)
and M6 washers (D) as shown bellow. Use the hex wrench (E) to
loosely tighten all bolts.
Once all the bolts are in place. Fully tighten all the bolts with the
hex wrench (E).
page 12-14
8.
Place the canopy (9) onto the assembled frame, then insert the
pillar (5) into the arm (1) as shown bellow.
page 13-14
9.Check
to ensure the day bed is tightly assembled and stable
before use.
Place the cushions (10) and lumbar (11) on the day bed and enjoy.
page 14-14
CAMA DE DÍA NAPLES
NÚM. DE HDC: TBD
NÚM. DE FABRICANTE: FBS60408
Lee este manual de instrucciones, ya que te ahorrará tiempo al ensamblar este
producto.
Nota:
Antes del ensamblaje, abre la caja y coloca las piezas sobre una superficie
limpia y suave para evitar daños al acabado del producto.
páginas 1-14
Precaución:
La cama de día Naples fue fabricada con el propósito explícito de usarse como
mobiliario de exteriores y no como juguete. Este producto no está diseñado para
resistir las inclemencias del tiempo o condiciones severas del clima en ninguna
forma, incluidas pero no limitadas a: lluvia, granizo, aguanieve, nieve y/o viento. El
fabricante recomienda que guardes y/o cubras esta cama de día cuando se
aproximen condiciones climáticas adversas. No coloques el producto cerca de
ninguna llama expuesta. No utilices el producto como soporte. No sacudas, ni te
apoyes o subas sobre el producto. Un adulto responsable debe vigilar en todo
momento a los niños menores de 10 años cuando estén cerca del producto. Este
producto NO está diseñado para uso comercial y hacerlo anulará la garantía.
GARANTÍA
Yotrio Corporation, City of Industry, CA. 91748, extiende al comprador original una
garantía limitada de dos años para el armazón y dos años para la tela, como una
muestra de nuestros esfuerzos dirigidos a cumplir con las más altas normas de
calidad. La garantía cubre la cama de día bajo condiciones normales de uso
residencial. Esta garantía no es transferible y se anulará si se usa en entornos no
residenciales y/o se somete al maltrato. La garantía también se anulará si la cama
de día sufre daños por causas de fuerza mayor, catástrofes o uso incorrecto. Esta
garantía no cubre condiciones climáticas adversas como lluvia, granizo, aguanieve,
nieve o viento. Nos reservamos el derecho de sustituir el producto por mercancía
similar, si el modelo en cuestión ya no se fabrica. El fabricante recomienda que
cubras y guardes la cama de día en un lugar seguro cuando se aproxime
CUALQUIER tipo de condición climática adversa.
CUIDADO Y MANTENIMIENTO:
Para obtener mejores resultados, limpia el armazón con un paño húmedo y sécalo
completamente. Esto ayudará a prevenir la aparición de moho al quitar las
partículas de polvo que puedan acumularse. No utilices limpiadores o materiales
abrasivos. Los cojines se deben limpiar a mano con un jabón suave y agua.
Enjuaga bien los cojines y déjalos secar sin exprimir. No lavar los cojines en
lavadora ni secarlos en la secadora, ya que pueden encogerse. No apliques
blanqueador ni solventes en la tela. Para prolongar la vida útil de tu cama de día
cuando no la estés usando o durante un clima adverso (lluvia, granizo, aguanieve,
nieve, viento), fuego, calor extremo o congelamiento, debes guardarla en un lugar
seco y protegido.
páginas 2-14
NO LA DEVUELVAS AL MINORISTA
SI TIENES PREGUNTAS O INQUIETUDES
VISITA NUESTRO SITIO WEB:
www.homedecorators.com
O LLAMA AL NÚMERO GRATUITO:
1-800-245-2217
DE LUNES A VIERNES, DE 8:30 A.M. A 5:00 P.M. HORA ESTÁNDAR DEL PACÍFICO /
DE 11:30 A.M. A 8:00 P.M. HORA ESTÁNDAR DEL ESTE
Requisitos para la cobertura de la garantía:
1. Copia del recibo de compra original.
2. Fotos de las piezas dañadas.
3. Debes conocer el nombre de tu producto y cualquier otro número del artículo
correspondiente, así como el nombre de la tienda donde lo compraste.
4. Reúne toda esta información ANTES de contactar con el servicio al cliente.
páginas 3-14
Lista de verificación de piezas
Retira cuidadosamente todas las piezas de la caja y extiéndelas sobre una
superficie limpia y suave para proteger su acabado.
①
Brazo – 2 piezas
①
Asiento – 1 pieza
③
Pata – 2 piezas
④
Faldón
–
2
piezas
⑤
Pilar – 4 piezas
⑥
Barra superior larga – 2
piezas
⑦ Barra exterior corta – 2 ⑧
piezas
piezas
⑨
⑪
Cubierta – 1 pieza
Barra interior corta – 2
⑩
Cojín – 1 pieza
Almohada para la zona lumbar - 2 piezas
páginas 4-14
A. Perno M6X18 – 28+1 piezas
C. Perno M6X45 – 8+1 piezas
B. Perno M6X40 – 20+1 piezas
D. Arandela M6 –56+1 piezas
E. Llave hexagonal – 2 piezas
páginas 5-14
1.
Coloca con cuidado el asiento (2) boca abajo sobre una
superficie suave. Sujeta la pata (3) al asiento (2) con los
pernos M6x18 (A) y las arandelas M6 (D). Aprieta bien
todos los pernos con la llave hexagonal (E). Repite este
paso para la otra pata (3).
páginas 6-14
2. Coloca con cuidado el brazo (1) boca abajo sobre una superficie
suave. Sujeta el asiento (2) al brazo (1) con los pernos M6x40 (B) y
las arandelas M6 (D), como se muestra a continuación. Aprieta
ligeramente todos los pernos con la llave hexagonal (E).
¡No aprietes completamente los pernos!
páginas 7-14
3. Coloca con cuidado el faldón (4) boca abajo sobre una superficie
suave. Sujeta el asiento (2) al faldón (4) con los pernos M6x40 (B)
y las arandelas M6 (D).
Sujeta el faldón (4) al brazo (1) con los pernos M6x45 (C) y las
arandelas M6 (D). Aprieta ligeramente todos los pernos con la
llave hexagonal (E).
Repite este paso para el otro faldón (4).
¡No aprietes completamente los pernos!
páginas 8-14
4.
Coloca con cuidado el otro brazo (1) boca abajo sobre una
superficie suave. Sujeta el asiento (2) al brazo (1) con los pernos
M6x40 (B) y las arandelas M6 (D). Sujeta el otro brazo (1) a los
dos faldones (4) con los pernos M6x45 (C) y las arandelas M6 (D).
Aprieta ligeramente todos los pernos con la llave hexagonal (E).
Una vez que todos los pernos estén en su lugar, apriétalos
completamente con la llave hexagonal (E).
páginas 9-14
5.
Sujeta el pilar (5) a la barra exterior corta (7) con los pernos
M6x18 (A) y las arandelas M6 (D). Aprieta ligeramente todos los
pernos con la llave hexagonal (E).
Repite este paso para los pilares restantes (5) y las barras
exteriores cortas (7).
¡No aprietes completamente los pernos!
páginas 10-14
6.
Sujeta la barra interior corta (8) a la barra superior larga (6) con
los pernos M6x18 (A) y las arandelas M6 (D), como se muestra a
continuación. Aprieta ligeramente todos los pernos con la llave
hexagonal (E).
¡No aprietes completamente los pernos!
páginas 11-14
7.
Sujeta los pilares (5) a las barras superiores largas (6) con los
pernos M6x18 (A) y las arandelas M6 (D), como se muestra a
continuación. Aprieta ligeramente todos los pernos con la llave
hexagonal (E).
Una vez que todos los pernos estén en su lugar, apriétalos
completamente con la llave hexagonal (E).
páginas 12-14
8.
Coloca la cubierta (9) sobre el armazón ensamblado y, luego,
inserta los pilares (5) en los brazos (1), como se muestra a
continuación.
páginas 13-14
9.
Asegúrate de que la cama de día esté firmemente ensamblada y
estable antes de usarla.
Coloca el cojín (10) y las almohadas para la zona lumbar (11) en la
cama de día y ¡a disfrutar!
páginas 14-14