1
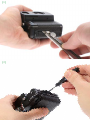
and the correction lens will be fixed (image 8).
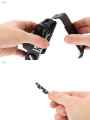
8.Screw the metal stand [F] into the camera’s tripod
screw mount (image 9).
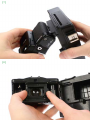
9.Slide the cold shoe adapter [G] into the Lomo
LC‑A’s hot shoe and attach the viewfinder [H]
(image 10).
10.Your Lomo LC‑A Instant Back+ is now ready to
rumble!
Shooting photos
With the Instant Back in place and the correction lens
properly fixed you are only seconds away from your
first shot. Here we go:
1.Insert two CR2 batteries (2x3V) into the Instant
Back’s battery compartment [I].
2.Turn on the Lomo LC‑A Instant Back+ by switching
the on/off switch [J] to ON.
3.Insert a new Fujifilm Instax Mini film.
4.Press the film ejection button [K] once to eject the
protection dark slide inside the film pack.
5.Set the ASA dial [M] of your Lomo LC‑A to ASA
200. This is the standard setting for using the Lomo
LC‑A Instant Back+. To make your image brighter or
darker you can adjust the ASA-settings to a higher
or lower level.
6.Cock the camera’s shutter by pulling the MX-switch
[N] at the bottom of the Lomo LC‑A+. If you are
using a Lomo LC‑A you need to – just like shooting
normally – manually wind on the film advance spool
[O] for each shot. This can be a bit tricky as parts
of the Instant Back cover the spool. But with a little
practice it’s an enjoyable exercise.
7.Set the focus (according to the Instant Back’s
distance-chart) and shoot.
21