1
7” MOTORIZED DVD RECEIVER
M P E G 4
ITALIANO
ENGLISH
MANUALE ISTRUZIONI
MANUAL INSTRUCTIONS
NOTICE DE MONTAGE ET D’EMPLOI
GEBRAUCHSANWEISUNGEN
MANUAL DE INSTRUCCIONES
VM 041
FRANÇAIS
DEUTSCH
ESPAÑOL
Note per la sicurezza
1. L’apparecchio va sempre e solo collegato ad un’alimentazione da 12 V cc, con negativo
a massa.
2. L’apparecchio non va mai installato in posizioni che compromettono la guida sicura.
3. Non usufruire dello schermo anteriore durante
la guida, per evitare la violazione del Codice della Strada e per evitare i rischi di incidenti. Durante
la guida, lo schermo anteriore va usato solo per la
retro-camera.
4. Non bagnare e non esporre l’apparecchio, e
relativo amplificatore e altoparlanti, all’umidità,
per evitare scintille o incendi.
5. La sostituzione del fusibile del cavo alimentazione
va effettuata da personale specializzato. Fusibili
inadatti possono danneggiare l’apparecchio o
causare incendi.
6. All’insorgere di uno dei seguenti problemi,
spegnere immediatamente l’apparecchio e
contattare il Servizio Assistenza PHONOCAR
oppure il Rivenditore presso il quale è stato
acquistato:
a) mancanza di Audio
b) mancanza di Immagine
c) acqua o oggetti all’interno dell’apparecchio
d) fumo
e) odori particolari
7. Per una guida sicura e per casi imprevisti,
selezionare sempre un Volume medio e gradevole.
Precauzioni
IT
1. L’apertura e la riparazione dell’apparecchio va eseguita soltanto da personale Specializzato.
2. Per eliminare eventuali sporcizie sul frontalino e/o monitor, usare uno straccio pulito,
con detergente neutro.
Uno straccio ruvido e detergenti non neutri (esempio l’alcool), possono graffiare e/o scolorire
le superfici trattate.
3. In caso di qualsiasi anomalia, vedere l’Elenco dei Problemi più frequenti, riportato nel presente manuale.
Se l’Elenco non riporta informazioni utili al caso, premere in ogni caso il Tasto RESET, posto sul
frontalino, per riprendere le impostazioni d’origine.
4. In caso di auto ferma a temperature troppo alte o basse, aspettare che la temperatura all’interno
dell’auto torni ad essere normale prima di utilizzare l’unità.
5. Dopo aver acceso il riscaldamento interno a basse temperature, potrebbero formarsi delle gocce
di condensa, NON utilizzare la sorgente, espellere il disco e pulirlo.
Se dopo qualche ora ancora non funziona, contattare il servizio di assistenza.
6. Evitare di colpire violentemente lo schermo LCD quando è aperto per non danneggiare
il meccanismo interno.
7. Per evitare il danneggiamento dello schermo, non utilizzare il touch screen con oggetti appunitti.
8. Il monitor utilizza un sistema motorizzato automatico, non forzare o cercare di tirarlo fuori
manualmente se si vuole evitare danni al sistema meccanico interno
9.
Per aiutare a comprendere le funzioni e la modalità di utilizzo di questa sorgente, saranno utilizzati
grafici e disegni.
Tuttavia alcune di queste illustrazioni potranno essere leggermente diversi da quello che verrà
visualizzato sullo schermo.
10.Quando l’unità è in funzione, verrà visualizzato
se l’operazione richiesta non è disponibile o illegale.
11.Utilizzare l’unità in modo corretto seguendo le indicazioni di questo manuale per prevenire possibili
problemi.
La garanzia non sarà valida se il problema è causato da un utilizzo scorretto.
Indice
Prima dell’utilizzo
Pannello frontale ......................................................5
Schermo LCD............................................................6
Telecomando.............................................................7
Funzioni Generali
Accensione on/off.....................................................8
Mute..........................................................................8
Regolazione Volume..................................................8
Regolazione Volume all'accensione..........................8
Menù sorgenti............................................................8
Riproduzione sorgenti...............................................8
Visualizzazione orario................................................8
Utilizzo schermo TFT Touch Screen.........................8
Resettare l’unità........................................................8
Modalità Radio
Selezione per ascolto radio.......................................9
Selezionare una stazione radio.................................9
Sintonizzazione Automatica......................................9
Sintonizzazione Manuale o Fine................................9
Salvataggio Automatico............................................9
Salvataggio Manuale.................................................9
Scansione stazione radio..........................................9
Selezionare le stazioni salvate...................................9
Ricerca locale............................................................9
Operazioni RDS
Funzione AF.............................................................10
Funzione TA . ..........................................................10
Funzione PTY..........................................................10
Servizio Programma................................................10
CT (Orario Orologio)................................................10
RT (Testo Radio)......................................................10
Modalità Lettura Disco
Inserimento disco....................................................11
Espulsione disco.....................................................11
Controlli Schermo Touch Screen.............................12
Pausa riproduzione..................................................12
Interrompere la riproduzione...................................12
Visualizzazione lista files.........................................12
Riproduzione rapida................................................12
Cambio traccia........................................................12
Cambio cartella.......................................................12
Ripetizione riproduzione..........................................12
Ripetizione A-B........................................................13
Riproduzione casuale..............................................13
Riproduzione intro...................................................13
Ricerca diretta.........................................................13
Ricerca GOTO ........................................................13
Menu DVD e Titolo .................................................13
Selezione lingua sottotitoli......................................13
Selezione visione multi-angolo................................14
Selezionare il canale Audio.....................................14
Funzione PBC..........................................................14
Zoom in/out.............................................................14
Ruotare un'immagine..............................................14
Informazioni Riproduzione................................. 14-15
Modalità USB-SD/CARD
Selezionare USB-SD/CARD....................................15
Controlli Touch Screen............................................15
Tasti controllo sullo schermo...................................15
Sospendere riproduzione........................................15
Interrompere riproduzione.......................................15
Visualizzazione lista dei files....................................15
Riproduzione veloce................................................15
Precedente/Successiva...........................................15
Cambiare cartella....................................................15
Ripetizione riproduzione..........................................15
Riproduzione casuale..............................................15
Ricerca Diretta.........................................................15
Ricerca GOTO.........................................................15
Zoom in/out.............................................................15
Ruota immagine......................................................15
Informazioni Riproduzione.......................................15
Altre Modalità
AUX-Camera-NAV-Sistema Bluetooth....................16
Icone e loro funzioni................................................17
Modalità telefono/musica........................................17
Accoppiamento.......................................................17
Disconnessione telefono.........................................17
Effettuare una chiamata..........................................17
Ricevere una chiamata............................................17
Trasferimento voce conversazione..........................18
Ultima chiamata......................................................18
Bluetooth Audio.......................................................18
Modalità Musica......................................................18
Attenzioni per connessione Bluetooth....................18
Setup
Procedure di impostazione ....................................19
Generali...................................................................19
Lingua................................................................ 19-20
Audio.......................................................................20
Bluetooth-Connect-Autoanswer-Paring code.........20
RDS-CT-TA VOL......................................................20
Parentale........................................................... 20-21
Impostazioni relative ai collegamenti......................21
P. VOL-TS CAL........................................................21
EQ...........................................................................22
Troubleshooting............................................... 23-24
Connessioni
Note per la connessione.........................................25
Cavi per controllo funzioni.......................................25
Connessioni del cavo freno a mano e retromarcia......26
Installazione e disinstallazione
Note di installazione................................................27
Installazione unità.............................................. 27-28
Installazione cornice................................................28
Disinstallazione........................................................28
Specifiche tecniche...............................................29
Schema di collegamento......................................30
Prima dell’utilizzo
IT
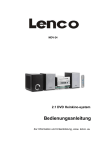
Pannello frontale
1. [DISP/PIC] 2. [OPEN/CLOSE]
3. [ /SRC]
4. [VOL/ ]
5. [RESET]
6. [MUTE]
7. [SDHC] 8. [AUX IN]
9. [USB]
10.[ ]
11.[ /TILT+] 12.[ /TILT-] Informazioni su display - Impostazione immagine
Apre/Chiude il pannello LCD
Accende/Spegne unità - Cambia modalità - Apre il menù principale
Regolazione volume - Riproduzione/Pausa - Risponde chiamata in arrivo
Ripristina le impostazioni di fabbrica dell’unità
Azzera audio - Aggancia telefonata
Slot per SD card compatibile HC
Ingresso Ausiliare A/V
Porta USB
Espulsione disco
Prossima traccia/stazione - Cursore a destra - Incrementa angolo del display
Precedente traccia/stazione - Cursore a sinistra - Decrementa angolo del display
5
Prima dell’utilizzo
LCD Frontale
1. Indicatore Disco - E’ acceso quando è inserito un disco; è spento quando non c’è nessun disco
all’interno
2. Indicatore modalità ripetizione - E’ acceso quando la modalità ripetizione è attivata; è spento quando
la modalità è disattivata.
3. Area display principale - Mostra i nomi, il tempo di riproduzione, la frequenza radio, l’orologio
e altre informazioni testuali.
4. Indicatori status radio - L’indicatore di stereofonia si accende quando la trasmissione radio è stereo;
l’indicatore local si accende quando la funzione ricerca locale è attivata
5. Indicatori funzione RDS - AF: Frequenza Altenativa PTY: Tipo Programma TA: Annunci traffico TP:
Programma Traffico.
Note: 1. Molte informazioni sono visualizzate solo quando lo schermo è chiuso. 2. LCD frontale visualizza le informazioni solo in inglese.
Note sull’utilizzo del telecomando
1. Direzionare il telecomando verso il sensore dell’unità.
2. Rimuovere la batteria del telecomando se non è utilizzato per un oltre un mese.
3. Non lasciare il telecomando alla luce diretta del sole o ad alte temperature, potrebbe non funzionare
correttamente.
4. La batteria può funzionare per 6 mesi a condizioni normali. Se il telecomando non funziona, cambiare la
batteria.
5. Usare soltanto le batterie al litio “a bottone” CR2025 (3V).
6. Non ricaricare, smontare, scaldare o esporre le batterie al fuoco.
7. Inserire la batteria nella posizione corretta controllando i poli + e –.
8. Lasciare le batterie in luoghi dove i bambini non riescono ad arrivare per evitare incidenti.
Inserire la Batteria
Usare soltanto le batterie al litio “a bottone”
CR2025 (3V). Inserire la batteria nel vano batteria
nella posizione corretta dei poli + e –
Togliere la Batteria
Far scivolare verso l’esterno la copertura della
parte bassa del telecomando
Tirare
6
Spingere
Prima dell’utilizzo
IT
Telecomando
1. Tasto (SRC): Seleziona la sorgente da utilizzare
2. Tasto (EJECT): Espelle il disco
3. Tasto (AUDIO): Seleziona la lingua dei dialoghi DVD
4. Tasto (VOL+/-): Regola Volume
5. Tasto (ZOOM): Zoom in/out Immagine
6. Tasto ( / BAND): Seleziona banda radio
Riproduzione rallentata
7. Tasto (WIDE): Cambia modalità di visualizzazione
8. Tasto ( ): Ricerca automatica - Precedente
Muove il cursore verso sinistra
9. Tasto( PRESET
): Cambia la stazione radio
10. Tasto (EQ): Apre il menù impostazioni
dell’equalizzatore
11. Tasto (GOTO/ ): Ricerca traccia - Capitolo specifico - Risponde a una chiamata in arrivo
12. Tasto (OPEN/CLOSE): Apertura
Chiusura schermo TFT
13. Tasto (TILT): Regola l’inclinazione del display
14. Tasto (REPT A-B): Ripetizione A-B
15. Tasto (RPT): Ripetizione riproduzione
16. Tasto (INT): Riproduce primi 10 secondi di ogni
traccia
17. Tasto (RDM): Riproduzione casuale del supporto
18. Tasti (0-9): Tastierino numerico
19. Tasto ( / ): Interrompe riproduzione
Aggancia chiamata in corso
20. Tasto (DISP/CLEAR) Mostra informazioni di
riproduzione - Cancella le informazioni di riproduzione
21. Tasto ( ): Indietro veloce - Muove il cursore
in basso
22. Tasto (PIC): Impostazioni immagine - navigazione
23. Tasto ( ): Ricerca automatica - Successivo - Muove il cursore a destra
24. Tasto ( ): Riproduzione - Pausa - Enter
25. Tasto (SETUP): Menù impostazioni
26. Tasto ( ): Avanti veloce/ Muove il cursore
verso l’alto
27. Tasto (TITLE): Titolo del DVD
28. Tasto (MENU): MENU DVD - PCB
29. Tasto (ANGLE): Selezione angolo di visione
30. Tasto (SUBTITLE): Seleziona lingua sottotitoli DVD
31. Tasto (POWER): Accende - Spegne unità
32. Tasto (MUTE): Azzera audio
7
Funzioni generali
Accensione/Spegnimento
Premere un qualunque tasto sul frontale (escluso EJECT) o premere il tasto POWER sul telecomando per
accendere il VM041. L’unità riprenderà dallo stato precedente allo spegnimento. Mantenere premuto il tasto
SRC sul frontale per oltre 2 secondi o premere il tasto POWER sul telecomando per spegnere.
Mute
Premere il tasto [MUTE ] sul frontale o sul telecomando per silenziare le uscite audio, durante il mute
l’icona relativa lampeggia sul display frontale. Premere il tasto [MUTE ] a lungo durante una conversazione
per interrompere la chiamata.
Note: 1. L’aumento del volume elimina la funzione MUTE. 2. Durante il muting l'icona mute lampeggerà sul display TFT
Regolazione del volume
Ruotare la manopola sul frontale o premere i tasti VOL sul telecomando per aumentare o diminuire il volume.
Premere la manopola volume per avviare e mettere in pausa la riproduzione o per rispondere ad una
chiamata in arrivo ( ). E’ possibile regolare il volume da 0 a 40.
Regolazione volume all'accensione
Il volume all'accensione è impostato a livello 10, è possibile modificarlo con questa sequenza:
Ad unità accesa regolare il volume desiderato e premere la manopola fino a quando il livello del volume non
scompare dallo schermo. Alla nuova accensione il livello sarà quello impostato.
Menù sorgenti
Premere il tasto SRC sul frontale, sul telecomando oppure toccare l’angolo in alto a sinistro dello schermo
touch screen per entrare nel menù di selezione sorgenti. Ripetere l’operazione precedente per tornare indietro.
Riproduzione sorgenti
Entrare nel menù sorgenti e toccare sullo schermo touch screen l’icona della sorgente desiderata oppure
muoversi tramite i tasti cursore del telecomando e premere i tasti ( / ) - ( / ) per selezionare.
Note: 1. Riproduzione sorgenti significa selezionare la modalità di riproduzione, esempio DVD, Radio, Camera ecc ecc.. 2. Se alcuni dispositivi non sono collegati e accesi non potranno essere selezionati.
Visualizzazione Orario
Tener premuto il tast (DISP) sul frontalino per passare dalla visualizzazione dell’orologio a quella della sorgente in riproduzione quando lo schermo touch screen è chiuso.
Utilizzo dello schermo TFT Touch screen
Aprire/ Chiudere lo schermo: Premere il tasto (OPEN / CLOSE) sul frontalino o sul telecomando per aprire o
chiudere lo schermo
Cambiare l’angolazione del monitor: A causa della natura stessa del LCD, la qualità della visione varia a seconda della diversa angolazione da cui si guarda lo schermo. L’angolazione dello schermo può essere modificata;
perciò si può selezionare l’angolazione per avere la miglior visione possibile. Premere il tasto (TILT) sullo schermo
o sul telecomando per regolare l’angolazione del monitor un passo alla volta. Tenendo premuto il tasto (TILT) sullo
schermo o sul telecomando si regola l’angolazione del monitor in modo continuo.
Cambiare il formato dell’immagine: Premere il tasto (WIDE) sul telecomando per regolare il formato di
visione dell’immagine
1. Entrare nel menu regolazione immagine - Premendo il tasto ( PIC ) sul telecomando
2. Scegliere il parametro da modificare - premere i tast ( / ) sul telecomando
3. Regolare il valore secondo la propria preferenza premendo i tasti ( / ) sul telecomando
4. Uscire dalla modalità di regolazione immagine - Per uscire, ripetere il primo passaggio o interrompere
l’operazione per alcuni secondi.
Resettare l’unità
Se l’unità non funziona in maniera corretta, si consiglia di resettare l’unità premendo il tasto (RESET) sul frontalino.
8
Modalità radio
IT
Selezione per ascolto Radio
Aprire il Menù Sorgenti e poi premere sull'icona Radio dello schermo touch screen
Selezionare una stazione radio
Premere il tasto (BAND) sul frontalino o sul telecomando o premere l’icona (BANDA) sullo schermo touch
screen per scegliere una banda radio tra FM1, FM2, FM3, AM1 e AM2.
Sintonizzazione Automatica
Premere i tasti ( / ) sul frontalino, sul telecomando o sulle icone ( / ) del touch screen per ricercare stazioni radio precedenti o successive.
Per interrompere la ricerca, premere altri tasti della sezione radio.
Note: Quando si riceve una stazione radio, la ricerca si ferma e la stazione rimane in ascolto. Se l’unità
riceve una trasmissione stereo, si illuminerà l’indicatore luminoso della stereofonia “ST” sul schermo touch
screen o sul display frontale.
Sintonizzazione Manuale o Fine
Durante la sintonizzazione manuale, la frequenza cambierà per step di 50 Hz. Premere i tasti ( / ) sul
telecomando o le icone ( / ) sul touch screen per ottenere una sintonia fine. Selezionare l’icona della
tastiera numerica sul touch screen e poi selezionare i bottoni numerici per inserire i numeri della frequenza
radio.
Salvataggio Automatico
Solo le stazioni con sufficiente segnale vengono trovate e memorizzate. Quando il monitor è chiuso, tenere
premuto il tasto (AS/PS) sul frontalino.
Quando il monitor è aperto, selezionare sul touch screen l’icona (AS). Per interrompere il salvataggio automatico, premere altri tasti della sezione radio.
Note: 1. Dopo il salvataggio automatico, le stazioni precedentemente salvate verranno sovrascritte - 2. L’unità
ha 5 bande, che sono FM1, FM2, FM3 AM1, AM2 e ogni banda può memorizzare 6 stazioni; perciò l’unità può
memorizzare 30 stazioni in tutto. Ripetere l'operazione per ciascuna banda.
Salvataggio Manuale
Quando si trova la stazione radio ricercata:
1. Premere l’icona (MEM) sul touch screen e si aprirà il menù delle memorie. - 2. Premere un bottone tra P1
e P6. - 3. Se si vuole uscire, premere il tasto (EXIT)
Scansione delle stazioni radio
La scansione delle stazioni radio è un processo che permette l’ascolto per 5-10 secondi di ogni stazione.
L’unità continua il processo fino a che non è stata fatta la scansione di tutta la banda.
Quando il monitor è aperto, premere l’icona
poi PS sul touch screen. Per interrompere il processo premere un qualunque tasto della sezione radio.
Selezionare le stazioni memorizzate
Premere uno dei tasti numerici delle stazioni radio da 1 a 6 sul telecomando o sul touch screen per selezionare la stazione corrispondente.
Ricerca Locale
Quando la ricerca locale è attivata, vengono individuate solo le stazioni radio locali con un forte segnale. Per
attivare o disattivare la funzione LOCAL, tener premuto la manopola del volume sul frontalino.
Note: 1. Quando la ricerca locale delle stazioni è attivata, l’indicatore luminoso “LOC” si accende; mentre si
spegne quando è disattivata. - 2. Il numero delle stazioni che possono essere ricevute diminuirà dopo che la
ricerca locale delle stazioni è attivata.
9
Operazioni RDS
L’unità offre funzioni base RDS, incluso PI (Identificazione Programma), Nome stazione radio, RT (testo Radio), CT (Orologio) AF (frequenza alternativa), TA (annunci traffico e PTY (Tipo Programma).
Funzione AF
La lista delle frequenze alternative (AF) è utilizzata in abbinamento con il codice PI (Identificazione Programma Radiofonico) per favorire la sintonizzazione automatica della nuova frequenza.
Usando queste informazioni, la radio può cercare automaticamente un’altra frequenza che sta trasmettendo
lo stessa stazione.
Questo è utile quando la stazione che si ascolta perde il segnale ed è presente una frequenza alternativa.
Per attivare la funzione AF, selezionare sul touch screen il tasto (AF). Per cancellare questa funzione, premere
nuovamente.
Note: Durante il passaggio automatico di stazione, qualche interferenza può essere percepita. Spegnendo
la funzione AF si risolve questo problema. Il numero delle stazioni che possono essere ricevute diminuirà
sensibilmente dopo che la funzione AF è stata attivata.
Funzione TA
La funzione TA (annunci traffico) permette al VM041 di ricevere in automatico gli annunci sul traffico indipendentemente del tipo di sorgente che si sta ascoltando. Una volta attivata la funzione TA è possibile ricevere
un’informazione di traffico TP dalle stazioni radio che lo trasmettono.
Quando TA è attivato e viene individuato nella banda FM un annuncio del traffico, la riproduzione in corso
viene sovrastata dall’annuncio. L’indicatore TA si accende, indicando che l’unità è in attesa dell’annuncio.
L’unità ritorna alla riproduzione originale dopo il termine dell’annuncio. Per attivare la funzione TA, selezionare il tasto (TA) sul touch screen.
Per interrompere questa funzione, premere nuovamente (TA).
Funzione PTY
PTY (tipologia programma) è un codice che definisce il tipo di programma in riproduzione (Es. News o Rock).
Sullo schermo verranno visualizzate 6 opzioni PTY. Per visualizzarne di più, premere la barra di posizione
laterale e le frecce sullo schermo. Quando una opzione PTY è stata selezionata, inizia la ricerca automatica
delle successive PTY disponibili fino a che non trova la successiva stazione che corrisponde a quella originaria. Se nessun PTY è trovato, l’unità tornerà alla stazione originaria
Servizio Programma (PS)
Preascolto e scansioni dell'emmittenti che può ricevere il dispositivo.
CT (Orario Orologio)
Alcune stazioni trasmettono l’orario e la data nel segnale RDS. L’orario si regola automaticamente quando
CT è messo in ON. L'orario viene aggiornato ogni qualvolta si sintonizza una stazione RDS, spesso l'orario
visualizzato non è corretto. Per evitare di ottenere la visualizzazione di un orario non corretto si consiglia di
posizionare CT su OFF e provvedere alla regolazione manuale dell'ora corrente.
RT (Testo Radio)
Quando la funzione è attivata, l’unità visualizzerà corti messaggi di dati trasmessi dal provider, come informazioni sulla stazione, il nome della canzone in ascolto e dell’artista.
10
Modalità lettura disco
IT
Tasti di controllo presenti sul display
Icona
Tastiera
numerica
Tastiera
numerica
Tastiera
numerica
Cartella
successiva
Cartella
precedente
Tastiera
numerica
Tastiera
numerica
Tastiera
numerica
Cartella
successiva
Cartella
precedente
Inserimento di un disco
Una volta inserito il disco l'unità passa automaticamente in modalità disco
NOTE:
1. Verificare che non sia presente alcun disco all'interno dell'unità prima di inserirne un altro
2. Alcuni supporti registrabili come CD-R, CD-RW, DVD-R, DVD+R, DVD-RW, DVD+RW non possono essere
riprodotti se registrati con un sistema non compatibile con il lettore oppure se non chiusi dal programma di
masterizzazione.
Espulsione del disco
premere il tasto EJECT sul pannello frontale o sul telecomando per espellere il disco.
É possibile espellere il disco anche ad unità spenta che rimarrà in tale stato anche dopo l'espulsione.
11
Modalità lettura disco
Controlli schermo touch screen
Sullo schermo sono presenti delle aree per il controllo della riproduzione del DVD:
A-Apre il menù sorgenti principale
B-Mostra le informazioni di riproduzione
C-Mostra il menù di gestione della riproduzione sullo schermo in
sovraimpressione
Pausa riproduzione
Premere il tasto (
) sul schermo dopo aver toccato la zona "C", oppure usare il telecomando (
Per riprendere la riproduzione premere nuovamente.
).
Interrompere la riproduzione
Premere il tasto ( ) sul telecomando oppure premere l’icona sul touch screen.
Quando viene premuto la prima volta il punto di interruzione viene memorizzato e da questo stesso punto
riprenderà la riproduzione tramite il tasto ( ).
Nel caso venga premuto due volte il tasto ( ) la riproduzione riprenderà dall’inizio e non più dall’interruzione.
Visualizzazione lista file
Per visualizzare la lista dei file presenti su un disco registrato interrompere la riproduzione.
Riproduzione rapida
Premere i tasti (
riproduzione.
/
Cambio traccia
Premere i tasti (
o successiva.
/
) su telecomando ripetutamente o sul touch screen per cambiare la velocità della
) sul frontale, sul telecomando o sul touch screen per passare alla traccia precedente
Cambio cartella
Premere le icone ( DIR+ ) / ( DIR- ) sul touch screen (si consiglia di interrompere la riproduzione se un video
o una foto è in visualizzazione) per cambiare la cartella durante la riproduzione di un disco masterizzato
contenente più di una cartella.
Ripetizione Riproduzione
Premere il tasto (RPT) sul telecomando ripetutamente o aprire il menù tasti sul touch screen e selezionare il
tasto ( ) ripetutamente per modificare la modalità ripetizione come nella tabella sottostante:
Tipo di disco
Modalità Ripetizione
Note:
1. Quando un VCD è riprodotto,
questa funzione non è possibile se il
PBC è attivato
2. Spegnendo l’unità o cambiando
tipo di riproduzione si annulla questa
funzione.
12
Modalità lettura disco
IT
Ripetizione A-B
Quando un DVD, VCD o CD è in riproduzione, è possibile riprodurre ripetutamente il contenuto compreso tra
i punti A e B.
Premere il tasto (RPT A-B) sul telecomando o aprire il menu tasti sullo schermo e poi selezionare i tasti (A-B)
per impostare il punto di inizio dell’intervallo. Fare la stessa operazione per impostare la fine dell’intervallo
da ripetere. Il contenuto dell’intervallo verrà ripetuto in continuazione. Fare la stessa operazione per la terza
volta per interrompere questa funzione.
Riproduzione casuale
Quando la funzione è attivata, il contenuto del disco verrà riprodotto in sequenza casuale.
Premere il tasto (RDM ) sul telecomando ripetutamente o aprire il menù tasti sullo schermo e premere il tasto
(
) sul touch screen ripetutamente per cambiare la modalità di ripetizione tra Random, Random repeat,
Repeat off.
Riproduzione intro
Quando questa funzione è attivata, l’unità riprodurrà i primi 10 secondi di ogni traccia di un disco CD o DVD.
Si può cercare il file desiderato usando questa funzione.
Premere il tasto (SCN) sul telecomando per attivare questa funzione. Fare la stessa operazione per interrompere questa funzione.
Ricerca diretta
Quando un disco DVD, VCD o CD è in riproduzione, si può cercare un particolare capitolo / traccia premendo i tasti numerici del telecomando. Per esempio, se si vuole selezionare la traccia 15, si può premere i tasti
numerici 1 e 5.
Ricerca GOTO
Entrare nella modalità ricerca GOTO
1. Premere il tasto (GOTO) sul telecomando o aprire il menù ricerca.
Per i DVD, si può fare la ricerca per titolo, capitolo e tempo.
Per i VCD, se la funzione PBC è disattivata, si puo’ effettuare la ricerca per tempo; se la funzione PBC è
attivata, si può effettuare la ricerca per traccia o tempo.
Per i CD, si può effettuare la ricerca per traccia.
Per i file MPEG, si può effettuare la ricerca per traccia e tempo.
Per i dischi masterizzati contenenti MP3 o/e file Jpeg, si può effettuare la ricerca per traccia (numero di file).
2. Entrare nelle Ricerca informazioni.
Selezionare gli oggetti premendo i tasti direzionali sul telecomando e entrare nella ricerca informazioni premendo i tasti numerici, come il titolo, il capitolo e il tempo.
3. Conferma
Premere il tasto (Enter) sul telecomando per confermare
4. Uscire dalla Ricerca GOTO
Ripetere l’operazione sopra finchè il menù ricerca non scompare o premere il tasto (Exit) sul touch screen.
Menù DVD e Titolo
Questa funzione è disponibile per i DVD che hanno “Menu/ Title”. Premere il tasto (MENU/TITLE) sul telecomando o aprire lo il menù tasti sullo schermo e premere il tasto (MENU) sul touch screen per aprire il Menù
DVD. Si può scegliere la lingua dell’audio e dei sottotitoli della riproduzione.
Premere il tasto (TITLE) sul telecomando o aprire lo il menù tasti sullo schermo e premere il tasto (TITLE) sul
touch screen per aprire il DVD TITLE. E’ possibile scegliere differenti titoli per la riproduzione
Selezione lingua sottotitoli
Premere il tasto (SUBTITLE) sul telecomando ripetutamente o aprire lo il menù tasti sullo schermo e premere
ripetutamente il tasto (SUBTITLE) sul touch screen per scegliere la lingua dei sottotitoli.
13
Modalità lettura disco
Selezione visione multi-angolo
Premere ripetutamente il tasto (ANGLE) sul telecomando per selezionare l’angolo di ripresa durante la riproduzione del DVD o del file video contenente la funzione multi-angolo.
Selezionare il canale Audio
Per i DVD contenenti files audio multilingua, premere il tasto (AUDIO)sul telecomando ripetutamente o aprire
lo il menù tasti sullo schermo e premere ripetutamente il tasto (AUDIO) sul touch screen per cambiare la
lingua dei dialoghi.
Per CD e VCD, premere il tasto (AUDIO)sul telecomando ripetutamente o aprire lo il menù tasti sullo schermo e premere ripetutamente il tasto (AUDIO) sul touch screen per passare alle diverse modalità di canali
audio come Voce sinistra, voce destra, mono sinistro, mono destro, Stereo.
Note: Canale sinistro e canale destro non possono funzionare correttamente se i file audio non sono registrati in maniera corretta.
Funzione PCB
Questa Funzione è disponibile nei dischi VCD con funzione PCB (Vers 2.0 o più recenti). Premere il tasto
(MENU) sul telecomando per attivare questa funzione.
Premere nuovamente per interromperla.
Note:
1. Quando il PCB è attivato, la riproduzione torna alla lista tracce e parte dalla prima traccia.
2. Quando il PCB è attivato, Riproduzione veloce, a rallentatore o salta sono disponibili mentre ripeti riproduzione e ricerca un capitolo o traccia particolare sono proibite.
3. Se si esegue la funzione riproduzione casuale, scannerizzazione o ricerca riproduzione quando il PBC è
attivato, PBC si interromperà automaticamente.
Zoom in/out
Per allargare o rimpicciolire un immagine riprodotta, premere tasto ZOOM sul telecomando o aprire il menù
tasti sullo schermo e premere l’icona ( ) sul touch screen.
Ruotare un’immagine
Quando un file immagine è visualizzato, si può ruotare l’immagine per avere il corretto angolo di visualizzazione premendo l’icona ( ) sul touch screen.
Informazioni Riproduzione
Premere la parte superiore dello schermo LCD quando un DVD o un VCD è in riproduzione e le informazioni
della riproduzione verranno visualizzate nella parte superiore.
Per DVD
1. Tipo di Disco
2. Informazioni titolo DVD. “5/8” indica che questo DVD ha 8 titoli e il titolo attualmente in riproduzione è il quinto
3. Informazioni Capitolo DVD. “2/16” indica che il corrente titolo ha 16 capitoli e il capitolo attualmente in
riproduzione è il secondo.
4. Tempo rimanente del titolo attualmente in riproduzione
5. “
” indica che i sottotitoli di questo DVD sono stati predisposti per 6 lingue e quella visualizzata
ora è la seconda, cioè l’inglese.
14
Modalità lettura disco
IT
Per VCD
1. Tipo di Disco
2. Indicatore funzione PCB. “PCB On” indica che la funzione PCB è attivata.
3. Informazioni Traccia VCD. “6/18” indica che questo VCD ha 18 tracce e la traccia attualmente in riproduzione è la sesta.
4. Tempo rimanente della traccia corrente.
Modalità USB-SD/CARD
Selezionare USB o SD/CARD come sorgente in riproduzione
Selezionare SD/USB come sorgente di riproduzione nei seguenti modi:
1. Premere il tasto ripetutamente fino ad arrivare alla selezione della sorgente desiderata
2. Aprire il menù sorgenti principale e selezionare SD Card o USB
Note: 1. L’unità passa alla modalità USB quando un dispositivo USB/SD (USB 8 GB max - SD 4 GB max)
è inserito. - 2. L’unità supporta hot swap (Lettura rapida del supporto) - 3. I dispositivi di memoria USB/SD
formattati con sistema FAT16/32 possono essere supportati da questo lettore, non viene supportato invece il
formato NTFS.
Contolli Touch Screen
Ripetizione riproduzione
Tasti controllo sullo schermo
Riproduzione casuale
L’operazione è la stessa della modalità disco.
L’operazione è la stessa della modalità disco.
I tasti di controllo sullo schermo sono gli stessi della
modalità disco.
L’operazione è la stessa della modalità disco.
Introduzione riproduzione
Sospendere la riproduzione
L’operazione è la stessa della modalità disco.
L’operazione è la stessa della modalità disco.
Ricerca diretta
Interrompere la riproduzione
L’operazione è la stessa della modalità disco.
L’operazione è la stessa della modalità disco.
Ricerca GOTO
Visualizzare la lista dei file
L’operazione è la stessa della modalità disco.
L’operazione è la stessa della modalità disco.
Zoom In/ out
Riproduzione veloce
L’operazione è la stessa della modalità disco.
L’operazione è la stessa della modalità disco.
Ruota Immagine
Precedente/ Successiva
L’operazione è la stessa della modalità disco.
L’operazione è la stessa della modalità disco.
Informazione riproduzione
Cambia Cartella
L’operazione è la stessa della modalità disco.
L’operazione è la stessa della modalità disco.
15
Altre modalità
AUX
I dispositivi esterni con uscite RCA audio e video possono essere connessi con l’unità.
Per entrare nella modalità AUX IN, aprire il Menù sorgenti e selezionare AUX IN.
Il VM041 è dotato di 2 ingressi AUX IN audio-video:
AUX IN 2 posto sul retro, permette di collegare dispositivi con uscita RCA ed è indicato per installazioni di
dispositivi fissi.
AUX IN 1 posto sul frontale, permette di collegare sia dispositivi con uscita RCA che Jack 3,5 mm. Questo
ingresso è indicato soprattutto per installazioni di dispositivi mobili.
Di seguito riportiamo la piedinatura del connettore Jack 3,5 mm.
Camera
Una retrocamera esterna può essere connessa all’unità.
La sorgente in riproduzione passerà a modalità “Camera” automaticamente quando la auto procede in
retromarcia.
NAV
Un dispositivo esterno di navigazione compatibile può essere connesso all’unità (optional NV003).
Per entrare nella modalità NAV, aprire il menù sorgenti e selezionare NAV dopo che il dispositivo esterno è
pronto.
E’ possibile ascoltare l’audio di una sorgente come radio,dvd,cd o usb/sd card mantenendo lo schermo
sulla navigazione.
In questa modalità quando la navigazione darà l'avviso di svolta il volume dell'audio musicale si abbassa e
la voce di navigazione si sovrappone.
Una volta selezionata la sorgente musicale tenere premuto il tasto [DISP] sul frontale per 2 secondi oppure il
tasto [WIDE] sul telecomando.
Il VM041 passerà sulla schermata di navigazione mantenendo l'audio della sorgente.
Note: Per le operazioni in modalità navigazione, fare riferimento al manuale utente del dispositivo esterno.
Sistema BLUETOOTH - Software 2.0 (OPTIONAL 6/860)
Il sistema Bluetooth è una trasmissione senza fili per brevi distanze(fino a 10m).
L’accessorio 6/860 permette di collegare il proprio telefono bluetooth con software fino al 2.0 all'unità
VM041. Dopo la connessione è possibile controllare il proprio cellulare direttamente dal'unità.
16
IT
Altre modalità
Icone e loro funzioni
= Accoppiamento
= Impostazioni
Menu = Menù
= Riproduzione / Pausa
= Traccia precedente
=
=
=
=
=
Disconnessione
Trasferimento chiamata
Risposta / Chiamata
Interruzione riproduzione
Modalità telefono
=
=
=
=
=
Tastiera chiamate
Mute
Interrompe chiamata
Traccia successiva
Modalità Musica
Modalità telefono o musica
Il modulo bluetooth ha due modalità operative: telefono o musica.
Premere sullo schermo l'icona ( ) o ( ) per passare alla modalità corrispondente.
In modalità telefono l'unità opera come vivavoce e può ricevere ed inviare chiamate. In modalità musica è
possibile ascoltare i brani musicali presenti sul proprio telefono direttamente tramite il VM041 nell'impianto
dell'auto.
ATTENZIONE: La modalità Musica funziona esclusivamente su telefoni con tecnologia AD2P e se presente
la funzione AVRCP sarà possibile controllare dall'unità la musica presente sul proprio telefono.
Accoppiamento
Utilizzare la funzione“PAIRING” per stabilire una connessione tra l'unità e il proprio telefono.
Premere il tasto “SRC” ripetutamente sul pannello inferiore oppure premere sullo schermo l'icona BT sul
menù "SOURCE" per entrare nella modalità bluetooth.
Una volta premuto ( ) sullo schermo comparirà "ACCOPPIARE TELEFONO".
Attivare la funzione bluetooth sul proprio cellulare, tenendolo a non oltre 3 metri dall'unità e iniziare la ricerca
di nuovi dispositivi bluetooth.
Dopo qualche secondo sul display del telefono compare il nome del modulo bluetooth “VM041”.
Selezionarlo ed inserire quando richiesto il codice “1234”.
Autorizzare il dispositivo a connettersi automaticamente se richiesto dal telefono cellulare.
Una volta andata a buon fine la connessione sullo schermo del VM041 compare l' ID del telefono.
L'unità è pronta per effettuare e ricevere chiamate.
Disconnessione telefono
Se si vuole disconnettere il telefono dal VM041 dopo avere effettuato la connessione, premere (
schermo. Il VM041 visualizzerà"EXIT PAIR"
) sullo
Effettuare una chiamata
Inserire il numero da chiamare tramite il tastierino numerico sul display.
Premere ( ) sullo schermo o sul telecomando per effettuare la chiamata.
Premere ( ) sullo schermo o sul telecomando per terminare la chiamata.
Ricevere una chiamata
Quando il telefono è collegato con il VM041, ad ogni chiamata in arrivo lo schermo passa automaticamente
sulla funzione Bluetooth.
Premere ( ) sullo schermo o sul telecomando per rispondere alla chiamata.
Premere ( ) sullo schermo o sul telecomando per terminare la chiamata.
17
Altre modalità
Traferimento voce della conversazione
Durante la conversazione è possibile passare la voce dall'unità in vivavoce al telefono cellulare per chiamate
private e viceversa.
Premere ( ) per trasferire l’audio al telefono cellulare e premerlo nuovamente per tornare al vivavoce.
Ultima chiamata
Premendo il tasto (
) sullo schermo o sul telecomando verrà inviata l'ultima chiamata effettuata o ricevuta.
Bluetooth Audio
Il VM041 può ricevere segnali audio stereo via bluetooth se il dispositivo che trasmette (telefono cellulare o
altro) ha la funzione A2DP e AVRCP.
ATTENZIONE
Per ragioni di sicurezza cercare di evitare (nei limiti del possibile) le telefonate mentre si guida.
Alcuni telefoni cellulari trasferiscono la voce della conversazione solo dopo che è stata attivata la chiamata.
Modalita’ musica
AD2P
AD2P è la sigla di Profilo Avanzato di Diffusione Audio.
Il telefono cellulare che supporta questa funzione permette la trasmissione in stereo del segnale audio.
Alcuni telefoni supportano la trasmissione audio ma non in stereofonia.
AVRCP
AVRCP è la sigla di Profilo di controllo remoto Audio Video.
Il telefono cellulare che supporta questa funzione permette il controllo della riproduzione musicale direttamente dall'unità . Durante la riproduzione musicale è possibile effettuare una chiamata digitando il numero e
premendo ( ) .
Non tutti i telefoni cellulari permettono il controllo della riproduzione da remoto.
Se durante la riproduzione musicale arriva una chiamata sullo schermo comparirà, INCOMING CALLING
ANSWER?. Premere ( ) per rispondere.
Attenzioni generali per connessione bluetooth
Durante i nostri test i telefoni NOKIA N7x, N9x, PHILIPS, Sony Ericsson e SAMSUNG, dopo l’indicazione
sul display del cellulare di accoppiamento effettuato, sullo schermo del “VM041” rimane la visualizzazione di
"WAITING FOR PAIRING" come se l"unità non avesse ancora terminato la procedura. É necessario trovare
nella lista dei dispositivi associati del telefono cellulare il modulo “VM041” e connetterlo manualmente,
a questo punto sullo schermo apparirà "CONNESSO".
Diversamente non sarà possibile udire alcuna voce durante la conversazione, anche se per il telefono la
connessione è abilitata.
Qualche telefono, come ad esempio PHILIPS, durante la riproduzione musicale in AD2P è necessario trovare
nella lista dei dispositivi associati il modulo “VM041” ed effettuare manualmente la connessione (verificare
sempre che il telefono sia compatibile con le funzioni AD2P e AVRCP).
Alcuni telefoni una volta impostata la conversazione privata (audio non trasferito al VM041) non si riconnettono
automaticamente ed è quindi necessario effettuare manualmente la connessione dalla lista dei
dispositivi associati del cellulare.
Se dopo avere effettuato la connessione automatica con un dispositivo con funzione AD2P e non si sente
l’audio stereo, verificare che sia stata attivata sul dispositivo la trasmissione audio bluetooth.
ATTENZIONE: Il protocollo di comunicazione Bluetooth è il Software 2.0. verificare la compatibilità con il
telefono cellulare prima dell’acquisto.
18
Setup
IT
Procedure di impostazione
1. Entrare nella modalità SETUP
Premere il tasto (SETUP) sul telecomando o aprire il menù tasti sullo schermo e premere l’icona (
touch screen.
Il Menù seguente apparirà quando si entra nella modalità impostazioni.
Il sub-menù generale è sottolineato di partenza.
) sul
2. Selezionare un sub-menù
Premere i tasti direzionali sul telecomando
3. Selezionare un elemento
Premere i tasti (
) sul telecomando per selezionare un elemento e premere il tasto ( ) per confer
mare.
4. Selezionare un valore
Premere i tasti (
) sul telecomando per selezionare un elemento e premere il tasto ( ) per
confermare.
Note: Tutte le seguenti impostazioni possono essere modificate direttamente sul touch screen
Generali
•
•
•
•
Modalità Orologio
12 Hr: l’orologio visualizza l’orario del tipo 12 ore esempio 11:18 AM
24 Hr: l’orologio visualizza l’orario del tipo 24 ore esempio 20:18
Orologio
Regolare l’orario visualizzato nell’angolo in alto a destra dello schermo TFT
Regione Sintonizzatore
L’unità provvede numerosi sistemi radio e si può selezionare il corretto sistema radio in base alla propria nazione. Per l'Italia selezionare Europa.
Beep
On: Suono tasti di fondo è attivato
Off: Suono tasti di fondo è disattivato
Lingua
• OSD
Selezionare una lingua del menù sistema
• Audio DVD
Selezionare la lingua dei dialoghi del DVD
Note: Se il DVD non contiene la lingua selezionata, i dialoghi inrirpoduzione saranno nella lingua di base.
• Sottotitoli DVD
Selezionare la lingua dei sottotitoli del DVD
Note: Se il DVD non contiene la lingua selezionata, i sottotitoli visualizzati saranno nella lingua di base.
19
Setup
• Menù disco
Selezionare una lingua per il menù DVD
Note: Se il DVD non contiene la lingua selezionata, il Menù del DVD sarà nella lingua di base.
Audio
•
•
•
•
DRC
Imposta l’intervallo dinamico del Dolby Digital del Disco.
On: Riproduzione audio più dinamica con i bassi
Off: Uscita Normale
Loudness
On: Modalità Loudness attivata
Off: Modalità Loudness disattivata
Subwoofer
On: Attiva subwoofer
Off: Disattiva subwoofer
Filtro Sub
Si può avere differenti effetti dei bassi quando di impostano differenti tagli di frequenza del filtro sub. In
base all’acustica e all’impianto dell’auto, selezionare la frequenza appropriata. Sono disponibili 80 Hz,
120 Hz e 160 Hz.
Bluetooth ON/OFF Accende/Spegne il modulo bluetooth
Connect ON/OFF Attiva/Disattiva la risposta automatica
Autoanswer
AUTO Il modulo bluetooth si connette automaticamente non appena il telefono è nel raggio di azione
MANUALIl modulo bluetooth si connette manualmente dal telefono
Pairing code
É il codice necessario per autorizzare il modulo bluetooth alla connessione. Il codice di fabbrica è 1234.
RDS RDS ON/OFF Funzione RDS attiva/Disattiva
CT ON/OFF Ricezione automatica del segnale orario tramite RDS attiva/disattiva
TA VOL
Selezionare il volume desiderato per le altre sorgenti audio.
Si può selezionare un volume tra 0 e 10
TUNER REGION
L’unità permette la ricezione di diversi sistemi di segnali radio. E’ possibile selezionare il sistema corretto
selezionando la propria nazione di appartenenza.
Parentale
In alcuni DVD è inserito blocco famiglia che non permette ai bambini di vedere alcune scene esplicite di
violenza o sesso.
• Impostare la password: La password originale dell’unità è vuota. Si consiglia di inserire una nuova password come indicato:
Metodo cambio password:
1. Posizionare il cursore sulla opzione password, premere i tasti numerici sul telecomando o premere
l’opzione password sul touch screen, premere i tasti numerici per inserire la password (password iniziale
per prima) e poi confermare
20
Setup
IT
2. Ripetere l’operazione sopra per inserire una nuova password da 6 caratteri e poi confermare. La nuova
password è registrata e il blocco famiglia è chiuso.
Livello di protezione.
L’unità ha alcuni livelli di visione come segue:
1. Sicuro per bambini: Valutazione di un film che è adeguato per i bambini
2. G: Valutazione di un film che permette la visione a persone di tutte le età
3. PG: Valutazione di un film che permette la visione a persone di tutte le età ma che consiglia per i
bambini la visione accompagnata dai genitori
4. PG-13: Valutazione di un film che permette la visione a persone di tutte le età ma che consiglia per
bambini sotto i 13 anni la visione accompagnata dai genitori
5. PG-R: ……
6. R: Valutazione di un film che permette la visione solo a persone maggiori di una certa età, solitamente
17 anni, a meno che accompagnati da un genitore o tutore.
7. NC-17: Valutazione di un film che permette la visione solo a persone maggiori di 17 anni
8. Adult: Valutazione di un film adatto ad un pubblico adulto
Procedure per cambiare il livello di protezione
1. Inserire la password per sbloccare il blocco famiglia
Posizionare il cursore sulla opzione password, premere i tasti numerici sul telecomando o premere
l’opzione password sul touch screen, premere i tasti numerici per inserire la password (password iniziale per prima) e poi confermare.
2. Cambiare il livello.
Selezionare un livello di protezione appropriato nella lista dei livelli
3. Chiudere il blocco famiglia.
Ripetere l’operazione del primo passaggio per inserire la password da 6 caratteri (nuova o vecchia) e poi
confermare. Il blocco famiglia è chiuso.
• Impostazioni di fabbrica:
Per ristabilire le impostazioni di fabbrica relative alla riproduzione di un DVD (Esempio Audio o sottotitoli)
premere sol l’opzione (RESET).
Impostazioni relative ai collegamenti
•
•
•
Apertura automatica schermo TFT.
Auto: il pannello TFT si apre automaticamente quando si accende l’unità.
Off: Il pannello TFT si apre solamente quando si preme il tasto Open a unità accesa.
Parcheggio
On: Le immagini si visualizzano sullo schermo solo dopo che la vettura è parcheggiata
(Freno a mano inserito).
Off: le immagini si visualizzano sempre.
L'uscita video è disponibile solo in formato NTSC.
P.VOL
P.VOL significa Volume programmabile
Si può regolare il volume a seconda della sorgente con questa funzione
• Sorgente
Selezionare la sorgente in riproduzione di cui si vuole regolare il volume
• Livello
E’ possibile impostare il livello del volume da -6 a +6.
TS CAL
Quando le funzioni su schermo sono poco sensibili o non precise, si può calibrare il touch screen con
questa funzione.
Calibrare il touch screen seguendo le indicazioni dopo essere entrati nella modalità TS CAL.
21
Impostazioni EQ
I controlli Audio permettono di modificare facilmente il sistema audio per avere il miglior suono possibile.
1. Entrata in modalità Impostazioni EQ
Premendo il tasto (EQ) sul telecomando o selezionando l’icona (EQ) sul touch screen sarà visualizzato il
seguente schema.
Selezione Modalità EQ
Area Fader/Bilanciamento
Parametri EQ
2. Selezione Modalità EQ
Selezionare ripetutamente la barra EQ e la modalità EQ cambierà.
3. Regolazione parametri EQ
Per regolare i parametri EQ, selezionare e trascinare le barre parametri EQ.
4. Regolazione fader frontale/ posteriore/ destro/ sinistro e bilanciamento
Si può regolare il bilanciamento Frontale/ posteriore/ destro/ sinistro dell’altoparlante per avere particolari
effetti in ascolto in base all’ambiente sonoro e ai propri gusti.
Per regolare il fader Frontale/ posteriore/ destro/ sinistro e il bilanciamento, selezionare e trascinare il piccolo
punto bianco nell’area regolazione Fader/ Bilanciamento.
Note:
1. L’unità è provvista di alcuni modelli EQ: User, Rock, Hip Hop, Dance, Latin, Rave, Urban, Acoustic.
2. Differenti EQ di distinguono per differenti livelli dei bassi, alti e dei medi. I parametri dei modelli EQ
sono fissi e non possono essere modificati ad esclusione di User.
3. La modalità EQ passerà automaticamente a User quando si modificano i livelli di BASS, TREB o MID
4. Il livello del sub è indipendente dalla modalità EQ e può essere modificato da solo.
22
Problemi - Cause e rimedi
IT
Quello che può sembrare un problema non è sempre una cosa seria. Seguire i seguenti punti prima di chiamare il servizio di assistenza.
Problema Cause Generale
L’unità non
si accende
Il telecomando non funziona
Volume basso o assente
dell’uscita audio
Qualità audio bassa o
disturbata
Malfunzionamento Mute
L’unità si resetta quando si
spegne la macchina
Rimedi
Il fusibile dell’unità è saltato
Installare un nuovo fusibile della giusta dimensione
Il fusibile della batteria auto è saltato
Installare un nuovo fusibile della giusta dimensione
Operazioni scorrette
Resettare l’unità
Batteria scarica
Cambiare la batteria
Batteria installata in modo scorretto
Installare la batteria correttamente
Connessione audio sbagliata
Controllare i cablaggi e correggere
Volume regolato troppo basso
Aumentare il volume
Altoparlante rovinato
Sostituire l’altoparlante
Bilanciamento volume errato
Regolare il bilanciamento verso il centro
I cablaggi degli altoparlanti fanno
contatto con parti metalliche dell’auto
Disco copia pirata in uso
La potenza supportata dall’altoparlante
non corrisponde a quella dell’unità
Errata connessione
Isolare tutti i caglaggi altoparlanti
Usare dischi originali
Sostituire gli altoparlanti
Controllare i cablaggi e correggere
L’altoparlante è in cortocircuito
Controllare i cablaggi e correggere
Il cavo mute è collegato a massa
Controllare i cablaggi Mute e correggere
Connessione errata tra ACC e BATT
Controllare i cablaggi e correggere
Monitor TFT
L’apertura automatica dello schermo
Il monitor non si apre
TFT è disattivata
automaticamente
Informazioni di allerta sono Il collegamento al freno a mano è errato
sempre visualizzate
Il sistema colori del DVD non coincide
con quello del monitor
Immagini disturbate
Disco in copia pirata in uso
appaiono sullo schermo.
Cablaggio Video rovinato
Connessioni segnale video scorrette.
23
Attivare la funzione apertura automatica
Schermo TFT
Controllare i cablaggi e correggere
Modificare il sistema colori del DVD
in uso o del monitor
Usare dischi originali
Cambiare i cavi
Controllare i cablaggi e correggere.
Problemi - Cause e rimedi
Continua
Problema Cause Riproduzione disco
Non si inserisce il disco
Rimedi
Già presente un disco nell’unità
Estrarre il disco e inserirne uno nuovo
Disco deformato o graffiato
Usare dischi in buone condizioni
Disco sporco o bagnato
Pulire i disco con un panno
Disco incompatibile
Usare dischi compatibili
Disco inserito al contrario
Codice Region non compatibile
con l’unità
Inserire il disco con l’etichetta in alto
PBC non utilizzabile durante la
riproduzione VCD
PBC non disponibile nel disco
Usare dischi dotati di PBC
Funzioni Ripetizione e Ricerca
non utilizzabili durante la
riproduzione VCD
PBC attivato
Spegnere PBC
Il disco non è letto
Usare dischi con codici region adatti
Messaggi di errore
No disc
Bad disc
Unknown disc
Region error
Disco sporco
Pulire i disco con un panno
Disco al contrario
Inserire il disco con l’etichetta in alto
Nessun disco
Inserire un disco
Disco sporco
Pulire i disco con un panno
Disco al contrario
Formato disco non compatibile con
questa unità
Codice Region non compatibile con
l’unità
Inserire il disco con l’etichetta in alto
24
Usare dischi di formato compatibile
Usare dischi con codici region adatti.
Connessioni
IT
Note sulle connessioni
• Questa unità è progettata per essere usata su un veicolo con batteria 12 volt e negativo a massa. Prima
di installare l’unità su un autobus o un camion assicurarsi che il voltaggio della batteria è appropriato per
questo uso, altrimenti installare un trasformatore per convertire il voltaggio a 12 V.
• Per evitare corto circuito nel sistema elettrico, assicurarsi che il cavo negativo della batteria è disconnesso
prima dell’installazione.
• Per evitare il corto circuito e danni per l’unità, fermare i cavi con morsetti e nastro adesivo. Far passare i
cavi in posti sicuri, fuori da luoghi che possono scaldarsi evitando di toccare parti che si muovono come il
cambio, il freno a mano o sedili per evitare che l’isolamento di cavi venga sciolto o tagliato.
• Mai far passare il cavo giallo attraverso il foro di installazione nello spazio motore e connetterlo alla batteria. Altrimenti c’è il rischio di un corto circuito con al batteria.
• Sostituire con un fusibile da 10 A quando il vecchio è rotto, non usare il fusibile o usarne uno di dimensioni errate può causare danni all’unità o causare fuoco. Se anche dopo l’installazione del corretto fusibile il
problema elettronico rimane, contattare un negozio specializzato.
• Non connettere altri equipaggiamenti alla batteria per evitare il surriscaldamento della batteria
• Verificare che tutte le connessioni e cavi sono ben isolati. Altrimenti l’unità può essere danneggiata da
corto circuito• Se non è disponibile ACC, connettere il cavo ACC all’alimentazione con un interruttore.
• Se un amplificatore esterno è connesso, non connettere il cavo P.CONT al cavo alimentazione di un amplificatore esterno.
• La minor grandezza di altoparlanti connessi è di 50 W con impedenza 4-8
Cavi per controllo funzioni
Auto illuminazione
Per evitare che il display sia troppo luminoso in uso notturno, collegare il cavo di illuminazione a ILLUMI, in
questo modo accendendo la luce si abbasserà la luce dello schermo e viceversa.
Mute del telefono
Se il cavo MUTE è connesso al vivavoce del telefono, l’audio del VM041 si interromperà durante la conversazione telefonica.
Retromarcia
Se la retrocamera è connessa con il VM041 ed il relativo cavo collegato con la luce di retromarcia, si visualizzerà automaticamente l’immagine della retrocamera quando si azionerà la retromarcia.
Al termine della retromarcia, la sorgente in riproduzione ritornerà a funzionare dallo stesso punto.
Freno a mano
Se il cavo “BRAKE” è connesso all’interruttore del freno a mano, il display video sarà controllato da questa
funzione. In caso di attivazione della retromarcia (Se il cavo relativo è collegato) il display video passera in
modalità CAMERA.
Il monitor visualizza lo schermo blu con informazioni di avvertimento per evitare che il guidatore guardi i
contenuti video durante la guida, ma i passeggeri possono guardare normalmente i contenuti video se ci
sono ulteriori monitor collegati nell’uscita Video.
25
Connessioni
Freno a mano: connessioni
Cavo freno a mano
Cavo rosa BRAKE
Batteria
Spia freno
Leva freno a mano
Chassis auto
Pedale freno a mano
Retromarcia: connessioni
Alimentazione segnale retromarcia
Chassis auto
Cavo rosa
REVERSE
Batteria auto
Chassis auto
Cambio
26
Installazione e disinstallazione
IT
Note di installazione
1.
2.
3.
4.
5.
6.
7.
Prima dell’installazione, verificare che siano state effettuate le corrette connessioni e che l’unità
funzioni normalmente. Connessioni errate potrebbero danneggiare l’unità.
Utilizzare solamente accessori progettati e specifici per questa unità, accessori non autorizzati
potrebbero danneggiare l’unità.
Prima dell’installazione, fissare tutti i cavi alimentazione
Non installare l’unità in un luogo vicino a fonti di calore per evitare danni a componenti elettrici come
lettore laser
Installare l’unità orizzontalmente. Installando l’unità con pendenza maggiore di 30° si rischia un
peggiorante nelle prestazioni
Per evitare scintille, connettere prima il polo positivo e poi quello negativo
Non ostruire la bocchetta di raffreddamento per assicurare la giusta dissipazione dell’unità, o potrebbero verificarsi dei danni.
Installazione unità
Metodo A
1. Inserire la gabbia nel vano, scegliere la linguetta di montaggio adeguata alla larghezza dello spazio,
piegando la linguetta verso l’esterno con cacciavite per fissare la gabbia nel vano
2. Usare 2 pezzi delle viti a forma di cono MX5x5 per fissare le due barre su entrambi i lati dell’unità
(vedi immagine 1)
Linguetta di
montaggio
Immagine 1
3. Avvitare un pezzi di M5X24 nel foro del posteriore dell’unità e mettere sopra la vite una guaina di gomma (vedi immagine 2)
Cruscotto
Guaina in gomma
Gabbia di montaggio
Linguetta di montaggio
4.
Immagine 2
Inserire l’unità nella gabbia, fissare la vite M4X6 alla fascia antincendio nella parte posteriore della
plancia, e usa 4 pezzi della vite M2X2 per bloccare le fascie di assemblaggio e la gabbia in posizione.
Note: In base alla profondità dell’apertura, usale differenti dimensioni di barre di assemblaggio.
Se l’apertura è troppo poco profonda, il monitor può uscire fuori dalla plancia di 10 mm.
27
Installazione e disinstallazione
Metodo B
1. Inserire l’unità direttamente nel vano della plancia
2. Posizionare 5 viti cilindriche M4X3, M5X5 o a forma di cono M5X5 attraverso i fori delle fasce di
montaggio all’interno dei fori dell’unità e fissare bene le viti.
Staffa di montaggio
Cruscotto
Installazione cornice
Agganciare la cornice intorno al frontalino ….
Disinstallazione
Smontare la cornice
1. Spingere la cornice di rifinitura verso l’alto e tirare la parte speriore.
2. Spingere la cornice verso il basso e tirare la parte inferiore.
Smontare l’unità
1. Svitare le 4 viti M2x”.
2. Usare un cacciavite per raddrizzare la linguetta di montaggio piegata e estrarre l’unità dalla gabbia.
Rimuovi la guaina in gomma
Svitare le 4 viti
3. Tirare fuori l’unità dalla gabbia con entrambe le mani.
28
Specifiche Tecniche
Generali
Reference Supply Voltage............................... 12V(DC)
Operating Voltage Range....................10.5~15.8V(DC)
Max Operating Current...........................................10A
Grounding System...............Car Battery Negative Pole
Installation Dimension
(W×H×D)...................... 178 mm×50mm×(165+25) mm
Installation Angle............................................... 0°~30°
Net Weight........................................................... 2.3kg
FM
Signal Noise Ratio................................................55dB
Residual Noise Sensitivity(S/N=30dB............. 20dBμV
Frequency Response(±3dB..................40Hz~12.5KHz
Station Seeking Level................................ 20~30dBμV
Distortion..............................................................1.5%
Stereo Separation(1KHz.......................................20dB
Antenna Impedance.............................................. 75Ω
IT
TFT Monitor
Screen Diagonal..............................................7 inches
Usable Display Area...................... 154.1(W) × 87.0 (H)
Resolution........................................ 800 (W) × 480 (H)
Brightness....................................................400cd/m2
(Effettuare la misurazione della luminosità
dopo 30 minuti)
Contrast....................................................... 300( TYP. )
Response Time
Rise.............................................................. 12ms
Fall............................................................... 18ms
Viewing Angle
From Top..........................................................40°
From bottom....................................................65°
Horizontally ...................................................±65°
LCD Life Cycle................................ 10000 hours(at 25)
Ambiente
Operating Temperature...................................................-10~60
Storing Temperature.......................................................-20~70
Residual Noise Sensitivity (S/N=20dB........... 40dBμV Operating Humidity................................45%~80%RH
Selectivity (±9KHz) ..............................................50dB Storing Humidity.....................................30%~90%RH
AM
DVD Player
Signal / Noise Ratio..............................................90dB
Dynamic Range................................................... 90dB
Distortion(line out.................................................0.1%
Frequency Response(±3dB.................... 20Hz~20KHz
Maximum Output Power...................................4×45W
Load Impedance..................................................... 4Ω
Codice regione
In base alla divisione delle vendite dei DVD il mondo
è suddiviso in 6 regioni.
Un DVD può essere riprodotto solo quando il codice
regionale è compatibile con il lettore in uso.
AUX IN
Distortion..............................................................0.5%
Frequency Response(±3dB.....................20Hz~20KHz
Audio Input Level............................................. 0.4Vrms
Audio
Audio Output Impedance.................................... 200Ω
Audio Output Level............................. 2+0.2Vrms(Max)
(Livello ingresso audio normale e al
volume massimo )
Video
Normal Video Input Level(CVBS.....................1.0±0.2V
Video Input Impedance......................................... 75Ω
Video Output Impedance...................................... 75Ω
Video Output Level.........................................1.0±0.2V
(Livello ingresso audio normale)
NOTE: Le specifiche tecniche sono soggette a possibili variazioni senza preavviso.
29
Schema di collegamento
30
ENGLISH
Warnings
1. Only connect this unit to a 12V DC power supply
with negative grounding.
Never install this unit where the operation for safety
driving is restrained.
Never use the video display function in the
2. Front when driving to prevent the violation of laws
& regulations and also to reduce the risk of traffic
accident except using the rear view video camera.
3. Never expose this unit, amplifier, speakers to
moisture or water to prevent electronic sparks or
fires.
5. Please don't change the fuse in the power cord
without professional guidance,
4. improper fuse may cause damage to this
using unit or even cause fire.
6. Please power off this unit at once and send it
back to the after-sales service center or the dealer
distributor you purchased from if one of the following
symptoms is found:
(a)No audio output;
(b)No image output;
(c)Water or other obstacle enters the unit;
(d)Smoking;
(e)Peculiar smell.
7. To ensure safe driving, please adjust the volume
to a safe and comfort level in case of emergency
situations.
Precautions
GB
1. Never disassemble or adjust the unit without any professional guide. For details, please consult any
professional car shop / dealer for inquiry.
2. If the front panel or TFT monitor is squalid, please use a clean silicone cloth and neutral detergent to
wipe off the spot. Using a rough cloth and non-neutral detergent such as alcohol for cleaning may result
in scratching or decoloration to the applicant.
3. If any abnormal behavior of the unit is found, please refer to trouble shooting guide of this manual. If no
relevant information is found,please press the [RESET] key on the front panel to resume factory default.
4. If you have parked the car in hot or cold weather for a long time, please wait until the temperature in the
car becomes normal before operating the unit.
5. Using in-car heater in low temperature environment may result in beads coagulate inside the unit, DO
NOT use the unit in this situation, eject the disc and wipe off the bead on the disc. If the unit still doesn't
work after a few hours, please contact with after-sales service center.
6. No fierce impact to the LCD monitor when it is in open position for preventing the damage to any
mechanisms inside.
7. To prevent the damage to the screen, avoid touching it with sharp objects.
8. The monitor employs auto motorizing mechanism, please don't push, pull, or swivel the monitor
manually to prevent damage to the core mechanism.
9. To provide a clear demonstration and an alternative for easy understanding to the operation of this unit,
graphic illustrations areused. However, these illustrations are some different from the actual images dis
played on the screen.
10. During operating the unit
will display if the current operation is not available or illegal.
11. Operate the unit correctly according to this manual to prevent unnecessary problem.
The guarantee won't be valid if the problem is caused by inappropriate operation.
33
Index
Before using
Front Panel..............................................................35
Auxiliary LCD...........................................................36
Remote Control + Notes of remote control using...36
Remote control (keys functions)..............................37
Basic operations
Power on/off............................................................38
Mute........................................................................38
Volume adjustment..................................................38
Open SOURCE MENU............................................38
Playing source selection..........................................38
Display system time................................................38
Using the TFTmonitor..............................................38
Reset the unit..........................................................38
Radio mode
Select radio as playing source............................... 39
Select one radio band.............................................39
Autotuning...............................................................39
Manual tuning..........................................................39
Auto save.................................................................39
Manual save............................................................39
Preview scan ..........................................................39
Recall the stored stations........................................39
Local seeking..........................................................39
RDS operations
AF function..............................................................40
TA function..............................................................40
PTY function............................................................40
Program Service (PS)..............................................40
CT (Clock Time).......................................................40
RT (Radio Text)........................................................40
Disc mode
Insert a disc.............................................................41
Eject the disc...........................................................41
Touch screen controls.............................................41
Onscreen control buttons........................................41
Suspend playback...................................................42
Stop playback.........................................................42
Display file list..........................................................42
Fast playback..........................................................42
Previous / Next........................................................42
Change folder..........................................................42
Repeat playback.....................................................42
Repeat A-B........................................................ 42-43
Random playback...................................................43
Intro playback..........................................................43
Direct search...........................................................43
GOTO search...........................................................43
DVD MENU and TITLE............................................43
Select subtitle language..........................................43
Select multi-angle views.........................................43
Select audio channel ..............................................44
PBC function...........................................................44
Zoom in/out.............................................................44
Rotate picture..........................................................44
Playback information......................................... 44-45
USB mode
Select USB or SD/Card as playing source..............45
Touch screen controls.............................................45
Onscreen control buttons........................................45
Suspend playback...................................................45
Stop playback.........................................................45
Display file list..........................................................45
Fast playback..........................................................45
Previous / Next........................................................45
Change folder..........................................................45
Repeat playback.....................................................45
Random playback.................................................. 45
Intro playback..........................................................45
Direct search...........................................................45
GOTO search...........................................................45
Zoom in/out............................................................ 45
Rotate picture..........................................................45
Playback information...............................................45
Other modes
AUX.........................................................................46
Camera....................................................................46
NAV..........................................................................46
Bluetooth system....................................................46
Function icons.........................................................47
Work modes of Bluetooth module...........................47
Phone mode-Music mode................................. 47-48
General notes for bluetooth....................................48
Setup
Setup procedures....................................................49
General....................................................................49
Language........................................................... 49-50
Audio.......................................................................50
Bluetooth-Connect-Auto Answers..........................50
RDS-CT-TA VOL......................................................50
Rating................................................................ 50-51
Hardware................................................................ 51
P.VOL-TS CAL................................................... 51-52
EQ...........................................................................52
Troubleshooting............................................... 53-54
Device connection
Notes of connection-Control Cables.......................55
Installation and uninstall
Notes of installation.................................................57
Unit installation.................................................. 57-58
Trim Ring installation...............................................58
Uninstall...................................................................58
Specifications........................................................59
Electrical Connections.............................................60
34
Before using
GB
Front Panel
1. [DISP/PIC] 2. [OPEN/Close] 3. [ /SRC]
4. [VOL/ ] 5. [Reset] 6. [MUTE] 7. SDHC Slot
8. AUX IN jack
9. USB Slot
10. [ ]
11. [ /TILT+ ] 12. [ /TILT-] Display information / Image setting
Key: Open / Close the TFT monitor
Unit power / Change work mode / Open SourceMenu
Adjust volume / Play(pause) /Answering an incoming call
Reset the unit
Mute audio outputs / Hangup (Long press)
Eject disc
Next / Move cursor to the right Increase display angle
Previous / Move cursor to the left Decrease display angle
35
Before using
Auxiliary LCD
1. Disc indicator. Light up when one disc is inside; Light off when no disc is inside.
2. Repeat mode indicator. Light up when repeat mode is on; Light off when repeat mode is off.
3. Main display area. Display characters, playback time, tuning frequency, clock and other text information.
4. Radio status indicators. Stereo indicator lights up when the radio broadcast is a stereo one; Local
indicator lights up when the local seeking function is activated.
5. RDS function indicators AF: Alternative Frequency - PTY: Program TYpe - TA: Traffic Announcement
TP: Traffic Program
Note:
• Most information can be displayed on this LCD only when the TFT monitor is closed.
• Only English font support on this LCD.
Notes of remote control using
1. Aim the remote controller at the remote sensor on the unit.
2. Remove the battery from the remote control or insert a battery.
3. DO NOT store the remote control under direct sunlight or in high temperature environment, or it may not
function properly.
4. The battery can work for 6 months under normal condition. If the remote control can't work, please
change the battery.
5. Use “button shaped” lithium battery "CR2025” (3V) only.
6. DO NOT recharge, disassemble, heat or expose the battery in fire.
7. Insert the battery in proper direction according to the (+) and (-) poles.
8. Store the battery in a place where children cannot reach to avoid the risk of accident.
Unistall battery
Slide out the battery compartment tray at the
bottom on the back of the remote control.
Instal battery
Use button-shaped lithium battery "CR2025” (3V)”
only. Insert the battery to the battery tray with
proper direction according to the (+) and (-) poles.
PUSH IN
PULL OUT
36
Before using
GB
Remote control - Introduce of key functions
1. [SRC] Key: Select playing source
2. [EJECT] Key: Eject disc
3. [AUDIO] Key: Select DVD dialogue language
4. [VOL+/-] Key: Adjust volume
5. [ZOOM] Key: Image zoom in/out
6. [BAND/
] Key: Select radio band / Slow Playback
7. [WIDE] Key: Change display mode
8. [ ] Key: Auto search / Previous / Move cursor
to the left
9. [PRESET
] Key: Select preset radio station
or TV channel
10. [EQ] Key: Open EQ setting menu
11. [GOTO/
] Key: GOTO search /Call
12. [OPEN/CLOSE] Key: Open or close the TFT monitor
13. [TILT] Key: Adjusting the TFT monitor tilting angle
14. [RPT A-B] Key: A-B repeat
15. [RPT] Key: Repeat playback
16. [INT] Key: Intro playback
17. [RDM] Key: Random playback
18. [0~9] Key: Numeric keys
19. [ / ] Key: Stop playback/ Hangup
20. [DISP/CLEAR] Key: Display information
Clear information
21. [ ] Key: Fast reverse/ Move cursor down
22. [PIC] Key: Image setting - Navigation
23. [ ] Key: Auto search / Next / Move cursor
to the right
24. [ ] Key: Play / Pause / Enter
25. [SETUP] Key: Setup menu
26. [ ] Key: Fast forward / Move cursor up
27. [TITLE] Key: DVD TITLE
28. [MENU] Key: DVD MENU / PBC
29. [ANGLE] Key: Select view angle
30. [SUBTITLE] Key: Select DVD subtitle language
31. [POWER] Key: Unit power
32. [MUTE] Key: Mute audio outputs
37
Basic operations
Power on / off
Pressany key on the front panel or the[POWER] key on the remote control to turn on the power under standby mode. The unit goes back to the last status after power on. Press and hold the [SRC] key on the front
panel or press the [POWER] key on the remote control to turn off the power under work mode.
Mute
Press the [MUTE] key on the front panel or remote control to mute the volume from the unit.
Press the [MUTE] key longly to hangup the phone
Notes: • Doing the operation above again or adjusting volume will release muting.
• Mute icon winks on the TFT during muting.
Volume adjustment
Turn the volume knob on the front panel or press the [VOL] key on the remote control. The adjustable range
of volume is 0 to 40.
Setting the Switch-on-Volume
The Switch-on-Volume is preset at level 10. This level can be modified as follows: With switched-on Unit,
regulate the Volume per requirement. Then press the Volume-knob until the volume-level will disappear from
the screen. This modified Volume-level will enter in force at the next switch-on of the Unit.
Open SOURCE MENU
Press the [SRC] key on the front panel or remote control or touch the top left corner of the screen to open
the SOURCE MENU. Do the above operation again to return to the original source.
Playing source selection
Open the SOURCE MENU, and then touch the source you desired or select one source by moving the cursor and then confirm.
Notes:
• Playing source selection means selecting work mode, such as DVD mode, Radio mode, Camera mode, etc.
• When some devices are not ready, they cannot be selected.
Display system time
Press and hold the [DISP] key on the front panel to switch the display information between system time and
playing source when the TFT monitor is closed.
Using the TFT Monitor
Open / Close monitor: Press the [OPEN/CLOSE] key on the front panel or remote control to push the display panel out or in.
Change the monitor tilt angle: Due to the inherent character of LCD, you will get different vision impressions when you watch it from different angles . The display angle of this unit can be changed; hence you can
select the best angle where you can get the best vision impression.
Press the [TILT] key on the display panel or the remote control to adjust the tilt angle one step at a time.
Press and hold the [TILT] key on the display panel or the remote control to adjust the tilt angle continuously.
Change aspect ratio : Press the [WIDE] key on the remote control to adjust the aspect ratio.
Image setting
1. Enter image setting mode. Press the [PIC] key on the remote control.
2. Select one item to adjust. Press the ( / ) keys on the remote control. Adjust the value
3. Press the ( / ) keys on the remote control.
4. Exit image setting mode To exit image setting mode, repeat the first step or stop operation for some
seconds.
Reset the unit
If the unit can not work correctly, you should reset the unit by pressing the [RESET] button on the front panel.
38
Radio mode
GB
Select radio as playing source
Open the SOURCE MENU and then touch RADIO.
Select one radio band
Press the [BAND] key on the display panel or remote control or touch the [BAND] icon on the user interface
to select one radio band among FM1, FM2, FM3, AM1 and AM2.
Auto tuning
Press the ( / ) keyonthedisplaypanel orremotecontrolor oucht
the ( / ) icon on the user interface to seek a higher / lower station. To stop searching, repeat the operation above or press other keys having radio functions.
Note: • When a station is received, searching stops and the station is played. If the unit receives a stereo
broadcasting, the indicator light of stereo ‘ST’ on the TFT or LCD display will be lighted.
Manual tuning
During manual tuning, the frequency will be changed in steps. Press the ( / ) key on remote control or
touch the ( / ) icon on the user interface to tune in a higher / lower station.
Touch the numeric keypad icon( ) and then touch the numeric buttons to input the radio station frequency
numbers.
Auto save
Only stations with sufficient signal strength will be detected and stored in the memory. When the monitor is
closed, press and hold the [AS PS] key on the / display panel. When the monitor is opened, touch the [AS]
icon on the user interface. To stop auto save, press other keys having radio functions.
Notes:
• After auto save, the previous saved stations will be overwritten.
• The unit has 5 bands, such as FM1, FM2, FM3, AM1, AM2, and Each band can store 6 stations; hence the
unit can store 30 stations in all.
Manual save
When one expected radio station has been detected……
1. Press the MEM icon on the user interface and the preset menu will be opened.
2. Press one preset button among P1~P6.
3. If you want to abort, press the [Exit] button.
Preview scan
Preview scan searching is such a process that the searching pauses when a station is received and then
played for 5~10 seconds. After being played, the unit continues the process until the whole band is detected. When the monitor is closed, press the [AS/PS] key on the display panel. When the monitor is opened,
touch the [PS] icon on the user interface. To stop the process, press other keys having radio functions.
Recall the stored stations
Press one numeric key among 1 to 6 on the remote control or touch an onscreen station button to select the
corresponding stored station.
Local seeking
When LOCAL seeking is on, only those radio stations with strong radio
signal could be received.
To open or close LOCAL function, press and hold the volume knob on the
front panel.
Notes: • When the local radio station searching is on, the indicator light ‘LOC’ lights up; whereas the light
goes off. • The number of radio stations that can be received will decrease after the local seeking mode is
on.
39
RDS operations
The unit provides basic functions of RDS, including PI (Program Identification), radio station name , RT (Radio Text), CT (Clock Time), AF (Alternative Frequency), TA (Traffic Announcement) and PTY (Program Type)
Selection.
AF function
Alternative Frequencies Lists are used for the same program service and used in conjunction with the PI
code (Program Identification code) to assist automatic tuning.
Using this information, a radio can automatically search out another station that is playing the same material.
This is useful when the station you are listening to is fading out.
To activate AF function, touch the [AF] button on the user interface. To cancel this function, do the operation
above again.
Note:
During auto switching radio frequency, some interference could be heard. Turning off AF function can settle
this problem.
TA function
The TA (Traffic Announcement flag) function lets heunit t receive traffic announcements automatically no
matter what media source is playing back. The TA function can be activated by a TP (Traffic Program) station
broadcasting traffic information. When TA is activated and a traffic announcement is received, the current
playing source will be overridden by the traffic announcement if the current radio band is FM and the ‘TA’ indicator lights up, indicating that the unit is waiting for traffic announcements. The unit returns to the original
source after the traffic announcement has been received. To activate TA function, touch the [TA] button on
the user interface. To cancel this function, do the operation above again.
PTY function
PTY is the abbreviation for Program Type which is a code defining the
type of program being broadcast (e.g. News or Rock).
Six PTY options will display on the screen. To view more PTY options,
touch the scroll bar and arrows on the screen.
When one PTY option is touched (e.g. News), auto search for next
available PTY by increasing tuning frequency until the PTY of the next
station matches the current. If no matched PTY has been found, the unit
will return to the original radio frequency.
Program Service (PS)
Used for receiver displays of an 8 character alpha numeric Program Service name which may use Upper or
Lower case characters, e.g. {BBC_4_FM}, {Classic_}.
CT (Clock Time)
Some stations broadcast the time and date within the encoded RDS signal. The clock time is automatically
adjusted when ‘CT’ is set to ‘On’.
RT (Radio Text)
When this function is activated, the unit will display short message data transmitted from the provider, such
as station information, the name of the current broadcasting song and the artist name.
40
Disc mode
GB
Insert a disc
control to eject the disc. You can eject a disc after
the unit has been powered off. The unit
remains off after the disc is ejected.
Upon inserting a disc, the unit will switch to disc
mode automatically.
Notes: • Please confirm whether there is a disc in
the unit before you insert another one. • Some recorded discs, such as CD-R, CD-RW, DVD-R, DVD+R,
DVD-RW, DVD+RW cannot be played back because
of different recording status. Otherwise, the discs
without being closed could not be played back. •
About the cautions of disc using, please refer to the
appendix.
Touch screen controls
The touch key areas for DVD playback are outlined
below:
A - Open SOURCE
MENU
B - Display playback
information
C - Display onscreen
control menu
Eject the disc
Press the [EJECT] key on the front panel or remote
Onscreen control buttons
41
Disc mode
Suspend playback
Press the (
touch the (
) key on the front panel or remote control or open the onscreen control buttons menu and then
) button. To resume normal play, repeat the above operation.
Stop playback
To stop playback, press the ( ) key on the remote control or open the onscreen control buttons menu and
then touch the ( ) button. When the above operation is executed for the first time, the current playback is
paused and the break point is memorized and the playback will resume when you start playback again or
switch back from other playing sources. The current playback will cancel if the above operation is executed
twice and the playback will start over when youstart playback again.
Display file list
To display the file list of one recorded disc , stop current playback.
Fast playback
Press the ( / ) key on the remote control repeatedly or open the onscreen control buttons menu and
then touch the ( / ) button repeatedly to change the rate of fast forward/fast reverse.
Previous / next
Press the ( / ) key on the display panel or remote control or open the onscreen control buttons menu
and then touch the ( / ) button to play the next or previous file.
Change folder
Press the [DIR+]/[DIR-] icon on the user interface (you should stop playback first if a video or picture file is
played back) to change folder during the playback ofonerecorded disc containingmorethanone folder.
Repeat playback
Press the [RPT] key on the remote controlrepeatedly or open theonscreen control buttons menu and then
touch the ( ) button repeatedly to alter repeat mode according to the following table.
Disc type
Repeat mode
Notes:
When a VCD is played back, this function is prohibited if the PBC is on.
Turning off the power or switching playing source to other modes and back will cancel this function.
Repeat A-B
When a DVD, VCD or CD disc is played back, you can play back the contents between the time points from
A to B repeatedly.
Press the [RPTA-B] key on the remote control or open the onscreen control buttons menu and then touch
the [A-B] button to set the start point (A) of the repeated section.
42
Disc mode
GB
Do the above operation again to set the end point of the repeated section.
The selected portion will repeat continuously.
Do the above operation for the third time to cancel this function.
Random playback
When this function is on, the contents in the disc will be played back randomly.
Press the [RDM] key on the remote control repeatedly or open the onscreen control buttons menu and
then touch the (
) button repeatedly to alter random playback mode among ‘Random’, ‘Random repeat’,
‘Repeat Off’.
Intro playback
When this function is on, the unit will play back the first 10 seconds of each track of a VCD or CD disc. You
can search the file you desired using this function.
Press the [SCN] key on the remote control to activate this function. Do the above operation again to cancel
this function.
Direct search
When a DVD, VCD or CD disc is played back, you can search for a particular chapter / track by pressing
the numeric keys of the remote control. For example, if you want to select the 15 track, you should press
numerical key [1] and [5].
GOTO search
1. Enter GOTO search mode
Press the [GOTO] key on the remote control to open search menu.
For DVD, you can search according to title, chapter and time.
For VCD, if PBC function is off, you can search according to time; if PBC function is on, you can search
according to track, time and Disc time.
For CD, you can search according to track.
For MPEG files, you can search according to track and time.
For record discs containing MP3 and/or JPG files, you can search according to track(file number).
2. Enter search information
Select items by pressing the direction keys on the remote control and enter search information by pressing
the numeric keys, such as title, chapter and time.
3. Confirm
Press the [Enter] key on the remote control to confirm.
4. Exit GOTO search mode
Repeat the above operation until the search menu disappeared or touch the [Exit] button on the menu.
DVD MENU and TITLE
This function is only available for the DVD discs having “MENU / TITLE”. Press the [MENU] key on the
remote control or open the onscreen control buttons menu and then touch the [MENU] button to open DVD
MENU. You can select audio language, subtitle language and so on for playback. Press the [TITLE] key on
the remote control or open the onscreen control buttons menu and then touch the [TITLE] button to open
DVD TITLE. You can select a different title for playback.
Select subtitle language
Press the [SUBTITLE] key on the remote control repeatedly or open the onscreen control buttons menu and
then touch the [SUBTITLE] button repeatedly to choose a subtitle language.
Select multi-angle views
Press the [ANGLE] key on the remote control repeatedly to choose a shooting angle during the playback of a
DVD disc or video file containing multi-angle views.
43
Disc mode
Select audio channel
For DVD containing multi-language audio files, press the [AUDIO] key on the remote control repeatedly or
open the onscreen control buttons menu and then touch the [AUDIO] button repeatedly to change dialogue
language.
For VCD and CD, press the [AUDIO] key on the remote control repeatedly or open the onscreen control
buttons menu and then touch the [AUDIO] button repeatedly to alter audio channel modes among Left vocal,
Right vocal, Mono left, Mono right, Stereo.
Note:
Left channel and right channel cannot work properly if the audio files are not recorded correctly.
PBC function
This function is available for the VCD discs with PBC function (Ver 2.0 or higher).
Press the [MENU] key on the remote control to activate this function.
Press again to cancel.
Notes:
• When PBC is on, playback goes back to the track list and starts from the first track.
• When PBC is on, fast motion playback, slow motion playback or skip search is available but repeat playback and searching for a particular chapter or track is prohibited.
• If you do the operation of random playback, scan playback or searching playback when PBC is on, PBC
will be off automatically.
Zoom in/out
To zoom in/out the image being played, press the (
control buttons and then touch the ( ) icon.
) keyon the remote control or open the onscreen
Rotate picture
When one picture file is played back, you can rotate the picture to get proper view angle by pressing
the ( ) icon on the onscreen control buttons.
Playback information
Touch the top center area of TFT LCD when playing back DVD and VCD discs and the playback information
will be displayed on the top area of the TFT.
For DVD
1. Disc type.
2. DVD Title information. “5/8” indicates that this DVD has 8 titles and the title playing back now is the fifth
title.
3. DVD Chapter information. “2/16” indicates that current title has 16 chapters and the chapter playing back
now is the second chapter.
4. Elapsed time of the current title.
5. “
” indicates that the subtitle of this DVD has been recorded in 6 languages and the language
displayed now is the second, that is English.
44
Disc mode
GB
For VCD
1. Disc type.
2. PBC function indicator. “PBC On” indicates that PBC function has been activated.
3. VCD Track information. “6/18” indicates that this VCD has 18 tracks and the track playing back now is the
sixth title.
4. Elapsed time of the current track.
USB/SD mode
Select USB or SD/CARD as playing source
Method 1:
Method 2:
Open the 'SOURCE MENU' and then select SD.
Notes:
1. The unit will switch to SD card mode or USB mode after a SD card or USB device has been inserted (USB
8 GB max - SD 4 GB max). 2. The unit supports hot swap.
Touch screen controls
Repeat playback
Onscreen control buttons
Random playback
The operation is the same as disc mode.
The operation is the same as disc mode.
Onscreen control buttons under USB mode
are the same as disc mode.
The operation is the same as disc mode.
Intro playback
Suspend playback
The operation is the same as disc mode.
The operation is the same as disc mode.
Direct search
Stop playback
The operation is the same as disc mode.
Display file list
The operation is the same as disc mode.
The operation is the same as disc mode.
GOTO search
The operation is the same as disc mode.
Zoom in/out
Fast playback
The operation is the same as disc mode.
The operation is the same as disc mode.
Rotate picture
Previous / next
The operation is the same as disc mode.
The operation is the same as disc mode.
Playback information
Change folder
The operation is the same as disc mode.
The operation is the same as disc mode.
45
Other modes
AUX
External peripheral devices with RCA audio and video outputs can be connected with the unit.
To enter AUX IN mode, open the SOURCE MENU and then touch AUX IN.
Camera
This player is “camera ready”. Before accessing any camera features, youmust purchase andinstall a rearvideo camera. Once the rear camera is connected and operating properly, the CAMERA source mode will
become active. While the camera is not installed, the CAMERA option appears gray, indicating the function
is not available. The playing source will change to ‘CAMERA’ mode automatically when you reverse your car.
NAV
This player is “navigation ready”. Before accessing any navigation features, you should purchase and install
the suited navigation module. Once the navigation module is connected and operating properly, the NAV
source mode will become active. While the navigation module is not installed, the NAV option appears gray,
indicating the function is not available. All installation and operating instructions are included with the navigation module.
There is the possibility of maintaining the navigation-interface on the screen (optional NV003), while listening
to the Audio coming from one of these sources: Radio/DVD/CD or USB/SD-card.
During the NAV-mode, the music-volume will reduce automatically, every time the Navigation-unit comes
with a road-indication, so that the navigation-voice will prevail.
Once the musical source has been selected, keep the DISP-key, situated on the front-panel, pressed for 2
seconds, or, if you prefer, the WIDE-key on the remote-control unit.
The VM041 will shift to the navigation-interface , while the Audio continues unchanged.
BLUETOOTH-System/Software 2.9 (OPTIONAL 6/860)
The Bluetooth-system is a wireless transmission-mode for small distances (up to 10 metres).
With the 6/860-device you can connect your Bluetooth-mobile-phone (with software up to 2.0), to the
VM041.
On the basis of such connection, the mobile-phone can be governed on the VM041 directly.
46
Other modes
GB
Function icons
The function icons of BT are outlined as below.
= Paring
= Setup
Menu = Menu
= Play / Pause
= Previous
=
=
=
=
=
Disconnect
Voice transfer
Answer / Dial
Stop
Phone mode
=
=
=
=
=
Dial panel
Mute
Hangup
Next
Music mode
Work modes of Bluetooth module
The bluetooth module has two work modes, which are phone mode and music mode. Touch the mode
switch icon to switch to its corresponding mode. Under phone mode, hand-free, call and other phone functions are available. Under music mode, you can enjoy the music played back by your mobile phone through
the speakers in your car and you can control the playback.
Phone mode
Pairing: Use this function toestablish a connection betweenthe Bluetooth module and your mobile phone.
Switch the work mode of the Bluetooth module to phone mode, open the SETUP menu and select the Bluetooth sub-menu and then set the 'Bluetooth' option to 'On'.
Turn on the Bluetooth function of your mobile phone and start to search Bluetooth devices.
After the name of the Bluetooth module appears on the pairing list on your mobile phone, you should select
it. At this time, a pairing code is required. The Bluetooth module will exit pairing mode if there is no pairing
instruction from your mobile phone during the pairing time (90s) and 'Phone Pairing Fail' is displayed on the
screen.
Enter the pairing code (1234 by default) to initiate the pairing process. The paired mobile phone name will
display on the screen.
Browse call numbers
The Bluetooth module will download phone book and call records from your mobile phone after pairing.
Touch the [MENU] icon to display the Menu list. There are some options on the menu list, including missed
calls, received calls, dialed calls and phone book. When youpress one of them, the Bluetoothmodule will get
its corresponding information from your mobile phone.
Make an outgoing call
Browse through the Phone book or call records, touch the number you want to dial and then touch the dial
icon to make an outgoing call.
Touch the Dial Panel icon to open dial panel and then touch the numeric buttons to input phone numbers.
Touch the [C lear ] icon to clear the last digit. Touch the hangup icon to clear the entire numbers or end the
conversation. Touch the Ans icon to make an outgoing call.
Answer an incoming call
The Bluetooth module will switch to phone mode automatically when there is an incoming call and the incoming call number will be displayed on the screen. If the 'Auto Answer' option of the 'Bluetooth' sub-menu
under the SETUP MENU is set to 'On', the unit will answer incoming calls automatically, otherwise you
should answer them manually.
The call duration will be displayed on the screen after the incoming call has been put through.
47
Other modes
Hangup
While talking, press the hangup key on your mobile phone or touch the hangup icon on the screen to end
the conversation.
Voice transfer
While talking, touch the 'Voice transfer' icon on the screen to transfer
audio from the unit to your mobile phone, and touch again to transfer
audio from your mobile phone to the unit.
Note: Some mobile phones will transfer audio from the unit to themselves once the incoming call is answered.
Microphone mute
While talking, press the microphone mute icon on the screen to mute the microphone built in the unit. Under
this condition, the one talking over the telephone with you can not hear what you are saying. Touch the mute
icon again to resume microphone functionality.
Music mode Pairing Before pairing, switch the work mode of the Bluetooth module to music mode. The
procedures of pairing under music mode is the same as the phone mode.
A2DP
A2DPis short forAdvancedAudio DistributionProfile. The mobile phones supporting this function can transmit
stereo audio, whereas the ones not supporting this function can transmit mono audio only.
After pairing, open the audio player of your mobile phone and set the transmit mode to Bluetooth. At this
time, the speakers of your mobile phone will close automatically.
About howto set the transmit modeof mobile phonesto Bluetooth,please refer to the user manual or help
document of the mobile phone in use or the audio player software because the audio players of different
mobile phones are different greatly.
AVRCP
AVRCP is short for Audio/Video Remote Control Profile. The mobile phones supporting this function can
control the playback of a Bluetooth audio player. After pairing, touch the corresponding icon to control current playback, such as Play, Pause, Stop, Previous, Next.
General notes for bluetooth
1. For N7X, N9X, PHILIPS, Sony Ericssion, SAMSUNG mobile phones, during our test, after the mobile
phones appear connection successful, the unit still appear waiting for pairing. At this time you must find the
unit’s Bluetooth module name “PHONOCAR” on the pairing list on your mobile phone and select connecting
in the submenu, then the unit will appear pair OK. Otherwise, there is no voice coming out when communicating, though the mobile phone has already displayed pair OK. Some mobile phones, such as PHILIPS,
when it playbacks A2DP, you must find the unit “PHONOCAR” in the phone’s menu and reconnect (check
your mobile phone whether has the A2DP & AVRCP functions).
2. When pairing, some types of mobile phone hint that how to operate, for example, when you make a
phone call by the unit, if the mobile phone voice dosn’t be transferred to the unit, no voice comes out. The
SAMSUNG mobile phone hints that voice should be transferred to Bluetooth device.
3. Depending on the mobile phone, if private mode is selected, when you make a phone call by the unit, or
receive, the voice would be transferred to the mobile phone. But sometime the Bluetooth maybe disconnect
till the communication ends, then connects your mobile phone to the unit automtically.
Some mobile phones maybe need pair again.
4. For mobile phone, the Bluetooth device name must be pr imary symbols or numbers. Otherwise, some
unpredictable issues may occur during the Bluetooth devices connecting and making phone call.
5. After paired OK, if no sound produced, please check whether the Bluetooth stereo audio on the phone
switched ON.
ATTENTION: our Bluetooth communication-protocol is based on the 2.0 Software. Before purchasing this
Product, please make sure that this Software is compatible with your mobile-phone.
48
Setup
GB
Setup procedures
1. Enter setup mode
Press the [SETUP] key on the remote control or touch the setup icon [] on the user interface.
The following menu appears after entering the setup mode.
The GENERAL sub-menu is highlighted by default.
2. Select one sub-menu
Press the direction keys on the remote control.
3. Select one item
Press the (
) key on the remote control to select one item and then press the ( ) key to confirm.
4. Select one value
Press the (
) key on the remote control to select one suitable value and then press the ( ) key to
confirm.
Note: • All following settings can be done by touching the option directly.
General
•
•
•
•
Clock mode
12Hr: the clock displays in the type of 12 hours such as 11:18 AM.
24Hr: the clock displays in the type of 24 hours such as 20:18.
Clock
Adjust the clock displayed on the top right corner of the TFT screen.
Tuner Region
The unit provides several radio systems and you can select a correct radio system
according to your country.
Beep
On : Background sound of key-press is on.
Off: Background sound of key-press is off.
Language
• OSD
Select onelanguage of system menu display.
• DVD Audio
Select one dialogue language of DVD disc.
Note: • If the DVD disc does not contain the selected language, the dialogues you listening to will be in
default language.
•
DVD Subtitle
Select one subtitle language of DVD disc.
Note: • If the DVD disc does not contain the selected language, the subtitle will be displayed in default
language.
49
Setup
•
Disc Menu
Select one language of DVD MENU display.
Note:• If the DVD disc does not contain the selected language, the DVD MENU will be displayed
in default language.
Audio
•
•
•
•
DRC
Set the dynamic range of Dolby digital DVD discs.
On: Playback more dynamic audio with Bass.
Off: Normal output.
Loudness
On: Loud mode is on.
Off: Loud mode is off.
Subwoofer
On: Open the subwoofer speaker.
Off: Close the subwoofer speaker.
Sub Filter
You can get different bass effect when you set different cut off frequency of sub filter.
According to the acoustics surroundings of your car, select a proper frequency. 80Hz, 120Hz, 160Hz
are available.
Bluetooth
On/Off Turn on the power of the Bluetooth module.
Connect
Auto bluetooth module connects with the bluetooth device automatically after disconnecting.
Manual bluetooth module connects with the bluetooth device manually after disconnecting.
Pairing code You should enter the pairing code when the bluetooth module is pairing with another bluetooth
device. The original paring code is 1234 and you can change the paring code when the bluetooth module
is on.
Auto Answer
On/Off Answer automatically when one call is coming in.
RDS
RDS On: RDS function is opened. Off: RDS function is closed.
CT
On: The clock time is on. Off: The clock time is off.
Tuner Region The unit provides several radio systems and you can select a correct radio system according
to your country.
TA VOL
Set relative volume to other audio sources.
Rating
Some DVD discs have built-in parental lock which prevents children to watch some scenes as force or
eroticism especially.
• Set Password
The original password of the unit is null .
You should set a new password ASAP.
Method of changing password:
1. Locate the cursor on the ‘password’ option, press the numeric keys on the remote control or touch the
50
Setup
GB
‘Password’ option directly to open the onscreen keypad, touch the numeric buttons to enter your
password (original password for the first time) and then confirm.
2. Repeat the operation above to enter a new 6-digit password and then confirm.
The new password becomes effective and the parental lock is closed.
• Rating
The unit has some watching level as followings:
1. Kid safe: A movie rating that is condign to children.
2. G: A movie rating that allows admission to persons of all ages.
3. PG: A movie rating that allows admission of persons of all ages but suggests parental guidance in the
case of children.
4. PG-13: A movie rating that allows admission of persons of all ages but suggests parental guidance in the
case of children under the age of 13.
5. PG-R: PG-related.
6. R:A movie rating that allows admission only to persons of a certain age, usually 17, unless accompanied
by a parent or guardian.
7. NC-17: A movie rating that allows admission to no one under the age of 17.
8. Adult: A movie rating that is condign to the adult only.
Procedures of changing the rating:
1. Enter password to unlock the parental lock Locate the cursor on the ‘password’ option,press the nume
rickeys on the remote control or touch the ‘Password’ option directly to open the onscreenkeypad,touch
thenumeric buttons to enter your password and then confirm.
2. Change the rating
Select an appropriate rating from the ‘rating’ list.
3. Close the parental lock.
Repeat the operation of the first step to enter a 6-digit password (old or new) and then confirm. The
parental lock is closed.
• Load Factory
To restore the default settings relating with DVD playback (e.g.: DVD Audio, DVD Subtitle), press the
[RESET] option only.
Hardware
•
•
•
•
Camera In
Normal: Actual scenes shot by the camera display on the TFT monitor while reverse driving (just like
what you are looking). Mirror: The mirror images of actual scenes display on the TFT monitor while
reverse driving (just like looking from the rearview mirror).
TFT Auto Open Auto:
The TFT panel automatically opens when the unit is turned on. Manual: When the ignition is turned off,
the TFT panel remains open if it was opened previously. Off: The TFT panel opens only by pressing
OPEN button when the unit is turned on.
Video input NTSC:
Set the color system of the TFT screen to NTSC. PAL: Set the color system of the TFT screen to PAL.
AUTO: Set the color system of the TFT screen automatically by the unit according to the input
video formats.
Parking
On: Image displays only after your car has been parked.
Off: Image displays at all times.
51
P.VOL
P.VOL means Programmable Volume.
You can balance the volume among different audio sources using this function.
• Source
Select one playing source that you want to set relative volume.
• Level
You can set relative volume level from -6 to 6.
TS CAL
When the touch function is not sensitive or valid, you should calibrate the touch screen by this function.
Calibrate the touch screen just following the screen introductions after entering the TS CAL mode.
EQ
Audio control allows you to easily adjust the audio system to get the best possible sound effect.
1. Enter the EQ setup mode
Press the [EQ] key on the remote control or touch the EQ icon in the user interface and the following interface will display on the screen .
EQ selection
Fader/Balance
adjustment area
EQ parameters
2. Select EQ mode
Touch the EQ selection bar repeatedly and the EQ mode will change.
3. Adjust EQ parameters
To adjust EQ parameters, touch and drag the EQ parameters adjustment bar.
4. Adjust Front/Rear/Left/Right fader and balance
You can adjust front/back/left/right balance of the speaker to get larruping listening effect according to the
surroundings and your interest. To adjust Front/Rear/Left/Right fader and balance, touch and drag the small
white point in the Fader/Balance adjustment area.
Notes:
1. The unit has provided some EQ modes: User, Rock, Hip Hop, Dance, Latin, Rave, Urban, Acoustic.
2. Different EQ reflects in different Bass, Treble and Middle level. The parameters of the EQ modes has
been preset and you can not change them besides ‘User’.
3. The EQ mode will change to ‘User’ automatically when you adjust the value of BASS, TREB or MID
under the modes besides ‘User’.
4. The value of SUB is independent of EQ mode and can be adjusted solely.
52
Troubleshooting
GB
What appears to be trouble is not always serious. Please check the following points before calling a service
center.
Problem Cause General
Unit can not
power on
Remote control does not
work
No/low audio output
Poor sound quality or
distortion
Tel-Mute malfunction
Unit resets itself
when engine is off
Unit fuse blown.
Install new fuse with correct rating
Car battery fuse blown
Install new fuse with correct rating
Illegal operation
Reset the unit
Battery depleted
Change the battery.
Battery installed incorrectly
Install the battery correctly.
Improper audio output connection
Check wiring and correct.
Volume set too low
Increase volume level.
Speakers damaged
Replace speakers.
Heavily biased volume balance
Adjust the channel balance to center position.
Speaker wiring is in contact with metal
part of car
Insulate all speaker wiring connections.
Piratic disc is in use
Speaker power rating
does not match unit
Use original disc
Flashing image or interference appears on screen
Replace speakers.
Wrong connections
Check wiring and correct.
Speaker is shorted
Check wiring and correct.
MUTE wire is grounded
Check the ‘MUTE’ wiring and correct.
Incorrect connection between
ACC and BATT
Check wiring and correct.
Monitor does not open
automatically
Warning information is
shown at all times
Corrective action
TFT monitor
TFTAuto Open is turned off
Turn TFTAuto Open on.
Parking break wiring is not correct
Check wiring and correct.
Parking break wiring is not correct
Adjust the color system of the DVD disc
playing back or the monitor in use.
Piratic disc is in use
Use original disc
Video cable damaged
Replace cables
Improper video signal connections
Check wiring and correct
53
Troubleshooting
(Continued)
Problem Cause Disc playback
Cannot insert disc
Disc does not play back
Corrective action
A disc inside the unit already.
Eject current disc and insert new one.
Disc is warped or scratched.
Use disc in good condition.
Disc is dirty or wet.
Clean disc with soft cloth.
Incompatible disc is used.
Use compatible disc.
Disc is inserted upside down.
Insert disc with label side up
Disc region code is not compatible
with unit.
Use disc with proper region code.
PBC cannot be used during
VCD playback
PBC is not available on the disc.
Use disc with PBC available.
Repeat or search function is
invalid during VCD playback
PBC is on.
Turn PBC off.
Error messages
No disc
Disc is dirty
Clean disc with soft cloth
Disc is upside down
Insert disc with label side up.
No disc inside
Insert disc.
Disc is dirty
Clean disc with soft cloth.
Disc is upside down
Insert disc with label side up.
Unknown disc
Format is not compatible with this unit
Use disc with compatible format.
Region error
DVD region code is not compatible
with this unit
Use disc with compatible region cod
Bad disc
54
Device connections
GB
Notes of connection
• This unit is designed to be used in a vehicle with a 12-volt battery and negative grounding. Before instal-
ling this unit to a recreational vehicle, a bus, or a truck, make sure the battery voltage is appropriate for this
unit to be used, otherwise, install a transformer by professional to convert the output voltage to 12V.
• To avoid short circuit in the electrical system, ensure that the negative battery cable is disconnected before
installation.
• To prevent short circuit in the wiring and damaging to this unit, secure all wirings with cable clamp or
adhesive tape. Route the wirings in a secured, out of heating place without touching any moving parts such
asgear shift,handbrake,and seatrails to preventthe wiring insulation being melted / wore off.
• Never pass the yellow power cord through the installation hole into the engine compartment and connect
to the car battery. Otherwise, a high possibility of serious short circuit to the electrical system may be occurred.
• Replacing a new fuse with 10A rating when the old one is broken, using no fuse or fuse with improper
rating may cause damage to this unit or even fires. If a proper fuse is installed and electrical problems still
occur, please contact with any professional car shops for inquiry.
• DO NOT connect other equipments with thecar batteryto avoidbattery overheating.
• Please make sure all the wiring connections & the cables of the speakers are well-insulated. Otherwise,
this unit may be damaged by short circuit.
• If there is no ACC available Please connect ACC lead to the power supply with a switch.
• If an external power amplifier is connected, please don’t connect P.CONT lead to the power lead of the
external power amplifier, otherwise, electric spark or other damage may be resulted.
• Never ground the speaker output to prevent the damage to the built-in power amplifier.
• The minimum rating of the speakers connected to this unit is 50W with 4 to 8Ω impedance.
Control Cables
Auto Brightness Control
To avoid the display being too bright at night time, if the headlight cable is connected to ILLUMI, turning on
the headlight will dim the backlight of the TFT LCD and vice versa.
Telephone Mute
If the MUTE cable is connected to a car phone, other audio outputs mute when one call is received by the
car phone.
Reverse Driving
If a rear view camera is connected with the unit, the playing source switches to CAMERA automatically
when you start reverse driving.
As the reverse driving is done, the playing source switches to the previous.
Parking Brake
If “BRAKE” cable is connected to hand brake switch, video display on the TFT monitor will be controlled by
this function. Parking cablefunction ceases when the playing source is CAMERA.
The monitor displays the blue screen with warning information to prevent the driver watching video contents
during driving, but the passengers at the rear seat can watch video contents normally.
55
Connessioni
Parking Brake Cable Connecions
Pink wire BRAKE
Reverse Driving Cable Connections
56
Installation and uninstall
GB
Notes of installation
1. Before installation, please make sure properconnections are conducted and the unit operates normally.
Improper connection may result in damage to the unit.
2. Use only accessories designed and manufactured for this unit and other unauthorized accessories may
result in damage to the unit. 3) Before installation, please fasten all power cables. 4) DO NOT install the unit
in the place where close to hot area to prevent damage to electrical components such as the laser head. 5)
Install the unit horizontally. Installing the unit more than 30 degree vertically may result in worse performance. 6) To prevent electric spark, connect the positive pole first and then the negative pole. 7) DO NOT block
the cooling fan exit to ensure sufficient heating dissipation of this unit, or it may result in damage to this unit.
Unit Installation
Method A
1. Insert mounting bracket into dashboard,choose appropriate mounting tab according to the gap width,
bending the mounting tab outwards with a screwdriver to fix the mounting bracket in place.
2. Use 2 pieces of M5×5 cone shaped screw to fix two assemble bars on both sides of the unit
(see picture 1).
1
3. Screw in 1 piece of M5×24 to the hole of the unit back and put on a rubber sheath over the screw.
(see picture 2)
4. Inserttheunitintothebracket,fastentheM4×6 screw to thefireproofing board available at theback ofthe
dashboard, and use 4 piecesof M2×2 screw to lock the assemble bars and the mounting bracket in position.
Note: According to the depth of the opening, use different length of assemble bar accordingly. If the opening
is too shallow, the monitor may be extended out 10mm from the dashboard.
57
Installation and uninstall
Method B
1. Insert this unit directly to the opening of the dashboard. ()
2. Place M4×3, M5×5 cylindrical screw or M5×5 cone shaped screw through the holes of the mounting
frame located inside the opening to holes of the unit and fasten the screws to left & right.
Trim Ring installation
Attach the trim ring around the front panel with two indentions on one side facing upwards
Uninstall
Disassemble trim ring
1. Push the trim ring upward and pull out the upper part.
2. Push the trim ring downward and pull out the lower part.
Disassemble the unit
1. Unscrew the 4 pieces M2×2 screws.
2. Use a screwdriver to bend straight the bended mounting tab and tip out the unit from the mounting bracket.
3. Pull out the unit from the mounting bracket with both hands .
58
Specifications
General
Reference Supply Voltage............................... 12V(DC)
Operating Voltage Range....................10.5~15.8V(DC)
Max Operating Current...........................................10A
Grounding System...............Car Battery Negative Pole
Installation Dimension
(W×H×D)...................... 178 mm×50mm×(165+25) mm
Installation Angle............................................... 0°~30°
Net Weight........................................................... 2.3kg
FM
Signal Noise Ratio................................................55dB
Residual Noise Sensitivity(S/N=30dB............. 20dBμV
Frequency Response(±3dB..................40Hz~12.5KHz
Station Seeking Level................................ 20~30dBμV
Distortion..............................................................1.5%
Stereo Separation(1KHz.......................................20dB
Antenna Impedance.............................................. 75Ω
GB
TFT Monitor
Screen Diagonal..............................................7 inches
Usable Display Area...................... 154.1(W) × 87.0 (H)
Resolution........................................ 800 (W) × 480 (H)
Brightness....................................................400cd/m2
(Measure the center brightness
after 30 minutes)
Contrast....................................................... 300( TYP. )
Response Time
Rise.............................................................. 12ms
Fall............................................................... 18ms
Viewing Angle
From Top..........................................................40°
From bottom....................................................65°
Horizontally ...................................................±65°
LCD Life Cycle................................ 10000 hours(at 25)
Environment
Operating Temperature...................................................-10~60
Storing Temperature.......................................................-20~70
Residual Noise Sensitivity (S/N=20dB........... 40dBμV Operating Humidity................................45%~80%RH
Selectivity (±9KHz) ..............................................50dB Storing Humidity.....................................30%~90%RH
AM
DVD Player
Signal / Noise Ratio..............................................90dB
Dynamic Range................................................... 90dB
Distortion(line out.................................................0.1%
Frequency Response(±3dB.................... 20Hz~20KHz
Maximum Output Power...................................4×45W
Load Impedance..................................................... 4Ω
Region Code
According to DVD sale region, the whole world is
divided into six regions. A DVD disc can be played
back only when its region code is compatible with
that of the player in use.
AUX IN
Distortion..............................................................0.5%
Frequency Response(±3dB.....................20Hz~20KHz
Audio Input Level............................................. 0.4Vrms
Audio
Audio Output Impedance.................................... 200Ω
Audio Output Level............................. 2+0.2Vrms(Max)
(Under normal audio input level and
maximum volume)
Video
Normal Video Input Level(CVBS.....................1.0±0.2V
Video Input Impedance......................................... 75Ω
Video Output Impedance...................................... 75Ω
Video Output Level.........................................1.0±0.2V
(Under normal video input level)
NOTE: Specifications are subject to possible modifications for improvement without further notice.
59
Electrical Connections
60
Information De Securite
1. l’appareil doit être connecté uniquement à une
alimentation de 12 V cc, avec Mise à la terre
(à la masse).
2. Ne pas installer l’appareil dans des endroits
qui empêchent les manœuvres de la conduite
prudente.
3.
Ne pas se servir de l’écran antérieur pendant
la conduite, pour éviter de violer le code de
la route et par conséquence éviter les risques d’accidents.
Pendant la conduite, l’écran antérieur doit être
utilisé uniquement pour la camera de recul.
4.
Ne pas mouiller ni exposer l’appareil, ainsi
que leur amplificateur et haut parleur à
l’humidité pour éviter les étincelles ou les
incendies.
5.
Le remplacement du fusible du câble
d’alimentation doit être fait par du personnel
spécialisé.
Les fusibles inaptes peuvent endommager
l’appareil ou causer les incendies.
6.
À l’apparition d’un de ces problèmes, débrancher
immédiatement l’appareil et contacter le service
d’assistance PHONOCAR, ou le revendeur chez
qui vous l’avez acheté :
• audio manquante
• image manquante
• eau ou objets à l’intérieur de l’appareil
• fumé
• odeurs particulières
7. Pour une conduite prudente et pour des
imprévus, choisir toujours un volume moyen
et agréable.
FR
1. L’ouverture et la réparation de l’appareil doit être fait uniquement par le personnel spécialisé.
2. Pour éliminer des éventuels taches sur la façade et/ou monitor, utiliser une chiffon propre, et un
détergent neutre. Un chiffon rugueux et un détergent pas neutre (exemple l’alcool), peuvent gratter
ou faire décolorer les superficies traitées.
3. En cas d’anomalie, voir la liste des problèmes plus fréquent que vous trouverez dans ce manuel.
Si la liste ne contient pas les informations utiles aux cas traités, appuyer de tout façon sur la touche
RESET, que vous trouvez en avant pour reprendre les installations d’origine.
4. Dans le cas ou le véhicule a une température très élevée ou trop basse, attendre qu’ elle se normalise
à l’intérieur avant d’utiliser le lecteur.
5. Après avoir mis en marche le chauffage interne à une température basse, les goûtes de condense
peuvent se former, n’utiliser pas la source,expulser le disque et le nettoyer. Si après quelques heures, ça
ne fonctionne pas toujours, contacter le service d’assistance.
6. Éviter de cogner violemment sur l’écran LCD lorsqu’il est ouvert de peut de détruire le mécanisme
interne.
7. Pour éviter l’endommagement de l’écran, n’utiliser pas le touch screen avec des objets pointilleux.
8. Le monitor utilise un système automatique motorisé, donc ne pas forcer ni essayer de l’enlever
manuellement si on veut éviter des dommages au système mécanique interne.
9. Pour aider à comprendre les fonctions et les modalités d’utilisation de cette source, on se servira des
graphiques et des dessins. Toute fois certaines de ces illustrations peuvent légèrement se différencier
de ceux que vont apparaître sur l’écran.
10.Quand l’appareil est en fonction, apparaîtra
si l’opération désirée n’est ni disponible, ni illégale.
11.Utiliser correctement l’appareil en suivant les indications de ce manuel pour prévenir si possible
des problèmes. La garantie ne sera pas valable si le problème est causé par une mauvaise utilisation. 63
Index
Contrôles touch sreen.............................................75
Avant l’utilisation
Panneau frontale.....................................................65 Bouton sur l’écran...................................................75
Écran LCD...............................................................66 Suspendre la reproduction......................................75
Télécommande........................................................67 Interrompre la reproduction.....................................75
Visualiser la liste des morceaux..............................75
Opérations fondamentales
Branchage on/off-Mute...........................................68 Reproduction rapide................................................75
Réglage du Volume.................................................68 Précédente/successive...........................................75
Réglage Volume d'allumage....................................68. Changer le fichier....................................................75
Menu source............................................................68 Répétition de la reproduction..................................75
Sélection source en reproduction...........................68 Reproduction casuelle.............................................75
Horloge du système display....................................68 Recherche directe...................................................75
Utiliser le monitor TFT.............................................68 Recherche GOTO....................................................75
Reset de l’appareil...................................................68 Zoom in/out.............................................................75
Tourne image...........................................................75
Modalité Radio
Sélection source en reproduction...........................69 Informations de reproduction..................................75
Sélectionner une station de transmission radio......69 Autres modalités
Syntonisation Automatique.....................................69 AUX-Camera-NAV...................................................76
Syntonisation manuelle...........................................69 Sistema BLUETOOTH 2.0.......................................76
Sauvegarde Automatique........................................69 Icônes et leurs fonctions.........................................77
Sauvegarde manuel ...............................................69 Couplage.................................................................77
Scanning.................................................................69 Déconnexion du téléphone.....................................77
Récupérer les stations sauvées..............................69 Effectuer un appel...................................................77
Recherche locale.....................................................69 Recevoir un appel...................................................77
Transfert voix de la conversation.............................78
Opérations RDS
Fonction AF-TA-PTY...............................................70 Dernier appel...........................................................78
Programme de service (PS).....................................70 Bluetooth audio.......................................................78
CT (horaire)-Radio Text............................................70 Modalite musique....................................................78
Fonctions générales Bluetooth...............................78
Modalité de lecture du CD
Insérer le CD............................................................71 Procédures Setup
Expulser le CD.........................................................71 Procédures d'enregistrement..................................79
Contrôles touch sreen.............................................71 Générales................................................................79
Boutons sur l’écran.................................................71 Langue............................................................... 79-80
Suspendre la reproduction......................................72 Audio-Bluetooth-Reponse automatique.................80
Arrêter la reproduction............................................72 Connect-Paring code-RDS-CT...............................80
Visualiser la liste des morceaux..............................72 Turner Region..........................................................80
Reproduction rapide................................................72 TA VOL.....................................................................80
Précédente/successive...........................................72 Niveau de protection......................................... 80-81
Changer le fichier....................................................72 Réglages relatifs aux connexions............................81
Répéter la reproduction...........................................72 P.VOL.......................................................................81
Répétition A-B.........................................................72 TS CAL....................................................................81
Reproduction casuelle.............................................73 EQ...........................................................................82
Reproduction intro...................................................73 Troubleshooting............................................... 83-84
Recherche directe...................................................73 Connexion
Recherche GOTO....................................................73 Note pour la connexion...........................................85
Menu DVD e TITTLE................................................73 Câbles de contrôles................................................85
Sélectionner la langue des sous titres.....................73 Connexions du câble frein à main...........................86
Sélectionner la vision multi angle............................73 Connexion du câble marche arrière........................86
Sélectionner le canal Audio............................... 73-74 Installation et désinstallation
Fonction PBC..........................................................74 Note d’installation...................................................87
Zoom in/out.............................................................74 Installation de l’appareil..................................... 87-88
Tourne image...........................................................74 Installation Trim Ring...............................................88
Informations de reproduction............................ 74-75 Désinstallation.........................................................88
Spécifications........................................................89
Modalité USB/SD
Sélectionner USB/SD....................................................75 64 Connections électriques.......................................90
Avant l’utilisation
FR
Panneau frontale
1. [DISP/PIC] 2. [OPEN/CLOSE] 3. [ /SRC] 4. [VOL/ ]
5. [RESET] 6. [MUTE]
7. [SDHC] 8. [AUX IN]
9. [USB]
10.[ ]
11.[ /TILT+] 12.[ /TILT-] informations sur l’afficheur – réglage image
Ouvre et Ferme le panneau LCD
Allume /Eteint l’appareil – Change la modalité – Ouvre le menu principal
Réglage Volume – Reproduction/Pause – Réponse appel entrant
Restaure les réglages d’origine de l’appareil
Met à zéro l’audio – Termine l’appel
Slot pour Carte SD compatible HC
Entrée auxiliaire A/V
Porte USB
Expulsion du CD
Trace /Station suivante – Curseur à droite – Augmente l’angle du Display
Trace / Station précédente – Curseur à gauche – Réduit l’angle du Display
65
Avant l’utilisation
LCD Frontale
1.
2.
3.
4.
5.
Indicateur CD – c’est allumé lorsqu’un CD est inséré ; c’est éteint quand il n’y a aucun CD à l’intérieur
Indicateur modalité répétition – c’est allumé quand la modalité répétition est activée; c’est éteint quand
la modalité est débranchée.
Zone du display principale – fait voir les noms, le temps de reproduction, la fréquence radio, l’horloge et
d’autres informations textuelles.
Indicateur statut radio – l’indicateur de stéréophonie s’allume quand la transmission radio est stéréo;
l’indicateur local s’allume quand la fonction recherche local est activée
Indicateur fonction RDS – AF: fréquence alternative PTY: type de programme TA: annonce de trafique
(circulation) TP: programme de trafique
Note: 1. Plusieurs informations sont visualisées seulement quand l’écran est fermé. 2. LCD frontale fait voir
les informations uniquement en anglais
Note sur l’utilisation de la télécommande
1.
2.
3.
4.
5.
6.
7.
8.
Diriger la télécommande vers le senseur de l’appareil
Enlever la pile (batterie) de la télécommande si on ne l’utilise pas pendant plus d’un mois
Ne laisser pas la télécommande exposée au soleil, ni au températures élevées, elle pourrait ne pas
fonctionner correctement.
La pile peut fonctionner pendant 6 mois aux conditions normales. Si la télécommande ne fonctionne,
changer la pile.
Utiliser uniquement les piles au litio « à bouton » CR2025 (3V)
Ne pas recharger, démonter, réchauffer ou exposer les piles à la chaleur
Insérer la pile de façon correcte en contrôlant les pôles + et –
Tenir les piles hors de la portée des enfants pour éviter les accidents.
Enlever la pile
faire glisser vers l’extérieur la couverture du coté
bas de la télécommande
Insérer la pile
Utiliser uniquement les piles au litio « à bouton » CR2025 (3V).
Insérer la pile dans l’espace correspondant en respectant
la position correcte des pôles + et
66
Introduction aux fonctions des touches
FR
Télécommande
1. Touche (SRC): Sélectionne la source à utiliser
2. Touche (EJECT): expulse le CD
3. Touche (AUDIO): Sélectionne la langue des dialogues DVD
4. Touche (VOL+/-): Règle le Volume
5. Touche (ZOOM): Zoom in/out image
6. Touche ( / BAND): Sélectionne la bande radio
Reproduction ralentie
7. Touche (WIDE): Change la modalité de visualisation
8. Touche ( ): Recherche automatique / Précédente
Déplace le curseur vers la gauche
9. Touche (PRESET
): Change la station radio
10. Touche (EQ): Ouvre le menu des réglages de l’égaliseur
11. Touche (GOTO/ ): Recherche trace / chapitre spécifique
Réponse à un appel entrant
12. Touche OPEN / CLOSE): Ouverture / Fermeture écran TFT
13. Touche (TILT): Règle l’inclination du display
14. Touche (REPT A-B): Répétition A-B
15. Touche (RPT): Répétition reproduction
16. Touche (INT): Reproduit les 10 premières secondes
de chaque trace
17. Touche (RDM): Reproduction casuelle du support
18. Touche (0-9): Clavier numérique
19. Touche ( / ): Interrompt la reproduction
Termine l’appel en court
20. Touche (DISP / CLEAR): Montre les informations
de reproduction - Efface les informations de reproduction
21. Touche ( ):Retour rapide - Déplace le curseur vers le bas
22. Touche (PIC): Réglages image - Navigation
23. Touche ( ): Recherche automatique / Successive
Déplace le curseur à droite
24. Touche ( ): Reproduction / Pause / Enter
25. Touche (SETUP): Menu réglages
26. Touche ( ): Avance rapide / Déplace le curseur
vers le haut
27. Touche (TITLE): Titre du DVD
28. Touche (MENU): Menu DVD / PCB
29. Touche (ANGLE): Sélectionne l’angle de vision
30. Touche (SUBTITLE): Sélectionne la langue des sous titres DVD
31. Touche (POWER): Allume / Eteint l’appareil
32. Touche (MUTE): Met à zéro l’audio
67
Opérations fondamentales
Mise en marche/Débranchement
Appuyer sur n’importe quel touche en avant ou appuyer la touche Power sur la télécommande pour mettre en
marche le VM040. L’unité reprendra à partir de l’état précédente au débranchement. Appuyer sur la touche SRC
pour plus de 2 secondes ou appuyer la touche POWER sur la télécommande pour éteindre (débrancher).
Mute
Appuyer la touche [MUTE ] sur la face ou sur la télécommande pour réduire au silence les sorties audio,
durant le mute, l’icône correspondante clignote sur le display frontal. Appuyer longtemps la touche [MUTE]
pendant la conversation pour interrompre l’appel. Note: 1. L’augmentation du volume annule la fonction
[MUTE ] 2. Durant le Muting, l’icône du Mute clignote sur le display TFT
Réglage du volume
Tourner le bouton frontal ou appuyer les touches VOL sur la télécommande pour augmenter ou réduire le
volume. Appuyer le bouton volume pour lancer et mettre en pause la reproduction ou pour répondre à un
appel entrant. On peut régler le volume de 0 à 40.
Réglage volume d’allumage
A l’allumage, le volume est réglé sur le niveau 10, il peut être modifié en suivant cette séquence:
Quand l’appareil est allumé, régler le volume désiré et appuyer le bouton jusqu’à ce que le niveau du volume
disparaisse de l’écran. Au prochain allumage, le volume sera celui réglé.
Menu source
Appuyer la touche SRC sur la face, sur la télécommande ou toucher l’angle haut à gauche de l’écran touch srceen
pour entrer dans le menu de sélection sources. Répéter l’opération précédente pour retourner en arrière.
Reproduction des sources
Entrer dans le menu sources et toucher sur l’écran touch sreem l’icône de la source désirée ou se déplacer
à travers les touches du curseur de la télécommande et appuyer la touche ( / ) - ( / ) pour
sélectionner. Note: 1. la reproduction des sources veut dire choisir le type de reproduction par exemple DVD,
Radio, Camera etc… 2. si certains dispositifs ne sont pas reliés et allumés, ils ne pourront pas être sélectionnés.
Visualisation de l’horaire
Tenir presser la touche (DISP) en avant pour passer de la visualisation de l’horloge à celle de la source en
reproduction quand l’écran touch screen est fermé.
Utilisation de l’écran TFT Touch Screem
Ouvrir/fermer l’écran. Appuyer la touche (OPEN / CLOSE) sur la façade ou sur la télécommande pour ouvrir
et fermer l’écran. Changer l’ angle de prise de vue du monitor. A cause de la nature même du LCD, la
qualité de la vision varie selon les différentes angles à partir des quels on visionne. L’angle de prise de vue
de l’écran peut être modifié; pour cette raison, on peut choisir l’angle qui permet d’avoir la meilleur vision
possible. Appuyer la touche (TILT) sur l’écran ou sur la télécommande pour régler l’angle du monitor pas
à pas. En tenant la pression sur la touche (TILT) sur l’écran ou sur la télécommande, on règle l’angle du
monitor de façon continu. Changer le format de l’image. Appuyer la touche (WIDE) sur la Télécommande
pour régler le format de vision de l’image.
1. entrer dans le menu de réglage de l’image - appuyer la touche ( / ) sur la télécommande
2. choisir le paramètre à modifier - appuyer les touche ( / ) sur la télécommande
3. régler la valeur selon se qu’on préfère - appuyer les touches sur la télécommande
4. sortir de la modalité de réglage de l’image - pour sortir, répéter le premier passage ou arrêter l’opération
pour quelques secondes
Réinitialiser l’appareil
Si l’appareil ne fonctionne pas de façon correcte, on conseille de le reformater en appuyant la touche
(RESET) en avant.
68
Modalité Radio
FR
Sélection pour l’écoute audio
Ouvrir le menu source et ensuite appuyer sur l’écrit radio du touch screen
Sélectionner une bande radio
Appuyer la touche () en avant ou sur la télécommande ou appuyer l’icône (BAND) sur l’écran touch screen
pour choisir une bande radio entre FM1, FM2, FM3, AM1 ET AM2.
Syntonisation automatique
Appuyer la touche ( / ) en avant, sur la télécommande ou sur l’icône ( / ) du touch screen pour
chercher les stations radios précédentes et suivantes.
Pour arrêter la recherche, appuyer les autres touches de la section radio.
Note: Quand on reçoit une station radio,la recherche s’arrête et la station reste en écoute. Si l’appareil
reçoit une transmission stéréo, l’indicateur lumineux de la stéréophonie « ST » va s’allumer sur l’écran touch
screem ou sur le display frontal.
Syntonisation manuelle
Pendant la syntonisation manuelle, la fréquence changera par déclenchement. Appuyer les touches i
( / ) sur la télécommande ou les icônes i ( / ) sur le touch screem pour se syntoniser sur une
station radio successive ou précédente. Choisir l’icône du clavier numérique sur le touch screem et ensuite
sélectionner les boutons numériques pour introduire les chiffres de la fréquence radio.
Sauvegarde automatique
Uniquement les stations qui ont suffisamment le signal peuvent être trouvées et mémorisées. Quand le
monitor est fermé, faire pression sur la touche () en avant.
Quand le monitor est ouvert, sélectionner l’icône ()sur le touch screem. Pour arrêter la sauvegarde
automatique, appuyer sur les autres touches de la section radio.
Note: 1. Après la sauvegarde automatique, les stations précédemment enregistrer seront écrites.
2. Le lecteur a 5 bandes , qui sont FM1, FM2, FM3, AM1, AM2 et à chaque bande peuvent être mémoriser 6
stations ; pour cela le lecteur peut mémoriser 30 stations au total.
Sauvegarde manuelle
Lorsqu’on trouve la station radio recherchée…
1. appuyer l’icône (MEM) sur le touch screem pour ouvrir le menu des mémoires
2. appuyer un bouton entre P1 et P6
3. si on veut sortir, appuyer la touche (EXIT)
Scanning des stations radios
Le scanning des stations radio est un procès qui permet d’écouter pendant 5 – 10 secondes chaque station.
Le lecteur continu la procédure jusqu’au scanning de toute la bande.
Quand le monitor est ouvert, appuyer l’icône
depuis PS sur le touch screem. Pour interrompre la
procédure, appuyer une touche quelconque de la section radio.
Sélectionner les stations mémorisées
Appuyer une des touches numériques des stations radios de 1 à 6 sur la télécommande ou sur le touch
screem pour sélectionner la station correspondante.
Recherche locale
Quand la recherche locale est activée, les stations radios qu’on peut trouver sont celles qui ont un signal
élevé. Pour activer ou débrancher la fonction LOCAL, faire pression sur le bouton du volume en face.
Note: 1. quand la recherche locale des stations est activée, l’indicateur lumineux « LOC » s’allume; alors
qu’ elle s’éteint quand il est débranché. 2. le nombre de station qui peut être reçu se réduira après que la
recherche locale ait été lancée.
69
Opération RDS
Le lecteur offre des fonctions de base RDS, y compris PI (identification du programme), Nom de la station
radio, RT (texte radio), CT (horaire), AF (fréquence alternative), TA (info sur la circulation) et PTY ( type de
programme).
Fonction AF
La liste des fréquences alternatives (AF) est utilisée en jumelage avec le code PI ( identification du
programme radiophonique) pour favoriser la syntonisation automatique de la nouvelle fréquence.
En utilisant ces informations, la radio peut chercher automatiquement une autre fréquence transmise par la
même station.
Cette fonction est utile quand la station qu’on écoute perd le signal et une fréquence alternative est
présente.
Pour activer la fonction AF, sélectionner sur le touch screem la touche (AF). Pour annuler cette fonction,
appuyer de nouveau.
Note: pendant le passage automatique des stations, on peut percevoir quelques interférences. En éteignant
la fonction AF, on résout ce problème.
Fonction TA
La fonction TA (annonce sur la circulation routière) permet de recevoir automatiquement des informations
sur la circulation indépendamment du type de source écouté. Une fois activée la fonction TA, on peut recevoir une information sur la circulation TP à partir des stations radio qui la transmette. Lorsque TA est activé
et une annonce sur la circulation est localisée dans la bande FM, la reproduction en court est dominée par
cette annonce.
L’indicateur TA s’allume, pour indiquer ainsi que l’appareil est en attente de l’annonce. L’appareil reprendra
la reproduction originale à la fin de l’annonce. Pour activer la fonction TA, sélectionner la touche TA sur le
touch screen.
Pour interrompre cette fonction, appuyer de nouveau (TA)
Fonction PTY
PTY (typologie de programme) est un code qui définit le type de programme en reproduction (Ex. News o
Rock). Sur l’écran on visualisera 6 options PTY.
Pour en visualiser plus, appuyer la barre latérale et les flèches sur l’écran.
Quand une option PTY a été sélectionner, la recherche automatique des successives PTY disponibles
commence jusqu’à ce qu’elle trouve la station suivante correspondante à celle originale. Si aucune PTY
n’est trouvée, le lecteur retournera à la station originale.
Service Programme (PS)
Ecoute anticipée et scanning des émetteurs que l’appareil peut recevoir.
CT (horaire)
Certaines stations transmettent l’heure et la date dans le signal RDS. L’heure se règle automatiquement
quand CT est mis sur ON.
RT (texte radio)
quand la fonction est activée, le lecteur visualise des messages brefs de donnés transmis à partir du
provider : Ex. informations sur la station, le nom de la chanson qu’on écoute et de l’artiste.
70
Modalité de lecture du CD
FR
Insertion du CD
télécommande pour enlever le CD. On peut expulser
le CD après que le lecteur soit éteint. L’appareil reste
éteint après l’expulsion du CD.
Après avoir insérer le CD, le lecteur passera
automatiquement en modalité reproduction.
Note: 1. Vérifier que le lecteur soit vide avant
l’insertion du CD.
2. certains CD copiés, comme par ex. CD-R, CDRW,
DVD-R, DVD+, DVD-RW, DVD+RW peuvent ne pas
être lus à cause des différentes modalités d’écriture.
En outre les CD qui ne sont pas fermés pendant
qu’on les copies ne peuvent pas être lus.
3. pour plus de précaution dans l’utilisation des CD,
se référer à l’indice.
Contrôle Touch screen
Les zones touches dans la reproduction DVD sont
signalées en dessous:
A. Ouvre le Menu
sources
B. Informations sur la
reproduction
C. Menu contrôles sur
l’écran (OSD).
Expulsion du CD
Appuyer la touche (EJECT) en face ou sur la
Touches de contrôle qu’on trouve sur le display
71
Modalité de lecture du CD
Pause reproduction
Appuyer la touche ( ) sur la télécommande autrement appuyer sur l’icône sur le touch screem. Pour
continuer la reproduction, appuyer de nouveau.
Interrompre la reproduction
Appuyer la touche ( ) sur la télécommande ou appuyer l’icône touch screem.
Quand on l’appuie la première fois, le point d’interruption est mémorisé et à partir de ce même point,
reprendra la reproduction grâce à la touche ( ). Dans le cas où on appuie deux fois la touche ( ) , la
reproduction reprendra à partir du début et non plus à partir du point d’interruption.
Visualisation liste des morceaux
Pour visualiser la liste des morceaux sur un CD enregistré, interrompre la reproduction.
Reproduction rapide
Appuyer les touches ( /
vitesse de reproduction.
) sur la télécommande répétitivement ou sur le touch creem pour changer la
Changement de trace
Appuyer les touches ( / ) en face, sur la télécommande ou sur le touche screem pour passer à la trace
précédente ou successive.
Changement de fichier
Appuyer les icônes (DIR+)/(DIR-) sur le touch screem ( c’est conseillé d’interrompre la reproduction si on est
entrain de visualiser: vidéo ou photo) pour changer le fichier durant la reproduction d’un CD copié contenant
plus d’un fichier.
Répétition de la reproduction
Appuyer la touche (RPT) sur la télécommande répétitivement ou ouvrir le menu touches sur le touch screem
et sélectionner la touche ( ) répétitivement pour modifier la modalité de répétition selon la tabelle cidessous :
Type de CD
Modalité de répétition
Note:
1. quand un VCD est reproduit, cette fonction est impossible si le PBC est activé
2. en éteignant le lecteur ou en changeant le type de reproduction cette fonction s’annule.
Répétition A-B
Quand un DVD, VCD ou CD est en reproduction, c’est possible reproduire répétitivement le contenu compris
entre les points A et B.
Appuyer la touche (RPT A-B) sur la télécommande ou ouvrir le menu touche sur l’écran et ensuite
sélectionner les touches (A-B) pour régler le point du début de l’intervalle. Faire la même opération pour
régler la fin de l’intervalle à répéter. Le contenu de l’intervalle sera répété en continuation. Faire la même
opération pour la troisième fois pour interrompre cette fonction.
72
Modalité de lecture du CD
FR
Reproduction casuelle
Quand la reproduction est activée, le contenu du CD est reproduit en séquence casuelle.
Appuyer la touche (RDM) sur la télécommande répétitivement ou ouvrir le menu touches sur l’écran et
appuyer la touche (
) sur le touch creen répétitivement pour changer la modalité de répétition entre
Random, Random repeat, Repeat off.
Intro reproduction
Quand cette fonction est activée, le lecteur reproduira les 10 premières secondes de toutes les traces d’un
CD ou DVD. On peut chercher la chanson désirée en utilisant cette fonction.
Appuyer la touche (SCN) sur la télécommande pour activer cette fonction. Faire la même opération pour
interrompre cette fonction.
Recherche directe
Quand un DVD, VCD ou CD est en reproduction, on peut chercher un chapitre en particulier/une trace en
appuyant les touches numériques de la télécommande. Par exemple, si on veut sélectionner la trace 15, on
peut appuyer les touches numériques 1et 5.
Recherche GOTO
Entrer dans la modalité recherche GOTO
1. Appuyer la touche (GOTO) sur la télécommande ou bien ouvrir le menu recherche.
Pour les DVD, on peut faire la recherche par titre, chapitre et temps.
Pour les VCD, dans le cas où la fonction PBC est débranchée, on peut effectuer la recherche par temps; si
la fonction PBC est activée, on Peut faire la recherche soit par trace que par temps.
Pour la CD, on peut effectuer la recherche par trace.
Pour les dossiers MPEG, on peut effectuer la recherche par trace et par temps.
Pour les CD copiés contenant MP3 ou/et dossier JPEG, on peut effectuer la recherche par trace (numéro du
dossier).
2. Entrer dans le recherche des informations. Sélectionner les objets en appuyant les touches directionnelles
sur la télécommande et entrer dans la recherche des informations en appuyant les touches numériques,
comme le titre, le chapitre et le temps.
3. Confirme appuyer la touche (Enter) sur la télécommande pour confirmer son choix
4. Sortir de la recherche GOTO répéter l’opération ci-dessus jusqu’à la disparition du menu recherche ou
appuyer la touche (Exit) sur le touch screem.
Menu DVD et Titre
Cette fonction est disponible pour les DVD qui ont « Menu/Title ». appuyer la touche (MENU/TITLE) sur la
télécommande ou ouvrir le menu touche sur l’écran et appuyer la touche (MENU) sur le touch srceem pour
ouvrir le Menu DVD. On peut choisir la langue de l’audio et des sous titres de reproduction.
Appuyer la touche (TITLE) sur la télécommande ou ouvrir le menu des touches sur l’écran et appuyer la
touche (TITLE) sur le touch screem pour ouvrir le DVD TITLE. On peut choisir des titres différents pour la
reproduction.
Sélection de la langue des sous titres
Appuyer la touche (SUBTITLE) sur la télécommande répétitivement ou ouvrir le menu des touches sur l’écran et
appuyer répétitivement la touche (SUBTITLE) sur le touch screem pour choisir la langue des sous titres.
Sélection visuelle multi angle
Appuyer répétitivement la touche (ANGLE) sur la télécommande pour sélectionner l’angle de reprise pendant
la reproduction du DVD ou du dossier vidéo qui contient la fonction multi angle
Sélectionner le canal Audio
Pour les DVD contenants des dossiers audio multi langue, appuyer la touche (AUDIO) sur la télécommande
73
Modalité de lecture du CD
répétitivement ou ouvrir le menu des touches sur l’écran et appuyer plusieurs fois la touche (AUDIO) sur le
touch screem pour changer la langue des dialogues. Pour les CD et VCD, appuyer la touche (AUDIO) sur
la télécommande plusieurs fois ou ouvrir il menu des touches sur le touch screem et appuyer plusieurs fois
la touche (AUDIO) sur le touch screem pour avoir à disposition les différentes modalités de canaux audio
comme voix gauche, voix droite,mono gauche, mono droite, stéréo.
Note: le canal gauche et le canal droite ne peuvent pas fonctionner correctement si les dossiers audio ne
sont pas bien enregistrés.
Fonction PCB
Cette fonction est disponible dans les VCD ayant la fonction PCB (Vers 2.0 ou plus récents). Appuyer la
touche (MENU) sur la télécommande pour activer cette fonction.
Appuyer de nouveau pour l’arrêter.
Note:
1. lorsque le PCB est activé, la reproduction rentourne à la liste de trace et commence par la première trace.
2. lorsque le PCB est activé, les fonctions disponibles sont: la reproduction rapide, au ralentie ou saute,
alors que les fonctions de répétition de la reproduction et recherche par chapitre ou trace particulières sont
interdites.
3. si on exécute la fonction reproduction casuelle, ou recherche reproduction quand le PBC est activé, le
PBC s’arrêtera automatiquement.
Zoom in/out
Pour élargir ou réduire une image reproduite, appuyer ’icône (
touches sur l’écran et appuyer ’icône ( ) sur le touch screen.
) sur la télécommande ou ouvrir le menu
Tourner une image
Quand un dossier image est visualisé, on peut tourner l’image pour avoir un bon angle de vision en
appuyant l’icône ( ) sur le touch screem
Informations de reproduction
Appuyer la partie supérieur de l’écran LCD quand un DVD ou un VCD est en reproduction et les informations
relatives à la reproduction y seront visualiser.
Pour les DVD
1. type de CD
2. informations sur le titre du DVD. « 5/8 » indique que ce DVD a 8 titres et le titre actuellement en reproduction est le cinquième.
3. informations sur le chapitre DVD. « 2/16 » indique que le titre courant a 16 chapitres et le chapitre actuellement en reproduction est le deuxième.
4. temps restant du titre en reproduction
5. « » signifie que les sous titres de ce DVD ont été prédisposés pour 6 langues et celle visualisée actuellement est la deuxième, c’est-à-dire l’anglais.
74
Modalité de lecture du CD
FR
Pour les VCD
1. type de CD
2. indicateur fonction PCB. « PCB ON »indique que la fonction PCB est activée
3. informations sur la trace VCD. « 6/18 » indique que ce VCD a 18 traces et la trace en exécution est la
sixième.
4. temps restant de la trace courante..
Modalité USB/SD
Sélectionner USB/SD comme source en reproduction
Ouvrir le menu source et sélectionner USB.
Sélectionner SD / USB comme source de reproduction en suivant la procédure suivante:
1. Appuyer maintes fois la touche jusqu’à la sélection de la source désirée
2. Ouvrir le menu des sources principales et sélectionner Carte SD ou USB
Note: 1. lecteur passe à la modalité USB quand un dispositif USB est inséré.
2. le lecteur supporte hot swap (lecture rapide du support)
3. les dispositifs de mémoire USB formaté avec système FAT16/32 peuvent être supporté par ce lecteur, et
par contre il ne supporte pas le Format NTFS.
Contrôle Touch screem.
Répétition de la reproduction
Touches contrôle sur l’écran
Reproduction casuelle
L’opération est la même que pour la modalité CD.
L’opération est la même que pour la modalité CD
Les touches de contrôle sur l’écran sont les mêmes
de la modalité CD.
L’opération est la même que pour la modalité CD
Introduction reproduction
Suspendre la reproduction
L’opération est la même que pour la modalité CD
L’opération est la même que pour la modalité CD.
Recherche directe
Interrompre la reproduction
L’opération est la même que pour la modalité CD
L’opération est la même que pour la modalité CD
Recherche GOTO
Visualiser la liste des dossiers
L’opération est la même que pour la modalité CD
L’opération est la même que pour la modalité CD
Zoom IN / OUT
Reproduction rapide
L’opération est la même que pour la modalité CD
L’opération est la même que pour la modalité CD
Tourner l’image
Précédente / successive
L’opération est la même que pour la modalité CD
L’opération est la même que pour la modalité CD
Information reproduction
Change fichier
L’opération est la même que pour la modalité CD
L’opération est la même que pour la modalité CD
75
Autres modalités
AUX
Les dispositifs externes avec sorties RCA audio et vidéo peuvent être connectés à l’appareil.
Pour entrer dans la modalité AUX IN, ouvrir le Menu source et sélectionner AUX IN
Camera
Une camera de recul peut être connectée à l’appareil.
La source en reproduction passera en modalité « Camera » automatiquement quand le véhicule est en
marche arrière.
NAV
Un dispositif externe de navigation compatible peut être connecté à l’appareil.
Pour entrer en modalité NAV, ouvrir le Menu source et sélectionner NAV après que le dispositif externe soit
prêt. C’est possible écouter l’audio d’une source comme radio, dvd, cd, ou usb/carte sd en maintenant
l’écran sur la navigation (OPTIONNEL NV003).
Dans cette modalité, lorsque la navigation donne l’avis de virage, le volume de l’audio musical se réduit et la
voix de navigation se superpose.
Une fois sélectionnée la source musicale, appuyer pendant 2 secondes la touche [DISP] sur la façade ou la
touche [WIDE] sur la télécommande.
Le VM041 passera sur l’écran de navigation en maintenant intacte l’audio.
Note:pour les opérations en modalité navigation, se référer au manuel d’instruction du dispositif externe.
Système BLUETOOTH – Software 2.0 (optionnel 6/860)
Le système Bluetooth est une transmission sans fil pour des courtes distances (jusqu’à 10m).
L’accessoire 6/860 permet de relier son propre téléphone bluetooth ayant un software jusqu’à 2.0 à
l’appareil VM041.
Après la connexion, c’est possible contrôler son propre portable directement à partir de l’appareil.
76
Autres modalités
FR
Icônes et leurs fonctions
= Couplage
= Réglages
Menu = Menù
= Reproduction/Pause
= Trace précédente
=
=
=
=
=
Déconnexion
Transfert d’appel
Répond / Appel
Interruption de la reproduction
Modalité Téléphone
=
=
=
=
=
Clavier pour les appels
Mute
Interrompt l’appel
Trace suivante
Modalité musique
Modalité téléphone ou musique
Le module bluetooth a deux modalités opératives: téléphone ou musique.
Appuyer l’icône ( ) ou ( ) sur l’écran pour passer à la modalité désirée.
En modalité téléphone, l’appareil fonctionne comme main libre et peut recevoir ou faire des appels. En
modalité musique, on peut écouter les morceaux qui se trouvent dans son propre téléphone directement à
travers le VM041 qui se trouve dans le système du véhicule.
La modalité musique fonctionne exclusivement sur les téléphones ayant la technologie AD2P, et si la
fonction AVRCP est présente, ce sera possible contrôler à partir de l’appareil la musique présente dans son
propre portable.
Couplage
Se servir de la fonction « PAIRING » pour établir une connexion entre l’appareil et son téléphone. Appuyer la
touche « SRC » maintes fois sur le panneau inférieur ou appuyer sur l’écran l’icône BT du menu « SOURCE »
pour entrer dans la modalité bluetooth.
Une fois appuyer la touche PAIR, sur l’écran apparaît « WAITING FOR PAIRING ».
Activer la fonction bluetooth sur son portable en le tenant proche de l’appareil (distant pas plus de 3 mètres)
et commencer la recherche de nouveaux dispositifs bluetooth.
Après quelques secondes, sur l’afficheur du téléphone apparaît le nom du module bluetooth VM041.
Le sélectionner et insérer le code « 1234 » quand c’est demandé.
Autoriser le dispositif à se connecter automatiquement si le portable le demande.
Une fois la connexion réussie, sur l’écran du VM041 apparaît « PAIR OK ».
L’apparaît est prêt à effectuer et recevoir les appels.
Déconnexion du téléphone
Si on veut déconnecter le téléphone du VM041 une fois la connexion effectuer, appuyer « PAIR » sur l’écran.
Le VM041 visualisera « EXIT PAIR »
Effectuer un appel
Insérer le numéro à appeler grâce au clavier numérique sur l’afficheur.
Appuyer ( ) sur l’écran ou sur la télécommande pour effectuer l’appel.
Appuyer ( ) sur l’écran ou sur la télécommande pour terminer l’appel.
Recevoir un appel
Lorsque le téléphone est relié au VM041, à chaque appel en entrée, l’écran passe automatiquement sur la
fonction bluetooth.
Appuyer ( ) sur l’écran ou sur la télécommande pour répondre à l’appel.
Appuyer ( ) sur l’écran ou sur la télécommande pour terminer l’appel
77
Autres modalités
Transfert voix de la conversation
Pendant la conversation, c’est possible transférer la voix de l’appareil en main libre au téléphone portable
pour des appels privés et vice-versa. Appuyer ( ) pour transférer l’audio au téléphone portable et
l’appuyer de nouveau pour retourner à la main libre.
Dernier appel
En appuyant la touche [récepteur soulevé] sur l’écran ou sur la télécommande, le dernier appel effectué ou
reçu sera visualisé.
Bluetooth audio
Le VM041 peut recevoir des signaux audio stéréo via bluetooth si le dispositif qui transmet (téléphone
portable ou autre) a la fonction A2DP et AVRCP.
Attention: Pour des raisons de sécurité, éviter de parler au téléphone pendant la conduite.
Attention: Certains téléphones portables transfèrent la voix de la conversation uniquement après l’activation
de l’appel.
Modalite musique
AD2P
AD2P est le sigle de: Profil Avancé de Diffusion Audio
Le téléphone portable qui supporte cette fonction permet la transmission en stéréo du signal audio.
Certains téléphones supportent la transmission audio mais pas en stéréophonie.
AVRCP
AVRCP est le sigle de: Profil de Contrôle Remote Audio Vidéo.
Le téléphone portable qui supporte cette fonction permet le contrôle de la reproduction musicale
directement à partir de l’appareil. Pendant la reproduction musicale, c’est possible effectuer l’appel en
tapant le numéro et en appuyant ( ) .
Au même moment sur l’écran apparaît « DIALING ».
Terminé l’appel, sur l’écran apparaît « MUSIC PLAYING ».
Tous les téléphones portables ne permettent pas le contrôle de la reproduction à partir du remote.
Si pendant la reproduction musicale arrive un appel, sur l’écran apparaît « PHONE NUMBER ANSWER ? ».
Appuyer ( ) pour répondre.
Fonctions générales
Attentions generales pour connexion bluetooth
Pendant nos test, les téléphone NOKIA N7x, N9x, PHILIPS, Sony Ericsson et SAMSUNG, après l’indication
sur l’afficheur du portable de couplage effectué, sur l’écran du VM041 reste la visualisation de «WAITING
FOR PAIRING » comme si l’appareil n’avait pas encore terminé la procédure. Dans ce cas, il faut
nécessairement trouver dans la liste des dispositifs associés du portable le module VM041 et le connecter
manuellement, à ce point sur l’écran apparaît « PAIR OK ».
Autrement, aucune voix ne sera écoutée pendant la conversation même si pour le téléphone la connexion
est activée.
Pour certains téléphones, comme par exemple PHILIPS, pendant la reproduction musicale en AD2P, il
faut nécessairement trouver dans la liste des dispositifs associés le module « PHONOCAR » et effectuer
manuellement la connexion (il faut toujours vérifier que le téléphone soit compatible avec les fonctions AD2P
et AVRCP)
Certains téléphones une fois réglée la conversation privée, (l’audio n’est pas transféré au VM041) ne se
connectent pas automatiquement et donc il faut effectuer manuellement la connexion à partir de la liste des
dispositifs associés du portable.
Si après avoir effectué la connexion automatique avec un dispositif ayant la fonction AD2P on n’entend pas
l’audio stéréo, vérifier que la transmission audio bluetooth du dispositif soit activée.
ATTENTION: le protocole de communication Bluetooth est le software 2.0.
vérifier la compatibilité avec le téléphone portable avant l’achat de ce produit.
78
Procédures Setup
FR
Procédure d’enregistrement
1. Entrer dans la modalité SETUP (réglage)
appuyer la touche (SETUP) sur la télécommande ou ouvrir le Menu touche sur l’écran et appuyer l’icône(xx)
sur le touch screem.
Le Menu suivant apparaîtra quand on entre dans la modalité enregistrement.
Le Sub-menu générale est souligné au départ
2. Sélectionner un Sub-menu
appuyer les touches directionnelles sur la télécommande
3. Sélectionner un élément
appuyer les touches (
) sur la télécommande pour sélectionner un élément et appuyer la touche (> / -)
pour confirmer.
4. Sélectionner une valeur
appuyer les touches (
) sur la télécommande pour sélectionner un élément et appuyer la touche (>-/)
pour confirmer
Note: tous les enregistrement suivants peuvent être modifiés directement sur le touch screem
Générales
• modalité horaire
12 Hr: l’horloge visualise l’heure du type 12 heure; exemple 11:18 AM
24 Hr: l’horloge visualise l’heure du type 24 heures: exemple 20:18
• l’horloge
régler l’heure visualisée à l’angle haut à droite de l’écran TFT
• Région Syntoniseur
l’appareil contient plusieurs systèmes radios et on peut sélectionner le correcte système radio par rapport à
sa nation
• Beep
ON: son touches de fond est activé
OFF: son touches de fond débranché
Langue
• OSD
Sélectionner une langue du menu système
• Audio DVD
Sélectionner la langue de dialogue du DVD
Note: si le DVD ne contient pas la langue sélectionnée, les dialogues en reproduction seront en langue
de base
• Sous titres DVD
Sélectionner la langue des sous titres du DVD
Note: si le DVD ne contient pas la langue sélectionnée, les sous titres visualisés seront en langue de
base.
79
Procédures Setup
• Menu CD sélectionner une langue pour le menu DVD
Note: si le DVD ne mémorise pas la langue choisie, le Menu du DVD sera en langue originale
Audio
• DRC: Règle l’intervalle dynamique du Dolby numérique du CD.
On : reproduction audio plus dynamique avec les basses
Off: sortie normale
• Loudness: On: modalité Loudness activée
Off: modalité Loudness débranchée
• Subwoofer On: active le subwoofer
Off: débranche le subwoofer
• Filtre Sub
On peut avoir des différents effets des basses quand on règle des différents coupures de fréquence du
filtre Sub. Selon le signal acoustique et l’installation du véhicules, sélectionner la fréquence appropriée.
Les fréquences disponible sont: 80 Hz. 120 Hz et 160 Hz.
Bluetooth: ON/OFF Allume/Eteint le module Bluetooth
Reponse automatique (autoanswer): ON/OFF Active / Désactive la réponse automatique
Connect: AUTO le module Bluetooth se connecte automatiquement à peine le téléphone est dans le
rayon d’action MANUAL le module bluetooth se connecte manuellement à partir du téléphone
Pairing code: il s’agit du code nécessaire à la connexion du module bluetooth. Le code d’origine est 1234.
RDS ON/OFF fonction RDS active/Désactive
CT ON/OFF Réception automatique du signal horaire à travers RDS active / désactive
Tuner region: L’appareil permet la réception de différents systèmes de signaux radio. C’est possible
choisir le système correct en sélectionnant sa propre nation d’appartenance.
TA VOL: Sélectionner le volume désiré pour les autres sources audio. On peut sélectionner un volume entre 0 et 10.
Niveau de protection
Certains DVD sont dotés d’un bloque famille qui empêche aux enfants de voir certaines scènes explicites de
violence ou de sexe.
•Programmer le mot de passe
Le mot de passe originale de l’appareil est zéro
On conseille d’insérer un nouveau mot de passe en suivant les indications suivantes:
comment insérer le mot de passe:
1. Positionner le curseur sur l’option mot de passe, appuyer les touches numériques sur la télécommande ou appuyer l’option du mot de passe sur le touch srceem, appuyer les touches numériques pour insérer
le mot de passe (mot de passe initial en premier) et ensuite confirmer
2. Répéter l’opération ci-dessus pour insérer un nouveau mot de passe ayant 6 lettres/chiffres et ensuite
confirmer. Le nouveau mot de passe est enregistré et le bloque famille est fermé.
• Niveau de protection
L’appareil a certains niveau de vision:
1. sécurisant pour les enfants: évaluation de film adéquat pour les enfants
2. G: identification de film accessible à tous
3. PG: identification de film accessible à tous, mais qui conseille pour les enfants la vision avec les parents
80
Procédures Setup
FR
4. PG-13 identification de film accessible à tous, mais qui conseille au moins de 13 ans la vision avec les
parents
5. PG-R.....
6. R: identification de film accessible seulement aux majeurs d’un certain age, habituellement 17, sauf si un
parent ou un tuteur est présent.
7. NC-17: identification de film accessible uniquement au majeur de plus de 17 ans.
8. Adult: identification de film apte pour un public adulte.
Comment changer le niveau de protection
1. insérer le mot de passe pour débloquer le bloque famille, positionner le curseur sur l’option mot de
passe, appuyer les touches numériques sur la télécommande ou appuyer l’option mot de passe sur le touch
screem, appuyer les touches numériques pour insérer le mot de passe (mot de passe initial) et ensuite
confirmer
2. changer de niveau
sélectionner un niveau de protection approprié dans la liste des niveaux
3. fermer le bloque famille
Répéter l’opération du premier passage pour insérer le mot de passe de 6 lettres / chiffres
( nouveau ou ancien) et ensuite confirmer. Le bloque famille est fermé
• Réglage d’origine
Pour réinsérer les réglages d’origine pour la reproduction d’un DVD (exemple Audio et sous titres)
appuyer uniquement l’option (RESET)
Réglages relatifs aux connexions
•
•
•
•
Entrée de la Camera
Normale: l’image de la télé camera est visualisée sur le monitor quand le véhicule est en marche arrière
exactement comme on le voit
Mirror: l’image de la camera est visualisée sur le monitor quand le véhicule est en marche arrière comme
on voit à travers le rétroviseur.
ouverture automatique de l’écran TFT
Auto: le panneau TFT s’ouvre automatiquement quand le lecteur s’allume
Off: le panneau TFT s’ouvre uniquement quand on appuie la touche Open avec lecteur allumé.
Entrée vidéo
NTSC: règle le système de l’écran TFT en NTSC
PAL: règle le système de l’écran TFT en PAL
AUTO:règle le système de l’écran TFT automatiquement selon le format du signal vidéo en entré
Stationnement
On: les images se visualisent sur l’écran uniquement après le stationnement du véhicule ( frein en main insérer)
Off: les images sont toujours en visualisation
P.VOL
P :VOL veut dire que le volume est programmable. On peut régler le volume selon la source ayant cette fonction
• Source sélectionner la source en reproduction dont on veut régler le volume
• Niveau c’est possible régler le niveau du volume de -6 à +6
TS CAL
Quand les fonctions sur l’écran sont peu sensibles ou ne sont pas précises, on peut calibrer le touch screem
avec cette fonction
Rééquilibrer le touch screem en suivant les indications après être entré dans la modalité TS CAL.
81
EQ
Les contrôles Audio permettent de modifier facilement le système audio pour avoir le meilleur son possible.
1. Entrée en modalité réglages EQ
En appuyant la touche (EQ) sur la télécommande ou en sélectionnant l’icône (EQ)sur le touch screem on
verra le schéma suivant.
Sélection de la modalité EQ
Zone Fader/équilibrage
Paramètres EQ
2. Sélection de la Modalité EQ
Sélectionner répétitivement la barre EQ et la modalité changera
3. Réglages des paramètres EQ
pour régler les paramètres EQ, sélectionner et traîner les barres paramètres EQ
4. Réglage Fader avant / postérieur/ droit/ gauche et équilibrage
On peut régler l’équilibrage avant /postérieur/ droit/ gauche du haut parleur pour avoir des effets particulier
durant l’écoute selon l’atmosphère sonore et selon ses goûts
Pour régler le Fader avant/ postérieur/droit/gauche et l’équilibrage, sélectionner et traîner le petit point blanc
qui se trouve dans l’air réglage fader/équilibrage
Note:
1. l’appareil est doté de certains modèles de EQ: User, Rock, Hip Hop, Dance, Latin, Rave, Urban, Acoustic
2. les différents EQ se distinguent selon le niveau du volume des basses, des hauts et des moyens. Les
paramètres des modèles EQ sont fixes et ne peuvent pas être modifier à exception de User.
3. la modalité EQ passera automatiquement à User quand les niveau de BASS, TREB OU MID se modifient.
4. le niveau du sub est indépendant de la modalité EQ et peut être modifié.
82
Problemes - causes et solutions
FR
Ce qui peut sembler un problème n’est pas toujours sérieux. Suivre les points suivants avant d’appeler le
service d’assistance.
Problème Cause Général
Le fusible de l’appareil a pété
Solutions
Installer un nouveau fusible ayant bonne dimension
L’appareil ne s’allume pas Le fusible de la batterie du véhicule a pété Installer un nouveau fusible ayant la bonne dimension
Opérations incorrectes
Reset de l’appareil
La télécommande
ne fonctionne pas
Le volume est bas ou absent
de la sorti audio
Batterie déchargée
Changer la batterie
Batterie mal installée
Installer correctement la batterie
Mauvaise connexion audio
Contrôler les câblages et corriger
Volume réglé trop bas
Augmenter le volume
Haut parleur endommagé
Remplacer le haut parleur
Mauvais équilibrage du volume
Régler l’équilibrage vers le centre
Les câblages des hauts parleurs font contact
avec les parties métallique du véhicule
En utilisation un CD piraté
La puissance supportée par le haut parleur
La qualité de l’audio est basse ne correspond pas à celle de l’appareil
Mauvaise connexion
ou subis des interférence
L’haut parleur est en court circuit
Isoler tous câblages pour haut parleur
Mauvais fonctionnement du Mute
Le câble Mute est relié à la masse
Contrôler les câblages Mute et corriger
L’unité se reset quand on
éteint le véhicule
Mauvaise connexion entre ACC et BATT
Contrôler les câblages et corriger
Utiliser les CD originaux
Remplacer les hauts parleurs
Contrôler les câblages et corriger
Contrôler les câblages et corriger
Monitor TFT
Le monitor ne s’ouvre pas L’ouverture automatique de L’écran TFT
automatiquement
est débranchée
La connexion au frein à main
Les informations de mises en
est incorrecte
garde sont toujours visualisées
Le système couleurs du DVD ne
coïncide pas avec celui du monitor
Les images parasitées
CD piraté en utilisation
apparaissent sur l’écran.
Connexion vidéo endommagée
Câblage signal vidéo incorrecte
83
Activer la fonction ouverture automatique
de l’écran TFT
Contrôler les câblages et corriger
Modifier le système couleurs du DVD
en utilisation ou du monitor
Utiliser les disques originaux
Changer les câbles
Contrôler les câblages et corriger
Problemes - causes et solutions
Continua
Problème Cause Reproduction du CD
Le CD ne s’insère pas
Le CD n’est pas lu
PBC pas utilisable durant la
reproduction du VCD
Fonctions de répétition et
recherche pas utilisables
pendant la reproduction VCD
Solutions
Il y a déjà un CD dans l’appareil
Extraire le CD et en insérer un autre
CD déformé ou gratté
Utiliser les CD en bonnes états
CD sale ou mouillé
Nettoyer le CD avec un chiffon
CD incompatible
Utiliser les CD compatibles
CD inséré à l’envers
Code Région pas compatible avec
l’appareil
Insérer le CD avec l’étiquette en haut
Utiliser les CD avec les codes région aptes
PBC pas disponible dans le CD
Utiliser les CD qui ont le PBC
PBC activé
Éteindre le PB
Message d’erreur
No disc
Bad disc
Unknown disc
Region error
CD sale
Nettoyer le CD avec un chiffon
CD inversé
Insérer le CD avec l’étiquette vers le haut
Aucun CD
Insérer un CD
CD sale
Nettoyer le CD avec un chiffon
CD inversé
Le Format du CD n’est pas compatible
avec cet appareil
Code Région pas compatible avec
l’appareil
Utiliser les CD avec format compatible
84
Utiliser les CD avec format compatible
Utiliser les CD avec des codes région aptes.
Connexion
FR
Note de connexion
• cet appareil est construit pour être utilisé sur un véhicule ayant une batterie 12 volt et négatif à masse.
Avant d’installer l’appareil sur un bus ou camion se rassurer que le voltage de la batterie est approprié pour
cette utilisation, autrement installer un transformateur pour convertir le voltage a 12 V.
• pour éviter le court circuit dans le système électrique, se rassurer que le câble négatif de la batterie est
débranché avant de commencer l’installation.
• pour éviter le court circuit et les dommages à l’appareil, bloquer les câbles avec des pinces et scotch.
Faire passer les câbles dans des endroits surs, loin des lieux qui peuvent se réchauffer en évitant de
toucher les parties mobiles comme le levier de vitesse, le frein à main ou siège pour éviter que l’isolement
des câbles se coupe.
• ne jamais faire passer le câble jaune à travers le trou de l’installation dans l’espace du moteur et le
connecter à la batterie. Autrement il y a risque d’un court circuit avec la batterie.
• remplacer avec un fusible de 10 A quand l’ancien est cassé ou endommagé, ne pas utiliser le fusible ou
utiliser une de dimension incorrecte peut causer des dommages à l’appareil ou provoquer le feu. Si même
après l’installation du bon fusible le problème électronique persiste, contacter un magasin spécialiser.
• ne pas connecter d’autres équipages sur la batterie pour éviter le risque de surchauffage.
• vérifier que toutes les connexions et les câbles soient bien isolées. Autrement l’appareil peut être
endommagé par un court circuit.
• si le ACC n’est pas disponible, connecter le câble ACC à l’alimentation avec un interrupteur.
• si un amplificateur externe est connecter, ne pas connecter le câble P.CONT au câble d’alimentation de
l’amplificateur externe.
• la grandeur moyenne des hauts parleurs connectés est de 50 W avec une impédance de 4-8
Câble pour le contrôle des fonctions
Auto illumination
Pour éviter que le display soit trop lumineux pendant l’utilisation nocturne, relier le câble d’illumination à
ILLUMI, de cette façon, en allumant la lumière du display, celle de l’écran s’abaissera et vice-versa.
Mute du téléphone
Si le câble MUTE est connecté à la main libre du téléphone, l’audio du VM040 s’arrêtera durant la
conversation téléphonique.
Marche arrière
Si la marche arrière est connectée au VM040 et le câble relatif relié à la lumière de marche arrière, l’image de
la camera de recul se visualisera automatiquement quand on actionnera la marche arrière.
Terminer la marche arrière, la source en reproduction retournera à fonctionner à partir du même point.
Frein à main
Si le câble « PRK SW » est connecté à l’interrupteur du frein à main, le display vidéo sera contrôlé par cette
fonction. Si on active la marche arrière (le relatif câble doit être relié), le display vidéo passera en modalité
CAMERA.
Il monitor visualise l’écran bleu avec des informations d’avertissements pour éviter que le conducteur
regarde les contenus vidéo pendant la conduite, mais les passagers peuvent regarder normalement les
contenus vidéo si d’ultérieurs monitor sont reliés à la sortie vidéo.
85
Connexion
Frein à main: connexions
Pink wire BRAKE
Marche arrière: connexions
86
Installation et Désinstallation
FR
Note d’installation
1. Avant l’installation, vérifier que toutes les connexions soient faites correctement et que l’appareil fonctionne normalement. Les connexions incorrectes peuvent endommagées l’appareil.
2. Utiliser uniquement les accessoires faits spécifiquement pour cet appareil, accessoires non autorisés pour
endommager l’appareil.
3. Avant l’installation, fixer tous les câbles d’alimentations
4. Ne pas installer l’appareil proche des sources de chaleur pour éviter des dommages aux composants
électriques comme le lecteur laser.
5. Installer l’appareil horizontalement. En installant l’appareil avec une inclinaison supérieure à 30°, on risque
de compromettre son bon fonctionnement.
6. pour éviter les étincelles, connecter tout d’abord le pole positif et ensuite le pole négatif.
7. Ne pas obstruer la goulotte de refroidissement pour garantir une juste dissipation de l’appareil, ou des
dommages pourront se vérifier.
Installation de l’appareil
Méthode A
1. insérer la cage dans son espace, choisir la languette de montage adéquat à la largeur de l’espace, en
pliant la languette vers l’extérieur grâce à un tourne vis pour fixer la cage dans l’espace.
2. utiliser 2 pièces des vis à forme de cone MX5x5 pour fixer les deux barres sur les deux cotés de l’appareil.
figure 1
3. visser une pièce du M5x24 dans le trou postérieur de l’appareil et mettre au dessus des vis une gaine de
caoutchouc (voir figure 2)
figure 2
4. insérer l’appareil dans la cage , fixer la vis M4x6 sur la bande anti-incendie sur la partie postérieure de la
planche, et utiliser 4 pièces de la vis M2x2 pour bloquer les bandes d’assemblage et la cage en position.
Note: Par rapport à la profondeur de l’ouverture, utilise les différentes dimensions des barres d’assemblage.
Si l’ouverture est peu profonde, le monitor peut sortir hors de la planche de 10 mm
87
Installation et Désinstallation
Méthode B.
1. Insérer l’appareil directement dans l’espace de la planche
2. positionner 5 vis cylindriques M4x3, M5x5 ou à forme de cone M5x5 à travers les trous des bandes de
montage à l’intérieur des trous de l’appareil et fixer bien les vis.
Installation du cadres
Bloquer le cadre tout autour du frontale
Désinstallation
Démonter le cadre
Pousser le cadre de finition vers le haut et tirer la partie supérieure
Pousser le cadre vers le bas et tirer la partie inférieure
Démonter l’appareil
Dévisser les 4 visM2x »
Se servir d’un tourne vis pour redresser la languette de montage pliée et extraire l’appareil de la cage
Tirer hors de la cage l’appareil avec toutes les deux mains.
88
Spécifications
Generali
Reference Supply Voltage............................... 12V(DC)
Operating Voltage Range....................10.5~15.8V(DC)
Max Operating Current...........................................10A
Grounding System...............Car Battery Negative Pole
Installation Dimension
(W×H×D)...................... 178 mm×50mm×(165+25) mm
Installation Angle............................................... 0°~30°
Net Weight........................................................... 2.3kg
FM
Signal Noise Ratio................................................55dB
Residual Noise Sensitivity(S/N=30dB............. 20dBμV
Frequency Response(±3dB..................40Hz~12.5KHz
Station Seeking Level................................ 20~30dBμV
Distortion..............................................................1.5%
Stereo Separation(1KHz.......................................20dB
Antenna Impedance.............................................. 75Ω
FR
TFT Monitor
Screen Diagonal..............................................7 inches
Usable Display Area...................... 154.1(W) × 87.0 (H)
Resolution........................................ 800 (W) × 480 (H)
Brightness....................................................400cd/m2
(Effettuare la misurazione della luminosità
dopo 30 minuti)
Contrast....................................................... 300( TYP. )
Response Time
Rise.............................................................. 12ms
Fall............................................................... 18ms
Viewing Angle
From Top..........................................................40°
From bottom....................................................65°
Horizontally ...................................................±65°
LCD Life Cycle................................ 10000 hours(at 25)
Ambiente
Operating Temperature...................................................-10~60
Storing Temperature.......................................................-20~70
Residual Noise Sensitivity (S/N=20dB........... 40dBμV Operating Humidity................................45%~80%RH
Selectivity (±9KHz) ..............................................50dB Storing Humidity.....................................30%~90%RH
AM
DVD Player
Signal / Noise Ratio..............................................90dB
Dynamic Range................................................... 90dB
Distortion(line out.................................................0.1%
Frequency Response(±3dB.................... 20Hz~20KHz
Maximum Output Power...................................4×45W
Load Impedance..................................................... 4Ω
Code region
Selon la division des ventes des DVD, le monde est
subdivisé en 6 régions.
Un DVD peut être reproduit uniquement lorsque
le code régional est compatible avec le lecteur en
usage.
AUX IN
Distortion..............................................................0.5%
Frequency Response(±3dB.....................20Hz~20KHz
Audio Input Level............................................. 0.4Vrms
Audio
Audio Output Impedance.................................... 200Ω
Audio Output Level............................. 2+0.2Vrms(Max)
(Livello ingresso audio normale e al
volume massimo )
Video
Normal Video Input Level(CVBS.....................1.0±0.2V
Video Input Impedance......................................... 75Ω
Video Output Impedance...................................... 75Ω
Video Output Level.........................................1.0±0.2V
(Livello ingresso audio normale)
NOTE: les précisassions techniques peuvent subir des variations sans préavis.
89
Connections électriques
90
Vorsichtsmaßnahmen
D
Bitte berücksichtigen:
1. Gerät immer nur bei 12Volt-Stromversorgung
anschließen, mit Minus-Pol an die Masse.
2. Gerät nicht an Stellen installieren, die die
Sicherheit am Steuer in Gefahr bringen könnten.
3. Während der Fahrt, darf der Fahrer das Display
NICHT benutzen, denn es könnte zu Unfällen
führen und stößt im übrigen gegen die Ver
kehrsregeln.
Der Fahrer darf das Display nur benutzten,
um den Vorgang der Rückfahr-Camera
zu verfolgen.
4. Das Gerät, mitsamt eingebautem Verstärker
und Lautsprecher, fernhalten von Flüssigkeiten oder Feuchtigkeit, um Funken bzw.
Feuerausbruch zu vermeiden.
5.
Die Sicherung auf der Stromleitung NICHT ersetzten, ohne vorher einen Fachmann zurate
gezogen zu haben.
Falsche Sicherungen können das Gerät
beschädigen oder Brände verursachen.
6. Gerät sofort ausschalten und bei Ihrem
Phonocar-Händler einreichen, falls einer
dieser Vorfälle auftaucht:
a) Kein Audio am Ausgang
b) Kein Bild am Ausgang
c) Wasser oder Gegenstände ins Gerät
eingedrungen
d) Rauch
e) Geruch.
7. Um ein sicheres Fahren zu gewährleisten,
Lautstärke auf ein vernünftiges Niveau einstellen, so dass die Aufmerksamkeit gegenüber des
Verkehrs und etwaiger Gefahren, nicht
beeinträchtigt wird.
91
Wichtige Hinweise
1. Das Gerät nur vom Fachmann öffnen oder reparieren lassen, daher immer Ihren Phonocar-Händler
befragen.
2. Zum Säubern des Bildschirms oder des Bedienteils, ein sauberes Tuch, mit neutralem Reinigungsmittel,
verwenden. Ein zu raues Tuch bzw. angreifende Reinigungsmittel (z.B. Alkohol) könnten das Gerät entwe
der verkratzen oder entfärben.
3. Bei Ungewöhnlichkeiten am Gerät, bitte im Handbuch unter „Problem-Lösungen“ nachschlagen. Falls
kein Lösungsvorschlag im Handbuch angegeben ist, dann bitte RESET-Taste auf dem Bedienteil
drücken, um auf die Fabrik-Einstellungen zurückzukehren.
4. Bei langem Parken unter extrem kalten oder warmen Wetterbedingungen, bitte warten, bis sich die
Luft im Wageninneren normalisiert hat. Erst dann das Gerät einschalten.
5.
Bei eingeschalteter Heizung und kalter Außentemperatur könnten sich Wassertropfen bilden, wodurch
das Gerät nicht funktioniert. In solch einem Fall, bitte CD herausnehmen und trocken wischen.
Falls, nach einigen Stunden Pause, das Gerät immer noch nicht funktioniert, bitte Ihren
Phonocar-Händler zurate ziehen..
6. Immer gut darauf achten, dass der offen stehende LCD-Monitor keiner Stoßgefahr ausgesetzt ist, denn
es könnten auch interne Bauteile dadurch Schaden erleiden.
7. Um Schäden am Bildschirm zu vermeiden, ihn niemals mit scharfkantigen Gegenständen antasten.
8. Der Monitor ist vollautomatisch, so dass Sie bitte NICHT schieben, ziehen oder schwenken,
um den Mechanismus nicht zu beschädigen.
9. Um die Bedienung des Geräts noch klarer zu gestalten, bedienen wir uns auch graphischer Abbildungen.
10.Während des Betriebs könnte ggf. das Zeichen
verfügbar oder nicht umsetzbar ist.
erscheinen, falls die gewählte Funktion nicht
11.Um keine unnötigen Probleme am Gerät zu verursachen, befolgen Sie bitte die vorliegenden
Betriebsanleitungen.
Eine unsachgemäße Inbetriebnahme bzw. Verwendung des Geräts führt zum Erlöschen der Garantie.
92
Inhalts-Verzeichnis
Vor der Inbetriebnahme
Bedienteil ...............................................................94
LCD-Bildschirm.......................................................95
Fernbedienung........................................................96
Basis-Funktionen
Ein-/Ausschalten-Mute (Stumm).............................97
Lautstärke-Regler....................................................97
Einstellung der Einschalt-Lautstärke.......................97
Eintritt ins SOURCE-MENÜ.....................................97
Wahl der Quelle.......................................................97
Uhrzeit auf System-Display.....................................97
Anwendung des TFT-Monitors................................97
Einheit neu einstellen (Reset)..................................98
Radio-Modus
Radio als Wiedergabequelle....................................98
Radio-Sender einstellen..........................................98
Automatische Sendersucher...................................98
Manuelle Sendersuche............................................98
Automatische Einspeicherung.................................98
Manuelle Einspeicherung........................................98
Kurzes Anspielen der Sender..................................98
Wahl der eingespeicherten Sender.........................98
Lokalisierte Sendersuche........................................99
Operazioni RDS
AF-TA-PTY-Funktion................................................99
Service-Programm (PS)...........................................99
Uhrzeit-Radio-Text..................................................99
CD-Wiedergabe
CD-Eingabe-CD-Auswurf......................................100
Touch-Screen-Funktionen.....................................100
Kontroll-Knöpfe auf dem Bildschirm.....................100
Wiedergabe unterbrechen.....................................101
Wiedergabe stoppen.............................................101
Dateien-Liste ausweisen.......................................101
Schnelle Wiedergabe............................................101
Datei vorher / nachher...........................................101
Ordner wechseln...................................................101
Nochmalige Wiedergabe.......................................101
Wiedergabe A-B....................................................101
Unwillkürliche Wiedergabe (Random)...................102
Einleitende Kurz-Wiedergabe................................102
Direkt-Suche..........................................................102
GO-TO-Suche.......................................................102
DVD-Menü und -Titel.............................................102
Wahl der Untertitel-Sprache..................................102
Wahl der Multi-Sichtwinkel-Besichtigung.............102
Wahl des Audio-Kanals................................. 102-103
PBC-Funktion........................................................103
Zoom In/Out..........................................................103
Bild drehen............................................................103
Wiedergabe-Informationen............................ 103-104
USB/SD-Modus
Wiedergabe im USB/SD-Modus...........................104
Touch-Screen-Funktionen.....................................104
D
Kontroll-Tasten auf dem Bildschirm......................104
Wiedergabe stoppen.............................................104
Wiedergabe unterbrechen.....................................105
Datei-Liste ausweisen...........................................104
Schnell-Wiedergabe..............................................104
Datei vorher/nachher.............................................104
Datei-Wechsel.......................................................104
Nochmalige Wiedergabe.......................................104
Unwillkürliche Wiedergabe (Random)...................104
Direkt-Suche..........................................................104
GO-TO-Suche.......................................................104
Zoom In/Out..........................................................104
Bild drehen............................................................104
Wiedergabe-Informationen....................................104
Weitere Modus-Möglichkeiten
AUX-Rückfahr-Camera-NAV.................................105
Bluetooth-System 2.0...........................................105
Ikonen und deren funktion.....................................106
Telefon-Bzw. Musik-Modus...................................106
Kopplung...............................................................106
Telefon-deaktivierung............................................106
Ein telefon-gespräch starten.................................106
Einen telefon-anruf in empfang nehmen...............106
Telefon-stimme weiterleiten...................................107
Letzthin geführtes gespräch..................................107
Bluetooth-audio / Musik-modus...........................107
Allgemein-Funktionen IT........................................107
Einstellungen
Einstellungs-Vorgang.............................................108
Allgemein-Info.......................................................108
Sprache......................................................... 108-109
Audio.....................................................................109
Bluetooth...............................................................109
Autoanswers..........................................................109
Connect.................................................................109
Paring code...........................................................109
RDS-CT-Tuner region............................................109
TA VOL...................................................................109
Jugend-Schutz.............................................. 109-110
P. VOL-TS CAL.............................................. 110-111
EQ.........................................................................112
Problem-Erkennung und-Abhilfe............... 112-113
Gerät-Verbindungen
Anschluss-Hinweise..............................................114
Kontroll-Kabel........................................................114
Kabel-Verbindungen zur Handbremse..................115
Kabel-Verbindungen zum Rückwärtsgang............115
Einbau und Ausbau
Einbau-Hinweise...................................................116
Geräte-Einbau............................................... 116-117
Befestigung des Anpass-Rahmens.......................118
Ausbau..................................................................118
Technische Eigenschaften..................................118
Anhang.................................................................119
93
Vor der Inbetriebnahme
Bedienteil
1. [DISP/PIC] 2. [OPEN/CLOSE]
3. [ /SRC]
4. [VOL/ ]
5. [RESET]
6. [MUTE]
7. [SDHC] 8. [AUX IN]
9. [USB]
10.[ ]
11.[ /TILT+] 12.[ /TILT-]
Infos auf dem Display – Bild-Einstellung
Öffnen/Schließen des LCD-Bildschirms
Öffnen/Schließen des Geräts – Modus-Wahl – Öffnen des Haupt-Menüs
Lautstärke-Einstellung – Wiedergabe/Pause – Gespräch in Empfang nehmen
Fabrik-Einstellungen wieder aufnehmen
Stumm-Schalten – Gespräch beenden
Öffnung für SD-Karte HC- kompatibel
A/V-Zusatz-Eingang
USB-Öffnung
CD-Auswurf
Stück /Sender danach – Läufer rechts – Display-Winkel vergrößern
Stück /Sender davor – Läufer links – Display-Winkel verkleinern
94
Vor der Inbetriebnahme
D
LCD Bildschirm
1. CD-Anzeige – leuchtet auf, wenn eine CD im Gerät ist. Die Leuchte erlischt, wenn keine CD im Gerät ist.
2. Anzeige der Wiederholungs-Funktion – leuchtet auf, wenn die Wiederholungs-Funktion aktiviert ist.
Die Leuchte erlischt, wenn diese Funktion abgeschaltet is.
3. Haupt-Display - Anzeige von: Titel, Wiedergabe-Dauer, Radio-Frequenz, Uhrzeit und sonstige Text-Infos.
4. Anzeige des Radio-Zustands – Stereo-Anzeige leuchtet auf, wenn die Radio-Übertragung Stereo ist.
Die Lokal-Anzeige leuchtet auf, wenn die Lokal-Suche aktiviert ist.
5. Anzeige der RDS-Funktionen AF: Alternativ-Frequenz PTY: Programm-Art TA: Verkehrs-Hinweise TP :
Verkehrs-Programm
Wichtiger Hinweis: • Ein Großteil der Infos wird nur bei geschlossenem Bildschirm ausgewiesen.
• Das LCD-Display formuliert alle Infos in Englischer Sprache.
Fernbedienungs-Gebrauchsanleitung
1.
2.
3.
4.
5.
6.
7.
8.
Fernbedienung in Richtung des Gerät-Sensors halten
Batterie aus der Fernbedienung nehmen, falls Fernbedienung einen Monat oder noch länger, nicht
benutzt wird
Fernbedienung nicht der prallen Sonne bzw. hohen Temperaturen aussetzen, da die Funktionstüchtigkeit
darunter leiden könnte.
Unter normalen Bedingungen, beträgt die Lebensdauer der Batterie circa 6 Monate.
Falls die Fernbedienung nicht mehr reagiert, Batterie ersetzten.
Immer nur Knopf-förmige Litium-Batterien CR2025 (3V) verwenden
Batterien niemals wiederaufladen, öffnen, erwärmen oder ins Feuer geben.
Batterie, unter Berücksichtigung des +/-Pols, korrekt einlegen
Batterien immer so aufbewahren, dass Kinder keinen Zugang haben, denn es besteht Gefahr des
Verschluckens.
Batterie entfernen
Deckel hinter der Fernbedienung nach Außen
schieben und entfernen.
Tirare
95
Batterie einlegen
Immer nur Knopf-förmige Lithium-Batterien
„CR2025 (3V)“ verwenden.
Batterie, in der angezeigten Pol-Richting +/- einlegen.
Spingere
Vor der Inbetriebnahme
Fernbedienung : Erklärung der verschiedenen Tasten
1. Taste (SRC): Gewünschte Quelle festlegen
2. Taste (EJECT): CD-Auswurf
3. Taste (AUDIO): Wahl der Sprach bei DVD-Wiedergabe
4. Taste (VOL+/-): Lautstärke-Einstellung
5. Taste (ZOOM): Bild-Vergrößerung (Zoom) Ein/Aus
6. Taste ( / BAND):Radioband-Wahl - langsame
Wiedergabe
7. Taste (WIDE): Besichtigungs-Modus wählen
8. Taste ( ): Such-Automatik/ davor / Läufer nach links verschieben
9. Taste ( PRESET
): Radio-Sender wechseln
10. Taste (EQ): Equalizer-Einstellungsmenü öffnen
11. Taste (GOTO/ ): Bestimmtes Stück/Kapitel
suchen-Gespräch in Empfang nehmen
12. Taste (OPEN/CLOSE): Öffnen/Schließen des
TFT-Displays
13. Taste (TILT): Einstellung des Display-Neigungsgrades
14. Taste (REPT A-B): Wiederholung A-B
15. Taste (RPT): nochmalige Wiedergabe
16. Taste (INT): jedes Stück wird 10Sek. eingespielt
17. Taste (RDM): wahllose Wiedergabe
18. Tasten (0-9): Nummern-Tasten
19. Taste ( / ): Wiedergabe unterbrechen - Gespräch
beenden
20. Taste (DISP/CLEAR) Wiedergabe-Infos einblenden
Wiedergabe-Infos löschen
21. Taste ( ): schnell Rückwärts - Läufer nach unten
22. Taste (PIC): Bild-Einstellungen - Navigation
23. Taste ( ): Such-Automatik/ danach / Läufer nach
rechts
24. Taste ( ): Wiedergabe / Pause/ Bestätigung
25. Taste (SETUP): Einstellungs-Menü
26. Taste ( ): schnell Vorwärts / Läufer nach oben
27. Taste (TITLE): DVD-Titel
28. Taste (MENU): MENÜ DVD/ PCB
29. Taste (ANGLE): Wahl des Sichtwinkels
30. Taste (SUBTITLE): Wahl der DVD-Untertitel-Sprache
31. Taste (POWER): Gerät Ein-/Ausschalten
32. Taste (MUTE): Stumm-Schaltung
96
Basis-Funktionen
D
Gerät Ein / Ausschalten
Um den VM040 einzuschalten, kann man eine beliebige Taste auf dem Bedienteil drücken, oder aber die POWERTaste auf der Fernbedienung.
Das Gerät wird genau an dem Punkt wieder einsetzen, an dem es ausgeschaltet wurde.
Um den VM040 auszuschalten, kann man die SRC-Taste mindestens 2 Sekunden gedrückt halten, oder aber die
POWER-Taste auf der Fernbedienung drücken.
Stummschaltung (Mute)
MUTE-Taste
auf dem Bedienteil oder der Fernbedienung drücken, um die Audio-Ausgänge stumm zu schalten. Währenddessen blinkt die Mute-Ikone auf dem Display. MUTE-Taste
längere Zeit gedrückt halten, um das
Gespräch zu beenden. Wichtiger Hinweis: • Bei Erhöhung der Lautstärke unterbricht sich die Mute-Funktion.
• Bei aktivierter Stummschaltung, erscheint und blinkt die Mute-Ikone auf dem TFT-Display.
Lautstärke-Regler
Dreh-Knopf auf dem Bedienteil drehen oder VOL-Tasten auf der Fernbedienung drücken, um die Lautstärke zu
erhöhen bzw. zu reduzieren. Auf den Lautstärke-Regler drücken, um die Wiedergabe zu starten bzw. zu stoppen,
oder um ein Gespräch in Empfang zu nehmen ( ). Lautstärke lässt sich von 0 bis 40 einstellen.
Einstellung der Einschalt-Lautstärke
Die Einschalt-Lautstärke ist auf 10 vorbestimmt. Dieses Lautstärke-Niveau lässt sich wie folgt ändern:
Bei eingeschaltetem Gerät, die gewünschte Lautstärke wählen und dann den Lautstärke-Knopf so lange gedrückt
halten, bis die Lautstärke-Skala vom Bildschirm verschwindet. Das neu eingestellte Lautstärke-Niveau wird beim
nächsten Einschalten in Kraft treten.
Quellen-Menü
SRC-Taste auf dem Bedienteil oder auf der Fernbedienung drücken, oder linke Ecke auf dem Touch-Screen
antasten, um das Quellen-Menü zu betreten. Um zurückzukehren, diesen Vorgang nochmals wiederholen.
Quellen-Wahl
Das Quellen-Menü betreten und auf dem Touch-Screen die Ikone der gewünschten Quelle antasten. Die gewünschte
Quelle lässt sich auch mit dem Kursor der Fernbedienung suchen und mittels ( / ) - ( / ) bestätigen.
Wichtiger Hinweis: • Unter dem Begriff "Quellen-Wahl" versteht man den Wiedergabe-Modus, d.h. DVD, Radio, Rückfahrcamera usw. • Die Geräte, die eventuell nicht angeschlossen sind, lassen sich natürlich nicht wählen.
Uhrzeit-Anzeige
Wenn der Touch-Screen geschlossen ist, Taste (DISP) auf dem Bedienteil gedrückt halten, um von der UhrzeigAnzeige umzuschalten auf die aktuelle Wiedergabe-Quelle.
Bedienung des TFT Touch-Screens
Bildschirm öffnen / schließen: Taste (OPEN / CLOSE) auf dem Bedienteil oder der Fernbedienung drücken, um
den Bildschirm aus- oder einzufahren.
Sichtwinkel des Bildschirms einstellen: Die Bildqualität eines LCD-Bildschirms ändert sich je nach Sichtwinkel.
Der Sichtwinkel ist einstellbar, so dass jeweils die optimale Bildqualität erreichbar ist. Taste (TILT) auf dem Display
oder auf der Fernbedienung drücken, um den Sichtwinkel schrittweise zu ändern. Taste (TILT) auf dem Display
oder auf der Fernbedienung gedrückt halten, um den Sichtwinkel kontinuierlich zu ändern.
Bild-Format ändern: Taste (WIDE) auf dem Bedienteil oder der Fernbedienung drücken, um das Bild-Wiedergabeformat einzustellen.
1. Bild-Einstell-Menü betreten: Taste ( PIC ) auf der Fernbedienung drücken.
2. Detail wählen, das geändert werden soll: Taste ( / ) auf der Fernbedienung drücken.
3. Detail nach Wunsch einstellen: Taste ( / ) auf der Fernbedienung drücken.
4. Bild-Einstell-Modus verlassen: dazu, den ersten Punkt wiederholen oder einige Sekunden lang den Betrieb einstellen.
97
Gerät neu einstellen (Reset)
Falls das Gerät nicht korrekt funktioniert, kann man die Reset-Funktion durchführen, indem man auf die RESETTaste auf dem Bedienteil drückt.
Radio-Modus
Wahl der Radio-Wiedergabe
Das Quellen-Menü öffnen. Dann auf dem Touch-Screen die „Radio“-Funktion wählen.
Radio-Frequenzband wählen
Taste (BAND) auf dem Bedienteil oder auf der Fernbedienung drücken , oder die Ikone (BAND) auf dem TouchScreen antasten, und zwischen folgenden Radio-Frequenzbändern wählen: FM1, FM2, FM3, AM1, AM2.
Automatische Sendersuche
Tasten ( / ) auf dem Bedienteil oder auf der Fernbedienung drücken , oder die Ikonen ( / ) auf dem
Touch-Screen antasten, um vorausgehende/darauffolgende Radiosender zu suchen.
Um die Suche zu unterbrechen, einfach eine beliebige Radio-Funktionstaste drücken.
Wichtige Hinweise: • Sobald der gesuchte Radio-Sender gefunden ist, stoppt die Suche von selbst und der
Radio-Sender bleibt präsent. Bei Stereo-Empfang, leuchtet die Anzeige „ST“ (=Stereo), auf dem
Touch-Screen oder auf dem Display, auf.
Manuelle Sendersuche
Während der manuellen Sendersuche ändert sich die Frequenz schrittweise. Die Tasten ( / ) auf der
Fernbedienung drücken, oder die Ikonen ( / ) auf dem Touch-Screen antasten, um einen vorhergehenden bzw. nachfolgenden Sender zu wählen. Auf dem Touch-Screen, die Ikone der Nummern-Tastatur
antasten, dann die Frequenz-Nummern des gewünschten Senders.
Automatische Einspeicherung
Es werden nur die Sender ausfindig gemacht, die ein ausreichend gutes Signal ausstrahlen, und nur diese
können daher eingespeichert werden. Wenn der Bildschirm geschlossen ist, Taste (AS/PS) auf dem Bedienteil gedrückt halten. Wenn der Bildschirm offen ist, die Ikone (AS) auf dem Touch-Screen antasten.
Um den Vorgang der automatischen Einspeicherung zu unterbrechen, einfach eine beliebige Radio-Taste drücken.
Wichtige Hinweise: • Mit der automatischen Einspeicherung werden alle vorher eingespeicherten Sender
überspielt und gehen deshalb verloren. • Das Gerät hat 5 Frequenzbänder, d.h. FM1, FM2, FM3, AM1, AM2.
Jedes einzelne davon kann 6 Sender einspeichern, so dass das Gerät insgesamt 30 Sender speichern kann.
Manuelle Einspeicherung
Sobald man den gewünschten Radiosender ausfindig gemacht hat: Ikone (MEM) auf dem Touch-Screen
antasten, so dass das Speicher-Menü erscheinen wird. Eine der Tasten (zwischen P1 und P6) antasten
Will man den Modus verlassen, Taste (EXIT) drücken.
Kurzes Anspielen der Sender
Immer wenn ein Sender gesucht und gefunden wird, findet ein kurzes Anspielen (5 – 10 Sekunden) des Senders
statt. Dieser Prozess wiederholt sich so lange, bis das gesamte Frequenzband abgesucht worden ist.
Wenn der Bildschirm offen ist, die Ikone
>PS auf dem Touch-Screen antasten. Um den Vorgang zu unterbrechen, eine beliebige Radio-Taste drücken.
Wahl der eingespeicherten Sender
Die eingespeicherten Sender, auf der Fernbedienung oder auf dem Touch-Screen, entsprechend der Nummern-Tasten von 1 bis 6, anwählen.
98
Radio-Modus
D
Lokalisierte Sendersuche
Wenn die lokalisierte Sendersuche (LOCAL) aktiviert ist, dann werden nur die Sender erkannt, die ein starkes
Signal haben. Um die lokalisierte Sendersuche (LOCAL) zu aktivieren bzw. deaktivieren, Lautstärke-Knopf
auf dem Bedienteil gedrückt halten.
Wichtige Hinweise: • Wenn die lokalisierte Sendersuche aktiviert ist, leuchtet die Anzeige „LOC“ hell auf.
Wenn die lokalisierte Sendersuche deaktiviert ist, erlischt dieses LOC-Anzeige-Licht. • Während die lokalisierte Sendersuche aktiviert ist, reduziert sich die Anzahl der empfangenen Sender.
Das Gerät bietet alle RDS-Basis-Funktionen, u.a. PI (Programm-Identifizierung), Radio-Sender, RT (RadioText), CT (Uhrzeit), AF (Alternativ-Frequenz), TA (Verkehrs-Hinweise), PTY (Programm-Typ).
AF-FUNKTION
Die Liste der Alternativ-Frequenzen (AF) vereinfacht, unter Verwendung der PI-Code-Nummer (ProgrammIdentifizierung), die automatische Sendersuche.
Anhand dieser Infos kann das Gerät automatisch nach einer anderen Frequenz suchen, die denselben Sender ausstrahlt.
Diese Möglichkeit ist vor allem dann nützlich, wenn das Signal des eingestellten Programms schwindet und
eine Alternativ-Frequenz zur Verfügung steht.
Um die AF-Funktion zu aktivieren, Taste (AF) auf dem Touch-Screen antasten. Nochmals antasten, um die
Funktion wieder zu löschen.
Wichtiger Hinweis: Während der automatischen Frequenz-Suche, könnten Störungen hörbar werden. Das
Problem verschwindet durch das Ausschalten der AF-Funktion.
TA-FUNKTION
Durch die TA-Funktion (Verkehrsmitteilungen), kommen Verkehrsmitteilungen immer ganz automatisch,
egal welche Quelle gerade benutzt wird. Bei aktivierter TA-Funktion lassen sich Verkehrsmitteilungen von
den zuständigen Verkehrsfunk-Programmen hören.
Sobald, bei aktivierter TA-Funktion, auf dem FM-Band eine Verkehrsmitteilung ansteht, erhält die Durchsage den absoluten Vorrang: das TA-Leuchtsignal schaltet sich ein und gibt somit bekannt, dass das Gerät
gerade auf eine Verkehrsmitteilung wartet.
Nach beendeter Verkehrsmitteilung nimmt das Gerät den vorhergehenden Sender wieder auf.
Die TA-Funktion lässt sich auf dem Touch-Screen, mit der (TA)-Taste aktivieren. Um die TA-Funktion wieder
zu deaktivieren, nochmals auf die (TA)-Taste drücken.
PTY-Funktion
PTY (=Programm-Typ) weist auf die Code-Nummer des momentan übertragenen Programmes hin (z.B.
Nachrichten bzw. Rockmusik). Das Display weist insgesamt 6 PTY-Optionen aus. Es lassen sich zusätzliche
Programm-Typen (PTY) ersehen, indem man auf den linken Positions-Balken drückt und die Richtungspfeile
auf dem Bildschirm betätigt.
Nachdem der Programm-Typ gewählt worden ist (z.B. Nachrichten), beginnt die Suche auf einer höheren
Frequenz und so lange, bis das nächstgelegene gewünschte Programm ausfindig gemacht wird. Falls kein
PTY auffindbar ist, nimmt das Gerät die vorhergehende Programm-Frequenz wieder auf.
Programm-Service (PS)
Aufzeichnung aller empfangsbereiten Sender, mit kurzem Anspielen der Programme.
Uhrzeit (CT)
Einige Sender benutzen das RDS-Signal, um die Uhrzeit und das Datum festzuhalten. Wenn die CT-Funktion eingeschaltet, d.h. auf ON steht, dann regelt sich die Uhrzeit automatisch von selbst.
Radio-Text (RT)
Wenn die Funktion aktiviert ist, dann erteilt das Gerät kurze Hinweise, die vom Provider stammen: z.B.
Sender, Musik-Titel, Sänger.
99
CD-Wiedergabe
CD-Einlegen
Sobald eine CD eingelegt wird, schaltet das Gerät
automatisch auf den CD-Modus.
WICHTIGE HINWEISE:
1. Vorher gut kontrollieren, dass keine CD im Gerät
ist. Dann erst die gewünschte CD eingeben.
2. CDs, die als CD-R, CD-RW, DVD-R, DVD+R,
DVD-RW, DVD+RW registriert wurden, jedoch nach
einem NICHT-kompatiblen Registrierungs-System
oder NICHT-abgeschlossenerer CD-Brennprozedur,
erweisen sich als NICHT Wiedergabe-fähig.
3. Weitere Hinweise zur CD-Funktion bitte im spezifischen Absatz nachlesen.
CD - Auswurf
EJECT-Taste auf dem Bedienteil oder auf der Fernbedienung drücken, um die CD auszuwerfen.
Die CD lässt sich auch bei ausgeschaltetem Gerät
auswerfen. Nach Auswurf der CD bleibt das Gerät
ausgeschaltet.
Touch-Screen-Funktionen
Auf dem Bildschirm befinden sich bestimmte Felder,
auf denen die DVD-Funktionen wählbar sind.
A -Quellen-Menü öffnen
B -Wiedergabe-Infos
abrufen
C -Wiedergabe-Menü
am Bildschirm-Rand ausweisen.
Display Kontroll-Knöpfe
Icona
Tastiera
numerica
Tastiera
numerica
Tastiera
numerica
Cartella
successiva
Cartella
precedente
Tastiera
numerica
Tastiera
numerica
Tastiera
numerica
Cartella
successiva
Cartella
precedente
100
CD-Wiedergabe
D
Wiedergabe unterbrechen
Taste (
) auf dem Bedienteil oder auf der Fernbedienung drücken, oder aber di Ikone auf dem TouchScreen antasten. Um die Wiedergabe wieder aufzunehmen, dieselbe Taste nochmals drücken.
Wiedergabe stoppen
Taste ( ) auf der Fernbedienung drücken oder die Ikone auf dem Touch-Screen antasten.
Beim ersten Wiedergabe-Stop wird die Wiedergabe-Stelle eingespeichert, so dass die Wiedergabe genau an
dieser Stelle wieder aufgenommen werden kann, durch Druck auf die Taste ( ). Drückt man die Taste ( )
zwei Mal, dann startet die Wiedergabe von Anfang an, und nicht von der unterbrochenen Stelle.
Dateien-Liste ausweisen
Um die Liste der auf CD eingespeicherten Dateien in Erfahrung zu nehmen, Wiedergabe unterbrechen.
Schnelle Wiedergabe
Die Tasten ( / ) mehrmals auf der Fernbedienung oder dem Touchscreen antasten, um die WiedergabeGeschwindigkeit zu ändern.
Datei vorher / nachher
Die Tasten ( / ) auf dem Bedienteil, der Fernbedienung oder dem Touch-Screen drücken, um auf die
vorhergehende oder nachfolgende Datei überzugehen.
Ordner wechseln
Die beiden Ikonen (DIN+) / (DIR-) auf dem Touch-Screen antasten, um auf einen anderen Ordner zu gehen,
wenn auf der gerade abgespielten CD mehrere Ordner zur Verfügung stehen. Anders bei Filmen oder Fotos:
hier immer erst die Wiedergabe stoppen, bevor man auf einen anderen Ordner wechselt.
Nochmalige Wiedergabe
Um die Wiederholungs-Modalität lt. Tabelle zu ändern, RPT-Taste auf der Fernbedienung mehrmals drücken,
oder Touch-Screen-Tastenmenü öffnen, und dann die Taste ( ) mehrmals antasten:
CD - Typ Wiederholungs-Modalitä
Wichtige Hinweise:
• Bei Wiedergabe einer VCD reagiert diese Funktion, bei aktiviertem PBC, nicht.
• Die Funktion löscht sich von selbst, wenn das Gerät ausgeschaltet wird oder die Wiedergabe-Art geändert wird.
Wiedergabe A-B
Wenn eine DVD, VCD oder CD gerade abgespielt wird, dann lässt sich der Inhalt zwischen A und B beliebig
oft wiederholen: Taste (RPT A-B) auf der Fernbedienung drücken, oder das Tasten-Menü auf dem Bildschirm öffnen. Dann die Tasten (A-B) wählen, um den Ausgangspunkt des Abschnitts A-B festzuhalten. Dasselbe nochmals durchführen, um den Endpunkt des Abschnitts A-B festzuhalten. Der Inhalt, der zwischen
den beiden Punkten A-B vorzufinden ist, wird nun fortwährend wiederholt. Wiederholt man die Prozedur ein
drittes Mal, so wird die Funktion aufgehoben.
101
CD-Wiedergabe
Unwillkürliche Wiedergabe (Random)
Bei aktivierter Random-Funktion erfolgt die CD-Wiedergabe in unwillkürlicher Reihenfolge.
(RDM)-Taste auf der Fernbedienung mehrmals drücken oder das Tasten-Menü auf dem Bildschirm öffnen.
Dann (
)-Taste auf dem Touch-Screen mehrmals antasten, um unter folgenden Wiedergabe-Modalitäten
zu wählen: Random, Random repeat, Repeat off.
Einleitende Kurz-Wiedergabe
Wenn diese Funktion aktiviert ist, dann spielt das Gerät nur die ersten 10 Sekunden eines jeden Stücks (bei
CD und DVD). Taste (SNC) auf der Fernbedienung drücken, um die Funktion zu aktivieren. Dieselbe Taste
nochmals drücken, um die Funktion wieder aufzuheben.
Direkt-Suche
Während der Wiedergabe einer DVD, VCD oder CD, kann man ein bestimmtes Kapitel oder Stück suchen,
anhand der Nummerntasten auf der Fernbedienung. Will man, z.B. das Stück Nr. 15 hören, dann drückt man
di Nummerntasten 1 und 5.
GO-TO-Suche
Modus der GO-TO-Suche betreten.
1. Taste (GOTO) auf der Fernbedienung drücken, oder das Such-Menü öffnen.
Bei DVDs gibt es die Suche nach Titel, Kapitel und Zeit.
Bei VCDs gibt es, bei deaktivierter PBC-Funktion, die Suche nach Zeit. Wenn die PBC-Funktion aktiviert ist,
dann funktioniert die Suche nach Zeit und Stück. Bei CDs gibt es die Suche nach Stück.
Bei MPEG-Dateien kann man nach Stück und Zeit suchen. Bei selbst gebrannten CDs, die MP3 und/oder
Jpeg-Dateien beinhalten, kann man nach Stück (Nummer der gewünschten Datei) suchen.
2. Modus der Informations-Suche betreten
Mit den Richtungspfeilen der Fernbedienung auf die gewünschte Information gehen und mit den Nummerntasten anwählen (Titel, Kapitel, Zeit).
3. Bestätigung. Auf der Fernbedienung, die Taste (Enter) drücken, um die Wahl zu bestätigen.
4. Modus der GO-TO-Suche wieder verlassen. Anfängliche Prozedur nochmals wiederholen, bis das SuchMenü verschwindet, oder die Taste (Exit) auf dem Touch-Screen antasten.
DVD-MENÜ und - TITEL
Es sind nur DVDs ansprechbar, die über die „Menu/Title“-Funktion verfügen. Auf der Fernbedienung, Taste
(MENU/TITLE) drücken, oder das Tasten-Menü auf dem Bildschirm öffnen und die Taste (MENU) auf dem
Touch-Screen antasten, um das DVD-Menü zu öffnen. Die Sprache für Audio und Untertitel ist wählbar.
Um die Funktion „DVD-TITLE“ zu öffnen, gibt es zwei Möglichkeiten: Taste (TITLE) auf der Fernbedienung
drücken, oder Das Tasten-Menü auf dem Bildschirm öffnen und die Taste (TITLE) antasten.
Man kann nun verschiedene Titel für die Wiedergabe wählen.
Wahl der Untertitel-Sprache
Taste (SUBTITLE) auf der Fernbedienung mehrmals drücken, oder das Tasten-Menü auf dem Bildschirm
öffnen und die Taste (SUBTITLE) mehrmals auf dem Touch-Screen antasten, um die Untertitel-Sprache zu
wählen.
Wahl der Multi-Sichtwinkel-Besichtigung
Die Taste (ANGLE) mehrmals auf der Fernbedienung drücken, um, während der Wiedergabe, auf einen
bestimmten Sichtwinkel umzustellen, soweit die laufende DVD bzw. Video-Datei über die Multi-SichtwinkelFunktion verfügt.
Wahl des Audio-Kanals
Bei DVDs, die mehrsprachige Audio-Dateien enthalten, die Taste (AUDIO) auf der Fernbedienung mehrmals drücken, oder das Tasten-Menü auf dem Bildschirm öffnen und mehrmals die Taste (AUDIO) auf dem
102
CD-Wiedergabe
D
Touch-Screen antasten, um auf eine andere Sprache umzuschalten. Bei CDs und VCDs, die Taste (AUDIO)
auf der Fernbedienung mehrmals drücken, oder das Tasten-Menü auf dem Bildschirm öffnen und
mehrmals die Taste (AUDIO) auf dem Touch-Screen antasten, um auf die verschiedenen Audio-Kanäle zu
gehen, d.h. Stimme links, Stimme rechts, Mono links, Mono rechts, Stereo.
Wichtiger Hinweis: Der linke und rechte Kanal können nur dann gut funktionieren, wenn die Audio-Dateien
auch korrekt aufgenommen worden sind.
PBC-Funktion
Diese Funktion steht bei VCDs mit PCB (Vers. 2.0 oder noch aktueller) zur Verfügung.
Taste (MENU) auf der Fernbedienung drücken, um die Funktion zu aktivieren.
Dieselbe Taste nochmals drücken, um die PBC-Funktion wieder zu löschen.
Wichtige Hinweise: • Wenn die PBC-Funktion aktiviert ist, dann erfolgt die Wiedergabe entsprechend der
Musikstück-Liste und fängt dabei beim ersten Musikstück an. • Wenn die PBC-Funktion aktiviert ist, dann
stehen folgende Funktionen zur Verfügung: Schnelle Wiedergabe, langsame Wiedergabe, Stücke überspringen. Folgende Funktionen sind dagegen nicht verfügbar: nochmalige Wiedergabe, Kapitel-Suche, Suche
nach Kapitel/Stück. • Wenn die PBC-Funktion aktiviert ist und man wählt : Unwillkürlichen Wiedergabe,
Scan-Wiedergabe oder Suche, dann schaltet sich die PBC-Funktion von selbst aus.
Zoom In / Out ( Ein / Aus )
Um ein Bild zu vergrößern oder zu verkleinern, auf die Ikone (O) der Fernbedienung drücken, oder das
Tasten-Menü auf dem Bildschirm öffnen und die Ikone (O) auf dem Touch-Screen antasten.
Bild drehen
Bei der Wiedergabe einer Bild-Datei besteht die Möglichkeit, das Bild in den bestmöglichen Sichtwinkel zu
drehen. Hierzu die Ikone ( ) auf dem Touch-Screen antasten.
Wiedergabe-Informationen
Berührt man den oberen, mittleren Rand des LCD-Bildschirm während der Wiedergabe einer DVD oder VCD,
dann erscheinen nähere Informationen bezügliche der laufenden Wiedergabe.
Bei DVDs
1. DVD-Typ
2. Informationen betreffend DVD-Titel. „5/8“ bedeutet, dass 8 Titel auf der DVD stehen und momentan der
5. Titel abgespielt wird.
3. Informationen betreffend DVD-Kapitel. „2/16“ bedeutet, dass der laufende Titel aus 16 Kapiteln besteht
und momentan das 2. Kapitel abgespielt wird.
4. Übrige Dauer des momentan laufenden Titels.
5. “
” bedeutet, dass die Untertitel dieser DVD in 6 Sprachen verfasst sind, und dass momentan
die 2. Sprache gewählt ist, d.h. Englisch.
103
CD-Wiedergabe
Bei VCDs
1. VCD-Typ
2. PBC-Anzeige. „PBC On“ bedeutet, dass die PBC-Funktion aktiviert ist.
3. Informationen betreffend die VCD-Stücke. „6/18“ bedeutet, dass die laufende VCD insgesamt 18 Stücke
umfasst und momentan das 6. abgespielt wird.
4. Übrige Dauer des momentan laufenden Stücks.
SD/USB-Wiedergabe-Modus wie folgt wählen:
Wiedergabe im USB/SD-Modus
Quellen-Menü öffnen und USB/SD wählen.
1.Taste so lange drücken, bis der gewünschte Wiedergabe-Modus erscheint.
2.Quellen-Menü öffnen und zwischen SD-Card und USB wählen.
Wichtige Hinweise: Das Gerät geht automatisch auf USB-Modus über, sobald ein USB-Stift eingegeben
wird. • Das Gerät ist für „hot swap“ (schnelles Ablesen) geeignet. • Das Gerät liest USB-Stifte, die unter dem
System FAT 16/32 formatiert worden sind, NICHT aber das System NTFS.
Touch-Screen-Funktionen
Der Vorgang ist derselbe wie bei CDs.
Kontroll-Tasten auf dem Bildschirm
Unwillkürliche Wiedergabe (Random)
Die Prozedur ist dieselbe wie im CD-Modus.
Es werden dieselben Kontroll-Tasten benützt wie im
CD-Modus.
Einleitende Kurz-Wiedergabe
Wiedergabe stoppen
Direkt-Suche
Die Prozedur ist dieselbe wie im CD-Modus.
Die Prozedur ist dieselbe wie im CD-Modus.
Wiedergabe unterbrechen
GO-TO-Suche
Die Prozedur ist dieselbe wie im CD-Modus.
Die Prozedur ist dieselbe wie im CD-Modus.
Datei-Liste ausweisen
Zoom In / Out
Die Prozedur ist dieselbe wie im CD-Modus.
Die Prozedur ist dieselbe wie im CD-Modus.
Schnell-Wiedergabe
Bild drehen
Die Prozedur ist dieselbe wie im CD-Modus.
Die Prozedur ist dieselbe wie im CD-Modus.
Datei vorher / nachher
Wiedergabe-Informationen
Die Prozedur ist dieselbe wie im CD-Modus.
Die Prozedur ist dieselbe wie im CD-Modus.
Die Prozedur ist dieselbe wie im CD-Modus.
Datei-Wechsel
Die Prozedur ist dieselbe wie im CD-Modus.
Nochmalige Wiedergabe
Die Prozedur ist dieselbe wie im CD-Modus.
104
Weitere Modus-Möglichkeiten
D
AUX-IN
Am Gerät lassen sich externe Vorrichtungen anschließen, die Audio/Video Chinch-Ausgänge haben.
Um den Modus AUX-IN zu betreten, muss man das Quellen-Menü öffnen und AUX-IN wählen.
AUX IN 2 : befindet sich hinten am Gerät. Ermöglicht den Anschluss von Vorrichtungen mit Chinch-Ausgang.
Besonders geeignet für fest installierte Vorrichtungen.
AUX IN 1 : befindet sich auf dem Bedienteil. Bietet beide Anschluss-Möglichkeiten: Chinch und 3,5mmJack. Spezifisch geeignet für mobile Vorrichtungen.
Belegung des 3,5 mm-Jack Verbinders:
Rückfahr-Camera
Am Gerät kann eine externe Rückfahr-Camera angeschlossen werden.
Die momentan laufende Wiedergabe-Quelle schaltet automatisch auf „Rückfahr-Camera“ über, sobald der
Rückwärtsgang eingelegt wird.
NAV
Am Gerät lässt sich ein externes, passendes Navigationsgerät anschließen (NV003).
Um die Modalität NAV zu betreten, muss man das Quellen-Menü öffnen und NAV wählen, sobald das externe Navigationsgerät bereit steht.
Es besteht die Möglichkeit, die Audio-Wiedergabe einer beliebigen Quelle zu wählen, z.B. Radio, DVD, CD,
USB/SD- Karte, und gleichzeitig das Navigationsbild festzuhalten (OPTIONAL NV003).
Dieser Modus bewirkt, dass vor jeder Anweisung des Navigators, die Musik-Lautstärke zurückgeht, damit
die Navigationsstimme hörbar wird.
Nachdem die gewünschte Musik-Quelle gewählt wurde, die Taste [DISP], auf dem Bedienteil, 2 Sekunden
lang gedrückt halten , oder aber die Taste [WIDE] auf der Fernbedienung drücken.
Auf dem VM041 wird somit das Navigationsbild erscheinen, während die Musik unverändert weiterläuft.
Wichtiger Hinweis: die Navigations-Funktionen lesen Sie bitte im Handbuch des externen Navigationsgerätes nach.
BLUETOOTH-System: Software 2.0 (OPTIONAL 6/860)
Unter Bluetooth-System versteht man die drahtlose Telefon-Kommunikation innerhalb kurzer Entfernungen
(bis max. 10m).
Mit Hilfe des Art. 6/860 lässt sich ein Bluetooth-Mobil-Telefon, mit einer Software bis 2.0, am VM041
anschließen.
Nachdem das Mobil-Telefon angeschlossen worden ist, lässt es sich direkt vom VM041 kontrollieren.
105
Weitere Modus-Möglichkeiten
Ikonen und deren funktion
= Kopplung
= Einstellungen
Menu = Menù
= Wiedergabe /Pause
= vorhergehendes Stück
=
=
=
=
=
Deaktivierung
Gespräch weiterleiten
antworten/anrufen
Wiedergabe unterbrechen
Telefon-Modus
=
=
=
=
=
Tasten für Telefonanrufe
Mute
Gespräch beenden
nachfolgendes Stück
Musik-Modus
Telefon-Bzw. Musik-Modus
Das Bluetooth-Modul bietet 2 Betriebsmöglichkeiten: Telefon- und Musik-Betrieb.
Auf dem Bildschirm, den gewünschten Modus wählen, durch einfaches Antasten der betroffenen Ikone, d.h.
( ) bzw. ( ).
Im Telefon-Modus funktioniert der VM041 als Freisprechgerät und kann daher Gespräche in Empfang
nehmen und Gespräche starten. Im Musik-Modus kann man, mit Hilfe des VM041, die auf dem Telefon
eingespeicherte Musik, über die Auto-Hifi-Anlage hören.
Der Musik-Modus ist NUR möglich, wenn das Mobil-Telefon der AD2P-Technologie entspricht. Verfügt das
Mobil-Telefon desweiteren über die AVRCP-Funktion, dann lässt sich die Musik durch den VM041 steuern.
Kopplung
Die Funktion “PAIRING” verwendet man, um den VM041 mit dem Mobil-Telefon zu verbinden.
Um den Bluetooth-Modus zu betreten, wie folgt vorgehen: auf dem Bedienteil, Taste “SRC” mehrmals drücken, oder, auf dem Bildschirm selbst, innerhalb des »SOURCE”-Menüs, die BT-Ikone antasten.
Dann die Funktion „PAIR“ auf dem Bildschirm antasten, so dass der Hinweis “WAITING FOR PAIRING”
erscheint. Aus einer Entfernung von maximal 3m vom VM041, erst die Bluetooth-Funktion auf dem Mobil-Telefon aktivieren, dann die Suche nach weiteren Bluetooth-Geräten starten. Nach wenigen Sekunden
erscheint auf dem Display des Mobil-Telefons das Bluetooth-Modul namens VM041. Dieses wählen und,
auf Verlangen, die Code-Nummer “1234” eingeben. Jetzt zustimmen, dass sich die Vorrichtung automatisch
aktivieren darf, wenn ein Signal des Mobil-Telefons eingeht. Sobald diese Verbindung erfolgreich abgeschlossen worden ist, erscheint auf dem VM041 der Hinweis “PAIR OK”. Der VM041 ist nun bereit, Gespräche zu empfangen und zu starten.
Telefon-deaktivierung
Will man das Mobil-Telefon wieder vom VM041 trennen, wiederum die Taste (
ten. Daraufhin zeigt der VM041 die Aufschrift “EXIT PAIR”.
) auf dem Bildschirm antas-
Ein telefon-gespräch starten
Gewünschte Rufnummer auf den Nummerntasten des Bedienteils eingeben.
Auf dem Bildschirm oder auf der Fernbedienung, Taste ( ) drücken, um ein Gespräch einzuleiten.
Auf dem Bildschirm oder auf der Fernbedienung, Taste ( ) drücken, um ein Gespräch zu beenden.
Einen telefon-anruf in empfang nehmen
Wenn das Mobil-Telefon mit dem VM041 verbunden ist, dann schaltet der Bildschirm, sobald ein Telefon-Anruf ankommt, automatisch auf die Bluetooth-Funktion.
Auf dem Bildschirm oder auf der Fernbedienung, Taste ( ) drücken, um den Anruf zu beantworten.
Auf dem Bildschirm oder auf der Fernbedienung, Taste ( ) drücken, um das Gespräch zu beenden.
106
Weitere Modus-Möglichkeiten
D
Telefon-stimme weiterleiten
Während des Telefongesprächs kann man die Stimme, aus Privatgründen, umstellen, vom Freisprechgerät
auf das Mobil-Telefon, oder auch umgekehrt. Taste ( ) drücken, um die Stimme aufs Mobil-Telefon umzuleiten. Dieselbe Taste nochmals drücken, um die Stimme wieder auf das Freisprechgerät zu leiten.
Letzthin geführtes gespräch
Drückt man, auf dem Bildschirm oder auf der Fernbedienung, die Taste ( ) so wird das letzthin geführte
Gespräch angezeigt (egal, ob in Empfang genommenes oder gestartetes).
Bluetooth-audio
Der VM041 kann nur dann Stereo-Signale über Bluetooth empfangen, wenn das Sende-Gerät (Mobil-Telefon) über die Funktion A2DP bzw. AVRCP verfügt.
VORSICHT Aus Verkehrs-Sicherheitsgründen, sollte man, am Steuer, so wenig wie möglich am Telefon sprechen.
WICHTIG Bei einigen Mobil-Telefon-Modellen muss der Anruf aktiviert werden, um die Umleitung der Stimme zu
bewirken.
Musik-modus
AD2P: AD2P steht für: fortgeschrittene Audio-Diffusion.
Mobil-Telefone, die diese Funktion haben, leiten das Audio-Signal im Stereo-Modus weiter.
Bestimmte Mobil-Telefon-Modelle sind auf Audio-Übermittlung angepasst, NICHT jedoch in Stereo.
AVRCP: AVRCP steht für: Audio/Video Remote-Control Profile.
Mobil-Telefone, die diese Funktion haben, lassen die Musik-Wiedergabe direkt durch den VM041 zu.
Während der Musik-Wiedergabe besteht die Möglichkeit, ein Gespräch zu starten, indem man die Telefonnummer wählt und die Taste ( ) drückt. Auf dem Display erscheint sofort der Hinweis “DIALING” (Nummer
gewählt) Ist das Gespräch beendet, erscheint auf dem Display “MUSIC PLAYING”.
Nicht alle Mobil-Telefone lassen eine Remote-Wiedergabe zu. Kommt, während der Musik-Wiedergabe, ein
Telefonanruf, erschein auf dem Display die Frage “PHONE NUMBER ANSWER?“ (Telefonat in Empfang
nehmen?). Um den Anruf in Empfang zu nehmen, Taste [Hörer ab] drücken.
Allgemein-Funktionen IT
Besondere tipps zum bluetooth-betrieb
Während unserer Tests auf den Mobil-Telefon-Modellen NOKIA N7x, N9x, PHILIPS, Sony Ericsson und
SAMSUNG, haben wir festgestellt, dass, auf dem Telefon-Display, die Koppelung als durchgeführt ausgewiesen wird, JEDOCH auf dem VM041 weiterhin der Hinweis “WAITING FOR PAIRING” erscheint, als
wäre die Kopplungs-Prozedur doch noch nicht abgeschlossen. In solch einem Fall ist es notwendig, auf
dem Mobil-Telefon die gekoppelten Geräte nachzulesen, um schließlich das “PHONOCAR”-Modul manuell
zu aktivieren. Erst dann erscheint auf dem Display der Hinweis “PAIR OK”.
In anderen Worten, die manuelle Aktivierung muss vorgenommen werden, auch wenn das Mobil-Telefon die
Verbindung als bereits aktiviert angibt, da sonst keine Telefon-Stimme hörbar ist.
Bei manchen Mobil-Telefon-Modellen, z.B. PHILIPS, muss, während der AD2P-Musik-Wiedergabe, das
“PHONOCAR”-Modul im Mobil-Telefon ausfindig gemacht und manuell aktiviert werden (dabei immer auch
kontrollieren , ob das Mobil-Telefon AD2P bzw. AVRCP-kompatibel ist).
Bestimmte Mobil-Telefon-Modelle setzen sich, nach einem „Privat-Gespräch“ (Audio nicht umgeleitet auf
den VM041) NICHT automatisch wieder mit dem VM041 in Verbindung, sondern man muss manuell das
„PHONOCAR“-Modul im Mobil-Telefon suchen und aktivieren.
Sollte das Audio NICHT Stereo hörbar sein, obwohl das Mobil-Telefon AD2P/AVRCP-kompatibles ist und
die automatische Verbindung gewählt wurde, muss kontrolliert werden, ob das Telefon auch wirklich auf
Bluetooth-Audio-Übertragung eingestellt ist.
BITTE BEACHTEN: Das Bluetooth-Kommunikations-Protokoll funktioniert mit dem Software 2.0. Vor
dem Kauf gut kontrollieren, ob das Mobil-Telefon mit der Software 2.0 kompatibel ist.
107
Einstellungen
Einstellungs-Vorgang
1.
Die Modalität SETUP betreten
Taste (SETUP) auf der Fernbedienung drücken, oder das Tasten-Menü auf dem Bildschirm öffnen und die Ikone ( ) auf dem Touch-Screen antasten.
Das abgebildete Menü erscheint, sobald man die Einstellungs-Modalität betritt.
Das generelle Unter-Menü ist von sich aus unterstrichen.
2.
3.
4.
Ein Unter-Menü wählen
Die Richtungspfeile auf der Fernbedienung betätigen.
Wahl vornehmen
Tasten (
) auf der Fernbedienung drücken, die gewünschte Wahl vornehmen und mit der Taste (
bestätigen.
Wert festlegen
Tasten (
) auf der Fernbedienung drücken, die gewünschte Wahl vornehmen und mit der Taste (
bestätigen.
Wichtiger Hinweis: Alle Einstellungen lassen sich auch auf dem Touch-Screen abändern.
) )
Allgemein-Informationen
•
•
•
•
Uhrzeit-Modus
12 Hr: die Uhr zeig bis zu 12 Stunden an: Beispiel 11:18
24 Hr: die Uhr zeigt bis zu 24 Stunden an: Beispiel 20:18
Uhrzeit
Die oben rechts auf dem TFT-Bildschirm ausgewiesene Uhrzeit nach Bedarf ändern.
Gebietsbezogener Tuner
Das Gerät verfügt über zahlreiche unterschiedliche Radio-Systeme. Ja nach Land, lässt sich das zutref
fende Radio-System wählen.
Beep
On: Tasten-Ton ist aktiviert
Off: Tasten-Ton ist deaktiviert.
Sprache
•
•
•
OSD
Aus dem System-Menü die gewünschte Sprache wählen.
DVD-Audio
Sprache der DVD-Dialoge.
Wichtiger Hinweis: falls die DVD nicht über die eingestellte Sprache verfügt, dann kommen die Dialogo
automatisch in der Ausgangs-Sprache.
DVD-Untertitel
Sprache der DVD-Untertitel wählen.
Wichtiger Hinweis: falls die DVD nicht über die eingestellte Sprache verfügt, dann kommen die Unterti
tel automatisch in der Ausgangs-Sprache.
108
Einstellungen
•
D
DVD-Menü
Sprache für das DVD-Menü wählen.
Wichtiger Hinweis: falls die DVD nicht über die eingestellte Sprache verfügt, dann kommt das DVDMenü automatisch in der Ausgangs-Sprache.
Audio
•
•
•
•
DRC: .Dynamik-Einstellung der Dolby-Digital-DVDs.
On: besonders dynamische, Bass-reiche Audio-Wiedergabe
Off: Normal-Ausgang
Loudness
On: Loudness-Modus aktiviert
Off: Loudness-Modus deaktiviert
Subwoofer
On: aktiviert den Subwoofer
Off: deaktiviert den Subwoofer
Sub-Filter
Der Bass-Effekt fällt unterschiedlich aus, je nach dem welchen Frequenz-Schnitt des Sub-Filters man
wählt. Der passende Frequenz-Schnitt richtet sich nach der Auto-Akustik und der vorhandenen
Hifi-Anlage. Zur Wahl stehen: 80 Hz, 120 Hz, 160 Hz.
BLUETOOTH ON/OFF Ein-/Ausschalten des Bluetooth-Moduls
Autoanswer ON/OFF
Aktivierung/Deaktivierung der automatischen Beantwortung
Connect AUTO Das Bluetooth-Modul schaltet sich automatisch ein, sobald das Mobil-Telefon seinen
Aktionskreis betritt.
MANUAL.Das Bluetooth-Modul schaltet man manuell durch das Mobil-Telefon
Pairing Code
Darunter versteht man die Code-Nummer, die benötigt wird, um das Bluetooth-Modul zur Verbindung freizugeben. Die fabrikmäßig vorgegebene Code-Nummer lautet: 1234.
RDS ON/OFF RDS-Funktion Aktiviert/Deaktiviert
CT ON/OFF Automatischer Empfang des RDS-Uhrzeit-Signals Aktiviert/Deaktiviert
Tuner Region
Der VM041 ist in der Lage, verschiedene Radio-Signal-Systeme zu empfangen. Um das spezifisch geeignete System zu wählen, muss man das betreffende Land eingeben.
TA VOL
Lautstärke für die übrigen Audio-Quellen wählen.
Lautstärke von 0 bis 10 einstellbar
Jugend-Schutz
Bestimmte DVDs verfügen über einen Jugend-Schutz, d.h. Kinder werden vor Gewalt- oder Sex-Szenen
bewahrt
• Passwort eingeben
Fabrikäßig ist ein Null-Passwort eingegeben, so dass Sie bitte schnellstens Ihr Passwort einspeichern.
Passwort-Eingabe:
1. Kursor auf Passwort stellen. Nummerntasten auf der Fernbedienung drücken, oder „Passwort“ auf dem
Touch-Screen antasten, um die Nummerntasten erscheinen zu lassen. Passwort eingeben (beim ersten Mal
109
Einstellungen
das Fabrik-Passwort) und bestätigen.
2. Diesen Vorgang nochmals wiederholen, d.h. mit einem neuen 6-stelligen Passwort, und bestätigen. Das
neue Passwort ist nun eingespeichert und der Jugend-Schutz aufgestellt.
• Jugendschutz-Stufen
Das Gerät verfügt über insgesamt 8 Besichtigungs-Stufen:
1. Eignungsstufe „Kinder“: für Kinder geeignete Filme
2. G: für alle Altersstufen geeignete Filme
3. PG: für alle Altersstufen geeignet. Kinder sollten jedoch wenigstens mit einem Elternteil zuschauen.
4. PG-13: für alle Altersstufen. Kinder unter 13 Jahren sollten jedoch wenigstens mit einem Elternteil zuschauen.
5. PG-R: im Sinne von PG.
6. R: nur ab einem bestimmten Alter (normalerweise 17 Jahre), oder wenn mit einem Elternteil oder einer
Aufsichtsperson zugeschaut wird.
7. NC-17: nur ab 18 Jahre geeignet
8. Adult: nur für Erwachsene geeignet.
Änderung der Jugendschutz-Stufe
1. Passwort eingeben, um den Jugend-Schutz aufzuheben
Kursor auf „Passwort“ stellen. Nummerntasten auf der Fernbedienung drücken, oder „Passwort“ auf
dem Bildschirm antasten und anhand der Nummerntasten Passwort eingeben. Dann bestätigen.
2. Jugendschutz-Stufe ändern
Aus der aufgeführten Jugendschutz-Liste die geeignete Stufe wählen.
3. Jugendschutz aufstellen
Die Prozedur von Anfang an wiederholen, dabei ein 6-stelliges Passwort (altes oder neues) eingeben und
bestätigen. Somit ist der Jugendschutz wieder aufgestellt.
• Fabrik-Einstellungen
Um die DVD-Fabrik-Einstellungen wieder herzustellen (Audio bzw. Untertitel), RESET drücken.
Einstellungen der Verbindungen (HANDWARE)
•
•
•
•
•
Eingang Rückfahr-Camera
Normal: Das Bild, das beim Einlegen des Rückwärtsganges auf dem Bildschirm erscheint, entspricht der reellen Größe.
Mirror: Das Bild auf dem Bildschirm entspricht dem des Rückblickspiegels.
Automatisches Öffnen des TFT-Bildschirms
Auto: der TFT-Bildschirm öffnet sich automatisch beim Einschalten des Geräts.
Off: der TFT-Bildschirm öffnet sich nur, wenn man, bei eingeschaltetem Gerät, die Taste „Open“ drückt.
Video-Eingang
NTSC: um das Bildschirm-System auf NTSC einzustellen.
PAL: um das Bilschirm-System auf PAL einzustellen.
AUTO: das Bildschirm-System richtet sich nach dem eingehenden Video-Signal und schaltet
automatisch auf das betreffende Format um.
Parken
On: auf dem Bildschirm erscheinen erst dann Bilder, wenn das Auto fertig geparkt ist (und die
Handbremse angezogen ist).
Off: die Bilder erscheinen unbeschränkt immer auf dem Bildschirm.
Video-Ausgang nur im Format NTSC möglich.
P.Vol
P.Vol steht für „programmierbare Lautstärke“
Mit dieser Funktion lässt sich, quellen-abhängig, die gewünschte Lautstärke einstellen.
110
• Quelle
Die laufende Quelle einstellen, deren Lautstärke geregelt werden soll.
• Lautstärke-Stufen
Die Lautstärke lässt sich von -6 bis +6 einstellen.
TS CAL
Falls die Funktionen auf dem Touch-Screen unpräzise oder nicht sensibel genug sind, dann lässt sich der
Touch- Screen nachkalibrieren.
Zu diesem Zweck, den TS-Modus betreten und die erscheinenden Kalibrierungs-Anweisungen nach und
nach durchführen.
EQ
D
Das gesamte Audio-System lässt sich, mit Hilfe der Audio-Kontrollen, schnell und einfach auf die bestmögliche Tonqualität einstellen.
1. Betreten der EQ-Einstellungen
Drückt man die Taste (EQ) auf der Fernbedienung, oder tastet man auf die Ikon (EQ) auf dem Touch-Screen,
so erscheint folgende Tafel auf dem Bildschirm:
Selezione Modalità EQ
Area Fader/Bilanciamento
Parametri EQ
2. Wahl der EQ-Modalität
Die EQ-Funktion ändert sich mit jedem Druck auf die EQ-Taste.
3. Einstellung der EQ-Parameter
Um die EQ-Parameter einzustellen, die EQ-Marke antasten und nach Wunsch verschieben.
4. Einstellung von FADER und BALANCE ( Front-Heck-Rechts-Links )
Die Lautsprecher-Balance lässt sich im Bezug auf Front-Heck-Rechts-Links einstellen, um bestimmte TonEffekte, je nach Innenraum und Geschmack, zu erzielen.
Fader und Balance lassen sich, im Bezug auf Front-Heck-Rechts-Links, einstellen. Zu diesem Zweck, den
weißen Punkt im Fader/Balance-Feld verschieben.
Wichtige Hinweise:
1. Das Gerät verfügt über diverse EQ-Typen: User, Hip-Hop, Dance, Latin, Rave, Urban, Acoustic.
2. Die diversen EQ-Typen unterscheiden sich untereinander im Bezug auf das Niveau der Bässe, Mittel- und
Hochtöne. Die EQ-Parameter sind fest eingegeben und lassen sich, mit Ausnahme der User-Funktion, nicht
ändern.
3. Die EQ-Modalität schaltet automatisch auf die User-Funktion über, wenn die Niveaus von BASS, TREB
und MID verändert werden.
4. Der SUB-Pegel ist ganz für sich alleine einstellbar, denn er steht nicht in Verbindung mit der EQ-Modalität.
111
Problem-erkennung und abhilfen
Hinter möglichen Schwierigkeiten verbergen sich nicht unbedingt ernsthafte Probleme. Deshalb gehen Sie
immer erst folgenden Hinweisen nach, bevor Sie den Kundendienst bzw. Ihren Händler befragen.
Problem Ursache Allgemein
Das Gerät schaltet sich
nicht ein
Die Fernbedienung
funktioniert nicht
Am Audio-Ausgang wenig
oder gar kein Ton
Abhilfe
Gerät-Sicherung ist durchgebrannt
Die Auto-Batteriesicherung ist durchgebrannt
Neue leistungsgerechte Sicherung einsetzen
Funktionen falsch durchgeführt
Reset des Geräts vornehmen
Neue leistungsgerechte Sicherung einsetzen
Batterie ist platt
Neue Batterie einsetzen
Batterie falsch installiert
Batterie korrekt einbauen
Audio-Anschluss nicht korrekt
Kabel kontrollieren und korrekt verbinden
Lautstärke zu gering eingestellt
Lautstärke erhöhen
Lautsprecher kaputt
Lautsprecher ersetzen
Lautstärke-Balance unkorrekt
Kanal-Balance in die Mitte verschieben
Lautsprecher-Kabel haben Kontakt mit
Metallteilen des Wagens
Piraterie-CD eingegeben
Lautsprecher-Leistung stimmt nicht mit
Audio-Qualität gering oder
der Leistung des Geräts überein
gestört
Verbindung falsch
Lautsprecher kurzgeschaltet
Alle Lautsprecher-Kabel gut isolieren
Nur Original-CDs verwenden
Lautsprecher ersetzen
Kabel kontrollieren und korrekt verbinden
Kabel kontrollieren und korrekt verbinden
Mute-Funktion reagiert schlecht Mute-Kabel an Masse angeschlossen
Mute-Kabel kontrollieren und korrekt verbinden
Gerät führt beim Ausschalten Verbindung zwischen ACC und BATT
falsch
ein Reset durch
Kabel kontrollieren und korrekt verbinden
TFT-Monitor
Bildschirm öffnet sich nicht Das automatische Öffnen des Bildschirms ist deaktiviert
automatisch
Störungs-Infos bleiben
Verbindung zur Handbremse ist falsch
konstant eingeschaltet
DVD-Farbsystem stimmt nicht mit
Monitor-System überein
Piraterie-CD eingegeben
Bilder erscheinen gestört
Video-Kabel beschädigt
Verbindungen des Video-Signals nicht
korrekt.
112
Funktion „autom. Bildschirm-Öffnen“ aktivieren
Kabel kontrollieren und korrekt verbinden
Farb-System der laufenden DVD oder
des Monitors ändern
Nur Original-CDs verwenden
Kabel ersetzen
Kabel kontrollieren und korrekt verbinden.
Problem-erkennung und abhilfen
Problem CD lässt sich nicht eingeben
CD wird nicht abgelesen
D
Ursachen Abhilfe
CD-Wiedergabe
CD liegt bereits im Gerät
CD heraus nehmen und eine andere eingeben
CD verformt oder verkratzt
Nur CDs in gutem Zustand verwenden
CD verschmutzt oder nass
CD mit weichem Tuch reinigen
CD nicht kompatibel
Nur kompatible CDs verwenden
CD verkehrt eingelegt
CD mit Etikett nach oben einlegen
Regional-Code-Nr. nicht kompatibel
mit Gerät
Nur CDs mit zulässigem Regional-Code verwenden
PBC nicht möglich bei VCDWiedergabe
PBC auf CD nicht vorgesehen
CDs mit PBC-Funktion verwenden
Funktionen Wiederholung/
Suche nicht möglich bei VCDWiedergabe
PBC aktiviert
PBC ausschalten
Fehler-Meldungen
No disc
CD verschmutzt
CD mit weichem Tuch reinigen
CD verkehrt eingelegt
CD mit Etikett nach oben einlegen
Keine CD vorhanden
CD einlegen
CD verschmutzt
CD mit weichem Tuch reinigen
CD verkehrt eingelegt
CD mit weichem Tuch reinigen
Unknown disc
CD-Format nicht kompatibel mit Gerät
CDs mit kompatiblem Format verwenden
Region error
Regional-Code-Nr. nicht kompatibel
mit Gerät
CDs mit zulässigen Regional-Code-Nr. verwenden.
Bad disc
113
Gerät-Verbindumgen
Anschluss-Hinweise
• Das Gerät eignet sich nur für Fahrzeuge, die mit einer 12-Volt-Batterie ausgestattet sind und den MinusPol auf der Masse haben. Bei etwaiger Verwendung auf Autobussen oder LKWs, vorher unbedingt kontrollieren, ob die Batterie-Spannung fürs Gerät geeignet ist. Im negativen Fall muss ein Spannungswandler
eingesetzt werden, der die Spannung auf 12V bringt.
• Um Kurzschlüsse auf dem Elektro-System zu vermeiden, unbedingt sicherstellen, dass vor der Installation
der Negativ-Pol der Batterie abgetrennt ist.
• Um Kurzschlüsse oder Schäden am Gerät zu verhindern, die Kabel mit Klemmen und Isolierstreifen versehen. Kabel immer an sicheren Stellen verlegen, d.h. fern von Hitze und fern von beweglichen Teilen wie
Gangschaltung, Handbremse, Sitze, damit die Kabel-Isolierung nicht abschmilzt oder sich beschädigt.
• Gelbes Kabels NIE unter die Motor-Haube geben oder an der Batterie anschließen. Es besteht die Gefahr
eines Kurzschlusses am Elektro-System.
• Durchgebrannte Sicherung immer mit einer neuen 10A-Sicherung ersetzten. Das Weglassen der Sicherung, oder das Einsetzen einer unangemessenen Sicherung, können dem Gerät schaden oder Brand verursachen. Falls, nach Einsetzen der angemessenen Sicherung, das elektrische Problem weiterhin besteht,
bitte Ihren Fachhändler befragen.
• Keine weiteren Geräte an der Batterie anschließen, um eine Überhitzung der Batterie zu vermeiden.
• Kontrollieren, dass alle Verbindungen und Kabel gut isoliert sind. Im negativen Fall könnte das Gerät durch
Kurzschlüsse beschädigt werden.
• Falls kein ACC verfügbar ist, das ACC-Kabel, mittels Schalter, mit der Stromzufuhr verbinden.
• Falls ein externer Verstärker angeschlossen ist, dann bitte Kabel „ P.CONT“ NICHT an das Stromkabel
des externen Verstärkers anschließen.
• Die Lautsprecher müssen, für dieses Gerät, eine Mindest-Leistung von 50Watt (bei 4 – 8 Ohm Impedanz)
aufweisen.
Kontroll-Kabel
Automatische Helligkeits-Kontrolle
Um, im Dunkeln, kein zu grelles Display zu haben, muss man das Beleuchtungskabel an ILLUMI anschließen. Beim Einschalten der Lichter ergibt sich dadurch eine angenehm abgeschwächte Display-Beleuchtung. Beim Ausschalten der Lichter wird die Display-Beleuchtung dagegen wieder verstärkt.
Telefon-Stummschaltung
Wenn das Mute-Kabel mit dem Freisprechgerät verbunden ist, dann unterbricht sich das Audio des VM040
immer während des laufenden Telefongesprächs.
Rückwärtsgang
Wenn die Rückfahr-Camera mit dem VM040, und das Kabel mit den Rückwärtsgang-Lichtern verbunden
sind, dann werden, beim einlegen des Rückwärtsganges, automatisch die Bilder der Rückfahr-Camera
sichtbar.
Nach abgeschlossener Rückwärtsfahrt beginnt die Quelle, von der unterbrochenen Stelle aus, wieder zu
spielen.
Handbremse
Wenn das Kabel „BRAKE“ am Handbremsen-Schalter angeschlossen ist, dann wird das Video-Display von
dieser Funktion kontrolliert. Beim Einlegen des Rückwärtsganges schaltet das Video-Display (soweit das
zuständige Kabel angeschlossen ist), direkt auf den CAMERA-Modus um.
Der Bildschirm wird Blau und lässt eine Vorsicht-Mitteilung erscheinen, damit der Fahrer, während der Fahrt,
keine Filme besichtigt. Sind mehrere Bildschirme am Video-Ausgang angeschlossen, dann können die Mitfahrer, ohne Unterbrechung, den Film weiter verfolgen.
114
Gerät-Verbindumgen
D
Kabelverbindungen zur Handbremse
Pink wire BRAKE
Kabelverbindungen zum Rückwärtsgang
115
Einbau und Ausbau
Einbau-Hinweise
1.
2.
3.
4.
5.
6.
7.
Vor der Installation, bitte kontrollieren, dass alle Elektroverbindungen stimmen und das Gerät korrekt
funktioniert. Falsch durchgeführte Verbindungen könnten das Gerät beschädigen.
Immer nur Zubehörteile verwenden, die spezifisch für dieses Gerät entwickelt worden sind. Fremdart
Teile könnten das Gerät beschädigen.
Vor der Installation, unbedingt alle Stromkabel befestigen.
Das Gerät fern von Wärmequellen installieren, um Schäden an Elektroteilen zu vermeiden
(z.B. Laserkopf).
Das Gerät immer waagerecht installieren. Bei einer Neigung von mehr als 30° wird die Leistungsfähigkeit
des Geräts beeinträchtigt.
Um keine Funken entstehen zu lassen, erst den Plus-Pol, dann den Negativ-Pol anschließen.
Die Lüftungs-Öffnung niemals abdecken, denn sonst könnten Schäden am Gerät entstehen, weil die
Wärme nicht aus dem Gerät entweichen kann.
Geräte-Einbau
A-Methode
1. Radio-Halterung in den Radio-Schacht geben. Je nach Schacht-Breite, passende Montage-Zunge wählen. Dann Montage-Zunge, mittels Schraubenzieher, nach Außen biegen und Radio-Halterung
damit im Schacht befestigen.
2. Um die beiden Montage-Bügel jeweils seitlich am Gerät zu befestigen, 2 konus-förmige Schrauben MX5x5 verwenden.
(siehe Abb. 1)
3. Eine weitere Schraube (M5x24) rückwärtig auf dem Gerät einsetzen und mit einer Gummihaube
abdecken (siehe Abb. 2).
(siehe Abb. 2)
4.
Gerät in die Radio-Halterung eingeben. Schraube M4X6 an der Feuer-Schutzwand hinten am
Armaturenbrett, befestigen. Dann weitere 4 Schrauben (M2X2) einsetzen, um die Befestigungsbügel
und Radio-Halterung im Schacht zu befestigen.
Wichtiger Hinweis: Je nach Tiefe des Radio-Schachtes, die angemessenen Bügel wählen. Falls die
Tiefe des Radio-Schachtes besonders gering ist, dann könnte das Gerät bis zu 10mm vom
Armaturenbrett hervorragen.
116
Einbau und Ausbau
D
B-Methode
1. Das Gerät direkt in den Radio-Schacht einschieben.
2. 5 zylindrische Schrauben (M4X3, M5X5) oder 5 konus-förmige Schrauben M5X5 durch
die Montagebügel gut in das Gerät eindrehen.
Befestigung des Anpass-Rahmens
Anpass-Rahmen gegen die Gerät-Front halten, mit den beiden Einkerbungen nach oben gekehrt.
Ausbau
Anpass-Rahmen abnehmen
1. Anpass-Rahmen nach oben drücken und den oberen Teil heraus ziehen.
2. Anpass-Rahmen nach unten drücken und den unteren Teil heraus ziehen.
Gerät wieder ausbauen
1. Die 4 Schrauben (M2x2) lösen.
2. Mittels Schraubenzieher, Montage-Zungen wieder geradebiegen und Gerät aus dem
Radio-Halter herausnehmen.
3. Gerät dabei bitte mit beiden Händen herausziehen.
117
Technische Eigenschaften
General
Reference Supply Voltage............................... 12V(DC)
Operating Voltage Range....................10.5~15.8V(DC)
Max Operating Current...........................................10A
Grounding System...............Car Battery Negative Pole
Installation Dimension
(W×H×D)...................... 178 mm×50mm×(165+25) mm
Installation Angle............................................... 0°~30°
Net Weight........................................................... 2.3kg
FM
Signal Noise Ratio................................................55dB
Residual Noise Sensitivity(S/N=30dB............. 20dBμV
Frequency Response(±3dB..................40Hz~12.5KHz
Station Seeking Level................................ 20~30dBμV
Distortion..............................................................1.5%
Stereo Separation(1KHz.......................................20dB
Antenna Impedance.............................................. 75Ω
TFT Monitor
Screen Diagonal..............................................7 inches
Usable Display Area...................... 154.1(W) × 87.0 (H)
Resolution........................................ 800 (W) × 480 (H)
Brightness....................................................400cd/m2
(Measure the center brightness
after 30 minutes)
Contrast....................................................... 300( TYP. )
Response Time
Rise.............................................................. 12ms
Fall............................................................... 18ms
Viewing Angle
From Top..........................................................40°
From bottom....................................................65°
Horizontally ...................................................±65°
LCD Life Cycle................................ 10000 hours(at 25)
Environment
Operating Temperature...................................................-10~60
Storing Temperature.......................................................-20~70
Residual Noise Sensitivity (S/N=20dB........... 40dBμV Operating Humidity................................45%~80%RH
Selectivity (±9KHz) ..............................................50dB Storing Humidity.....................................30%~90%RH
AM
DVD Player
Signal / Noise Ratio..............................................90dB
Dynamic Range................................................... 90dB
Distortion(line out.................................................0.1%
Frequency Response(±3dB.................... 20Hz~20KHz
Maximum Output Power...................................4×45W
Load Impedance..................................................... 4Ω
Regional-code-nummer
Für die Vermarktung der DVD-Produkte wurde der
Weltmarkt in 6 Regionen aufgeteilt.
Eine DVD ist folglich nur dann Wiedergabe-fähig,
wenn die DVD-Regional-Codenummer mit dem DVDPlayer kompatibel ist.
AUX IN
Distortion..............................................................0.5%
Frequency Response(±3dB.....................20Hz~20KHz
Audio Input Level............................................. 0.4Vrms
Audio
Audio Output Impedance.................................... 200Ω
Audio Output Level............................. 2+0.2Vrms(Max)
(Under normal audio input level and
maximum volume)
Video
Normal Video Input Level(CVBS.....................1.0±0.2V
Video Input Impedance......................................... 75Ω
Video Output Impedance...................................... 75Ω
Video Output Level.........................................1.0±0.2V
(Under normal video input level)
NOTE: Specifications are subject to possible modifications for improvement without further notice.
118
Anhang
D
119
Notas para la Seguridad
1. El aparato está estudiado para funcionar solo y
exclusivamente con una alimentación de 12 Voltios
con el negativo a masa
2. El aparato no tiene que ser instalado en lugares
que puedan comprometer la conducción segura.
3. No visionar la pantalla mientras se está conduciendo, para evitar infringir las normas de circulación
y evitar accidentes de trafico
Durante la conducción el monitor delantero puede
ser usado solo con la retro-cámara, en fase de aparcamiento
del vehículo.
4. No exponer el aparato y relativo amplificador a
humedad, lluvia para evitar chispas o incendios.
5. La sustitución del fusible del cable de alimentación
tiéne que ser efectuado por profesionales del sector.
Fusibles inadaptos pueden estropear el aparato
y causar incendios.
6. Si observas algunos de los siguientes problemas,
apagar inmediatamente el aparato y contactar
con el Servicio de Asistencia Técnica de Phonocar,
o en su lugar el establecimiento donde compro el
aparato:
a) falta de sonido (audio)
b) falta de imagen
c) agua o bien objetos en el interior del aparato
d) humo
e) olores raros
7. Para una conducción segura y para evitar los imprevistos de la carretera, seleccionar siempre un
Volumen medio y agradable.
120
Precauciones
E
1. La apertura y la reparación del aparato tiene que ser ejecutada solo y exclusivamente por personal
especializado.
2. Para eliminar una eventual suciedad en la caratula y en el monitor, usar un trapo limpio y suave con
detergente neutro. No usar trapos gruesos o productos que no son neutros o que contienen alcohol o
disolventes, ya que rayan y estropean los plásticos y lo decoloran.
3. En caso de cualquier anomalía, consultar el listado de los problemas más frecuentes, que se muestra
en este mismo manual.
En el caso que el listado no contempla ninguna información acerca del problema, presionar de todas formas
la tecla RESET, que se encuentra en el frontal, con esta operación el aparato vuelve con los ajustes de
fábrica.
4. En el caso de que el coche se haya quedado estacionado a temperatura demasiado alta o baja, antes
de utilizar el aparato esperar que en el interior del coche se regularice la temperatura.
5. Después de haber encendido la calefacción con el interior del coche demasiado frio sacar el disco
presente en el aparato ya que podrían haberse creado gotas de condensación encima del disco. Limpiar
adecuadamente el disco y volver a posicionarlo en su ubicación. En el caso de que pasadas algunas horas
no funcione, contactar con el servicio técnico.
6. Evitar de golpear violentamente la pantalla LCD cuando está abierta para no dañar el mecanismo interno.
7. Para evitar dañar la pantalla táctil, no utilizar objetos puntiagudos.
8. El monitor utiliza un sistema motorizado automático, no forzar o intentar de sacarlo fuera manualmente
si no queremos dañar el sistema mecánico interno.
9. Para facilitar la comprensión de las funciones y el modo de utilización de este aparato, se utilizaran
Gráficos y dibujos. Se informa de todas formas que algunas de estas ilustraciones pueden ser ligeramente
diferentes de las que se visualizaran en el monitor.
10.Cuando la unidad este en función, será visualizada
o ilegal.
si la operación solicitada no estuviera disponible
11.Utilizar la unidad en modo correcto siguiendo las indicaciones de este manual para prevenir
posibles problemas. La garantía no será valida si el problema ha sido causado por una utilización no correcta.
121
Index
Informaciones Reproducción.................................132-133
Antes de utilizar
Panel frontal ................................................................... 123 Modo USB
Pantalla LCD................................................................... 124 Seleccionar USB como modo de reproducción........ 133
Mando a distancia.......................................................... 125 Controles Pantalla táctil................................................ 133
Teclas de control en la pantalla................................... 133
Funciones Generales
Encendido on/off ........................................................... 126 Parar la reproducción................................................... 133
Mute................................................................................. 126 Interrumpir la reproducción.......................................... 133
Ajuste Volumen .............................................................. 126 Visualización listado de los archivos........................... 133
Menú fuentes ................................................................. 126 Reproducción rápida..................................................... 133
Reproducción fuentes . ................................................. 126 Precedente/Sucesiva .................................................. 133
Visualización hora .......................................................... 126 Cambiar carpeta . ........................................................ 133
Utilización pantalla TFT Táctil ...................................... 126 Repetición reproducción................................................ 133
Reset unidad . ................................................................ 126 Reproducción casual..................................................... 133
Búsqueda Directa........................................................... 133
Modo Radio
Selección para escuchar la radio.................................. 127 Búsqueda GOTO ......................................................... 133
Seleccionar una emisora de radio................................. 127 Zoom in/out..................................................................... 133
Sintonización Automática.............................................. 127 Girar imagen ................................................................. 133
Sintonización Manual o Fine......................................... 127 Informaciones Reproducion.......................................... 133
Guardar Automático....................................................... 127 Otros Modos
Guardar Manual.............................................................. 127 AUX-Cámara-NAV.......................................................... 134
Escansión emisora de radio.......................................... 127 Iconos y sus funciones................................................... 135
Seleccionar las emisoras guardada.............................. 127 Modo telefono/musica................................................... 135
Búsqueda local .............................................................. 127 Emparejamiento.............................................................. 135
Desconectar teléfono.................................................... 135
Operaciones RDS
Función AF..................................................................... 128 Efectuar una llamada..................................................... 135
Función TA .................................................................... 128 Recibir una llamada....................................................... 135
Función PTY................................................................... 128 Transferir la voz en una conversación........................... 136
Servicio Programa......................................................... 128 Ultima llamada................................................................ 136
CT (Horario Reloj).......................................................... 128 Bluetooth Audio.............................................................. 136
RT (Texto Radio) ............................................................ 128 Modo Musica.................................................................. 136
Detalles para la conexión del Bluetooth....................... 136
Modo Lectura Disco
Insertar disco.................................................................. 129 Setup
Expulsión disco............................................................... 129 Como ajustar ............................................................. 137
Control Pantalla táctil..................................................... 129 Generales ....................................................................... 137
Teclas de control presentes el display......................... 129 Idiomas.....................................................................137-138
Pausa reproducción....................................................... 130 Audio................................................................................ 138
Interrumpir reproducción ............................................. 130 Bluetooth, Conexión, Auto-conexión, Cód. Emparejamiento...... 138
Visualización lista de los archivos................................ 130 RDS-CT-TA VOL............................................................. 138
Reproducción rápida...................................................... 130 Bloqueo Parental.....................................................138-139
Cambio pista.................................................................. 130 Ajustes de las conexiones............................................. 139
Cambio carpeta ............................................................. 130 P. VOL-TS CAL................................................................ 139
Repetición reproducción .............................................. 130 EQ............................................................................
140
Repetición A-B................................................................ 130 Troubleshooting.....................................................141-142
Reproducción casual..................................................... 131 Conexiones
Reproducción intro......................................................... 131 Notas para la conexión ................................................. 143
Búsqueda Directa........................................................... 131 Cables para el control de las funciones .................... 144
Búsqueda GOTO .......................................................... 131 Conexiones del cable del freno de mano e marcha atrás 145
Menú DVD y TITLE ........................................................ 131 Instalación y desinstalación
Seleccionar idioma de los subtítulos........................... 131 Notas de instalación . ................................................. 146
Seleccionar Visión multi-angulo ................................... 131 Instalación unidad ...............................................146-147
Seleccionar canal Audio............................................... 132 Instalación cerquillo ...................................................... 146
Función PBC................................................................... 132 Desinstalación ............................................................ 146
Zoom in/out..................................................................... 132 Características técnicas ........................................... 147
Girar imagen................................................................... 132 122Esquema de conexión . ........................................... 148
Antes de utilizar
E
Panel frontal
1. [DISP/PIC] 2. [OPEN/CLOSE]
3. [ /SRC]
4. [VOL/ ]
5. [RESET]
6. [MUTE]
7. [SDHC] 8. [AUX IN]
9. [USB]
10.[ ]
11.[ /TILT+] 12.[ /TILT-] Informaciones en el display - configuración imagen
Abre/ Cierra el panel LCD
Enciende/Apaga la unidad - Cambia modo - Abre el menú principal
Ajuste volumen - Reproducción/Pausa - Contesta a las llamadas
Reinicia con la configuración de fabrica
Mute audio - Colgar teléfono
Ranura para SD card compatible HC
Entrada Auxiliar A/V
Puerta USB
Expulsión disco
Siguiente pista/emisora - Cursor a la derecha - Aumenta el ángulo del displayy
Precedente pista/emisora - Cursor a izquierda - Disminuye el ángulo del display
123
Antes de utilizar
LCD Frontal
1. Indicador Disco – Está encendido cuando está insertado un disco; y apagado Cuando no hay ningún disco en
el interior.
2. Indicador modo repetición - Está encendido cuando el modo repetición está activado; y apagado cuando está desactivado.
3. Área display principal – Muestra los nombres, el tiempo de reproducción, la frecuencia radio, el reloj y más
informaciones textuales.
4. Indicadores status radio – El indicador de estereofonía se enciende cuando la trasmisión radio es en estéreo;
Indicador local se enciende cuando la función búsqueda local está activada
5. Indicador función RDS - AF: Frecuencia Alternativa PTY: Tipo Programa TA: Anuncios sobre el tráfico
TP: Programa Trafico.
Notas
1. Muchas informaciones están visualizadas solo cuando la pantalla esta cerrada. 2. El LCD frontal visualiza las informaciones solo en ingles.
Notas sobre la utilización del Mando a distancia
1. Direccionar el mando a distancia hacia el sensor de la unidad.
2. Quitar la batería del mando a distancia en caso de no utilizarse durante más de un mes.
3. No dejar el mando a distancia a la luz directa del sol, o bien a altas temperaturas ya que podría no funcionar correctamente.
4. La batería puede funcionar durante 6 meses en condiciones normales. Si El mando a distancia no funciona
sustituir la batería.
5. Usar únicamente baterías de litio “de botón” CR2025 (3V).
6. No recargar, desmontar, calentar o exponer las baterías al fuego.
7. Insertar la batería en la posición correcta controlando los polos + y -.
8. Con el fin de evitar accidentes, no dejar al alcance de los niños las batería.
Insertar la Batería
Usar únicamente baterías de litio “de botón”
art. CR2025 (3V). Insertar la batería en el hueco Batería
respetando las polaridad de los polos + y –
Como quitar la batería
Desplazar hacia el exterior la tapa puesta en la
parte inferior del mando a distancia.
Extracción
124
Empujar
Antes de utilizar
E
Mando a destancia
1. Tecla (SRC): Selecciona la fuente que se desea utilizar
2. Tecla (EJECT): extrae el disco
3. Tecla (AUDIO): Selecciona el idioma de los diálogos DVD
4. Tecla (VOL+/-): Ajuste Volumen
5. Tecla (ZOOM): Zoom in/out Imagen
6. Tecla ( /band): Selecciona banda radio - Reproducción ralentizada
7. Tecla (WIDE): Cambia el modo de visualización
8. Tecla ( ): Búsqueda automática/ Precedente/ desplaza el cursor hacia izquierda
9. Tecla ( PRESET
): Cambia la emisora de radio
10. Tasto (EQ): Abre el l menú de configuración del ecualizador
11. Tecla (GOTO/ ): Búsqueda pista - Capitulo especifico Contesta a una llamada
12. Tecla (OPEN/CLOSE): Abertura - Cierre pantalla TFT
13. Tecla (TILT): Ajusta la inclinación del display
14. Tecla (REPT A-B): Repetición A-B
15. Tecla (RPT): Repetición reproducción
16. Tecla (INT): Reproduce los primeros 10 segundos de
cada pista
17. Tecla (RDM): Reproducción casual del soporte
18. Teclas (0-9): Teclado numérico
19. Tecla ( / ): Interrumpe reproducción - Colgar llamada
20. Tecla (DISP/CLEAR) Muestra informaciones de la
reproducción - Borrar las informaciones de reproducción
21. Tecla (
): Atrás rápido - Desplaza el cursor hacia abajo
22. Tecla (PIC): Configuración del imagen
23. Tecla ( ): Búsqueda automática/Siguiente/ Desplaza
el cursor a la derecha
24. Tecla ( ): Reproducción/ Pausa/ Enter
25. Tecla (SETUP): Menú de configuración
26. Tecla ( ): Adelante rápido/ Desplaza el cursor hacia
arriba
27. Tecla (TITLE): Titulo del DVD
28. Tecla (MENU): MENU DVD/ PCB
29. Tecla Tasto (ANGLE): Selecciona ángulo de visión
30. Tecla (SUBTITLE): Selecciona idioma subtítulos DVD
31. Tecla (POWER): Enciende/Apaga la unidad
32. Tecla (MUTE): Pone en mute el audio.
125
Funciones generales
Encendido/apagado
Presionar cualquier tecla en el frontal o presionar la tecla POWER en el mando a distancia para encender la VM041 la
unidad volverá al mismo estado que estaba antes de apagarla. Mantener presionado la tecla SRC durante más de 2
segundos o presionar la tecla POWER en el mando a distancia para apagar la unidad.
Mute
Presionar la tecla [MUTE ] en el frontal o en el mando a distancia para silenciar. Las salidas de audio, durante
el mute el icono correspondiente parpadeara en el display frontal. Presionando la tecla [MUTE ] durante una
conversación se interrumpe la llamada.
Nota: 1. El aumento del volumen elimina la función del MUTE. 2. Durante el muting el icono mute parpadeara
En el display TFT
Mando volumen
Presionar el mando del volumen para iniciar y poner en pausa la reproducción o para contestar a una llamada. Girar el mando en el frontal o presionar las teclas VOL en el mando a distancia para subir o bajar el volumen ( )
Es posible ajustar el volumen de 0 a 40.
Configuración volumen de encendido
El volumen de la unidad en el momento del encendido está ajustado al nivel 10, es posible modificarlo con
esta secuencia: Con la unidad encendida ajustar el volumen al nivel deseado, presionar el mando hasta que el nivel del volumen desaparezca de la pantalla. En el momento que se vuelva a encender la unidad el
nivel de volumen será el mismo que hemos previamente configurado.
Menú fuentes
Presionar la tecla SRC en el frontal, o en el mando a distancia o bien tocar el ángulo en alto a la izquierda de la pantalla táctil para entrar en el menú de selección de las fuentes. Repetir la operación precedente para volver atrás.
Reproducción fuentes
Entrar en el menú fuentes y tocar en la pantalla táctil el icono de la fuente deseada bien desplazarse mediante las
teclas cursor del mando a distancia y presionar las teclas ( / ) - ( / ) para seleccionar.
Nota: 1. Reproducción fuentes se entiende seleccionar el modo de reproducción, ejemplo DVD, Radio, Cámara oct.
2. En el caso de que algunos dispositivos no esten conectados o encendidos no podrán ser seleccionados.
Visualización Hora
Tener presionada la tecla (DISP) en el frontal para pasar de la visualización del reloj a la de la fuente en reproducción
cuando la pantalla táctil este cerrada.
Utilización de la pantalla táctil TFT
Abrir/ Cerrar la pantalla: Presionar la tecla (OPEN / CLOSE) en el frontal o en el mando a distancia para abrir o cerrar la
pantalla
Cambiar el ángulo del monitor: A causa de la naturaleza del mismo LCD, la calidad de la visión varia según la diferente angulación de como se mire la pantalla. El ángulo de la pantalla puede ser modificada; por este motivo se puede
seleccionar el ángulo para obtener la mejor visualización posible. Presionar la tecla (TILT) en la pantalla o en el mando a
distancia para ajustar el ángulo del monitor paso a paso. Teniendo presionado la tecla (TILT) en la pantalla o en el mando
a distancia se ajusta el ángulo del monitor de forma continua. Cambiar el formato de la imagen
Presionar la tecla (WIDE) en el frontal o en el mando a distancia para ajustar el formato de vision de la imagen
1. Entrar en el menú de ajuste de la imagen - Presionar la tecla (PIC) en el mando a distancia 2. Elegir el parámetro que
desea modificar - Presionar las teclas ( / ) en el mando a distancia 3. Ajustar el valor según la propia preferencia
presionando las teclas ( / ) en el mando a distancia 4. Salir del modo de ajuste de la imagen - Para salir, repetir el
primer pasó o interrumpir la operación durante algunos segundos.
Reset de la unidad
Si la unidad no funciona correctamente, se aconseja hacer un reset de la unidad presionando La tecla (RESET) en el frontal
126
Modo radio
E
Seleccionar para escuchar la Radio
Abrir el Menú Fuentes y a continuación presionar el icono Radio en la pantalla táctil.
Seleccionar una emisora de radio
Presionar la tecla (BAND) en el frontal o en el mando a distancia, o bien presionar el icono (BAND) en la pantalla táctil
para elegir la Banda radio entre FM1, FM2, FM3, AM1 e AM2.
Sintonización Automática
Presionar las teclas ( / ) en el frontal. O en el mando a distancia, o en el icono de la pantalla táctil ( / ). Para
buscar las emisoras precedentes o siguientes. Para interrumpir la búsqueda, presionar las demás teclas de la sección radio.
Nota: Cuando se recibe una emisora de radio, la búsqueda se para y la emisora a continuación se escucha. Si
la unidad recibe una trasmisión estéreo, se ilumina el indicador de la estereofonía “ST” en la pantalla táctil o en el
display frontal.
Sintonización Manual o Fine
Durante la sintonización manual, la frecuencia cambiará por paso de 50 Hz. Presionar las teclas ( / ) en el
mando a distancia o los iconos ( / ) en la pantalla táctil para obtener una sintonía fine. Seleccionar el icono del
teclado numérico de la pantalla táctil y a continuación seleccionar los pulsantes numéricos para insertar los números
de la frecuencia radio.
Guardar las emisoras en Automático
Solo las emisoras con suficiente señal se encuentran y se pueden memorizar. Cuando el monitor está cerrado, tener
presionado la tecla (AS/PS) en el frontal. Cuando el monitor está abierto, seleccionar en la pantalla táctil el icono (AS).
Para interrumpir el guardado automático, presionar otras teclas de la sección radio.
Nota: 1. Después del guardado automático, las emisoras precedentemente guardadas serán sobre escritas - 2. La
unidad tiene 5 bandas, que son FM1, FM2, FM3 AM1, AM2 y cada banda puede memorizar 6 emisoras; por lo
tanto la unidad puede memorizar 30 emisoras en total. Repetir la operación para cada una de las bandas.
Guardar las emisoras de forma Manual
Cuando se encuentra una emisora radio que se busca.… 1. Presionar el icono (MEM) en la pantalla táctil y se abrirá
el menú de las memorias. 2. Presionar una tecla entre P1 e P6. 3. Si se desea salir presionar la tecla (EXIT)
Escansión de las emisoras de radio
La escansión de las emisoras de radio es una función que permite la escucha durante 5-10 segundos de cada emisora. La unidad continua el proceso de escansión hasta que no haya sido recorrido toda la Banda.
Cuando el monitor está cerrado presionar la tecla (AS/PS) en el frontal. Cuando el monitor está abierto, presionar el
icono (PS) en la pantalla táctil. Para interrumpir el proceso presionar cualquier tecla de la sección radio.
Seleccionar las emisoras memorizadas
Presionar una tecla del teclado numérico de las emisoras de radio de 1 a 6. En el mando a distancia o en la pantalla
táctil para seleccionar la emisora correspondiente.
Búsqueda Local
Cuando la búsqueda esta activada, solo se encontraran las emisoras locales con una fuerte señal. Para activar o
desactivar la función LOCAL, tener presionado el mando del volumen en el frontal.
Nota: 1. Cuando la búsqueda local de las emisoras esta activada, el indicador luminoso “LOC” se enciende; y se
apaga cuando está desactivada. 2. El numero de las emisoras que se pueden recibir disminuirá en el momento que
activemos la búsqueda local.
127
Operaciones RDS
La unidad ofrece funciones base de RDS, incluido PI (Identificación Programa), Nombre emisora radio, RT
(texto Radio), CT (Reloj) AF (frecuencia alternativa), TA (anuncios de trafico y PTY (Tipo Programa).
Función AF
La lista de las frecuencias alternativas (AF) es utilizada en combinación con el código PI (Identificación Programa Radiofónico) para favorecer la sintonización automática de la nueva frecuencia. Usando estas informaciones, la radio puede buscar automáticamente una frecuencia que está trasmitiendo la misma emisora.
Esta función es útil cuando la emisora que estamos escuchando pierde la señal y está presente una frecuencia alternativa.
Para activar la función AF, seleccionar en la pantalla táctil la tecla (AF). Para borrar esta función, presionar
nuevamente.
Nota: Durante el paso automático de la emisora, alguna interferencia puede ser recibida. Apagando la
función AF se resuelve este problema. El numero de las emisoras que pueden ser recibidas disminuirá
sensiblemente después de que la función AF haya sido activada.
Función TA
La función TA (anuncios de tráfico) permite al VM041 de recibir en automático los anuncios de tráfico
Independientemente del tipo de fuente que estamos escuchando. Una vez activada la función TA es posible
recibir una información de trafico TP desde las emisoras de radio que lo trasmitan.
Cuando TA está activado y viene individuado en la banda FM un anuncio de trafico, la reproducción en
curso viene puesta en segundo plano por el anuncio es decir que el anuncio tiene prioridad.
El indicador TA se enciende, indicando que la unidad está en espera del anuncio. La unidad vuelve a la
reproducción original después de terminar el anuncio. Para activar la función TA, seleccionar la tecla (TA) en
la pantalla táctil. Para interrumpir esta función, presionar nuevamente (TA).
Función PTY
PTY (tipología programa) es un código que define el tipo de programa en reproducción (Ej. News o Rock)
En la pantalla serán visualizadas 6 opciones PTY. Para visualizar más, presionar la barra de posición.
Lateral y las flechas en la pantalla. Cuando una opción PTY ha sido seleccionada, inicia la búsqueda
automática. De las siguientes PTY disponibles hasta que no encuentra la sucesiva emisora que corresponda a la de origen. Si ningún PTY ha sido encontrado, la unidad volverá a la emisora de origen.
Servicio Programa (PS)
Pre-escucha y escansión de las emisoras que puede recibir el dispositivo.
CT (Hora Reloj)
Algunas emisoras trasmiten la hora y la fecha en la señal RDS. La hora se ajusta automáticamente
Cuando CT ha sido configurado en ON. La hora se actualiza cada vez que se sintoniza una emisora en
RDS, muy a menudo la hora visualizada no es correcta. Para evitar de obtener la visualización
de la hora incorrecta se aconseja de posicionar CT en OFF y efectuar manualmente el ajuste correcto
de la hora.
RT (Texto Radio)
Cuando la función está activada, la unidad visualizará mensajes cortos de datos transmitidos por el proveedor, como informaciones sobre la emisora, el nombre de la canción que se está escuchando o del artista.
128
Modo lectura disco
E
Teclas de control presentes en el display
Icona
Teclado
numerico
Teclado
numerico
Teclado
numerico
Carpeta
sucesiva
Carpeta
precedente
Teclado
numerico
Teclado
numerico
Teclado
numerico
Carpeta
sucesiva
Carpeta
precedente
Introduccion de un disco
Una vez introducido el disco la unidad se pone automáticamente en modo disco.
Notas:
Verificar que no sea presente ningún disco en el interior de la unidad antes de introducir otro
Algunos soportes grabables como CD-R, CD-RW, DVD-R, DVD+R, DVD-RW, DVD+RW no pueden ser
reproducido en el caso de haber sido grabados con un sistema no compatible con el lector o bien si las
grabaciones no han sido cerradas por el programa de grabación.
Para las precauciones en la utilización del disco, hacer referencia a las indicaciones que se indican en el
manual.
Expulsion del disco
Presionar la tecla EJECT en el panel frontal o en el mando a distancia para sacar el disco.
Es posible sacar el disco también con la unidad apagada, quedara tal también después de sacar el disco.
129
Modo reproducción disco
Controles pantalla tactil
En la pantalla se encuentran unas áreas para el control de la reproducción del DVD:
A- Abre el menú fuentes principales
B- Muestra las informaciones de reproducción
C- Muestra el menú de gestión de la reproducción en la pantalla
en sobreimpresión
Pausa reproducción
Presionar la tecla ( ) en el frontal, en el mando a distancia, o bien presionar el icono en la pantalla táctil.
Para volver a la reproducción presionar nuevamente.
Interrumpir la reproducción
Presionar la tecla (
) en mando a distancia o bien el icono en la pantalla táctil. Cuando viene presionado
la primera vez el punto de interrupción viene memorizado y desde este mismo punto volverá la reproducción mediante la tecla (
) . El caso de presionar dos veces la tecla ( ) la reproducción iniciará desde el
inicio y no más desde que se interrumpió anteriormente.
Visualización lista archivo
Para visualizar la lista de los archivos presentes en el disco grabado interrumpir la reproducción
Reproducción rápida
Presionar las teclas ( / ) repetidamente en el mando a distancia o en la pantalla táctil para cambiar la
velocidad de la reproducción.
Cambio Pista
Presionar las teclas ( / ) en el frontal, en el mando a distancia o bien en la pantalla táctil para pasar a la
pista/canción precedente o sucesiva.
Cambio carpeta
Presionar los iconos ( DIR+ ) / ( DIR-) en la pantalla táctil (se aconseja de interrumpir la reproducción
en el caso que se este visualizando un video o una foto) para cambiar la carpeta durante la reproducción de
un disco grabado que contie más de una carpeta.
Repetición Reproducción
Presionar la tecla (RPT) repetidamente en el mando a distancia o abrir el menú teclas en la pantalla táctil
y seleccionar la tecla ( ) repetidamente para modificar el modo de repetición como en la tabla de aquí
abajo:
Nota:
Tipo di disco Modalità Ripetizione
1. Cuando un VCD está siendo
reproducido, esta función no es
posible si el PBC está activado
2. Apagando la unidad o cambiando
el tipo de reproducción se anula
esta función.
130
Modo reproducción disco
E
Repetición A-B
Cuando un DVD, VCD o CD esta siendo reproducido, es posible reproducir repetidamente
el contenido comprendido entre los puntos A y B. Presionar la tecla (RPT A-B) en el mando a distancia o
abrir el menú tecla en la pantalla y después seleccionar. Las teclas (A-B) para determinar el punto de inicio
del intervalo. Hacer la misma operación para determinar el fin del intervalo de repetir. El contenido del intervalo será repetido en continuación. Hacer la misma operación por tercera vez para interrumpir esta función.
Reproducción casual
Cuando la función está activada, el contenido del disco será reproducido en secuencia casual.
Presionar la tecla (RDM) en el mando a distancia repetidamente o abrir el menú teclas en la pantalla
y presionar la tecla ( ) repetidamente en la pantalla táctil para cambiar el modo de repetición entre Random,
Random repeat, Repeat off.
Reproducción intro
Cuando esta función está activada, la unidad reproducirá los primeros 10 segundos de cada pista
de un CD o DVD. Se puede buscar el archivo deseado usando esta función.
Presionar la tecla (SCN) en el mando a distancia para activar esta función. Hacer la misma operación
para interrumpir esta función.
Búsqueda directa
Cuando un disco DVD, VCD o CD se está reproduciendo se puede buscar un especifico capitulo / pista
presionando las teclas numéricas del mando a distancia. Por ejemplo, si se desea seleccionar la pista 15,
se puede presionar las teclas numéricas 1 y 5.
Búsqueda GOTO
Entrar en el modo de búsqueda GOTO
1. Presionar la tecla (GOTO) en el mando a distancia o abrir el menú búsqueda.
Con los DVD, se puede hacer la búsqueda por titulo capitulo y tiempo.
Con los VCD, si la función PBC está desactivada, se puede efectuar la búsqueda
por tiempo; si la función PBC está activada, se puede efectuar la búsqueda por archivo por pista o tiempo.
Con los CD, se puede efectuar la búsqueda por pista.
Con los archivos MPEG, se puede efectuar la búsqueda por pista/ canción o tiempo.
Con los discos grabados que contienen MP3 o archivos Jpeg, se puede efectuar la búsqueda por pista
(número de archivo).
2. Entrar en la búsqueda informaciones.
Seleccionar los objetos presionando las teclas direccionales en el mando a distancia
y entrar en la búsqueda informaciones presionando las teclas numérica, como el titulo, el capitulo
y el tiempo.
3. Confirma. Presionar la tecla (Enter) en el mando a distancia para confirmar
4. Salir de la búsqueda GOTO. Repetir la operación mencionada hasta que el menú de búsqueda no desaparece o presionar la tecla (Exit) en la pantalla tactil.
Menú DVD y Titulo
Esta funcion está disponible para los DVD que tienen el “Menú/ Title”. Presionar la tecla (MENU/TITLE) en el
mando a distancia o abrir el menú tecla en la pantalla y presionar la tecla (MENU)
En la pantalla táctil para abrir el DVD. Se Puede elegir el idioma del audio y de los subtítulos de la reproducción. Presionar la tecla (TITLE) en el mando a distancia o abrir el menú teclado en la pantalla táctil y
presionar la tecla (TITLE) en la pantalla táctil para abrir DVD TITLE. Es posible elegir diferentes títulos para
la reproducción.
Selección idioma y subtítulos
Presionar la tecla (SUBTITLE) repetidamente en el mando a distancia o abrir el menú teclado en la pantalla
táctil y presionar repetidamente la tecla (SUBTITLE) en la pantalla táctil para elegir el idioma de los subtítulos.
131
Modo reproducción disco
Selección visión multi-angulo
Presionar repetidamente la tecla (ANGLE) en el mando a distancia para seleccionar el ángulo de visión
durante la reproducción del DVD o del archivo de video que contiene esta función multi-angulo.
Seleccionar el canal Audio
Para los DVD que contienen el archivo multilingüe, presionar repetidamente la tecla (AUDIO) en el mando a
distancia o abrir el menú teclado en la pantalla táctil y presionar repetidamente la tecla (AUDIO) para cambiar el idioma de los diálogos.
Para CD y VCD, presionar repetidamente la tecla (AUDIO) en el mando a distancia o abrir el menú teclado
en la pantalla táctil y presionar repetidamente la tecla (AUDIO) en la pantalla táctil para pasar a los diferentes
modos de los canales de audio como Voz izquierda, voz derecha, mono izquierdo, mono derecho, Estéreo.
Nota: Canal izquierdo y canal derecho no pueden funcionar correctamente. Si los archivos no están grabados de forma correcta.
Función PCB
Esta Funcion está disponible en los discos VCD con función PCB (Vers 2.0 o más recientes).
Presionar la tecla (MENU) en el mando a distancia para activar esta función. Presionar nuevamente para
interrumpirla.
Nota: Cuando el PCB está activado, la reproducción vuelve a la lista pistas y arranca de la primera pista o
canción. Cuando el PCB esta activado, Reproducción veloz, ralentizada o salta están disponibles mientras
repitas la reproducción busca un capitulo o pista concreta están prohibidas.
Si se ejecuta la función reproducción casual, escancion o búsqueda reproducción cuando el PBC está
activado, PBC se parará automáticamente.
Zoom in/out
Para desanchar o hacer más pequeñas una imagen reproducida, presionar el icono ( ) en el mando a
distancia o abrir el menú teclado en la pantalla, presionar el icono ( ) en la pantalla táctil.
Girar una imagen
Cuando un archivo se está visualizando, se puede girar la imagen para obtener el correcto ángulo De visión
presionando el icono ( ) en la pantalla táctil.
Informaciones Reproducción
Presionar la parte superior de la pantalla LCD cuando un DVD o un VCD se está reproduciendo y las informaciones de la reproducción serán visualizadas en la parte superior.
Para DVD
1. Tipo de Disco
2. Informaciones titulo DVD. “5/8” indica que este DVD tiene 8 títulos y el titulo que está actualmente en
reproducción es el quinto.
3.Informaciones Capitulo DVD. “2/16” indica que el corriente titulo tiene 16 capítulos Y que el capitulo actualmente en reproducción es el segundo.
4. Tiempo que queda del titulo actualmente en reproducción.
5.“
” indica que los subtítulos de este DVD están predispuestos en 6 idiomas y que aquella visualizada es la segunda es decir en ingles.
132
Modo reproducción disco
E
Para VCD
1. Tipo de Disco
2. Indicador función PCB. “PCB On” indica que la función PCB está activada.
3. Informaciones Pista VCD. “6/18” indica que este VCD tiene 18pistas y la pista actualmente en reproducción es la sexta.
4. Tiempo que queda de la pista corriente.
Modo USB-SD/CARD
Seleccionar USB o SD/CARD como fuente en reproducción
Selecciona SD/USB como fuentes de reproducción en los siguientes modos:
1. Presionar la tecla repetidamente hasta encontrar la fuente deseada
2. Abrir el menú fuentes principales y seleccionar SD Card o USB
Nota: 1. La unidad pasa al modo USB cuando un dispositivo USB esta introducido. - 2. La unidad
soporta hot swap (Lectura rápida del soporte) - 3. Los dispositivos de memoria USB que hayan sido formateados con sistema FAT16/32 pueden ser compatibles por este lector. Mientras que el sistema NTFS no es
compatible por este dispositivo.
Controles de la pantalla táctil
Reproducción casual
Teclas de control en la pantalla
Introducción reproducción
La operación es la misma del modo disco.
Las teclas de control en la pantalla son los mismos
del modo disco.
Suspender la reproducción
La operación es la misma que del modo disco.
Interrumpir la reproducción
La operación es la misma que del modo disco.
Visualizar la lista de los archivos
La operación es la misma que del modo disco.
Reproducción rápida
La operación es la misma que del modo disco.
Precedente/ Sucesiva
La operación es la misma que del modo disco.
La operación es la misma que del modo disco.
La operación es la misma que del modo disco.
Búsqueda directa
La operación es la misma que del modo disco.
Búsqueda GOTO
La operación es la misma que del modo disco.
Zoom In/ out
La operación es la misma que del modo disco.
Gira la Imagen
La operación es la misma que del modo disco.
Información reproducción
La operación es la misma que del modo disco.
Cambia Carpeta
La operación es la misma que del modo disco.
Repetición reproducción
La operación es la misma que del modo disco.
133
Otro Modos
AUX
Los dispositivos externos con salidas RCA audio y video pueden ser conectados con la unidad.
Para entrar en el modo AUX IN, abrir el Menú fuentes y seleccionar AUX IN.
El VM041 está dotado de 2 entradas AUX IN audio-video:
AUX IN 2 está ubicado en el retro de la autorradio permite conectar dispositivos con salidas RCA y esta
pensado para la instalaciones de dispositivos fijos.
AUX IN 1 puesto en el frontal, permite conectar indiferentemente dispositivos con salidas RCA o bien con
Jack de 3,5 mr. Esta entrada está indicada especialmente para dispositivos portables a continuación se
detalla el esquema del conector Jack 3,5 mm.
Cámara
Una retro cámara exterior puede ser conectada a la unidad. La fuente en reproducción pasará en modo
“Cámara” automáticamente cuando el coche procede. En Marcha atrás.
NAV
Es posible escuchar el audio de una fuente de audio como radio, DVD, CD o USB/SD card manteniendo la
pantalla en modo de navegación (OPTIONAL NV003).
En este modo cuando el navegador nos indica cualquier información sobre la navegación el volumen del
audio musical se reduce y la voz del navegador se sobrepone a la música
Una vez seleccionada la fuente musical mantener presionada durante 2 segundos la tecla [DISP] en el
frontal o bien durante 2 segundos la tecla [WIDE] en el mando a distancia.
El VM041 se desplazará a la ventana de navegación manteniendo invariado el audio.
Sistema BLUETOOTH - Software 2.0 (OPTIONAL 6/860)
El sistema Bluetooth es una trasmisión sin cables y para cortas distancias (hasta 10m).
El accesorio 6/860 permite conectar el proprio teléfono movil con sistema bluetooth con software hasta
el 2.0 a la unidad VM041.
Después de la conexión es posible controlar el propio teléfono movil directamente desde la unidad.
134
E
Otro Modos
Iconos y sus funciones
= Emparejamiento
= Configuración
Menu = Menú
= Reproducción/Pausa
= Pista precedente
=
=
=
=
=
Descolgar
Transferir llamada
Respuesta llamada/Efectuar llamada
Interrupción reproducción
Modo teléfono
=
=
=
=
=
Teclado numérico
Silencia el audio
Interrumpir llamada
Pista siguiente
Modo Música
Modo telefono o musica
El modulo bluetooth tiene dos funciones: teléfono o música.
Presionar en la pantalla el icono ( ) o ( ) para pasar al modo correspondiente.
En modo teléfono la unidad opera como un manos libres de forma que puede enviar y recibir llamadas.
En modo música es posible escuchar las canciones presentes en el movil mediante el VM041 en el equipo
de música del coche.
El modo Música funciona exclusivamente en los móviles con tecnología AD2P. Si presente la función
AVRCP será posible controlar desde la unidad la música presente en el propio teléfono movil.
Emparejamiento
Utilizar la funcion "PAIRING" para establecer una conexión entre la unidad y el teléfono movil.
Presionar la tecla "SRC" repetidamente en el panel inferior o bien presionar el la pantalla el icono BT en el
menú "SOURCE" para entra en el modo bluetooth.
Una vez presionado PAIR en la pantalla aparecerá "WAITING FOR PAIRING".
Activar la función bluetooth en el movil, teniéndolo a no más de 3 metros de la unidad e iniciar la búsqueda de nuevos dispositivos bluetooth.
Después de algunos segundos en el display del teléfono aparecerá el nombre del modulo bluetooth
"PHONOCAR". Seleccionar y introducir el codigo"1234" cuando le será solicitado.
Autorizar el dispositivo para que se conectes automáticamente si lo solicita el mismo teléfono movil.
Una vez configurado la conexión, perfectamente en la pantalla del VM041 aparecerá "PAIR OK".
La unidad está lista para efectuar y recibir llamadas.
Desconexion telefono
En el caso de querer desconectar el móvil del VM041 después de haber efectuado la conexión presionar
“( )” en la pantalla aparecerá “EXIT PAIR”
Efectuar una llamada
Componer el numero que deseamos llamar mediante el teclado numérico del monitor
Presionar la tecla ( ) en el monitor o bien en el mando a distancia para efectuar la llamada.
Presionar la tecla de ( ) en el monitor o bien en el mando distancia para terminar la llamada.
Recibir una llamada
Cuando el teléfono está conectado con el VM041 en cada llamada entrante la pantalla entra en modo
Bluetooth.
Presionar ( ) en la pantalla o bien en el mando a distancia para contestar la llamada.
Presionar ( ) en la pantalla o bien en el mando a distancia para terminar la llamada.
135
Otro Modos
Traslado de la voz en la conversacion
Durante la conversación es posible escuchar la voz de nuestro interlocutor de forma privada trasladando
la voz desde el manos libres de la unidad a lo del teléfono móvil y al revés. Presionar ( ) para trasladar el
audio al móvil y presionar nuevamente para volver al sistema de manos libres.
Llamada anterior
Presionando la tecla ( ) en la pantalla o bien mediante en el mando a distancia se visualizará la ultima
llamada efectuada o recibida.
Bluetooth audio
El VM041 puede recibir señales audio estéreo vía bluetooth si el dispositivo que transmite (teléfono movil o
otra fuente) tiene la función A2DP e AVRCP.
ATENCION
Por obvias razones de seguridad evitar en el limite del posible de hablar al teléfono mientras se conduce.
Algunos teléfonos trasfieren la voz de la conversación solo después de que haya sido activada la llamada.
Modo musica
AD2P
A2DP es la definición de Perfil Avanzado de Difusión Audio.
El teléfono móvil que soporta esta función permite la transmisión en estéreo de la señal audio.
Algunos teléfonos soportan la transmisión audio pero no en estereofonía.
AVRCP
AVRCP es la definición de Perfil de control remoto Audio Video. El teléfono movil que soporta esta función
permite el control de la reproducción musical directamente de la Unidad.
Durante la reproducción musical es posible efectuar una llamada digitando el numero y presionando ( ).
Al mismo tiempo aparece en la pantalla “DIALING”. Terminada la llamada, en la pantalla aparece “MUSIC
PLAYING”. No todos los teléfonos móviles permiten el control remoto de la reproducción.
En el caso de recibir una llamada durante la reproducción musical en la pantalla aparecerá “PHONE NUMBER ANSWER?”. Presionar ( ) para contestar.
Algunas precisaciones para conexiones buetooth
1. Durante los test, los teléfonos NOKIA N7x, N9x, PHILIPS, Sony Ericsson y SAMSUNG, después de la
indicación en la pantalla del movil de emparejamiento efectuado, en la pantalla del VM041 queda visualizada “WAITING FOR PAIRING” como si la unidad no hubiese todavía terminado la configuración del acoplamiento. Es necesario buscar en la lista de los dispositivos asociados del movil el modulo “SUN-BNA 19” y
conectarlo manualmente, a este punto en la pantalla aparecerá “PAIR OK”.
De no ser así no será posible escuchar ninguna voz durante la conversación aun si por el teléfono la
conexión está habilitada. Algunos teléfonos como los de PHILIPS, durante la reproducción musical en
AD2P es necesario buscar En la listas de los dispositivos asociados el modulo “SUN-BNA 19” y efectuar la
conexión manualmente (Verificar siempre si el teléfono es compatible con las funciones AD2P y AVRCP).
2. Algunos teléfonos una vez configurada la conversación privada (audio no trasladada al VM041) no se
vuelven a conectar automáticamente y es necesario efectuar manualmente la conexión desde la lista de
los dispositivos asociados del teléfono movil.
3. Si después de haber efectuado la conexión automática con un dispositivo con función AD2P no se escucha el audio estéreo, verificar que haya sido activada en el dispositivo la transmisión audio bluetooth.
Algunos teléfonos una vez establecida una conversación privada (audio no trasferido al VM041) no se
vuelve a conectar automáticamente por tal motivo es necesario efectuar manualmente la conexión desde la
lista de los dispositivos asociados del movil. En el caso de haber efectuado la conexión automática con un
dispositivo con función AD2P y no se oye el Audio estéreo, verificar que haya sido activado en el dispositivo
la transmisión audio bluetooth.
ATENCION: El protocolo de comunicación de este Bluetooth es 2.0 verificar si el Software es compatible
con su teléfono móvil.
136
Setup
E
Configuración unidad
1. Entrar el modo SETUP
Presionar la tecla (SETUP) en el mando a distancia o A
. brir el menú del teclado en la pantalla tactil y presionar el icono ( ) en la pantalla táctil.
El menú siguiente aparecerá cuando se entra en el modo configuraciones.
El sub-menú general está presente.
2. Seleccionar un sub-menú
Presionar las teclas direccionales en el mando a distancia
3. Seleccionar un elemento
Presionar las teclas (
) en el mando a distancia para seleccionar un elemento y presionar la tecla
( ) para confirmar
4. Seleccionar un valor .Presionar las teclas (
) en el mando a distancia para seleccionar un elemento y presionar la tecla ( ) para confirmar.
Nota: Las siguientes configuraciones pueden ser modificadas directamente en la pantalla táctil.
Generales
•
•
•
•
Modo Reloj
12 H: el reloj visualiza el horario del tipo de 12 horas ejemplo 11:18 AM
24 H: el reloj visualiza el horario del tipo de 24 horas ejemplo 20:18
Reloj
Ajustar el horario visualizado en el ángulo en alto a la derecha de la pantalla TFT
Región Sintonizador
La unidad dispone de varios sistemas de radio y se puede seleccionar el correcto sistema radio en base al propio País. Para España seleccionar Europa.
Beep
On: Sonido de las teclas activado
Off: Sonido de las teclas desactivado
Idioma
•
•
•
•
OSD .Seleccionar un idioma en el menú sistema
Audio DVD S
. eleccionar el idioma de los diálogos del DVD
Nota: Si el DVD no contiene el idioma seleccionado, los diálogos en reproducción
serán en el idioma de base.
Subtítulos DVD
Seleccionar el idioma de los subtítulos del DVD
Nota: Si el DVD no contiene el idioma seleccionado, los subtítulos visualizados serán en el idioma de base.
Menú disco
Seleccionar un idioma para el menú DVD
Nota: Si el DVD no contiene el idioma seleccionado, el Menú del DVD será en el idioma de base.
137
Setup
Audio
•
•
•
•
DRC
Configura el intervalo dinámico del Dolby Digital del Disco.
On: Reproducción audio más dinámica con graves
Off: Salida Normal
Loudness
On: Modo Loudness activado
Off: Modo Loudness desactivado
Subwoofer
On: Activa subwoofer
Off: Desactiva subwoofer
Filtro Sub
Se puede obtener diferentes efectos de los graves cuando se configura
Los cortes de frecuencias del filtro sub. En b
. ase a la acústica y al equipo del coche, seleccionar
la frecuencia apropiada. Están disponibles 80 Hz, 120 Hz e 160 Hz.
Bluetooth ON/OFF E. nciende /Apaga el modulo bluetooth
Connect ON/OFF Activa/Desactiva la respuesta automatica
Autoanswer
AUTO El modulo bluetooth se conecta automáticamente nada mas el teléfono se encuentre en su radio de acción.
MANUAL El modulo bluetooth se conecta manualmente desde el teléfono.
Pairing code
Es el código necesario para autorizar el modulo bluetooth a la conexión. El código de fábrica es el 1234.
RDS RDS ON/OFF Función RDS Activa/Desactiva
CT Recepción automática del señal horario mediante RDS activa/desactiva
TA VOL
Seleccionar el volumen deseado para las demás fuentes de audio.
Se puede seleccionar un volumen entre 0 y 10
TUNER REGION
La unidad permite la recepción de los diferentes sistemas de señales de radio. Es posible seleccionar el
sistema correcto seleccionando el propio País.
Nivel de Protección
En algunos DVD esta se ha introducido un bloqueo con el fin de que los niños no puedan
Ver las películas o capítulos de violencia o de sexo.
• Configurar la password .La password de origen de la unidad esta vacía. Se aconseja de introducir una
nueva password como indicado:
Método cambio password:
1. Posicionar el cursor en la opción password, presionar el teclado numérico en el mando a distancia o presionar .La opción password en la pantalla táctil, presionar el teclado numérico para introducir la password
(primero la password inicial) y después confirmar
2. Repetir la operación como indicada para introducir la nueva password de 6 caracteres y a continuación
confirmar la nueva .password ha sido registrada y el bloqueo familia esta cerrado.
138
Setup
E
Nivel de protección.
La unidad dispone de los siguientes niveles de visión:
1. Seguro para los niños: Valoración de una película que es adapta para los niños
2. G: Valoración de una película que permite la visión a personas de todas las edades
3. PG: Valoración de una película que permite la visión a todas las personas de todas las edades
pero que aconseja la visión a los niños solo si acompañados por los padres.
4. PG-13: Valoración de una película que permite la visión a personas de todas las edades, pero se aconseja
A los niños inferiores de los 13 años ser acompañados por los padres.
5. PG-R: ……
6. R: Valoración de una película que permite la visión solo a personas mayores de una determinada edad
, normalmente.17 años, o que sean acompañados por un padre o tutor.
7. NC-17: Valoración de una película que permite la visión solo a personas mayores de 17 años
8. Adult: Valoración de una película adapta solo para el público adulto
Modo para cambiar el nivel de protección
1. Introducir la password para desbloquear la protección familia Posicionar el cursor en la opción password, presionar las teclas numéricas en el mando a distancia O bien presionar la opción de password en
la pantalla táctil, presionar las teclas numéricas para introducir la password (primero la password inicial) y
después confirmar.
2. Cambiar el nivel. Seleccionar un nivel de protección adapto en la lista que se indica.
3. Cerrar el bloque familia. la operación del primer paso para introducir la password de 6 caracteres (nueva
o vieja y después confirmar El bloqueo familia está cerrado.
• Ajustes de fábrica
Para restablecer los ajustes de fabrica relativas a la reproducción de un DVD (Ejemplo Audio o subtítulos)
Presionar sobre la opción (RESET).
Ajustes con relación a las conexiones
•
•
•
Abertura automática pantalla TFT.
Auto: el panel TFT se abre automáticamente cuando se enciende la unidad.
Off: El panel TFT se abre solamente cuando se presiona la tecla Open con la unidad encendida.
Entrada Video.
NTSC: configura el sistema de la pantalla TFT en NTSC.
PAL: configura el sistema de la pantalla TFT en PAL.
AUTO: configura el sistema de la pantalla TFT automáticamente en base al formato de la señal de video
en entrada
• Estacionamiento
On: Las imágenes se visualizan en la pantalla solo después que el coche está estacionado
(Freno de mano introducido).
Off: las imágenes se visualizan siempre.
La salida video esta disponible solo en formato NTSC.
P.VOL
P.VOL significa Volumen programable
Se puede ajustar el volumen según la fuente con esta función
• Fuente
Seleccionar la fuente en reproducción que deseamos ajustar el volumen
• Nivel
Es posible ajustar el nivel del volumen de -6 a +6.
TS CAL
Cuando las funciones en la pantalla se manifiestan poco sensible o no exacta, se puede calibrar la pantalla
táctil con esta función.
Calibrar la pantalla táctil siguiendo las indicaciones después de entrar en el modo TS CAL.
139
Ajustes de EQ
Los ajustes del Audio permiten modificar con facilidad el sistema audio para obtener el mejor sonido posible.
1. Entrada en modo Ajustes EQ
Presionando la tecla (SEL) en el mando a distancia o seleccionando el icono (EQ) en la pantalla táctil será
visualizado el siguiente esquema.
Selezione Modalità EQ
Area Fader/Bilanciamento
Parametri EQ
2. Selección Modo EQ
Seleccionar repetidamente la barra EQ y el modo EQ cambiará.
3. Ajustes de los parámetros EQ
Para ajustar los parámetros EQ, seleccionar y desplazar las barras de los parámetros EQ.
4. Ajuste del fader frontal/trasero/ derecho/ izquierdo y balance
Se puede ajustar el balance frontal/trasero/ derecho/izquierdo de los altavoces para obtener efectos
especiales en la escucha en base al ambiente sonoro y a los gustos de cada uno.
Para ajustar el fader frontal/trasero/ derecho/ izquierdo y el Balance, seleccionar y desplazar el pequeño punto
blanco en el área de ajuste Fader/ Balance.
Nota:
1. La unidad esta dotada de algunas ecualizaciones pre configuradas tipo: User, Rock, Hip Hop, Dance, Latin,
Rave, Urban, Acoustic.
2. Las diferentes ecualizaciones del sonido se diferencian entre ellas por tener niveles de graves,
agudos o medios diferentes. Los parámetros de los modos EQ no se pueden modificar ya que están prefijados de fábrica, con la excepción del modo User que se puede modificar.
3. Los modos de EQ pasan automáticamente a User cuando se modifican los niveles de BASS, TREB o MID
4. El nivel del sub es independiente de los modos de EQ y se puede modificar según la propia necesidad.
140
Problemas causas y remedios
E
A veces lo que puede parecer un problema serio, en muchas ocasiones no es tan grave como parece
Seguir los siguientes puntos antes de llamar el Servicio Técnico.
Problemas Causas General
La unidad no se enciende
El mando a distancia
no funciona
Volumen bajo o ausente
en la salida audio
Remedios
El fusible de la unidad se ha quemado
Reponer el fusible con el mismo valor de origen
El fusible de batería de coche se ha quemado
Operaciones no correctas
Reponer el fusible con el mismo valor de origen
Batería descargada
Batería instalada en modo incorrecto
Cambiar la batería
Instalar la batería correctamente
Conexión audio equivocado
Controlar los cableados y corregir
Volumen ajustado demasiado bajo
Aumentar el volumen
Altavoz estropeado
Sustituir el altavoz
Balance volumen no correcto
Ajustar el balance hacia el centro
Controlar el cableado del los altavoces que
no entren en contacto con las partes
metálicas del coche.
Disco copia pirata en uso
Calidad audio baja o con La potencia soportada por el altavoz no
corresponde a la de la unidad
disturbios
Conexión incorrecta
El altavoz está en cortocircuito
Mal funcionamiento Mute El cable del mute está conectado a la masa
del coche
La unidad no mantiene
en memoria los ajustes
realizados cuando se apaga Conexión incorrecta entre ACC e BATT
el coche
Resetear la unidad
Aislar todos los cableados de los altavoces
Usar discos originales
Sustituir los altavoces
Controlar el cableado y corregir
Controlar el cableado y corregir
Controlar el cableado y corregir
Controlar el cableado y corregir
Monitor TFT
El monitor no se abre
automáticamente
La abertura automática de la pantalla TFT
está desactivada
Activar la función de abertura automática
Pantalla TFT
Las Informaciones de alerta están
continuamente visualizadas.
La conexión al freno de manos
es incorrecta
Controlar el cableado y corregir
Imágenes con disturbios
aparecen en el monitor.
El sistema de los colores del DVD no
coincide con lo de la pantalla
Disco copia pirata en uso
Modificar el sistema de los colores del DVD
en uso o del monitor
Cableado Video estropeado
Cambiar los cables
Conexiones señal de video incorrectas
Controlar los cableados y corregir
141
Usar discos originales
Problemas causas y remedios
Continua Mensajes de error
Problema Causas Reproducción disco
No se introduce el disco
El disco no se puede leer
La función PBC que no se
puede utilizar durante la
reproducción VCD
Funciones Repetición
y Búsqueda que no se
pueden utilizar durante la
reproducción del VCD
Remedios
Existe ya un disco en el interior
Extraer el disco e introducir uno nuevo
Disco deformado o rallado
Usar discos en buenas conducciones
Disco sucio o mojado
Limpiar los discos con un paño
Disco no compatible
Usar discos compatibles
Disco introducido al revés
Código Región no compatible
con la unidad
Introducir el disco con la etiqueta hacia arriba
Usar discos con códigos regionales correspondientes
PBC no disponible en el disco
Usar discos dotados de PBC
PBC activado
Apagar PBC
Messaggi di errore
No hay disco
Disco sucio
Limpiar los discos con un paño suave
Disco al revés
Introducir el disco con la etiqueta hacia arriba
No disco
Introducir un disco
Disco sucio
Limpiar el disco con un paño
Disco al revés
Introducir el disco con la etiqueta hacia arriba
Disco desconocido
Formato disco no compatible
con esta unidad
Usar discos con el formato compatible
La Region del disco no es
compatible
Código Región no compatible
con esta unidad
Usar discos con el código regional correspondiente.
Disco malo
142
Conexiones
E
Nota sobre las conexiones
• Esta unidad ha sido proyectada para ser instalada en vehículos con batería de 12 volt y negativo a masa
(tierra). Antes de instalar la unidad en un autobús o un camión asegurarse que el voltaje de la batería es
apropiado para este uso, de lo contrario hay que instalar un trasformador de corriente que convierte el
voltaje a 12 V.
• Para evitar corto circuitos en el sistema eléctrico, asegurarse que el cable negativo de la batería esté
desconectado antes de la instalación.
• Para evitar el corto circuito y daños al aparato, bloquear los cables con terminales y cinta adhesiva.
Pasar los cables en lugares seguros lejos de lugares donde puedan sobrecalentarse evitando de tocar
partes del coche que se mueven como el freno de mano, cambio o asientos con el fin de evitar que el aislamiento del cable se derrite o se corte.
• Nunca pasar el cable amarillo a través del orificio de instalación en el espacio del motor y conectarlo a la
batería, se corre el riesgo de un corto circuito con la batería.
• Sustituir con un fusible de 10 A, cuando el viejo está roto, no usar fusibles con amperaje superior ya que
puede causar daños a la unidad e incluso causar un incendio si también después de instalar el correcto
fusible el problema persiste, contactar con un instalador especializado.
• Non conectar otros equipos a la batería para evitar el sobrecalentamiento de la batería
• Verificar que todas las conexiones y los cables están bien aislados. De lo contrario la unidad se puede
dañar debido a un corto circuito.
• Si no está disponible ACC, conectar el cable ACC a la alimentación mediante un interruptor.
• Si un amplificador externo está conectado, no conectar el cable P.CONT al cable alimentación de un
amplificador externo.
• Se aconseja tener instalados altavoces de 50 W con una impedancia de 4-8 Ohm.
Cables para el control funciones
Auto iluminación
Para evitar que el display tenga demasiado luz nocturna, conectar el cable de iluminación al terminal
ILLUMI, de este modo encendiendo la luz se bajará la iluminación de la pantalla o al revés.
Mute del teléfono
Si el cable MUTE esta conectado al manos libres del movil, el audio del VM041 se interrumpe durante la
conversación telefónica.
Marcha atrás
Si a la marcha atrás está conectada una retro cámara, con el VM041 tenemos la posibilidad de ver en la
pantalla la parte trasera del coche.
Una vez terminada la maniobra de aparcamiento el aparato vuelve al mismo punto donde se había interrumpido
Freno de mano
Si el cable “PRK SW” esta conectado con el interruptor del Freno de Mano, el display video será controlado
por esta función. En el caso de activación de la marcha atrás (si el cable relativo esta conectado) En el caso
de activación de la marcha atrás el display video pasará en modo CAMERA. (Si el cable esta correctamente
conectado el monitor mostrará la pantalla azul con advertencias para evitar que el conductor se entretenga
en ver los contenidos durante la conducción, mientras que los pasajeros pueden seguir viendo los programas si hay en el coche más monitores conectados a la salida de video.
143
Conexiones
Freno de mano: conexiones
Cable freno de mano
Cable rosa BRAKE
Batería
Carrocería
coche
Piloto freno
Palanca freno de mano
Pedal freno de mano
Marcha atrás: Conexiones
Alimentación señal marcha atrás
Carrocería
coche
Cable rosa
REVERSE
Batería
Carrocería
coche
Cambio
144
Instalación-desinstalación
E
Nota de instalación
1. Antes de la instalación, verificar que hayan sido efectuadas correctamente las conexiones
y que la unidad funcione normalmente. Conexiones equivocadas pueden dañar la unidad
2. Utilizar solamente accesorios idoneos y específicos para esta unidad
3. Antes de la instalación fijar todos los cables de alimentación
4. No instalar la unidad en lugares próximos a fuentes de calor
para evitar sobrecalentamiento de los componentes eléctricos como el lector de laser
Instalar la unidad horizontalmente ya que instalandola con una inclinación superior a 30 grados
se compromete el normal funcionamiento del aparato.
Para evitar chispas, conectar antes el polo positivo y a continuación el negativo
No obstruir las tomas de aire del aparato ya que no se asegura la correcta disipación del calor
generado internamente por el aparato. En el caso de no respetar esta advertencia se pueden
verificar daños al aparato
Instalación unidad
Método A
1. Introducir el soporte metálico de la radio, elegir las chapitas de montaje lateral que mejor se ajusten,
doblando las chapitas hacia el exterior con un destornillador para fijar el soporte metálico al hueco
2. Usar 2 tornillos con la cabeza a cono MX5x5 para fijar las dos barras en los 2 lados del aparato
(Ver imagen 1)
Linguetta di
montaggio
Immagine 1
3. Atornillar un tornillo M5X24 en la parte posterior del aparato con su soporte en goma
(Ver imagen 2)
Cruscotto
Guaina in gomma
Gabbia di montaggio
Linguetta di montaggio
Immagine 2
4. Introducir la unidad en el soporte metálico, fijar el tornillo M4X6 a la faja anti incendio en la parte posterior de la plancha, y usar los 4 tornillos M2X2 para bloquear las fajas de ensamblaje al soporte metálico en
posición en base a la profundidad de la abertura, usar diferentes dimensiones de las barras de fijación
Si la abertura es demasiado poco profunda, el monitor puede salir fuera del salpicadero de 10 mm.
145
Instalación-desinstalación
Método B
1. Introducir la unidad directamente en el hueco
2. Posicionar los 5 tornillos cilíndricos M4X3, M5X5 o a forma de cono M5X5 mediante los agujeros
De las fajas de montaje en el interior de los agujeros de la unidad Y fijar bien los tornillos
Staffa di montaggio
Cruscotto
Instalación cerquillo
Enganchar el cerquillo alrededor del frontal….
Desinstalación
Desmontar el cerquillo
1. Empujar el cerquillo embellecedor hacia arriba y tirar la parte superior.
2. Empujar el cerquillo hacia abajo y tirar la parte inferior.
Desmontar la unidad
1. Destornillar los 4 tornillos M2x2”.
2. Usar un destornillador para doblar las chapitas en su posición natural y a continuación extraer el soporte metálico.
Rimuovi la guaina in gomma
Svitare le 4 viti
3. Sacar el soporte de la unidad con ambas manos.
146
Características técnicas
Generales
Reference Supply Voltage...........................................12V(DC)
Operating Voltage Range.............................. 10.5~15.8V(DC)
Max Operating Current.......................................................10A
Grounding System........................Car Battery Negative Pole
Installation Dimension
(W×H×D)................................178 mm×50mm×(165+25) mm
Installation Angle.............................................................0°~30°
Net Weight......................................................................... 2.3kg
FM
Signal Noise Ratio.............................................................55dB
Residual Noise Sensitivity(S/N=30dB........................20dBµV
Frequency Response(±3dB........................... 40Hz~12.5KHz
Station Seeking Level............................................20~30dBµV
Distortion.................................................................................1.5
Stereo Separation(1KHz...................................................20dB
Antenna Impedance............................................................75Ω
E
TFT Monitor
Screen Diagonal............................................................7 inches
Usable Display Area..................................154.1(W) × 87.0 (H)
Resolution....................................................1440 (W) × 234 (H)
Brightness..................................................................400cd/m2
(Efectuar la medida del brillo después
de 30 minutos)
Contrast.....................................................................300( TYP. )
Response Time
Rise..............................................................................12ms
Fall................................................................................18ms
Viewing Angle
From Top.........................................................................40°
From bottom..................................................................65°
Horizontally ..................................................................±65°
LCD Life Cycle............................................10000 hours(at 25)
Ambiente
Residual Noise Sensitivity (S/N=20dB...................... 40dBµV
Selectivity (±9KHz) . ..........................................................50dB
Operating Temperature...................................................-10~60
Storing Temperature.......................................................-20~70
Operating Humidity...........................................45%~80%RH
Storing Humidity................................................30%~90%RH
DVD Player
Codigo region
AM
Signal / Noise Ratio...........................................................90dB
Dynamic Range................................................................ 90dB
Distortion(line out...............................................................0.1%
Frequency Response(±3dB.............................. 20Hz~20KHz
Maximum Output Power..............................................4×45W
Load Impedance....................................................................4Ω
En base a la división de las vendidas de los DVD el mundo
ha sido subdividido en 6 regiones.
Un DVD puede ser reproducido solo cuando el código
regional es compatible con el lector en uso.
AUX IN
Distortion.............................................................................0.5%
Frequency Response(±3dB...............................20Hz~20KHz
Audio Input Level..........................................................0.4Vrms
Audio
Audio Output Impedance................................................ 200Ω
Audio Output Level........................................ 2+0.2Vrms(Max)
(Nivel de entrada audio normal y al máximo volumen)
Video
Normal Video Input Level(CVBS............................... 1.0±0.2V
Video Input Impedance.......................................................75Ω
Video Output Impedance...................................................75Ω
Video Output Level..................................................... 1.0±0.2V
(Nivel entrada audio normal)
NOTA: Las características técnicas están sujetas a cambios o a variaciones sin preaviso.
147
Esquema de conexión
148
NOTE / NOTES
149
E
NOTE / NOTES
150
S.p.A. - Via F.lli Cervi, 167/C - 42124 Reggio Emilia (Italy) - Tel. ++39 0522 941621 - Fax ++39 0522 942452
www.phonocar.com - e-mail:[email protected]
FRANCE
Vente et Assistance assurées par le Fabricant italien Tél/Fax N° Vert 0800.90.43.99
www.phonocar.fr • e-mail:[email protected]
DEUTSCHLAND
71711 - MURR - Rudolf Diesel Strasse, 13 - Tel. 07144 82302-0 / Fax 07144 282114
www.phonocar.de - e-mail:[email protected]
ESPAÑA
Delegado Comercial Sr. VERDERESE DOMENICO
Tel. 958 302295 - Fax 958 302470 - Movil 607592406
e-mail: [email protected]