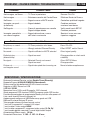
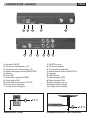
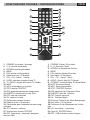
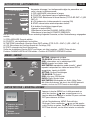
1
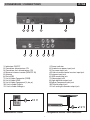
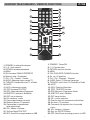
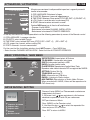
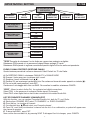
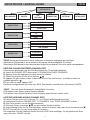
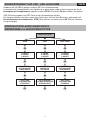
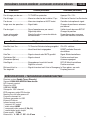
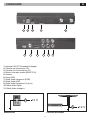
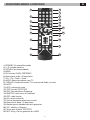
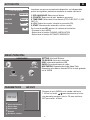
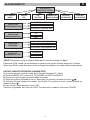
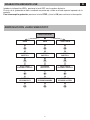
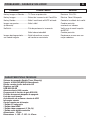
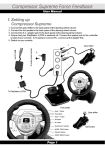
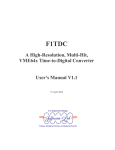
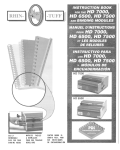
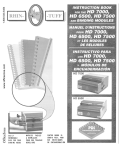
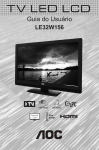
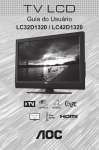
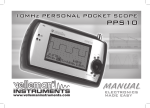
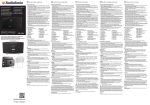
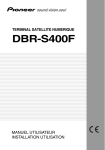
DVB-T RICEVITORE DIGITALE PER AUTO CAR DIGITAL TUNER ITALIANO ENGLISH FRANÇAIS DEUTSCH ESPAÑOL MANUALE ISTRUZIONI INSTRUCTIONS MANUAL NOTICE DE MONTAGE ET D’EMPLOI GEBRAUCHSANWEISUNGEN MANUAL DE INSTRUCCIONES VM 209 CONNESSIONI / CONNECTIONS IT/GB ANT IN 1 2 3 4 USB CVBS OUT HDMI OUT 6 7 8 ANT IN 5 pb Y L pr COAXIAL R 9 10 11 1. Power indicator 2. Quadrate car power input jack 3. Car power input jack 4. External remote control receiver input jack 5. Antenna input jack 6. USB connecting jack 7. Video output jack 8. High-definition output jack 9.Y,pb,pr,Component input jack 10. Coaxial output jack 11. Left and right channels output jack 1. Indicatore ON/OFF 2. Connettore alimentazione 12V 3. Connettore Jack alimentazione 12V 4. Sensore infrarossi remoto (REMOTE IN) 5. Antenne 6. Porta USB 7. Uscita Video Composito (CVBS) 8. Uscita Video HDMI 9. Uscita Video Component (Y, pb, pr) 10. Uscita Audio Digitale 11. Uscita Audio Analogica 12 V 12 V Alimentazione / Power Collegamento antenne / Aerial connection 2 FUNZIONI TELECOMANDO / REMOTE FUNCTIONS 1 IT/GB 10 11 12 2 13 3 14 15 4 16 5 17 6 18 19 7 20 21 8 9 22 1. STANDBY: Pause/ON 2. 0 – 9: Number keys 3. RETURN: previous function 4. MENU 5. FAV: FAVOURITE-CHANNEL-function 6. Go up +10 positions 7. CH+ / CH-: Channel+ / Channel8. AUDIO: Select TV-Channel Language 9. TV/RADIO: switch from TV-Channels to Radio 10. MUTE 11. INFO: Channel-Information 12. TEXT: TELETEXT-function 13. EPG: Electronic Programme Guide 14. SUBTITLE: select Subtitles 15. EXIT: leave function 16. OK: confirm selection 17. Direction-keys for movements within Menu 18. Go down +10 positions 19. Commands for reproduction of recorded tracks 20. VOL: Volume+ / Volume – 21. Keys for TELETEXT-Menu 22. REC: Start/Pause recording-process on USB 1. STANDBY: In attesa/Accensione 2. 0 – 9 : tasti numerici 3. RETURN: funzione precedente 4. MENU 5. FAV: funzione CANALE PREFERITO 6. Muove in alto +10 posizioni 7. CH+ / CH-: Canale+ / Canale – 8. AUDIO: Seleziona lingua canale TV 9. TV/RADIO: Cambia da canali TV a Radio 10. MUTE 11. INFO: informazioni canale 12. TEXT: funzione TELETEXT 13. EPG: Guida elettronica Programmi 14. SUBTITLE: seleziona i Sottotitoli 15. EXIT: uscita funzione 16. OK: conferma scelta 17. Frecce spostamento nei menù 18. Muove in basso +10 posizioni 19.Comandi per la riproduzione delle registrazioni 20. VOL: Volume +/Volume 21. Tasti per Menù TELETEXT 22. REC: Avvia/Ferma registrazione su USB 3 ATTIVAZIONE / ACTIVATIONS Alla prima accensione è indispensabile impostare i seguenti parametri tramite telecomando: First Installation OSD Language IT/GB ENGLISH COUNTRY Europe Time Zone GMT+1 LNC ON Start 1. OSD LANGUAGE: Seleziona la lingua 2. COUNTRY Seleziona il paese di appartenenza 3. TIME ZONE: Seleziona il fuso orario (IT-FR-D-SP GMT +1) (GR GMT +2) 4. LCN: Ordina i canali durante la scansione (ON) 5. START: Memorizzazione automatica canali Qualora NON apparisse la finestra d’Installazione: - Premere il tasto MENU - Selezionare la funzione CHANNEL INSTALLATION - Selezionare la funzione AUTOMATIC RESEARCH. At the very first switch-on, it is indispensable to set the following parameters by means of the Remote-control: 1. OSD LANGUAGE : Language-selection 2. COUNTRY: select related Country 3. TIME ZONE: select related GMT-zone (IT-FR-D-SP = GMT +1); (GR = GMT +2) 4. LCN: ranges the channels while scrolling (ON) 5. START: automatic channel-memorization For the case that the Installation-window should NOT appear: - Press MENU-key - Select function CHANNEL INSTALLATION - Select function AUTOMATIC RESEARCH MENU’ PRINCIPALE / MAIN MENU HOME MENU IMPOSTAZIONI PLAYSTATON TELEVISORE RADIO DISCO IMPOSTAZIONI: Impostazioni di Sistema TELEVISORE: Visione della televisione DISCO: Informazioni periferica USB RADIO: Ascolto stazioni radio PLAYSTATION: Riproduzione Audio-Video*-Foto Riproduce solo video in formato PVR se registrati dal VM209 SETTING: System Set-Up TELEVISION: watching TV DISK: Information on USB-drive RADIO: Listening to Radio-stations MULTIMEDIA: Reproduction of Audio-Video-Pictures When recorded with VM209, Videos will be reproduced in PVR-format only. IMPOSTAZIONI / SETTING • Impostaz. di sistema •Imposta video • Imposta audio • Sistema •Gestione canali • • • • • • Premere il tasto (MENU) sul Telecomando e selezionare impostazioni di sistema. 1. Utilizzare i tasti per posizionarsi sulla funzione desiderata e premere il tasto OK per confermare. EXIT per ritornare al Menù. Press (MENU) on the Remote-control 1. Use direction-keys to select the requested function and press OK to confirm. Press EXIT to return to MENU. 4 IMPOSTAZIONI / SETTING IT/GB IMPOSTAZIONI SISTEMA SYSTEM SETUP LINGUA OSD OSD LANGUAGE IMPOSTAZIONI VIDEO VIDEO SETTING IMPOSTAZIONI AUDIO AUDIO SETTING INSTALLAZIONE INSTALLATION GESTIONE CANALI CHANNEL EDIT CITTÁ COUNTRY LCH TIME ZONE ZONA ORARIO SUMMER TIME INFORMAZIONI SYSTEM INF. FABBRICA FACTORY RESET SISTEMA TV / TV SYSTEM USCITA HD / HD OUTPUT FORMATO VIDEO / SCREEN RATIO LR SPDIF* RICERCA MANUALE / MANUAL SEARCH RICERCA AUTOMATICA / AUTO SEARCH AGGIORNAMENTO/USB UPGRADE TV CHANNELS RADIO CHANNELS *SPDIF Permette di selezionare l’uscita Audio per connessione analogica o digitale. Selezionare PCM quando si è in presenza di segnali Stereo analogici (2 canali. Selezionare RAW quando si vogliono connettere dispositivi digitali all’uscita audio corrispondente. ELENCO CANALI PREFERITI (GESTIONE CANALI) Questa funzione permette di creare un elenco dei Canali Preferiti sia TV che Radio. A. Da GESTIONE CANALI, selezionare CANHALE TV o CANALE RADIO B. Premere il tasto rosso, per visualizzare tutti i canali. C. Scegliere i favoriti utilizzando i tasti . D. Premere OK per inserire ogni canale nella Lista. Per conferma a fianco del canale apparirà un simbolo ( E. Per uscire dal menù premere il tasto EXIT. Confermare il salvataggio della lista con SAVE. Per annullare la modifica selezionare CANCEL. ). *SPDIF Allows to select Audio-Exit, for analogical and digital connections. Select PCM, in the presence of analogical Stereo-signals (2 channels). Select RAW when digital devices have to be connected to the related Audio-Exit. LIST OF FAVOURITE CHANNELS (CHANNEL EDIT) With this function, you can create a Favourite-Channels List, both for TV and Radio. A. Starting from CHANNEL EDIT, select TV-CHANNELS or RADIO-CHANNELS. B. Press red key, to visualize all channels. C. Use direction-keys and select your Favourite channel. D. Press OK , each time you introduce a channel into the List. As a confirmation, a symbol will appear near the channel in question. E. To leave the MENU, press EXIT. Now confirm the recorded List, by pressing SAVE. To disregard the List-changes, press CANCEL. 5 REGISTRAZIONE SU USB / RECORDING ON USB IT/GB Inserire USB e premere il tasto REC sul telecomando. L'inizio della registrazione verrà segnalata da un punto rosso visibile in alto a sinistra dello schermo. Interruzione della registrazione: premere il tasto STOP e il tasto OK per confermare l'interruzione. Insert the USB-stick and press REC on the Remote-control. When recording-process starts, a red dot will appear on the left top corner of the screen. To Pause the recording-process: press STOP , then OK to confirm interruption. RIPRODUZIONE AUDIO/VIDEO/FOTO REPRODUCTION OF AUDIO/VIDEO/PICTURES MENU PLAYSTATION AUDIO VIDEO FOTO / PHOTO OK OK OK CARTELLA A: A: FOLDER CARTELLA A: A: FOLDER CARTELLA A: A: FOLDER OK OK OK SELEZIONA CARTELLA SELECT FOLDER CARTELLA PVR PVR FOLDER SELEZIONA CARTELLA SELECT FOLDER SELEZIONA TRACCIA SELECT TRACK SELEZIONA REGISTRAZIONE SELECT RECORDING SELEZIONA FOTO SELECT PHOTO OK OK OK 6 PROBLEMI - CAUSE E RIMEDI / TROUBLESHOOTING Problema Possibili Cause IT/GB Rimedi No Immagine, no Suono.............TV-Tuner in protezione Premere CH+/CH- No Immagine..............................Selezione scorretta del Canale/Paese Effettuare Reset e/o Ricerca. No Suono...................................Segnale scarso o MUTE inserito Controllare qualità del segnale. Immagine con punti....................Segnale debole (a diamante) Cambiare posizione o antenne non idonee No Segnale.................................Paese di appartenenza non corretto Segnale troppo debole Verificare dal menù SETUP Cambiare posizione Immagine spezzettata ...............Segnale discontinuo a causa con suono irregolare dell’auto in movimento Spostarsi in una zona con copertura maggiore Problem Possible Causes Remedies No picture, no sound..................TV-Tuner protection shut-down Press CH+/CH- No picture...................................Wrongly selected Channel/Country Effect RESET and/or Search. No sound....................................Signal insufficient or MUTE selected Check signal-quality. Dotted picture............................Signal too weak (diamond-like) Change position or check aerial suitability. No signal.....................................Selected Country not correct Signal too weak Check SETUP-Menu. Change position. Picture cut..................................Signal interrupted due to moving car and irregular sound Move to better-reception area SPECIFICHE / SPECIFICATIONS: Sistema di ricezione/Receiver system Double Tuner (Diversity) Supporta/Support H.264/AVC,MPEG4 Video decode Riceve canali ad alta definizione HD/HD channels receiver Registra su USB / Record on USB USB MAX 32 GB Memorizza fino a 1000 canali/Storage for 1000 channels Guida programmi EPG-funzione PIG/EPG programs guide-PIG function Funzione memoria dopo lo spegnimento/Memory function after power-off Lista canali favoriti/Favourite channels list Aggiornamento software via USB/Software up-grade via USB Sensore IR esterno/External IR sensor Telecomando infrarossi/Infrared remote control 1 uscita A/V composita/1 composit A/V output 1 uscita video/1 video output HDMI 1 uscita video component/1 component video output (Y, Pb, Pr) 1 uscita audio digitale coassiale/1 coaxial digital audio output Alimentazione/Power supply 12 Vdc Dimensioni/Dimensions L. 185 - P. 125 - H. 45 mm 7 CONNECTIONS • ANHANG FR/D ANT IN 1 2 3 4 USB CVBS OUT HDMI OUT 6 7 8 ANT IN 5 pb Y L pr COAXIAL R 9 10 1. Indicateur ON/OFF 2. Connecteur d’alimentation 12V 3. Connecteur Jack d’alimentation 12V 4. Capteur infrarouges remote (REMOTE IN) 5. Antenne 6. Porte USB 7. Sortie Vidéo composite (CVBS) 8. Sortie Vidéo HDMI 9. Sortie Vidéo Component (Y, PB, PR) 10. Sortie Audio numérique 11. Sortie Audio Analogique 11 1. ON/OFF-Leuchte 2. 12V-Stromverbinder 3. 12V-Jack-Stromverbinder 4. Infrarot Remote-Sensor (REMOTE IN) 5. Antennen 6. USB-Öffnung 7. Video-Ausgang CVBS 8. Video-Ausgang HDMI 9. Video-Ausgang Y, pb, pr 10. Digigal-Audio-Ausgang 11. Analog-Audio-Ausgang 12 V 12 V Alimentazione / Power Collegamento antenne / Aerial connection 8 FONCTIONS DES TOUCHES • TASTENFUNKTIONEN 1 FR/D 10 11 12 2 13 3 14 15 4 16 5 17 6 18 19 7 20 21 8 9 1. STANDBY: en attente / allumage 2. 0 – 9: touches numériques 3. RETURN: fonction précédente 4. MENU 5. FAV: fonction chaîne préférée 6. Déplace en haut +10 position 7. CH+ / CH-: chaîne + / chaîne8. AUDIO: sélectionne langue chaîne TV 9. TV / RADIO: change, de chaînes TV à Radio 10.MUTE 11.INFO: informations sur la chaîne 12.TEXT: fonction TELETEXT 13.EPG: guide électronique des programmes 14.SUBTITLE: sélectionne les sous-titres 15.EXIT: sortir de la fonction 16.OK: confirme le choix 17.flèches pour parcourir le menu 18.Déplace en bas +10 positions 19.Commandes pour la reproduction des enregistrements 20.VOL: Volume+ / Volume21.Touches pour le menu TELETEXT 22.REC: Commence / interrompt l’enregistrement sur USB 22 1. STANDBY: Warten / Einschalten 2. 0 – 9 : Nummern-Tasten 3. RETURN: vorhergehende Funktion 4. MENÜ 5. FAV: Lieblings-Sender (Favoriten) 6. Nach oben +10 Positionen 7. CH+ / CH- : Kanal+ / Kanal8. AUDIO : Sprach-Wahl für TV-Sender 9. TV/RADIO : Umstell-Schalter TV-Sender/Radio 10.MUTE (Stummschaltung) 11.INFO : Kanal-Informationen 12.TEXT : TELETEXT-Funktion 13.EPG: elektronischer Programm-Führer 14.SUBTITLE: Wahl der Untertitel 15.EXIT: Funktion verlassen 16.OK : Wahl bestätigen 17.Richtungs-Tasten für die Menü-Bewegungen 18.Nach unten +10 Positionen 19.Funktionen für die Wiedergabe der Aufnahmen 20.VOL: Lautstärke + / Lautstärke 21.Tasten für TELETEXT-Menü 22.REC: USB-Aufnahme starten/stoppen 9 ACTIVATIONS • AKTIVIERUNG FR/D Au premier allumage, il est indispensable régler les paramètres suivants à travers la télécommande: 1. OSD LANGUAGE: sélectionne la langue OSD Language ENGLISH 2. COUNTRY: sélectionne le pays d’appartenance 3. TIME ZONE: Sélectionne le fuseau horaire (IT-FR-D-SP GMT +1) (GR COUNTRY Europe GMT +2) 4. LCN: ordonne les chaînes pendant le scanning (ON) 5. START: mémorisation automatique des chaînes Time Zone GMT+1 Si la fenêtre d’installation n’apparaît pas, -Appuyer la touche MENU LNC ON -Sélectionner la fonction CHANNEL INSTALLATION Start -Sélectionner la fonction AUTOMATIC RESEARCH. Bei der ersten Inbetriebnahme müssen unbedingt folgende Parameter, auf der Fernbedienung, eingegeben werden: 1. OSD LANGUAGE: Sprache wählen 2. COUNTRY: das betreffende Land wählen 3. TIME ZONE: betreffende Uhrzeiten-Zone (GMT) wählen (IT-FR-D-SP = GMT+1) (GR = GMT +2) 4. LCN: Einsortieren der Kanäle während des Scrollings (ON) 5. START: automatische Kanal-Speicherung Sollte das Installations-Fenster NICHT erscheinen, wie folgt vorgehen: - MENÜ-Taste drücken Funktion CHANNEL INSTALLATION wählen - Funktion AUTOMATIC RESEARCH wählen. First Installation MENU • MENÜ HOME MENU IMPOSTAZIONI PLAYSTATON TELEVISORE RADIO DISCO SETTING: réglages du système TELEVISION: vision de la télévision DISK: informations sur la périphérique USB RADIO: écouter les stations radio MULTIMEDIA: reproduction audio-visuelle* - photo* reproduit uniquement les vidéos en format PVR si enregistrées à partir du VM209 SETTING: System-Einstellungen TELEVISION: TV-Ansicht DISK: Infos zum USB-Antrieb RADIO: Radio-Sender hören MULTIMEDIA: Wiedergabe von Audio-Video-Fotos Alle Video-Aufnahmen, die durch den VM209 gemacht wurden, sind nur im PVR-Format zu besichtigen. IMPOSTATIONS • EINSTELLUNGEN • • • • • Impostaz. di sistema Imposta video Imposta audio Sistema Gestione canali • • • • • • Appuyer la touche (MENU) sur la télécommande se servir des touches pour se positionner sur la fonction désirée et appuyer la touche OK pour confirmer EXIT pour retourner au Menu. Auf der Fernbedienung, MENÜ-Taste drücken. Richtungs-Tasten verwenden , um auf die gewünschte Funktion zu gehen. Dann mit OK-Taste bestätigen. EXIT-Taste drücken, um das Menü wieder zu verlassen. 10 IMPOSTATIONS • EINSTELLUNGEN FR/D SYSTEM SETUP OSD LANGUAGE COUNTRY LCH TIME ZONE SUMMER TIME SYSTEM INF. FACTORY RESET TV SYSTEM VIDEO SETTING HD OUTPUT SCREEN RATIO AUDIO SETTING LR SPDIF* MANUAL SEARCH INSTALLATION AUTO SEARCH USB UPGRADE CHANNEL EDIT TV CHANNELS RADIO CHANNELS *SPDIF permet de sélectionner la sortie audio pour la connexion analogique ou numérique. Sélectionner PCM quand on est en présence de signaux stéréo analogiques (2 chaînes). Sélectionner RAW quand on veut brancher des dispositifs numériques à la sortie audio correspondante. LISTE DES CHAINES PREFEREES (CHANNEL EDIT) Cette fonction permet de créer une liste des chaînes soit TV que Radio préférées. A. A partir de CHANNEL EDIT, sélectionner TV-CHANNELS ou RADIO CHANNELS B. Appuyer la touche rouge pour visualiser toutes les chaînes. C. Choisir les favorites en utilisant les touches D. Appuyer OK pour insérer chaque chaîne dans la liste. Pour confirmation, à coté de la chaîne un symbole apparaîtra ( ). E. Pour sortir du menu, appuyer EXIT. Confirmer l’enregistrement de la liste avec SAVE. Pour annuler la modification, sélectionner CANCEL. *SPDIF Wahl des Audio-Ausgangs für Analog/Digital-Anschluss. PCM wählen, wenn Stereo-Analog-Signale vorliegen. RAW wählen, wenn Digital-Geräte am Audio-Ausgang angeschlossen werden sollen. LISTE DER LIEBLINGS-KANÄLE (CHANNEL EDIT) Mit dieser Funktion lassen sich Listen der TV- und Radio-Lieblingssender einrichten. A. Innerhalb der Funktion CHANNEL EDIT, TV-CHANNELS bzw. RADIO-CHANNELS wählen. B. Rote Taste drücken, um alle Kanäle auszuweisen. C. Richtungs-Tasten verwenden , um die Lieblings-Kanäle zu wählen D. Jeden einzelnen Kanal mit OK-Taste bestätigen, worauf ein Symbol, neben dem Kanal, erscheinen wird( ). E. EXIT-Taste drücken, um das Menü wieder zu verlassen. Die aufgestellte Liste der Lieblings-Kanäle durch die SAVE-Taste bestätigen. Um die gewünschte Änderung zu löschen, CANCEL drücken. 11 ENREGISTREMENT SUR USB • USB-AUFNAHME FR/D Introduire une clé USB et appuyer la touche REC sur la télécommande. Le lancement de l’enregistrement sera signalé par un point rouge visible en haut à gauche de l’écran. Interruption de l’enregistrement: appuyer la touche STOP et la touche OK pour valider l’interruption. UBS-Schlüssel eingeben und REC-Taste auf der Fernbedienung drücken. Der Aufnahme-Beginn wird durch einen roten Punkt, oben links auf dem Bildschirm, gekennzeichnet. Um die Aufnahme zu unterbrechen: STOP-Taste drücken und dann mit der OK-Taste die Unterbrechung bestätigen. REPRODUCTION AUDIO/VIDEO/PHOTO WIEDERGABE von AUDIO/VIDEO/FOTOS MENU PLAYSTATION AUDIO VIDEO FOTO / PHOTO OK OK OK A: FOLDER A: DOSSIER A: ORDNER A: FOLDER A: DOSSIER A: ORDNER A: FOLDER A: DOSSIER A: ORDNER OK OK OK SELECT FOLDER SELECTION DOSSIER ORDNER WÄHLEN PVR FOLDER DOSSIER PVR PVR ORDNER SELECT FOLDER SELECTION DOSSIER ORDNER WÄHLEN SELECT TRACK SELECTIONNE TRACE STÜCK WÄHLEN SELECT RECORDING SELECTIONNE ENREGISTREMENT AUFNAHME WÄHLEN SELECT PHOTO SELECTIONNE PHOTO FOTO WÄHLEN OK OK OK 12 PROBLÈMES-CAUSES-REMÈDES • AUFNAHME-VORGANG WÄHLEN Problèmes Causes probables FR/D Remèdes (solutions) Pas d’image, pas de son..............TV-TUNER en protection Appuyer CH+ / CH- Pas d’image..................................Mauvaise sélection de la chaîne / Pays Effectuer le Reset et /ou Recherche Pas de son ...................................Mauvaise réception ou MUTE inséré Contrôler la réception du signal. Image avec des parasites............Signal faible Changer de position ou antennes pas bonnes Pas de signal................................Pays d’appartenance pas correct Signal trop faible Vérifier à partir du menu SETUP Changer de position Image entrecoupée avec son irrégulier Se positionner dans une zone ayant une meilleure couverture Problem Signal discontinu à cause du véhicule en mouvement Mögliche UrsachenAbhilfe Kein Bild, kein Ton.......................TV-Tuner hat Schutzschaltung ausgelöst CH+/CH- drücken Kein Bild......................................Kanal/Land falsch eingegeben RESET und/oder Research durchführen Kein Ton......................................Signal schwach oder MUTE gewählt Signal-Stärke kontrollieren Punktiertes Bild ..........................Signal schwach (Diamanten-Spitzen) Position wechseln bzw. Antenne ungeeignet Kein Signal..................................Eingegebenes Land nicht korrekt Signal zu schwach SET-UP-Menü kontrollieren Position wechseln Bild zerstückelt u........................Signal inkonstant weil Auto in Bewegung In Zone gehen, wo mehr Ton abgehakt Empfang herrscht SPÉCIFICATIONS • TECHNISCHE EIGENSCHAFTEN Receiver system Double Tuner (Diversity) Support H.264/AVC,MPEG4 Video decode HD channels receiver Record on USB USB MAX 32 GB Storage for 1000 channels EPG programs guide-PIG function Memory function after power-off Favourite channels list Software up-grade via USB External IR sensor Infrared remote control 1 composit A/V output 1 video output HDMI 1 component video output (Y, Pb, Pr) 1 coaxial digital audio output Power supply 12 Vdc Dimensions L. 185 - P. 125 - H. 45 mm 13 CONEXIONES E ANT IN 1 2 3 4 USB CVBS OUT HDMI OUT 6 7 8 ANT IN 5 pb Y L pr COAXIAL R 9 10 11 1. Indicador ON/OFF Encendido /Apagado 2. Conector de alimentación 12V 3. Conector Jack alimentación 12V 4. Sensor infrarrojos remoto (REMOTE IN) 5. Antenas 6. Puerto USB 7. Salida Video Composito (CVBS) 8. Salida Video HDMI 9. Salida Video Component (Y, pb, pr) 10. Salida Audio Digital 11. Salida Audio Analógica 12 V 12 V Alimentación Conexión de antenas 14 FUNCIONES MANDO A DISTANCIA 1 E 10 11 12 2 13 3 14 15 4 16 5 17 6 18 19 7 20 21 8 9 22 1. STANDBY: En espera/Encendido 2. 0 – 9: teclado numérico 3. RETURN: función precedente 4. MENÚ 5. FAV: función CANAL PREFERIDO 6. Mueve hacia arriba +10 posiciones 7. CH+ / CH-: Canal+ / Canal – 8. AUDIO: Selecciona idioma canal TV 9. TV/RADIO: Cambia de canales TV a emisoras de Radio y al revés 10. MUTE 11. INFO: información canal 12. TEXT: función TELETEXTO 13. EPG: Guía electrónica Programas 14. SUBTITLE: selecciona los subtítulos 15. EXIT: salida función 16. OK: confirma elección 17. Flechas de desplazamiento en el menú 18. Mueve hacia abajo +10 posiciones 19. Mandos para la reproducción de la grabación 20. VOL: Volumen +/Volumen 21. Teclas para el Menú TELETEXTO 22. REC: Inicia y Para la grabación en la USB 15 ACTIVACIÓN E La primera vez que se enciende este dispositivo es indispensable ajustar los siguientes parámetros mediante el mando a distancia: First Installation OSD Language ENGLISH COUNTRY Europe Time Zone GMT+1 LNC ON Start 1. OSD LANGUAGE: Selecciona el idioma 2. COUNTRY Selecciona el país donde se encuentra 3. TIME ZONE: Selecciona el fuso horario (IT-FR-D-SP GMT +1) (GR GMT +2) 4. LCN: Ordena los canales durante la escansión (ON) 5. START: Memorización automática de los canales En el caso de que NO aparezca la ventana de instalación: - Presionar la tecla MENU - Seleccionar la función CHANNEL INSTALLATION - Seleccionar la función AUTOMATIC RESEARCH. MENÚ PRINCIPAL HOME MENU IMPOSTAZIONI PLAYSTATON TELEVISORE SETTING: Ajuste del Sistema TELEVISION: Visión de la televisión DISK: Información periférica USB RADIO: Escucha emisoras de radio MULTIMEDIA: Reproducción Audio-Video*-Foto Reproduce solo video en formato PVR si ha sido grabado con el VM209 RADIO DISCO PARAMETROS • Ajuste del sistema •Ajuste video • Ajuste audio • Sistema •Gestiones canales HD DV3 • • • • • • Presionar la tecla (MENU) en el mando a distancia 1. Utilizar las teclas para desplazarse en la funcion deseada, presionar la tecla OK para confirmar. EXIT para volver al Menú. 16 PLANTEAMIENTO E SYSTEM SETUP AJUSTES DEL SISTEMA OSD LANGUAGE IDIOMA COUNTRY PAIS VIDEO SETTING CONFIGURACIÓN DE VÍDEO AUDIO SETTING CONFIGURACIÓN AUDIO INSTALLATION INSTALACIÓN CHANNEL EDIT CONFIGURACIÓN DE CANAL LCH TIME ZONE SUMMER TIME HORARIO VERANO SYSTEM INF. INFORMACIÓN FACTORY RESET AJUSTES DE FABRICA TV SYSTEM / SISTEMA TV HD OUTPUT / SALIDA HD SCREEN RATIO / FORMATO DE VÍDEO LR SPDIF* MANUAL SEARCH / BÚSQUEDA MANUAL AUTO SEARCH / BÚSQUEDA AUTOMÁTICA USB UPGRADE / ACTUALIZACIÓN DE USB TV CHANNELS RADIO CHANNELS *SPDIF Permite seleccionar la salida de Audio para la conexión analógica o digital. Seleccionar PCM cuando nos encontramos en presencia de señales Estéreo analógicos (2 canales. Seleccionar RAW cuando deseamos conectar dispositivos digitales a la salida audio correspondiente. LISTADO CANALES PREFERIDOS (CHANNEL EDIT) Esta función permite crear un listado de los Canales Preferidos TV y Radio. A. Desde CHANNEL EDIT, seleccionar TV-CHANNELS o RADIO CHANNELS B. Presionar la tecla roja para visualizar todos los canales. C. Elegir los favoritos utilizando las teclas. Seleccionar los favoritos utilizando las teclas . D. Presionar OK para introducir los canales en el listado. Por confirmar el canal, puede aparecer un símbolo al lado ( ). E. Para salir del menú presionar la tecla EXIT. Confirmar el guardado de la lista con SAVE. Para descartar la modifica seleccionar CANCEL. 17 GRABACION MEDIANTE USB E Introducir el dispositivo USB y presionar la tecla REC en el mando a distancia. El inicio de la grabación se indica mediante un punto rojo visible en el lado superior izquierdo de la pantalla. Para interrumpir la grabación: presionar la tecla STOP y la tecla OK para confirmar la interrupción. REPRODUCCION AUDIO/VIDEO/FOTO MENU PLAYSTATION AUDIO VIDEO FOTO / PHOTO OK OK OK A: FOLDER CARPETA A: A: FOLDER CARPETA A: A: FOLDER CARPETA A: OK OK OK SELECT FOLDER SELECCIONE LA CARPETA PVR FOLDER CARPETA PVR SELECT FOLDER SELECCIONE LA CARPETA SELECT TRACK SELECCIONE PISTA SELECT RECORDING SELECCIONE GRABACIÓN SELECT PHOTO SELECCIONE LAS FOTOS OK OK OK 18 PROBLEMAS - CAUSAS E SOLUCIÓN Problema E Posible Causas Solución No hay Imagen, ni Sonido..........TV-Tuner en protección Presionar CH+/CH- No hay Imagen...........................Selección incorrecta del Canal/País Efectuar Reset Búsqueda. No hay Sonido............................Señal insuficiente o MUTE activado Controlar la calidad de la señal. Imagen con puntos....................Señal débil (a diamante) Cambiar posición o antenas no idóneas No Señal.....................................País de pertenencia incorrecto Señal demasiado débil Imagen desfragmentada............Señal discontinuo a causa con sonido irregular del coche en movimiento CARACTERISTICAS TECNICAS Sistema de recepción Double Tuner (Diversity) Suporta H.264/AVC,MPEG4 Video decode Recibe canales de alta definición HD Registros en USB USB MAX 32 GB Almacena hasta 1000 canales Programa de la función de guía EPG-PIG Función de memoria después de apagado Lista de canal favorito Actualización de software a través de USB Infrarrojos exterior Control remoto por infrarrojos 1 Salida A/V composita 1 Salida video HDMI 1 Salida video component (Y, Pb, Pr) 1 Salida audio digitale coassiale Alimentacion 12 Vdc Dimensiones L. 185 - P. 125 - H. 45 mm 19 Verificar en el menú la opción de SETUP Cambiar posición Desplazarse en una zona con mayor cobertura S.p.A. - Via F.lli Cervi, 167/C • 42124 Reggio Emilia (Italy) Tel. ++39 0522 941621 • Fax ++39 0522 942452 www.phonocar.com • e-mail:[email protected]