1
DSX-M50BT
SECTION 1
SERVICING NOTES
UNLEADED SOLDER
Boards requiring use of unleaded solder are printed with the leadfree mark (LF) indicating the solder contains no lead.
(Caution: Some printed circuit boards may not come printed with
the lead free mark due to their particular size)
ABOUT CHECKING THE OPERATION
When checking the operation of this unit, connect a USB device
to this unit.
Refer to the support site written in the operating instruction for the
details about the compatibility of a USB device.
: LEAD FREE MARK
Unleaded solder has the following characteristics.
• Unleaded solder melts at a temperature about 40 °C higher
than ordinary solder.
Ordinary soldering irons can be used but the iron tip has to be
applied to the solder joint for a slightly longer time.
Soldering irons using a temperature regulator should be set to
about 350 °C.
Caution: The printed pattern (copper foil) may peel away if
the heated tip is applied for too long, so be careful!
• Strong viscosity
Unleaded solder is more viscous (sticky, less prone to flow)
than ordinary solder so use caution not to let solder bridges
occur such as on IC pins, etc.
• Usable with ordinary solder
It is best to use only unleaded solder but unleaded solder may
also be added to ordinary solder.
NOTE OF REPLACING THE KEY BOARD
When the KEY board is defective, exchange the FRONT PANEL
ASSY (Ref. No. FP1).
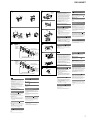
Maintenance
Replacing the lithium battery of the
remote commander
When the battery becomes weak, the range
of the remote commander becomes shorter.
Replace the battery with a new CR2025
lithium battery. Use of any other battery may
present a risk of fire or explosion.
+ side up
Notes on the lithium battery
ˎ Keep the lithium battery out of the reach of
children. Should the battery be swallowed,
immediately consult a doctor.
ˎ Wipe the battery with a dry cloth to assure a good
contact.
ˎ Be sure to observe the correct polarity when
installing the battery.
ˎ Do not hold the battery with metallic tweezers,
otherwise a short-circuit may occur.
WARNING
Battery may explode if mistreated.
Do not recharge, disassemble, or dispose
of in fire.
Cleaning the connectors
The unit may not function properly if the
connectors between the unit and the front
panel are not clean. In order to prevent this,
and clean
theclean the
detach the front panel (page
9) and
connectors with a cotton swab. Do not apply
too much force. Otherwise, the connectors
may be damaged.
NOTE OF REPLACING THE BT BOARD
When the BT board is defective, exchange the complete mounted
board.
NOTE OF REPLACING THE IC603 ON THE MAIN BOARD
IC603 on the MAIN board cannot exchange with single. When this
part is damaged, exchange the complete mounted board.
IMPORTANT NOTE OF “INITIALIZING”
The purpose of “Bluetooth Initialize” is to initialize the Bluetooth
connection history (HF/Audio Streaming). (To delete the device
information for the devices that you connected to when searching,
etc.)
When the BT board or MAIN board (including BT board) are replaced, it is necessary to initialize this unit.
Refer to the following, initialize this unit.
Note: Phonebook data and dialed/received call history can be deleted by
executing “Bluetooth Initialize.”
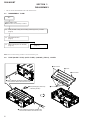
Procedure:
1. In the state of source off (the clock is displayed), press and
hold the [PUSH ENTER/SELECT/ ] button.
2. Rotate the control dial, and select the “BT INIT”.
3. Press the [PUSH ENTER/SELECT/ ] button, and the message “INIT-NO” is displayed on the liquid crystal display.
4. Rotate the control dial clockwise, and the message “INITYES” is displayed on the liquid crystal display.
5. Press the [PUSH ENTER/SELECT/ ] button, and the message “INITIAL” is blinked on the liquid crystal display.
6. When “Bluetooth Initialize” is completed, the message
“COMPLETE” is displayed on the liquid crystal display for a
moment.
7. Press the [ /MODE] button, and return to the state of source
off (the clock is displayed) mode.
Canceling the DEMO Mode
You can cancel the demonstration display
which appears while this unit is turned off.
1
Press and hold SELECT.
The setup display appears.
2
Rotate the control dial to select
[DEMO], then press it.
3
Rotate the control dial to select
[DEMO-OFF], then press it.
The setting is complete.
4
Press
(back).
The display returns to normal reception/
play mode.
Notes
ˎ For safety, turn off the ignition before cleaning
the connectors, and remove the key from the
ignition switch.
ˎ Never touch the connectors directly with your
fingers or with any metal device.
3