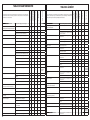
1
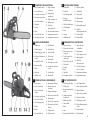
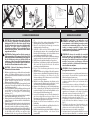
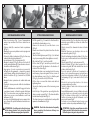
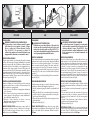
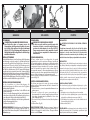
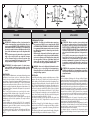
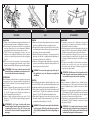
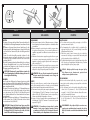
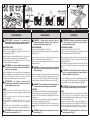
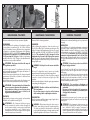
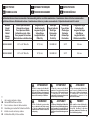
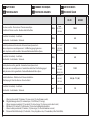
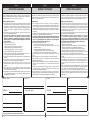
57
58
Italiano
English
Français
UTILIZZO
USE
UTILISATION
NORME DI LAVORO
ATTENZIONE – Abbattere un albero è un’operazione che
richiede esperienza. Non tentare di abbattere alberi se
siete inesperti. EVITATE TUTTE LE OPERAZIONI PER LE
QUALI NON VI SENTITE QUALIFICATI! Si raccomanda agli
operatori inesperti di astenersi dall’abbattere alberi il cui
tronco abbia un diametro superiore alla lunghezza della
barra.
Se si usa la motosega per la prima volta, eseguire alcuni
tagli su di un tronco stabile per acquisire sicurezza
nell’uso. Durante il taglio accelerare al massimo. Non
spingere eccessivamente sulla motosega; il solo peso della
stessa permetterà di tagliare con il minimo sforzo.
OPERATING INSTRUCTIONS
WARNING - Tree filling is a task that requires experience.
Not groped tree filling if you are inexperienced. AVOID
ALL TRANSACTIONS FOR WHICH YOU ARE NOT QUALIFIED!
It is recommended that inexperienced operators to refrain
tree filling if the trunk has a diameter greater than the
length of the bar.
When using the chainsaw for the first time, make several
cuts in a small trunk in order to become familiar with the
saw in action. Always use full throttle when cutting with
the saw, regardless of the size of the timber. Never push
down on the saw when cutting. The weight of the saw
alone enables it to cut properly with minimum effort.
UTILISATION
ATTENTION – Abattre un arbre est une opération qui
nécessite une certaine expérience. N'essayez pas d'abattre
des arbres si vous n'en avez pas encore l'expérience.
ÉVITEZ TOUTES LES OPÉRATIONS POUR LESQUELLES VOUS
NE VOUS SENTEZ PAS QUALIFIÉS ! Il est recommandé aux
opérateurs inexperts de ne pas abattre d'arbres dont le
tronc présente un diamètre supérieur à la longueur de la
barre.
Si l’on utilise la tronçonneuse pour la première fois, il
faut d’abord s’exercer sur des petites bûches pour se
familiariser avec le fonctionnement. En coupe, utilisez la
machine au maximum de sa puissance. Ne forcez pas sur
les poignées ; la machine doit descendre en coupe de son
propre poids et vous permettre de couper sans le moindre
effort.
ATTENZIONE - Non tagliare quando c’é cattivo tempo,
scarsa visibilità, temperature troppo rigide o elevate.
Assicurarsi che non ci siano rami secchi che possono
cadere.
ABBATTIMENTO
Nelle operazioni di abbattimento e sezionatura sfruttare la presenza
dell’arpione, facendo perno su di esso. Studiare bene l’albero e
il terreno circostante prima di cominciare a tagliare. Liberare la
zona di lavoro. Prepararsi un’ampia possibilità di arretramento per
quando l’albero inizierà la caduta (Fig. 57). Togliere gli eventuali
rami presenti nella parte inferiore del tronco per circa 2 metri.
Praticare un taglio perpendicolare alla pianta corrispondente a 1/4
del diametro del tronco, iniziandolo dalla parte dove si prevede la
caduta (1 - Fig. 58).
Circa 10 cm più in alto iniziare un secondo taglio che vada a
congiungersi alla fine del primo taglio. Si asporterà così un cuneo
che darà la direzione dove cadrà la pianta (2 - Fig. 58).
Praticare ora dalla parte opposta al primo taglio il vero taglio di
abbattimento che dovrà essere posizionato 4-5 cm più in alto del
primo (3 - Fig. 58).
Lasciare sempre una cerniera (A, Fig. 59-60) che consenta il
controllo della direzione di caduta. Mettere un cuneo nel taglio di
abbattimento, prima che l’albero cominci a muoversi, per evitare
che la barra della motosega venga bloccata.
Se il diametro del tronco è superiore alla lunghezza della barra
eseguire il taglio di abbattimento come la sequenza indicata in
Fig. 60.
28
WARNING - Never cut in high wind, bad weather, when
visibility is poor or in very high or low temperatures.
Always check the tree for dead branches which could fall
during the felling operation.
TREE FELLING
In tree filling and bucking operations exploit the presence of spike
bumpers, pivoting on it. Study the tree and surrounding area
before starting to cut. Clear the work area before beginning to cut.
Prepare the widest possible path of retreat for when the tree falls
(Fig. 57). Cut off any branches at the bottom of the trunk up to a
height of about 2 metres. Make a 90 degree notch on the face of
the tree, in the direction it will fall. The depth of the notch should
never exceed 1/4 of the diameter of the trunk (1 - Fig. 58). About
10 cm (4”) higher up the trunk make a cut down towards the first
cut, in order to extract a wedge. This is the mouth of the hinge, and
is the direction in which the tree falls (2 - Fig. 58).
Now, make your felling cut on the opposite side of the trunk. Start
the cut about 4-5 cm (2”) higher than the center of the notch
(3 - Fig. 58).
Always leave a hinge (A, Fig. 59-60) which allows you to control the
direction the tree falls in. Put a wedge into the felling cut, before
the tree starts to move, to prevent the chainsaw guide bar from
getting stuck.
If the diameter of the trunk is greater than the length of the guide
bar, make the felling cut as shown in the sequence of Fig. 60.
ATTENTION - Ne coupez jamais si le temps est mauvais, si la
visibilité est insuffisante ou si la température est trop basse
ou trop élevée. Assurez vous qu’il n’y a pas de branches sèches
qui puissent tomber.
ABATTAGE
Lors des opérations d'abattage et de découpe, utilisez le harpion
comme point d'appui. Avant de commencer à couper, étudiez bien
l’arbre, le terrain et ses environs. Dégagez la zone de travail. Préparez
un vaste espace pour pouvoir reculer lorsque l’arbre commencera à
tomber (Fig.57). Otez les branches qui seraient éventuellement sur
environ deux mètres de la partie basse du tronc. Effectuez en sens
perpendiculaire par rapport à la plante, une entaille correspondant
à environ 1/4 du diamètre du tronc, en commençant du côté où vous
prévoyez la chute de l’arbre (1- Fig.58). A environ 10 cm un peu plus
haut, commencez une seconde entaille qui rejoigne la première.
Otez ainsi un coin qui donnera la direction vers laquelle l’arbre
tombera (2-Fig.58).
Pratiquez maintenant, du côté opposé à la première coupe, la
véritable entaille d’abattage qui devra être positionnée 4-5 cm plus
haut par rapport à la première entaille (3-Fig.58).
Laissez toujours une charnière (A-Fig.59-60) qui permette le contrôle
de la direction de chute. Mettez un coin dans l’entaille d’abattage,
avant que l’arbre ne commence à bouger, de façon à éviter que le
guide de la tronçonneuse ne reste bloqué.
Si le diamètre du tronc est supérieur à la longueur du guide,
effectuez l’entaille d’abattage suivant la séquence indiquée sur la
Fig.60.