1
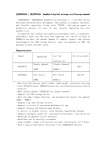
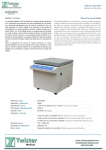
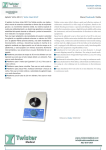
ENGLISH ANEX I: CE CERTIFICATE CUBETA DE ELECTROFORESIS VERTICAL VERTICAL ELECTROFORESIS CELL AUXILAB S.L. CE DECLARATION OF CONFORMITY HORIZONTAL ELECTROFORESIS CELL of Auxilab,S.L for the Directive of machines (89/392/CEE modified) and the regulations adopted for its transposition NAME OF THE MANUFACTURER / IMPORTER: AUXILAB, S.L. ADDRESS: Polígono Morea Norte, 8 31191 Beriáin (Navarra) WE STATE THAT: HORIZONTAL ELECTROFORESIS CELL 53001001 Are designed and manufactured according to: Directive 89/392/CEE, including the modifications and the national regulations that transpose them. Directive 73/23/CEE, modified over the electric security. Directive 89/336/CEE, modified over the electromagnetic compatibility. And that the following harmonized rules have applied (or part of them): UNE 292-1/-2/-2/A1,UNE-EN 1050, UNE-EN 614-1,UNE-EN 1037, UNE-EN 1088, UNE-EN 547, UNE-EN 953, UNE-EN 294, UNE-EN 418, UNE-EN 894-1, UNEEN 894-2, UNE-EN 954-1, UNE-EN 60204-1, UNE 61010-1/A2, UNE-EN61010-2-051. Este manual es parte inseparable del aparato por lo que debe estar disponible a todos los usuarios del equipo. Le recomendamos leer atentamente el presente manual y seguir rigurosamente los procedimientos de uso para obtener las máximas prestaciones y una mayor duración del mismo. BERIAIN 04th JUNE 2007 This manual should be available for all users of these equipments. To get the best results and a higher duration of this equipment it is advisable to read carefully this manual and follow the processes of use. Signed by: ALFONSO AINCIBURU SANZ DIRECTOR/MANAGER Polígono Morea Norte, 8 31191 Beriain (Navarra) - Spain. Tel. 948 310 513 Fax 948 312 071 Internet: www.auxilab.es · Email: [email protected] Page 28 Instruction manual 53001001 Version 1 May-07 Revisión 1 Mayo-2007 Manual de instrucciones 53001001 Pág. 1 CASTELLANO Gracias por haber adquirido este equipo. Deseamos sinceramente que disfrute de la cubeta de electroforesis vertical Nahita. Le recomendamos que cuide el equipo conforme a lo expuesto en este manual. Nahita desarrolla sus productos según las directrices del marcado CE y haciendo hincapié en la ergonomía y seguridad del usuario. La calidad de los materiales empleados en la fabricación y el correcto proceder le permitirán disfrutar del equipo por muchos años. El uso incorrecto o indebido del equipo puede dar lugar a accidentes, descargas eléctricas, cortocircuitos, fuegos, lesiones, etc. Lea el punto de Mantenimiento, donde se recogen aspectos de seguridad. LEA DETALLADAMENTE ESTE MANUAL DE INSTRUCCIONES ANTES DE OPERAR CON ESTE EQUIPO CON EL FIN DE OBTENER LAS MÁXIMAS PRESTACIONES Y UNA MAYOR DURACIÓN DEL MISMO. Tenga especialmente presente lo siguiente: Este manual es parte inseparable de la cubeta de electroforesis vertical Nahita, por lo que debe estar disponible para todos los usuarios del equipo. Debe manipularse siempre con cuidado evitando los movimientos bruscos, golpes, caídas de objetos pesados o punzantes. Cualquier duda puede ser aclarada por su distribuidor (instalación, modo de uso, funcionamiento). Usted puede también mandarnos sus dudas o sugerencias a la siguiente dirección de correo del Servicio Técnico Nahita ([email protected]) o bien llamando al Tel: 807117040 (0.30 Euros/min). Este equipo está amparado por la Ley de garantías y bienes de consumo (10/2003). No se consideran en garantía las revisiones del equipo. Los accesorios, así como su pérdida, no están cubiertos por dicha garantía. Tampoco estarán cubiertos por el periodo de garantía las piezas en su desgaste por uso natural. Asegúrese de guardar la factura de compra para tener derecho de reclamación o prestación de la garantía. En caso de enviar el equipo al Servicio Técnico adjunte factura o copia de la misma como documento de garantía. Rellene y envíe la garantía antes de los 15 días después de la compra. El fabricante se reserva los derechos a posibles modificaciones y mejoras sobre este manual y equipo. ¡ATENCIÓN! NO SE ADMITIRÁ NINGÚN APARATO PARA REPARAR QUE NO ESTÉ DEBIDAMENTE LIMPIO Y DESINFECTADO. INDICE DE IDIOMAS Castellano Inglés Pág. 2 2-15 16-28 Manual de instrucciones 53001001 Revisión 1 Mayo-07 ENGLISH 7. MAINTENANCE AND CLEANING To get the best results and a higher duration of the vertical electrophoresis cell it is essential to follow the processes of use. Note: All the processes of use mentioned below will not have any value unless you keep a continued and careful maintenance. " Please follow the processes of use of this manual. This manual should be available for all users of this equipment. Always use original components and supplies. Other devices can be similar but they can damage the equipment. Never autoclave or dry-heat sterilize the apparatus or components. Do not expose the apparatus or components to phenol, benzene, acetone, halogenated hydrocarbon solvents or undiluted laboratory alcohols. Avoid prolonged exposure of the apparatus or components to the UV light. Periodically make a simple and routine inspection of the electrical components to ensure both the safety and good performance of the equipment: - If the banana connectors of either the gel support or the power cords can be rocked easily or present signs of corrosion, replace them. - If power cords show any sign of wear and damage replace them immediately. Cleaning After each use, wash all components gently with water and non abrasive detergents, and rinse well in deionized water. Note: be careful not to damage the electrode wire when cleaning the gel support. Wipe dry with a soft cloth or allow to air dry. Never use scourers or substances that can grate as they damage the electrophoresis cell and produce an early ageing of the equipment. ATTENTION!! IF EQUIPMENTS ARE NOT PROPERLY CLEAN AND DISINFECTED THEY WOULD NOT BE ALLOWED TO REPAIR BY OUR TECHNICAL SERVICE. INSTRUCTIONS ON ENVIRONMENT PROTECTION At the end of its life cycle, please, do not dispose of this equipment by throwing it in the usual garbage; hand it over a collection point for the recycling of electrical and electronic appliances. It does not contain dangerous or toxic products for humans but a non adequate disposal would damage the environment. The materials are recyclable as mentioned in its marking. By recycling material or by other forms of re-utilization of old appliances, you are making an important contribution to protect our environment. Please inquire at the community administration for the authorized disposal location. Version 1 May-07 Instruction manual 53001001 Page 27 ENGLISH INDICE DE CONTENIDOS 6. TROUBLESHOOTING PROBLEM COMMENTS The glass plates crack - The wedge to hold the gel is too tight. - The voltage or current setting may be too high, causing overheating. - Electrophoresis buffer may be too concentrated, leading to a too high current and overheating at a constant voltage. The gel dye front is not straight - Verify that the cell is level during electrophoresis - The gel may be overheated. Reduce the voltage or current. Use chilled electrophoresis buffer. Bands are distorted CASTELLANO - Samples may contain a excess of salt. Dialyze or desalt before loading on gel. - Samples may be too concentrated. Dilute samples or reduce voltage. - Samples may contain precipitate material. Centrifuge or filter before loading on gel. - The upper surface of the resolving gel may not be flat. Use water-saturated n-butanol to overlay the gel solution, rather than water or buffer. - Sample wells may contain small fragments of polyacrylamide. Rinse wells thoroughly before loading samples. 1. APLICACIONES DEL INSTRUMENTO 2. DESCRIPCIÓN Y COMPONENTES 3. ESPECIFICACIONES TÉCNICAS 4. MODO DE USO 5. FÓRMULAS PARA LA PREPARACIÓN DE GELES Y TAMPONES 6. RESOLUCIÓN DE PROBLEMAS 7. MANTENIMIENTO Y LIMPIEZA ANEXO I: CERTIFICADO CE 1. APLICACIONES DEL INSTRUMENTO La cubeta de electroforesis vertical de Nahita está diseñada para la separación de proteínas y ácidos nucleicos en geles de poliacrilamida. El equipo viene completo con todos los accesorios necesarios para la preparación y electroforesis de geles de 82x82 mm. 2. DESCRIPCIÓN Y COMPONENTES 1. Tanque externo 2. Conectores tipo banana 3. Soporte para geles 4. Cuña 5. Tapa 6. Cables fijos Lanes are broader at the bottom - This is normal if adjoining lanes are not loathan the top ded with similar samples. It is also normal for polyacrylamyde gradient gels. Page 26 Instruction manual 53001001 Version 1 May-07 6 2 5 Dye migration is slower than expec- The electrophoresis buffer may be too concented trated. Check buffer preparation procedure. If the concentration is high, at constant current the voltage will be lower than usual. - Check voltage or current settings on power supply. - Check for secure connections of lid and power cords. Dye migration is slower than expec- The electrophoresis buffer may be too diluted. ted Check buffer preparation procedure. - Check voltage or current settings on power supply. 3 3 5 5 11 12 13 15 2 3 4 1 Revisión 1, Mayo-07 Manual de instrucciones 53001001 Pág. 3 CASTELLANO Componentes La cubeta de electroforesis vertical de Nahita se suministra junto con todos los componentes necesarios para la preparación y electroforesis de geles de poliacrilamida de 82x82 mm: - Tanque externo: fabricado en material acrílico de alta calidad y en una sola pieza sin junturas que evita las fugas de líquido y las roturas. Es un dispositivo duradero y transparente resistente a la acción de agentes químicos y presión y temperaturas elevadas. - Tapa: al igual que el tanque, está fabricada con un material de elevada calidad y resistencia. Presenta dos cables fijos de alimentación con conector tipo banana para conectar a la fuente de alimentación. - Soporte para geles: en el mismo soporte se lleva a cabo la polimerización y posterior electroforesis de los geles minimizando su manipulación y facilitando y agilizando el trabajo. El soporte incluye 2 cuñas de plástico para asegurar una buena fijación de los geles y electrodos de platino puro resistentes a la corrosión y a elevadas temperaturas. Soporte para geles Pág. 4 Manual de instrucciones 53001001 1.Resolving gel CHART 3. To prepare 10 mL of acrylamide solutions of different percentages: Component Acrylamide stock solution [29% (w/v) acrylamide, 1% (w/v) bisacrylamide in deionized water] Volume (mL) according to acrylamide % 7.5 % 10 % 12.5 % 15 % 2.5 3.3 4.2 4.0 1.5 M Tris-HCl (pH 8.8) 2.5 2.5 2.5 2.5 10% (w/v) SDS 0.1 0.1 0.1 0.1 Deionized water 4.8 4.0 3.1 2.3 10% (w/v) ammonium persulphate 0.1 0.1 0.1 0.1 TEMED 0.01 0.01 0.01 0.01 CHART 4. To prepare 10 mL of 4 % acrylamide solution: Junta silicona Component Volume (mL) Acrylamide stock solution [29% (w/v) acrylamide, 1.3 1% (w/v) bisacrylamide in deionized water] Palanca - Placas de vidrio: el equipo incluye 2 placas de vidrio planas y 2 placas formateadas y con espaciadores fijos de 1.0 y 1.5 mm grosor para la preparación y electroforesis de los geles. Además, el equipo incluye también una placa de vidrio grueso para utilizar en caso de realizar la electroforesis de un único gel NOTE: acrylamide is a powerful neurotoxin. Always wear gloves when handling solutions, gels or equipment that has been in contact with this substance and strictly observe the safety regulations indicated for its manipulation and disposal of wastes. 2. Stacking gel Cuñas de plástico - Dispositivo para preparación de geles: es un dispositivo exclusivo que presenta una junta de silicona en la base, proporcionando un perfecto sellado para evitar fugas de poliacrilamida que constituyen un riesgo tóxico para el usuario. Presenta también unas palancas laterales con dos posiciones para la preparación de geles de 1.0 y 1.5 mm grosor respectivamente. ENGLISH 1.5 M Tris-HCl (pH 8.8) 2.5 10% (w/v) SDS 0.1 Deionized water 6.0 10% (w/v) ammonium persulphate 0.1 TEMED 0.001 3. Electrophoresis buffer CHART 5. Final concentration of the different components of the electrophoresis buffer. Final pH must be 8.3. Component Placa plana Placa formateada Revisión 1 Mayo-07 Final concentration Tris base 24.8 M Glycine 192 mM SDS 0.1% (w/v) Version 1 May-07 Instruction manual 53001001 Page 25 ENGLISH red to one of the glass plates. - Transfer the gel to a proper container for further staining or electroblotting. Note: for electroblotting, please refer to Nahita Transfer Module (ref. 53001501) user's manual. - Clean the tank and all the accessories with deionized water. Allow to air dry. Security The vertical electrophoresis cell must be used by previously qualified staff that knows how the equipment works thanks to the user manual. Put the electrophoresis cell on top of a horizontal, plane and stable table. Do not put the electrophoresis cell near any warm supply (burners, blowlamps…). Avoid vibrations. Vertical electrophoresis cell is intended to use with a DC power supply. An inadequate manipulation may cause burns, hurts and damages to the electrical installation. Never connect the electrophoresis cell to the power supply before starting the experiment. The electrical current supplied by the power supply is transmitted to the cell through the leads and the lid assembly. Never use the electrophoresis cell without the lid. Always turn off the power supply before opening and removing the lid. Never operate damaged or leaking equipment. Certain reagents indicated for use in this manual are of a hazardous nature. User should strictly observe the safety regulations indicated for such products. The equipments used in these procedures (e.g. power supplies) should be used following the manufacturer safety recommendations. 5. FORMULATION FOR GELS AND ELECTROPHORESIS BUFFER Polyacrylamide gels are generated by polymerization of acrylamide as a effect of a cross-linking agent, the bis-acrylamide, and in the presence of an initiator and a catalytic agent. Usually, TEMED (N,N,N,N'-tetramethylenediamine) is used as the initiator and the persulphate ion (S2O82-) added in the form of ammonium persulphate as the catalytic agent. Gel porosity depends on the relative proportions of polyacrylamide and bis-acrylamide; a higher bis-acrylamide vs. acrylamide proportion generates a smaller pore. Usually, gels are designated with the acrylamide/bisacrylamide % that contain, thus, this value determinates the separation range of the gel. Most of proteins are well separated in 5-10 % gels; a lower percentage (larger pore) is better to separate larger proteins. Protein electrophoresis is usually performed in denaturalizing conditions, it means, proteins lose their three-dimensional structure and migrate completely denaturalized. Migration is therefore, proportional to the charge and size of the molecule but not to its shape. The most commonly used denaturalizing agent is the sodium dodecyl sulphate (SDS). The formulas for preparation of electrophoresis buffer and discontinuous denaturing gels for protein separation are shown below. Page 24 Instruction manual 53001001 Version 1 May-07 CASTELLANO - Peines: el equipo se suministra con un conjunto de 8 peines de 1.0 y 1.5 mm de grosor y con 10 ó 15 dientes 3. ESPECIFICACIONES TÉCNICAS Referencia 53001001 Nº geles 1ó2 Dimensiones gel 82x82 mm Dimensiones placa vidrio 102x82 mm Nº muestras 10 ó 15 por gel Grosor peines 1 y 1.5 mm Volumen sol. tampón (aprox.) 500 mL Condiciones trabajo 0-40 ºC y < 80% HR Voltaje electroforesis 200 V Tiempo de electroforesis 45-60 min Dimensiones cubeta (LxAxH) 100x140x150 mm 4. MODOS DE USO 4.1 Inspección preliminar Desembale la cubeta de electroforesis vertical, retire todas las protecciones y asegúrese de que no presenta ningún daño debido al transporte. De ser así, comuníquelo inmediatamente a su transportista o suministrador para que pueda hacer las debidas reclamaciones en el plazo establecido. Guarde el embalaje, ya que siempre se deben realizar las devoluciones en su embalaje original con todos los accesorios suministrados. Compruebe los accesorios que usted debe recibir junto al equipo: - 1 Tanque externo - 1 Tapa con cables fijos - 1 Soporte para geles - 2 Cuñas de plástico - 1 Dispositivo para preparación de geles - 2 Almohadillas de silicona - Juego de placas de vidrio: - 4 placas de vidrio planas - 2 placas de vidrio planas y formateadas con espaciadores fijos de 1.0 mm Revisión 1, Mayo-07 Manual de instrucciones 53001001 Pág. 5 CASTELLANO ENGLISH - 2 placas de vidrio planas y formateadas con espaciadores fijos de 1.5 mm must have enough glycerol to be denser than the electrophoresis buffer. Well visualization may be difficult; to facilitate localization of wells you can use two methods: a. Before putting the gel support into the tank and with the comb still placed between both glass plates, outline the wells with a water resistant marking pen on the nonnotched glass plate. b. Illuminate the bench area with a light source placed directly behind the electrophoresis cell. - 1 placa de vidrio gruesa para electroforesis de 1 único gel - Juego de peines: - 2 peines de 1.0 mm grosor y 10 dientes - 2 peines de 1.0 mm grosor y 15 dientes - 2 peines de 1.5 mm grosor y 10 dientes - 2 peines de 1.5 mm grosor y 15 dientes - Garantía - Manual de instrucciones Solo aceptamos devoluciones de equipos en los 15 días posteriores al envío y siempre que vengan completos en su embalaje original. CHART 2 Maximum volume of sample depending on the type of comb and the gel thickness. 4.2 Modo de uso Nota: el equipo está diseñado exclusivamente para su uso en el laboratorio; la temperatura ambiente debe ser de 0-40 ºC y la humedad relativa no debe exceder del 80%. Para su utilización, coloque la cubeta de electroforesis en una superficie, plana, lisa y libre de vibraciones. Montaje para preparación del gel Asegúrese de que las placas de vidrio planas, las placas formateadas, los peines, las cuñas y el soporte para geles están perfectamente limpios y secos antes de proceder al montaje. Superponga sobre una placa de vidrio plana, una placa de vidrio formateada, de manera que los espaciadores fijos queden entre ambas placas. Ambas placas deben estar perfectamente alineadas en sus bordes; para ello, colóquelas verticalmente sobre una superficie plana y asegúrese de que los bordes laterales estén alineados. Inserte las placas colocadas de esta manera, en uno de los compartimentos del soporte para geles de manera que la placa formateada quede hacia el interior. Sin soltar las placas, inserte una de las cuñas (la parte plana queda en contacto con las placas de vidrio) y empújela hacia abajo para que las placas de vidrio queden bien sujetas. placa formateada Gel thickness (mm) Nº teeth Vol/well ( μ L) 1.0 10 50 15 30 10 75 15 45 1.5 Note: volumes given are approximate. Note: To obtain the best results and promote a uniform running of the stacking front, load sample buffer in all the wells whether or not they contain samples - Fill the tank with approximately 250 mL of electrophoresis buffer. Buffer level must not exceed the wells. Electrophoresis - Cover the electrophoresis tank with the lid. Note: The lid is especially designed to fit in a unique position thus assuring that the black lead is always connected to the black electrode and the red lead to the red electrode. - Plug the power leads to a power supply. - Switch the power supply on and set the desired parameters. Standard SDS gel electrophoresis is conveniently performed 125 to 200 V (constant voltage) for 45 min to 1 h. Note: The first time the apparatus is used for particular type of gel, monitor the progress of electrophoresis frequently. - When electrophoresis is complete (the marker dye front has reached the bottom of the gel), turn the power supply off and disconnect the leads. placa plana soporte para geles cuña Pág. 6 Manual de instrucciones 53001001 Revisión 1 Mayo-07 After electrophoresis - Remove the lid - Gently pull out the wedge that holds the gel; it may be slippery in detergentcontaining solutions. Take the gel support out from the electrophoresis tank. - Properly discard the electrophoresis buffer. Do not reuse the buffer. - Take the glass plate assembly with the gel out from the gel support and put them on a paper towel. - Use a thin spatula or similar to separate the glass plates. The gel will be adhe Version 1 May-07 Instruction manual 53001001 Page 23 CASTELLANO ENGLISH Gel thickness 1.0 mm 1.5 mm Acrylamide volume 1 gel Discontinuous Continuous 3.4 mL 6.7 mL 5 mL 10 mL 2 gels Discontinuous Continuous 6.7 mL 13.5 mL 10 mL 20 mL - Carefully pipet the resolving acrylamide gel filling the space between both glass plates until 1 or 2 mm above the desired level. Overlay the solution with a few drops of water-saturated n-butanol to eliminate bubbles and separate the gel from the air oxygen (inhibitor of polymerization). - Wait until the gel polymerizes (15-30 min); polymerization is faster at 4 ºC. Note: keep the assembly vertical while the acrylamide polymerizes. - After the resolving gel has polymerized, pour off any unpolymerized solution and n-butanol. Rinse the top of the gel with deionized water and drain thoroughly. - Add the stacking gel solution to within 2 mm of the top of the notched plate. Eliminate any bubble formed. - Insert completely the comb. Be careful not to trap bubbles under and between the comb teeth. - Allow the acrylamide solution to polymerize completely. 2. Continuous buffer system gels - Prepare the volume of acrylamide solution depending on gel thickness (Chart 1). - Carefully pipet the acrylamide solution filling the space between both glass plates to within 2 mm of the top of the notched plate. Eliminate any bubble formed. - Insert completely the comb. Be careful not to trap bubbles under and between the comb teeth. - Allow the acrylamide solution to polymerize completely. Assembly for gel electrophoresis and sample loading Gel electrophoresis is performed on the same support in which it has been cast, minimizing gel manipulation and speeding up and making work easier. Proceed as follows: - Turn the handles of the gel casting device to their original position. - Take off the support with the polymerized gels from the gel casting device and put it into the electrophoresis tank. Note: the special design of the tank and the gel support allows to fit them at the correct position. - Carefully remove the comb by pulling it vertically and rinse with deionized water. - Fill the central part of the gel support with approximately 150 mL of electrophoresis buffer. Make sure that the wells are completely covered with buffer. - Carefully rinse the wells with deionized water or electrophoresis buffer to eliminate bubbles or acrylamide fragments. Use a syringe or pipette. - Load the samples into the wells with a micropipette. The sample volume that can be loaded in each well depending on gel thickness is shown in chart 2. Note: samples Page 22 Instruction manual 53001001 Version 1 May-07 Nota: si se va a realizar la electroforesis de un único gel, en el otro compartimento del soporte para geles inserte la aplaca de vidrio gruesa y a continuación la cuña. Si se van a utilizar dos geles, proceda de la manera anteriormente indicada para la preparación del segundo gel. Coja el dispositivo para la preparación del gel y coloque en su base la almohadilla de silicona. Nota: La almohadilla debe estar perfectamente limpia y seca. Después de la preparación del gel, retire la junta de silicona, lávela con agua y déjela secar al aire. No utilice ningún otro método para la limpieza de la junta. Coloque el soporte en el dispositivo para preparación de geles. La base del soporte debe quedar perfectamente sellada con la junta de silicona para evitar fugas a la hora de añadir la solución de acrilamida Presione hacia adentro las palancas blancas situadas a cada lado del dispositivo de preparación de geles; gírelas simultáneamente hasta que las flechas señalen la posición adecuada según el grosor del gel (cada palanca presenta marcas con indicación 1.5 ó 1.0 que hacen referencia al grosor del gel; si está preparando geles de 1.5 mm grosor deberá girar las palancas hasta que las flechas señalen las marcas con la anotación 1.5). Preparación del gel Nota: no toque las palancas del dispositivo durante todo el proceso de preparación del gel, ya que se podría aflojar el montaje produciendo fugas de las soluciones de acrilamida. 1. Sistema tampón discontinuo Este sistema es especialmente adecuado para analizar muestras diluidas sin perder resolución. La preparación del gel se debe realizar con dos tampones distintos. De esta manera, el primer tampón (primera parte del gel, "stacking gel") asegura la migración de todas las proteínas en el frente de migración, produciéndose la acumulación de todas las proteínas cargadas en el pocillo. Cuando el frente de migración llega al segundo tampón (gel resolutivo o de separación) comienza realmente la separación de las proteínas. Revisión 1, Mayo-07 Manual de instrucciones 53001001 Pág. 7 CASTELLANO El primer gel ('stacking') es de mayor poro (menor porcentaje de acrilamida+bisacrilamida) y tiene un pH más ácido que el segundo gel que es el que realmente separa las proteínas. Para la preparación de este tipo de geles proceda de la siguiente manera: - Prepare el volumen de solución de acrilamida según el grosor del gel (Tabla 1) TABLA 1. Volumen de solución de acrilamida en función del grosor del gel. En los geles discontinuos, el volumen indicado hace referencia al volumen de solución que hay que preparar para cada tipo de gel (stacking o resolutivo). Grosor gel 1.0 mm 1.5 mm Discontinuo 3.4 mL 5 mL Volumen acrilamida 1 gel 2 geles Continuo Discontinuo Continuo 6.7 mL 6.7 mL 13.5 mL 10 mL 10 mL 20 mL Pipetee cuidadosamente la solución de gel resolutivo de acrilamida, llenando el espacio entre las dos placas de vidrio hasta 1 ó 2 mm por encima del nivel deseado. Cubra el borde del gel con unas gotas de n-butanol saturado en agua para eliminar posibles burbujas y separar el gel del oxigeno del aire (inhibidor de la polimerización). Espere hasta que el gel polimerice (15-30 min); la polimerización es más rápida a 4 ºC. Nota: mantenga siempre el montaje en posición vertical durante la polimerización. Cuando el gel resolutivo haya polimerizado, retire los restos de n-butanol y acrilamida sin polimerizar. Lave la parte superior del gel con agua desionizada y retire completamente el agua de lavado. Añada con una pipeta la solución de gel de apilamiento ("stacking gel") hasta unos 2 mm por debajo del borde de la placa formateada. Elimine cualquier burbuja que se haya formado. Inserte totalmente el peine poniendo especial cuidado en que no queden atrapadas burbujas entre y bajo los dientes del peine. Deje que el gel polimerice totalmente. 2. Sistema tampón continuo Prepare el volumen de solución de acrilamida necesario según el grosor del gel (Tabla 1) Pipeteando cuidadosamente, llene con solución de acrilamida el espacio entre las dos placas de vidrio hasta unos 2 mm por debajo del borde de la placa formateada. Elimine cualquier burbuja que se haya formado. Inserte totalmente el peine poniendo especial cuidado en que no queden atrapadas burbujas entre y bajo los dientes del peine. Deje que el gel polimerice totalmente. Montaje para electroforesis del gel y carga de muestras La electroforesis del gel se realiza en el mismo soporte en el que ha sido preparado, minimizando su manipulación y agilizando enormemente el proceso. Proceda de la siguiente manera: Pág. 8 Manual de instrucciones 53001001 Revisión 1 Mayo-07 - Take the exclusive gel casting device and put on its base a silicon rubber cushion. Note: The cushion must be perfectly clean and dry. After gel casting, remove the silicon rubber cushion, rinse it with water and allow to air dry. Do not use any other method to clean the silicon cushion. - Put the gel support into the gel casting device. The base of the gel support must be perfectly sealed with the silicon rubber cushion to avoid acrylamide solution leaks - Press inwards the white handles placed on each side of the gel casting device; turn them simultaneously until the arrows point at the correct position depending on the gel thickness (each handle presents marks with 1.5 or 1.0 indications that refer to the gel thickness; if a 1.5 mm thick gel is going to be cast, handles should be turned until the arrows point at the 1.5 marks). Gel casting Note: Do not move the handles of the gel casting device during gel casting process since the assembly could be loosened resulting in acrylamide leaks. 1. Discontinuous buffer system gels This system is specially recommended to analyze diluted samples without resolution lost. Gel casting must be performed with two different buffers. The first buffer (stacking gel) assures the accumulation of all proteins loaded in each well at the migration front. When the migration front reaches the second buffer (resolving gel), the separation of the different proteins begins. The first gel, stacking gel, presents a larger pore (lower acrylamide/bisacrylamide percentage) and presents a more acid pH than the resolving gel. For casting this type of gels procceed as fllows: - Prepare the volume of acrylamide solution depending on gel thickness (Chart 1). CHART 1. Volume of acrylamide solution that must be prepared depending on gel thickness. In discontinuous gels, the indicated volume refers to the volume of solution that must be prepared for each type of gel (stacking or resolving gel). Version 1 May-07 Instruction manual 53001001 Page 21 ENGLISH CASTELLANO - 1 thick glass plate for single gel electrophoresis - Set of combs: - 2 combs 1.0 mm thick and with 10 teeth - 2 combs 1.0 mm thick and with 15 teeth - 2 combs 1.5 mm thick and with 10 teeth - 2 combs 1.5 mm thick and with 15 teeth - Warranty - User's manual We will only accept any equipment return within 15 days after delivery and provided it comes in its original wrapping. - Gire las palancas del dispositivo para la preparación de los geles hasta su posición inicial. - Retire el soporte con los geles del dispositivo e introdúzcalo en el tanque de electroforesis. Nota: el diseño especial del tanque y del soporte para geles, solamente permite que el soporte sea colocado en la posición correcta. - Retire cuidadosamente el peine tirando de él verticalmente y aclárelo con abundante agua desionizada. - Llene la parte central del soporte para geles con unos 150 mL de tampón de electroforesis. Asegúrese de que los pocillos están completamente cubiertos de tampón de electroforesis. - Lave los pocillos con agua desionizada o con tampón de electroforesis para eliminar posibles burbujas formadas o restos de acrilamida. Para ello, ayúdese con una pipeta o jeringuilla. - Con ayuda de una pipeta, cargue las muestras en los pocillos. El volumen de muestra que se puede cargar en cada pocillo dependiendo del grosor del gel se muestra en la tabla 2. Nota: las muestras deben tener la cantidad suficiente de glicerol para hacer que la muestra sea más densa que la solución de electroforesis y así caiga hacia el fondo del pocillo. La visualización de los pocillos puede ser difícil, para facilitar su localización puede utilizar dos métodos: a. Antes de introducir el soporte con los geles en el tanque de electroforesis y con el peine todavía colocado, marque con un rotulador permanente los límites de los pocillos sobre la placa de vidrio no formateada. b. Ilumine la zona de trabajo con una fuente de luz situada justo detrás de la cubeta de electroforesis. 4.2 Operating mode Note: the equipment is exclusively designed for laboratory purposes; ambient temperate must be 0-40 ºC and relative humidity must not exceed the 80%. Prior to use, put the electrophoresis cell on a plane, smooth and vibration-free surface. Assembly for gel casting - Make sure that the flat glass plates, the notched glass plates, the combs, the wedges and the gel support are perfectly clean and dry before assembling the different components. - Put a notched glass plate on a flat plate, so as the fixed spacers stay between both plates. The edges of both plates must be perfectly aligned; to get this, put the plates vertically on a plane surface and make sure that the lateral edges are aligned. - Put both plates into a compartment of the gel support so as the notched plate faces inside. Holding the plates, insert a plastic wedge (the flan side is in contact with the glass plates) and push it downwards to perfectly hold the glass plates. TABLA 2. Volumen máximo de muestra en función del tipo de peine y del grosor del gel. Grosor gel (mm) Notched glass plate 1.0 1.5 Glass plate Gel casting support Wedge Note: if a single gel electrophoresis is going to be performed, put the thick glass plate into the other compartment of the gel support and hold it with the other plastic wedge. In case of a double gel electrophoresis, proceed as previously indicated to prepare the second gel. Page 20 Instruction manual 53001001 Version 1 May-07 Nº dientes Vol/pocillo ( μ L) 10 50 15 30 10 75 15 45 Nota: los volúmenes indicados son aproximados Nota: Para asegurar unos buenos resultados y una migración uniforme del frente del gel, no deje ningún pocillo vacío; en aquellos pocillos que queden libres añada tampón de carga. - Llene el tanque con unos 250 mL de tampón de electroforesis. El nivel de tampón no debe sobrepasar la altura a la que están los pocillos. Revisión 1, Mayo-07 Manual de instrucciones 53001001 Pág. 9 CASTELLANO Electroforesis - Coloque la tapa sobre el tanque de electroforesis Nota: El diseño especial de la tapa únicamente permite colocarla en una posición asegurando siempre que el cable negro está conectado al electrodo negro y el cable rojo al electrodo rojo. - Conecte los cables con la fuente de alimentación. - Encienda la fuente de alimentación y seleccione los parámetros deseados. La electroforesis de geles estándar en presencia de SDS se lleva a cabo a un voltaje constante de 125-200 V durante 45 min ó 1 h. Nota: La primera vez que realice la electroforesis para un determinado tipo de gel vigile frecuentemente el proceso de migración. - Cuando la electroforesis se haya completado (el colorante del frente de migración alcanza la parte inferior del gel) apague la fuente de alimentación y desconecte los cables de la tapa. Después de la electroforesis - Retire la tapa - Suavemente retire la cuña que sujeta el gel en el soporte; en soluciones que contengan detergente puede estar resbaladiza. Saque el soporte para geles del tanque de electroforesis. - Vacíe el tanque en el recipiente de desechos adecuado. No reutilice la solución tampón. - Saque las placas de vidrio con el gel del soporte para geles y colóquelas sobre un papel. - Utilice una espátula o similar para separar ambas placas de vidrio. El gel permanecerá adherido a una de las placas de vidrio. - Pase el gel a una cubeta con colorante o a un soporte adecuado para una posterior transferencia de las moléculas a una membrana. Nota: para una posterior transferencia, por favor, consulte el manual de instrucciones del Módulo de Transferencia Nahita (ref. 53001501) - Limpie el tanque y todos los accesorios con agua desionizada. Deje secar al aire. Seguridad La cubeta de electroforesis vertical debe ser utilizada por personal cualificado previamente, que conozca el equipo y su manejo mediante el manual de uso. Coloque la cubeta de electroforesis sobre una mesa horizontal, plana y estable. No coloque la cubeta de electroforesis en zonas próximas a fuentes de calor (mecheros, sopletes...). Evite las vibraciones en el lugar de trabajo. La cubeta de electroforesis vertical está preparada para ser conectada a una fuente de alimentación de CA. Una manipulación no adecuada puede resultar en quemaduras, heridas y daños a la instalación eléctrica. Nunca conecte la cubeta de electroforesis a la fuente de alimentación antes de comenzar el experimento. La corriente eléctrica proporcionada por la fuente de alimentación se transmite a la cubeta a través de los cables y la conexión de la tapa Nunca intente utilizar la cubeta de electroforesis sin la tapa puesta. Apague siempre la fuente de alimentación antes de abrir la cubeta y retirar la tapa. Nunca utilice equipos dañados, rotos o con fugas de líquido. Pág. 10 Manual de instrucciones 53001001 Revisión 1 Mayo-07 ENGLISH - Combs: the equipment is supplied with a set of 8 combs of 1.0 and 1.5 mm thick and with 10 or 15 teeth. 3. TECHNICAL SPECIFICATIONS Code 53001001 Nº gels 1 or 2 Gel dimensions 82x82 mm Glass plate dimensions 102x85 mm Nº samples 10 or 15 per gel Comb thickness 1 and 1.5 mm Buffer volume (approx.) 500 mL Working conditions 0-40 ºC and < 80% RH Electrophoresis voltage 200 V Running time 45-60 min Cell dimensions (LxWxH) 100x140x150 mm 4. OPERATING MODE 4.1 Preliminary inspection Unwrap the vertical electrophoresis cell, take off all protections and make sure it does not present any damage because of the shipment. In case it presents any damage tell it immediately to your transport agent or dealer so that they can make the claims in the correct time limit. Please keep the original wrapping; you will always need it for returns enclosed with all the accessories supplied. Please check that all the accessories are enclosed with the equipment: - 1 External tank - 1 Lid with fixed leads - 1 Gel support - 2 plastic wedges - 1 Gel casting device - 2 Silicon rubber cushions - Set of glass plates: - 4 flat glass plates - 2 flat and notched glass plates with 1.0 mm thick fixed spacers - 2 flat and notched glass plates with 1.5 mm thick fixed spacers Version 1 May-07 Instruction manual 53001001 Page 19 ENGLISH CASTELLANO Components Nahita vertical electrophoresis cell is supplied together with all the necessary components for preparation and electrophoresis of polyacrylamide gels (82x82 mm): - External tank: made of a unique seamless high quality acrylic material piece to avoid leakage and breakage. It is a durable and transparent device resistant to chemical agents and high pressure and temperatures. - Lid: it is also made of a high quality and resistant material. It presents two fixed power leads with banana connector to be plugged to a power supply. - Gel support: gel casting and electrophoresis are performed at the same support minimizing gel manipulation and speeding up and making work easier. The support includes 2 plastic wedges to hold the gel assembly and pure platinum electrodes resistant to corrosion and high temperatures. Determinados reactivos indicados en este manual son peligrosos. El usuario deberá observar estrictamente las normas de seguridad indicadas para dichos productos. El usuario deberá así mismo seguir las normas de seguridad específicas para los equipos utilizados en el procedimiento indicado en este manual (p.ej. fuentes de alimentación). Gel casting support Cuñas de plástico - Gel casting device: it is an exclusive device that presents a silicon rubber cushion on its base, allowing a perfect sealing to avoid polyacrylamide leaks that constitute a toxic risk for the user. It also presents two white handles with two positions for casting gels of 1.0 and 1.5 mm thick respectively. 5. FÓRMULAS PARA LA PREPARACIÓN DE GELES Y TAMPONES Los geles de poliacrilamida se forman por la polimerización de la acrilamida por acción de un agente entrecruzador, la bis-acrilamida, en presencia de un iniciador y un catalizador. Como iniciador se suele utilizar TEMED (N,N,N,N'-tetrametilnediamina) y como catalizador el ión persulfato (S O 2-) que se añade en forma de persulfato amónico. 2 8 La porosidad del gel viene determinada por las proporciones relativas de poliacrilamida y bis-acrilamida, siendo menor el poro cuanta más bisacrilamida vs. acrilamida se use. Los geles se denominan habitualmente en función de % acrilamida/bisacrilamida que contienen, siendo este valor el que determina el rango de separación del gel. La mayoría de las proteínas se separan bien en el rango de 5 a 10%; un menor porcentaje (mayor tamaño de poro) es mejor para separar proteínas de gran tamaño. Generalmente la electroforesis de proteínas se realiza en condiciones desnaturalizantes, es decir, las proteínas migran totalmente desnaturalizadas (pierden su estructura tridimensional). De este modo, la migración es proporcional a la carga y el tamaño de la molécula, pero no a su forma. El agente desnaturalizante más comúnmente empleado es el dodecilsulfato sódico (SDS). A continuación se detallan las fórmulas para la preparación de geles discontinuos para separación de proteínas en condiciones desnaturalizantes, y del tampón de electroforesis. Rubber cushion NOTA: la acrilamida es una potente neurotoxina. Lleve guantes en todo momento cuando manipule soluciones, geles o equipos que hayan estado en contacto con esta sustancia y observe estrictamente las normas de seguridad indicadas para su manipulación y eliminación de residuos. 1. Gel resolutivo TABLA 3. Fórmula para preparar 10 mL de solución de acrilamida de distinto %. Componente Crank Solución stock de acrilamida [29% (p/v) acrilamida, 1% (p/v) bisacrilamida en agua desionizada] - Glass plates: the equipment includes 2 flat glass plates and 2 notched plates with fixed spacers of 1.0 and 1.5 mm thick for casting and electrophoresis of gels. The equipment also includes a thick glass plate to use in case of carrying out a single gel electrophoresis. placa plana Page 18 Instruction manual 53001001 placa formateada Version 1 May-07 Volumen (mL) según el % acrilamida 7.5 % 10 % 12.5 % 2.5 3.3 4.2 15 % 4.0 1.5 M Tris-HCl (pH 8.8) 2.5 2.5 2.5 2.5 10% (p/v) SDS 0.1 0.1 0.1 0.1 Agua desionizada 4.8 4.0 3.1 2.3 10% (p/v) Persulfato amónico 0.1 0.1 0.1 0.1 TEMED 0.01 0.01 0.01 0.01 Revisión 1, Mayo-07 Manual de instrucciones 53001001 Pág. 11 CASTELLANO 2. Gel de acumulación (stacking gel) INDEX OF CONTENTS TABLA 4. Fórmula para preparar 10 mL de solución de acrilamida al 4% Componente Volumen (mL) Solución stock de acrilamida [29% (p/v) acrilamida, 1.3 1% (p/v) bisacrilamida en agua des ionizada] 1.5 M Tris-HCl (pH 8.8) 2.5 10% (p/v) SDS 0.1 Agua desionizada 6.0 10% (p/v) Persulfato amónico 0.1 TEMED 0.001 TABLA 5. Concentración final de los distintos componentes del tampón de electroforesis. El pH final debe ser de 8.3. 24.8 M Glicina 192 mM SDS 0.1% (p/v) COMENTARIOS La placas de vidrio se rompen El frente del gel no es recto Pág. 12 Nahita horizontal electrophoresis cell is specially designed for separating proteins and nucleic acids in polyacrylamide gels. The equipment is provided complete with all the necessary accessories for preparation and electrophoresis of 82x82 mm gels. 1. Tanque externo 2. Conectores tipo banana 3. Soporte para geles 4. Cuña 5. Tapa 6. Cables fijos 6. RESOLUCIÓN DE PROBLEMAS PROBLEMA - Compruebe que la cubeta está bien nivelada durante la electroforesis - El gel puede estar sobrecalentado. Reduzca el voltaje o la corriente. Utilice tampón de electroforesis previamente enfriado. Revisión 1 Mayo-07 6 2 - La cuña para sujetar el gel está demasiado apretada. - El voltaje o la corriente son demasiado elevados produciendo un sobrecalentamiento. - El tampón de electroforesis está demasiado concentrado haciendo que la corriente sea demasiado alta a un voltaje constante y produciendo sobrecalentamiento. Manual de instrucciones 53001001 17 17 19 19 24 29 27 28 2. DESCRIPTION AND COMPONENTS Concentración final Tris base 1. USES OF THE INSTRUMENT 2. DESCRIPTION AND COMPONENTS 3. TECHNICAL SPECIFICATIONS 4. OPERATING MODE 5. FORMULATION FOR GELS AND ELECTROPHORESIS BUFFER 6. TROUBLESHOOTING 7. MAINTENANCE AND CLEANING ANNEX I: CE CERTIFICATE 1. USES OF THE INSTRUMENT 3. Tampón de electroforesis Componente ENGLISH 5 2 3 4 1 Version 1 May-07 Instruction manual 53001001 Page 17 ENGLISH Thank you for choosing this equipment. We sincerely wish that you enjoy your Nahita vertical electrophoresis cell. We highly recommend looking after this equipment according to what is stated in this manual. Nahita develops its products according to the CE marking regulations as well as emphasizing the ergonomics and security for its user. The correct using of the equipment and its good quality will permit you to enjoy this equipment for years. The improper use of the equipment can cause accidents and electric discharges, circuit breakers, fires, damages, etc. Please read the point of Maintenance, where we expose the security notes. CASTELLANO Las bandas están distorsionadas TO GET THE BEST RESULTS AND A HIGHER DURATION OF THE EQUIPMENT IT IS ADVISABLE TO READ THOROUGHLY THIS MANUAL BEFORE OPERATING WITH THE EQUIPMENT. Please bear in mind the following: This manual is inseparable from the Nahita vertical electrophoresis cell, so it should be available for all the users of this equipment. You should carefully handle the electrophoresis cell avoiding sudden movements, knocks, free fall of heavy / sharp objects on it. If you have any doubt about setting up, installation or functioning do not hesitate in contacting your wholesaler. You can also tell us any doubts or suggestions you have by contacting Nahita Technical Assistance Department by email to [email protected] or by telephone: +34 807 117 040 (0.30 Euros/min). This equipment is protected under the Warranties and consumer goods regulation (10/2003). Overhaul is not covered by the equipment warranty. Accessories (including their loss) are not covered by the product's warranty. The warranty neither covers piece's deterioration due to the course of time. Please make sure you keep the invoice, either for having the right to claim or asking for warranty coverage. In case you have to send the equipment to Nahita Technical Assistance Department you should enclose the original invoice or a copy as guarantee. Please do not forget filling the warranty certificate and send it before 15 days after the date of purchase. Manufacturer reserves the right to modify or improve the manual or equipment. ATTENTION!! IF EQUIPMENTS ARE NOT PROPERLY CLEAN AND DISINFECTED THEY WOULD NOT BE ALLOWED TO REPAIR BY OUR TECHNICAL SERVICE. INDEX OF LANGUAGES Spanish English Page 16 2-15 16-28 Instruction manual 53001001 Version 1 May-07 - Las muestras contienen un exceso de sal. Dialice o reduzca la concentración de sal en las muestras antes de cargarlas en los pocillos. - Las muestras están demasiado concentradas. Dilúyalas o reduzca el voltaje. - Las muestras contienen precipitados. Centrifugue o filtre las muestras antes de la carga del gel. - El límite superior del gel resolutivo no es plano. Utilice n-butanol saturado en agua para cubrir el límite superior del gel en lugar de agua o tampón. - Los pocillos contienen restos de poliacrilamida. Lave bien los pocillos antes de cargar las muestras. Las calles son más anchas en la - Esto es normal si las calles adyacentes no se parte inferior que en la parte superior cargan con muestras similares. Es también nordel gel mal en geles de gradiente de acrilamida. La migración del colorante del fren- El tampón de electroforesis está demasiado te del gel es más lenta de lo esperado concentrado. Compruebe el procedimiento para la preparación del tampón. Si la concentración es elevada, a corriente constante el voltaje será menor del esperado. - Compruebe los parámetros (voltaje y corriente) de la fuente de alimentación. - Compruebe las conexiones de los cables y de la tapa. La migración del colorante del fren- El tampón de electroforesis está demasiado te del gel es más rápida de lo espera- diluido. Compruebe el procedimiento para la do preparación del tampón. - Compruebe los parámetros (voltaje y corriente) de la fuente de alimentación. 7. MANTENIMIENTO Y LIMPIEZA Para un adecuado funcionamiento de la cubeta de electroforesis vertical es necesario seguir algunas recomendaciones. Nota: Todas las normas de utilización citadas anteriormente carecerán de valor si no se realiza una continua labor de mantenimiento. Revisión 1, Mayo-07 Manual de instrucciones 53001001 Pág. 13 CASTELLANO Siga las instrucciones y advertencias relativas a este manual. Tenga este manual siempre a mano para que cualquier persona pueda consultarlo. Utilice siempre componentes y repuestos originales. Puede ser que otros dispositivos sean parecidos, pero su empleo puede dañar el equipo. Nunca esterilice mediante autoclave o calor los distintos componentes de la cubeta. No exponga el aparato a productos como fenol, benceno, acetona, solventes hidrocarbonatos halogenados o alcoholes de laboratorio no diluidos. Evite la exposición prolongada del equipo o sus componentes a la luz UV. Realice periódicamente una sencilla inspección de los componentes eléctricos para asegurar un buen funcionamiento del equipo y garantizar la seguridad del usuario: - Si los conectores tipo banana del soporte para geles o de los cables se mueven o balancean o si muestran signos de corrosión, deberá reemplazarlos. - Si los cables están dañados o muestran signos de desgaste, deberá reemplazarlos. ENGLISH ANEXO I: CERTIFICADO CE AUXILAB S.L. DECLARACIÓN CE DE CONFORMIDAD CUBETA DE ELECTROFORESIS VERTICAL NAHITA de Auxilab,S.L a la Directiva de Máquinas (89/392/CEE modificada) y a las reglamentaciones adoptadas para su transposición NOMBRE DEL FABRICANTE / IMPORTADOR: AUXILAB, S.L. DIRECCIÓN: Limpieza Después de cada uso, limpie los distintos componentes del equipo suavemente con agua y detergentes no abrasivos y aclárelos con agua desionizada. Nota: ponga especial cuidado en no dañar el cable de los electrodos cuando limpie el soporte para geles. Seque los componentes con un trapo suave o déjelos secar al aire. Nunca utilice productos abrasivos, estropajos o productos que puedan rayar, ya que deterioran el equipo, limitando su vida útil. ¡ATENCIÓN! NO SE ADMITIRÁ NINGÚN APARATO PARA REPARAR QUE NO ESTÉ DEBIDAMENTE LIMPIO Y DESINFECTADO. INSTRUCCIONES Polígono Morea Norte, 8 31191 Beriáin (Navarra) DECLARAMOS QUE: CUBETA ELECTROFORESIS VERTICAL 53001001 Están diseñados y fabricados de acuerdo a: Directiva 89/392/CEE, incluidas las modificaciones de la misma, y las reglamentaciones nacionales que la transponen. Directiva 89/336/CEE modificada sobre compatibilidad electromagnética. Directiva 73/23/CEE modificada sobre seguridad eléctrica. Y que se han aplicado las siguientes normas armonizadas (o parte de ellas): SOBRE PROTECCIÓN DEL MEDIO AMBIENTE No se deshaga de este equipo tirándolo a la basura ordinaria cuando haya terminado su ciclo de vida; llévelo a un punto de recogida para el reciclaje de aparatos eléctricos y electrónicos. No contiene elementos peligrosos, tóxicos para el humano pero una eliminación no adecuada, perjudicaría al medio ambiente. Los materiales son reciclables tal como se indica en la marcación. Al reciclar materiales u otras formas de reutilización de aparatos antiguos, esta Ud. Haciendo una contribución importante a la protección del medio ambiente. Por favor póngase en contacto con la administración de su comunidad para que le asesoren sobre los puntos de recogida. UNE 292-1/-2/-2/A1,UNE-EN 1050, UNE-EN 614-1,UNE-EN 1037, UNE-EN 1088, UNE-EN 547, UNE-EN 953, UNE-EN 294, UNE-EN 418, UNE-EN 894-1, UNEEN 894-2, UNE-EN 954-1, UNE-EN 60204-1, UNE 61010-1/A2, UNE-EN61010-2-051 BERIAIN a 04 de JUNIO 2007 Fdo: ALFONSO AINCIBURU SANZ DIRECTOR/GERENTE Polígono Morea Norte, 8 31191 Beriain (Navarra) - Spain. Tel. 948 310 513 Fax 948 312 071 Internet: www.auxilab.es · Email: [email protected] Pág. 14 Manual de instrucciones 53001001 Revisión 1 Mayo-07 Revisión 1, Mayo-07 Manual de instrucciones 53001001 Pág. 15