1
ENGLISH
26
Prepare and secure the piece. Adjust the current intensity in
accordance with the needs of the kind of material and joint to
be made, first making a test on a test piece. Refer to specialized
literature o regulated professional training for more information
in this respect.
The torch must receive a supply of inert gas (pure argon, usually)
proceeding from a cylinder, through a pressure-reducing system
capable of adequately regulating the gas flow as necessary.
POTENZA TIG 170 HF model includes two welding adjustments
ending:
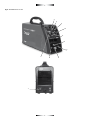
1. “Down Time” 11 control establishes a decrease amperage
ramp when the welding stops. The ramp starts in the selected
working amperage and it finishes in 0 amps. The ramp duration (from 0 to 5 seconds) is what it is adjusted with the control.
The purpose is to implement very soft arc stop for improving
finishing and crater quality. As a general rule, increase the time
at the same time you increase the welding amperage.
Except for model T100.20H, all equipments require a TIG torch
with direct connection to the flow meter and gas control by
means of a shutoff valve included in the TIG torch itself.
2. “Post Time” 12 control established the time (from 0,5 to 7 seconds) of additional gas´s output (argon) after finishing the
welding bow. The aim is that the weld is not polluted by the air
when it is liquid or too hot. As a general rule, increase the time
at the same time you increase the welding amperage.
Model T100.20H includes an internal start/stop control so that
the gas passage is governed internally by means of the control
pushbutton of the TIG torch. T100.20H also has the advantage of
the selector switch for additional gas outlet time prior to starting
and after welding has ended. This additional gas provides a
higher protection and quality of work. A short (2 sec., position
‘short’, greater saving) or long (6 sec., higher quality, position
‘long’), by means of switch 8 for this purpose.
5.- Maintenance instructions and service
5.1.- Cleaning, maintenance, lubrication,
sharpening
TIG DC 200 HF model includes a 2T-4T selector in order to
choose between pressing the trigger while you want to weld
(2T) and pressing the trigger when you want to start the welding
and being able to remove the finger of the trigger while you are
welding (4T). When you press the trigger the second time, the
welding will finish.
For cleaning operations, always disconnect the equipment and
wait for at least 10 minutes for securing that capacitors are
discharged. Clean the housing with a slightly wetted cloth.
Depending on the pollution of the working environment or at
least every 1000 hours, clean the inside with dry compressed air,
removing the upper housing and eliminating dust, metal pollution
and fluffs, paying special attention to dissipaters and to the fan.
Except for models S60.17L, PROGRESS1700L and T100.20H,
to initiate the arc, the tip of the torch must be slightly scratched
until imitation of the working arch.
5.2.- Repair services with their addresses
Model S60.17L, PROGRESS1700L, BITENSION 20/14 y
POTENZA 200 CEL, has the improved feature of a lift arc
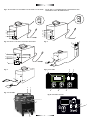
starting system (LiftArc). To initiate the TIG weld, move switch
7 to position TIG, open the gas outlet valve and bring the tip of
the torch into contact with the piece to be welded. Wait about
2 seconds and slowly lift the torch so that the arc initiates
automatically.
STAYER IBERICA
Área Empresarial Andalucía – Sector I
Calle Sierra de Cazorla No. 7
ZIP: 28320 Pinto (Madrid) SPAIN
List of parts that may be replaced by the user.
Due to the sophistication and potential danger, qualified
intervention is required except for minor repairs such as
inspection of connections and replacement of the standard
power supply plug and revision of the welding cable; they are
therefore not considered as parts that are replaceable by the
user.
Model T100.20H, TIG DC 200 HF y TIG 170 HF models present
the maxim quality of arc starting because it does not need
physical contact with the piece and for that reason, the arc and
welding conditions do not suffer damages provoked by tungsten
electrode contamination. To start TIG welding, move switch 7 to
position TIG and simply bring the tip about 3-5 mm near to the
piece to be welded. Press the pushbutton of the arch so that the
arc initiates automatically. Should there be difficulties in starting,
you can slightly lean the ceramic nozzle on the piece so as to
facilitate priming of the electrode.
6.- Regulations
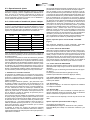
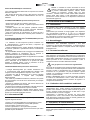
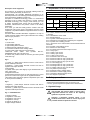
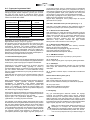
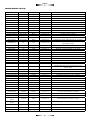
6.1.- Technical Specifications
Once the arc has initiated, the weld is made in accordance with
the needs thereof. As a general orientation, it must advance in
a manner inverse to electrode welding so that, instead of pulling
backwards, it is started by pushing forward as if the gas flow
were helped to impact on the weld coating. Incline the torch such
that it is incident in a position near (70º to 80º) to the vertical line
with respect to the horizontal line and centered with respect to
the weld coating.
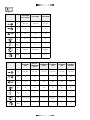
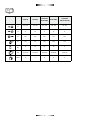
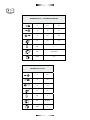
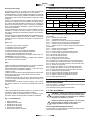
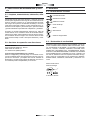
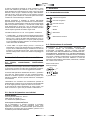
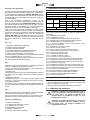
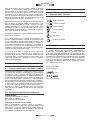
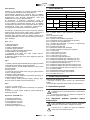
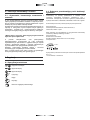
= Input voltage
= Input current
= Output current
Slowly deposit the filler material of the rod by bringing the latter
near the coating of successively fused material. To finish, simply
stop pressing the torch switches (model T100.20H) or, regarding
the rest of the models, slightly separate the torch until the arc is
interrupted, and close the manual shutoff valve of the inert gas
cylinder.
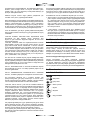
ON
-
OFF
% = Duty cycle
EN60974
= Weight
= Dimensions
-
26
= Generator power