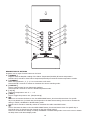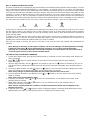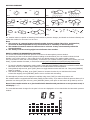
1
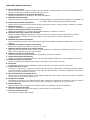
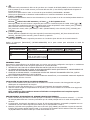
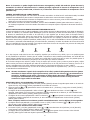
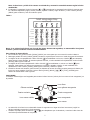
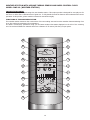
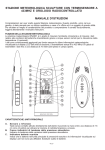
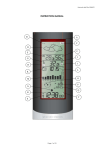
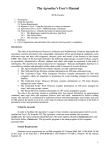
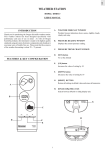
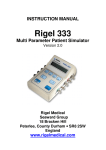
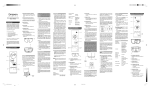
MANUAL DE INSTRUCCIONES DWS-61 ESTACIÓN METEOROLÓGICA CON SENSOR TÉRMICO DE 433 MHZ Y RELOJ CONTROLADO POR RADIO MODELO DWS-61 (ESTACIÓN METEOROLÓGICA) MANUAL DE INSTRUCCIONES Enhorabuena por la compra de su nueva estación meteorológica. Este producto exclusivo está diseñado para su uso cotidiano en el hogar o la oficina y le resultará enormemente útil. Para aprovechar al máximo todas las funciones del producto y entender mejor su funcionamiento, le rogamos que lea atentamente este manual de instrucciones. FUNCIONES DE LA ESTACIÓN METEOROLÓGICA La estación meteorológica mide su entorno inmediato y recibe datos climatológicos de hasta cinco termómetros externos. Los datos se actualizan constantemente para que usted reciba la información meteorológica más reciente en la pantalla LCD de la unidad receptora. El emisor inalámbrico de 433 MHz transmite datos a una distancia de 75 metros en espacios abiertos. B A D C E F G I H J K L M O N P R Q S T 2 FUNCIONES: UNIDAD PRINCIPAL A. Sensor de infrarrojos Es un interruptor que no requiere contacto y permite activar la retroiluminación o la función de repetición de la alarma con solo pasar la mano a una distancia de unos 6 cm. B. Flechas de tendencia de la presión atmosférica Muestra la tendencia de los cambios en la presión atmosférica. C. Indicador de batería baja Indica que queda poca carga en las pilas de la unidad principal y que la información mostrada en la pantalla LCD no es fiable. Deben cambiarse las pilas lo antes posible. D. Ventana de previsión atmosférica Muestra los iconos de previsión de tiempo soleado, ligeramente nuboso, nuboso, lluvioso, tormentoso o nevado. E. Indicador interior Muestra la temperatura y la humedad en el interior. F. Indicador de máximo/mínimo en el interior Muestra las temperaturas y los niveles de humedad máximos y mínimos en el interior. G. Indicador del sensor remoto en el exterior Muestra la señal recibida actualmente por el sensor remoto en el exterior. Puede mostrar hasta 5 sensores remotos diferentes, ubicados en 5 lugares distintos, a un máximo de 75 metros de distancia de la unidad principal. H. Indicador de cambio automático El icono animado que muestra una flecha girando aparece para indicar el cambio automático entre los 5 canales remotos. I. Indicador de máximo/mínimo en el exterior Muestra las temperaturas máxima y mínima en el exterior. J. Indicador de batería baja en el sensor remoto Aparece cuando las pilas del sensor remoto se están agotando y la temperatura medida por el sensor ya no es fiable. Deben cambiarse las pilas lo antes posible. K. Indicador de historial barométrico Muestra las lecturas de presión atmosférica registradas en las últimas 24 horas. L. Ventana de presión barométrica Muestra la lectura de presión barométrica en mb hPa (milibares/hectopascales) o inHg (pulgadas de mercurio). M. Gráfico de presión barométrica Muestra un gráfico de la tendencia de la presión barométrica en las últimas 24 horas. N. Fase lunar La animación de la fase lunar se detendrá durante 5 segundos en el lugar de la fase lunar actual. O. Posición del Sol y la Luna El Sol sale por el Este (E) y se pone por el Oeste (W) todos los días. Esta estación meteorológica puede calcular la hora de la salida y la puesta del Sol y la Luna según la ciudad indicada, y muestra un diagrama con la posición del Sol y la Luna a intervalos de 3 horas. P. Hora del amanecer y la puesta de sol Muestra la hora exacta del amanecer en una ciudad predefinida un día concreto. Pulse el botón [CITY] (CIUDAD) una vez para ver la hora de la puesta de sol. Q. Nombre de la ciudad Abreviatura del nombre de una ciudad europea. Debe configurar la ciudad antes de empezar a utilizar la estación meteorológica para disponer de datos correctos sobre el amanecer, la puesta de sol y la fase lunar. R. Ventana de reloj Muestra la fecha y la hora actuales y el día de la semana, el calendario o la hora de la alarma. S. Señal de recepción de radio Muestra el estado de la recepción de hora por radio a través de una señal DCF77. T. Icono de alarma activada Se muestra si la alarma está activada. 3 DESCRIPCIÓN DE LOS BOTONES El aparato tiene 10 botones de funciones principales en la parte posterior. 1. [ MEMORY ] (MEMORIA) Utilice este botón para alternar entre la lectura máxima o mínima de la temperatura y la humedad en el interior y la temperatura en el exterior. Mantenga pulsado el botón durante 2 segundos para borrar los registros de temperatura y humedad en el interior y de temperatura en el exterior. 2. [ CHANNEL ] (CANAL) Seleccione el canal 1, 2, 3, 4 ó 5, o bien acceda al modo de cambio automático. Mantenga pulsado el botón durante 2 segundos para activar o desactivar el modo de búsqueda de sensores. 3. [ HISTORY ] (HISTORIAL) Pulse este botón para ver las lecturas barométricas de las últimas 24 horas. Mantenga pulsado el botón 2 segundos para entrar en el modo de ajuste de altitud. 4. [ °C/°F ] Permite alternar entre las dos unidades de temperatura: °C <- ->°F. 5. [ UNIT ] (UNIDAD) Pulse este botón para alternar entre las unidades de presión: (mb hPainHg). 6. [ ] Pulse este botón una vez para adelantar la fecha en la que desea ver el estado de la FASE LUNAR, la hora del amanecer o la de la puesta de sol de un día concreto, en formato día-mes-año (o mes-día-año, dependiendo del ajuste de formato de fecha). Pulse una vez para aumentar el valor en el modo de ajuste de RELOJ, CALENDARIO o ALARMA. Mantenga pulsado el botón durante 2 segundos para activar o desactivar manualmente la función controlada por radio. 4 7. [ ] Pulse este botón para atrasar la fecha en la que desea ver el estado de la FASE LUNAR, la hora del amanecer o la de la puesta de sol en un día concreto, en formato día-mes-año (o mes-día-año, dependiendo del ajuste de formato de fecha). Pulse una vez para reducir el valor en el modo de ajuste de RELOJ, CALENDARIO o ALARMA. Pulse una vez para activar o desactivar la alarma diaria en el modo de visualización de la alarma. 8. [ CITY ] (CIUDAD) Pulse una vez para alternar entre la hora del amanecer y la de la puesta de sol de una ciudad predeterminada en un día concreto. El icono indica la hora del amanecer y el icono la de la puesta de sol. Mantenga pulsado el botón durante 2 segundos para entrar en el modo de ajuste de ciudad. Utilice [ ] y [ ] para seleccionar la abreviatura del país y la ciudad según la lista del apéndice. Pulse el botón [CITY] (CIUDAD) para confirmar. Utilice los botones [ ] y [ ] para seleccionar DST (horario de verano) «ON» (ACTIVADO) u «OFF» (DESACTIVADO). Pulse el botón [CITY] (CIUDAD) para confirmar. 9. [ CLOCK ] (RELOJ) Permite alternar la pantalla del reloj entre segundos (hora-minutos-segundos), día (hora-minutos-día de la semana), calendario (fecha-mes-año), hora de alarma y repetición. 10.[ MODE ] (MODO) Mantenga pulsado durante 2 segundos para entrar en el modo de ajuste del color de la retroiluminación. Deslice el interruptor [BACKLIGHT] (RETROILUMINACIÓN) de la parte trasera para seleccionar el modo de retroiluminación. Power Supply Slide switch Position Sólo batería Batería y adaptador Sólo adaptador Acerque la mano en frente del sensor IR para activar la luz de retroiluminación durante 5 segundos Auto Desactivar la function de retroiluminación OFF Acerque la mano en frente del Retroiluminación siempre encendida ON sensor IR para activar la luz de retroiluminación durante 5 segundos PRIMEROS PASOS Esta estación meteorológica se ha diseñado para que resulte muy sencillo configurarla. Para lograr un rendimiento óptimo, es necesario llevar a cabo los pasos siguientes en el orden adecuado. 1. INTRODUZCA LAS PILAS DE LA UNIDAD PRINCIPAL ANTES QUE LAS DE LOS SENSORES. 2. LA UNIDAD RECEPTORA NO SE PUEDE AJUSTAR MANUALMENTE HASTA QUE FINALICE EL PROCEDIMIENTO DE REGISTRO DE LOS SENSORES REMOTOS INALÁMBRICOS. 3. COLOQUE LA UNIDAD REMOTA Y LA PRINCIPAL DENTRO DEL ÁREA DE TRANSMISIÓN EFECTIVA, QUE EN CIRCUNSTANCIAS NORMALES ES DE 75 METROS. Aunque la unidad remota es resistente a distintas condiciones atmosféricas, es recomendable mantenerla alejada de la luz solar directa, la lluvia o la nieve. COLOCACIÓN DE LAS PILAS EN LA UNIDAD PRINCIPAL 1. Gire la tuerca metálica de la parte inferior de la unidad en el sentido contrario al de las agujas del reloj para desbloquear el compartimento de las pilas. 2. Introduzca cuatro pilas alcalinas de 1,5 V y tamaño AA respetando las marcas de polaridad. 3. Vuelva a colocar la tapa del compartimento de las pilas y gire la tuerca metálica en el sentido de las agujas del reloj para bloquearla. Nota: cambie las pilas cuando se muestre el indicador correspondiente en la esquina superior derecha de la pantalla LCD. PROCEDIMIENTO DE REGISTRO DEL SENSOR REMOTO INALÁMBRICO 1. Primero introduzca 4 pilas AA en la unidad principal. El indicador de temperatura exterior mostrará --.- y el icono de onda parpadeará durante 2 minutos para indicar que la unidad principal está en el modo de búsqueda de sensores. 2. A continuación, introduzca 2 pilas AAA en el sensor. El LED del panel delantero comenzará a parpadear con una velocidad de una vez cada 2 segundos para indicar que se está utilizando el canal 1. 3. Mientras el LED del sensor parpadea, pulse una vez el botón [CH] (CANAL) para cambiar el ajuste de canal al 2. El botón [CH] permite cambiar hasta el canal 5. La frecuencia de parpadeo del LED indica el canal. Por ejemplo, un parpadeo doble constante indica que el canal seleccionado es el 2. 5 Nota: si el usuario no pulsa ningún botón durante 10 segundos, saldrá del modo de ajuste de canal y transmitirá la señal de radiofrecuencia. La unidad principal registrará la lectura de temperatura (si el transmisor tiene una pantalla LCD, el botón ºC/ºF alternará entre las unidades de temperatura en la pantalla LCD). CAMBIO AUTOMÁTICO DEL CANAL REMOTO Este dispositivo está equipado con una función de cambio automático. Si dicha función está seleccionada, la unidad cambiará automáticamente para mostrar la temperatura de cada sensor remoto durante 6 segundos. 1. Para recuperar manualmente la lectura de temperatura de un sensor concreto, pulse el botón CHANNEL (CANAL) hasta que se muestre el número del canal que busca. 2. Para activar la función de cambio automático, utilice el botón CHANNEL (CANAL) para seleccionar el canal 1, 2, etc. hasta que aparezca el icono de cambio automático en la esquina superior izquierda de la tercera línea de la pantalla. RELOJ CONTROLADO POR RADIO MEDIANTE FRECUENCIA DCF77 La hora controlada por radio se calcula mediante el reloj atómico de cesio de Braunschweig (reloj oficial de Alemania). La hora se codifica y se transmite desde Mainflingen (cerca de Fráncfort) a través de una señal DCF77 (77,5 kHz). El alcance de transmisión de la señal es de 1500 km, lo que significa que la mayor parte de Europa Central y Occidental recibe esta señal. Dentro de estos límites, la hora recibida es totalmente precisa. No obstante, existen muchos factores ambientales que pueden afectar a la recepción RCC. Por ejemplo, monitores de ordenador u otros dispositivos electrónicos, superficies metálicas, edificios altos, etc. Lo más recomendable es colocar el aparato cerca de una ventana y orientado hacia Mainflingen (cerca de Fráncfort, Alemania). Consulte el indicador de fuerza de la señal RCC en la pantalla del reloj para verificar si hay alguna onda sobre la torre de recepción. Hay 4 iconos de onda para indicar los 4 niveles de fuerza de la señal RCC: Muy Débil Media Fuerte Si no hay ninguna onda sobre la torre de recepción, significa que la señal es muy débil y que no es posible ajustar el reloj mediante la señal RCC. Intente girar la unidad o colocarla en otras ventanas para obtener una señal RCC de mayor calidad. También hay que tener en cuenta que la señal RCC es más fuerte por la noche. Es posible ajustar el reloj manualmente con la hora local y dejarlo por la noche para que reciba la señal RCC. Si no funciona ninguna otra solución, saque el reloj al exterior por la noche, quite y vuelva a poner las pilas y déjelo toda la noche para forzar la búsqueda por radio de la señal de hora. Si el reloj funciona en el exterior, pero no en el interior, probablemente tiene algún problema relacionado con interferencias dentro de su casa o edificio. Una vez recibida la señal de la hora, el icono de las ondas permanecerá en la pantalla LCD, y la hora y el calendario se actualizarán automáticamente. Nota: durante 10 minutos a partir de la recepción de la señal, quedarán bloqueados todos los ajustes manuales. Si desea realizar algún ajuste manual, pulse una vez el botón [ ] para desactivar la recepción. También puede pulsar y mantener el mismo botón durante 3 segundos para activar la recepción manualmente en el modo normal. El reloj funcionará como un reloj de cuarzo normal si no logra recibir la señal RCC. AJUSTE DEL RELOJ, EL CALENDARIO Y EL IDIOMA 1. En el modo de reloj, mantenga pulsado el botón [CLOCK] (RELOJ) durante 2 segundos para entrar en el modo de ajuste del reloj. Se mostrará la hora parpadeando en formato de 24 horas. 2. Pulse los botones [ ] o [ ] para alternar entre los formatos de 12 y 24 horas, y luego pulse el botón [CLOCK] (RELOJ) para confirmar. 3. Los dígitos de las horas parpadearán. Utilice el botón [ ] para adelantar una hora o el botón [ ] para atrasarla, hasta ajustar la hora correcta. Si mantiene pulsado cualquiera de los botones, el valor cambiará más rápidamente. Pulse el botón [CLOCK] (RELOJ) para confirmar. 4. Los dígitos de los minutos parpadearán. Utilice los botones [ ] o [ ] para ajustar los minutos al valor correcto. Si mantiene pulsado cualquiera de los botones, el valor cambiará más rápidamente. Pulse el botón [CLOCK] (RELOJ) para confirmar. Nota: cualquier cambio en los minutos pondrá automáticamente a cero los dígitos de los segundos. 5. Los dígitos del año parpadearán y se mostrará el icono Yr (Año). Pulse los botones [ ] o [ ] para ajustar el año correcto. Pulse el botón [CLOCK] (RELOJ) para confirmar. Nota: el intervalo de años es de 2000 a 2099. 6. Los iconos D (Día) y M (Mes) parpadearán. Pulse [ ] o [ ] para seleccionar D M (Día Mes) o M D (Mes Día) como formato. Pulse el botón [CLOCK] (RELOJ) para confirmar. 7. Los dígitos del mes parpadearán. Pulse los botones [ ] o [ ] para ajustar el mes correcto. Pulse el botón [CLOCK] (RELOJ) para confirmar. Repita la operación para ajustar la fecha. 6 8. Nota: la fase lunar y el día de la semana se calcularán y mostrarán automáticamente según la fecha establecida. El indicador E parpadeará. Pulse los botones [ ] o [ ] para alternar la presentación del día de la semana entre los 5 idiomas disponibles (inglés, alemán, francés, español e italiano, según la tabla 1). Pulse el botón [CLOCK] (RELOJ) para confirmar y salir del modo de ajuste. Tabla 1 Multi Language Day display language ENGLISH SUNDAY MONDAY TUESDAY WEDNESDAY THURSDAY FRIDAY SATURDAY GERMAN FRENCH SPANISH ITALIAN (SU) (SO) (DI) (DO) (DO) (MO) (MO) (LU) (LU) (LU) (TU) (DI) (MA) (MA) (MA) (WE) (MI) (ME) (MI) (ME) (TH) (DO) (JE) (JU) (GI) (FR) (FR) (VE) (VI) (VE) (SA) (SA) (SA) (SA) (SA) Nota: si no pulsa ningún botón en el modo de ajuste durante 10 segundos, se mantendrán los ajustes actuales y volverá al modo normal automáticamente. Para ajustar la alarma diaria: 1. En el modo de reloj, pulse el botón [CLOCK] (RELOJ) tres veces para que se muestre la hora de la alarma. 2. Mantenga pulsado el botón [CLOCK] (RELOJ) durante 2 segundos para entrar en el modo de ajuste de la alarma. 3. Los dígitos de la hora parpadearán. Utilice el botón [ ] para adelantar una hora o el botón [ ] para atrasarla, hasta ajustar la hora deseada. Si mantiene pulsado el botón, el valor cambiará más rápidamente. Pulse el botón [CLOCK] (RELOJ) para confirmar. 4. Los dígitos de los minutos parpadearán. Utilice el botón [ ] para adelantar un minuto o el botón [ ] para atrasarlo, hasta ajustar los minutos correctamente. Si mantiene pulsado el botón, el valor cambiará más rápidamente. Pulse el botón [CLOCK] (RELOJ) para confirmar y finalizar el ajuste. 5. Cuando la alarma esté sonando, pase la mano por delante del sensor de infrarrojos para postergar la alarma, de forma que suene pasados 5 minutos. Pulse el botón [CLOCK] (RELOJ), [ ], [ ] o [CITY] (CIUDAD) para detener la alarma hasta el día siguiente. FASE LUNAR La estación meteorológica está equipada para mostrar 8 fases lunares (es decir, de luna nueva a luna menguante) en la pantalla. Luna llena Gibosa creciente Luna gibosa menguante Cuarto creciente Cuarto menguante Luna menguante Luna nueva visible Luna nueva • • La animación de la fase lunar se detendrá durante 5 segundos en el lugar de la fase lunar actual, según los cálculos realizados a partir de la fecha ajustada. También es posible pulsar los botones [ ] o [ ] para desplazarse por el calendario y consultar la fase lunar de una fecha específica distinta de la ajustada. 7 POSICIÓN DEL SOL Y LA LUNA Y HORA DEL AMANECER Y LA PUESTA DE SOL La estación meteorológica calculará automáticamente la posición del Sol, la de la Luna, y la hora del amanecer y la puesta de sol, según la ciudad y los datos que haya proporcionado. PREVISIÓN METEOROLÓGICA Soleado Lluvioso Parcialmente nuboso Tormentoso Nublado Nevado La estación meteorológica puede detectar cambios en la presión barométrica local y, a partir de los datos recopilados, predecir el tiempo de las próximas 12 a 24 horas. Notas: 1. La precisión de una previsión meteorológica basada en la presión general es de entre el 70% y el 75%, de modo que no podemos hacernos responsables de los inconvenientes causados por una previsión inexacta. 2. La previsión meteorológica es válida durante las siguientes 12 a 24 horas. Es posible que no refleje la situación actual. 3. La previsión de tiempo soleado en horas nocturnas significa que el tiempo estará despejado. CÓMO COMPROBAR LA PRESIÓN BAROMÉTRICA La presión barométrica actual e histórica se muestra en la ventana de presión atmosférica. Para supervisar la lectura de presión barométrica a nivel del mar a partir de determinada altitud, deberá seleccionar la altitud local (de –100 a 2500 metros o de –330 a 8200 pies) en el ajuste de altitud. La estación meteorológica requiere que introduzca la altitud en metros y en pies por separado. Para determinar la altitud de su ubicación, póngase en contacto con la biblioteca local, los servicios de previsión del tiempo de radio o televisión, o visite en Internet la siguiente página web: http://www.worldatlas.com/aatlas/infopage/elvation.htm 1. 2. 3. Para entrar en el modo de ajuste de compensación de la altitud, mantenga pulsado el botón [HISTORY] (HISTORIAL) durante 2 segundos para cambiar del modo de ajuste de la presión barométrica al de ajuste de la altitud durante 10 segundos y el icono de los metros comenzará a parpadear. En el modo de ajuste de la altitud, pulse el botón [UNIT] (UNIDAD) para alternar entre pies y metros. A continuación, pulse el botón [HISTORY] (HISTORIAL) para confirmar. La última lectura de altitud parpadeará. Pulse el botón [UNIT] (UNIDAD) para aumentar el valor en 10 unidades. Mantenga pulsado el botón para que el avance sea más rápido. Pulse el botón [HISTORY] (HISTORIAL) una vez para confirmar y salir del modo de ajuste. La presión atmosférica se puede mostrar en mb hPa o inHg. Pulse el botón [UNIT] (UNIDAD) para seleccionar la unidad de presión. La estación meteorológica está equipada para almacenar las lecturas barométricas de las últimas 24 horas. Si desea comprobar el historial de presión de una hora concreta en las últimas 24, pulse el botón [HISTORY] (HISTORIAL). Con cada pulsación del botón retrocederá una hora. 8 Nota: si acaba de poner las pilas a la estación meteorológica y aún no se han realizado mediciones, el historial mostrará «----». Los cambios barométricos registrados en las últimas 24 horas se muestran en un gráfico de barras bajo la ventana de presión barométrica. AJUSTE DEL COLOR DE LA RETROILUMINACIÓN Compruebe si el interruptor de retroiluminación está en la posición de encendido y mantenga pulsado el botón [MODE] (MODO) durante 2 segundos para entrar en el modo de ajuste de color de retroiluminación. El gráfico barométrico mostrará una «C» para indicar al usuario que seleccione el color. La retroiluminación alternativa indica que está configurada en el modo automático y que el color cambiará según las condiciones climatológicas (consulte la sección «CAMBIO DE COLOR DE RETROILUMINACIÓN SEGÚN LAS PREVISIONES METEOROLÓGICAS»). Pulse el botón [UNIT] (UNIDAD) para seleccionar un color fijo de retroiluminación en la secuencia «ÁMBAR»«AZUL»«PÚRPURA» y de nuevo modo automático. Pulse el botón [MODE] (MODO) para confirmar el ajuste o saldrá de este modo automáticamente cuando transcurran 10 segundos. Nota: la combinación de colores de retroiluminación está sujeta a cambios en el producto final. CAMBIO DEL COLOR DE RETROILUMINACIÓN SEGÚN LAS PREVISIONES METEOROLÓGICAS Si la retroiluminación está configurada en el modo automático, el color de la retroiluminación cambiará según las previsiones meteorológicas, para que el usuario compruebe fácilmente el tiempo previsto. Soleado: color ámbar Ligeramente nublado y nublado: color púrpura Lluvioso o tormentoso (o nevado): color azul Especificaciones Unidad principal Intervalo de temperaturas mostrado : –10 °C a +60 °C (14 °F a 140 °F) Intervalo de temperaturas de funcionamiento : 0 °C a +50 °C (32 °F a 122 °F) Resolución de temperatura : 0,1 °C (0,2 °F) Medición de temperatura mediante dispositivos remotos Medición de la humedad relativa en el interior de 25% HR a 95% HR a 25 °C (77 °F) Pilas : 4 pilas alcalinas UM-3 AA 1,5 V Sensor Intervalo de temperaturas mostrado Intervalo de temperaturas de funcionamiento Resolución de temperatura Intervalo de humedad mostrado Intervalo de humedad de funcionamiento Frecuencia de transmisión RF Rango de transmisión RF Pilas : : : : : : : : –20 °C a +60 °C (-4 °F a 140 °F) -10 °C a +50 °C (14 °F a 122 °F) 0,1 °C (0,2 °F) 20% a 99% 20% a 99% 433 MHz 75 metros en área abierta 2 pilas alcalinas UM-4 AAA 1,5 V Precaución: Es posible que en entornos con muchas interferencias de frecuencia de radio la unidad no logre establecer o mantener la comunicación con las unidades remotas. La situación volverá a la normalidad cuando cesen las interferencias. El producto puede sufrir perturbaciones a causa de interferencias electromagnéticas de gran intensidad. Si se da el caso, reinícielo para restablecer el funcionamiento normal. En caso de que no sea posible restablecer el funcionamiento, utilice el producto en otra ubicación. 9 C i udad Berlin Dusseldorf Dresden Frankfurt Flensburg Freiburg Hann over B r eme n Hamburg Ro sto ck Stralsund Koblenz Kiel Kassel Leipzig Muen chen Magdeburg Nurnberg Regensburg Stuttgart Saarbruechen Schwerin Alborg Arhus Copenhagen Odense Alicante An dorra Badajoz Barcelona Bilbao Cadix Cordoba Ibiza La Coruna Leo n Las Palmas Madrid Malaga Salamanca Sevilla Valencia Zaragoza Besancon Biarritz Bordeaux Brest Cherbourg Clermont Ferrand Lyo n Marseille Mon aco Metz Nantes Nice Orleans Paris Perpignan Lille Rouen Strasbourg Apéndice Lista de abreviación de ciudades europeas C ódigo ciudad País Código país BER German y DEU DUS German y DEU DRE German y DEU FRA German y DEU FLE German y DEU FRE German y DEU HAN German y DEU BRM German y DEU HAM German y DEU HRO German y DEU HST German y DEU KOB German y DEU KI E German y DEU KAS German y DEU LEZ German y DEU M U E German y DEU MAG German y DEU NUR German y DEU REG German y DEU STU German y DEU SAA German y DEU SCH German y DEU ALB D e n ma r k DNK ARH D e n ma r k DNK CPH D e n ma r k DNK ODE D e n ma r k DNK AL I Spain ESP AND Andorra ESP BAD Spain ESP BAR Spain ESP BIL Spain ESP CAD Spain ESP COR Spain ESP IBZ Spain ESP LCO Spain ESP LE O Spain ESP L PA Spain ESP MAD Spain ESP M A L Spain ESP SAL Spain ESP SEV Spain ESP VAL Spain ESP ZAR Spain ESP BES France FRA BIA France FRA BOR France FRA BRE France FRA CHE France FRA CMF France FRA LYO France FRA MAR France FRA MCO France FRA MET France FRA NAN France FRA NIC France FRA ORL France FRA PAR France FRA P E R France FRA L I L France FRA ROU France FRA STR France FRA 10 C i udad Toulouse Helsinki Aberdeen Belfast Birmingham Bristol Edinburgh Kingston Liverpool L o nd on Manchester Newcastle upon Tyne Pl ymou th Budapest Zagreb A n c o n a Bari Bologna Cagliari Catania Firenze Foggia Genova Lecce Messina Milano Napo li Pal e rmo Pa rma Per r ero Ro me To r i n o Tr ies t e Venezia Verona Ventimiglia Dublin Luxembourg Bergen Oslo Stavanger Amsterd am Arnhem Eindh ov en Enschede Groningen Den Haag Rotte rdam Evora Coimbra Faro Leiria Lisbon P o r t o Gdansk Krakow Po zn an Szczecin Warsaw Krasnodar Moscow Novosibirsk Samara C ódigo ciudad T O U HE L ABD BEL BIR BRI EDH KIN LVP LON MAN N U T P LY BUD ZAG ANC BAI BOL CAG C AT FIR FOG GEN LEC MES M I L NAP PA L PA M PRO ROM T O R TRI VEN VER VTG DUB LUX BGN OSL STA AMS ARN EI N ENS GRO HAA R O T AVO COI FAR L E I LIS POR GDZ K K W POZ SZC WAW KRA MOS NOV SAM País France Finland UK UK UK UK UK UK UK UK UK UK UK Hungary Cro atia Italy Italy Italy Italy Italy Italy Italy Italy Italy Italy Italy Italy Italy Italy Italy Italy Italy Italy Italy Italy Italy Ireland Luxembourg Norway Norway Norway Netherlands Netherlands Netherlands Netherlands Netherlands Netherlands Netherlands Portugal Portugal Portugal Portugal Portugal Portugal Po la n d Po la n d Po la n d Po la n d Po la n d Russia Russia Russia Russia 11 Código país FRA FIN GBR GBR GBR GBR GBR GBR GBR GBR GBR GBR GBR HUN HRV I TA I TA I TA I TA I TA I TA I TA I TA I TA I TA I TA I TA I TA I TA I TA I TA I TA I TA I TA I TA I TA IRL LUX NOR NOR NOR NLD NLD NLD NLD NLD NLD NLD P RT P RT P RT P RT P RT P RT POL POL POL POL POL RUS RUS RUS RUS C i udad St. Petersburg Ufa Vladivostok Yekaterinburg Gothenburg Malmo Stockholm Bratislava Ljubljana Berlgrade Graz Innsbruck Linz Salzburg Vienna Antwerp en Brugge Bruxelles Charleroi Liege Basel Bern Chur Geneva L o c a r n o Lucerne St Moritz St Gallen Sion Zurich Prague Hong Kong C ódigo ciudad P E T UFA VLA YEK GOT M L O STO BRV LJU BEO GRZ INN LN Z SLZ VIE A N T BRG BRU CHA L I E BAS BRN CHR GNV LOC LUC MOR SGL SIO ZUR PRG HKG País Russia Russia Russia Russia Sweden Sweden Sweden Slovakia Slovenia Serbia and Montenegro Austria Austria Austria Austria Austria Belgium Belgium Belgium Belgium Belgium Switzerland Switzerland Switzerland Switzerland Switzerland Switzerland Switzerland Switzerland Switzerland Switzerland Czech Republic China Código país RUS RUS RUS RUS SWE SWE SWE SLO SLO SCG AUT AUT AUT AUT AUT BEL BEL BEL BEL BEL CHE CHE CHE CHE CHE CHE CHE CHE CHE CHE CZE CHN Declaración de Conformidad Por medio de la presente Flamagas SA declara que el producto DWS-61 cumple los requisitos y objetivos de protección básicos de: • La Directiva 2004/108/EC de Compatibilidad Electromagnética • La Directiva 1999/5/CE sobre Aparatos de Telecomunicación • La Directiva 73/23/EC de Baja Tensión Para obtener una copia completa de la declaración de conformidad visite la dirección www.electronicaflamagas.com Garantía Este aparato tiene una garantía de 2 años desde la fecha de adquisición contra todo fallo de fabricación. Esta garantía no cubre las pilas. El incumplimiento de las instrucciones o precauciones de uso contenidas en este manual implican la pérdida automática de la garantía. Para que esta garantía tenga validez, es necesario presentar el ticket o factura de compra original. Importador exclusivo Flamagas S.A., www.electronicaflamagas.com 12 INSTRUCTION MANUAL DWS-61 WEATHER STATION WITH 433MHZ THERMO SENSOR AND RADIO CONTROL CLOCK MODEL: DWS-61 (WEATHER STATION) INSTRUCTION MANUAL Congratulations on your of purchasing this new Weather Station. This unique product is designed for everyday use for the home or office and is a definite asset of great use. To fully benefit from all the features and understand the correct operation of this product, please read this instruction manual thoroughly. FUNCTIONS OF THE WEATHER STATION This weather station measures the environment of its surrounding area and receives weather data transmitting from up to five outdoor thermometers for temperature. The data is continuously updated to bring you the latest weather information displayed on the LCD of the receiving unit. Its wireless 433MHz can transmit data over a distance of 75 meters (250 feet) in open space. B A D C E F G I H J K L M O N P R Q S T 14 FEATURES: MAIN UNIT A. IR sensor It is a contactless key for user to wave hand within 3 inches distance to activate the backlit or snooze function. B. Air pressure trend arrows Indicate the trend of air pressure changes. C. Low battery indicator Shown to indicate the battery in the main unit is low and all displayed information in LCD is no longer reliable. The user needs to change the batteries at once. D. Weather fo re ca st w indow Displays the weather-forecast icons for sunny, slightly cloudy, cloudy, rainy, stormy and snowy. E. Indoor indicator Indicates the indoor temperature and humidity are displayed. F. Indoor maximum/minimum indicator Indicates the maximum/minimum indoor temperature and humidity are displayed. G. Outdoor remote sensor indicator Indicates the current outdoor remote sensor signal received. It can display up to 5 different remote sensors which is placed in 5 different places and within 75 meter distance from the main unit. H. Auto scroll indicator The animated rolling arrow icon is shown to indicate the auto scroll of 5 different remote channel. I. Outdoor maximum/minimum indicator Indicates the maximum/minimum outdoor temperature is displayed. J. Remote sensor battery low indicator Appears when the batteries of the remote sensor are running dry and the temperature measured by this sensor is no longer reliable. The user must change the batteries at once. K. Barome tric hist ory indicato r Indicates the recorded air pressure reading in the past 24 hours. L. Barometric pressure window Displays the barometric pressure reading in mb hpa or inHg. M. Barometric pressure chart Shows the barometric pressure trend chart for the past 24 hours. N. Moon phase The animated running moon phase will pause for 5 seconds in place of current moon phase. O. Sun position and Moon position Sun rises from the east (E) and goes down in the west (W) everyday. This weather station can calculate the different sunrise, sunset, moonrise and moonset time according to the input city and diagrams the sun and moon position in a day at 3 hour interval. P. Sunrise and Sunset time Shows the exact sunrise time of a pre-set city in a specific day. Press [CITY] button once to toggle to see the sunset time. Q. City name Abbreviation of a city name in Europe. The user must set to his own located city before start to use this weather station to have the correct sunrise, sunset time & moon phase. R. Clock window Display current time, current time and weekday, calendar or alarm time. S. Radio reception signal Indicates the condition of DCF77 radio controlled time reception. T. Alarm on icon Appears when alarm is activated. 15 DESCRIPTION OF BUTTONS Sculpture has 10 major function buttons on the back 1. [ MEMORY ] Toggle to view the Max/Min reading of the Indoor Temperature/Humidity & Remote temperature. Press & hold 2 seconds to clear Indoor temperature/humidity memories & Remote temperature records. 2. [ CHANNEL ] Select among channel 1, 2, 3, 4, 5 or to enter auto scroll mode. Press and hold 2 seconds to activate or deactivate the sensor searching mode. 3. [ HISTORY ] Press to view the past 24-hour barometric readings. Press and hold 2 seconds to enter the altitude adjustment mode. 4. [ °C/°F ] Toggle the temperature unit °C <- ->°F. 5. [ UNIT ] Press to toggle the pressure unit. (hPa/mbinHg). 6. [ ] Press once to increase the date to view the MOON PHASE status, Sunrise and Sunset time of a specific day in Day-Month-Year (or Month-Day-Year depends on the date format setting). Press once to increase the setting in CLOCK, CALENDAR or ALARM setting mode. Press & hold 2 seconds to manually activate or deactivate the radio controlled function. 7. [ ] Press to decrease the date to view the MOON PHASE status, Sunrise and Sunset time of a specific day in Day-Month-Year (or Month-Day-Year depends on the date format setting). Press once to decrease the setting in CLOCK, CALENDAR or ALARM setting mode. Press once to arm or disarm the daily alarm under alarm display mode. 16 8. [ CITY ] Press once to toggle between the sunrise and sunset time of a pre-set city in a specific day. The icon is displayed to prompt for sunrise time and the icon is displayed to prompt for sunset time. Press and hold 2 seconds to enter city setting mode, use [ ] and [ ] to select the abbreviation of country name and then the city name according to the list in the appendix, press [CITY] button to confirm. Use [ ] and [ ] to select the DST (Daylight Saving Time) ‘ON’ or ‘OFF’, press [CITY] button to confirm. 9. [ CLOCK ] Toggle amongst display for Clock-Sec (HR-MIN-Sec), Clock-day (HR-MIN-Weekday), Calendar (Date-Month-Year), alarm time and repeat… 10.[ MODE ] Press & hold 2 seconds to enter backlight color setting mode. Slide switch [BACKLIGHT] on the rear side to select the backlight mode Power Supply Slide switch Position Battery Only Battery & Adapter Adapter Auto Wave hand in front of the IR sensor to activate backlight for 5 seconds Disable the backlight function OFF ON Wave hand in front of the IR Backlight always on sensor to activate backlight for 5 seconds GETTING STARTED This Weather Station was designed for easy set up. For best operation, the following steps are required to be done in the proper sequence. 1. INSERT BATTERIES FOR MAIN UNIT BEFORE DOING SO FOR THE SENSOR UNITS. 2. RECEIVING UNIT CANNOT BE SET MANUALLY UNTIL THE WIRELESS REMOTE SENSOR UNIT REGISTRATION PROCEDURE HAS BEEN COMPLETED. 3. POSITION THE REMOTE UNIT AND MAIN UNIT WITHIN EFFECTIVE TRANSMISSION RANGE, WHICH, IN USUAL CIRCUMSTANCES, IS 75 METERS. Although the remote unit is weather resistant, it should be placed away from direct sunlight, rain or snow. BATTERY INSTALLATION FOR MAIN UNIT 1. Turn the metal nut anti-clockwise on the bottom of the unit to open and release the battery compartment . 2. Insert 4 AA size 1.5V alkaline battery as indicate by the polarity. 3. Push the battery compartment back, turn the metal nut clockwise to lock. Note: Replace the batteries when the low battery indicator appears on the top-right corner of the LCD. WIRELESS REMOTE SENSOR REGISTRATION PROCEDURE 1. Insert x4 AA batteries first to the main unit, the outdoor temperature display shows --.- While the wave icon will keep blinking for 2 minutes indicate unit is in sensor searching mode. 2. In a second step, insert the x2 AAA batteries for the sensor unit. The LED on the front panel will start flashing at a rate of one time per around 2 seconds indicates channel-1 is in use. 3. While the LED in the sensor unit is flashing, press once the [CH] key will change the sensor channel setting to 2. Keep toggle on [CH] key can change channel setting up to 5. The LED is blinking at a frequency to indicate the channel setting. i.e. continuous blinks 2 times indicate channel-2 is selected. Note : If user does not press any key for 10 seconds, it w ill exit the channel setting mode and transmit the RF signal. The main unit will register the temperature reading. (If the transmitter has the LCD display, th e C/F key w ill toggle the tempera ture unit on the LCD.) REMOTE CHANNEL AUTO-SCROLLING This device is equipped with an auto-scroll function. While the auto-scroll function is set, the unit will automatically cycle to display the temperature of each remote sensor for 6 seconds. 1. To retrieve manually the specific sensor temperature reading, press CHANNEL key until desired channel number is displayed. 2. To enable auto-scroll function, use CHANNEL button to select channel 1, 2, ... until auto scroll icon appears on the left hand corner of the 3rd line display. 17 DCF 77 RADIO CONTROLLED CLOCK The radio-controlled time is calculated by the Cesium Atomic clock of Braunschweig (official clock of Germany). Then the time is coded and transmitted from Mainflingen - near Frankfurt - via a signal on DCF-77 (77.5 kHz). The transmitting range of the signal is 1500 km, which means that most of Western and Central Europe is covered by this signal. Within this range the received time is completely accurate. However, there are many environment factors may affect the RCC reception, i.e. nearby computer monitors or other electronic devices, put on any metal surface, surrounded by any tall buildings and so on. The user had better to place the atomic clock near the window and face the transmitter in Mainflingen-near Frankfurt, Germany. And then check the RCC strength indicator in the clock display to see if there has any wave above the reception tower. There have 3 wave icons flash to indicate 4 levels of RCC signal status: Very weak Weak Medium Strong If there has no wave above the reception tower that means the signal is very weak and the clock can not be set by the RCC signal, please try to rotate the unit or other windows to seek for a better RCC reception location. Besides, the RCC signal is the strongest at night, the user can manually set the clock to locale time and leave it overnight to receive the RCC signal. If nothing else works, take the clock outdoors after dark at night, remove and re-install the batteries and leave it overnight to force it to look for the radio controlled time signal. If the clock works outdoors but not indoors, you probably have a local interference problem inside your house or building. Once the time signal is received, the wave icon will stay on the LCD, and time and calendar will automatically be updated. Note: During 10 minutes of time signal reception, all ma nual settings w ill be suspended. If setting is desired, press once [ ] key to deactivate the reception. You can also press and hold the same key for 3 seconds to manually activate the reception in normal mode. The clock will work as a normal quartz clock if it can’t receive the RCC signal. SET THE CLOCK, CALENDAR & LANGUAGE 1. In clock time display mode, press & hold [CLOCK] button for 2 seconds to enter clock setting mode. Flashing 24 hours will appear. 2. Press [ ] or [ ] button to switch between 24 hours and 12 hours format, and then press [CLOCK] button to confirm. 3. The hour digits will flash. Use the [ ] button to increase by one hour or [ ] button to decease by one hour to your desired hours. Holding down either button will change the increment unit rapidly. Press [CLOCK] button to confirm. 4. The minute digits will flash. Use the [ ] button or [ ] button to set your desired minutes. Holding down either button will change the increment unit rapidly. Press [CLOCK] button to confirm. Note: Every change of minute digit will auto ma tically reset the seco nds to zero . 5. The year digit will flash and Yr icon appears. Press [ ] or [ ] button to set your desired year. Press [CLOCK] button to confirm. Note: Year range is from 2000 to 2099. 6. D and M icons will flash. Press [ ] or [ ] to select D M (Date Month) or M D (Month Date) format. Press [CLOCK] button to confirm. 7. Month digits will flash. Press [ ] or [ ] button to set your desired month. Press [CLOCK] button to confirm. Do the same to set Date. Note: The mo on phase and the w eekda y w ill be automatically calcula ted and display ed for the date set above. 8. E digit will flash. Press [ ] or [ ] button to switch 5 languages display of weekday (English/German/ French/ Spanish/Italian. See table 1). Press [CLOCK] button to confirm and exit setting mode. 18 Table 1 Multi Language Day display language ENGLISH SUNDAY MONDAY TUESDAY WEDNESDAY THURSDAY FRIDAY SATURDAY GERMAN FRENCH SPANISH ITALIAN (SU) (SO) (DI) (DO) (DO) (MO) (MO) (LU) (LU) (LU) (TU) (DI) (MA) (MA) (MA) (WE) (MI) (ME) (MI) (ME) (TH) (DO) (JE) (JU) (GI) (FR) (FR) (VE) (VI) (VE) (SA) (SA) (SA) (SA) (SA) Note: If no key press during setting mode for 10 seconds, it w ill automatically keep the setting and exit to normal display. To set daily alarm 1. In clock time display mode, press [CLOCK] button thrice to switch to display alarm time. 2. Press and hold [CLOCK] button for 2 seconds to enter alarm setting mode. 3. The hour digits will flash, use [ ] button to increase by one hour or [ ] button to decease by one hour to your desired hours. Holding down the button will change the increment unit rapidly. Press [CLOCK] button to confirm. 4. The minute digits will flash. Use [ ] button to increase by one minute or [ ] button to decease by one minute to your desired minutes. Holding down the button will change the increment unit rapidly. Press[CLOCK] button to confirm and finish the setting. 5. When alarm is beeping, wave hand in front of the IR sensor to snooze for 5 minutes. Press [CLOCK], [ ], [ ] or [CITY] button to stop the alarm for a day. MOON PHASE Our weather station is equipped with 8 moon phases display (i.e. from new moon to waning crescent) on the screen. FULL Moon Waning Gibbous Waxing Gibbous Last Quarter First Quarter Waning Crescent Waxing Crescent New Moon • • The animated rolling moon phase will pause 5 seconds in the place of the current moon phase calculated by the current calendar date. The user also can press [ ] button or [ ] button go through the calendar to check the moon phase for a specific date other than the current date. SUN POSITION, MOON POSITION, SUNRISE AND SUNSET TIME The weather station will automatically calculate the sun position, moon position, sunrise and sunset time based on the input city location and the set data. 19 WEATHER FORECAST Sunny Rainy Slight Cloudy Stormy Cloudy Snowy Our weather station is capable of detecting local barometric pressure changes, and based on the data collected, can predict the weather for the next 12 to 24 hours. Note: 1. The accuracy of a general pressure-based weather forecast is about 70 to 75%, and therefore, we cannot be held responsible for any inconveniences so caused by an inaccurate one. 2. The weather forecast is meant for the next 12 to 24 hours. It may not necessarily reflect the current situation. 3. The ‘Sunny’ forecast covering night hours indicates clear weather. HOW TO CHECK THE BAROMETRIC PRESSURE The current and historical barometric pressure is shown on the atmospheric pressure window. For monitoring the Sea Level barometric pressure reading at certain altitude, the user needs to select the local altitude (-100 to 2500 meter or -330 to 8200 foot) for the altitude setting. Our weather station requires entry of elevation in meter and in foot separately. To determine your location elevation, please either contact your local library, TV/radio weather forecaster, or via Internet at http://www.worldatlas.com/aatlas/infopage/elvation.htm 1. 2. 3. To enter the altitude compensation setting mode, press and hold [HISTORY] button for 2 seconds to switch from Barometric Pressure to Altitude adjust mode for 10 seconds and the meter icon flashes. During Altitude adjust mode, press [UNIT] button to toggle between meter and foot unit. Then press [HISTORY] button to confirm. Last altitude reading will flash, press [UNIT] button to increase the value by 10. Hold down the button to have fast stepping. Press [HISTORY] button once to confirm and exit setting. The atmospheric pressure can be displayed in mb/hPa, inHg. Press [UNIT] to select the pressure unit. Our weather station is equipped with barometer reading for 24hr history. If you want to check the pressure history for a particular hour during the past 24 hours, press [HISTORY] button, each press on the button will go back by an hour. Note: If the weather station w as just installed with batteries and past data w as not yet mea sured, it will display ”----”. The recorded barometric changes for the past 24 hours are displayed in a bar chart below the barometric pressure window. 20 SET BACKLIGHT COLOR Make sure the backlight switch is not on ‘OFF’ position, press & hold [ MODE ] for 2 seconds to enter the backlight color setting and the barometric chart displays a “C” pattern to prompt the user to set the color, the alternate backlight indicates the backlight is set to auto mode and its color is changed according to the weather condition (see more details in ˇBACKLIGHT COLOR CHANGE ACCORDING TO FORECAST WEATHER CONDITIONˇ), press [UNIT] button to select fix backlight color in the sequence, ‘AMBER’ ‘BLUE’ ‘PURPLE’ and then cycle back to ‘auto mode’. Press [MODE] button to confirm the setting or auto exit after 10 second. Note: The combination of the backlight colo r is subject to change in final product BACKLIGHT COLOR CHANGE ACCORDING TO FORECAST WEATHER CONDITION While the backlight is set to auto mode, the color of the backlight will change according to the forecast weather condition to acknowledge the user for the forecast weather. Sunny - amber color Slight Cloudy & Cloudy - purple color Rainy & Stormy (or Snowing) - blue color Specifications Main Unit Displayed temperature range : -10°C to +60.0°C (14°F to 140.0°F) Proposed operating range : 0°C to +50.0°C (32.0°F - 122.0°F) Temperature resolution : 0.1°C (0.2°F) Indoor relative humidity measurement ranging from 25%RH to 95%RH at 25°C(77°F) Batteries : Use 4 pieces UM-3 AA size 1.5V alkaline battery Sensor Displayed temperature range Proposed operating range Temperature resolution Displayed temperature range Proposed operating range RF transmission frequency RF transmission range Batteries : : : : : : : : -20°C to +60.0°C (-4°F to 140°F) -10°C to +50.0°C (14°F to 122°F) 0.1°C (0.2°F) 20% to 99% 20% to 99% 433MHz Maximum 75 meters in open area Use 2 pieces UM-4 AAA size 1.5V alkaline battery Caution: Under severe environment with radio frequency interference, the unit may not establish or maintain communication link under this condition. It will return to normal state when interference stops. The product may be disturbed by Strong Electro Magnetic Interference. If so, simply reset the product to resume normal. In case the function could not resume, please use the product in other location 21 City Berlin Dusseldorf Dresden Frankfurt Flensburg Freiburg Hann over B r eme n Hamburg Ro sto ck Stralsund Koblenz Kiel Kassel Leipzig Muen chen Magdeburg Nurnberg Regensburg Stuttgart Saarbruechen Schwerin Alborg Arhus Copenhagen Odense Alicante An dorra Badajoz Barcelona Bilbao Cadix Cordoba Ibiza La Coruna Leo n Las Palmas Madrid Malaga Salamanca Sevilla Valencia Zaragoza Besancon Biarritz Bordeaux Brest Cherbourg Clermont Ferrand Lyo n Marseille Mon aco Metz Nantes Nice Orleans Paris Perpignan Lille Rouen Strasbourg Appendix Europe City Abbreviation List Citycode Country BER German y DUS German y DRE German y FRA German y FLE German y FRE German y HAN German y BRM German y HAM German y HRO German y HST German y KOB German y KI E German y KAS German y LEZ German y M U E German y MAG German y NUR German y REG German y STU German y SAA German y SCH German y ALB D e n ma r k ARH D e n ma r k CPH D e n ma r k ODE D e n ma r k AL I Spain AND Spain BAD Spain BAR Spain BIL Spain CAD Spain COR Spain IBZ Spain LCO Spain LE O Spain L PA Spain MAD Spain M A L Spain SAL Spain SEV Spain VAL Spain ZAR Spain BES France BIA France BOR France BRE France CHE France CMF France LYO France MAR France MCO France MET France NAN France NIC France ORL France PAR France P E R France L I L France ROU France STR France 22 Count ry Code DEU DEU DEU DEU DEU DEU DEU DEU DEU DEU DEU DEU DEU DEU DEU DEU DEU DEU DEU DEU DEU DEU DNK DNK DNK DNK ESP ESP ESP ESP ESP ESP ESP ESP ESP ESP ESP ESP ESP ESP ESP ESP ESP FRA FRA FRA FRA FRA FRA FRA FRA FRA FRA FRA FRA FRA FRA FRA FRA FRA FRA City Toulouse Helsinki Aberdeen Belfast Birmingham Bristol Edinburgh Kingston Liverpool L o nd on Manchester Newcastle upon Tyne Pl ymou th Budapest Zagreb A n c o n a Bari Bologna Cagliari Catania Firenze Foggia Genova Lecce Messina Milano Napo li Pal e rmo Pa rma Per r ero Ro me To r i n o Tr ies t e Venezia Verona Ventimiglia Dublin Luxembourg Bergen Oslo Stavanger Amsterd am Arnhem Eindh ov en Enschede Groningen Den Haag Rotte rdam Evora Coimbra Faro Leiria Lisbon P o r t o Gdansk Krakow Po zn an Szczecin Warsaw Krasnodar Moscow Novosibirsk Samara Citycode T O U HE L ABD BEL BIR BRI EDH KIN LVP LON MAN N U T P LY BUD ZAG ANC BAI BOL CAG C AT FIR FOG GEN LEC MES M I L NAP PA L PA M PRO ROM T O R TRI VEN VER VTG DUB LUX BGN OSL STA AMS ARN EI N ENS GRO HAA R O T AVO COI FAR L E I LIS POR GDZ K K W POZ SZC WAW KRA MOS NOV SAM Country France Finland UK UK UK UK UK UK UK UK UK UK UK Hungary Cro atia Italy Italy Italy Italy Italy Italy Italy Italy Italy Italy Italy Italy Italy Italy Italy Italy Italy Italy Italy Italy Italy Ireland Luxembourg Norway Norway Norway Netherlands Netherlands Netherlands Netherlands Netherlands Netherlands Netherlands Portugal Portugal Portugal Portugal Portugal Portugal Po la n d Po la n d Po la n d Po la n d Po la n d Russia Russia Russia Russia 23 Count ry Code FRA FIN GBR GBR GBR GBR GBR GBR GBR GBR GBR GBR GBR HUN HRV I TA I TA I TA I TA I TA I TA I TA I TA I TA I TA I TA I TA I TA I TA I TA I TA I TA I TA I TA I TA I TA IRL LUX NOR NOR NOR NLD NLD NLD NLD NLD NLD NLD P RT P RT P RT P RT P RT P RT POL POL POL POL POL RUS RUS RUS RUS City St. Petersburg UfaUFA Vladivostok Yekaterinburg Gothenburg Malmo Stockholm Bratislava Ljubljana Berlgrade Graz Innsbruck Linz Salzburg Vienna Antwerp en Brugge Bruxelles Charleroi Liege Basel Bern Chur Geneva L o c a r n o Lucerne St Moritz St Gallen Sion Zurich Prague Hong Kong Citycode P E T Russia VLA YEK GOT M L O STO BRV LJU BEO GRZ INN LN Z SLZ VIE A N T BRG BRU CHA L I E BAS BRN CHR GNV LOC LUC MOR SGL SIO ZUR PRG HKG Country Russia RUS Russia Russia Sweden Sweden Sweden Slovakia Slovenia Serbia and Montenegro Austria Austria Austria Austria Austria Belgium Belgium Belgium Belgium Belgium Switzerland Switzerland Switzerland Switzerland Switzerland Switzerland Switzerland Switzerland Switzerland Switzerland Czech Republic China Count ry Code RUS RUS RUS SWE SWE SWE SLO SLO SCG AUT AUT AUT AUT AUT BEL BEL BEL BEL BEL CHE CHE CHE CHE CHE CHE CHE CHE CHE CHE CZE CHN Declaration of Conformity Flamagas, S.A. declares product DWS-61 complies with the essential protective requirements and objectives of: • EMC Directive 2004/108/EC • R& TTE Directive 1999/5/EC • Low Voltage Directive 73/23/EC To check the entirely declaration of conformity of this model, visit www.electronicaflamagas.com Warranty This device has 2 years warranty from the buying date against all manufactured defective problems. Batteries are not related to this warranty. The non-fulfilment of the instructions or cautions use in this manual implies automatically a cancellation of the warranty. It is necessary to show the buying invoice to validate this warranty. Exclusive importer Flamagas S.A., www.flamagas.com 24