1
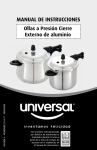
ÍNDICE
MANUAL DE INSTRUCCIONES
OLLA A PRESIÓN
OP-2977T
INTRODUCCIÓN ...................................................................................................................................... 3 DESCRIPCIÓN ......................................................................................................................................... 3 INSTRUCCIONES DE SEGURIDAD ..................................................................................................... 4 SEGURIDAD DEL PRODUCTO ............................................................................................................ 5 CARACTERÍSTICAS ESPECIALES ...................................................................................................... 5 INSTRUCCIONES DE OPERACIÓN ........................................................................................................ 6 LIMPIEZA Y MANTENIMIENTO ............................................................................................................... 7 OLLA A PRESIÓN ................................................................................................................................. 7 EMPAQUE DE CIERRE ........................................................................................................................ 7 VÁLVULA DE PRESIÓN Y TUBO DE LIBERACIÓN............................................................................. 7 VÁLVULA DE PREVENCIÓN ................................................................................................................ 7 RESOLUCIÓN DE PROBLEMAS ............................................................................................................ 8 PREGUNTAS Y RESPUESTAS ............................................................................................................... 9 GUÍA DE COCCIÓN ............................................................................................................................... 10 ESTIMADO CLIENTE
¡Felicitaciones por su compra!
Por favor lea cuidadosamente este manual y guárdelo para su futura referencia.
Si necesita soporte adicional no dude en escribir a: [email protected]
Página 1
INTRODUCCIÓN
Con el fin de que obtenga el mayor desempeño de su olla a presión, por favor lea este manual de
instrucciones cuidadosamente antes de comenzar a utilizarla.
PRECAUCIÓN
RIESGO DE CHOQUE
ELÉCTRICO , NO ABRA
DESCRIPCIÓN
Manija
Precaución: Para reducir el riesgo de choque eléctrico, no retire
la cubierta, no hay partes manipulables por el usuario al interior
de la unidad. Refiera todo mantenimiento o intervención técnica
a personal técnico calificado.
Este símbolo indica la existencia de voltaje peligroso al
interior de esta unidad que constituye un riesgo de choque
eléctrico.
Este símbolo indica que hay importantes instrucciones de
operación y mantenimiento en la literatura que acompaña a
esta unidad.
LÍNEAS DE SERVICIO AL CLIENTE PREMIER
Venezuela:
Colombia:
Website
E-mail:
Válvula de presión
Termómetro
Ventana de seguridad
Botón liberador de vapor
Indicador
Manija superior
Válvula de abertura de seguridad
Empaque de cierre
Manija
Manija inferior
0800 – ELECTRIC (353-2874)
01-900-331-PEJC (7352)
www.premiermundo.com
[email protected]
NOTA
Nos reservemos el derecho de modificar las especificaciones, características y/u operación de este
producto sin previo aviso con el fin de continuar las mejoras y desarrollo del mismo.
Cuerpo
Base
Calibre
Capacidad
Presión de operación
Página 2
22 cm
7L
65 Kpa / 105Kpa
Página 3
•
•
•
•
•
•
•
•
•
•
•
•
•
•
•
•
•
INSTRUCCIONES DE SEGURIDAD
Utilice la olla a presión únicamente para el propósito para el que fue diseñado.
La olla debe ser utilizada por personas experimentadas. En caso de ser usada por una persona sin
experiencia, se recomienda una estricta supervisión por parte de otro.
Mantenga la olla fuera del alcance de los niños.
Por debajo del límite de presión, el punto de ebullición de líquido está por debajo de los 120ºC
(250ºF). Tenga especial cuidado en este momento ya que saldrá una gran cantidad de vapor al
momento de hervir.
No cocine alimentos muy expansivos como mermelada de manzana, algas marinas, avena, etc.,
para evitar que se bloquee el sistema de liberación de vapor.
Mantenga todas las piezas de la olla en buenas condiciones de limpieza antes y después de
usarlas.
La olla a presión debe ser utilizada en una estufa estable. No coloque la olla sobre un quemador de
diámetro más grande que el de la olla. Al cocinar en una estufa de gas las llamas no deben alcanzar
las paredes de la olla. La olla a presión es apta para una estufa de 2kw.
No coloque la ventana de seguridad dirigida hacia el operador ni en dirección donde las personas
pasen por en frente.
Si sale vapor por la válvula de seguridad y por la válvula de protección, o si el empaque de cierre se
sale por la ventana de seguridad, apague de inmediato el fuego o la electricidad. Resuelva estos
inconvenientes antes de usarla de nuevo.
Tenga precaución al mover la olla. Llévele de forma horizontal y colóquela suavemente sobre la
superficie. Evite que se golpee.
No abra la olla si hay presión adentro. No cocine si la tapa no está bien cerrada.
No guarde sal, salsa de soya, álcali, azúcar, vinagre o vapor de agua dentro de la olla por mucho
tiempo. Límpiela y séquela bien después de cada uso.
No seque el agua restante con calor ni caliente alimentos en seco.
No la utilice para freír u hornear.
Cuando cocine alimentos gelatinosos con la olla a presión, agítela suavemente varias veces antes
de abrirla para evitar que la comida se pulverice.
No coloque ningún elemento sobre la válvula de presión.
Utilice el volumen adecuado de alimentos para no llenar por completo la olla. (Menos de 2/3 de la
altura de la olla para alimentos no expansivos como carne, vegetales, etc.; menos de 1/4 de la
altura de la olla para alimentos expansivos como arroz, fríjoles, etc.)
SEGURIDAD DEL PRODUCTO
•
•
•
•
Tecnología especial utilizada en el borde de la olla que fortalece enormemente la boca de la olla.
La tapa de prevención de bloqueo y la aguja de drenaje se utilizan para prevenir el bloqueo de la
válvula de presión.
El dispositivo de prevención de abertura asegura que la tapa se mantiene cerrada de forma segura.
El dispositivo de liberación de presión de tres grados contribuye al uso seguro de la olla.
Válvula de presión
El vapor sale de forma
normal por este conducto.
Válvula de prevención de abertura
Asegura la liberación de vapor por
este conducto bajo presión segura.
Contribuye con la abertura de la olla
de forma segura.
El vapor sale por este punto para
asegurar el cierre de la tapa por
completo.
Empaque de cierre/
Ventana de seguridad
Cuando la válvula de presión y la válvula de
seguridad no funcionan, el empaque será
expulsado por la ventana como medida de
seguridad.
CARACTERÍSTICAS ESPECIALES
•
•
•
•
La base de la olla está hecha por una máquina de fricción a presión lo cual la hace muy fuerte y
resistente y sin ninguna grieta.
Se ha colocado una aguja de drenaje dentro de la manija de la tapa la cual es muy útil para limpiar
el orificio de vapor.
El diámetro de la base es más grande que los productos convencionales lo cual hace que se
absorba el calor con mayor rapidez.
Un termómetro en la tapa le permite controlar la temperatura de cocción.
Termómetro
Página 4
Página 5
INSTRUCCIONES DE OPERACIÓN
LIMPIEZA Y MANTENIMIENTO
Limpie la olla a presión antes de utilizarla por primera vez.
Limpie la unidad antes utilizarla por primera vez.
1. Asegúrese de que los orificios de la válvula de seguridad
y de la válvula de presión no estén obstruidos antes de
cada uso. Si alguno de ellas está obstruido limpie las
partículas con la aguja de drenaje.
2. Para cerrar la olla alinee la marca “O” en la tapa con la
marca “O” en la manija inferior para cerrar la olla
adecuadamente antes de calentarla.
3. Para calentar la olla rápidamente coloque a fuego alto hasta que la válvula de presión comience a
trabajar. No coloque un fuego que sea demasiado alto, sino el suficiente para la olla. Es normal que
salga un poco de vapor de la válvula después de que la olla se caliente un rato, pero ya no debe
haber más vapor después de que la válvula se levante y la olla funcione normalmente. Cuando la
válvula de presión se haya levantado y el vapor salga de manera continua, baje a un fuego
moderado y comience a contar el tiempo de calentamiento.
OLLA A PRESIÓN
•
•
•
Lave la olla con agua y jabón suave y luego seque completamente.
No utilice utensilios metálicos que puedan dañar el acabado.
No almacene alimentos en la olla por mucho tiempo.
EMPAQUE DE CIERRE
•
•
•
•
•
Retire el empaque de la tapa y limpie con agua la suciedad del anillo y de la tapa.
Seque por completo las partes.
Coloque de nuevo el empaque en la tapa.
No coloque la tapa en la olla cuando no la esté utilizando para evitar que el empaque se apriete.
Si el color del empaque ha cambiado un poco esto no representa ningún problema. Se sugiere
cambiar el empaque cada 2 años o dependiendo del uso que se le dé. Si observa una modificación
mayor, debe ser reemplazado de inmediato por uno igual.
NOTA
El tiempo de calentamiento comienza cuando el vapor sale de la válvula y termina cuando se
apague el fuego. Permanezca cerca para y observar y controlar este periodo. No toque la
superficie metálica de la olla con las manos o el cuerpo. Cocine con precaución y utilice las
manijas para evitar quemarse.
4. Una vez termine el tiempo de calentamiento apague el fuego
y deje un momento más para que la presión se reduzca.
Levante la tapa cuando la válvula haya
bajado. El
procedimiento para abrir la tapa es contrario a la forma de
ponerla.
NOTA
Agite un poco la olla antes de abrirla para eliminar la
espuma que se puede formar al cocinar alimentos
pegajosos.
5. A veces se puede necesitar enfriar rápidamente la olla
cuando se ha pasado el tiempo de cocción, o para
prevenirlo o cuando se necesita abrir la olla antes de
terminar de cocinar. Coloque la olla en una superficie
plana y estable y báñela con agua fría lentamente hasta
que la válvula baje completamente. Tenga precaución de
que el agua no entre a la olla.
Página 6
VÁLVULA DE PRESIÓN Y TUBO DE LIBERACIÓN
•
•
•
Retire la tapa protectora y lave las partes con agua y jabón. Seque por completo.
Revise el tubo de liberación y si está obstruido límpielo con la aguja. Luego utilice agua y jabón para
terminar de limpiarlo.
Si el tornillo en la válvula de presión está flojo, apriételo.
Hale
VÁLVULA DE PREVENCIÓN
•
•
•
Válvula de prevención
Válvula de vapor
Retire la suciedad de la válvula utilizando la aguja de drenaje.
Lave con agua y jabón.
El pin debe moverse libremente después de esta operación.
Página 7
RESOLUCIÓN DE PROBLEMAS
PREGUNTAS Y RESPUESTAS
Esta lista es para ayudarle a resolver problemas simples que pueden presentarse en el uso de la
unidad. Por favor léala y verifique estos puntos antes de solicitar ayuda de personal de servicio técnico
autorizado.
PROBLEMA
El vapor sale de la válvula pero la válvula no •
sube. La presión interna no aumenta.
•
•
•
•
El vapor sale por los lados de la olla
•
•
Cuando la presión interna es baja, la válvula •
no regresa a su posición normal
•
Aún sale vapor después de que la válvula ha
subido
La tapa no ajusta bien
Al cocinar el empaque se sale de repente por
la ventana de seguridad
•
•
•
•
•
CAUSA Y SOLUCIÓN
La energía para el rango no es suficiente; suba la
energía
El agua en la olla no es suficiente; agregue más
agua
La válvula está sucia; límpiela
El empaque de cierre está sucio; límpielo
La tapa no está bien puesta; ajuste
El empaque de cierre está sucio; límpielo
El empaque de cierre está muy viejo; reemplace
La presión interna es en realidad más alta y no
permite abrir la tapa; reduzca la presión para bajar
el pin
La válvula está sucia; presione el pin hacia abajo,
abra la tapa y luego limpie el pin de cierre
La válvula está sucia; limpie
El empaque de cierre está roto; reemplace
La forma de la tapa ha cambiado; reemplace la tapa
El empaque está haciendo su función. Tal vez otro
dispositivo no está funcionando correctamente;
retire la olla y una vez esté fría verifique y limpie
todos los dispositivos. Reemplace los que ya no
sean funcionales
El empaque está viejo o ha perdido su forma;
cambie el empaque
¿Cómo cocinar buenos platos?
• Caliente la olla a fuego alto hasta que el vapor salga de la válvula.
• Luego baje a fuego medio cuando el vapor comience a salir.
• Permita que la presión interna reduzca de manera natural.
• El fuego demasiado alto hará que el agua se evapore y la comida se queme.
No estoy cocinando bien los alimentos. ¿Qué puedo hacer?
• Verifique el control en cuanto al tiempo de cocción.
• Verifique que la válvula de presión esté bien puesta.
• Verifique que el fuego no sea demasiado alto.
• Verifique que el volumen del agua y la sopa sea adecuado.
• Verifique que la presión sea normal. Que el vapor esté saliendo de la olla.
¿Qué es el tiempo de calentamiento?
• Es el tiempo transcurrido a partir del momento en que sale el vapor de la olla hasta el final de la
cocción.
¿Un material diferente necesita un tiempo diferente de calentamiento?
• El volumen máximo de comida está por debajo de 2/3 de la profundidad de la olla. Los fríjoles deben
estar por debajo de 1/4. El material no tiene ninguna relación con el tiempo de cocción. Tampoco el
volumen de la olla.
¿Por qué el color del arroz cambia a gris?
• Al cocinar a altas temperaturas y alta presión, los aminoácidos y los sacáridos se descomponen por
el calor. Por lo tanto, los alimentos ricos en proteínas y carbohidratos pueden cambiar a color gris.
Esto no tienen ningún efecto en el sabor o en la calidad.
•
De otro lado, después de calentar fríjoles de soya con leche mezclados con azúcar, puede esta
mezcla salir un poco por la válvula. Esto ocurre en general con alimentos mezclados con azúcar
gruesa debido a la alta presión interna. Al cocinar este tipo de alimentos no lo haga con la presión
puesta. Es decir, con la válvula de presión activa.
¿Qué se debe hacer en caso de que se caliente la olla en seco?
• Apague el fuego de inmediato y retire la olla. Permita que se enfríe de forma natural. No agregue
agua para enfriarla.
Página 8
Página 9
GUÍA DE COCCIÓN
Utilice esta guía como referencia para las proporciones y los tiempos que puede necesitar en la
preparación de sus recetas.
Alimento
Volumen de
alimento + agua
Tiempo en
minutos a fuego
medio después
de salir el vapor
de manera
abundante
Estado de la
comida después
de que se enfríe
de forma natural
Arroz
1/3
4-6
Bien cocinado,
buen olor
Cereal
1/3
10-15
Blando
Agregar un poco
de soda
Costillas
1/2
8-10
Carne y huesos
separados
Cortar en pedazos
Codo
1/2
15-20
Carne y huesos
separados
Cortar cruzado
Carne de res
Pollo
1/2
1/2
15-20
8-10
Muy blanda
Carne y huesos
separados
Cortar en pedazos
Todo el pollo
Pescado
Cordero
Zong Zi
Papas dulces
Tremella
1/3
2/3
2/3
2/3
2/5
2-4
8-12
10-25
6-10
15-25
Bien cocinado
Bien cocinado
Bien cocinado
Bien cocinado
Muy blanda
Página 10
Observación
CATALOGUE
USER’S MANUAL
STAINLESS STEEL PRESSURE COOKER
OP-2977T
DEAR CUSTOMER
Congratulations for your purchase!
Please read this manual carefully, and keep it for future reference.
If you need extra support, please write to [email protected]
I
The structure drawing and the model of products
2
II
Attention points of operation
3-4
III
Safety of products
4-5
IV
Special characters
5-6
V
How to use
7
VI
Trouble shooting
8-9
VII
Maintenance
9-10
VIII
Questions and answers
This series products are
designed and made on the
basis of the standard of
EN12778:2002.
Page 1
、The structure drawing and the model of products
(Fig.1)
、Attention points of operation
Use only after read and understood all about the manual.
Please keep this manual properly.
Warning, the user will take the responsibility when an accident occurs due
to the operation not follows the manual.
1、The pressure cooker is a family cookware and cannot be used for any other purpose.
Juveniles and persons who don’t know how to use it are suggested not to use. Must have
person watching and keep away from children
when using the pressure cooker.
2、Under the pressure limit, the boiling
point of the liquid is below 120ºC (250F).
Please operate carefully because a lot of steam
and soup juice will come out when boiling and
especially when the pressure reducing fast.
(Fig.2)
Fig.2
3、Do not cook expansive food such as apple jam, seaweed, oatmeal, etc. to avoid
blocking of the steam-releasing hole.
4 、 Keep the pressure-limiting valve, Safely open-preventing valve, sealing ring,
block-preventing cap, lid and cooker body clean and out of nastiness and greasiness
before and after using.
5、The pressure cooker should be used on a steady oven. Do not put the pressure
cooker on electric oven that has a bigger plate’s diameter than the cooker’s bottom. When
Fig.1
cooking on a gas oven, the fire shall not reach the cooker’s wall. The pressure cooker is
Specifications of ASF series stainless steel pressure cooker
6、Do not point the safety window to the user or to the area person often walk about.
OP-2977T
Caliber
Ø 22cm
Capacity
7L
squeezed out from the safety window, the power shall be shut off immediately. The problem
65Kpa
must be found out and solved before use again.
Working
Pressure
Page 2
applicable to 2KW oven.
Model
I
II 105Kpa
7、If steam sprays out from safely open-preventing valve, or the sealing ring is
8、Be very carefully when you moving the cooker with pressure. Carry it horizontally
and lay down gently. Do not bump.
Page 3
9、Do not open the cooker when there is pressure inside. Do not cook in case of the lid
is not closed well.
10、Do not store salt, soy sauce, alkali, sugar, vinegar, or steam water inside the
cooker for a long time. Clean and dry it every time after use.
11、Do not heat water off or dry heating. Not use for frying or baking food.
12、When cooking jelly-liked food with pressure cooker, shake lightly for several times
before open to avoid food spay out.
、Safety of products
We designed and equipped multi-device for safety. (Fig.6)
1、The block-preventing cap and dredging needle are to be used for preventing
blocking of the pressure-limiting valve.
2、The open-preventing device ensures the lid to be closed properly as well as safely.
3、The three-degree pressure release device ensures using safely.
13、Allowed volume of food inside the pressure cooker.
Less than 2/3 of the cooker height for non-expansive food such as meat, vegetable,
etc. (Fig.3)
※ Less than 1/4 of the cooker height for expansive food such as rice, bean, etc.(Fig.4)
Fig.3
Fig.4
Fig.6
14、It is prohibited to put anything on the pressure-limiting valve. (Fig.5)
、Special characters.
1、The composed bottom of the cooker is made by friction pressure machine, which
makes it strong and reliable, and without any chink.
2、The diameter of composed bottom is bigger than common products, which makes
cooker absorb heat faster.
Fig.5
Page 4
Page 5
、How to use
※ Please clean the pressure cooker before first time using.
1、Making sure that the steam-releasing hole is unobstructed
Make sure that the safely open-preventing valve hole and the steam-releasing valve
hole is not obstructed every time before using. If any of them is obstructed, clear away the
dirt with the dredging needle.
2、Closing the cooker
4、Turning off fire, releasing pressure and opening the cooker
When heating time is up, turn off the fire
and leave it for a while waiting for the pressure
reduced. Take off the lid when the safely
open-preventing valve fell down. The opening
procedure is contrary to the closing. (Fig.7)
Fig.7
Caution:
Shake
the
cooker
gently
before opening to eliminate the foam inside the cooker when cooking sticky food.
Align the mark “O” on the lid to the mark “O” on the lower handle to close the cooker
properly before heating.
5、Cooling down quickly
Sometimes it needs cooling down quickly
3、Heating
when cooking over time, or preventing cook
In order to raise the temperature quickly, heat with strong fire till the pressure-limiting
over time, or the cooker needs to be opened
valve begins to work. Pay attention not to using stronger fire than which is enough. It is
during cooking. Put the cooker on a level place
normal that a little steam seeps from the safely open-preventing valve after heating for a
and shower the cooker with cold water slowly
while. There should be no steam seeps after the open-preventing valve rises and the
till the safely open-preventing valve falls down.
cooker works normally. When the pressure-limiting valve raised and steam comes out
(Fig.8)
Fig.8
continuously, should use gentle fire and start to count heating time.
Caution: Avoid water flowing into the cooker through the safely open-preventing
Caution: Heating time is from the pressure-limiting valve starting to work to
valve.
turning off the fire.
Stand by and watching while cooking.
Do not touch the cooker’s metal surface with hands or body. Cook carefully
and use the handles to avoid a burn.
Page 6
Page 7
、Trouble shooting
、Maintenance
If any abnormal phenomenon been found, you shall turn off the fire immediately and
take the cooker to a level place and shower the cooker with water slowly to reduce the
temperature and the pressure. Find the reason and solve the problem with the table below.
Problem
Steam escapes from safely
open-preventing
valve,
safely
open-preventing
doesn’t rise up.
Pressure inside the cooker
doesn’t rise。
Reason
Solution
1.The energy from the range
is not enough.
2.Water inside the cooker is
not enough.
3. safely open -preventing
valve is dirty.
4. Sealing ring is dirty.
5.Cooker lid doesn’t fix
properly with the cooker.
Steam comes out from the
underside of the lid.
1. Sealing ring is dirty.
2. Sealing ring is too old.
When the pressure inside the
cooker
is
low,
safely
open-preventing valve doesn’t
return to its normal position.
1、The cooker should be cleaned before first time using.
※ Maintenance of the whole cooker.
※ Clear away the dirt.
1.Raise the energy of the
range.
2. Add more water.
3.Clean the safely openpreventing valve.
4.Clean the sealing ring,
the cooker mouth and the
cooker lid.
5. Fix the lid properly.
※ Then wipe off the water and keep the cooker dry.
1.Clean the sealing ring,
cooker mouth and lid.
※ Put the sealing ring back to the lid. Do not put the lid on when not using the cooker to
2. Change the sealing ring.
1.Lower the pressure
1.The pressure inside the
inside the cooker to have
cooker is over that to
the locking pin down.
open the cooker lid.
2.Press down the locking
2. safely open-preventing
pin, open the lid, then
valve is not clean.
clean the locking pin.
Steam still leaks after the
safely open-preventing valve
1.safely
pen-preventing 1. Clean the safely open
raised up.
valve is not clean.
-preventing valve.
2.”O”ring is aged or broken. 2.Change the “O” ring.
※ Do not scrape the cooker surface with hard material such as metal to avoid abrasion.
※ Do not touch the cooker with other kinds of metal to avoid electrochemical corrosion.
※ Do not store food inside the cooker for a long while.
2、Maintenance of the sealing ring
Remove the sealing ring from the lid. Clear away the dirt from the ring and the lid.
Wipe off the water and keep the sealing ring dry.
avoid the sealing ring being squeezed.
3、Maintenance of the pressure-limiting valve and the
steam-releasing pipe
※ Check the steam-releasing pipe. If it is blocked, clear away the dirt with the
dredging needle. Then wash and rinse the pipe with water.
※ If the screw on the pressure-limiting valve is found loose, tighten it right away.
4、Maintenance of the safely open-preventing valve
Clear away the dirt from the safely
open-preventing valve with the dredging needle.
※ Wash and rinse with water. The pin of the safely
open-preventing valve should be moved freely.
When cooking, the sealing
ring is suddenly forced out 1.The safety function of the
sealing ring is working.
from the safety valve window
Maybe other device has
and steam drain out.
lost its function.
2.The sealing ring is aged
and has lost its function.
※ If the screw on the safely open-preventing valve
1.Take away the cooker. After
it is cool, clean and check all
the safety devices. Change
the ones which have lost its
functions.
2.Change the sealing ring.
is found loose, tighten it right away.
Fig.9
Caution: Do not lose small parts such as
pressure-limiting valve. There is no problem if the color of the sealing ring changed.
It is suggested to change the sealing ring once in on or two years according the
usage frequency. But it must be changed immediately if there is any damage or
Lid cannot fix properly.
Page 8
The shape
changed.
of
the
lid
Change the lid.
shape changing. Please contact your dealer or the sales department of our company
for the replacement parts. Never use substitutes.
Page 9
.Questions and Answers
1. Q: How to cook good meals and dishes?
A: Heating the cooker with strong fire till steam sprays out from pressure-limiting valve.
Change the fire from strong to gentle when steam starts to spray out from
pressure-limiting valve.
6. Q: What to do in case of cooker is heated dry.
A: Put off the fire immediately, take the cooker away from the fire and let it cool naturally. Don’t
pour water onto the cooker.
IX Steps and times for cooking
Let the pressure inside the cooker reduce naturally.
Too strong fire will make water over-evaporate and cause burnt to the food inside
the cooker.
2. Q: Cannot do cooking well?
Name of
food
Volume of
food
+water
Step of
pressure-limiting
valve
The time of gentle fire after
steam spraying out steadily
from the pressure-limiting
valve
State of food
cooked after it is
cooling naturally
Remarks
Beef
1/2
II
15-20
Very mushy
Cut into pieces
Chop
1/2
II
8-12
Meat and bone are
separated
Cut into pieces
Pig
elbow
1/2
II
15-20
Meat and bone are
separated
Cross-cutting
Chicken
1/2
II
8-10
Meat and bone are
separated
Whole chicken
A: Check if the cooking time is controlled properly or not.
Check if the pressure-limiting valve is placed properly or not.
Check if the heating fire is too strong or too weak.
Check if the volume of water and soup is proper or not.
Check if the pressure is normal or not. (Is there any steam spraying out from
pressure-limiting valve or not.)
3. Q: What is heating time
A:Begin from the upspring of the steam spraying out from safely pressure-limiting
valve.
4. Q: Does different material need different heating time?
A: The maximum volume of the food to be cooked is below 2/3 of the depth of the cooker.
Beans are below 1/4. Cooking material has nothing to do with cooking time. Besides, the
Fish
1/3
II
2-4
Well cooked
Mutton
1/2
II
8-12
Well cooked
Zong Zi
2/3
II
10-15
Well cooked
Old corn
2/3
II
5-8
Well cooked
Sweet
potato
2/3
I
6-10
Well cooked
Rice
1/4
I
4-6
Well cooked, good
smell
Porridge
1/3
I
10-15
Mushy
Legume
1/4
II
12-16
Well cooked
Tremella
2/5
I
15-25
Very mushy
volume of the cooker has nothing to do with cooking time, either.
5. Q: Why the rice color changes to grey?
A: Cooking under high temperature and high pressure, the amino acid and saccharides
are decomposed by the heat. Thus the food containing rich protein and carbohydrate
may change its color to grey. But it is harmless and the taste will not change.
Notes: The time mentioned above is just for reference. The changes in detail are as
After heating, soya-bean milk mixed with sugar sprays out from the safety valve.
per food. Users can adjust it to the suitable time according to your practical
When heating, liquid food mixed with high-thick sugar will spray out from the safety valve
experiences.
because of the high pressure steam inside the cooker.
When cooking this kind of food, don’t cook with pressure on, which means not to place the
pressure-limiting valve on.
Page 10
Page 11
CAUTION
RISK OF ELECTRIC
SHOCK, DO NOT
OPEN
Caution: To reduce the risk of electric shock do not open this
device, there are not serviceable parts for customers. Please
refer any maintenance or repair to qualified personnel.
This sign means the existence of dangerous voltage at the
inside of the unit, which states a risk of electric shock.
This sign means that there are important instructions of
operation and handling in the manual that comes with this
device.
PREMIER CUSTOMER SERVICE
Venezuela:
Colombia:
Website
E-mail:
0800 – ELECTRIC (353-2874)
01-900-331-PEJC (7352)
www.premiermundo.com
[email protected]
NOTE
This unit may be submitted to changes in specifications, characteristics and/or operation
without prior notice to the user, in order to continue improving and developing its
technology.
Page 12