1
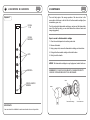
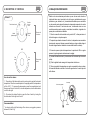
Manual de Usuario
User´s Guide
Sem
Ar iCo
tic lu
Sem mna
i-C Ar
olu tic
mn
E
1. DESCRIPCIÓN DE ELEMENTOS
5. MAINTENANCE
The most likely origin of the wrong operation of the mixer is due to the
accumulation of dirtiness in the the filter of the thermostatic cartridge (lime
incrustations, grave, etc.)
Esquema 1.
DUCHA
FIJA
DUCHA
FLEXIBLE
The dirt can bung the thermostatic cartridge up, and can soil the thermostatic
mixer. If the filters are dirty, you can clean them with a solution of water and
vinegar (suggested).
Steps to accede to the thermostatic cartridge:
1.- Close the central stopcocks to avoid any water leak.
2.- Remove the handle.
3.- Using a proper tool, remove the thermostatic cartridge, and clean them.
JETS
4.- Put again the thermostatic cartridge in the initial location.
5.- Finally, insert the handle.
ADVISE: The thermostatic cartridge is a very fragile piece; handle it with care.
GRIFERIA
ADVISE: DON´T CLEAN THE COLUMN WITH CLEANING PRODUCTS
MADE OF ACID BASE BECAUSE IT WILL BE DAMAGE.
Filters
CAÑO LLENADO
BAÑERA
Handle
Thermostatic cartridge
IMPORTANTE:
Lea con atención la totalidad de este manual antes de usar el producto.
Thermostatic mixer
2. DESCRIPCIÓN DE LOS MANDOS
4. MIXER REGULATION
Due to many different circumstances which can be found at any home or
building - such as water pressure, water heaters (electrical or gas) etc.-, the
real temperature of the water that flows from the column could be different
than the indicated in the thermostatic mixer.
Esquema 2.
Ducha flexible
Ducha Fija
If it occurs to your column, you can regulate the thermostatic mixer as follows:
1. Place the handle of the mixer in the position 38º, or place the safety button
in the upper position.
Desviador
4 funciones
Caño Llenado
Hidromasaje Vertical
2. Open the water flow until the hot water starts flowing from the portable handshower. At least during 2 minutes, check that the water temperature is constant.
3. If you would like to fix the temperature in the position of 38º, proceed as
follows:
[A] Remove the handle. (Do not remove the back piece with a red line).
38º
[B] Turn the mixer until getting the wished water temperature.
[C] Once the temperature is adjusted, put again the handle in a position where
the safety button coincides with the red line.
Agua
fría
Agua
Caliente
Mando
Termostático
Utilización:
Safety button
Red line
1.- Seleccionar la posición relativa a la temperatura deseada por medio de la
maneta del termostático.Cuando el pivote movil esté posicionado en la parte
alta, lo tendremos situado a ± 38º C. Para pasar a mayor temperatura
será necesario presionar primero el pivote movil e iniciar el giro a izquierdas.
Para agua fria, girar el mando termostático, a derechas.
2.- Para obtener la función deseada, abrir el caudal de agua girando el
mando del desviador a derecha o izquierda.
Thermostatic mixer
Recomendaciones:
* Para el funcionamiento óptimo del hidromasaje se recomienda una presión
mínima de 2,5 kg y máxima de 5 kg.
3. ANTES DE LA INSTALACIÓN
Este producto es de muy fácil instalación si se siguen fielmente las instrucciones
que le detallamos en los manuales de instalación.
Antes de conectar las tomas de agua de la cabina a la red de la vivienda, debe
sangrar las tuberías para eliminar las impurezas, tales como gravillas o
partículas metálicas que pueden obstruir con el tiempo la grifería y propiciar
su mal funcionamiento.
IMPORTANTE: Una incorrecta instalación del producto por olvido u omisión
del SANGRADO pertinente de las tuberías de agua, invalida la garantía y se
cobrará la intervención del Servicio Técnico al cliente.
Verifique la correcta conexión de las tomas de agua: para ello tenga en cuenta
que el latiguillo de agua caliente proveniente de la grifería esté conectado a
la salida de agua caliente de la instalación y el latiguillo de agua fría a la toma
de agua fría de la instalación. Si se intercambia la conexión de los latiguillos,
el mezclador termostático se averiará y será necesario sustituírlo (este tipo
de avería no está cubierto por la garantía).
NOTAS SOBRE EL CALENTADOR: Es indispensable que el calentador instalado
tenga un caudal mínimo de 10 litros/minuto para un correcto funcionamiento
y sea capaz de suministrar agua a 55ºC min.
Se aconseja que el calentador, teniendo un controlador de caudal y temperatura,
se posicione para un uso mayor de agua caliente y menor caudal.
Esto es necesario, sobre todo, cuando hay mucho recorrido desde el calentador
hasta la conexión con la grifería, pues repercute directamente sobre el tiempo
de respuesta desde que se manda la orden de abertura de agua caliente hasta
que ésta llega al mezclador termostático.
Cuando el calentador carezca del mencionado controlador de
caudal/temperatura, o bien éste no se comporte correctamente porque tiene
cierta antigüedad, puede presentarse el problema que la mezcla de agua
fría/caliente no se realice correctamente.
Esto es debido a que cuando la grifería termostática solicita agua caliente, el
calentador funciona al máximo hasta que la termostática cierra el consumo de
agua caliente (una de las ventajas de la termostática es el ahorro de agua
caliente) llegando a apagar la llama del calentador.
Para evitar el envío de flujos intermitentes de agua fría/caliente, es necesario
aumentar en el punto óptimo el regulador de caudal/temperatura del calentador.
3. BEFORE THE INSTALLATION
This product has a very easy installation. You just have to follow the instructions
of the Installation Guide.
Before installing the water hoses supply of the cabin to the net, the water pipes
have to be cleaned. The pipes of any building are often dirty (gravel, small
metallic particles, etc.), and this dirtiness can bung the filters up, and produce
a wrong functioning of the mixer.
Check the water hoses connections. The cold water hose should be connected
to the cold water supply, and the hot water hose, to the hot water supply. If,
by mistake, the connections are interchanged, the thermostatic mixer will be
damaged and, consequently, it must be changed.
ISSUES ABOUT THE WATER HEATER: if we want a proper functioning of the
cabin, your water heater must supply, minimum, 10 litres of water per minute.
Sometimes, it is possible that the hot-cold water does not mix properly. If this
occurs, proceed as follows:
- If your water heater has a water flow and temperature controller, we recommend
you to put it in a way that supplies more hot water and less water flow. This
is necessary when the water heater is located far from the cabin.
- If your water heater has not got the mentioned water-temperature controller,
or it is a quite old model, you can have that problem with the water mixture.
If so, we suggest to change the water heater.
4. REGLAJE DEL MEZCLADOR
2. DESCRIPTION OF CONTROLS
Scheme 2.
Portable
shower
head
Fixed shower head
Vertical
hydromassage
Bathtub
filler
Diverter with
4 functions
Debido a las circunstancias particulares que se dan en cada vivienda o
instalación tales como la presión de la red de agua, calentadores de agua
(eléctricos, a gas, calderas, etc.), el mezclador termostático que se suministra
en esta versión puede tener alteraciones de temperatura respecto a la escala
indicada en el mando. Si se diera este caso, le indicamos cómo con una
sencilla operación puede regular su mezclador termostático, siguiendo los
pasos que a continuación se detallan:
1. Situar la manecilla del mezclador en la posición 38º, o bien posicionar el
botón del seguro en la parte superior.
2. Comprobar que durante al menos 2 minutos, la temperatura sea constante
(previamente, esperar el tiempo necesario hasta que el agua caliente haga el
recorrido íntegro desde el calentador ó acumulador hasta la columna).
38º
Cold
water
3. En caso de querer ajustar la temperatura en la posición de 38º a su gusto
personal, siga las siguientes instrucciones de reglaje:
Hot
water
Thermostatic
handle
[A] Extraer la manecilla inferior. (El anillo blanco con la marca roja no se debe
quitar).
[B] Girar la griferia hasta conseguir la temperatura ideal de uso.
[C] Una vez regulada la temperatura a su gusto o necesidad, volver a colocar
la manecilla haciendo coincidir el boton de seguridad con la señal roja del
anillo blanco.
How to use the column:
1.- The position of the thermostatic control can be used to regulate the desired
temperature. When the moveable pivot is in the upright position, the temperature
will be ± 38º C. To increase the temperature, press the moveable pivot and
then proceed to turn it to the left; for a colder temperature, turn the thermostatic
control to the right.
.
Señal roja
Botón de seguridad
2.- To produce the desired function, open the flow of water by turning the
diverter control to the right or to the left.
Griferia termostatica
Recommendations:
* In order to get the right functioning of the column, we suggest a pressure
between 2,5 and 5 Kg.
Maneta
1. DESCRIPTION OF CONTROLS
5. MANTENIMIENTO
GB
El origen frecuente del mal funcionamiento de la grifería es la acumulación de
impurezas en el filtro del cartucho termostático (incrustaciones de cal, gravilla,
etc.). Para evitar la acumulacion de sedimentos calcareos en los filtros se
recomienda terminar el uso de la griferia con agua fria.
Scheme 1.
FIXED
SHOWER
HEAD
Las impurezas pueden llegar a obstruir y ensuciar el cartucho termostático.
Si los filtros aparecen sucios necesitarán una limpieza. Para ello utilice una
solución de agua con vinagre (recomendado), mantenga el cartucho sumergido
en dicha solución durante un periodo de 2 horas.
PORTABLE
SHOWER
HEAD
Si estuvieran muy sucios, o no se limpiaran correctamente, puede usar salfumán
diluído al 50% (mantenga el cartucho 1-2 segundos como máximo en la
solución y aclare con agua).
Pasos a seguir para acceder al cartucho termostatico :
1.- Cerrar las llaves de paso del baño o columna.
VERTICAL
JETS
2.- Quitar la maneta inferior de la griferia.
3.- Sacar el cartucho con una llave fija y limpiarlo.
4.- Abrir las llave de paso para limpiar las incrustaciones dentro de la griferia,
volver a cerrar las llaves de paso.
5.- Colocar de nuevo el cartucho en su posición original.
THERMOSTATIC
TAP
6.- Finalmente insertaremos la maneta y abriremos las llaves de paso
NOTA: Tenga en cuenta que el cartucho termostático es una pieza frágil; opere
con ella cuidadosamente.
NOTA: ¡NO LIMPIAR EL PRODUCTO CON PRODUCTOS ANTICAL CON
BASE ÁCIDA PUES LO DAÑARÍAN.
BATHTUB
FILLER
Filtros
Aro
Maneta
IMPORTANT:
Cartucho termostatico
Griferia termostatica
Please, read carefully the whole guide before using the product.