1
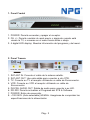
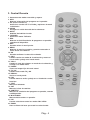
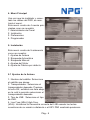
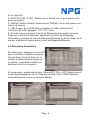
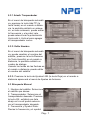
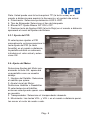
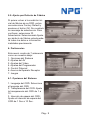
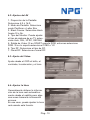
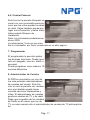
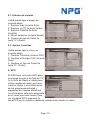
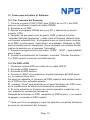
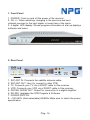
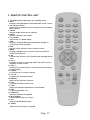
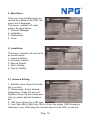
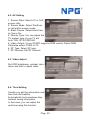
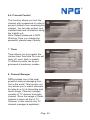
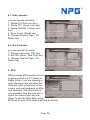
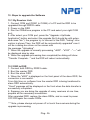
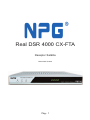
Real DSR 4000 CX-FTA
Receptor Satélite
Manual de Usuario
Pág.- 1
Seguridad
1. Dejar espacio libre alrededor del DSR para una ventilación correcta.
2. No cubrir el DSR o colocarlo cerca de un aparato que emita calor.
3. Use una tela suave y una solución suave de líquido de limpieza para
limpiar la carcasa.
4. No conecte o modifique cables cuando el DSR está conectado a la
corriente.
5. No quite la cubierta.
6. No deje la unidad expuesta a calor, frío ó humedad extrema.
7. Nunca permita que líquidos, spray u otros materiales entren en
contac to con el interior del DSR.
Características Principales
• 2500 canales programables
• PIG (Soporta Imagen en grafico)
• DiSEqC 1.2
• Teletexto
• Subtitulo
• Función de actualización y transferencia de datos (PC a receptor y
receptor a receptor)
• Edición de canales
• Guía Electrónica de Programas (EPG)
• Canales Favoritos y bloqueo paterno
• Compatible DVB/MPEG II
• 0/12V,0/22KHz, Puerto RS-232
• Control de volumen
• Multi Video 4/6/9
• Control total desde el mando a distancia.
• Zoom
• Busqueda Auto/Manual
• Memoriza el último canal
• SMPS (~100-240V,50/60Hz)
• Auto conversion PAL-NTSC
Pág.- 2
1. Panel Frontal
1. POWER: Permite encender y apagar el receptor.
2. CH +/-: Permite cambiar al canal previo o siguiente cuando está
viendo la TV, o moverse en el menú hacia arriba o abajo.
3. 4 digital LED display: Muestra información del programa y del menú.
2. Panel Trasero
1. SAT ANT IN: Conecte el cable de la antena satelite.
2. SAT ANT OUT: Use esta salida para conectar a otro STB.
3. TV: Conecte su TV al receptor utilizando un cable de Euroconector.
4. VCR: Conecte su VCR al receptor utilizando un cable de
Euroconector.
5. DIGITAL AUDIO OUT: Salida de audio para conectar a su HiFi.
6. RS-232: Permite actualizar el Programa del STB & Software.
7. POWER: Botón de encencido.
8. ~100-240V (Auto-selectable),50/60Hz. Asegúrese de comprobar las
especificaciones de la alimentación
Pág.- 3
3. Control Remoto
1. Conmuta entre modo encendido y reposo.
2. INFO
Muestra información del programa en la pantalla.
3. 0-9 (teclas numericas)
Selecciona canales de TV o Radio y opciones de menú
individuales.
4. AUDIO
Configura la salida de audio de los altavoces.
5. MUTE
Habilita/ deshabilita el audio.
6. TV/RADIO
Selecciona modo TV/Radio.
7. EPG
Muestra la Guía Electrónica de programas en pantalla,
cuando está disponible.
8. EXIT
Permite volver al menú previo.
9. MENU
Muestra el menú en pantalla, y permite retroceder al
menú desde un submenú.
10. OK
Permite confirmar la selección realizada.
11. CH+/Cambia canales en modo de visualización y mueve el
cursor arriba y abajo en el modo menú.
12. VOL+/Cambia el nivel del volumen en modo de visualización y
configu ra el modo menú.
13. PAUSE
Toma una imagen fija del canal actual.
14. TV / AV
Cambia entre modo TV y AV.
15. RECALL
Vuelve al canal previo.
16. FAV
Permite moverse arriba y abajo en su listado de canales
favoritos.
17. TEXT
Muestra el teletexto.
18. SAT
Muestra la lista de satelites.
19. SUBTITLE
Muestra los subtitulos del programa en pantalla, cuando
estáDisponible.
20. MULTIVIDEO
Muestra 4/6/9 canales en pantalla.
21. P/N
Permite seleccionar entre los modos PAL/ NTSC.
22. ZOOM
Hace un Zoom del area que usted ha seleccionado.
Pág.- 4
4. Menú Principal
Una vez que ha instalado y conectado los cables del DSR, se mostrará el menú.
Este menú consta de 4 menús principales como se muestra:
1. Administrador de Canal
2. Instalación
3. Preferencias
4. Programador
5. Instalación
Este menú consta de 5 submenús
como se muestra:
1. Ajustes de Antena
2. Búsqueda Automática
3. Búsqueda Manual
4. Ajustes del Motor
5. Ajuste de Fábrica por defecto.
5.1 Ajustes de la Antena
1. Nombre del satélite: Seleccione
el satélite que desee.
2. Transpondedor: Seleccione el
transpondedor deseado. Presione
la tecla OK, exhibirá una lista abajo
en la cuál le permite seleccionar el
transpondedor deseado.
3. Tipo de LNB: Seleccione el tipo
de LNB.
4. Low Freq.(MHz)/High Freq.
(MHz): Introduzca la frecuencia correcta del LNB usando las teclas
numéricas de su mando a distancia o el KEY PAD mostrado presionan
Pág.- 5
do la tecla OK.
5. SWITCH (22K, 0/12V): Seleccione el switch con el que quiere configurar la antena.
6. DiSEqC Switch Setting: Seleccione el DiSEqC con el que quiere configurar la antena.
7. LNB Power: Si su DSR está conectado al LNB, seleccione la
Corriente del LNB: apagado, 12V, 18V , Auto.
8. En este menú, presione la tecla de Búsqueda Automática (la tecla
Roja) en el mando a distancia, aparecerá el menú de Búsqueda
Automática, presione la tecla de Búsqueda Manual (la tecla Verde) en el
mando a distancia, aparecerá el menú de Búsqueda Manual.
5.2 Búsqueda Automática
En este menú, presione la tecla OK
para confirmar el satélite, presione
la tecla Scan (la tecla Azul) en el
mando a distancia para buscar en
el satélite, la pantalla exhibirá un
submenú como se muestra.
En este menú, puede seleccionar Buscar NIT ON u OFF, Seleccione el
modo de búsqueda de canal. Presione el botón OK, el DSR búscará
automáticamente como se muestra debajo:
Pág.- 6
5.2.1 Añadir Tranpondedor
En el menú de búsqueda automática, presione la tecla Add TP (la
tecla Verde) en el mando a distancia, la pantalla exhibirá un submenú, en este submenú, puede editar
la frecuencia y el symbol rate,
puede seleccionar la polarización
Horizontal ó Vertical para agregar
al transpondedor nuevo.
5.2.2. Edite Nombre
En el menú de búsqueda automática, puede cambiar el nombre del
satélite, presione la tecla Rename
(la Tecla Amarilla) en el mando a
distancia, la pantalla exhibirá un
cuadro de dialogo.
Usando las teclas de las flechas en
el mando a distancia, puede editar
el nombre del satélite.
5.2.3. Presione la tecla de Ajustes LNB (la tecla Roja) en el mando a
distancia aparecerá el menú de Ajustes de Antenna
5.3 Búsqueda Manual
1. Nombre del satélite: Seleccione
el satélite que desee.
2. Transpondedor: Seleccione el
transpondedor deseado. Presione
la tecla OK, exhibirá una lista
abajo en la cuál podrá seleccionar el transpondedor deseado.
3. Frecuencia y Symbol Rate:
Revise la frecuencia y el symbol
Pág.- 7
Rate. Usted puede usar la tecla suprimir TP (la tecla Verde) en el
mando a distancia para suprimir la frecuencia y el symbol rate actual.
4. Polarización: Seleccione polarización HOR ó VER.
5. Tipo de Búsqueda: Seleccione el tipo de búsqueda.
6. Búscar NIT: Ajuste Búscar NIT ON u OFF.
7. Presione tecla de Ajustes LNB (la tecla Roja) en el mando a distancia
aparecerá el menú de Ajustes de Antena.
5.3.1 Ajuste del PID
Si usted quiere ajustar el PID
manualmente, entonces presione la
tecla Ajuste del PID (la tecla
Amarilla) en el mando a distancia,
la pantalla exhibirá un submenú,
introduzca el valor actual y seleccione OK.
5.4. Ajuste del Motor
Seleccione Ajustes del Motor presionando la tecla OK, aparecerá
una pantalla como se muestra
debajo:
1. Nombre del Satélite: Seleccione
el satélite que quiere.
2. Ajuste Inicial del Motor:
Seleccione Habilitar o Desabilitar.
Si usted selecciona Habilitar,
entonces usted puede operar como
se muestra.
3. Transpondedor: Seleccione el transpondedor deseado.
4. Movimiento: Las teclas VOL- y VOL + en el mando a distancia permiten mover el motor de oeste o este.
Pág.- 8
5.5. Ajuste por Defecto de Fábrica
Si quiere volver a la condición inicial de fábrica de su DSR, entonces seleccione Factory Default y
presione el botón OK. Se mostrará
un mensaje de advertencia. Para
confirmar, seleccionar SÍ.
Advertencia: Seleccionando Ajuste
por defecto de fábrica usted perderá todos los datos e información
instalados previamente.
6. Preferencias
Este menú consta de 7 submenús
como se muestra abajo:
1. Opciones del Sistema
2. Ajustes del AV
3. Ajustes del Vídeo
4. Ajustes del Programador
5. Control Paternal
6. Acerca del Aparato Receptor
7. Juegos
6.1. Opciones del Sistema
1. Lenguaje del OSD: Seleccione
el lenguaje del OSD.
2. Transparencia del OSD: Ajuste
la transparencia del OSD de 1 a
10.
3. Intervalo de espera del OSD:
Ajuste el intervalo de espera del
OSD de 1 Sec a 10 Sec.
Pág.- 9
6.2. Ajustes del AV
1. Proporción de la Pantalla:
Seleccione 4:3 ó 16:9
2. Modo de Pantalla: Seleccione
modo PanScan o Letter Box
3. Black Freeze: Seleccióne black
freeze Sí o No.
4. Tipo del Monitor: Puede ajustar
el tipo de sistema de su TV, seleccione Auto, PAL, NTSC, SECAM.
5. Salida de Vídeo: Si su SCART soporta RGB, entonces seleccione
RGB. Si no lo soporta seleccione CVBS o YC.
6. Tipo RF: Seleccione el tipo de RF.
7. Canal RF: Seleccione el canal RF.
6.3. Ajuste del Vídeo
Ajuste desde el OSD el brillo, el
contraste, la saturación y el tono.
6.4. Ajustar la Hora
Generalmente obtiene la información de la hora real automáticamente desde el satélite pero algunas veces transmite información
erronea.
En ese caso, puede ajustar la hora
real usando esta función.
Pág.- 10
6.5. Control Paternal
Esta función le permite bloquear un
canal con una contraseña para prevenir que los niños puedan acceder
al canal. Usted también puede proteger sus información y datos instalados usando Bloqueo de
Instalación.
Nota: La contraseña predeterminada es 0000.
La advertencia: Una vez que cambie la contraseña, por favor consérvela en un sitio seguro.
7. Programador
El programador le permite ajustar
las diversas funciones. Puede ajustarlo en apagado, una vez, diario o
semanal.
Puede programar como máximo 10
eventos diferentes.
8. Administrador de Canales
El DSR se suministra con uno de
los más potentes administradores
de canales del mundo. Esta función no sólo le permite ver canales
sino que también puede hacer
muchas opciones interesantes y
útiles. El administrador de canales
gestiona canales de TV y de radio.
Dado que la gestión de los canales
de Radio es el mismo que los de
TV, en este manual sólo el administrador de canales de TV está explicado.
Pág.- 11
8.1. Edición de canales
Usted puede operar según se
muestra abajo.
1. Suprimir todo (la tecla Roja)
2. Suprimir un TP (la tecla Verde)
3. Suprimir Satellite (la tecla
Amarilla)
4. Mover seleccion (la tecla Recall)
5. Cambio de tipo de Canal (la
tecla TV / Radio)
8.2. Ajustar Favoritos
Usted puede operar como se
muestra abajo.
1. Cambiar Favoritos (la tecla FAV)
2. Cambiar el Nombre FAV (la tecla
Roja)
3. Cambiar el Tipo de Canal (la
tecla TV / Radio)
9. EPG
El DSR tiene la función EPG para
que tenga acceso a la Guía de TV
(o la Guía de Radio si usted escuchara canales de radio) que mostrará los títulos y otra información
de los programas actuales y
siguientes en canales diferentes.
La información está sólo disponible
en el canal que está viendo. Para
ver los datos EPG, presionar la
tecla EPG en su mando a distancia cuándo está viendo un canal.
Pág.- 12
10. Pasos para actualizar el Software:
10.1 Por Conexión del Receptor
1. Conecte el puerto COM (COM1 para COM4) de un PC y del DSR
para ser actualizado a través del cable RS232.
2. Encienda en el DSR
3. Ejecute el programa CREdit.exe en el PC y seleccione su puerto
correcto COM.
4. Después de que seleccione su puerto COM, presione el botón
"upgrade-UpGrade Application" y seleccione el firmware (debería estar
con nombre extendido bin). El programa hace un intento para conectarse al DSR, la información "conectando" es mostrada. Después, el DSR
será automáticamente actualizado. Ahora mostrará una ventana de diálogo en la pantalla con el mensaje "Uploading".
7. Cuando el programa este en proceso, "d000" - "d100" - será exhibido
paso a paso.
8. Cuando la actualización ha finalizado, mostrará "Transfer Complete..."
Y el DSR volverá a arrancar automáticamente.
10.2 De DSR a DSR
1. Conexione ambos DSR por medio de un cable RS232.
2. Encienda el DSR maestro.
3. Encienda el DSR esclavo.
4. Cuando el "d000" es mostrado en el panel delantero del DSR esclavo, la conexión tiene éxito.
De ahora en adelante, el firmware del DSR maestro está siendo tranferido al DSR esclavo automáticamente.
El mensaje "Good" será mostrado en el panel delantero del DSR cuando la transferencia de datos es exitosamente completada.
5. Si va ha actualizar el firmware de muchos aparatos receptores a la
vez, prepare los accesorios necesarios.
Después de actualizar un DSR, reemplace el DSR esclavo, y no necesita apagar y encender el DSR maestro.
*** Nota, por favor no apague ó toque los aparatos receptores durante el
proceso de actualización del firmware.
Pág.- 13
Real DSR 4000 CX-FTA
Digital Satellite
User Manual
Pág.- 14
Safety
1. Allow clear space around the DSR for sufficient ventilation.
2. Do not cover the DSR or place it on a unit that emits heat.
3. Use a soft cloth and a mild solution of washing liquid to clean the
casing.
4. Do not connect or modify cables when the DSR is plugged in.
5. Do not remove the cover.
6. Do not allow the unit to be exposed to extreme heat, cold or humid conditions.
7. Never allow liquids, spray or other materials to come into contact with
the inside of the model.
Main Features
• 2500 Free Programmable Channels
• Picture in Graphic
• DiSEqC 1.2
• Teletext
• Subtifle
• Upgrade Function & Data Transfer(PC to Receiver & Receiver to
Receiver)
• Programmable Edit
• Electronic Program Guide(EPG)
• Favorite Channels and Parental Lock
• Fully DVB/MPEG II Compliant System
• 0/12V,0/22KHz Circuit, RS-232 Software Port
• Volume Control
• Multi Video 4/6/9
• Full Function by Remote Control
• Zoom
• Auto/Manual Search
• Last Channel Memory
• SMPS (~100-240V,50/60Hz)
• PAI-NTSC Auto Conversion System
Pág.- 15
1. Front Panel
1. POWER: Turns on and off the power of the receiver.
3. CH +/-: When watching, changing to the previous and next
channel,ormoves to the next higher or lower item in the menu.
3. 4 digital LED display: Shows program information at star up displays
software and menu.
2. Rear Panel
1. SAT ANT IN: Connects the satellite antenna cable.
2. SAT ANT OUT: Use it to connect to other STB.
3. TV: Connects your TV via a SCART cable to this receiver.
4. VCR: Connects your VCR via a SCART cable to this receiver.
5. DIGITAL AUDIO OUT: Output for connection to a digital amplifier.
6. RS-232: Upgrades the STB Program & Software.
7. POWER SWITCH.
8. ~100-240V (Auto-selectable),50/60Hz.Make sure to check the power
specification.
Pág.- 16
3. REMOTE CONTROL UNIT
1. the STB between Operation and standby mode.
2. INFO
Displays the programme information box on the screen.
3. 0-9 (Numeric Keys)
Selects the TV or Radio service channels and individual
Menu options.
4. AUDIO
Set the output direction for speaker.
5. MUTE
Enables /Disables the Audio.
6. TV / RADIO
Selects the TV / Radio mode.
7. EPG
Displays the EPG (Electonic Programme Guide) on
screen only when available.
8. EXIT
Returns to the previous menu and the screen.
9. MENU
Displays the Menu on screen or returns to previous
menu from submenu.
10. OK
Confirms the choices and selection with highlight menu
item.
11. CH +/Changes channels in viewing mode and moves cursor
up/down in menu mode.
12. VOL +/Changes the volume level in viewing mode and setting
i in menu mode.
13. PAUSE
To still picture in current channel.
14. TV / AV
Changes the TV and AV mode.
15. RECALL
Moves to the previous channel.
16. FAV
To shows favorite channels list.
17. TEXT
Shows the teletext contteletext is transmitted.
18. SAT
To Display Satellite List
19. SUBTITLE
Show the Subtitle in program.
20. MULTIVIDEO
Show 4/6/9 Channels in screen.
21. P/N
Selects the PAL/NTSC mode.
22. ZOOM
Zoom the Area that you selected.
Pág.- 17
4. Main Menu
Once you have installed and connected the cables of the DSR, the
menu will is displayed.
This menu consists of 4 main
meuns as show below:
1. Channel Manager
2. Installation
3. Preferences
4. Timer
5. Installation
This menu consists of 5 sub-menu
as shown below:
1. Antenna Setting
2. Automatic Search
3. Manual Search
4. Motor Setting
5. Factory Default
5.1 Antenna Setting
1. Satellite name: Select first satellite you want.
2. Transponder: Select desired
transponder. Press OK key will
Display a down list box which also
let's you select desired transponder.
3. LNB Type: Select you LNB type.
4. Low Freq.(MHz)/High Freq. (MHz): Enter the proper LNB Frequency
referring to your LNB using the numeric keys On the RCU or use the
Pág.- 18
KEY PAD displayed by pressing OK key.
5. SWITCH ( 22K,0/12V): you can select the switch with you want to
configure the antenna.
6. DiSEqC Switch Setting: Select DiSEqC with you want to configure the
antenna.
7. LNB Power: If your DSR is connected the LNB, Select LNB Powr off
or 14V, 18V, Auto.
8. In this menu, press Automatic Search key (Red color key) on the RCU
to jump to automatic search menu, press Manual Search key ( Green
color key) on the RCU to jump to manual search menu.
5.2 Automatic Search
In this menu, press OK key to confirm satellite, than
press Scan key (Blue color key) on
the RCU to search
satellite, the screen will display a
sub-menu as below:
In this menu , you can select NIT Search ON or OFF, Select search
channel mode. Than press OK button, the DSR will automatic search as
shown below:
Pág.- 19
5.2.1 Add Transponder
In automatic search menu, press
Add TP key (Green color key) on
the RCU, the screen will display a
sub-menu, in this sub-menu, you
can edit the frequency and
symbol rate, select Hor or Ver polarization mode to add new transponder.
5.2.2 Edit Name
In automatic search menu, if you
want to change satellite name,
press Rename key (Yellow color
Key) on the RCU, the screen will
display the command box. The keypad dialog will appear. Using the
arrow keys on the RCU, you can
edit satellite name.
5.2.3 Press LNB Settings key ( Red color key) on the RCU
to jump to Antenna Settings menu.
5.3 Manual Search
1. Satellite Name: Select first
satellite you want.
2. Transponder: Select desired
transponder.press OK key will
Display a down list box which also
let's you select desired transponder.
3. Frequency & Symbol Rate: Edit
the frequency and symbol Rate.
Pág.- 20
You can use delete TP key ( Green color key) on the RCU to delete
current frequency and symbol rate.
4. Polarization: select HOR or VER polarization mode.
5. Search Type: select search type.
6. NIT Search: set NIT Search ON or OFF.
7. Press LNB Settings key( Red color key) on the RCU to jump to
Antenna Settings menu.
5.3.1 Set PID
If you want to set PID( Packet
Identifier) manually, Press Set PID
key ( Yellow color key ) on the
RCU, the screen will display a submenu, enter the current value and
select OK.
5.4. Motor Setting
Select Motor setting than press OK
key, the screen will shown as
below:
1. Satellite Name: Select first satellite which you want.
2. Motor Setup: Select Disable or
Enable. If you select Enable option,
you can operate as below.
3. Transponder: Select desired
transponder.
4. Move: use VOL- and VOL+ keys on the RCU to let motor move to
west or east setup.
Pág.- 21
5.5. Factory Default
If you want to bring DSR back to
the factory default condition, select
factory default and press OK button. Than a warning message will
displayed. To confirm, select YES.
Warning: On selecting factory
default you will lose all of data and
information, which was previously
installed.
6. Preferences
This menu consists of 7 sub-menus
as shown below:
1. System Options
2. AV Setting
3. Video Adjust
4. Time Setting
5. Parental Control
6. About Receiver
7. Game
6.1. System Options
1.OSD Language: Select OSD
language.
2.OSD Transparence: Set OSD
transparence from 1 to 10.
3.OSD Timeout: Set OSD timeout
from 1 Sec to 10 Sec.
Pág.- 22
6.2. AV Setting
1. Screen Ratio: Select 4:3 or 16:9
screen ratio.
2. Screen Mode: Select PanScan
or Letter Box screen mode.
3. Black Freeze: Select black freeze Yes or No.
4. Monitor Type: You can adjust the
TV system type of your TV set
Auto, PAL, NTSC,SECAM.
5. Video Output: If your SCART supports RGB control, Select RGB.
Otherwise select CVBS or YC.
6. RF Type: Select RF type.
7. RF Channel: Set RF channel.
6.3. Video Adjust
Set OSD brightness, contrast, saturation and hue to adjust video.
6.4. Time Setting
Usually you get the information real
time from the satellite
Automatically but sometimes they
transmit wrong information.
In that case, you can adjust the
real time using this function.
Pág.- 23
6.5. Parental Control
This function allows you lock the
channel with a password in order to
prevent children from accessing the
channel. You can also protect your
installed data and information using
the Install Lock.
Note: Default password is 0000.
Warning: Once you change the
password, please keep it safety.
7. Timer
Timer allows you to program the
various timer functions.You can set
timer off, once, daily or weekly.
10 different events can be programmed at maximum number.
8. Channel Manager
DSR provides one of the most
powerful channel managing function in the world. This function not
only allows you to watch channels
but also do a lot of interesting and
useful things. Channel manager
consists of TV channel and radio
channel. Since the usage of Radio
channel is same ad that of TV
Channel, in this manual only TV
channel manager is explained.
Pág.- 24
8.1. Edit channels
you can operate as below.
1. Delete All ( Red color key)
2. Delete TP ( Green color key)
3. Delete Satellite ( Yellow color
key)
4. Move Focus (Recall key)
5. Change Channel Type ( TV/
Radio key)
8.2. Set Favorites
you can operate as below.
1. Change Favorites ( FAV key)
2. Set FAV Name ( Red Color key)
3. Change Channel Type ( TV/
Radio key)
9. EPG
DSR provides EPG function for you
to get access to the TV Guide (or
Radio Guide if you are listening to
radio channels) that will show the
titles and other information of the
current and next programs on different channels. The information is
only available from the network to
which the channel you are watching. To see the EPG data, press
EPG key on your RCU when watching a channel.
Pág.- 25
10. Steps to upgrade the Software
10.1 By Receiver Link
1. Connect COM port(COM1 to COM4) of a PC and the DSR to be
upgraded through RS232 cable.
2. Power on the DSR
3. Run the CREdit.exe program in the PC and select your right COM
port.
4. After select your COM port, press the "Upgrade->UpGrade
Application" button and select the upgrade file(it should be with extended name "bin"). the program try to connect to the DSR, "linking" information is shown.Then, the DSR will be automatically upgraded".now it
will be a dialog box show on the screen with
the message "Uploading".
7. When the upgrade is normally processing, "d000" - "d100" - "----" will
be displayed step by step.
8. When the upgrade processing has completed,the dialog will show
"Transfer Complete..." and the DSR will reboot automatically.
10.2 DSR to DSR
1. Connect both DSR by RS232 cable.
2. Boot the master DSR.
3. Boot the slave DSR.
4. When the "d000" is displayed on the front panel of the slave DSR, the
connection is successful.
From this time on, software from the master DSR is being tansferred to
slave DSR automatically.
"Good" message will be displayed on the front when the data transfer is
successfully completed.
5. Suppose you are doing the upgrade of many receivers at one time,
prepare all the necessary accessories.
After upgraded DSR, replace the slave DSRs, and no need to power
OFF/ON again the master DSRs.
*** Note, please always not power off or touch the receivers during the
upgrade is processing.
Pág.- 26