1
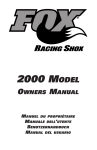
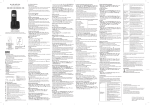
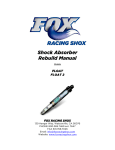
1999 Model Owners Manual
Air Vanilla
Air Vanilla FLOAT
Air Vanilla FLOAT-R
Air Vanilla FLOAT-RC
Vanilla
Vanilla R
Vanilla RC
Vanilla RC-Remote
FOX RACING SHOX
3641 Charter Park Drive, San Jose CA 95136
408.269.9201 FAX 408.269.9217
E-Mail: [email protected]
Table of Contents
General Information ..................................................................................................Page 3
Service
International Service
Warranty
Methods of Payment
Method of Shipping
Disclaimer
Consumer Safety
Shock Terminology.............................................................................................................5
Introduction ..........................................................................................................................6
FOX RACING SHOX History ...........................................................................................6
Pump
............................................................................................................................7
Illustration ..........................................................................................................7
Instructions ........................................................................................................7
Air Shocks
General Set-Up Instructions.............................................................................7
Measuring SAG...............................................................................8
Changing Air Pressure/Adjusting SAG..........................................8
Rebound Adjustment 9
Compression Setting 9
Air Shock Models
Air Vanilla 10
Air Vanilla FLOAT.........................................................................10
Air Vanilla FLOAT-R ....................................................................11
Air Vanilla FLOAT-RC .................................................................12
Coil Over Shocks
General Set-Up Instructions...........................................................................13
Measuring SAG.............................................................................13
Changing Preload/Adjusting SAG ................................................14
Installing and Removing Springs ...................................................................14
Vanilla RC/Vanilla RC Remote ...................................................14
Vanilla/Vanilla R............................................................................14
Rebound Adjustment 15
Compression Setting 15
Coil Over Shock Models
Vanilla
......................................................................................16
Vanilla R ......................................................................................17
Vanilla RC .....................................................................................18
Vanilla RC-Remote ......................................................................19
Maintenance and Service Instructions
Maintenance Checklist ...................................................................................20
Shock Specific Maintenance Instructions
Air Vanilla/Air Vanilla....................................................................21
Service Illustration ......................................................22
Air Vanilla FLOAT/ FLOAT-R/ FLOAT-RC................................23
Service Illustration ......................................................24
Important Service Notice............................................26
General Information
FOX RACING SHOX
3641 Charter Park Drive
San Jose CA 95136
USA
Business Hours: Monday - Friday
Phone: 408.269.9201
FAX:
408.269.9217
E-Mail: [email protected]
8:00 AM to 5:00 PM PST
Service
The following procedures must be completed in order to obtain service or repairs for
your shock.
•
•
•
•
•
Contact FOX Racing Shox to obtain a Return Authorization Number and shipping
address (408) 269-9201 (For our International Service Centers please refer to the
list below or contact FOX Racing Shox directly to determine the Service Center
nearest you).
Send shocks to FOX Racing Shox or your International Service Center with
shipping charges pre-paid by sender.
Mark the Return Address and Return Authorization Number clearly on the outside of
the package.
Include a description of the problem with the shock, bicycle information
(manufacturer, year and model), type of FOX shock, spring rate and return address
with daytime phone number on a note.
Satisfactory proof of purchase receipt is required for warranty consideration.
International Service Centers
Location
Canada
England
Germany
Holland
New Zealand
Switzerland
Company Name
ABC Cycles
Mojo Suspension
Shock Therapy
Cannondale Europe
Blue Shark Enterprises
Suspension Service Center
Phone Number
514.279.0369
+ 44 / 7000665685
+ 49 / 61275322
+ 31 / 541589898
+ 64 / 45894535
+ 31 / 8093020
Warranty
The factory warranty period for your shock is one year from the original date of
purchase of the bicycle or shock. A copy of the original purchase receipt must
accompany any shock being considered for warranty service. Warranty is at the full
discretion of FOX Racing Shox and will cover only defective materials or workmanship.
This warranty is void when damage to the shock has occurred from the following:
•
•
•
•
•
•
Abuse
Damage to the exterior finish caused by improper cable routing
Any attempt to disassemble
Modifications
Non-Factory oil changes or improper service
Shipping damages/loss (purchase of full value insurance is recommended)
Air Vanilla, Air Vanilla R, Air Vanilla FLOAT Warranty: To maintain high performance
and product longevity, periodic maintenance is required. (See the Maintenance
Checklist for further instructions)
To ensure peak performance, repairs and service to the shock must be performed by
FOX Racing Shox in the US or outside the US by a FOX Racing Shox Authorized
Service Center. Call (408) 269-9201 to find the service center nearest you. FOX
Racing Shox reserves the right to all final warranty or non-warranty decisions.
Methods of Payment
¥ VISA
¥ MASTERCARD
¥ Cashiers Check
Method of Shipping
We use UPS ground service within North America, unless otherwise specified.
Disclaimer
FOX Racing Shox is not responsible for any damages to you or others arising from
riding, transporting, or other use of your shock or bicycle. In the event that your shock
breaks or malfunctions, FOX Racing Shox shall have no liability or obligation beyond the
repair or replacement of your shock, pursuant to the terms outlined in the Service and
Warranty provisions of this Manual.
Consumer Safety
RIDING A BICYCLE IS DANGEROUS AND CAN RESULT IN DEATH OR SERIOUS
INJURY. TAKE YOUR RESPONSIBILITY TO YOURSELF AND OTHERS SERIOUSLY:
•
•
Maintain your bike & suspension
Wear protective clothing, eye
protection and a helmet
•
•
Ride within your limits
Tread lightly
Your bike is equipped with FOX RACING SHOX rear suspension. Before riding, take the
time to read the FOX RACING SHOX manual on set-up, use, and service of your shock.
If you have questions, call your Authorized FOX RACING SHOX Service Center or call
FOX Racing Shox directly at (408) 269-9201.
If your shock ever loses oil, or if it makes unusual noise, stop riding immediately and
have the shock inspected by a dealer or contact FOX RACING SHOX. RIDING WITH A
BROKEN OR MALFUNCTIONING SHOCK CAN RESULT IN LOSS OF CONTROL,
CRASHING, AND POSSIBLE DEATH OR SERIOUS INJURY.
Never modify your bike frame or shock. Only use genuine FOX RACING SHOX parts
for your shock. Any modification, improper service, or use of after-market replacement
parts will void the warranty and could damage the shock or cause loss of control of the
bike resulting in serious injury or death.
Follow the scheduled service recommendations in this Manual. Always have your shock
serviced by an Authorized FOX Racing Shox Service Center, or return it to FOX Racing
Shox for service.
Your FOX Racing Shox IS PRESSURIZED WITH NITROGEN. THE CHARGED PORTION
OF THE SHOCK SHOULD NEVER BE OPENED EXCEPT BY AN AUTHORIZED SERVICE
CENTER. IF YOU HAVE AN AIR SHOCK, THE PORTION OF THE SHOCK THAT IS
CHARGED WITH NITROGEN DOES NOT NEED TO BE OPENED IN ORDER TO
PERFORM CLEANING AND LUBRICATION OF THE AIR CHAMBER.
OPENING A PRESSURIZED SHOCK CAN BE DANGEROUS AND CAN RESULT IN
INJURY. DO NOT DO IT.
WARNING: DO NOT ATTEMPT TO PULL APART, OPEN, DISASSEMBLE OR SERVICE
A SHOCK IF IT IS COMPRESSED OR HAS NOT RETURNED (WILL NOT RETURN) TO
ITS ORIGINAL NEUTRAL LENGTH (WITH NO LOAD ON THE SHOCK). SERIOUS
INJURY CAN RESULT.
If for any reason you believe that your FOX Air Vanilla FLOAT shock has not returned
to its original neutral length (eye to eye position), DO NOT attempt to disassemble the
outer air sleeve or any part of the shock. Air has become trapped in the Air Negative
chamber and can cause serious injury if the shock is disassembled. If the shock is
compressed and will not return to its original position, please return the shock
IMMEDIATELY to FOX Racing Shox for service.
Shock Terminology
Shock Sag:
Compression
Damping:
Rebound:
Rebound
Damping:
Preload:
Spring rate:
FLOAT:
The amount the shock compresses with rider sitting on bike in normal riding
position. This is usually 15% to 25% of total shock travel. Cross country:
15% to 25% suggested, Downhill 25% suggested.
The oil resistance felt when trying to compress the shock.
After a shock is compressed it will extend because of the spring force.
Rebound damping controls the rate at which the shock will extend.
The initial amount of force placed on the spring.
The force needed to compress the spring one inch.
FOX Load Optimum Air Technology ( FLOAT ) FLOAT is air technology.
This air negative spring technology self adjusts the air negative chamber to
optimum performance based on the positive air chamber pressure. This
technology delivers the performance of a coil with the ease of adjustability
and light weight of an air shock.
Introduction
Thank you for choosing FOX Racing Shox for your bicycle. In doing so, you have
chosen the number one shock absorber in the industry! All FOX Racing Shox products
are designed, manufactured and assembled by the finest professionals in the industry.
As a consumer and supporter of FOX Racing Shox products, you need to be aware of
the importance of setting up your new shock correctly to ensure maximum performance.
This manual will provide you with the step-by-step instructions of how to set up your
shock.
FOX RACING SHOX History
Back in the mid-70 s Bob Fox, an avid motocross racer, came to the conclusion that the
quality and performance of the shock absorbers available for motocross racing were not
up to the extreme demands of the sport. As a mechanical engineer, he saw an
opportunity to design and develop a new shock that would surpass the performance of
current race equipment. With that goal in mind, Bob designed and began manufacturing
a revolutionary high-performance, externally adjustable, air-pressurized shock absorber.
FOX AirShox were born!
When Bob first designed shocks for motocross competition, he envisioned a product
that would be the very Best available. Today, that same philosophy continues to drive
FOX RACING SHOX.
We continue to push the envelope in racing shock absorber design, technology and
performance - shocks for Motorcycles, Snowmobiles, Mountain Bikes, Off-Road
vehicles, and ATV s. And we keep pushing that envelope based on our years of unique
experience. Experience that has covered a wide variety of the most extreme, most
demanding shock absorber applications on the planet.
The countless lessons we ve learned from the many forms of racing and the numerous
top racers we ve worked with...the expertise we ve gained in 23 years of
experience...the tiny details of shock design and manufacture that we know are so
important...the unique shock designs and technology we ve developed...
All of this has been brought together to create one single product...
...a FOX RACING SHOCK for YOU!
Pump
SCHRADER
VALVE
CHUCK
HANDLE
HOSE
150
100
200
250
50
PUMP BODY
300
0
P.S.I.
GAUGE
Pump Instructions
1) Remove the air valve cap on the shock.
2) Thread pump (Schrader Valve Chuck) onto air valve (Schrader valve) fitting
(approximately 4 turns). When pump is properly installed PSI will register on pump
gauge.
3) Stroke the pump a few cycles. The pressure should increase slowly. If pressure
increases rapidly check to make sure the pump is properly fitted and tightened onto
the Schrader valve.
Note: If shock has no air pressure, the gauge will not register.
4) Pump to desired PSI setting. When unthreading pump from air valve fitting, the
sound of the air loss is from the pump hose,
not the shock itself.
Note: If you re-attach the pump, the hose will need to re-fill with air. This will result in a
lower PSI registering approximately 15 to 20 PSI on the gauge.
Note: Average setting range is from 100 to 300 PSI. DO NOT EXCEED 300 PSI.
5) Replace the valve cap before riding.
Air Shocks
General Set-Up Instructions
To get the best performance from your FOX Racing Shox, it is necessary to adjust sag.
On your FOX Air Vanilla this is done by adjusting the air pressure. The air pressure
needed is determined by the rider’s weight and riding conditions. Sag is how much the
shock compresses when you sit on the bicycle. Increasing air pressure will make the
shock stiffer. Decreasing the air pressure will make the shock softer. (Note: It might be
necessary to change air pressure to achieve the proper sag setting). The smoothest
ride will be attained by running the air pressure low enough to occasionally bottom out.
Measuring SAG
The following set-up procedures will help you achieve the optimum performance from
your Air Vanilla shocks:
Measurement #1
1. Measure the distance from the center of one mounting bolt to the center of the
other mounting bolt. Record this measurement.
2. Sit on the bicycle in a normal riding position. Your weight should be on the saddle
with your feet on the pedals. It may be necessary to hold yourself up against a
wall or post to steady yourself. Make sure your weight is distributed on the saddle
and pedals as it would be in your normal riding position. Do not bounce on the
pedals or saddle.
Measurement #2
3. Have an assistant measure the distance from the center of one mounting bolt to
the center of the other mounting bolt while you are sitting in the riding position on
the bicycle. Record this measurement.
4.
The difference between measurement #1 & measurement #2 is the sag.
shock travel
(inches)
shock travel
(millimeters)
1.25
1.50
2.00
31.7
38.1
50.8
recommended
SAG
(inches)
.31
.38
.50
recommended SAG
(millimeters)
7.8
9.6
12.7
Changing Air Pressure/Adjusting SAG
1.
Locate the Schrader air valve on the shock and remove the valve cap.
2. Screw your FOX Racing Shox pump onto the air valve until the pump shows
pressure on the gauge. Do not over tighten.
3. Add air pressure by pushing on the pump handle until desired pressure is shown on
gauge. (See Pump Section)
4.
Unthread pump from air valve; measure the sag.
5. Repeat step 1-4 until proper sag is achieved. Replace valve cap after sag is set.
Rebound Adjustment - Air Shocks
Adjuster knobs for rebound can be found on the Air Vanilla R and the Air Vanilla RC.
Rebound damping is adjusted by the red rebound clicker knob on your FOX Racing
Shox. The red rebound clicker controls the speed at which the shock returns after the
shock is compressed through the stroke. Turning the rebound clicker clockwise will
cause the rebound to be slower; counterclockwise will cause the rebound to be faster.
This knob has at least 12 clicks, giving your shock a wide range of adjustment. The Air
Vanilla RC has 24 useable clicks of adjustment. This adjustment will enable you to tune
your rebound to any air pressure and riding condition. The proper rebound setting is a
personal preference and varies depending upon rider’s weight and riding style.
Rebound Setting Guidelines
Rebound should be as fast as possible without kicking back and pushing the rider off
the saddle when riding the bike in rough terrain. If the rebound is too slow the
suspension will not function properly and the wheel will not follow the changing terrain.
Determining the proper rebound setting may take a number of rides. During the first few
rides adjust the clicker and note the different ride characteristics. Your rebound clicker
setting may change with different riding conditions.
Compression Setting - Air Shocks
Compression adjustment is featured on the Air Vanilla RC shock only. The compression
adjuster is the blue lever. This lever is a two-position lever, representing the settings
on/off only. Please refer to the specific set up instructions for the compression setting
instructions for the Air Vanilla RC.
Air Vanilla
AIR SLEEVE
BODY
BUSHING
REDUCER
AIR Vanilla
EYELET
SCHRADER
VALVE
Shock Features
• Adjustable Air Spring
• Nitrogen Charged
SAG Set-Up
• Coil Negative Spring
• Internal Floating Piston
Please refer to the General Set-Up Instructions for the Air
Shocks.
Air Vanilla FLOAT
BODY
REDUCER
AIR SLEEVE
REDUCER
Vanilla FLOAT
AIR
EYELET
AIR SLEEVE
COLLAR
SCHRADER
VALVE
Shock Features
• Adjustable Air Spring
• Internal Floating Piston
• Self-Adjusting Air Negative Spring
• Nitrogen Charged
FOX Load Optimum Air Technology FLOAT : FLOAT is air
technology. This is air negative spring technology which self
adjusts the air negative chamber to optimum performance based on the positive air
chamber pressure. This technology delivers the performance of a coil with the ease of
adjustability and light weight of an air shock.
FLOAT Description
SAG Set-Up
Please refer to the General Set-Up Instructions for the Air Shocks
.
Air Vanilla FLOAT-R
AIR SLEEVE
BODY
REBOUND ADJUSTER
KNOB (RED)
EYELET
Vanilla FLOATR
AIR
REDUCER
REDUCER
AIR SLEEVE
COLLAR
SCHRADER
VALVE
Shock Features
• Adjustable Air Spring
• Internal Floating Piston
• Nitrogen Charged
SAG Set-Up
• 12 Click Externally Adjustable Rebound Damping
• Speed Sensitive Rebound Valve Stack
• Self Adjusting Air Negative Spring
Please refer to the General Set Up Instructions for Air Shocks.
Rebound damping is adjusted by the red clicker knob on your FOX Air
Vanilla FLOAT-R. The red rebound clicker controls the speed at which the
shock returns after the shock is compressed through the stroke. Turning the rebound
clicker clockwise will cause the rebound to be slower, counterclockwise will cause the
rebound to be faster. This knob has at least 12 clicks that gives your shock a wide
range of adjustment. This adjustment will enable you to tune your shock to any air
pressure and riding condition. The proper rebound setting is a personal preference and
varies depending upon your weight and riding style.
Rebound
Rebound should be as fast as possible without kicking
back and pushing the rider off the saddle when riding the
bike in rough terrain. If the rebound is too slow the suspension will not function
properly and the wheel will not follow the changing terrain. Determining the proper
rebound setting may take a number of rides. During the first few rides adjust the clicker
and note the different ride characteristics. Your rebound damping setting may change
with different riding conditions.
Rebound setting guidelines
Air Vanilla FLOAT-RC
AIR SLEEVE
BODY
COMPRESSION
ADJUSTER LEVER
EYELET
Vanilla FLOATRC
AIR
AIR SLEEVE
COLLAR
REDUCER
REBOUND
ADJUSTER
KNOB (RED)
SCHRADER
VALVE
REDUCER
Shock Features
•
•
•
•
•
Adjustable Air Spring
• Externally Adjustable Rebound Damping
Internal Floating Piston
• Self Adjusting Air Negative Spring
Nitrogen Charged
• Force-Sensitive Compression Damping
High Speed Compression Damping Blowoff
Two Position (On / Off) Compression Damping Lever
SAG Set-Up
Please refer to the General Set-Up Instructions for the Air Shocks.
Rebound damping is adjusted by the red clicker knob on your FOX Racing
Shox. The red rebound clicker controls the speed at which the shock
returns after the shock is compressed through the stroke. Turning the rebound clicker
clockwise will cause the rebound to be slower, counterclockwise will cause the rebound
to be faster. This knob has at least 24 clicks that gives your shock a wide range of
adjustment. The Rebound Adjustment Knob has 24 clicks of adjustment from the fast
position, all the way clockwise. (Note: More than 24 clicks will affect the shock s
compression damping.) This adjustment will enable you to tune your shock to any air
pressure and riding condition. The proper rebound setting is a personal preference and
varies depending upon your weight and riding style.
Rebound
Rebound should be as fast as possible without kicking
back and pushing the rider off the saddle when riding the
bike in rough terrain. If the rebound is too slow the suspension will not function
properly and the wheel will not follow the changing terrain. Determining the proper
rebound setting may take a number of rides. During the first few rides adjust the clicker
and note the different ride characteristics. Your rebound clicker setting may change
with different riding conditions.
Rebound setting guidelines
Compression adjustment is featured only on the Air
Vanilla RC Shock. The compression adjuster is the
blue lever. When the lever is in line with the shock, the shock is free to move.* By
rotating the lever 90 ° in either direction, you add significant compression damping. This
is intended to reduce the amount the shock compresses due to pedaling forces. This is
not a lock-out.
Compression Setting - Air Shocks
The lever on the Specialized Model (FSR) is at a 45 ° angle to the shock. Move the
lever from one side to the other to determine the ON / OFF position.
∗
Coil Over Shocks
General Set-Up Instructions
To get the best performance from your FOX Racing Shox, it is necessary to adjust
SAG. On the coil-over shocks this is done by adjusting the spring preload. The spring
preload is determined by the rider˝s weight. SAG is how much the shock compresses
when you sit on the bicycle. Increasing spring preload will make the shock compress
less. Decreasing the preload will make the shock compress more. The smoothest ride
will be achieved with one turn of preload. (Note: it might be necessary to change spring
rate to achieve the proper sag setting.) Adjusting sag setting is easiest with two
people, the bike rider and an assistant.
Measuring SAG
Measurement #1
1. Measure the distance from the center of one mounting bolt to the center of the
other mounting bolt. Record this measurement.
2. Sit on the bicycle in a normal riding position. Your weight should be on the saddle
with your feet on the pedals. It will be necessary to hold yourself up against a wall
or post to steady yourself. Make sure your weight is distributed on the saddle and
pedals as it would be in your normal riding position. Do not bounce on the pedals
or saddle.
Measurement #2
3.
Have an assistant measure the distance from the center of one mounting bolt to
the center of the other mounting bolt while you are sitting in the riding position on
the bicycle. Record this measurement.
4.
The difference between measurement # 1 & measurement # 2 is the SAG.
shock travel
(inches)
1.00
1.25
1.50
1.75
2.00
2.25
shock travel
(millimeters)
25.4
31.7
38.1
44.4
50.8
57.1
recommended SAG
(inches)
.25
.31
.38
.44
.50
.56
recommended SAG
(millimeters)
6.3
7.8
9.6
11.1
12.7
14.2
Changing Preload / Adjusting SAG
To set the preload, you need to adjust the spring preload ring. FOX Racing Shox
recommends no more than 4 turns of preload. If more than 2 turns of preload are
required to achieve the correct amount of sag, it is recommended that the spring be
replaced with the next higher spring rate.
1.
Adjust preload by threading the preload ring onto the body. Clockwise turns
increase preload which decreases the SAG. Counterclockwise turns decrease
preload which increases SAG.
OR
1. Change the spring (See Installing and Removing Springs). A stiffer spring (higher
spring rate) decreases SAG. A softer spring (lower spring rate) increases SAG.
2.
Measure SAG.
3.
Repeat Steps 1-2 until proper SAG is achieved.
Installing and Removing Springs
To remove the spring from your shock, follow these 3 steps.
Vanilla RC and Vanilla RC Remote
1. Back off preload ring to loosen the spring until the slotted retaining ring can be
removed from the shock.
2.
Slide the spring off over the eyelet.
3.
Slide the new spring on over the eyelet, re-install the retaining ring and tighten the
preload adjuster.
Vanilla and Vanilla R
1.
Loosen and remove the preload ring from the body.
Note: It might be necessary to remove the reducers from the body end of the shock to
remove the spring.
2. Slide the spring off over the shock body.
3. Install your new spring by sliding the spring on over the body of the shock. Reinstall the spring preload ring and tighten to adjust the preload.
Springs are available from your bicycle dealer, bicycle manufacturer or FOX Racing
Shox. Numbers are printed on the outside of the spring coils indicating the rate (in
pounds) and travel (in inches). Example: 550-1.95 is a 550 pound-per-inch spring rate
with 1.95 inches of travel. Please note this number when ordering replacement springs.
Rebound Adjustment - Coil Over Shocks
Externally adjustable rebound clicker knobs are featured on the following FOX Racing
Shox coil-over models: Vanilla R, Vanilla RC and the Vanilla RC Remote.
Rebound damping is adjusted by the red rebound clicker knob on your FOX Racing
Shox. The red rebound clicker controls the rate at which the shock returns after being
compressed. Turning the rebound clicker clockwise will cause the rebound to be slower;
counterclockwise will cause the rebound to be faster. This knob has at least 12 clicks
that gives your shock a wide range of adjustment. This adjustment will enable you to
tune your shock to any spring rate and/or riding condition. The proper rebound setting
is a personal preference and varies depending upon rider s weight and riding style.
Rebound setting guidelines
Rebound should be as fast as possible without kicking back and pushing the rider off
the saddle when riding the bike in rough terrain. If the rebound is too slow the
suspension will not allow the wheel to follow the changing terrain. Determining the
proper rebound setting may take a number of rides. During the first few rides adjust the
clicker and note the different ride characteristics. Your rebound clicker setting may
change with different riding conditions.
Compression Setting - Coil Over Shocks
Compression adjustment is a feature of the Vanilla RC shock. Please refer to the
specific Set Up Instructions for the compression setting instructions for the Vanilla RC.
Remote compression adjustment is a feature on the Vanilla RC-Remote. Please refer to
the specific set up instructions for the compression setting instructions for the Vanilla
RC-Remote.
Vanilla
EYELET WITH SPRING
RETAINER
BOTTOM OUT
BUMPER
SPRING
BODY
Vanilla
REDUCER
SHAFT
PRELOAD
RING
REDUCER
Shock Features
• Adjustable Spring Preload
• External Coil Spring
• Internal Floating Piston
SAG Set-Up
____
• One Piece Aluminum Body
• One Piece Eyelet
• Nitrogen Charged
Please refer to the General Set-Up Instructions for Coil-Over Shocks.
____________________________________________________________
Vanilla R
SPRING
RETAINER
BOTTOM OUT
BUMPER
SPRING
BODY
REBOUND ADJUSTER
KNOB (RED)
Vanilla R
REDUCER
REDUCER
EYELET
SHAFT
PRELOAD RING
Shock Features
• One Piece Aluminum Body
• Speed Sensitive Rebound Valve Stack
• Multi-Valve Piston
• Nitrogen Charged
• External Coil Spring
• Force-Sensitive Compression Damping
• Internal Floating Piston
• Adjustable Spring Preload
• 12 Click Externally Adjustable Rebound Damping
SAG Set-Up
Please refer to the General Set Up Instructions for the Coil Over
Shocks.
Rebound setting is adjusted by the red clicker knob on your
FOX Vanilla R. The rebound clicker controls the rate at which
the shock returns after being compressed. Turning the rebound clicker clockwise will
cause the rebound to be slower, counterclockwise will cause the rebound to be faster.
This knob has at least 12 clicks that gives your shock a wide range of adjustment.
This adjustment will enable you to tune your shock to any spring rate and/ or riding
condition. The proper rebound setting is a personal preference and varies depending
upon your weight and riding style.
Rebound Adjustment
Rebound should be as fast as possible without kicking
back and pushing the rider off the saddle when riding the
bike in rough terrain. If the rebound is too slow, the suspension will not have time to
extend before hitting the next bump.
Rebound setting guidelines
Vanilla RC
REBOUND ADJUSTER
KNOB (RED)
RESERVOIR
COMPRESSION
ADJUSTER KNOB
(BLUE)
SHAFT
BODY CAP
REDUCER
Vanilla RC
EYELET
SLOTTED
SPRING
RETAINER
BOTTOM
OUT
BUMPER
REDUCER
SPRING
BODY
PRELOAD
RING
Shock Features
•
•
•
•
•
Nitrogen Charged
• Speed Sensitive Rebound Valve Stack
Multi-Valve Piston• Piggy Back Remote Reservoir
External Coil Spring
• Force-Sensitive Compression Damping
Internal Floating Piston
• 12 Click Externally Adjustable Rebound Damping
Adjustable Spring Preload • 12 Click Externally Adjustable Compression Damping
SAG Set Up Please refer to the General Set Up Instructions for Coil Over Shocks
Rebound Adjustment Rebound setting is adjusted by the red clicker knob on your
FOX Vanilla RC. The red rebound clicker controls the rate at
which the shock returns after being compressed. Turning the rebound clicker clockwise
will cause the rebound to be slower, counterclockwise will cause the rebound to be
faster. This knob has at least 12 clicks that gives your shock a wide range of
adjustment. This adjustment will enable you to tune your shock to any spring rate and/
or riding condition. The proper rebound setting is a personal preference and varies
depending upon your weight and riding style.
Rebound should be as fast as possible without kicking
Rebound setting guidelines
back and pushing the rider off the saddle when riding the
bike in rough terrain. If the rebound is too slow the suspension will not have time to
extend before hitting the next bump.
Compression Setting The compression adjuster is the blue clicker knob on the
VANILLA RC. The Compression adjuster changes the force
required to compress the shock. Turning the blue knob clockwise increases
compression damping (more difficult to compress), while counterclockwise reduces the
compression damping (easier to compress). During the first few rides adjust the clicker
and note the different ride characteristics. Your compression clicker setting may
change with different riding conditions.
Note: The smoothest ride will be attained with the compression adjuster in the softest
setting.
Vanilla RC-Remote
RESERVOIR
COMPRESSION
ADJUSTER LEVER
REBOUND ADJUSTER
KNOB (RED)
BOTTOM OUT
BUMPER
RC REMOTE
REMOTE
Vanilla RC
REDUCER
BODY CAP
EYELET
SLOTTED
SPRING
RETAINER
REDUCER
SHAFT
SPRING
PRELOAD
RING
Shock Features
•
•
•
•
•
•
Nitrogen Charged
• 12 Click Externally Adjustable Rebound Damping
Multi-Valve Stack
• Remote Adjustable Compression Damping
External Coil Spring
• High Speed Compression Blowoff
Internal Floating Piston
• Force-Sensitive Compression Damping
Adjustable Spring Preload • Speed-Sensitive Rebound Valve Stack
Piggyback Remote Reservoir
SAG Set Up
Please refer to the General Set Up Instructions for Coil Over Shocks.
Rebound Adjustment
Please refer to the Rebound Adjustment Instructions for the
Vanilla RC.
Remote compression adjustment is a feature on the Vanilla RCRemote. It is designed for climbing or sprinting with minimized
pedal induced suspension compression and can be adjusted On-The-Fly . The
compression adjuster is the lever on the shock actuated by the remote lever at the
handlebar. This remote adjuster has only two settings, Firm and Soft. The compression
adjuster allows either normal compression (soft) or restriction of the compression
damping (harder). A Blow-off feature enables the shock to compress and absorb
LARGE impacts even when compression adjuster is in the firm position.
Compression Setting
Remote Cable Set-Up & Adjustment
1.
2.
3.
Install cable housing from remote hand lever assembly to cable stock on the
shock.
Route cable wire from remote hand lever to the shock lever with adjustable cable
stop (barrel type) fitted into shock lever. This cable stop has only one set screw to
tighten when adjusted.
NOTE: When the shock lever is pulled all the way (against spring tension) until it
stops at the piggyback shock body cap, the compression adjuster is
in the firm
position. When the shock lever is moved about 1/4" (7mm) from its stop (lever
touching shock), the compression adjuster is OFF. This is the normal operating
mode. Set the cable stop to allow for only limited range of motion and the lever
spring will have ample tension to eliminate cable slack.
4. Tighten cable stop set screw, trim off excess cable and crimp cable end protector if
provided.
5. Verify the audible CLICK as shock lever nearly touches shock body cap in ON
mode. There will be no click when lever is backed off.
Turn handlebars left and right to check cable routing and to see that compression
adjuster is not affected by steering. If the adjuster is affected by steering, the cable
might be too short and a longer cable might be needed.
Maintenance and Service Instructions
Maintenance Checklist
Specific Maintenance and Maintenance Intervals
New Every Every Every Every
Ride
8
40
200
Hours Hours Hours
Vanilla/Vanilla R/Vanilla RC/Vanilla RC-R
Set shock SAG
Set rebound adjustment to desired speed
Tighten shock mounting bolts
Adjust air pressure in Air Shocks only
Clean shaft, seal area, check shaft for damage
Clean out bottom bumper on Coil Shocks
√
√
√
√
√
√
√
√
√
√
Clean aluminum reducer, Check for Wear, Grease
√
√
√
√
√
Send to service center for oil change and inspection
√
√
√
√
√
√
Air Vanilla/Air Vanilla R/Air Vanilla FLOAT/Air Vanilla FLOAT-R/Air Vanilla FLOAT-RC
Air Sleeve Maintenance per Riding Conditions
Clean under Air Sleeve Lip
√
Riding Conditions: Dry, Dusty
Riding Conditions: Extreme Mud, Heavy Grit
√
√
√
√
√
√
√
√
√
√
Air Sleeve Maintenance (See pp. 21-24)
Riding Conditions: Dry, Dusty
Riding Conditions: Extreme Mud, Heavy
Oil Service
√
√
√
Shock Specific Maintenance Instructions
Air Vanilla/Air Vanilla R
NOTE: THE FOLLOWING INSTRUCTIONS ARE VERY IMPORTANT TO THE PROPER
PERFORMANCE OF ALL 1998 AND 1999 AIR VANILLA AIR SHOCKS.
(Excludes FLOAT technology)
WARNING: DO NOT ATTEMPT TO PULL APART, OPEN, DISASSEMBLE OR SERVICE A SHOCK
IF IT IS COMPRESSED OR HAS NOT RETURNED (WILL NOT RETURN) TO ITS ORIGINAL
NEUTRAL LENGTH (WITH NO LOAD ON THE SHOCK). SERIOUS INJURY CAN RESULT.
If for any reason you believe that your FOX Air Vanilla FLOAT shock has not returned to its original
neutral length (eye to eye position), DO NOT attempt to disassemble the outer air sleeve or any
part of the shock. Air has become trapped in the Air Negative chamber and can cause serious
injury if the shock is disassembled. If the shock is compressed and will not return to its original
position, please return the shock IMMEDIATELY to FOX Racing Shox for service.
To ensure peak performance and reduce the chances of premature wear to the air sleeve, wipe the area at
the base of the air sleeve / seal with a clean rag before dirt begins to accumulate. See the maintenance
schedule for frequency instructions and refer to the detailed shock illustration on the following page for a
diagram of specific service parts.
Periodic maintenance consists of the following:
•
Removal and cleaning of the aluminum air sleeve
•
Inspection of air seal and bearing
•
Replacement of worn parts
Removal of Air Sleeve
1.
2.
3.
7.
Remove the shock from the bicycle.
Release pressure from air fill valve.
Clamp upper shaft eyelet in vise with soft jaws. Do not release the nitrogen pressure. Note: be careful
not to clamp red knob or air valve in vise.
Grasp black aluminum Air Sleeve and turn counter clockwise to loosen.
Slide Air Sleeve over seal and remove.
Clean the inside of Air Sleeve with contact cleaner and inspect carefully for scratches or deep nicks in
the finish.
If excessive wear is evident the sleeve should be replaced.
•
O-ring seal and Air Sleeve are available for purchase directly from FOX or your local dealer.
4.
5.
6.
Inspection of Air Seal
1.
2.
3.
Remove O-ring seal and bearing (Air Sleeve guide).
Clean body with contact cleaner.
Apply low friction light grease to O-ring seal and bearing area and re install bearing and new O-ring
seal.
Assembly
1.
2.
3.
4.
5.
6.
7.
Liberally grease outside of O-ring seal / bearing area.
Liberally grease the threads at the end of the Air Sleeve
Carefully slide the Air Sleeve up the shock body and over the seal/bearing area.
Seat bearing strip in its groove, pinching the ends together to ensure the bearing is not damaged when
sliding the air sleeve over it.
Slide the air sleeve up to the eyelet and thread on to the body.
Tighten the Air Sleeve collar assembly by hand.
Re-inflate to desired psi using inflation instructions listed in the Pump Instructions
Note: Be extremely careful as the threads in the air sleeve can cut the seal. If this happens, you must start
over with a new seal.
1.
2.
3.
Thread the Air Sleeve on to the eyelet and tighten by hand.
Attach your FOX pump and re-inflate to desired PSI. Check for leaks.
Re-install in bike.
Air Vanilla/Air Vanilla R
Shaft Eyelet
Air Valve
O-ring
(Air Sleeve
static seal)
Threads for Air Sleeve
Shaft
Bearing
(Air Sleeve
guide)
O-ring
(Air Sleeve
dynamic seal)
Air Sleeve
Shock Body
Body Eyelet
Air Vanilla FLOAT/Air Vanilla FLOAT-R/Air Vanilla FLOAT-RC
To ensure peak performance it is necessary to perform some maintenance to your shock. See maintenance schedule
for frequency.
WARNING: DO NOT ATTEMPT TO PULL APART, OPEN, DISASSEMBLE OR SERVICE A SHOCK IF IT IS
COMPRESSED OR HAS NOT RETURNED (WILL NOT RETURN) TO ITS ORIGINAL NEUTRAL LENGTH
(WITH NO LOAD ON THE SHOCK). SERIOUS INJURY CAN RESULT.
If for any reason you believe that your FOX Air Vanilla FLOAT shock has not returned to its original neutral
length (eye to eye position), DO NOT attempt to disassemble the outer air sleeve or any part of the shock. Air
has become trapped in the Air Negative chamber and can cause serious injury if the shock is disassembled. If
the shock is compressed and will not return to its original position, please return the shock IMMEDIATELY to
FOX Racing Shox for service.
Periodic maintenance will consist of the following.
•
Removal and cleaning of Air Sleeve and O-rings in knurled collar.
•
Replacement of worn parts.
Removal of Air Sleeve
1.
2.
3.
4.
5.
6.
Remove shock from bike
Release all air pressure from Air Valve.
Clamp upper shaft eyelet in a vise with soft jaws.
Cycle shock a few more times and release more pressure until no more pressure is evident.
Remove aluminum reducers.
Loosen Air Sleeve & Collar as one assembly by turning counter clockwise and carefully slide down over the Air
seal O-ring. (Internal threads can cut the seal)
Inspection
1.
2.
3.
4.
5.
6.
7.
8.
Clean inside of the collar with contact cleaner.
Inspect and replace the seals inside of the Collar.
You must remove the collar to replace the seals.
Clean the inside of the Air Sleeve with contact cleaner.
Inspect O-ring seal on shock body for wear or damage.
Clean O-ring area with contact cleaner to remove dirt and grit.
Replace O-ring if necessary.
Inspect and clean bearing and re install. (The bearing should last the life of the shock; unless it is damaged, don t
change it)
9. Inspect the O-ring on the shaft eyelet,
10. Clean area with contact cleaner.
11. Replace shaft eyelet O-ring if necessary.
Assembly
1.
2.
3.
4.
5.
Lightly grease the outside of your O-ring seals and bearing.
Liberally grease the inner threads of your Air Sleeve collar assembly and carefully twist it on to the shock body,
being careful not to unseat the collar seals on the end of the body.
Seat bearing strip in its groove, pinching the ends together to ensure the bearing is not damaged when sliding the
air sleeve over it.
Tighten the Air Sleeve collar assembly by hand.
Re-inflate to desired psi using inflation instructions listed in the Pump Instructions.
23
Other Maintenance Considerations
•
•
•
If riding in extreme conditions, service shock more frequently
Wash your shock with soap and water
Keep away from high pressure washers
•
Other extensive, internal service should only be performed by an authorized FOX Racing Shox Service
Center.
Air Vanilla FLOAT/Air Vanilla FLOAT-R/Air Vanilla FLOAT-RC
Shaft Eyelet
Air Valve
Air Sleeve
O-ring
(Air Sleeve
static seal)
Threads for Air Sleeve
Lock-out Lever
Shaft
Bearing
(Air Sleeve
guide)
O-ring
(Air Sleeve
dynamic seal)
Threads for collar
(Knurled)
Collar
Shock Body
O-ring
(Negative Air Spring
dynamic seal)
O-ring
(Negative Air
Spring static seal)
Body Eyelet
24
IMPORTANT
SERVICE NOTICE
FOLLOWS
25
SERVICE NOTICE
WARNING
A potentially dangerous situation can arise if air
pressure has (incorrectly) transferred permanently
from the positive upper air chamber to the lower
negative chamber. Please review the differences
between Figures A and B below to determine if
your shock has this problem.
Eyelet
Schrader Valve
Sleeve
Main Air Chamber
Air Sleeve Bearing
Collar
Seal
Air Negative Chamber
Figure A. Normal Shock Fully Extended.
26
Special Procedure to Check for Problem Shown Below:
If the shock is completely or partially compressed, do the following:
1) Using a FOX air pump, pressurize the main chamber to 250 P.S.I.
2) If the shock does not extend, situation shown below has occurred.
3) If your shock has become partially or completely "stuck down", DO
NOT ATTEMPT TO DISASSEMBLE OR SERVICE THIS SHOCK.
Doing so could cause serious injury. Your shock must be sent back to
FOX RACING SHOX or an Authorized Service Center for repair.
Low Pressure (or zero) Here
Low Pressure here (or zero if pressure
has been released from air valve).
Shock is fully or partially
collapsed ("stuck down")
High Pressure Here
High pressure air has (incorrectly)
tansferred into this area (from Main Air
Chamber). It is "trapped here.
This pressure makes the shock "stuck
down". Shock can not easily be fully
extended now.
There is no simple way to depressurize
(release) this trapped air.
Follow special instructions given here.
Figure B. Partially or Completely "Stuck-down"
Shock. Shock will not return to full length (Figure A).
27