1
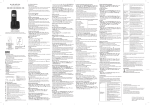
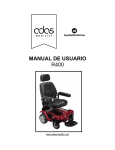
Your Telephone Operations
Switching on / off
- Press and hold the
key.
Notes: When the handset is OFF, it cannot be used for making calls
including emergency calls. There will be no ringing during an
incoming call.
To answer a call, you will need to switch it back on. It may take
some time for the handset to re-establish a radio link with the base
unit.
enter direct memory menu / or
to select EDIT NUMBER /
/
currently stored name displayed (or ENTER NAME if there is no
number stored) / edit or enter the name /
/ confirmation beep.
Change the display language
-
/ or
to select PERSONAL SET /
/ or
to select
LANGUAGE /
/ or
to your desired language /
/
confirmation beep.
Note: Once the display language is set, the option menus on the
handset will switch to display in the selected language immediately.
Set time and date
Note: If you subscribe to the Caller Display service, the time and
date will be set automatically when you receive a call, but you may
still need to set the correct year.
/ or
to select CLOCK & ALARM /
/
to select
DATE / TIME to display the last stored date / enter the current
(YY - MM - DD) /
/ enter the time (HH-MM) /
.
USER'S GUIDE
GUÍA DE USUARIO
Change your handset’s name
PLEASE READ THIS USER'S GUIDE BEFORE USING YOUR PHONE
-
FAVOR DE LEER ESTE MANUAL ANTES DE UTILIZAR SU TELÉFONO
/ or
to select
DIRECT MEM. /
/ or
to select KEY 1 or KEY 2 /
/ stored
name displayed (or NO NUMBER if it is empty) /
to enter direct
memory menu / or
to select DELETE /
/
/ confirmation
beep.
11
Make and answer calls
Make a call
13
-
either before or after dialing your number.
- From redial list :
12
1
2
3
5
4
6
7
18
17
16
15
14
8
/
or
/
.
- From call log list*:
/ or
/ .
Note: You need to subscribe to Caller Line Identification service to
be able to see the caller’s number or name in the call log.
- From phonebook:
/
or
/
.
ENGLISH
* Subject to subscription and availability of the service from the fixed line
operator.
.
Save call list entry into the phonebook
/ or
to select an entry /
/
or
-
to select SAVE
NUMBER /
to select and enter the name of contact (maximum
12 characters) /
.
Delete a Call Log entry
/ or
/
/ or
-
to select DELETE /
During a call, press
or
Delete all entries in the Call Log
/
/
or
to select DELETE ALL /
-
to select from VOLUME 1 to VOLUME 3.
to turn on / off the microphone.
located at the back of the base station. All the registered
handsets start to ring.
again to
If you have subscribed to Call Waiting service, the earpiece will emit
a beep tone to inform you that there is a second incoming call.
The number or name of the second caller will also be displayed on
your phone if you have subscribed to Caller Line Identification
service (CLI). Please contact your network provider for more
information on this service.
Phonebook settings: 50 entries
Access phonebook
or
to select PHONEBOOK /
-
/
or
Set the answer mode
-
/
.
Note: Instead of pressing
or
to browse the phonebook
entries, you can press the numeric key corresponding to the first
letter of the entry you wish to locate.
Modify a phonebook entry
Delete a phonebook entry
/ or
to select PHONEBOOK /
-
/ or
to select entry to delete /
Delete all entries from the phonebook list
/ or
to select PHONEBOOK /
/ or
DELETE ALL /
/
to select
/
/
Playback recorded messages
-
to select
/ or
to select
DIRECT MEM. /
/ or
to select KEY 1 or KEY 2 /
/ stored
name displayed, or NO NUMBER displayed if it is empty /
to
/ or
to select ANSW MACHINE /
/ or
to select
RECORD OGM /
/
or
to select ANSWER ONLY or
ANSW.&RECORD /
/ or
to select RECORD OGM /
to
start recording /
to end recording.
Note: The maximum length of an outgoing message is 3 minutes.
To hear your outgoing message, select PLAY after selection of
ANSWER ONLY or ANSWER&RECORD.
To delete a personalised outgoing message and return to the
predefined one, select DELETE after selection of ANSWER ONLY
or ANSWER&RECORD.
Playback and delete messages
The last recorded message is played first via the loudspeaker on
model. Old messages cannot be played again until after all new
messages have been played.
/ confirmation beep.
Add / edit direct access memory
to select PHONEBOOK /
/ or
/
or
to select ANSW MACHINE /
/ or
to select
ANSWER MODE /
/
or
to select ANSWER ONLY or
ANSW.&RECORD /
.
Record a personalised outgoing message
to select LIST
/ or
to select PHONEBOOK /
/ or
to select EDIT
ENTRY /
/ or
to select an entry to edit /
/ current name
is displayed / edit the name /
/ edit the number /
/ confirmation
beep.
/
or
to select ANSW MACHINE /
/
or
to select
ANSW. ON / OFF /
/
or
to select ON or OFF /
/
confirmation beep.
Note: You can also turn the answering machine on or off by
pressing the
on the base.
Note: If the answering machine is turned off and the master PIN is
still set at its default 0000, the answering machine will not answer
to any incoming ringing, but if the master PIN has been changed,
it will answer after 10 rings to allow remote access.
The model is supplied with two predefined outgoing messages
(OGM) used for the different answer modes.
There are 2 answer modes available: Answer Only and Answer &
Record.
By default, the answer mode is ANSW.&RECORD, which allows a
caller to leave a message on the answering machine. This can be
changed to ANSWER ONLY mode, which does not allow callers to
leave any messages on the answering machine.
-
/ or
to select PHONEBOOK /
/
to enter NEW
ENTRY / enter the name of contact /
/ enter the number of
contact /
/ confirmation beep (
to delete characters).
DELETE /
/ or
confirmation beep.
/ confirmation
The outgoing message
Store a contact in the phonebook
-
/
You can use the answer machine menu on the handset to access
and change the settings for all the answering machine functions.
Paging
- Press
-
/
beep.
Mute / unmute microphone
-
/
confirmation beep.
-
What the icons meas?
Indicates battery is fully charged.
Indicates battery is fully discharged.
Indicates that an external call is connected or held.
Icon blinks when receiving an incoming call.
Indicates you have a new voice mail message*.
Indicates you have new missed calls*, or the call log is being
viewed.
Displays when the phonebook is accessed.
Displays when the alarm clock is activated.
Displays when handsfree is activated (Sigma 260 Voice only).
Displays when ringer volume is turned off.
Indicates that the handset is registered and within range of the
base station.
Icon blinks when the handset is out of range or is searching for a
base.
Displays when in menu mode to confirm your selection.
Indicates that more options are available.
Use the UP / DOWN keys to scroll up / down.
Displays when in menu mode.
Select BACK to return to the previous menu level.
Access call log
/
/ or
Turn the answering machine on or off
.
Call waiting
13
14
15
16
17
18
NUMBER /
to select and enter the name of contact (maximum
.
12 characters) /
Adjust the earpiece volume
Phone Function Keys
11
12
Access call log
/
.
- / or
Save a redial number into the phonebook
/
or
to select an entry /
/ or
to select SAVE
-
- To activate / desactivate handsfree :
- Once retrieved, press any key on the handset or the
end the paging.
OK / Menu key
Back / Mute key
Navigation key
Talk key
Hang-up / Exit key
Call transfer / Intercom key
Recall (Flash) key - Access to operator service*
Redial Key
Start key
Hash key - To lock or unlock / to toggle between the external and
internal calls when both are set up.
Handset Locator - To page handsets / to start registration procedure.
Clear button - Delete current message / long press to delete all read
messages.
Turn the answering machine on / off
Increase speaker volume
Decrease speaker volume
Play / Stop message playback
Skip to next message
Go back to previous message or replay current message
Using the call log: stored up to 10 external calls
Use handsfree (only for Sigma 260 Voice)
Before 1st use
Connecting your phone:
- Connect plugs in corresponding sockets in the base station.
Plug the telephone line into telephone socket and insert power
plug in an electrical outlet.
- Insert batteries in handset.
Before you start to use your telephone, charge batteries
continuously for 15 hours.
Only use plug adapter supplied with the unit and
rechargeable batteries with your phone.
1
2
3
4
5
6
7
8
9
10
/
to display ENTER NAME / enter the name of contact
(maximum 12 characters) /
/ return the display to redial list.
Answering machine setting
Answering machine operation by handset
IMPORTANT NOTE: You can simply place the handset back on its
base station or charger pod to end the call.
10
to view details.
Save a redial number into the phonebook
/ or
to select an entry /
to display SAVE NUMBER
- - From direct memories : long press on KEY 1 or KEY 2 in idle mode.
Answer and end a call
/
.
9
The redial list stores the last 5 numbers dialed.
Access redial list
/ or
to browse the redial list /
-
/
or
to select ANSW MACHINE /
/
to start playback.
Note: During message playback you can press MENU key, then
Navigation to select options to REPEAT the current message, skip
forward to the NEXT message, skip back to the PREVIOUS
message or DELETE the current message.
Delete all recorded messages
-
/ or
to select ANSW MACHINE /
DELETE ALL /
.
/
or
to select
/
or
to select ANSW MACHINE /
/
or
to select
SETTINGS /
/
to enter RING DELAY /
or
to select
2 - 7 RINGS or ECONOMY /
/ confirmation beep.
Notes: If you select Economy mode, the answering machine will
answer calls and start playing the greeting message after 5 rings if
you have no new messages, or after 3 rings if there is at least one
new message recorded.
Activate / deactivate auto hang-up
/ or
to select PERSONAL SET /
AUTO HANG-UP /
confiramtion beep.
/
or
to select ANSW MACHINE /
/
or
to select
SETTINGS /
/
or
to select REMOTE ACC /
/
or
to select ACTIVATE or DEACTIVATE /
/ confirmation beep.
Notes: If the answering machine is turned off, you must change
your master PIN from its default 0000, before you can use the
remote access feature.
To check messages remotely
- Dial your home phone number / while the answering machine
playing greeting message /
to dial and enter remote access code
(master PIN code) / confirmation beep /
/ message start playing.
Note: The answer machine will drop the line immediately if there is
no detection of the master PIN entry within 8 seconds from
pressing .
The remote feature lets you perform the following functions:
To
Press this button
Review message
1
Play back messages
2
Stop message playback
8
Erase message
6 (during message playback)
Skip message
3
Turn on answerer machine
7
Turn off answerer machine
9
Note: If the answering machine is off, and the master PIN has been
changed from its default 0000, it will answer the call after 10 rings.
Dial the master PIN code within 8 seconds and you will hear a beep
to confirm you have entered the remote access mode, as above.
Set the OGM voice language (optional)
/ or
to select ANSW MACHINE /
/ or
to
select SETTINGS /
/ or
to select LANGUAGE /
/
or
to select your preferred language /
/ confirmation
beep.
Call screening
Call screening allows you to hear the caller while he is leaving
a message.
You can then decide if you want to talk to the caller directly.
To adjust the speaker’s volume during call screening, press
and
keys on the base station. The lowest volume level
turns call screening off.
Using the intercom
Intercom another handset
- If only 2 registered handsets:
.
- If more than 2 registered handsets: the available handset number
and * displayed / enter the handset number.
- To ring all handsets to intercom:
.
Answer an external call during intercom
/ answer the external call and end the intercom.
Note: To put the internal call on hold and answer the incoming
external call, press INT key.
Switch between an internal and external call
- During the call, press and hold
.
Establish a three-party conference call
- During call,
/ enter handset number /
on the called handset
to answer / long press
on the first handset.
CONFERENCE will be displayed on the screen once the
conference call is established.
/ or
to select
SET FORMAT /
/
to enter TIME FORMAT / current setting
displayed / or
to select 12 HOURS or 24 HOURS /
/
confirmation beep.
Set date format
/ or
to select CLOCK&ALARM /
-
/ or
to select
SET FORMAT /
/ or
to select DATE FORMAT /
/
current setting display /
or
to select DD/MM or MM/DD /
/
confirmation beep.
Set alarm
/ or
-
to select CLOCK&ALARM /
/ or
to select
ALARM /
/ or
to select OFF, ON ONCE or ON DAILY / .
- if select ON ONCE or ON DAILY, enter time (HH-MM) for alarm
/ or
to select AM or PM if in 12 HOURS format /
/
confirmation beep.
Set alarm tone
/ or
to select CLOCK&ALARM /
-
/
or
to select
ALARM TONE /
/
or
to select MELODY 1, MELODY 2 or
MELODY 3 /
/ confirmation beep.
Advanced use of your telephone
Change Master PIN
The Master PIN is used for registration / unregistration of handsets.
The default Master PIN number is 0000. The maximum length of the
Master PIN is 8 digits.
Note: If you forget your PIN code, you can reset it to its default 0000
using a handset Reset (see section Reset Unit).
-
/ or
to select ADVANCED SET /
/ or
to select
CHANGE PIN /
/ enter current master pin when prompted /
/
enter new PIN /
/ confirmation beep.
IMPORTANT: Handset registration is only necessary when you buy
extra handsets or if a handset has become faulty.
Up to 4 handsets can be registered to one base station.
The Master PIN is required before you can register or unregister
handsets.
By default, the Master PIN is 0000.
- On the base station, press and hold the
key for 5 seconds
- On the handset, press
/
or
to select ADVANCE SET
/
/
or
to select REGISTRATION /
/ enter Master PIN
when prompted /
/ WAITING displayed / confirmation beep.
Unregister your handset
/ or
to select ADVANCE SET /
-
/
or
to select
UNREGISTER /
/ enter Master PIN when prompted /
/
or
to select the handset number to unregister /
/
confirmation beep.
Change recall time
/ or
to select ADVANCE SET /
-
/
or
to select
to select SHORT, MEDIUM or
You should normally leave the dialling mode at its default setting of
TONE (also called MF or DTMF).
However, you can change to PULSE if necessary.
Note: If PULSE dialling is set, you can press
to switch to TONE
dialling for the rest of that call.
/ or
to select ADVANCED SET /
/
or
to select
DIAL MODE /
/
or
to select TONE or PULSE /
/
confirmation beep.
Reset unit
/ or
-
Set the ring melody: 10 ring melodies
/ or
to select PERSONAL SET /
-
/
or
to select
HANDSET TONE /
/
or
to select RING TONES /
/
or
to the desired melody /
/ confirmation beep.
to select
/ or
If the handset display shows KEYS LOCKED, press
and hold the * button to unlock it before you make
a call.
Only one handset (or the base unit) can be
connected to the outside line at a time.
If another handset is already using the line, you
need to wait until it has finished its call.
“When I press on
the keys, nothing
happens”
Make sure the batteries are fitted in your handset.
If the Battery Level symbol on the display shows
‘low’, put your handset back on the cradle to charge.
“When I key in a
number, it appears
on the display, but I
cannot make an
outside call”
Try a different position for the base unit –
somewhere higher if possible, or further from other
electrical equipment.
Try moving the handset closer to the base unit.
“The phone does
not ring”
Check that the base unit’s mains power adapter is
plugged in and power is switched on.
Check that ring volume is not on OFF.
“I hear ‘beeps’ from
my handset while
I’m on a call”
You may be going out of range of the base unit.
Move closer or your call may be cut off.
Check the Battery Level symbol on the display.
If it’s low, recharge the batteries.
“When I try to make
a call, I hear busy
tone”
If you’re using a multi-handset system, check
whether another handset is already on a call.
“The volume in the
earpiece is low
when I’m on a call”
Make sure you’re holding the earpiece correctly
over your ear.
Adjust the volume using the UP/DOWN key.
Batteries
“The handset’s
battery cells are
running low within
an hour or two”
Before you first use the handset, you should have
left it on the base unit or charger pod for 15 hours
to charge the batteries fully. You may need to
replace the batteries. Check the connection
between the base unit and the mains power socket
unit.
“I try to recharge the
batteries but I still
get a warning that
they are low”
You need to replace the batteries.
Dispose of used batteries safely – never burn them,
or put them where they could get punctured. Do not
use non - rechargeable batteries in your handset –
they may explode, causing damage.
RESET /
/
to select ADVANCE SET /
/ confirmation beep.
/
or
to select
If the fault persists...
Disconnect all other instruments connected to the
same line and try to make a call.
Disconnect the base unit from the telephone line
and plug a different phone into the master
telephone socket.
Try making a call. If this works, the line is OK.
If the call does not work, and you are using a twoway socket adapter, remove it and plug a telephone
directly into the socket.
If the call now works, the adapter may be faulty.
If you cannot make a call, the fault may be on the
exchange line.
Contact the service provider.
The store where you bought your telephone can also provide you
with information and after - sales support.
SAFETY
This telephone is not designed for Emergency calls when the main
power fails.
Do not use your telephone to notify a gas leak or other potential
explosion hazard!
Do not open your device or its power supply to avoid risk of
electrical shock. Do not attempt to open the batteries, as they
contain hazardous chemical substances.
Your telephone must be located in a dry place away from hot,
humide and direct sunlight condition. To avoid radio signal
interference, place the phone at least 1 meter away from other
electrical appliances or other phones.
ENVIRONMENT
This symbol means that your inoperative electronic
appliance must be collected separately and not mixed
with the household waste.
Help us protect the environment in which we live!
Troubleshooting
If you have difficulty with your phone, please try the suggestions
listed below.
As a general rule, if a problem occurs, remove the batteries
from all the handsets in your installation for about 1 minute,
then disconnect and reconnect the power supply to the base
and reinstall the handset batteries.
Always check first
that:
There are 5 ringer volume options (OFF, LEVEL 1, LEVEL 2,
LEVEL 3 and LEVEL 4). The default level is LEVEL 2.
/ or
to select PERSONAL SET /
/
or
to select
HANDSET TONE /
to select RING VOLUME /
/ or
to
the desired volume level /
/ confirmation beep.
“I cannot make a
call”
Register your handset
Handset Tone
Set the ring volume
/
or
HANDSET TONE /
/ or
to select KEY BEEP /
to select ON or OFF /
/ confirmation beep.
/ or
to select
to select ON or OFF /
/
Change the dial mode (dual mode dialing version only)
- If only 2 registered handsets:
.
- If more than 2 registered handsets: the available handset number
and * displayed / enter the handset number.
- To ring all handsets to intercom:
.
on the called handset to answer the internal call /
on the
first handset transfer the external call to the called handset /
external call tansferred.
Note: If there is no answer from the called handset, press INT key
to resume the external call.
Activate / deactivate key tone
/ or
to select PERSONAL SET /
-
or
RECALL TIME /
/
or
LONG /
/ confirmation beep.
Transfer an external call to another handset
During the call:
-
/
Set date / time format
Set time format
/ or
to select CLOCK&ALARM /
-
To activate / deactivate remote control access
-
Using the redial list
Using the call log: stored up to 10 external calls
/ or
to select PERSONAL SET /
/ or
to select
HANDSET NAME /
to display the current handset name /
to delete the characters / enter the new name (maximum 10
characters) /
/ confirmation beep.
-
Delete direct access memory
/ or
to select PHONEBOOK /
-
To lock / unlock the keypad
- Press and hold the key.
Note: Incoming calls can still be answered even if the keypad was
locked.
Set ring delay
Everyday use
“I cannot make or
answer calls”
You have followed all the steps listed in the user
manual to install and set up your telephone.
All connectors are firmly inserted in their sockets.
Mains power to the base unit is switched on at the
socket.
The handset’s batteries are correctly and securely
installed and are not run down.
If the handset’s display is blank, it may have been
switched off. Press and hold the HANG-UP/EXIT
key to switch it back on.
Check that the base unit’s mains power adapter is
plugged in and power is switched on.
The base unit needs mains power for normal
operation of the phone - not just for charging the
batteries.
Make sure you are using the telephone line cable
supplied with your telephone.
Other telephone line cables might not work.
Move the handset closer to the base unit.
Check the battery level symbol on the display. If it is
low, replace the handset on the base unit or charger
pod to recharge the batteries.
Switch off power at the mains socket, wait for a
short time and then switch back on. This may solve
the problem.
www.alcatel-home.com
ATLINKS, 22 quai Gallieni 92150 Suresnes – France
© ATLINKS 2013 - Reproduction prohibited.
The manufacturer reserves the right to modify the specifications of
its products in order to make technical improvements or comply
with new regulations.
ALCATEL and ATLINKS are registered trademarks.
The Alcatel logo and Alcatel name are trademarks of Alcatel
Lucent and used under license by ATLINKS.
Sigma 110 Voice / 110 Voice Duo / Trio
Sigma 260 Voice / 260 Voice Duo / Trio LA
A/W No. : 10000826 Rev. 0
Made in China
ESPAÑOL
Lea estas indicaciones antes de usar su teléfono
Conexión del teléfono:
- Conecte los enchufes en las tomas correspondientes en la
estación base. Conecte el cable de la línea telefónica en la
toma telefónica e inserte el adaptador de alimentación a una
toma de corriente.
- Coloque las baterías en el auricular.
Antes de empezar a usar el teléfono, asegúrese de que las
baterías hayan sido cargadas totalmente durante 15 horas.
Use siempre el adaptador de alimentación y las baterías que
se adjuntan en la caja.
Realizar y recibir llamadas
- Seleccione ESCUCHAR y confirme con la tecla O.K.
Uso de la agenda: 50 entradas
Realizar una llamada
antes o después de marcar el número de teléfono:
- Desde la lista de rellamadas:
/
ó
/ .
- Desde el registro de llamada*:
/
ó
/
.
Nota: Es necesario estar suscrito al servicio de identificación de
llamadas para poder ver el número de la persona que llama o el
nombre en el registro de llamadas.
Grabar su propio mensaje
Desde el teléfono
/ seleccione CONTESTADOR /
/ seleccione GRABAR
MENSAJE /
/ seleccione REPRODUCIR GRABACIÓN ó
REPRODUCIR SOLO /
/ seleccione GRABAR MENSAJE
/
/ dicte su mensaje /
.
Nota: Para volver al mensaje por defecto, seleccione BORRAR
con el navegador en el paso 5.
Guardar un contacto en la agenda
/ ó
para seleccionar AGENDA /
-
- Desde la agenda:
10
11
12
13
14
15
16
17
18
Tecla OK / Menú
Tecla Atrás / Silenciar (mute)
Tecla de Navegación
Tecla Hablar
Tecla Colgar / Salir
Tecla de Transferencia de Llamadas / Intercomunicador
Tecla Flash - Accede a los servicios del operador*
Tecla de Rellamada
Tecla de Asterisco - Para bloquear / desbloquear el teclado.
- Para cambiar entre llamadas internas y externas cuando ambas
están configuradas.
Tecla Almohadilla
Botón localizador del teléfono - Para buscar su teléfono / para
iniciar el procedimiento de registro.
Tecla borrar - Borrar el mensaje que se está reproduciendo
- Pulsación larga: elimina todos los mensajes reproducidos
Tecla de encendido / apagado del contestado
Aumenta el volumen del altavoz
Baja el volumen del altavoz
Escuchar o detener
Ir al siguiente mensaje
2 pulsaciones sucesivas: ir al mensaje anterior – 1 pulsación:
volver a escuchar el mensaje
¿Qué significan los íconos?
Indica que la batería está totalmente cargada.
Indica que la batería está totalmente descargada.
Indica que está conectado o en espera de una llamada
externa.
El ícono parpadea al recibir una llamada entrante.
Indica que ha recibido un nuevo mensaje de correo de voz.*
Indica que tiene nuevas llamadas perdidas o que se está
revisando el registro de llamadas.*
Aparece cuando se accede a la agenda.
Aparece cuando se activa el despertador.
Aparece cuando se activa el manos libres (sólo Sigma 260
Voice).
Aparece cuando se desconecta el volumen del sonido.
Indica que el teléfono está registrado y dentro de la
cobertura de la estación base.
El ícono parpadea cuando el teléfono está fuera de
cobertura o está buscando una base.
Aparece en modo menú para confirmar su selección.
Indica que están disponibles más opciones.
Use las teclas ARRIBA / ABAJO para desplazarse hacia
arriba / hacia abajo.
Aparece cuando está en modo menú.
Pulse la tecla ATRÁS para volver al nivel de menú anterior.
* Sujeto a suscripción y disponibilidad de servicio del operador de
la línea fija.
Las operaciones del teléfono
Conexión / desconexión
- Pulse y mantenga pulsada la tecla
.
Notas: Cuando el teléfono está DESCONECTADO no se puede
utilizar para hacer llamadas incluyendo llamadas de emergencia.
Éste no sonará durante una llamada entrante.
Para responder a una llamada tendrá que volver a conectarlo.
El teléfono puede tardar cierto tiempo en restablecer un enlace
de radio con la unidad base.
Para bloquear / desbloquear el teclado
.
- Pulse y mantenga pulsada la tecla
Nota: Todavía se pueden responder a las llamadas entrantes
aunque el teclado esté bloqueado.
Cambiar el idioma de pantalla
/ ó
para seleccionar AJUSTES PERS /
-
/ ó
para seleccionar IDIOMA /
/
ó
para seleccionar el
idioma que desee /
/ se reproduce un pitido de confirmación.
Nota: Una vez que se configura el idioma, los menús de opciones
del teléfono cambiarán en la pantalla en el idioma seleccionado
de forma inmediata.
Configurar fecha y hora
Nota: Si está suscrito al servicio de identificación de llamadas, la
hora y la fecha se fijarán de forma automática cuando reciba una
llamada; aunque todavía puede requerir fijar el año correcto.
-
/ ó
para seleccionar RELOJ&ALARMA /
/
para
seleccionar DIA / HORA / aparece la última fecha guardada /
introduzca la fecha actual (YY - MM - DD) /
/ posteriormente
introduzca la hora (HH-MM) /
.
Cambiar el nombre del teléfono
/
ó
para seleccionar AJUSTES PERS /
-
/
ó
para seleccionar NOMBRE TELF /
/ aparece el nombre actual
del teléfono /
para borrar los caracteres uno a uno / introduzca
el Nuevo nombre (máximo 10 caracteres) /
/ se reproduce un
pitido de confirmación.
ó
/
.
- Desde las teclas de memorias directas: en modo inactivo, pulse y
mantenga pulsado TECLA 1 ó TECLA 2.
-
NOTA IMPORTANTE: Simplemente puede volver a colocar el
teléfono en la estación base o cargador para finalizar una llamada.
Uso del manos libres (sólo para Sigma 260 Voice)
- Para activar / desactivar el modo manos libres: .
ó
-
Ajuste del número de tonos
para seleccionar VOLUMEN 1
La función Economizador permite que durante una llamada a
distancia se active la contestadora automática después de 3 tonos si
hay mensajes y después de 5 tonos, si no hay mensajes.
-
Silenciar (Mute) / dar volumen al micrófono
para conectar / desconectar el micrófono.
Buscar un teléfono (función paging)
situada en la parte posterior de la estación base.
- Pulse la tecla
Todos los teléfonos registrados empiezan a sonar.
- Una vez recuperado, pulse cualquier tecla del teléfono para
detener el timbre o pulse nuevamente la tecla
.
La Contestadora
El acceso a la contestadora se hace con las teclas en la unidad base
o en el menú del AURICULAR del teléfono. La escucha de mensajes
es a través del altavoz de la unidad base y también en el teléfono.
Funciones de la contestadora:
- 15 minutos de tiempo de grabación (máximo de un mensaje: 3
minutos)
- Filtro de llamadas
- 2 modos: Contestador-grabador / contestador simple
- 2 mensajes personalizables (1 Contestador-grabador, 1 Contestador
simple)
- 2 mensajes pregrabados (1 Contestador-grabador, 1 Contestador
simple)
- Consultas y órdenes de la contestadora a distancia
PUESTA EN MARCHA / PARADA DE LA CONTESTADORA
Desde de la unidad base
Pulsar la tecla
tantas veces como sea necesario para activar o
desactivar la contestadora.
La contestadora está preseleccionada por defecto en modo
Contestadorgrabador.
Un mensaje pregrabado será transmitido a sus contactos,
pidiéndoles que dejen un mensaje.
Para personalizar su mensaje, consulte la sección "Grabar su propio
mensaje" Incluso si la contestadora automática está apagada, se
pondrá en marcha automáticamente después de 10 tonos.
Nota: para encender la contestadora automática a distancia, primero
se debe cambiar el PIN (por defecto 0000).
/ seleccione CONTESTADOR /
/ seleccione
CONFIGURACIÓN /
/ seleccione Nº DE TONOS /
/
seleccione el número de tonos deseado o bien ECONOMIZADOR
para activar el economizador.
CONSULTA DE LA CONTESTADORA AUTOMÁTICA
Escuchar sus mensajes
Desde la unidad base
El LED de la unidad base parpadea para indicar que se han recibido
(x) mensajes.
Efectúe una pulsación breve
para escuchar los mensajes.
Se escuchan los mensajes nuevos (no los antiguos).
Nota: para escuchar los mensajes antiguos, hay que haber
escuchado previamente todos los mensajes nuevos.
Durante la escucha de un mensaje:
- Pulsar sobre
para borrarlo (pulsación breve).
- Pulsar sobre
para ajustar el volumen del altavoz de la
unidad base.
- Pulsar sobre
para volver al principio del mensaje en curso.
- Pulsar dos veces sobre
para volver al mensaje precedente.
- Pulsar sobre
para pasar al mensaje siguiente.
- Pulsar sobre
para detener la lectura del mensaje.
Desde el teléfono
- Pulse MENÚ, luego Seleccione CONTESTADOR y confirme
pulsando O.K.
- Seleccione ESCUCHAR y confirme con la tecla OK
Nota: mientras escucha el mensaje, puede pulsar la tecla MENÚ y
utilizar el navegador para seleccionar las siguientes opciones:
- REPETIR: volver a escuchar el mensaje
- SIGUIENTE: reproducir el siguiente mensaje
- ANTERIOR: escuchar el mensaje anterior
- BORRAR: borra el mensaje
ó
para seleccionar AGENDA /
/ las entradas de la
agenda se enumeran en orden alfabético y se puede pulsar la tecla
de Navegación para desplazarse a través de las entradas
guardadas /
.
Nota: En vez de pulsar la tecla de Navegación, para buscar las
entradas de la agenda, puede pulsar la tecla numérica que
corresponde a la primera letra de la entrada que desee localizar.
Modificar una entrada de la agenda
/
ó
para seleccionar AGENDA /
-
/
ó
para
seleccionar EDIT. ENTR /
/
ó
para seleccionar una
entrada /
/ se muestra el nombre actual / edite el nombre /
edite el número /
/ se reproduce un pitido de confirmación.
El preajuste por defecto es de 3 tonos.
Ajustar el volumen del micrófono
Durante una llamada pulse
a VOLUMEN 3.
Acceder a la agenda
/ seleccione CONTESTADOR /
/ seleccione
CONFIGURACIÓN /
/ seleccione IDIOMA CONTESTADOR
/
/ seleccione el idioma deseado con el navegador /
.
Cuando se está usando, la contestadora cuelga después de un
determinado número de tonos entre 2 y 7.
/
ó
para
seleccionar BORRAR /
/
ó
para seleccionar una entrada
a borrar /
/
/ se reproduce un pitido de confirmación.
Borrar todas las entradas de la lista de la agenda
/
ó
para seleccionar AGENDA /
/
ó
para
seleccionar BORRAR TODO /
confirmación.
/
/ se reproduce un pitido de
Añadir / editar el acceso a la memoria
/ ó
para seleccionar AGENDA /
-
/
ó
para
seleccionar MEM. DIRECTA /
/
ó
para seleccionar
TECLA 1 ó TECLA 2 /
/ aparece el nombre guardado y SIN
NÚMERO si está vacía / si no hay un número guardado en la tecla
seleccionada o si desea cambiar el nombre o el número que está
guardado, pulse
para entrar en el menú de la memoria directa
para añadir / editar el nombre o el número / ó
para
seleccionar EDITAR NUM /
/ la pantalla muestra el nombre
guardado actual o INTRO NOMB si no hay un nombre guardado,
edite o introduzca el nombre que desee /
/ se reproduce un
pitido de confirmación.
/
ó
para
seleccionar MEM. DIRECTA /
/ ó
para seleccionar
TECLA 1 ó TECLA 2 /
/ aparece el nombre guardado (o SIN
NÚMERO si ya está vacía) /
para entrar en el menú dememoria
directa /
ó
para seleccionar SUPRIMIR /
/
/ se
reproduce un pitido de confirmación.
Usar la lista de rellamada
La lista de rellamada guarda los últimos 5 números marcados.
/ ó
para buscar en la lista de rellamada /
para ver los
detalles de la entrada seleccionada.
- Acceda al menú pulsando la tecla MENÚ y seleccione
Usar el registro de llamadas: almacena hasta 10 llamadas
CONSULTA Y ÓRDENES A DISTANCIA
externas
Cuando usted se ausenta, puede consultar y ajustar su contestadora
automática desde otro teléfono.
Borrar una entrada del registro de llamadas
/ ó
/
/ ó
para seleccionar BORRAR /
-
/ seleccione REP ENCENDER / APAGAR (ON/OFF) /
seleccione ACTIVAR ó DESACTIVAR /
/
.
Para atender una llamada si la contestadora automática ya está en
marcha, simplemente tome el auricular y la contestadora automática
se detendrá inmediatamente.
FILTRADO DE LLAMADAS
Esta función es útil cuando sólo desea responder a ciertas llamadas.
Desde la unidad base
-
/ seleccione CONTESTADOR /
/ seleccione
CONFIGURACIÓN y /
/ seleccione ACCESO A DIST /
/
seleccione ACTIVAR ó DESACTIVAR /
.
Nota: si usted apaga su contestadora automática, para consultar
sus mensajes a distancia debe primero modificar el código PIN
(0000 por defecto).
Consultar sus mensajes a distancia
- Componga su número de teléfono.
- Durante o después de escuchar el mensaje de la contestadora
automática, pulse la tecla #, y después componga su código
secreto de 4 cifras (0000 por defecto).
Ajuste el volumen del altavoz de la unidad base con las teclas
para escuchar el mensaje grabado en su contestadora automática.
Si desea responder, pulse la tecla COLGAR.
AJUSTES DE LA CONTESTADORA
Seleccione el modo “Contestador-grabador" ó "Sólo contestador"
El modo de “Contestador-grabador” permite que las personas que
llaman dejen un mensaje, y el modo “Solo contestador” les informa
de su ausencia pero sin posibilidad de dejar un mensaje. En caso
de memoria llena (demasiados mensajes), el modo “Solo
contestador” se activa automáticamente.
Desde el teléfono
- Para seleccione el modo respuesta entre en el menú pulsando la
tecla MENÚ.
- Después seleccione CONTESTADOR AUTOMÁTICO, seleccione
MODO RESPONDER, luego REP / GRABAR o REP SIMPLE y
confirme con la tecla O.K.
Consultar el anuncio en servicio
Desde la unidad base
- Si la contestadora automática está desactivada, pulse la tecla
El mensaje se oye en el altavoz de la unidad base.
Guardar un número marcado en la agenda
/ ó
para seleccionar una entrada /
para mostrar
GUARDAR NUM. /
para mostrar INTRO. NOMB. / introduzca el
nombre del contacto (máximo 12 caracteres) /
/ volver a la
pantalla de la lista de rellamada.
.
Desde el teléfono
- Pulse la tecla MENÚ
- Seleccione CONTESTADOR y confirme con la tecla O.K.
- Seleccione GRABAR MENSAJE y confirme con la tecla O.K.
- Seleccione REPRODUCIR GRABACIÓN o SOLO REPRODUCIR y
confirme con la tecla O.K.
¡Si compone un código incorrecto la contestadora cuelga!
Pulse 2 para escuchar los mensajes.
Para ....
Pulse la tecla
- volver a escuchar el mensaje
1
- escuchar los mensajes
2
- detener la reproducción
8
- borrar el mensaje (durante la reproducción)
6
- pasar al siguiente mensaje
3
- encender la contestadora
7
- apagar la contestadora
9
Nota: Si antes de irse ha apagado la contestadora automática y ha
cambiado el código PIN, la contestadora tomará la línea después
de 10 tonos y usted tendrá acceso a las opciones mencionadas
anteriormente.
Llamada en espera
Si está suscrito al servicio de llamada en espera, el micrófono
emitirá un pitido para informarle que hay una segunda llamada
entrante.
El número o nombre de la segunda persona que llama se muestra
en el teléfono si está suscrito al servicio de identificación de llamadas.
Por favor, póngase en contacto con su proveedor de red para
obtener más información sobre este servicio.
/
/ se
reproduce un pitido de confirmación.
Activar / desactivar la consulta a distancia
ATENDER UNA LLAMADA
Tono del teléfono
Fijar el volumen del timbre
Existen 5 opciones de volumen de timbre (DESACTIVADO, NIVEL 1,
NIVEL 2, NIVEL 3 y NIVEL 4).
El nivel configurado de fabricación es el NIVEL 2.
/ ó
para seleccionar AJUSTES PERS /
/ ó
para
seleccionar TONOS TELF /
para seleccionar y mostrar VOL.
TIMBRE /
/ ó
para alcanzar el nivel de volumen que desee
/
/ se reproduce un pitido de confirmación.
Fijar la melodía de llamada: 10 melodias
/ ó
para seleccionar AJUSTES PERS /
-
/
ó
para
seleccionar TONOS TELF /
/
ó
para seleccionar TONOS
TELF /
/ ó
para fijar la melodía que desee /
/ se
reproduce un pitido de confirmación.
Activar / desactivar el tono de tecla
/ ó
para seleccionar AJUSTES PERS /
-
/ ó
para
seleccionar TONOS TELF /
/ ó
para seleccionar TONO
TECLA /
/
ó
para seleccionar ACTIV. ó DESACTIVADO
/
/ se reproduce un pitido de confirmación.
Activar / desactivar colgar automáticamente
/ ó
para seleccionar AJUSTES PERS /
/ ó
para seleccionar COLGAR AUTO /
/ ó
para
seleccionar ACTIV. ó DESACTIVADO /
/ se reproduce un
pitido de confirmación.
Borrar todas las entradas del registro de llamadas
/
/
ó
para seleccionar BORRAR TODO /
/
-
/ se
reproduce un pitido de confirmación.
Usar el intercomunicador
Intercomunicar con otro teléfono
- Si sólo 2 teléfonos están registrados:
.
- Si más de 2 teléfonos están registrados: aparecerán los números
de los teléfonos que están disponibles para la intercomunicación y
un * / introduzca el número del auricular.
- Para usar el modo intercomunicador:
.
Transferir una llamada externa a otro teléfono
Durante la llamada :
- Si sólo 2 teléfonos están registrados:
.
- Si más de 2 teléfonos están registrados: aparecerán los números
de los teléfonos que están disponibles para la intercomunicación y
un * / introduzca el número del auricular.
- Para usar el modo intercomunicador:
.
-
en el teléfono al que se llama para responder a la llamada
interna con el fin de que puedan hablar de forma interna las dos
personas que llaman /
en el primer teléfono para transferir la
llamada externa al teléfono al que se llama / se transfiere la
llamada externa.
Nota: En caso de que no haya respuesta del teléfono al que se
llama, pulse la tecla INT para volver a la llamada externa.
Responder a una llamada externa durante una llamada
interna
/ para responder a la llamada externa y acabar con la
intercomunicación.
Nota: Para poner en espera y responder a la llamada entrante
externa pulse la tecla INT.
Cambiar entre una llamada interna y una externa
- Durante la llamada, pulse
.
Cambio del modo de marcación
/
ó
para seleccionar AJUSTE AVANZ /
-
/ ó
para seleccionar MODO MARCADO /
/
/ ó
para
seleccionar TONO ó PULSO /
/ se reproduce un pitido de
confirmación.
Reiniciar la unidad
-
/ ó
para seleccionar AJUSTE AVANZ /
/
ó
para seleccionar RESTAURAR /
/
/ se reproduce un pitido
de confirmación.
Problemas y soluciones
De manera general, en caso de problemas, retirar las baterías de
todos los teléfonos de la instalación durante aproximadamente 1
minuto, luego desconectar y volver a conectar la alimentación
eléctrica de la base e instalar nuevamente las baterías.
“No puedo realizar una
llamada”
“Cuando pulso las
teclas no pasa nada”
“El teléfono no
funciona”
Compruebe que el adaptador de la unidad base
está conectado y la corriente encendida.
Compruebe que el volumen del pitido no está en
la posición de DESACTIVADO.
“No puedo hacer o
recibir llamadas”
Fijar el formato de fecha
/ ó
para seleccionar RELOJ&ALARMA /
-
Configurar la alarma
/ ó
para seleccionar RELOJ&ALARMA /
/ ó
para
seleccionar ALARMA /
/ ó
para seleccionar
DESACTIVADO / UNA SOLA VEZ / A DIARIO /
.
- Si ha seleccionado UNA SOLA VEZ ó A DIARIO, introduzca la
hora (HH-MM) de la alarma / ó
para seleccionar AM ó PM si
la hora está en formato de 12 horas /
/ se reproduce un pitido
de confirmación.
-
Configurar el tono de la alarma
/ ó
para seleccionar RELOJ&ALARMA /
-
/ ó
para
seleccionar TONO ALARMA /
/ ó
para seleccionar
MELODÍA 1, MELODÍA 2 ó MELODÍA 3 /
/ se reproduce un
pitido de confirmación.
Uso avanzado de su teléfono
Cambio del PIN máster
El PIN máster se usa para el registro y anulación de registro de los
teléfonos.
El número PIN máster por defecto es 0000.
La longitud máxima del Pin máster es de 8 dígitos.
Nota: En caso de que olvide su código PIN, puede reiniciarlo al
0000 (por fabricación) usando un reinicio de teléfono (ver Reiniciar
la unidad).
/ ó
para seleccionar AJUSTE AVANZ /
/
ó
para
seleccionar CAMBIAR PIN /
/ introduzca el PIN máster actual
cuando se le pida /
/ introduzca el Nuevo PIN /
/ se reproduce
un pitido de confirmación.
Registrar su teléfono
IMPORTANTE: El registro del teléfono sólo es necesario cuando
adquiere teléfonos extras o si el teléfono está defectuoso.
Se pueden registrar hasta 4 teléfonos a una estación base.
Es necesario el PIN máster antes de que pueda registrar o anular el
registro de teléfonos. Introduzca el PIN máster cuando se le pida y
posteriormente pulse la tecla OK para confirmarlo. (El PIN máster
por fabricación es 0000) Por fabricación, el PIN máster es 0000.
- En la estación base, pulse y mantenga pulsada la tecla
LOCALIZADOR DE TELÉFONO durante aproximadamente 5
segundos / En el teléfono, pulse
/ ó
para seleccionar
AJUSTE AVANZ /
/ ó
para seleccionar REGISTRO
/
/ aparece en pantalla ESPERANDO / se reproduce un pitido
de confirmación.
Anular el registro de su teléfono
/ ó
para seleccionar AJUSTE AVANZ /
-
/ ó
para
seleccionar ANULAR REG /
/ introduzca el PIN máster
cuando se le pida /
/ ó
para seleccionar el número del
teléfono al que anular el registro /
/ se reproduce un pitido de
confirmación.
Ajustar el tiempo del corte calibrado (flashing)
/ ó
para seleccionar AJUSTE AVANZ /
/
-
ó
para
seleccionar TIEMPO RELL. /
/ ó
para seleccionar
CORTO, MEDIO ó LARGO /
/ se reproduce un pitido de
confirmación / en la red de comunicación española, la duración
del corte es CORTO.
Asegúrese de que las baterías estén colocadas
en el teléfono. Si el símbolo del nivel de batería
en pantalla muestra “bajo”, vuelva a colocar el
teléfono en el cargador para cargarlo.
Pruebe colocando la unidad base en una posición
diferente – en algún lugar más elevado si es
posible o alejada de otros equipos eléctricos.
/ ó
para
seleccionar AJUST FORM /
/
para entrar en FORMATO
HORA / se muestra la configuración actual / ó
para
seleccionar 12 HORAS ó 24 HORAS /
/ se reproduce un pitido
de confirmación.
/ ó
para
seleccionar AJUST FORM /
/ ó
para seleccionar FORMAT
FECHA /
/ se reproduce un pitido de confirmación / ó
para
seleccionar DD/MM ó MM/DD /
/ se reproduce un pitido de
confirmación.
Si la pantalla del teléfono muestra TECLADO
BLOQ, pulse y mantenga pulsado la tecla * para
desbloquearlo y antes de que pueda realizar una
llamada.
“Cuando pulso un
número, aparece en
pantalla pero no puedo
hacer una llamada
externa”
Fijar el formato de fecha y hora
Fijar el formato de hora
/ ó
para seleccionar RELOJ&ALARMA /
-
Borrar el acceso directo a la memoria
/ ó
para seleccionar AGENDA /
-
CONTESTADORA
-
/
Borrar una entrada de la agenda
/
ó
para seleccionar AGENDA /
-
Memoria llena
La memoria de la contestadora automática es de 15 minutos de
grabación.
Cuando la memoria está llena, el teléfono indica MEM (MEMORIA)
LLENA.
La contestadora se activa entonces automáticamente.
Debe borrar mensajes para recuperar memoria disponible.
Desde el teléfono
desea llamar /
en el auricular al que se llama para responder / y
mantenga pulsada
en el primer teléfono para iniciar la
conferencia a tres bandas.
Aparecerá en pantalla CONFERENCIA una vez que se establezca
la llamada de conferencia.
/
para introducir
una NUEVA ENTR. / introduzca el nombre /
/ introduzca el
número /
/ se reproduce un pitido de confirmación (
para
borrar caracteres).
Cambio del idioma de la contestadora
Responder y finalizar una llamada
/
.
Teclas de funcionamiento del teléfono
1
2
3
4
5
6
7
8
9
/
Establecer una llamada de conferencia a tres
/ introduzca el número del auricular al que
- Durante una llamada,
Si la pantalla del teléfono está en blanco, puede
que se haya desconectado. Pulse y mantenga
pulsada la tecla COLGAR / SALIR para volverlo a
conectar.
Compruebe que el adaptador de alimentación de
la unidad base esté conectado y la alimentación
encendida.
La unidad base requiere alimentación para el
normal funcionamiento del teléfono – no sólo para
cargar la batería-.
Asegúrese que usa el cable de línea telefónica
que se suministra con el teléfono. Puede que no
funcionen otros cables de línea telefónica.
Mueva el teléfono más cerca de la unidad base.
Compruebe el símbolo del nivel de batería en la
pantalla.
Si está baja, sustituya el teléfono en la unidad
base o en el cargador para recargar la batería.
Apague la corriente del enchufe de alimentación;
espere un poco y posteriormente vuelva a
encenderlo.
Esto puede resolver el problema.
“Oigo “pitidos”
procedentes del
teléfono cuando estoy
llamando”
Puede que esté fuera de cobertura de la unidad
base.
Acérquese o puede que se corte la llamada.
Compruebe el símbolo de nivel de batería en la
pantalla.
Si está bajo, recargue la batería.
“El volumen del
auricular es bajo
cuando realizo una
llamada”
Ajuste el volumen usando la tecla ARRIBA / ABAJO.
Baterías
“La batería del teléfono
está baja en una hora
o dos”
“Intento recargar la
batería pero recibo una
advertencia de que
está baja”
Antes de que use el teléfono debe haberlo
cargando durante 15 horas para cargar
completamente la batería.
Puede que sea necesario sustituir la batería.
Compruebe la conexión entre la unidad base y el
enchufe de alimentación.
Es necesario que sustituya la batería.
Deshágase de la batería de forma segura –
nunca la queme o la coloque en algún lugar
donde pueda pincharse.
No use una batería no recargable en su teléfono,
puede explotar provocando daños.
SEGURIDAD
Usted no podrá llamar ni recibir llamadas de emergencia en caso de
fallo del adaptador de alimentación de red.
No use el teléfono para avisar de una fuga de gas si se encuentra en las
cercanías de dicha fuga.
No intente abrir el dispositivo o las fuentes de alimentación para evitar
el riesgo de una descargar eléctrica. No intente abrir la batería ya que
contiene sustancias químicas.
El teléfono debe mantenerse alejado de toda fuente de excesivo calor
(radiadores, luz solar, etc…) y protegido contra las vibraciones y el polvo.
Para limitar los riesgos de interferencias, se recomienda instalar el
teléfono por lo menos a 1 metro de otras fuentes de electricidad.
MEDIO AMBIENTE
Este símbolo indica que el aparato eléctrico fuera de uso se
debe desechar de forma independiente y nunca junto a los
residuos domésticos.
www.alcatel-home.com
ATLINKS, 22 quai Gallieni 92150 Suresnes – Franica
© ATLINKS 2013 - Reproducción prohibida
El fabricante se reserva el derecho de modificar sin previo aviso las
características de sus productos para introducir mejoras técnicas o
cumplir con nuevas regulaciones oficiales.
ALCATEL y SIGMA son marcas registradas.
Sigma 110 Voice / 110 Voice Dúo / Trío
Sigma 260 Voice / 260 Voice Dúo / Trío LA
A/W No. : 10000826 Rev. 0
Hecho en China