1
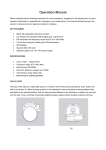
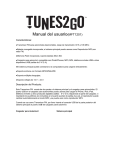
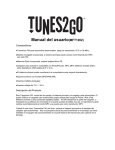
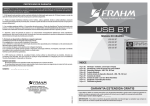
Active Speaker Box with Radio Receiver & MP3 Player Bocina Activa con Radio Receptor y reproductor de MP3 FM / USB / SD / MMC / AUX / Line In Use in Car, Office, Shop and Home Para ser utilizado en Automóvil, Oficina, Casa o Negocio Dual Power (12V DC / 110V AC) Funciona con corriente (12V DC/ 110V AC) USER MANUAL AND INSTALLATION INSTRUCTIIONS MANUAL DE USUARIO E INSTRUCCIONES DE INSTALACION Sondpex Corporation of America Monmouth Jct., NJ 08852, USA www.sondpex.com Customer Service Hotline 1-877-997-7888 (USA and Canada only) 732-940-4430 [email protected] Introduction Features The multi-purpose Active Speaker Box provides excellent performance in any situation. Its versatility enables you to enjoy music in your car or in your home. Please completely read the Active Speaker Box manual before proceeding with installation or use. Parts Included Remote Control Home Power Cord Cigarette Power Adapter Car Power Harness IR Remote Sensor Wire Audio Component Wires (optional) USB Input – 1000’s of songs (MP3 format of music only), play back with track control SD/Memory Card Input –1000’s of songs (MP3 format of music only), play back with track control. Digital Display – Large high tech digital display for easy viewing FM Radio Tuner – Listen to your favorite local radio stations RCA line in – Connect with your car stereo for added performance Auxiliary Input – Use any of your favorite audio devices. Dual Power – Power with AC(home) or DC(car) electricity Preset Equalizer – Enjoy your music with optimal quality in USB or SD mode. Computer Tuned Vented Box – provides precision sound and increased volume High Power 6.5” Speaker 200W Speaker with tweeter for superior sound. Heavy duty Aviation Carpet Dense fiberboard construction for durability and sound performance 3.5 Converting to MP3 format a. From CD to MP3 – Use Windows Media Player or any audio converter – Select Rip – Access Options – select format (mp3). b. To convert from other audio formats, select an audio converter (i.e. Roxio, 3.5mm M/M Stereo Audio Cable Nero). If you do not have one, there are many free audio converters available for download (some are only free trial versions that may require registration). 1 2 c. When using the audio converter, make sure the output format is in MP3 format. Top Control Panel POP(E3)→CLASSIC(E4)→COUNTRY(E5). Note: Equalizer only works in USB or SD mode 6. AUX (Button): Press the AUX button after connecting the AUX port, then the player works. 7. IR: Remote control sensor Side Control Panel 3 3 1. PREV/VOL-: Press the PREV/VOL button to skip to the previous track. Press and hold the PREV/VOL- button to decrease the volume. In FM mode, changes to previous preset station 2. PLAY/PAUSE: in USB / SD mode, press the PLAY/PAUSE button to play or pause the MP3 Player (does not function in AUX mode). In FM mode, press to scan for and preset stations (automatic) 3. NEXT /VOL+: Press the NEXT /VOL+ button to skip to the next track. Press and hold the NEXT/VOL+ button to increase the volume. In FM mode, changes to next preset station 4. MODE: Press the Mode button to switch among FM, SD and USB mode. 5. EQ: Sound Field Pattern. NORMAL(E0) →JAZZ(E1) →ROCK(E2)→ 3 1. MASTER VOLUME: Press the VOLUME to adjust the total volume. 2. DC POWER IN: DC 12V input ports. 3. ON/OFF: AC power supply controller 4. AC 110V IN: AC 110V input port 5. AC FUSE: Ensure the safety operation of the circuit 6. LINE IN: Audio component wire input port (red & white) 7. AUX: External audio signal input port 4 Remote Control Optional Cigarette lighter power plug 5) The remote control can be used by directly pointing at the Top Control The Active Speaker Box can be installed as an amplified sub-woofer. Panel or IR Sensor at the end of the IR Remote Sensor Wire Basic 1) CH: Press to scan for and preset FM radio frequencies amplifier installation techniques can be applied to facilitate the installation process 2) CH+/CH-: Press to increase/decrease FM frequency by 0.1 or as an additional reference. 3) +/-: Press to increase/decrease the volume 4) 0-9: In USB/SD mode, press to select MP3 track by number. Connect the following wires to the power harness; then plug the power harness into your Active Speaker Box. In FM mode, press to manually enter FM radio frequency/station. For instance, you can 1) The 12 volt constant wire can be gained directly from the battery’s positive enter 839 for station 83.9. terminal or from the fuse box. Directly wiring to the battery Warning Continued exposure to sound at excessively high volume may cause hearing 4 loss or damage. Listening to audio equipment at a high volume level while operating a motor vehicle may impair your ability to hear external sounds such as horns, warning signals, or emergency vehicles, thus constitute to potential traffic hazards. Please use caution. will simplify the install process. If connected directly to the battery, place a fuse within 16 inches of the connection for safety purposes. Mobile Audio Installation (vehicle) Your vehicles electrical system can power your Active Speaker Box. correctly follow all instructions. 2) The 12 volt switch Carefully and wire (REM) can be If you do not have the technical knowledge or feel attached from rear of uncertain about an installation, please consult a qualified technician or call our the radio (aftermarket) customer services hotline at 877-997-7888. or from an accessory wire in the vehicles Basic wiring needs: electrical system. The 1) +12V: 2) REM: 12volt switch wire (+12V and 0V) 12volt constant (power source) RED wire connected to the 3) GND: Ground wire (negative) NONFACTORY 4) Audio signal (aftermarket) radio is 5 back of the 6 still must be run, reference Step four. commonly a 12 volt switch. The wire has +12 volts when the car’s key is rotated forward to accessory position or when the car’s engine is running. turned off and key is removed the wire has 0 volts. When the car is If your Active Speaker Box is connected long term, the switch wire will send the proper signal when to turn off. If you do not have an aftermarket radio you will have to locate an accessory wire in the vehicles electric system. A multi-meter or testing device will help identify the correct wire. NOTE: A test light only indicates hot / cold wire, not voltage. NOT all wires are 12 volt. 3) The ground wire must connect to the vehicles body. The connection point to the car must be exposed metal free of dust/dirt/grease/paint/primer. Use a flat area, bolts and suspended locations may not be connected to the frame of the car. Use self-tapping screws and ring crimp connector to attach the end of the wire securely to the chassis/body. 4) To gain a sound source from the car’s radio you must use audio component wires. Run the wires from the rear of the NONFACTORY radio to the audio component inputs (RCA cables) on the active speaker box. If you have a factory radio you will need a “line out converter”. This device will convert your rear speaker wires into a component audio terminal. Follow the directions provided with the converter. 5) Run the IR Remote control sensor wire from the Active Speaker Box to a location where the remote control will be used most often (e.g. front dashboard). This will allow user to control the SD/USB track selection and volume; or enter FM radio frequency and change the volume. 6) If you do not want to hard wire the power, a cigarette power plug is If all connections are properly attached, the Active Speaker Box will play the music provided. You can use this to simplify the power needs of the Active Speaker Box. media that is being produced by the car radio. When the car is off you can Plug in power plug to the proper location and your Active Speaker Box will have unplug the unit’s power harness to remove the Active Speaker Box. power. Easily transfer the box to and from your vehicle. To play music from the car’s radio, the audio component wires (RCA cables) 7 8 Home Operation Trouble Shooting Refer to lists below and follow suggested procedure. Speakers and their wires should be tested first. Use the Active Speaker Box easily at home, office, shop or anywhere with an 110V wall socket outlet. Connect the power cord to the Active Speaker Box and plug into No Output: a. Confirm all connections are firmly connected. b. Check in-line and built-in fuses. Both “+12V” and “REM” terminals must have +12 Volts c. Make sure the unit is plugged in and the switch is in the on position d. Confirm signal source (Car Radio/Deck/ line-out converter.) is connected and supplying an output signal. To confirm that the Amplifier is working, connect an RCA audio component cables to an audio device with audio component outputs that is known to work. If you hear a sound you know the car radio out-put is the problem. Or briefly tap the center pin of each (disconnected) RCA plug on the other (disconnected) end with your finger. This should produce a noise (feedback) in the speakers. Leave the Active Speaker Box component audio plugged in. e. File format (MP3) or system file format maybe incorrect if using USB/SD card mode. f. Check main volume dial is set correctly a wall socket outlet; then use the on/off switch to turn on. Use a USB or SD/MMC card with your favorite songs. You can also connect an mp3 playing device to the AUX input. Weak Output a. Check volume control dial on the active Speaker box. Press and hold the Next/Vol+ button. b. MP3 file has too low bit-rate c. Car’s sound signal too low. 9 10 Noise in Audio a. If noise has a “whine” that goes up and down with engine speed, confirm that Amplifier and any other source units (Radio, EQ, X-over etc.) are properly grounded. Confirm the RCA wires are not near the POWER or REM wire. d. A “clicking” or “popping” noise at a rate that follows engine speed is generally induced by the vehicle’s ignition system. Confirm that the vehicle is equipped with resistor plugs and plug wires. Or, ignition system may need service. Ground loop insulator part may be needed. e. Distortion is heard, you must turn down the speaker to avoid damage f. Speaker and input wires should not be ran next to wires that interconnect lights and other high power accessories or equipment. g. If above steps do not improve/clear noise interference, the system should be checked by a professional. Extra parts may be needed to correct your vehicles specific issue. Introduccion La Bocina Activa provee excelente desempeño en cualquier situación. Su versatilidad le permite disfrutar de su música en su automóvil o en su hogar. Por favor lea cuidadosamente el manual de propietario antes de proceder con su uso o instalación. Partes Incluidad Control Remoto Arnés para automóvil Cable de AC Adaptador para encendedor Sensor de control remoto Cables de audio RCA Cable de audio estereo de 3.5mm 11 12 Caracteristicas Entrada USB – Reproducción de miles de canciones con el control de selección de pista Entrada SD/Memory Card – reproducción de miles de canciones con el control de selección de pista. Display Digital – Amplio display digital de alta tecnología para verse fácilmente Sintonizador de Radio FM – Escuche sus estaciones favoritas de radio local. Entrada de RCA – Conecte a su autoestéreo para agregarle mayor desempeño Entrada Auxiliar – Conecte cualquiera de sus aparatos de audio favoritos. Dual Power – Funciona con corriente AC (casa) o Directa DC (automóvil) Ecualizador preestablecido – Disfrute su música con óptima calidad Caja ventilada diseñada por computadora – provee sonido preciso e incrementa el volumen, Bocina de alta potencia de 6.5” (16.5cm) y 200W, con tweter para sonido superior. Cubierta de alfombra de aviación de uso rudo Construcción de aglomerado de alta densidad para alta durabilidad y mejora del sonido. 1. PREV/VOL-: Presione el botón PREV/VOL para pasar al track previo. Presione y mantenga el botón PREV/VOL para bajar el volumen. 2. PLAY/PAUSE: en modo USB / SD, presione el botón de PAY/PAUSE para reproducir o poner en pausa el reproductor de MP3 (Esto no opera en modo de Auxiliar). 3. NEXT /VOL+: Presione el botón NEXT /VOL+ para saltar a la siguiente pista. Presione y mantenga presionado el botón NEXT/VOL+ para incrementar el volumen. 4. MODE: Presione el botón de Mode para seleccionar entre el modo de FM, SD y USB. 5. EQ: Sonido de ecualización preestablecidos. NORMAL→JAZZ→ROCK →POP→CLASSIC→COUNTRY 6. AUX (Botón): Presione el botón de AUX después de conectar el puerto auxiliar, entonces el reproductor funcionara. 7. IR: Sensor de control remoto Panel de Control 13 14 Panel de control Lateral escuchar sonidos externos como claxon, señales de advertencia o vehículos de emergencia. Esto constituye un potencial riesgo de accidentes. Por favor use precaución. 3 Instalacion del Mobile (vehiculo) El sistema eléctrico de su vehículo puede operar su Bocina Activa. correctamente las instrucciones. Siga cuidadosa y Si usted no tiene el conocimiento técnico o se siente inseguro acerca de la instalación, consulte un técnico calificado. Requerimientos basicos de cableado: 1. MASTER VOLUME: Gire el control de VOLUMEN para ajustar el volumen total. 2. DC POWER IN: Puerto de entrada de 12V DC. 3. ON/OFF: Control de encendido y apagado de fuente de poder AC 4. AC 110V IN: Puerto de entrada de 110V AC 5. AC FUSE: Asegura la operación segura del circuito 6. LINE IN: Entrada del cable de audio componente (RCA, rojo y blanco) 7. AUX: Entrada de señal de audio externa 1) +12V: Fuente constante de 12volt (fuente de poder) 2) REM: Cable de 12volt del encendido (+12V and 0V) 3) GND: Cable de tierra (negativo) 4) Señal de Audio 5) Conector del encendedor (Opcional) La bocina Activa puede ser instalada como un subwoofer amplificado. Técnicas básicas de instalación de amplificadores pueden ser aplicadas para facilitar el proceso de instalación o como referencia adicional. Conecte los siguientes cables al conector de poder. Después conecte el conector de poder a su Bocina Activa. 1) El cable de 12 volt constante puede ser tomado directamente de la terminal positiva de la batería o directamente de la caja de fusibles. El cableado directamente de la bacteria facilitara el proceso de instalación. Si lo conecta directamente de la batería instale un fusible a 16 pulgadas de la conexión para propósitos de seguridad. 2) El cable de 12 volt del encendido (REM) puede ser tomado de la parte trasera de Advertencia La exposición continua a sonido con exceso de volumen puede ocasionar daño o pérdida del oído. Escuchar equipos de audio a alto volumen mientras se opera un vehículo de motor puede deshabilitar su capacidad de 15 su autoestéreo o de un cable de accesorios del sistema eléctrico del vehículo. El cable ROJO conectado a la parte trasera del autoestéreo es comúnmente un cable de encendido de 12 volts. El cable conduce +12 volts cuando la llave del vehículo es abierta o cuando el vehículo está funcionando. Cuando el automóvil se apaga y se 16 remueve la llave el cable linear”. Este aparato convierte la señal de salida de sus bocinas en una terminal de conduce 0 volts. audio componente. Siga las instrucciones incluidas en el convertidor. Si su bocina Activa está conectada por largo termino, el cable del 5) Conecte el cable del sensor del control remoto desde su Bocina Activa hasta encendido enviara la señal alguna locación donde el control remoto será utilizado más frecuentemente. apropiada para apagarse o permitirá al usuario controlar la función de selección de pista del SD/USB y el encenderse. volumen. Si usted no Esto cuenta con autoestéreo (no original) tendrá que localizar 6) Si usted no quiere instalar una fuente de poder fija, se provee un un cable de accesorio en el conector para el encendedor del automóvil. sistema eléctrico del vehículo. Usted Un multímetro o aparato de simplificar los requerimientos de prueba puede ayudarlo a poder identificar el cable correcto. Inserte NOTA: Una luz de prueba solo terminal apropiada en la Bocina indica un cable con corriente Activa positive, no el voltaje, no reproducir todos los cables conducen 12 autoestéreo, el cable de audio volts. componente (RCA) debe estar puede de la el para utilizarlo Bocina adaptador operarla. música para Activa. a la Para del colocado, referencia en el paso Diagrama de Hard-wire cuatro 3) El cable de tierra debe ser conectado al cuerpo del vehículo. El punto de conexión del vehículo debe estar expuesto al metal libre de polvo, suciedad, grasa, pintura o primer. Utilice una parte plana, Los tornillos en ubicaciones suspendidas podrían no estar conectadas al cuerpo del vehículo. Utilice tornillos de presión y rondanas para conectar la terminal firmemente al cuerpo del vehículo o chasis. 4) Para obtener una fuente de audio de del autoestéreo usted deberá utilizar cables de audio componente (RCA). Envié los cables de las salidas de (RCA) de la parte trasera del autoestéreo a las entradas de audio componente de la Bocina Activa. Si usted cuenta con autoestéreo original, usted podría necesitar un “convertidor de 17 Diagrama rapido de cableado 18 Si todas las conexiones están correctamente conectadas la Bocina Activa podrá reproducir la música que eta siendo reproducida por el autoestéreo. Cuando el automóvil este apagado, usted puede desconectar el cable de poder para retirar la Bocina Activa. Fácilmente transfiera la Bocina dentro y fuera del vehículo. Operación en el Hogar Utilice la Bocina Activa fácilmente en el Hogar. Conecte el cable de poder a la Bocina Activa y conéctelo al tomacorriente de pared; Entonces utilice el botón de on/off para encenderla. Utilice un USB o tarjeta SD/MMC con sus canciones favoritas. Usted también puede conectar un reproductor de MP3 a la entrada auxiliar. Solucion de fallas Refiera a la lista abajo y siga el procedimiento sugerido. La Bocina y sus cables deben ser probados primero. No hay salida de Audio: e. Confirme que todas las conexiones estén firmemente conectadas. f. Revise los fusibles internos y los de línea. Ambas terminales de “+12V” and “REM” deben tener +12 Volts g. Asegúrese que la unidad esté conectada a la fuente de poder y que le botón de encendido este en la posición de “on”. h. Confirme que la fuente de señal de audio del automóvil (Car Radio/Deck/ line-out converter.) está conectado y proveyendo una salida de señal. Para confirmar que el amplificador está funcionando, conecte los cables RCA de audio componente a un aparato de audio con salidas de audio componente que este seguro esté funcionando correctamente. Si usted escucha un sonido usted sabrá que la salida de audio del autoestéreo es el problema. O momentáneamente toque el pin central con su dedo del cable de RCA (desconectado del autoestéreo y conectado a la Bocina Activa) esto producirá un sonido o ruido (feedback) en las bocinas. e. El archivo del formato MP3 o el formato del archive del sistema podría ser incorrecto utilizando el modo de USB/SD. f. Revise que el control de Volumen este en posición correcta Salida Debil h. Revise el control de volumen de la Bocina Activa. Presione y mantenga presionado el botón de Next/Vol+. i. El archivo de MP3 tiene un rango bajo de Bits j. La señal de audio del autoestéreo es muy baja 19 20 Ruido en el Audio b. Si el ruido tiene un zumbido que sube y baja con la velocidad del motor, confirme que el amplificador y cualquier otra fuente de audio (Radio, EQ, X-over etc.) están apropiadamente conectados a tierra. Confirme que los cables RCA no estén cerca del cable de poder o del cable REM. k. O es generalmente inducido por el sistema de ignición del vehículo. Confirme que el vehículo está equipado con conectores de resistencia y cables de conexión adecuados. O quizá el sistema de encendido requiera servicio. Un filtro de la conexión a tierra podría ser necesario. l. Si se escucha distorsión usted debe apagar la bocina para evitar se dañe. m. La bocina y los cables de entrada de señal, no deben pasar cerca de los cables que interconectan luces y otros accesorios o equipos de alto poder. n. Si los pasos anteriores no mejoran la calidad del sonido o la interferencia, el sistema requerirá ser revisado por un profesional. Partes extra podrían ser requeridas para corregir la falla específica de su vehículo. paid mutually by both parties. Furthermore, this Warranty shall not apply if: 1. There are missing parts in the unit 2. Damage to the unit was caused by accident, disaster, abuse, misuse, negligence, inadequate packing or shipping procedures, commercial use, or voltage inputs in excess of the rated maximum of the unit. IT IS THE PURCHASER’S RESPONSIBILITY!!! Sondpex is under no obligation to replace or repair the unit. 3. The unit was opened, modified, or repaired by unauthorized personnel 4. The unit was not installed correctly as outlined in the installation instructions. TECHNICAL ASSISTANCE Phone: 1-877-997-7888 (Monday-Friday, 9am-5pm Eastern Standard Time) Email: [email protected] Return Address inquires to: Customer Services Dept. Sondpex Corp of America LLC 2031 Route 130, Unit K, Monmouth Jct., NJ 08852 In the event that your unit needs repair or service within the duration of the Warranty, you may return the unit to your authorized Sondpex Audio dealer using the following guidelines: 1. To return the product directly to Sondpex, contact us toll-free at 1-877-997-7888 to obtain a Return Authorization Number. YOU MUST HAVE PRIOR AUTHORIZATION TO 90-DAY LIMITED WARRANTY RETURN YOUR UNIT. WITHOUT A RETURN AUTHORIAZATION NUMBER, Sondpex warrants, to the original retail purchaser only, that this product will be free from SONDPEX WILL NOT ACCEPT THE RETURN UNIT. defects in materials and workmanship for 90 Days from the date of purchase. For the warranty number, date of purchase and dealer’s name and address when calling. Without the to be effective, the ‘receipt’ or a copy of the ‘bill of sale’ must show that the unit was purchased proof of purchase from an authorized Sondpex Audio Dealer, Sondpex is under no from an “Authorized Sondpex Audio Dealer”. If, within 90 days from the date shown on the obligation nor have any responsibility to honor the WARRANTY!!! receipt or the bill of sale, the unit fails due to a defect in workmanship or material, Sondpex will 2. repair or replace the defective components of the unit. All returned parts and products become the property of Sondpex. Products replaced or repaired under this warranty will be returned to the original retail purchaser. Freight costs will not be covered under the warranty but will be 21 Be prepared to state the model The risk of loss or damage in transit is the purchaser’s responsibility. SONDPEX IS NOT RESPONSIBLE. 3. FREIGHT COLLECT SHIPMENTS WILL BE REFUSED! WARRANTY DOES NOT COVER SHIPPING FOR RETURNS / REPAIRS 22