1
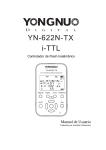
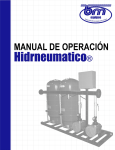
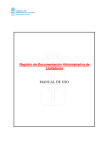
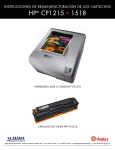
MANUAL DE USUARIO XXVIII Gracias por comprar nuestro producto. Sinceramente el Equipo PAS http://www.pas-sv.com | Skype: pas.sv Tel: 305 407-2736 35A, 70A, 100A PWM for HHO Hydrogen Cell + Monitor temperature Fig. 1.0. Definición de los componentes del driver de control generador de HHO. http://www.pas-sv.com | Skype: pas.sv Tel: 305 407-2736 Instrucciones Conexiones: 1. Conectar primero la línea de tierra o chasis (GROUND), dos conectores disponibles. 2. Conectar el voltaje de alimentación , protegido por fusible de 1 ampere, este voltaje es solamente para el driver de control. 3. Conectar el lado negativo de la celda, dos conectores disponibles, son los más próximos al disipador de calor (heatsink). 4. Conectar el lado positivo de la celda a batería con fusible de protección, el valor debe de ser menor que el máximo soportado por el driver. 5. Conectar el ventilador en el conector de dos pines en el centro de la tarjeta, el negativo es el pin que está más próximo al disipador de calor (heatsink), corriente máxima disponible para (7812) 1 ampere, (78L12) 100 mili ampere, (en driver ordenados sin ventilador puede no estar disponible) 6. Conectar el sensor de temperatura de la celda (HHO) en el conector de pines en el lado derecho, el negativo es el pin más próximo al potenciómetro, se puede usar cualquier resistencia de coeficiente negativo, por ejemplo el sensor de temperatura del refrigerante del motor, instalarlo en contacto con la celda de HHO. 7. Conectar el interruptor (pulsador) externo en el conector de dos pines en frente del pulsador (SW1) instalado en el driver, este queda en paralelo con el que tiene instalado el driver para facilitar el acceso en caso de usar una caja y querer estar cambiando la frecuencia sin abrirla. http://www.pas-sv.com | Skype: pas.sv Tel: 305 407-2736 Configurar: El interruptor SW1 está abierto en el encendido. Ajustar la frecuencia: Rango según driver adquirido (puede ordenarnos un rango que usted especifique) Girar los potenciómetros al centro, el led debe de estar apagado. Conectar un frecuencímetro en el lado negativo de la celda. Oprimir el interruptor para aumentar la frecuencia, el led parpadea cuando está cambiando la frecuencia. Al alcanzar el máximo disponible la frecuencia cambia al valor menor, el ciclo es infinito. Cuando ajuste la frecuencia que desea para operación ya no es necesario un nuevo ajuste, el valor queda guardado en memoria. Ajuste del ciclo de trabajo PWM: El ajuste se realiza con el potenciómetro que está a la izquierda del driver marcado con “PWM”. Girar a la izquierda para disminuir el PWM, mínimo valor 0%. Girar a la derecha para aumentar el PWM, máximo valor 100%. Ajuste del sensor de temperatura El ajuste se realiza con el potenciómetro que está a la derecha del driver marcado con “TEMP”. En el driver esta una resistencia fija y en la celda una variable (termistor de coeficiente negativo) que forman un divisor de voltaje. El voltaje que ajustemos con el potenciómetro es comparado con el del divisor de voltaje de la celda. El led estará encendido cuando el valor del potenciómetro sea mayor que el del divisor de la celda, indicando un valor de temperatura mayor que el ajustado (Caliente) http://www.pas-sv.com | Skype: pas.sv Tel: 305 407-2736 Cuando el led está encendido el ciclo de trabajo se disminuye (puede apagar la celda por completo PWM=0%, si no se enfría), al enfriarse la celda HHO se incrementa hasta el máximo valor programado. Modo especial: Para entrar al modo especial de operación debe de estar cerrado el interruptor (SW1 oprimido), en el encendido. Si el SW1 (push botton) esta oprimido en el encendido del driver este entra en modo especial de señal, mantener oprimido el pulsador hasta que el led comience a destellar, cuando destelle ya puede liberar el interruptor, el led deja de destellar y genera la señal de PWM en trenes de 8 pulsos y una pausa de igual tiempo (Puede ordenarnos una forma diferente de señales para este modo) . Las funciones son iguales que en el modo normal, el interruptor SW1 sirve para cambiar la frecuencia. Si el interruptor no se libera SW1 cerrado o un jumper en los pines del SW1 hará que el driver deshabilite la función de cambiar la frecuencia con el interruptor SW1, el resto funciona igual que en modo normal. NOTA: Si ya hemos ajustado la frecuencia a la que queremos que opere y queremos que entre de forma automática al modo especial de señal sin tener que oprimir el interruptor SW1 en el encendido, colocamos un jumper en los pines disponibles frente al interruptor SW1, el led comenzara a destellar después de un corto tiempo (15 destellos aproximadamente) deshabilitara el interruptor SW1 y comenzara a generar la señal especial, no se podrá cambiar la frecuencia de operación http://www.pas-sv.com | Skype: pas.sv Tel: 305 407-2736 pero todas la otras funciones estarán disponibles igual que en el modo normal. Si tiene alguna pregunta o sugerencia por favor enviarnos un correo a [email protected]. Atte. Equipo PAS. http://www.pas-sv.com Skype: pas.sv Tel: 305 407-2736 http://www.pas-sv.com | Skype: pas.sv Tel: 305 407-2736 OWNER’S MANUAL http://www.pas-sv.com | Skype: pas.sv Tel: 305 407-2736 XXVIII Thank you for buy our product. Sincerely PAS Team http://www.pas-sv.com | Skype: pas.sv Tel: 305 407-2736 35A, 70A, 100A PWM for HHO Hydrogen Cell + Monitor temperature Fig. 1.0. Definition of components of driver of control the generator of HHO. http://www.pas-sv.com | Skype: pas.sv Tel: 305 407-2736 Instructions Connections: 1. Connect first the grown line or chassis (GROWN), two 2. 3. 4. 5. 6. 7. connectors are available. Connect the voltage of feeding, protected by a fuse of 1 ampere, this voltage it’s only by the driver of control. Connect the positive side of cell, two connectors are available, those are closer to the heatsink. Connect the positive side of cell to the battery with protection fuse, the value it must be lower than maximum endured by the driver. Connect the fan in the connector of two pins in the center of the card, the negative pin is closer to the heatsink, maximum current available to (7812) 1 ampere, (78L12) 100 milliampere (on drivers ordered without fan it’s possible not available) Connect the temperature sensor of cell HHO in the pins connector at right side, the negative pin is closer to the potentiometer, you can use any resistance of negative coefficient, by example the temperature sensor of engine’s refrigerant, you have to install in contact with the cell. Connect the external switch in the connector of two pins in front of Switch 1 (SW1) installed on the driver, this one stay in parallel with the one installed on the driver to facilitate the access in case you use a box and you want change the frequency without open that box. http://www.pas-sv.com | Skype: pas.sv Tel: 305 407-2736 Config: The interrupter SW1 it’s open on the start Adjustment the frequency: The rank it’s according to ordered (you can order a specific rank) Turn the potentiometer to the center, the led must be off Connect a frequencymether at negative side of the cell Push the switch to increase the frequency, the led blink when it’s changing the frequency. When the maximum value of frequency it`s reached then change to the lowest value, the cycle it’s infinite. When you adjust the frequency needed for operate is not necessary a new adjust because the value is saved on memory. Adjustment of the work cycle PWM: You can do the adjustment with the potentiometer at left from the driver named “PWM”. Turn to the left to decrease the PWM, minimum value 0% Turn to the right to increase the PWM, minimum value 100% Adjustment of the temperature sensor You can do the adjustment with the potentiometer at right from the driver named “TEMP”. On the driver it’s a fix resistance and in the cell a variable resistance (thermistor of negative coefficient); those make a voltage divider. The voltage adjusted with the potentiometer is compared with the voltage divider of the cell. The led will be ON when the value of the potentiometer is bigger than the divider of the cell, that indicate a value of temperature bigger than the fitting in the driver. When the led is ON the cycle of work is decreased (it can turn off the cell completely (PWM=0%) if not cool), when cooling the cell HHO is increased to the maximum programmed value. http://www.pas-sv.com | Skype: pas.sv Tel: 305 407-2736 Special Mode: To enter in special mode of operation it had to be closed the switch on the start (SW1 pushed) If SW1 is pushed when start the driver begging in special mode of signal, keep pushed the switch until the led begin to blink, when blink you can release the switch, the led stop blink and generate the signal PWM in train of 8 pulses and a pause of equal time (You can order us a different wave of signal for this mode) The function are same than the normal mode, the switch SW1 is used to change the frequency. If the switch is not released SW1 closed or a jumper in pins of SW1 will do the driver make an inoperative the function of change the frequency with switch SW1, rest works in same way like normal. NOTE: If we was adjust the frequency needed and we want the driver start in special mode without to push the switch SW1 put a jumper in the pins in front to SW1, the led begging to blink (15 flash approximately) will be inoperative the switch SW1 and begging to generate the special signal, you can’t change the frequency of operation but the others functions will be operatives like normal way. http://www.pas-sv.com | Skype: pas.sv Tel: 305 407-2736 If you have any question o suggest, please send us an email to [email protected]. Att. Team PAS. http://www.pas-sv.com Skype: pas.sv Tel: 305 407-2736 http://www.pas-sv.com | Skype: pas.sv Tel: 305 407-2736