1
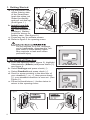
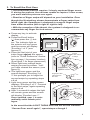
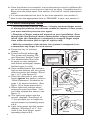
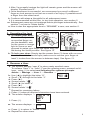
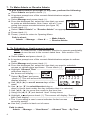
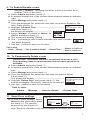
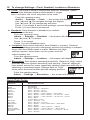
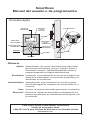
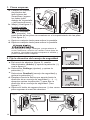
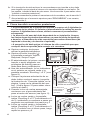
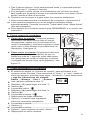
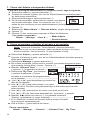
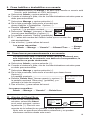
SmartScan
User/Programming Manual
Quick
Reference
SCREEN
DISPLAY
INDICATOR
LIGHT
BATTERY
LEVEL
PAD
Admin
About
12:00 am
SCROLL
UP
SCROLL
RIGHT
SCROLL
LEFT
SCROLL
DOWN
BACK
MINUS
CHECK
SENSOR
ENROLL
Glossary
Admin: Administrator. A user that is authorized to manage system functions. These functions include: Enroll, Delete,
Rename users, Enable/Disable access and assign/revoke
admin privileges.
Enrollment: The process in which fingerprint data is collected,
converted to templates and stored in memory.
Authentication: The process in which fingerprint data is compared to
templates in memory.
User: An individual authorized to operate the lock.
Biometric: Method of authenticating the identity of a person, based on
physiological and behavioral characteristics.
For assistance or warranty information call the following:
1-800-327-LOCK for Kwikset Customers in the USA.
Part # 70-042338-000 /01
www.kwikset.com
Copyright © 2006 Black & Decker Corporation
1
1. Getting Started.
Fig. 1
Fig. 2
a. Lift the plastic cover
off the interior side
of the SmartScan
(grab the sides just
under the display
and pull out and up).
(See figure 1.)
b. Install 4 new AA
Alkaline batteries (not included in
package). Battery
positions shown on
battery case. (See figure 2.)
c. Press any key to activate screen.
d. Refer to figure 3 for opening menu.
Do not dispose of in fire, recharge,
put in backwards, disassemble, mix
with used or other battery types.
May explode or leak and cause
personal injury
Fig. 3
2. Set Deadbolt Direction
a. From the opening menu (figure 3), highlight
Administrator (Admin) and press check (√),
see figure 4.
b. Select Settings and press check (√).
c. Select Deadbolt and press check (√).
d. Scroll to arrow pointing in the direction of
your deadbolt (←or →), then press check
(√); your deadbolt direction is now set. (See
Figure 5.)
e. Press the back/minus (-) button twice to
return to the opening menu.
Fig. 4
Fig. 5
Deadbolt?
-----------------
2
Deadbolt?
-----------------
3. To Enroll the First User
• The enrollment process requires 3 clearly captured finger scans.
If during the process, the unit was unable to capture 3 clear scans,
you must start the process over again.
• Direction of finger swipe will depend on your installation. Even
though the illustrations shown demonstrate a finger swipe from
left to right, the SmartScan is designed to accept a finger swipe
from either direction (left to right or right to left).
• With the exception of the thumb, the system is designed to accommodate any finger for lock access.
a. Press any key, to activate
Fig. 6
display.
b. Press the Enroll button
( ) then press the (√) button. The indicator light on
the exterior will turn green
and the screen will display
“Enrolling 1 of 3” (see
figures 6).
c. Place the first joint of your
index finger against the sensor,
(refer to “Quick Reference” illustration on page 1 for sensor location).
(See figure 7 for finger placement.)
d. When light turns orange begin
swiping across the sensor - until
you have cleared the sensor, (see
figure 8).
e. The light turns green and the
screen displays “Enrolling 2 of
3” this prompts you to begin the
second swipe by repeating steps
c & d.
f. Light turns green and the screen
displays “Enrolling 3 of 3”. Proceed
to the third swipe, again repeating
steps c & d.
g. After 3 successful swipes the light
will remain green and the screen
will display “Enrolled user 1”.
Once enrolled, user 1 is automatically set to Admin privileges.
Indicator
Light
Fig. 7
Placed
to aid control
of swipe
Press firmly
against sensor
Fingerprint data
collected from
this area.
First Joint
Fig. 8
Swiped
In the event that the LIGHT TURNS RED and the screen indicates
“Sensor Error enroll again”, repeat steps a though f.
3
h. Once enrollment is successful, we recommend you enroll a different finger so lock access is not lost as a result of an injury. If possible enroll a
finger from the other hand. See section 4 for how to “enroll subsequent
users”.
i. It is recommended at this time, to test lock operation, see section 5.
j. Now is also the appropriate time to “RENAME” a user; see section 6.
4. To enroll subsequent users
• The enrollment process requires 3 clearly captured finger scans.
If during the process, the unit was unable to capture 3 clear scans,
you must start the process over again.
• Direction of finger swipe will depend on your installation. Even
thought the illustrations shown demonstrate a finger swipe from
left to right, the SmartScan is designed to accept a finger swipe
from either direction (left to right or right to left).
• With the exception of the thumb, the system is designed to accommodate any finger for lock access.
a. Press any key, to activate
Fig. 9
display.
b. Press the Enroll button ( ).
The screen will display “Admin Required, Swipe Finger”
c. The administrator (first user
to enroll or user assigned
with Admin privileges) swipes
his/her finger to verify.
d. Once authenticated, the indicator
light on the exterior will turn green
and the screen will display “Enrolling 1 of 3” (see figures 9).
e. Place the first joint of your index
finger against the sensor, (refer to
“Quick Reference” illustration on
page 1 for sensor location). (See
figure 10 for finger placement.)
f. When light turns orange begin
swiping across the sensor - until
you have cleared the sensor, see
figure 11.
g. The light turns green and the
screen displays “Enrolling 2 of
3” this prompts you to begin the
second swipe by repeating steps
e & f.
h. Light turns green and the screen
displays “Enrolling 3 of 3”. Proceed to the third swipe, again
repeating steps e & f.
4
Indicator
Light
Fig. 10
Placed
to aid control
of swipe
Press firmly
against sensor
Fingerprint data
collected from
this area.
Fig. 11
Swiped
First Joint
i. After 3 successful swipes the light will remain green and the screen will
display “Enrolled user 2”.
j. Once enrollment is successful, we recommend you enroll a different
finger so lock access is not lost as a result of an injury. If possible enroll
a finger from the other hand.
k. Continue with steps e though h for all subsequent users.
l. It is recommended at this time, to test lock operation, see section 5.
m. Subsequent users are not assigned Admin privileges automatically. See
section 7 on how to “Make Admin”.
n. Now is also the appropriate time to “RENAME” a user; see section 6.
5. Operating the lock
Fig. 12
Fig. 13
a. To unlock your door:
Place the first joint of
an enrolled finger under the deadbolt, wait
Swipe
for the green or orange
light to come on and
proceed to swipe your finger the same way you
did during the enroll process. See figure 12.
b. To lock your door: Simply tap the sensor three (3) times with no more
than 1 second in-between taps (make sure to remove your finger at
least ½ inches from the sensor in-between taps). See figure 13.
6. Rename a User
a. The system assigns “user #” to store newly enrolled users.
To rename “User 1” to “John”: From the opening menu, proceed as follows - using (√) to select and following the systems prompts.
Admin → Manage → User 1 → Rename →
b. Use (◄) to highlight the letter “U”.
c. Scroll (▼) through to the letter “J”.
d. Press (►).
e. Screen reads: “J█ ”.
f. Scroll (▲) to letter “o”
g. Press (►).
h. Screen reads “Jo █ ”.
i. Repeat for remaining letters.
j. Press (√) when all required characters have been entered.
k. The screen displays: →
l. Press (√).
m. The screen displays: →
n. Press (-) to return to “Admin” menu.
o. Repeat for other users.
5
7. To Make Admin or Revoke Admin
To give Administrative privileges to any user, perform the following:
a. Select Admin and press check (√).
b. At system prompt one of the current Administrators swipes to
authenticate.
c. Select Manage and press check (√).
d. From the displayed list, select the user that you want Fig. 14
to make an administrator. Note: Users with an (*) preceding their names are administrators (see figure 14).
e. Press check (√).
f. Select “Make Admin” or “Revoke Admin” as appropriate.
g. Press check (√).
h. Press (-) twice to return to Opening Menu.
Path in short:
→ Make Admin
Admin → Manage → User # →
→ Revoke Admin
8. To Schedule or Limit a user’s access
Note: In order for the “Time Allowed” function to operate predictably,
the clock must be set to the correct dated time. See section 12 to
set clock.
a. Select Admin and press check (√).
b. At system prompt one of the current Administrators swipes to authenticate.
c. Select Manage and press check (√).
d. From the displayed list, select the user that you want to schedule
access on certain days and times. Press check (√). Rename
e. Highlight “Allowed Time” --------------------------------→ Make Admin/Revoke Admin
Allowed Time
and press check (√),
Delete user
the screen will display------→
f. Select “By Time” and press
check (√). This will access the scheduling
display window. -------------------------------------→
g. Use (◄) & (►) to scroll across days of the
week.
h. Use (▲) or (▼) to select/deselect day or
days (a check mark under the day indicates that it is selected).
i. Use (◄) & (►) to move the cursor to the hour line.
j. Using the (▲) & (▼) set desired “start” & stop times.
k. Highlight
and press check (√). The screen will display “Saving”
then it will display -------------------------------------------------------→ *User 1
%User 2
l. The % preceding a user’s name indicates limited access
recurring weekly.
m. Use the (-) button to back out of menu.
Path in short:
Admin → Manage → “User Name” → Allowed Time →By Time
6
9. To Enable/Disable a user
a.
b.
c.
d.
e.
f.
g.
h.
i.
(Default is Always = meaning that when a user is enrolled he is
enabled 100% of the time.)
Select Admin and press check (√).
At system prompt one of the current Administrators swipes to authenticate.
Select Manage and press check (√).
From the displayed list, select the user that you want to Enable or Disable. Press check (√).
Rename
Highlight “Allowed Time” ---------------------------------→ Make Admin/Revoke Admin
Allowed Time
and press check (√),
Delete user
the screen will display----------------------→
Select “Always” to enable or “Never” to
disable and press check (√).
The screen will display “Saving”.
The “-” preceding a user’s name indicates that user’s access
has been disabled.
Use the (-) button to back out of menu.
Path in short:
→ Always to enable user
Admin → Manage → “User to enable or disable” → Allowed Time →
→ Never to disable user
10. To Permanently Delete a user
a.
b.
c.
d.
e.
f.
Please note: The Delete function, completely removes a user
from memory; data is unrecoverable and no undo operation is
available.
Select Admin and press check (√).
At system prompt one of the current Administrators swipes to authenticate.
Select Manage and press check (√).
From the displayed list, select the user that you want to delete.
Press check (√).
The screen will display ------------------------------------→ Rename
Make Admin/Revoke Admin
Highlight “Delete User” and press check (√), the
Allowed Time
screen will display “Removing” and return to user list. Delete user
Use the (-) button to back out of menus.
Path in short:
Admin → Manage → “User to delete” → Delete User
11. SmartScan settings
a. To view current settings, Select
About on the main menu press
the check (√). For sample
screen shot, see Figure 15.
Fig. 15
Battery: 5.2v
Users: 2
Deadbolt:
More
Biometrics:
High
Rev. 672
Note: This is for information only and no changes are available from this menu.
7
12. To change Settings - Clock, Deadbolt, Locktime or Biometrics
a. Clock: The clock is used in conjunction with the “schedule” option.
Note: If time between battery replacement is longer
than 2 minutes, the clock may have to be reset.
Sun 12:00am
From the opening menu:
Admin → Settings → Clock → the screen will display ↑
Use (◄) and (►) to navigate through the display.
Use (▲) and (▼) to change day and time.
Press (√) to accept & save clock settings -screen displays ↑
Press (-) to exit menus as desired.
b. Deadbolt: Sets direction of deadbolt (no default,
Deadbolt?
--------direction must be set).
--------From the opening menu:
Admin → Settings → Deadbolt → the screen will display ↑
Use (▲) and (▼) to select.
Press (√) to accept.
Press (-) to exit deadbolt menu.
c. Locktime: Sets motor activation time (Default = normal). “Medium”
and “High” settings provide a temporary solution for binding or warped
doors until door/jamb repair is made. Medium and High
settings impose extra strain on the system and will
reduce battery life.
From the opening menu:
Admin → Settings → Locktime → the screen will display ↑
d. Biometrics: Sets system sensitivity/selectivity. Default is “High” which
provides optimum system sensitivity and security. “Normal” setting allows easier access for users (especially children) that have difficulty in
obtaining a consistent swipe. Change back to “High”
when users become familiar with the swiping process.
From the opening menu:
Admin → Settings → Biometrics → the screen will display ↑
Quick Path Guide
OPERATION
REQUIRED KEYSTROKES
ABOUT
ADMIN
BIOMETRICS
CLOCK
DEADBOLT
DELETE
DISABLE
ENABLE
ENROLL
OPENING MENU
OPENING MENU
ADMIN → SETTINGS → BIOMETRICS
ADMIN → SETTINGS → CLOCK
ADMIN → SETTINGS → DEADBOLT
ADMIN → MANAGE → “USER TO DELETE” → DELETE USER
ADMIN → MANAGE → “USER TO DISABLE” → ALLOWED TIME → NEVER
ADMIN → MANAGE → “-USER TO ENABLE” → ALLOWED TIME → ALWAYS
ADMIN → ENROLL
OR PRESS ENROLL BUTTON
ADMIN → ERASE ALL → YES
ADMIN → SETTINGS → LOCKTIME
ADMIN → MANAGE → “USER TO MAKE ADMIN” → MAKE ADMIN
ADMIN → MANAGE
ADMIN → MANAGE → “ USER TO RENAME “ → RENAME
ADMIN → MANAGE → “ *USER TO REVOKE “ → REVOKE ADMIN
ADMIN → MANAGE → “USER TO SCHEDULE” → ALLOWED TIME → BY TIME
ADMIN → SETTINGS
ERASE ALL
LOCKTIME
MAKE ADMIN
MANAGE
RENAME
REVOKE ADMIN
SCHEDULE/RESCHEDULE
SETTINGS
8
SmartScan Troubleshooting Guide
Problem
Check/Remedy
Display does not come on.
Verify that the Batteries are good and that they are
installed correctly
The system does not wake up
(No green or red light).
Press a key on the keypad: If the LCD does not
come on, check the batteries. If the LCD comes on,
check the cable connection between the Deadbolt
and the Main unit.
The green and orange lights
come on, but then the red light
flickers and the door does not
unlock.
If you have access to the LCD, look for system
messages. If you have no access to the LCD, try
swiping at a slower rate with constant speed and
pressure, making sure to wait until green or orange
light comes on before beginning your finger swipe.
Try swiping a different finger that you have enrolled.
Try to improve swiping technique. Enroll same
finger additional times. Change “Biometrics” setting
to Normal.
Some users have trouble
operating the lock.
Display the users list (Admin→ Manage). A user
preceded by a % will have limited access. To
change user status, go to “Allowed Time” under
“Manage” menu.
My batteries are wearing out too
quickly.
Avoid “waking up” the system unnecessarily. Battery
life estimate is based on 10-15 accesses a day,
including times that the LCD is on, even without
driving the bolt. Also check “Locktime” under
“Settings” menu; change to “Normal”.
The motor stays on for too long.
Check “Locktime” under “Settings” menu; change to
“Normal”.
Sometimes I hear a beeping
sound when I operate the lock.
This is a “Low Battery” warning; system batteries are
low and need to be replaced.
My lock works backwards: It
locks when I swipe and unlocks
when I tap three times.
Check Deadbolt direction under “Settings”. Change
deadbolt arrow to match your installation.
I replaced the batteries and now
my clock is all wrong.
To guarantee clock integrity, do not leave batteries
out of the system longer than two (2) minutes.
When I operate the lock the
motor sounds strained and the
bolt only goes halfway.
This is probably due to a warped door. As a
temporary “fix” ONLY, try a different “Locktime”
setting. Please note that locktime settings other
than “Normal” increase system strain and decrease
battery life; they are not recommended to be used in
lieu of door or jamb repair.
9
Frequently Asked Questions (FAQs)
Q. Why can’t I enroll without setting the Deadbolt direction in the system?
A. In order for the system to operate predictably, it needs to “know” which direction to drive the
bolt when Lock or Unlock commands are issued. Before the first user is allowed to enroll, the
Dead Bolt direction needs to be set.
Q. Do I have to set the “Deadbolt direction” every time I enroll a user?
A. No, once the dead bolt direction is set, it is stored in non-volatile memory and it does not have
to be reset even when power is removed. Bolt direction may be changed, as applicable, if the
lock is installed on a different door.
Q. Can anybody enroll himself and have access to the system?
A. No. Only an Admin is authorized to enroll new users.
Q. What is an Admin?
A. An Administrator is a user that is authorized to Manage system functions such as Enroll,
Delete or Rename other users; he/she is also authorized to assign administrative privileges to
other users.
Q. How do I become an Admin:
A. The first user automatically becomes an Administrator; in turn he may assign admin privileges
to other users.
Q. Does the First Admin have more privileges than subsequent ones?
A. No, the system treats all Admin the same.
Q. Is there a limit to the number of Administrators that I can have?
A. No; you can have as many Administrators as users. To prevent system tampering and
unauthorized use however, it is recommended that you limit the number of Admin to 2 or 3.
Q. How long will SmartScan last on a single set of batteries?
A. Under normal use (10-15 accesses per day) SmartScan should operate for a year on a single
set of alkaline batteries.
Q. How can I conserve battery life?
A. The system goes to Low-power “sleep” mode after 30 seconds of inactivity; in this mode
minimum power is consumed. Whenever the system is active (display on or driving the
deadbolt) it consumes maximum power. Avoiding “waking up” the system unnecessarily will
extend battery life.
Q. How long can the system stay in “sleep” mode without losing its setting?
A. In sleep mode SmartScan can run for several years on a single set of batteries. It is impossible
for SmartScan to “forget” its settings even if the batteries are removed.
Q. How do I know when to replace the batteries?
A. 1. Look at the battery icon in the opening menu. Amount of shading corresponds to remaining
battery charge. 2. Check battery voltage under “Settings” Replace batteries when indicated
voltage is 4.3V or less. 3. When batteries need replacement, the system emits a warning
beeping sound after locking or unlocking the door. 4. When accessing the bolt, the motor will
sound “straining” under low battery condition.
Q. Do I have to reconfigure the lock when I replace batteries?
A. No; system configuration and user information & data, are saved in non volatile Flash memory
(similar to the one used in jump-drives and MP3 players;) data may be stored indefinitely
without the need of batteries. One exception to this rule however, is the clock: It is
recommended that battery replacement is accomplished within 2 minutes, otherwise Day and
Time may need to be reset. No other settings are affected.
Q. My child has difficulty operating the lock (fail to match). What can I do?
A. Young children may have difficulty authenticating, probably due to inconsistent finger swipes
(speed, position and angle.) To improve success rate try one or both of the following: 1.
Change “Biometrics” from “High” to “Normal” to increase system sensitivity. Switch back to
“High” when children become familiar with the lock. 2. Enroll the same finger of the child more
than once. After a short period of time, practice will eventually eliminate the need for multiple
enrollments.
10
Frequently Asked Questions (FAQs) continued....
Q. Since the SmartScan is basically a computer, can it “lock-up” like my PC sometimes does?
A. Many times what it is perceived as a “lock-up” is just an attempt by the PC to access a nonresponding peripheral; given enough time (sometimes minutes) a PC will “time-out” and return
to accept commands. Other times the PC may try to execute a barrage of instructions that an
impatient user may have issued. Being a general purpose computer, the PC has long timeouts and from the user’s prospective (in both scenarios above) the computer will appear to be
“locked-up.” Since SmartScan is a dedicated special purpose computer, the designers have
been able to build in several safeguards with short time-outs; the possibility of a “lock up” has
been minimized. In the event however, that SmartScan is busy executing a series of
commands (keypad or swipe) and needs to be stopped, all is required is to remove one
battery, wait for 60 seconds and reinsert. SmartScan returns to the opening menu. Please
note that the operation in process just before battery removal, will have to be repeated.
Q. Why is there a delay from when I touch the sensor and the unit LED activating?
A. In order to conserve batteries, the system is put in a low power (sleep) mode after 30 seconds
of inactivity. When Keypad or Finger print activity is detected, the system receives a “wake-up”
command; it takes approximately 0.2 seconds for the electronics to come up and ready to
collect data.
Q. Why does the unit not read my finger the first time I swipe my finger.
A. It is important to wait for the system to wake up or activate before swiping your finger. If you
begin swiping or moving your finger before the system is awake the full fingerprint is not
captured for comparison.
Q. Can I use my finger on my left hand or right hand? Does the direction of the swipe make a
difference?
A. The system is designed to capture data from either direction; as long as the direction and
finger of the swipe matches the direction and the finger of enrollment, the lock will function
properly.
Q. What do the LED colors indicate?
A. Green: System is awake and ready to accept commands.
Orange: The system is capturing fingerprint data.
Red: Authentication (comparing captured data to templates in memory) failed.
Q. If my finger gets dirty will the unit still work?
A. The SmartScan finger print sensor uses RF techniques to collect data from below the skin
therefore, its “reading” ability is not affected by dirt. It is advisable however, to wipe dirt and
sand off, prior to swiping, to avoid scratching the sensor’s protective glass surface.
Q. If I cut my finger will the unit still work?
A. The system reads sub-dermal (below the skin) fingerprint data therefore is tolerant to small
cuts and skin blemishes. It will not however, read through a bandage.
Q. If I go swimming for a long period of time will my finger still work?
A. Staying in water for prolonged periods may distort fingerprint data, resulting in failure to
authenticate. A few minutes of “drying” time will be sufficient to remedy the problem.
Q. I tap my finger and I hear the motor operate but the lock does not lock.
A. Check the alignment between the bolt and the strike to make sure the bolt can move into the
strike without any interference.
Q. What is the purpose of the Locktime adjustment?
A. This is a temporary electronic “fix” for a misaligned or warped door. The default setting is
“Normal” which provides optimum timing for most applications. The “Medium” and “High”
settings may be used to temporarily overcome alignment problems until a permanent repair
is made Please note: Medium and High Locktime modes impose extra strain on the system
and shorten battery life; these modes are offered as a convenience only and they are not to be
used as a substitute for a door or a door-jamb repair.
Q. What can I do to help the unit wake up easier?
A. Grasp the lower side of the deadbolt with one finger wrapped around the fingerprint sensor
and
the thumb on the top of the deadbolt. Hold for 1-2 seconds, then remove hand from deadbolt.
Q. My unit won’t wake up what should I do?
A. Remove your hand from the deadbolt for about 30 seconds and try again.
Q. Should I carry a key as a back-up?
A. An alternate way to access the premises is advisable. A back-up key is recommended.
11
Frequently Asked Questions (FAQs) continued....
Q. What is the purpose of having the thumb on the deadbolt while finger swiping?
A. The thumb is used as a pivot point to control swiping speed and angle.
Q. Does the lock work if the finger is scanned in a vertical position?
A. No; data is collected by swiping Left to Right or Right to Left only.
Q. Can someone “steal” my fingerprint and use it in “Identity theft” scam?
A. No. Your fingerprint is NOT stored in the system: The data collected during swiping is used to
extract a mathematical expression of the features that make your print unique. This
mathematical representation is what is stored in memory. This method is both economical
(small memory requirements) and secure (unable to duplicate the actual fingerprint).
This product is covered by one or more of the following patents or patents pending:
4844522 5123683 5317889 5335525 53359505441318 5452928 5482335 5490700 54960825513509 5513510
5529351 5540070 55709125662365 5761937 5810402 5857365 60587466128933 6151934 6398465 6401932
64123196443504 6532629 6536812 6568727 65984406622537 6662606 6695365 6702340 67456026828519
6860131 6860529 6862909 6871520 6880871 6948748
For assistance or warranty information call the following:
1-800-327-LOCK for Kwikset Customers in the USA.
12
www.kwikset.com
SmartScan
Manual del usuario o de programación
Consulta rápida
PANTALLA
INDICADORA
CARGA DE
LA PILA
TECLADO
LUZ INDICADORA
TECLADO
Admin
About
DESPLAZAR
HACIA ARRIBA
12:00 am
DESPLAZAR HACIA
LA IZQUIERDA
DESPLAZAR
HACIA
LA DERECHA
DESPLAZAR
HACIA ABAJO
REGRESO
MENOS
PALOMITA
SENSOR
INSCRIBIR
Glosario
Admin: Administrador. Un usuario autorizado para administrar
las funciones del sistema, que son: Inscribir, Borrar y
Renombrar usuarios, Habilitar/Deshabilitar acceso y
asignar/suspender privilegios administrativos.
Enrollment: Inscripción, el procedimiento en el cual se recopilan los
datos de la huella digital, se convierten a plantillas y se
almacenan en la memoria.
Authentication: Autentificación, el procedimiento en el cual los datos
de la huella digital se comparan con las plantillas en la
memoria.
User: Usuario, la persona autorizada para operar la cerradura.
Biometric: Biométrica, método de autentificar la identidad de una
persona apoyándose en características fisiológicas y de
la conducta.
Para recibir ayuda o para obtener información
acerca de la garantía, llame:
1-800-327-LOCK para Clientes de Kwikset en los Estados Unidos.
www.kwikset.com
13
1. Cómo empezar.
Fig. 1
Fig. 2
a. Levante la cubierta
de plástico del
lado interno del
SmartScan (agarre
los lados justo
debajo de la pantalla
y jale hacia afuera y
b. abajo) (Vea figura 1.)
Instale 4 pilas
nuevas alcalinas
AA (no incluidas
en el paquete). Las
posiciones de las pilas se muestran en el compartimiento de las pilas.
(Vea figura 2.)
c. Oprima cualquier tecla para activar la pantalla.
d. Oprima cualquier tecla para activar la pantalla.
No disponga en fuego, recargue, ponga adentro al
revés, desmonte, mezcle con usada u otros tipos de
la batería. Una batería podría escaparse o estallar y
podría causar lesión corporal.
Fig. 3
2. Fije la dirección del cerrojo de seguridad
a. Del menú de abertura (figura 3), resalte
Administrador (Admin) y oprima la palomita (√),
vea la figura 4.
b. Seleccione Settings (ajustes) y oprima la
Fig. 4
palomita (√).
c. Seleccione Deadbolt (cerrojo de seguridad) y
oprima la palomita (√).
d. Desplace hacia la flecha que apunta hacia la
dirección de su cerrojo de seguridad (← ó →),
después oprima la palomita (√) para fijar la
dirección de su cerrojo de seguridad. (Vea
figura 5.)
e. Oprima el botón de regreso/menos (-) dos veces
para regresar al menú de abertura.
Fig. 5
Deadbolt?
-----------------
14
Deadbolt?
-----------------
3. Cómo inscribir al primer usuario
• El procedimiento de la inscripción requiere la captura de 3 digitalizaciones claras de los dedos. Si durante el procedimiento la unidad no puede
capturar 3 digitalizaciones claras, deberá comenzar el procedimiento
nuevamente.
• La dirección del pase del dedo dependerá de su instalación. Aunque
las ilustraciones mostradas demuestran un pase del dedo de izquierda
a derecha, el SmartScan ha sido concebido para ambas direcciones (de
izquierda a derecha y de derecha a izquierda).
• A excepción del dedo pulgar, el sistema ha sido concebido para que
cualquier dedo sea pasado para acceder a la cerradura.
Fig. 6
a. Oprima cualquier tecla para
activar la pantalla indicadora.
Luz
indicadora
b. Oprima el botón Inscribir ( ),
luego el botón (√). La luz indicadora del exterior se volverá
verde y la pantalla indicará
“Enrolling 1 of 3” (Inscribiendo a
1 de 3) (vea figura 6).
c. Coloque la primera articulación
Fig. 7
Colocado para
de su dedo índice contra el sensor
ayudar a
controlar el
(consulte la ilustración de “Consulta
pase.
rápida” en la página 1 para ver la
ubicación del sensor). (Vea la figura 7
para saber cómo colocar el dedo.)
d. Cuando la luz se vuelva anaranjada,
comience con el procedimiento del
Oprima
pase a través del sensor (vea figura
firmemente en
contra del sensor
8).
e. La luz se vuelve verde y la pantalla
Los datos de la
indica “Enrolling 2 of 3” (Inscribiendo
huella digital se
toman desde
a 2 de 3), instándole a comenzar a
esta área.
pasar por segunda vez repitiendo los
Primera articulación
pasos c y d.
f. La luz se vuelve verde y la pantalla
Fig. 8
indica “Enrolling 3 of 3” (Inscribiendo
a 3 de 3). Continúe con el tercer
pase, luego repita los pasos c y d.
g. Tras 3 pases exitosos, la luz
permanecerá verde y la pantalla
indicará “Enrolled user 1” (Usuario 1
inscrito).
Pasado
Una vez inscrito, el usuario 1
es fijado automáticamente a los
privilegios Admin.
Si la LUZ SE VUELVE ROJA y la pantalla indica “Sensor Error
enroll again” (Error del sensor, inscríbase otra vez), repita los
pasos a - f.
15
h. Si la inscripción ha sido exitosa, le recomendamos que inscriba a otro dedo
para impedir que se pierda el acceso a la cerradura debido a una lesión. De
ser posible, inscriba al dedo de otra mano. Vea la sección 4 para saber cómo
“inscribir a usuarios posteriores”.
i. Ahora recomendamos probar el mecanismo de la cerradura, vea la sección 5.
j. Ahora también es el momento oportuno para “RENOMBRAR” a un usuario;
vea la sección 6.
4. Cómo inscribir a usuarios posteriores
• El procedimiento de la inscripción requiere la captura de 3 digitalizaciones claras de los dedos. Si durante el procedimiento la unidad no puede
capturar 3 digitalizaciones claras, deberá comenzar el procedimiento
nuevamente.
• La dirección del pase del dedo dependerá de su instalación. Aunque
las ilustraciones mostradas demuestran un pase del dedo de izquierda
a derecha, el SmartScan ha sido concebido para ambas direcciones (de
izquierda a derecha y de derecha a izquierda).
• A excepción del dedo pulgar, el sistema ha sido concebido para que
cualquier dedo sea pasado para acceder a la cerradura.
Fig. 9
a. Oprima cualquier tecla para
Luz
activar la pantalla indicadora.
indicadora
b. Oprima el botón Inscribir ( ).
La pantalla mostrará “Admin
Required, Swipe Finger”
c. El administrador (el primer usuario
inscrito o aquél asignado con
privilegios de Admin) pasa su
dedo para fines verificatorios.
Colocado para
Fig.10
ayudar a
d. Una vez autentificado, la luz indicadora
controlar el
en el exterior se volverá verde y la
pase.
pantalla mostrará “Enrolling 1 of 3” (vea
figura 9).
e. Coloque la primera articulación de su
dedo índice contra el sensor (consulte
la ilustración de “Consulta rápida” en la
Oprima
firmemente en
página 1 para ver la ubicación del sencontra del sensor
sor). (Vea la figura 10 para saber cómo
colocar el dedo.)
Los datos de la
huella digital se
f. Cuando la luz se vuelva anaranjada,
toman desde
comience con el procedimiento del
esta área.
Primera articulación
pase a través del sensor (vea figura 11).
g. La luz se vuelve verde y la pantalla
Fig. 11
indica “Enrolling 2 of 3” (Inscribiendo a 2
de 3), instándole a comenzar a pasar por
segunda vez repitiendo los pasos e y f.
h. La luz se vuelve verde y la pantalla
indica “Enrolling 3 of 3” (Inscribiendo a 3
de 3). Continúe con el tercer pase, luego
repita los pasos e y f.
Pasado
16
i. Tras 3 pases exitosos, la luz permanecerá verde y la pantalla indicará
“Enrolled user 2” (Usuario 2 inscrito).
j. Si la inscripción ha sido exitosa, le recomendamos que inscriba a otro dedo
para impedir que se pierda el acceso a la cerradura debido a una lesión. De ser
posible, inscriba al dedo de otra mano.
k. Continúe con los pasos e-h para todos los usuarios posteriores.
l. Ahora recomendamos probar el mecanismo de la cerradura, vea la sección 5.
m. A los usuarios posteriores no se les asignan privilegios Admin
automáticamente. Consulte la sección 7 para saber cómo “Make Admin”
(dar administración).
n. Ahora también es el momento oportuno para “RENOMBRAR” a un usuario; vea
la sección 6.
Fig. 12
5. Cómo operar la cerradura
a. Cómo abrir su puerta: Coloque la primera
articulación del dedo inscrito bajo el cerrojo
de seguridad, espere que se encienda la luz
verde o anaranjada y comience a pasar su dedo
igual como lo hizo durante el procedimiento de
inscripción. Vea figura 12.
Pase
Fig. 13
b. Cómo cerrar su puerta: Simplemente déle tres
(3) golpecitos al sensor cuidando de que no
transcurra más de 1 segundo entre cada golpecito (asegúrese de quitar su dedo por lo menos
½ pulgada del sensor entre cada golpecito). Vea
figura 13.
6. Cómo renombrar a un usuario
a. El sistema le asigna un “número de usuario” para almacenar a los
usuarios recién inscritos. Para renombrar el “User 1” a “John”: desde el
menú de abertura, proceda como sigue - utilizando (√) para seleccionar
y siga las indicaciones del sistema.
Admin → Manage → User 1 → Rename →
b. Use (◄) para resaltar la letra “U”.
c. Desplace (▼) hasta llegar a la letra “J”.
d. Oprima (►).
e. La pantalla indica: “J█”.
f. Desplace (▲) hasta llegar a la letra “o”
g. Oprima (►).
h. La pantalla muestra “Jo█”.
i. Repita para las letras restantes.
j. Oprima (√) cuando haya ingresado
todos los caracteres obligatorios.
k. La pantalla muestra:------------------------------- ↑
l. Oprima (√).
m. La pantalla muestra: -------------------------------→
n. Oprima (-) para regresar al menú “Admin”.
o. Repita para los otros usuarios.
17
7. Cómo dar Admin o suspender Admin
Para darle privilegios administrativos a cualquier usurio, haga lo siguiente:
a. Seleccione Admin y oprima palomita (√).
b. Cuando el sistema lo pida, uno de los Administradores actuales pasa
su dedo para autentificar.
Fig. 14
c. Seleccione Manage y oprima palomita (√).
d. De la lista mostrada, seleccione al usuario que desee
volver administrador. Nota: los usuarios con un (*)
antes de sus nombres ya son administradores (vea figura 14).
e. Oprima (√).
f. Seleccione “Make Admin” o “Revoke Admin” según sea pertinente.
g. Oprima (√).
h. Oprima (-) dos veces para regresar al Menú de Abertura.
Los pasos resumidos:
→ Make Admin
Admin → Manage → User # →
→ Revoke Admin
8. Cómo programar o limitar el acceso a un usuario
Nota: Para que la función “Time Allowed” (tiempo permitido)
funcione como es de esperarse, debe ajustarse el reloj a la hora y
fecha correctas. Vea la sección 12 para ajustar el reloj.
a. Seleccione Admin y oprima palomita (√).
b. Cuando el sistema lo pida, uno de los Administradores actuales pasa su
dedo para autentificar.
c. Seleccione Manage y oprima palomita (√).
d. De la lista mostrada, seleccione al usuario que desee programar para
que acceda ciertos días y horas. Oprima (√).
Rename
e. Resalte “Allowed Time” ----------------------------------→ Make Admin/Revoke Admin
Allowed Time
y oprima (√), la pantalla mostrará -→
Delete user
f. Seleccione “By Time” (por tiempo)
y oprima la palomita (√) para
acceder a la ventana de programación
en la pantalla ----------------------------------------→
g. Use (◄) y (►) para desplazar por todos los
días de la semana.
h. Use (▲) o (▼) para seleccionar o no seleccionar el día o los días (una palomita bajo el día indica que ha sido
seleccionado).
i. Use (◄) y (►) para mover el cursor a la línea de la hora.
j. Con (▲) y (▼) fije las horas deseadas de “comienzo” y parada.
k. Resalte
y oprima la marca (√). La pantalla mostrará
1
“Saving” (guardando) y luego mostrará ---------------------------→ *User
%User 2
l. El % antes del nombre del usuario indica acceso limitado
que se repite semanalmente.
m. Use el botón (-) para salirse del menú.
Pasos resumidos:
Admin → Manage → “Usuario” → Allowed Time →By Time
18
9. Cómo habilitar o deshabilitar a un usuario.
a.
b.
c.
d.
e.
f.
g.
h.
i.
(Predeterminación es Always = es decir que cuando un usuario está
inscrito, está habilitado el 100% del tiempo.)
Seleccione Admin y oprima palomita (√).
Cuando el sistema lo pida, uno de los Administradores actuales pasa su
dedo para autentificar.
Seleccione Manage y oprima palomita (√).
De la lista mostrada, seleccione al usuario que
Rename
desea Habilitar o Deshabilitar. Oprima (√).
Make Admin/Revoke Admin
Resalte “Allowed Time” ----------------------------------→ Allowed Time
Delete user
y oprima (√), la pantalla mostrará -------→
Seleccione “Always” (siempre) o “Never”
(nunca) para deshabilitar y oprima (√).
La pantalla mostrará “Saving”(guardando).
El “-” antes del nombre del usuario indica que su acceso ha
sido deshabilitado.
Use el botón (-) para salirse del menú.
Los pasos resumidos:
→ Always
Admin → Manage → “Usuario” → Allowed Time →
→ Never
10. Cómo borrar permanentemente a un usuario.
Por favor tome nota: la función Delete (borrar) elimina al usuario totalmente de la memoria; sus datos sin irrecuperables; la
operación no puede deshacerse.
a. Seleccione Admin y oprima palomita (√).
b. Cuando el sistema lo pida, uno de los Administradores actuales pasa
su dedo para autentificar.
c. Seleccione Manage y oprima palomita (√).
d. De la lista mostrada, seleccione al usuario que desea borrar.
Oprima (√).
Rename
La pantalla mostrará ----------------------------------------→ Make Admin/Revoke Admin
Allowed Time
e. Resalte “Delete User” (borrar usuario) y oprima (√),
Delete user
la pantalla mostrará “Removing” (quitando) y regresará a la lista de usuarios.
f. Use el botón (-) para salirse del menú.
Los pasos resumidos:
Admin → Manage → “Usuario” → Delete User
11. Ajustes del SmartScan
Fig. 15
a. Para ver las configuraciones
Battery: 5.2v
Users: 2
actuales, seleccione About
Deadbolt:
More
en el menú principal, oprima
la palomita (√). Para ver una
muestra de la indicación en pantalla, vea la figura 15.
Biometrics:
High
Rev. 672
Nota: esto es para fines informativos solamente y no pueden
efectuarse cambios desde este menú.
19
12. Cómo cambiar Settings - Clock, Deadbolt, Locktime o Biometrics
a. Clock: El reloj se utiliza junto con la opción “schedule” (programar).
Nota: Si se tarda más de 2 minutos para cambiar las pilas, tendrá que
ajustarse nuevamente la hora del reloj
Sun 12:00am
Del menú de abertura,
Admin → Settings → Clock --------→ la pantalla mostrará ↑
Use (◄) y (►) para navegar a través de las indicaciones.
Use (▲) y (▼) para cambiar el día y la hora.
Oprima (√) para aceptar y guardar los ajustes del reloj e indicaciones de la
pantalla -----------------------------------------------------→
Oprima (-) para salirse de los menús si lo desea.
b. Deadbolt: Fija la dirección del cerrojo de seguridad (no hay predeterminación,
la dirección tiene que fijarse).
Del menú de abertura,
Deadbolt?
Admin → Settings → Deadbolt → la pantalla mostrará→ ----------------Use (▲) y (▼) para seleccionar.
Oprima (√) para aceptar.
Oprima (-) para salirse del menú del cerrojo de seguridad.
c. Locktime: Fija la hora para activar el motor (predeterminado = normal). Ajustes “Medium” (medio) y “High” (alto) solucionan provisionalmente el problema
de puertas dobladas o combadas hasta que se repare la puerta o jamba.
Los ajustes Medium y High le imponen una carga extra al
sistema, ocasionando la disminución en la vida útil de las pilas.
Del menú de abertura,
Admin → Settings → Locktime ---→ la pantalla mostrará --→
d. Biometrics: Fija la sensibilidad o selectividad del sistema. La predeterminación
es “High”, la cual le brinda al sistema la sensibilidad y seguridad óptimas. El
ajuste “Normal” permite el acceso más fácil a los usuarios (especialmente a los
niños) a quienes se le dificulta pasar sus dedos de manera uniforme. Cambia
de regreso a “High” cuando los usuarios se hayan
familiarizado con el procedimiento del pase.
Del menú de abertura,
Admin → Settings → Biometrics ---→ la pantalla mostrará ↑
Guía de pasos resumidos
OPERACIÓN
TECLEOS REQUERIDOS
ABOUT
ADMIN
BIOMETRICS
CLOCK
DEADBOLT
DELETE
DISABLE
ENABLE
ENROLL
OPENING MENU
OPENING MENU
ADMIN → SETTINGS → BIOMETRICS
ADMIN → SETTINGS → CLOCK
ADMIN → SETTINGS → DEADBOLT
ADMIN → MANAGE → “USER TO DELETE” → DELETE USER
ADMIN → MANAGE → “USER TO DISABLE” → ALLOWED TIME → NEVER
ADMIN → MANAGE → “-USER TO ENABLE” → ALLOWED TIME → ALWAYS
ADMIN → ENROLL
OR PRESS ENROLL BUTTON
ADMIN → ERASE ALL → YES
ADMIN → SETTINGS → LOCKTIME
ADMIN → MANAGE → “USER TO MAKE ADMIN” → MAKE ADMIN
ADMIN → MANAGE
ADMIN → MANAGE → “ USER TO RENAME “ → RENAME
ADMIN → MANAGE → “ *USER TO REVOKE “ → REVOKE ADMIN
ADMIN → MANAGE → “USER TO SCHEDULE” → ALLOWED TIME → BY TIME
ADMIN → SETTINGS
ERASE ALL
LOCKTIME
MAKE ADMIN
MANAGE
RENAME
REVOKE ADMIN
SCHEDULE/RESCHEDULE
SETTINGS
20
Guía para resolver problemas
Problema
Revisar o Remediar
La pantalla indicadora no se
enciende.
Verifique que las pilas estén bien y que hayan sido
instaladas correctamente
El sistema no despierta (no hay
luz verde o roja).
Oprima una tecla del telado numérico: si la pantalla
de cristal líquido (LCD) no se enciende, revise las
pilas. Si la LCD sí se enciende, revise la conexión
del cable entre el cerrojo de seguridad y la unidad
principal.
Se encienden las luces verde y
anaranjada, pero luego parpadea
la luz roja y la puerta no se abre.
Si puede acceder a la LCD, busque los mensajes
del sistema. Si no puede acceder a la LCD, intente
pasar su dedo más lentamente con velocidad y
presión constantes, asegurándose de esperar hasta
que la luz verde o anaranjada se encienda antes de
comenzar a pasar el dedo. Intente pasar un dedo
distinto al ya inscrito.
Intente mejorar su técnica del pase. Inscriba
al mismo dedo varias veces. Cambie el ajuste
“Biometrics” a Normal.
Algunos usuarios tienen
dificultades para operar la
cerradura.
Muestre la lista de usuarios (Admin→ Manage). Un
usuario precedido por el símbolo % tendrá acceso
limitado. Para cambiar el estado del usuario, vaya a
“Allowed Time” en el menú “Manage”.
Mis pilas se gastan demasiado
rápido.
Evite “despertar” al sistema innecesariamente.
Estimamos que la vida útil de las pilas se base en
10-15 pasadas por día, incluyendo las veces en que
la LCD está encendida, incluso sin mover el cerrojo.
Además, revise “Locktime” en el menú “Settings”;
cambie a “Normal”.
El motor se queda encendido
demasiado tiempo.
Revise “Locktime” en el menú “Settings”; cambie a
“Normal”.
A veces oigo un sonido agudo al
operar la cerradura.
Es una advertencia de “Pilas bajas”; las pilas del
sistema están bajas y tendrán que cambiarse.
Mi cerradura funciona al revés:
cierra cuando paso el dedo y abre
cuando golpeteo tres veces.
Revise la dirección del cerrojo de seguridad en
“Settings”. Cambie la flecha del cerrojo de seguridad
para que concuerde con su instalación.
Puse pilas nuevas y ahora mi reloj
está todo mal.
Para garantizar la integridad del reloj, no saque las
pilas del sistema por más de dos (2) minutos.
Cuando opero la cerradura, el
motor suena forzado y el cerrojo
sólo se mueve hasta la mitad.
Esto se debe probablemente a una puerta combada.
Como un “arreglo” temporal ÚNICAMENTE, intente
otro ajuste de “Locktime”, pero recuerde que los
ajustes de locktime fuera de “Normal” incrementarán
la carga del sistema y disminuirán la vida útil de
las pilas; no los recomendamos para sustituir la
reparación de una puerta o jamba.
21
Las preguntas más frecuentes
P.
R.
P.
R.
¿Por qué no puedo inscribirme sin ajustar la dirección del Cerrojo de Seguridad en el
sistema?
Para que el sistema funcione como es de esperarse, necesita “saber” en qué
dirección mover el cerrojo cuando se dan los comandos Cerrar o Abrir. Antes de que
el primer usuario pueda inscribirse, deberá fijarse la dirección del Cerrojo de
Seguridad.
¿Tengo que fijar la “dirección del Cerrojo de Seguridad” cada vez que inscriba a un
usuario?
No, una vez fijada la dirección del cerrojo de seguridad, ésta se almacena en la
memoria no volátil y no tiene que volverse a fijar incluso si se quita la fuente de
poder. Puede cambiarse la dirección del cerrojo, si es pertinente, al instalarse en otra
puerta.
P.
R.
¿Puede alguien inscribirse para acceder al sistema?
No, sólo un Admin está autorizado a inscribir a nuevos usuarios.
P.
R.
¿Qué es un Admin?
Un(a) Administrador(a) es un usuario autorizado para administrar las funciones del
sistema tales como Inscribir, Borrar o Renombrar a otros usuarios; él o ella también
cuenta con la autorización para asignar a otros usuarios.
P.
R.
¿Cómo me vuelvo un Admin?
El primer usuario automáticamente se vuelve un Administrador, quien a su vez puede
asignar privilegios administrativos a otros usuarios.
P.
R.
¿Tiene el primer Admin más privilegios que los posteriores?
No, el sistema trata a todos los Admin igualmente.
P.
R.
¿Está limitado el número de Administradores que puedo tener?
No; usted puede tener el mismo número de Administradores como de usuarios. Sin
embargo, para evitar que alguien utilice el sistema sin autorización, recomendamos
que limite el número de Admin a 2 ó 3.
P.
R.
¿Cuánto tiempo durará SmartScan con un solo juego de pilas?
Con uso normal (10-15 accesos al día) SmartScan debería funcionar por un año con
un solo juego de pilas alcalinas.
P.
R.
¿Cómo puedo alargar la vida útil de las pilas?
El sistema cambia al modo de “ahorro de energía” tras 30 segundos de inactividad
para conservar el mínimo de energía; Siempre que esté activo el sistema (pantalla
indicadora encendida o movimiento del cerrojo de seguridad), consume máxima
energía. Evite “despertar” al sistema innecesariamente y prolongará la vida útil de las
pilas.
P.
¿Cuánto tiempo podrá el sistema estar en el modo de “ahorro de energía” sin perder
sus ajustes?
En este modo, SmartScan puede funcionar por varios años con un solo juego de
pilas. Es imposible que SmartScan se “olvide” de sus ajustes incluso si se sacan las
pilas.
R.
P.
R.
¿Cómo sé cuándo debo cambiar las pilas?
1. Fíjese en el ícono de la pila en el menú de abertura. La cantidad de sombreado
corresponde a la carga restante de la pila. 2. Revise el voltaje de la pila en “Settings”
(ajustes). Cambie las pilas cuando el voltaje indicado sea 4.3V o inferior. 3. Cuando
las pilas deban cambiarse, el sistema emitirá un sonido tras cerrar o abrir la puerta.
4. Al acceder al cerrojo de seguridad, el motor sonará como que hace un “esfuerzo”
si las pilas están bajas.
P.
R.
¿Tengo que reconfigurar la cerradura cuando cambio las pilas?
No; la configuración del sistema, así como la información y los datos de los usuarios,
se almacenan en memoria Flash no volátil (similar a la utilizada en dispositivos jumpdrives y reproductores MP3); ción a esta regla es el reloj: recomendamos que las
pilas se cambien en 2 minutos, ya que de lo contrario tendrán que reajustarse el Día y
la Hora. Esto no afecta a ningún otro ajuste.
22
Las preguntas más frecuentes continuación....
P.
R.
Mi hijo tiene dificultades para operar la cerradura (no concuerda). ¿Qué puedo hacer?
Los niños pequeños pueden tener dificultades para autentificarse, probablemente
porque no pasan sus deditos de manera uniforme (velocidad, posición y ángulo.)
Para que lo hagan mejor, intente una o ambas alternativas: 1. Cambie “Biometrics” de
“High” a “Normal” para incrementar la sensibilidad del sistema. Regrese a “High”
cuando los niños se hayan familiarizado con la cerradura. 2. Inscriba al dedo del
mismo niño más de una vez. Al cabo de poco tiempo, la práctica finalmente hará que
ya no se necesiten inscripciones múltiples.
P.
Ya que SmartScan es básicamente una computadora, ¿puede “congelarse” como a
veces sucede con mi PC?
Muchas veces lo que uno percibe como un “congelamiento” es sólo un intento por
parte de la PC de acceder a un dispositivo periférico que no responde; si se le da
suficiente tiempo (a veces minutos), una PC estará en “tiempo fuera” y finalmente
volverá a aceptar comandos. Otras veces la PC intentará ejecutar una lluvia de
instrucciones que el usuario impaciente quizá le dio. Ya que la PC es una
computadora de uso general, tiene tiempos fuera largos y desde el punto de vista del
usuario (en ambas situaciones hipotéticas anteriores), la computadora paracerá
haberse “congelado.” Debido a que SmartScan es una computadora dedicada de uso
general, sus fabricantes han podido construirla con varias protecciones y tiempos
fuera cortos; la posibilidad de un “congelamiento” ha sido reducida al mínimo. Sin
embargo, en caso de que SmartScan esté ocupado ejecutando una serie de
comandos (teclado numérico o pase) y necesita ser parado, lo único que se necesita
hacer es quitar una pila, esperar 60 segundos y reintroducirla. SmartScan regresa al
menú de abertura. No se olvide de que la operación que estaba ejecutándose justo
antes de quitar la pila tendrá que repetirse.
R.
P. ¿Por qué hay una demora entre el instante que toco el sensor y la activación de la
unidad LED?
R.
Para conservar energía en las pilas, el sistema se pone en modo de ahorro de energía
tras 30 segundos de inactividad. Cuando detecta movimiento en el teclado numérico
o con el dedo, el sistema recibe el comando para “despertarse”; la electrónica tarda
aproximadamente 0.2 segundos para volver y recopilar datos.
P.
R.
¿Por qué la unidad no lee mi dedo la primera vez que paso mi dedo?
Es importante esperar a que el sistema se despierte o active antes de pasar su dedo.
Si comienza a pasar o mover su dedo antes de que el sistema se haya despertado, la
huella digital completa no será capturada paracompararla.
P.
¿Uso el dedo de mi mano derecha o izquierda? ¿Hay una diferencia en la dirección en
que paso el dedo?
El sistema está hecho para capturar datos de cualquier dirección; siempre y cuando
la dirección y el dedo que se pasa concuerden con la dirección y el dedo de la
inscripción, la cerradura funcionará debidamente.
R.
P.
R.
¿Qué indican los colores del diodo emisor de luz (LED)?
Verde: el sistema está despierto y listo para aceptar comandos.
Anaranjado: el sistema está capturando los datos de la huella digital.
Rojo: la autentificación (comparación de plantillas en la memoria) falló.
P.
R.
¿Seguirá funcionando la unidad si se me ensucia el dedo?
El sensor de huellas digitales SmartScan utiliza técnicas de radiofrecuencia para
recopilar datos de debajo de la piel, por lo que la suciedad no afecta su capacidad de
“lectura”; sin embargo, es aconsejable quitarse la suciedad o arena antes de pasar el
dedo para no raspar el cristal protector externo del sensor.
P.
R.
¿Seguirá funcionando la unidad si me corto el dedo?
El sistema lee los datos de la huella digital subdermalmente (debajo de la piel), por lo
que tolera cortadas pequeñas y defectos cutáneos. Sin embargo, no puede leer a
través de una venda.
P.
R.
¿Seguirá funcionando la unidad si nado por largo tiempo?
Si uno permanece en el agua por largo tiempo, los datos de los dedos pueden
distorsionarse, y la unidad no podrá autentificar. Un corto tiempo de “secado” será
suficiente para remediar el problema.
P.
R.
Golpeteo mi dedo y oigo que el motor funciona pero la cerradura no cierra.
Revise la alineación entre el cerrojo y la placa fija para cerciorarse de que el cerrojo
se mueve hacia la placa fija sin ningún obstáculo.
23
Las preguntas más frecuentes continuación....
P.
R.
¿Cuál es la finalidad del ajuste Locktime?
Se trata de un “arreglo” electrónico temporal para una puerta combada o mal
alineada. El ajuste predeterminado “Normal” brinda la coordinación óptima para
la mayoría de las aplicaciones. Pueden utilizarse los ajustes “Medium” y “High” para
superar temporalmente los problemas de alineación hasta que se efectúe la
reparación. Le recordamos que los modos Medium y High Locktime le imponen
una carga extra al sistema y reducen la vida útil de las pilas; brindamos estos modos
únicamente para fines de comodidad. No deben utilizarse como un sustituto para
reparar la puerta o jamba.
P.
R.
¿Qué puedo hacer para ayudarle a la unidad a despertarse más fácilmente?
Agarre el lado inferior del cerrojo de seguridad con un dedo envuelto alrededor del
sensor de huellas digitales y el pulgar sobre la parte superior del cerrojo de
seguridad. Detenga por 1 a 2 segundos y luego retire la mano del cerrojo de
seguridadad.
P.
R.
¿Qué hago si mi unidad no quiere despertarse?
Quite su mano del cerrojo de seguridad alrededor de 30 segundos e intente
nuevamente.
P.
R.
¿Debería tener una llave de repuesto?
Es aconsejable tener otra manera de entrar a las instalaciones. Recomendamos una
llave de repuesto.
P.
¿Cuál es la finalidad de tener el pulgar sobre el cerrojo de seguridad al pasar el
dedo?
El pulgar es usado como punto de pivoteo para controlar la velocidad y el ángulo del
pase.
R.
P.
R.
¿Funciona la cerradura si el dedo es escaneado en posición vertical?
No; los datos se recopilan sólo pasando el dedo de izquierda a derecha y de derecha
a izquierda.
P.
¿Puede alguien “robarse” mi huella digital para utilizarla en una estafa de “robo de
identidad”?
No. El sistema NO almacena su huella digital: utiliza los datos recopilados durante
el pase para extraer una expresión matemática de las características que hacen única
a su huella digital. Esta representación matemática es la que se almacena en la
memoria. Este método es no sólo económico (necesita poca memoria) sino seguro
(incapaz de duplicar la verdadera huella digital).
R.
Para recibir ayuda o para obtener información
acerca de la garantía, llame:
1-800-327-LOCK para Clientes de Kwikset en los Estados Unidos.
www.kwikset.com
Part # 70-042338-000 /01
24