1
TEMP!.pdf
1
11/05/2010
11:32:07
1
2
C
B
3
N
M
Y
PRINTED IN P.R.C.
0565 5336
ENGLISH
ESPAÑOL
CM
R
Q
S
P
INSTRUCTION MANUAL
C
O
GB
ES
D
MY
CY
A
CMY
K
E
K
L
F
G
H
PRINTED IN P.R.C.
48002422
I
J
M
freejet 3 in 1 cover inner.pdf 01/08/2008 23:34:33
4
5
10
6
7
12
8
9
C
M
Y
CM
MY
CY
CMY
K
11
GB
IMPORTANT INFORMATION
This cleaner should only be used for domestic cleaning, as described in this user guide. Please ensure that this guide is
fully understood before operating the appliance. Use only attachments recommended or supplied by Candy. The charger
base is double insulated and must not be earthed.
Electrical Requirements
This Candy appliance is supplied with a double insulated battery charger which is only suitable for insertion in a 230V (UK
240V) socket outlet. Ensure that the charger rating label matches your voltage supply.
SAFETY REMINDERS
• DO NOT let children play with the appliance or its controls. Please supervise the use of the appliance by older
children, the elderly or the infirm.
• DO NOT use your cleaner outdoors, on wet surfaces or for wet pickup.
• DO NOT pick up hard or sharp objects, matches, hot ashes, cigarette ends or other similar items.
• DO NOT spray with, or pick up flammable liquids such as cleaning fluids, petrol, etc, or their vapours, as they
may cause an explosion or fire.
• DO NOT replace the NiMH batteries with non rechargable batteries.
• DO frequently clean the dust cup and filter assembly.
• DO return the appliance to the charger base after use to recharge the batteries. Occasionally fully discharge the
batteries to obtain the maximum battery life.
CANDY SERVICE: To ensure the continued safe and efficient operation of this appliance we recommend that any servicing
or repairs are only carried out by an authorised Candy service engineer.
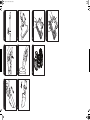
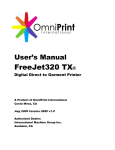
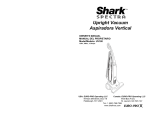
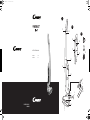
PRODUCT COMPONENTS
1-
Main Cleaner
2-
Handheld cleaner
3-
Filters
A.
B.
C.
D.
E.
F.
G.
H.
I.
J.
K.
L.
M.
Main Body
On/Off Switch
On/Off Turbo Switch
Push and Go Release button
Handheld Cleaning Unit
Nozzle release Button
Carpet and Floor Nozzle
Charger
Charger Indicator
Power Cord
Crevice Tool
Dusting Brush
Rigid Extension Tube*
N.
O.
P.
Q.
On/Off Switch
Bin Empty Trigger
Filter Access Button
Dust Container
R.
S.
Filter Screen
Filter
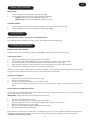
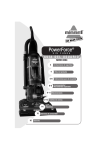
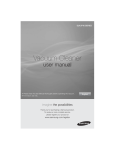
PREPARING YOU CLEANER
1.
Line up the handle to the main body of the cleaner and push into the main body until it locks in place. [4]
2.
Line up the nozzle with the main body and firmly push into the Main Body until the nozzle locks into place. [5]
3.
Assemble the handheld unit [2] to the main body.
4.
Place the cleaner on the charger. For first use, charge your cleaner for 24 hours.
5.
The indicator light will illuminate when charging.
Note: To remove the nozzle press the nozzle release button and pull away from the main body.
Note: Use only the charger supplied with your cleaner to recharge.
Important: When charging the cleaner the On/Off switch must be OFF.
Keep the charger plugged into the socket at all times. It is normal for the charger to become warm to the touch when
charging.
If the operating times reduces after repeated use let the cleaner run until it stops then recharge for 24 hours, repeat this
monthly for best results.
* Features vary according to model
3
GB
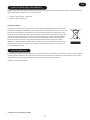
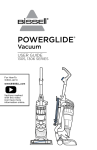
USING YOUR CLEANER
Main cleaner
1.
Turn the cleaner on by pressing the On/Off button. [1B]
2.
Set the On/Off Turbo switch to the desired cleaning mode. [1C]
CARPET: Switch Turbo Nozzle ON (LED will be ON.)
HARD FLOOR: Switch Turbo Nozzle OFF (LED will be OFF.)
Handheld Cleaner
1.
2.
Press the Push and Go button and lift the handheld unit from the cleaner main body. {6]
Turn the handheld cleaner on by pressing the On/Off button. [2N]
ACCESSORIES
Rigid Extension Tube*, Crevice Tool and Dusting brush
All accessories are stored at the rear of the charger. All fit directly onto the handheld unit.
CLEANER MAINTENANCE
Emptying the Dust Container
Hold the unit over a bin and pull the bin empty trigger [2O] to instantly empty the dust container. [7]
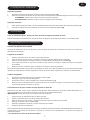
Cleaning the Filters
1.
2.
3.
4.
5.
Release the handheld unit from the main body of the cleaner.
Press the filter access button [2P] and remove the handle section from the dust container. [8]
Use the filter handle to remove the filter and filter screen from the dust container. [9]
Wash the filter and screen in hand warm water. Once thoroughly dry return to the dust container.
Reassemble the handheld unit and return to the cleaner main body.
Note: Do not use hot water or detergents when cleaning the filters. In the unlikely event of the filters becoming damaged,
fit a genuine Candy replacement. Do not try and use the product without a filter fitted.
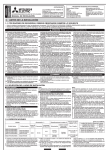
Changing the Agitator
1.
2.
3.
4.
Using a coin turn the lock to the open position. [10]
Remove the agitator retainer.
Unloop the belt and lift the agitator out of the cleaner. [11]
Loop the belt around the new agitator and return to its original position. Replace the agitator retainer and lock in
place.
End of Product Life Battery Disposal
If the cleaner is to be disposed of the batteries should be removed. Used batteries should be taken to a recycling station
and not disposed with household waste.
IMPORTANT: Always fully discharge the batteries before removal.
1.
2.
3.
4.
5.
6.
Run the unit until the batteries run flat.
Release the handheld unit from the main body of the cleaner.
Press the filter access button and remove the handle section from the dust container.
Remove 6 screws and open the unit. [12]
Remove the motor/battery housing and disconnect the cables.
Remove the batteries from the housing.
Note: Should you experience any difficulties in dismantling the unit or for more detailed information about treatment,
recovery and recycling of this product, please contact your local city office, your household waste disposal service.
* Features vary according to model
4
GB
CANDY SPARES AND CONSUMABLES
Always replace parts with genuine Candy spares. These are available from your local Candy dealer or direct from Candy.
When ordering parts always quote your model number.
• Pre-motor Filter: S93 C – 35601128
• Agitator: Y24 C - 35601129
The Environment:
This appliance is marked according to the European directive 2002/96/EC on Waste Electrical
and Electronic Equipment (WEEE). By ensuring this product is disposed of correctly, you will help
prevent potential negative consequences for the environment and human health, which could
otherwise be caused by inappropriate waste handling of this product. The symbol on the product
indicates that this product may not be treated as household waste. Instead it shall be handed
over to the applicable collection point for the recycling of electrical and electronic equipment.
Disposal must be carried out in accordance with local environmental regulations for waste
disposal. For more detailed information about treatment, recovery and recycling of this product,
please contact your local city office, your household waste disposal service or the shop where
you purchased the product.
YOUR GUARANTEE
The guarantee conditions for this appliance are as defined by our representative in the country in which it is sold. Details
regarding these conditions can be obtained from the dealer from whom the appliance was purchased. The bill of sale or
receipt must be produced when making any claim under the terms of this guarantee.
Subject to change without notice.
* Features vary according to model
5
ES
INFORMACIÓN IMPORTANTE
Este aspirador debe utilizarse sólo para la limpieza doméstica tal y como se describe en el presente manual del usuario.
Asegúrese de haber comprendido todo el contenido de este manual antes de poner en funcionamiento el aparato. Utilice
únicamente accesorios recomendados o distribuidos por Candy. La base de carga dispone de doble aislamiento y no debe
conectarse a tierra.
Requisitos eléctricos
Este aparato Candy se suministra con un cargador de pilas de doble aislamiento que únicamente puede conectarse a
un enchufe de pared de 230 V (Reino Unido 240 V). Cerciórese de que el régimen de carga indicado en la etiqueta se
corresponde con la alimentación de energía disponible.
ADVERTENCIAS DE SEGURIDAD
• NO DEBE permitir que los niños jueguen con el aparato ni con sus mandos. Supervise a niños mayores, ancianos
o enfermos cuando utilicen el aparato.
• NO DEBE utilizar el aspirador en exteriores, sobre superficies húmedas o para recoger líquidos.
• NO DEBE aspirar objetos duros o afilados, cerillas, ceniza candente, colillas de cigarrillo u objetos similares.
• NO DEBE pulverizar el aparato con líquidos inflamables tales como productos de limpieza y gasolina ni sus vapores,
ni tampoco recoger ninguno de los anteriores, dado que podría provocarse un incendio o una explosión.
• NO DEBE sustituir las pilas de NiMH por otras que no sean recargables.
• DEBE limpiar con frecuencia el conjunto del filtro y el depósito de suciedad.
• DEBE volver a colocar el aparato en la base de carga tras utilizarlo para que se recarguen las pilas. Descargue
por completo las pilas de vez en cuando para que duren el máximo tiempo posible.
SERVICIO DE REPARACIONES CANDY: Para garantizar el funcionamiento seguro, eficaz y duradero del aspirador,
recomendamos que las tareas de mantenimiento sean realizadas exclusivamente por técnicos autorizados del servicio de
reparaciones de Candy.
COMPONENTES DEL PRODUCTO
1 - Aspirador principal
2 - Aspirador de mano
3 - Filtros
A. Cuerpo principal
B. Interruptor de encendido/apagado
C. Interruptor de encendido/
apagado de la función turbo
D. Botón de apertura fácil
E. Unidad de limpieza de mano
F. Botón para desenganchar la tobera
G. Tobera para alfombras y suelos
H. Cargador
I. Indicador del cargador
J. Cable de alimentación
K. Accesorio para rincones
L. Cepillo para quitar el polvo
M. Tubo de extensión rígido*
N. Interruptor de encendido/
apagado
O. Gatillo de vaciado
del contenedor
P. Botón de acceso al filtro
Q. Depósito de suciedad
R. Parrilla del filtro
S. Filtro
PREPARACIÓN DEL ASPIRADOR
Alinee el mango con el cuerpo principal del aspirador y presiónelo para que quede encajado en el cuerpo del aspirador. [4]
Coloque la tobera sobre el cuerpo principal y presione la tobera con firmeza en el interior del cuerpo principal hasta que
la tobera quede encajada en su lugar [5].
3.
Monte la unidad de mano [2] en el cuerpo principal.
4.
Coloque la aspiradora en el cargador. Antes de utilizar el aspirador por primera vez, cárguelo durante 24 horas.
5.
El indicador se iluminará durante el proceso de carga.
Nota: Para extraer la tobera, pulse el botón de desenganche de la misma y tire de ella para separarla del cuerpo principal.
1.
2.
Nota: Utilice solamente el cargador que se suministra con el aspirador para recargarlo.
Importante: El interruptor de encendido/apagado del aspirador debe estar apagado durante la carga.
Mantenga el cargador enchufado en la toma de corriente en todo momento. Es normal que el cargador esté caliente al
tacto durante el proceso de carga.
Si el tiempo de funcionamiento disminuye tras haber utilizado el aparato en repetidas ocasiones, deje funcionar el aparato
hasta que se detenga, recárguelo durante 24 horas y repita esta operación una vez al mes para lograr un resultado óptimo.
* Las características varían en función del modelo
6
ES
UTILIZACIÓN DEL ASPIRADOR
Aspirador principal
1.
Encienda el aspirador pulsando el interruptor de Encendido/Apagado. [1B]
2.
Seleccione la posición de limpieza en que desee poner el interruptor de encendido/apagado de la función turbo. [1C]
ALFOMBRAS: Active la tobera turbo (se iluminará el piloto indicador)
SUELOS DUROS: Desactive la tobera turbo (se apagará el piloto indicador)
Aspirador de mano
1.
2.
Pulse el botón de apertura fácil y tire de la unidad de mano hacia arriba para sacarla del cuerpo del aspirador. [6]
Encienda el aspirador de mano pulsando el interruptor de encendido/apagado. [2N]
ACCESORIOS
Tubo de extensión rígido*, Accesorio para rincones y cepillo para quitar el polvo
Todos los accesorios se almacenan en la parte de atras del cargador. Se encajan directamente en la unidad portátil.
MANTENIMIENTO DEL ASPIRADOR
Vaciado del depósito de suciedad
Sostenga la unidad sobre el cubo de la basura y pulse el gatillo de vaciado del contenedor para vaciar en un instante el
depósito de suciedad. [7]
Limpieza de los filtros
1.
2.
3.
4.
5.
Saque la unidad de mano del cuerpo principal del aspirador.
Pulse el botón de acceso al filtro y extraiga la parte del mango del depósito de suciedad. [8]
Utilice el mango del filtro para extraer el filtro y la parrilla del filtro del depósito de suciedad. [9]
Lave el filtro y la parrilla con agua tibia. Cuando se haya secado por completo, instálelo de nuevo en el depósito
de suciedad.
Monte de nuevo la unidad de mano e instálela en el cuerpo principal del aspirador.
Nota: No utilice detergentes ni agua caliente para limpiar los filtros. En el caso improbable de que los filtros sufrieran algún
desperfecto, instale filtros de repuesto originales de Candy. No intente utilizar el producto sin que haya un filtro instalado.
Cambio del agitador
1.
2.
3.
4.
Sírvase de una moneda para girar la cerradura y abrirla. [10]
Extraiga el seguro de retención del agitador.
Desmonte la correa y eleve el agitador para sacarlo del aspirador. [11]
Monte la correa en el agitador nuevo y póngalo de nuevo en su posición original. Coloque de nuevo el seguro de
retención del agitador y encájelo en su sitio.
Cómo desechar las pilas cuando se haya agotado su vida útil
Debe extraer las pilas cuando vaya a deshacerse del aspirador. Debe deshacerse de las pilas usadas llevándolas a un
centro de reciclaje en vez de tirarlas a la basura con el resto de los residuos domésticos.
IMPORTANTE: Descargue las pilas por completo antes de extraerlas.
1.
2.
3.
4.
5.
6.
Haga funcionar la unidad hasta que se agoten las pilas.
Saque la unidad de mano del cuerpo principal del aspirador.
Pulse el botón de acceso al filtro y extraiga la parte del mango del depósito de suciedad.
Extraiga 6 tornillos y abra la unidad. [12]
Extraiga el alojamiento del motor o la pila y desconecte los cables.
Saque las pilas de su alojamiento.
Nota: Si experimenta alguna dificultad para desmontar la unidad o necesita información más detallada sobre el tratamiento,
la recuperación y el reciclaje de este producto, póngase en contacto con su Ayuntamiento o su servicio de recogida de
residuos domésticos.
* Las características varían en función del modelo
7
ES
PIEZAS DE REPUESTO Y CONSUMIBLES DE CANDY
Utilice siempre piezas de repuesto originales de Candy. Puede adquirirlas en su concesionario local de Candy o pedirlas
directamente a Candy. Cuando realice pedidos de piezas, indique siempre el número de modelo que posee.
• Filtro premotor: S93 C – 35601128
• Agitador: Y24 C – 35601129
El medio ambiente:
Este aparato está marcado de acuerdo con la Directiva Europea 2002/96/CE sobre residuos
de aparatos eléctricos y electrónicos (RAEE). Al cerciorarse de que este producto se elimine
correctamente, usted ayudará a prevenir las posibles consecuencias perjudiciales para el medio
ambiente y la salud humana que, de otro modo, podrían producirse en caso de manejo inadecuado
de los residuos de este producto. El símbolo que puede verse en el producto indica que este
producto no puede tratarse como un residuo doméstico. En vez de esto debe entregarse en un
punto de recogida apropiado para el reciclaje de equipos eléctricos y electrónicos. La eliminación
debe llevarse a cabo según los reglamentos medioambientales locales sobre eliminación de
residuos. Para información más detallada sobre el tratamiento, la recuperación y el reciclaje de
este producto, póngase en contacto con su Ayuntamiento, su servicio de recogida de residuos
domésticos o con el establecimiento donde haya comprado el producto.
SU GARANTÍA
Las condiciones de garantía para este aparato vienen definidas por nuestro representante en el país de venta. Puede
obtener los detalles acerca de estas condiciones en el establecimiento donde haya comprado este aparato. Debe
mostrarse la factura de compra o el recibo al hacer alguna reclamación en virtud de las condiciones de garantía.
Sujeto a cambios sin previo aviso.
* Las características varían en función del modelo
8