1
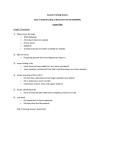
TRC3 – REMOTE-CONTROLLED MINI SUBMARINE
1.
Introduction & Features
Thank you for buying the TRC3! Please read the manual
thoroughly before bringing this device into service.
If the device was damaged in transit, don't use it and contact your dealer.
The TRC3 set should include the following:
- 1 submarine
- 1 remote control
- 1 antenna for remote control
- 1 bag of adjustment lead balls
- 1 instruction manual.
a. Remote Control
The remote control operates on two 1.5V AAA alkaline
batteries. Make sure to install the batteries properly.
1. Open the battery compartment cover of the remote
control.
2. Insert the two 1.5V AAA batteries respecting the
polarity.
Make sure the connections are secure.
3. Close the battery compartment cover.
4. Screw the antenna into the remote control.
Pull out the antenna completely.
•
2.
General Guidelines
•
•
•
•
•
•
Damage caused by user modifications or disregard of certain guidelines in
this manual is not covered by the warranty and the dealer will not accept
responsibility for any ensuing defects or problems.
A qualified technician should service this device.
Keep the device away from unauthorised users.
Do not shake the device. Avoid brute force when operating the device.
Use the original packaging if the device is to be transported.
All modifications of the device are forbidden for safety reasons.
3.
Unit Denomination
•
•
If you operate the remote control but the transmission LED does not light up,
check the polarity and connections of the batteries. If polarity and connections
are OK, the batteries are probably drained. Install new ones.
Remove the batteries when the device is not being used.
Keep the remote control away from water, as it is not waterproof.
b.
a. Submarine
LED light
Antenna
Cabin hole
Propeller
Tail part
Fig. 1
b. Remote Control
1.
2.
3.
4.
5.
6.
7.
5.
Preparations
Fig. 3
Batteries are not included.
Three 1.5V AAA alkaline batteries are required (2 for the remote control, 1 for the
submarine).
1.
2.
3.
4.
5.
4.
The submarine operates on one 1.5V AAA battery.
Make sure to install it properly.
1. Open the submarine by pulling off the rear end.
2. Insert a 1.5V AAA battery. Make sure the polarity is correct.
3. Put the rear end back on the rest of the submarine.
Make sure the alignment ribs (black parts in fig. 4) on the front and rear parts
match.
•
Beware
Keep the lead balls out of reach of children.
Do not touch the propellers during operation.
This submarine may be used in clear water, such as a fish tank, a bathtub or a small
pond. Do not use it in swimming pools, rivers and seawater.
The water quality may affect the functioning and the life duration of the submarine.
Use it in clean water without any chemical agents. Respect the operation
temperature of 10→40°C.
Keep the interior of the submarine dry at all times. If it should get wet, wipe it dry
immediately.
The remote control is not waterproof. Using the remote control in water will damage
it.
Remove the batteries from boat and remote control when the TRC3 is not being
used.
Keep away from any radio appliance during operation.
•
7.
Technical Specifications
Fig. 4
•
•
Do not turn or bend to remove it as you could damage the rubber sealing rings
(fig. 4 #1).
Do not apply pressure on the tail wings to keep them from breaking off.
Make sure the sealing rings (fig.4 #1) stay in place when the rear end is put
back on. Otherwise water could penetrate into the submarine.
Remove the battery when the device is not being used.
c.
Fig. 2
Whatever the command given, the light (fig.1 #1) will be on automatically.
To submerge & go forward: press the forward key (fig.2 #4). The two propellers will
operate simultaneously and the submarine will submerge and go forward at a normal
speed.
To turn left forward: press the forward key (fig.2 #4) and the left key (fig.2 #6)
simultaneously ; only the right propeller will be operating, causing the submarine to turn
left.
To turn right forward: press the forward key (fig.2 #4) and the right key (fig.2 #7)
simultaneously ; only the left propeller will be operating, causing the submarine to turn
right.
Super dive: press the super dive key (fig.2 #2). The two propellers will operate
simultaneously and the submarine will submerge and go forward at high speed. The super
dive function can be combined with a left or right turn.
To reverse & rise / resurface: press the backward key (fig.2 #5). The two propellers will
operate simultaneously and the submarine will rise slowly and go backward at a normal
speed.
To reverse & turn left: press the backward key (fig.2 #5) and the left key (fig.2 #6)
simultaneously ; only the right propeller will be operating, causing the submarine to turn
left.
To reverse & turn right: press the backward key (fig.2 #5) and the right key (fig.2 #7)
simultaneously ; only the left propeller will be operating, causing the submarine to turn
right.
6.
•
•
•
•
Antenna
Super dive key
Transmission LED
Forward key
Backward key
Left turn key
Right turn key
Submarine
Operation
Submarine Buoyancy Adjustment
Depending on the environment where the submarine is used, you can add or remove
lead balls through the cabin hole (fig.1 #3) to regulate the buoyancy and
submergence capacity of the submarine for easy operation and control.
Do make sure to seal the cabin hole with e.g. paper or plasticine before submerging
to keep water from entering the lead ball compartment and to keep lead balls from
getting out during operation.
•
•
•
•
a. Remote Control
Transmission frequency
Power Source
Features
Transmission range
Dimensions (L x W x H)
40.68MHz
1 x 1.5V AAA alkaline battery
Forward, reverse, left, right, super dive keys
1-3 meters, depending on environment
80 x 31 x 60mm (without antenna)
b. Submarine
Power Source
Battery life
Dimensions (L x W x H)
Diving Depth
Operation Temperature
2 x 1.5V AAA alkaline battery
150 minutes continuously
73.5 x 61 x 37.5mm
60cm
10→40°C
The information in this manual is subject to change without prior notice.
4.
TRC3 – AFSTANDSBEDIENDE MINIDUIKBOOT
1.
Inleiding en kenmerken
Dank u voor uw aankoop! Lees deze handleiding grondig voor u het toestel in
gebruik neemt. Als het toestel werd beschadigd tijdens het transport, gebruik het
dan niet en raadpleeg uw dealer.
De TRC3 set bestaat uit de volgende onderdelen:
- 1 duikboot
- 1 afstandsbediening
- 1 antenne voor de afstandsbediening
- 1 zakje loden bolletjes
- 1 handleiding
2.
Veiligheidsinstructies
•
De garantie geldt niet voor schade door wijzigingen die de gebruiker heeft
aangebracht of voor schade door het negeren van bepaalde richtlijnen in
deze handleiding en uw dealer zal de verantwoordelijkheid hiervoor afwijzen.
Laat dit toestel onderhouden door een geschoolde technicus.
Hou dit toestel uit de buurt van onbevoegden.
Schud het toestel niet dooreen. Vermijd brute kracht tijdens de bediening van
dit toestel.
Gebruik de oorspronkelijke verpakking wanneer u het toestel vervoert.
Om veiligheidsredenen mag de gebruiker geen wijzigingen aanbrengen aan
het toestel.
•
•
3.
Onderdelen
a. Duikboot
1.
2.
3.
4.
5.
LED licht
Antenne
Cabinegaatje
Propeller
Staartstuk
Fig. 1
Antenne
Superduik-knop
ZendLED
Vooruit-knop
Achteruit-knop
Links-knop
Rechts-knop
a.
Bij eender welke bediening gaat het lichtje (fig.1 #1) automatisch branden.
Om te duiken & vooruit te gaan: druk op de vooruit-knop (fig.2 #4). De twee propellers
zullen tegelijk draaien en de duikboot zal duiken en tegen een normale snelheid vooruit
gaan.
Om links vooruit te draaien: druk tegelijk op de vooruit-knop (fig.2 #4) en de links-knop
(fig.2 #6) ; enkel de rechtse propeller zal draaien, waardoor de duikboot naar links zal
draaien.
Om rechts vooruit te draaien: druk tegelijk op de vooruit-knop (fig.2 #4) en de rechtsknop (fig.2 #7) ; enkel de linkse propeller zal draaien, waardoor de duikboot naar rechts
zal draaien.
Superduik: druk op de superduik-knop (fig.2 #2). De twee propellers zullen tegelijk
draaien en de duikboot zal snel duiken en vooruit gaan. De superduik-functie kan ook
gecombineerd worden met een bocht naar links of rechts.
Om achteruit te gaan en te stijgen: druk op de achteruit-knop (fig.2 #5). De twee
propellers zullen tegelijk draaien en de duikboot zal stijgen en tegen een normale snelheid
achteruit gaan.
Om links achteruit te draaien: druk tegelijk op de achteruit-knop (fig.2 #5) en de linksknop (fig.2 #6) ; enkel de rechtse propeller zal draaien, waardoor de duikboot naar links
zal draaien.
Om rechts achteruit te draaien: druk tegelijk op de achteruit-knop (fig.2 #5) en de
rechts-knop (fig.2 #7) ; enkel de linkse propeller zal draaien, waardoor de duikboot naar
rechts zal draaien.
Afstandsbediening
De afstandsbediening werkt op twee 1.5V AAA alkaline
batterijen. Plaats de batterijen zoals het hoort.
1. Open het deksel van het batterijcompartiment van de
afstandsbediening.
2. Plaats twee 1.5V AAA batterijen. Let op de polariteit.
Zorg ervoor dat de batterijen goed contact maken.
3. Plaat het deksel van het batterijcompartiment terug.
4. Schroef de antenne in de afstandsbediening.
Trek de antenne volledig uit.
•
•
•
Als u de afstandsbediening bedient mar de zendLED licht niet op, controleer dan
de polariteit en aansluitingen van de batterijen. Als die correct zijn, zijn de
batterijen waarschijnlijk leeg. Plaats nieuwe batterijen.
Verwijder de batterijen wanneer het toestel niet wordt gebruikt.
Hou de afstandsbediening uit het water, want deze is niet waterdicht.
b.
6.
•
•
•
•
De duikboot werkt op één 1.5V AAA batterij.
Plaats de batterij zoals het hoort.
1. Open de duikboot door het staartstuk eraf te trekken.
2. Plaats een 1.5V AAA batterij. Zorg ervoor dat de polariteit correct is.
3. Plaats het staartstuk terug op de rest van de duikboot.
Zorg dat de uitlijningsribben (de zwarte stukken op fig. 4) van het voor- en
achterstuk in elkaars verlengde liggen.
•
•
•
•
Draai of buig het staartstuk niet om het eraf te halen ; u zou de dichtingsringen
(fig. 4 #1) kunnen beschadigen.
Trek niet aan de staartvinnen ; deze zouden kunnen afbreken.
Let erop dat de dichtingsringen (fig.4 #1) blijven zitten als u het staartstuk er
terug op steekt. Anders kan er water doordringen in de duikboot.
Verwijder de batterij wanneer het toestel niet wordt gebruikt.
c.
Fig. 2
Duikboot
Fig. 4
•
•
b. Afstandsbediening
1.
2.
3.
4.
5.
6.
7.
5.
Fig. 3
Batterijen zijn niet inbegrepen.
U heeft drie 1.5V AAA alkaline batterijen nodig (2 voor de afstandsbediening, 1
voor de duikboot).
•
•
•
Voorbereidingen
Regeling drijfvermogen duikboot
Afhankelijk van de omgeving waarin de duikboot wordt gebruikt, kunt u via het
cabinegaatje (fig.1 #3) loden bolletjes toevoegen of verwijderen om de drijf- en
duikcapaciteit van de duikboot te regelen voor uw bedieningsgemak.
Als dit is gebeurd, verzegel dan het cabinegaatje met bvb. papier of plasticine
voordat u de duikboot laat duiken, zodat er geen water in het bolletjescompartiment
kan komen en dat er ook geen bolletjes uit kunnen.
•
•
7.
Bediening
Let op
Hou de loden bolletjes buiten het bereik van kinderen.
Raak de propellers niet aan terwijl ze draaien.
Deze duikboot kan gebruikt worden in helder water, zoals een aquarium, een bad of
een kleine vijver. Gebruik hem niet in zwembaden, rivieren en zeewater.
De waterkwaliteit kan de werking en de levensduur van de duikboot verminderen.
Gebruik hem in helder water zonder chemische stoffen. Respecteer de
werkingstemperatuur van 10→40°C.
Hou de binnenkant van de duikboot altijd droog. Mocht die nat worden, droog hem
dan onmiddellijk af.
De afstandsbediening is niet waterdicht. De afstandsbediening zal beschadigd
worden door gebruik in water.
Verwijder de batterijen uit de boot en de afstandsbediening wanneer de TRC3 niet
wordt gebruikt.
Blijf uit de buurt van toestellen met radiogolven wanneer u de TRC3 wenst te
gebruiken.
Technische Specificaties
a. Afstandsbediening
Zendfrequentie
Voedingsbron
Bedieningen
Zendbereik
Afmetingen (L x B x H)
b. Duikboot
Voedingsbron
Levensduur batterijen
Afmetingen (L x B x H)
Duikdiepte
Werktemperatuur
40.68MHz
1 x 1.5V AAA alkaline batterij
Vooruit, Achteruit, links, rechts, superduik knoppen
1-3 meters, afhankelijke van de omgeving
80 x 31 x 60mm (zonder antenne)
2 x 1.5V AAA alkaline batterij
150 minuten doorlopend
73.5 x 61 x 37.5mm
60cm
10→40°C
De informatie in deze handleiding kan te allen tijde worden gewijzigd zonder
voorafgaande kennisgeving.
4.
TRC3 – MINI SOUS-MARIN TELECOMMANDE
1.
Introduction et caractéristiques
Nous vous remercions de votre achat ! Lisez le présent manuel attentivement
avant la mise en service de l'appareil.
Vérifiez l’état de l’appareil. S'il a été endommagé pendant le transport, consultez
votre revendeur.
Le TRC3 vient avec les pièces suivantes:
- 1 sous-marin
- 1 télécommande
- 1 antenne pour la télécommande
- 1 sachet de boules en plomb
- 1 notice
2.
Prescriptions de sécurité
•
•
•
La garantie ne s'applique pas aux dommages survenus par de modifications
de l'utilisateur ou en négligeant certaines directives de ce manuel et votre
revendeur déclinera toute responsabilité pour ces dommages.
Un technicien qualifié doit s'occuper de l’entretien.
Gardez votre TRC3 hors de la portée de personnes non qualifiées.
Evitez de secouer l'appareil et traitez l'appareil avec circonspection pendant
l'opération.
Transportez l'appareil dans son emballage originel.
Toute modification de l’appareil est interdite pour des raisons de sécurité.
3.
Dénomination
Lampe LED
Antenne
Trou de la cabine
Hélice
Queue
Fig. 1
Antenne
Bouton Super plongée
LED de transmission
Bouton avant
Bouton arrière
Bouton gauche
Bouton droite
Lors de n'importe quel opération, la LED (fig.1 #1) s'illumine automatiquement.
Pour plonger & aller tout droit: pressez le bouton avant (fig.2 #4). Les deux hélices
tourneront simultanément et le sous-marin plongera et ira en avant à une vitesse normale.
Pour avancer à gauche: pressez les boutons avant (fig.2 #4) et gauche (fig.2 #6)
simultanément ; seul la hélice droite tournera, et le sous-marin avancera vers la gauche.
Pour avancer à droite: pressez les boutons avant (fig.2 #4) et droite (fig.2 #7)
simultanément; seul la hélice gauche tournera, et le sous-marin avancera vers la droite.
Super plongée: pressez le bouton super plongée (fig.2 #2). Les deux hélices tourneront
simultanément et le sous-marin plongera et ira en avant à haute vitesse. La super plongée
peut également être effectué à gauche ou à droite.
Pour reculer & monter / faire surface: pressez le bouton arrière (fig.2 #5). Les deux
hélices tourneront simultanément et le sous-marin montera lentement et ira en arrière à
une vitesse normale.
Pour reculer à gauche: pressez les boutons arrière (fig.2 #5) et gauche (fig.2 #6)
simultanément; seul la hélice droite tournera, et le sous-marin avancera vers la gauche.
Pour reculer à droite: pressez les boutons arrière (fig.2 #5) et droite (fig.2 #7)
simultanément; seul la hélice gauche tournera, et le sous-marin avancera vers la droite.
Télécommande
La télécommande marche sur 2 piles alcalines 1.5V R03.
Installez les piles comme il faut.
1. Ouvrez le couvercle du compartiment de piles de la
télécommande.
2. Insérez les deux piles 1.5V R03 en respectant la
polarité.
Etablissez correctement les connexions.
3. Fermez le couvercle du compartiment de piles.
4. Vissez l'antenne dans la télécommande.
Dépliez entièrement l'antenne.
•
•
•
Si vous opérez la télécommande mais la LED de
transmission ne s'allume pas, vérifiez la polarité et les connexions des piles.
S'ils sont OK, les piles sont probablement épuisées. Installez de nouvelles piles.
Enlevez les piles quand l'appareil n'est pas utilisé.
Gardez la télécommande hors de l'eau, comme elle n'est pas étanche.
b.
Sous-marin
Fig. 4
•
•
Ne tournez ou courbez pas la queue pour l'enlever ; vous endommagerez les
anneaux de colmatage (fig. 4 #1).
Ne pressez pas sur les ailes de la queue pour ne pas les casser.
Vérifiez si les anneaux de colmatage (fig.4 #1) restent en place quand la queue
est remise. Sinon de l'eau pourrait pénétrer dans le sous-marin.
Enlevez la pile quand l'appareil n'est pas utilisé.
Opération
6.
Attention
•
•
•
•
Gardez les boules en plomb hors de portée d'enfants.
Ne touchez pas les hélices pendant qu'elles tournent.
Ce sous-marin peut être utilisé dans de l'eau clair, comme un aquarium, un bain ou
un petit étang. Ne l'utilisez pas dans des piscines, des rivières ou dans de l'eau de
mer.
La qualité de l'eau peut affecter le fonctionnement et la durée de vie du sous-marin.
Utilisez-le dans de l'eau clair sans agents chimiques. Respectez la température de
travail de 10 à 40°C.
Gardez l'intérieur du sous-marin sec à tout temps. S'il devrait se mouiller, séchez-le
immédiatement.
La télécommande n'est pas étanche. Utiliser la télécommande dans de l'eau
l'endommagera.
Enlevez les piles du sous-marin et de la télécommande quand vous n'utilisez pas le
TRC3.
Utilisez le TRC3 loin d'appareils à ondes radiographiques.
7.
Spécifications techniques
•
•
•
b. Télécommande
1.
2.
3.
4.
5.
6.
7.
a.
Le sous-marin marche sur une pile alcaline 1.5V R03.
Installez la pile comme il faut.
1. Ouvrez le sous-marin en retirant la queue.
2. Insérez la pile 1.5V R03. Vérifiez si la polarité est correcte.
3. Mettez la queue sur le reste du sous-marin.
Vérifiez si les côtes d'alignement (parties noires dans la fig. 4) de la partie
frontale et la queue correspondent.
a. Sous-marin
1.
2.
3.
4.
5.
5.
Fig. 3
Les piles ne sont pas incluses.
Vous avez besoin de trois piles alcalines 1.5V R03 (2 pour la télécommande, 1
pour le sous-marin).
•
•
•
Préparations
•
•
•
a.
Fréquence de transmission
Source de puissance
Commandes
Portée de transmission
Dimensions (Lo x La x H)
b.
c.
Fig. 2
Réglage flottabilité du sous-marin
Selon l'environnement où vous utilisez le sous-marin, vous pouvez ajouter ou enlever
des boules en plomb par le trou de cabine (fig.1 #3) pour régler la capacité de
flottation et de plongée du sous-marin pour une opération facile.
Colmatez le trou de cabine avec p.ex. du papier ou du pâte à modeler avant de
plonger afin d'éviter que de l'eau entre la cabine ou que les boules sortent de la
cabine.
Télécommande
40.68MHz
1 pile alcaline 1.5V R03
Boutons tout droit, arrière, gauche, droite, super dive
1-3 mètres, selon l'environnement
80 x 31 x 60mm (sans antenne)
Sous-marin
Power Source
Durée de vie des piles
Dimensions (Lo x La x H)
Profondeur de plongée
Température de travail
2 piles alcalines 1.5V R03
150 minutes en continu
73.5 x 61 x 37.5mm
60cm
10→40°C
Toutes les informations présentées dans ce manuel peuvent être modifiées sans
notification préalable.
4.
TRC3 – FERNGESTEUERTES MINI-U-BOOT
1.
Einführung und Eigenschaften
Wir danken Ihnen für den Kauf des TRC3 ! Bitte lesen Sie sorgfältig diese
Bedienungsanleitung bevor Sie das Gerät benutzen. Wenn das Gerät während
des Transportes beschädigt wurde, benutzen Sie es nicht und wenden Sie sich an
Ihren Händler.
Lieferumfang :
- 1 Mini-U-Boot
- 1 Fernbedienung
- 1 Antenne für die Fernbedienung
- 1 Packung mit Bleikugeln
- 1 Bedienungsanleitung
2.
Sicherheitsanweisungen
•
•
•
Schäden durch Modifikationen des Anwenders oder Vernachlässigung
bestimmter Anweisungen dieser Anleitung verursacht, fallen nicht unter die
Garantie. Auch wird Ihr Händler deswegen die Verantwortung für folgende
Probleme oder Defekte ablehnen.
Lassen Sie dieses Gerät von einem Fachmann warten.
Das Gerät von Unbefugten fernhalten.
Nicht schütteln! Brutale Kraft während der Bedienung dieses Geräts
vermeiden.
Wenden Sie zum Transport die Originalverpackung an.
Aus Sicherheitsgründen darf der Benutzer keine Änderungen am Gerät
durchführen.
3.
LED
Antenne
Öffnung für Kajüte
Propeller
Endstück
U-Boot
Abb. 4
Abb. 1
•
b. Fernbedienung
Antenne
Tieftauch-Taste
Übertragungs-LED
Vorwärts-Taste
Rückwärts-Taste
Links-Taste
Rechts-Taste
Wenn Sie die Fernbedienung bedienen, aber die LED nicht aufleuchtet, prüfen
Sie dann die Polarität und den Batteriekontakt. Wenn Sie da keine Probleme
feststellen können, dann ist wahrscheinlich die Batterie leer. Legen Sie neue
ein.
Entfernen Sie die Batterien wenn Sie das Gerät nicht verwenden.
Setzen Sie die Fernbedienung keinem Wasser aus, denn sie ist nicht
wasserdicht.
b.
•
•
1.
2.
3.
4.
5.
6.
7.
Bei irgendwelchem Befehl wird die LED automatisch aufleuchten (Abb. 1 #1).
Tauchen und vorwärts fahren: Drücken Sie auf die Vorwärts-Taste (Abb. 2 #4). Die zwei
Propeller werden zur gleichen Zeit drehen und das U-Boot wird abtauchen und mit einer
normalen Geschwindigkeit vorwärts gehen.
Links vorwärts drehen: drücken Sie gleichzeitig auf die Vorwärts- (Abb.2 #4) und die
Links-Taste (Abb. 2 #6), nur der rechte Propeller wird drehen und das U-Boot wird nach
links schwenken.
Rechts vorwärts drehen: drücken Sie gleichzeitig auf die Vorwärts- (Abb.2 #4) und die
Rechts-Taste (Abb. 2 #6), nur der linke Propeller wird drehen und das U-Boot wird nach
rechts schwenken.
Tieftauchen: drücken Sie auf die Tieftauch-Taste (Abb. 2 #2). Die 2 Propeller werden
gleichzeitig drehen und das U-Boot wird schnell tauchen und vorwärts fahren. Die
Tieftauch-Funktion kann auch mit einer Kurve nach links oder rechts kombiniert werden.
Rückwärts fahren und steigen: drücken Sie auf die Rückwärts-Taste (Abb.2 #5). Die 2
Propeller drehen zur gleichen Zeit und das U-Boot wird steigen und mit einer normalen
Geschwindigkeit rückwärts gehen.
Links rückwärts drehen: drücken Sie zur gleichen Zeit auf die Rückwärts- (Abb.2 #5)
und die Links-Taste (Abb. 2 #6); nur der rechte Propeller wird drehen und das U-Boot wird
nach links drehen.
Rechts rückwärts: drücken Sie zur gleichen Zeit auf die Rückwärts- (Abb.2 #5) und die
Rechts-Taste (Abb. 2 #6); nur der linke Propeller wird drehen und das U-Boot wird nach
rechts drehen.
Fernbedienung
Das U-Boot wird über eine 1.5V AAA Batterie versorgt.
Legen Sie die Batterien richtig ein.
1. Öffnen Sie das U-Boot, indem Sie das Endstück abnehmen.
2. Legen Sie eine 1.5V AAA-Batterie ein. Achten Sie auf die Polarität.
3. Befestigen Sie das Endstück wieder am U-Boot.
Sorgen Sie dafür, dass die Ausrichtungslinien (die schwarzen Teile in Abb.4)
des Vorder- und des Hinterteils in einer Linie liegen.
Beschreibung
a. U-Boot
1.
2.
3.
4.
5.
a.
Abb. 3
•
•
•
5.
Die Fernbedienung wird über zwei 1.5V AAA –AlkalineBatterien versorgt. Legen Sie die Batterien richtig ein.
1. Öffnen Sie den Deckel des Batteriefachs der
Fernbedienung.
2. Legen Sie zwei 1.5V AAA –Batterien ein. Achten Sie auf
die Polarität.
Prüfen Sie ob es einen guten Kontakt mit den Batterien
gibt.
3. Schließen Sie den Deckel des Batteriefachs.
4. Schrauben Sie die Antenne in die Fernbedienung ein.
Ziehen Sie die Antenne völlig aus.
Die Batterien werden nicht mitgeliefert.
Sie brauchen 1.5V AAA (Micro) Alkaline-Batterien (2 für die Fernbedienung und 1
für das U-Boot).
•
•
•
Vorbereitungen
•
Drehen oder biegen Sie das Endstück nicht wenn Sie es abnehmen wollen; so
könnten Sie die Dichtringe (Abb. 4) beschädigen.
Seien Sie sehr vorsichtig mit den Heckflossen, sie könnten abbrechen.
Achten Sie darauf, dass die Dichtringe (Abb.4 #1) an der Stelle bleiben, wenn
Sie das Endstück erneut montieren. Sonst kann das Wasser in das U-Boot
eindringen.
Entfernen Sie die Batterie wenn Sie das U-Boot nicht verwenden.
c.
Abb. 2
Schwimmfähigkeit des U-Bootes regeln
Abhängig von der Umgebung, in der das U-Boot eingesetzt wird, können Sie über die
Öffnung für die Kajüte (Abb.1 #3) Bleikugeln zufügen oder entfernen um die
Schwimmfähigkeit und das Untertauchen zwecks einfacher Bedienung und Lenkung,
zu regeln.
Versiegeln Sie dann die Öffnung mit Papier oder Plastilin, bevor Sie das U-Boot
abtauchen lassen. So vermeiden Sie, dass Wasser in das U-Boot eindringt und die
Bleikugeln austreten.
Bedienung
6.
Achtung
•
•
•
•
Die Bleikugeln außer Reichweite von Kindern aufbewahren.
Die Propeller während des Betriebs nicht anfassen.
Dieses U-Boot ist nur geeignet für klares Wasser, wie z.B. für das Aquarium, die
Badewanne oder kleine Teiche. Nicht verwenden in Schwimmbädern, Meerwasser
und Flüssen.
Die Wasserqualität kann das Funktionieren und die Lebensdauer des U-Bootes
beeinflussen. Immer in klarem Wasser ohne Chemikalien verwenden. Respektieren
Sie die Betriebstemperatur von 10→40°C.
Die Innenseite des U-Bootes immer trocken halten. Falls die Innenseite nass werden
sollte, sofort abtrocknen.
Die Fernbedienung ist nicht wasserdicht, Einsatz in Wasser wird sie beschädigen.
Batterien aus dem U-Boot und der Fernbedienung entfernen wenn das TRC3 nicht in
Betrieb ist.
Das TRC3 nicht in der Nähe von Radiowellen verwenden.
7.
Technische Spezifikationen
•
•
•
•
a. Fernbedienung
Sendefrequenz
Spannungsversorgung
Bedienung
Reichweite
Abmessungen (L x B x H)
b. U-Boot
Spannungsversorgung
Lebensdauer Batterien
Abmessungen (L x B x H)
Tauchtiefe
Betriebstemperatur
Änderungen vorbehalten.
40.68MHz
1 x 1.5V AAA Alkaline-Batterie
Vorwärts, Rückwärts, links, rechts, Tieftauch-Funktion
1-3m, abhängig von der Umgebung
80 x 31 x 60mm (ohne Antenne)
2 x 1.5V AAA Alkaline-Batterie
150 Minuten, dauernd
73.5 x 61 x 37.5mm
60cm
10→40°C
4.
TRC3 – MINI SUBMARINO TELEDIRIGIDO
1.
Introducción y características
¡Gracias por haber comprado el TRC3! Lea cuidadosamente las instrucciones del
manual antes de usarlo.
Verifique si el aparato ha sufrido algún daño en el transporte antes de la puesta en
marcha. Si es el caso, no conecte el aparato a la red y póngase en contacto con
su distribuidor.
El TRC3 incluye las siguientes piezas:
- 1 submarino
- 1 mando a distancia
- 1 antena para el mando a distancia
- 1 paquete de bolas de plomo
- 1 manual del usuario
Instrucciones de seguridad
•
Daños causados por descuido de las instrucciones de seguridad de este
manual y daños causados por modificaciones no autorizadas invalidarán su
garantía y su distribuidor no será responsable por ningún daño u otros
problemas resultantes.
El mantenimiento debe ser realizado por personal especializado.
Mantenga el TRC3 fuera del alcance de personas no calificadas y de niños.
No agite el aparato. Evite usar excesiva fuerza durante el uso.
Transporte el aparato en su embalaje original.
Por razones de seguridad, las modificaciones no autorizadas del aparato
están prohibidas.
Descripción
Lámpara LED
Antena
Agujero de la cabina
Hélice
Cola
Antena
Botón “super inmersión”
LED de transmisión
Botón “hacia adelante”
Botón “hacia atrás”
Botón “hacia la izquierda”
Botón “hacia la derecha”
•
•
Mando a distancia
Si activa el mando a distancia y si el LED de potencia no
se ilumina, verifique la polaridad y las conexiones de las
pilas. Si todo está correcto, la pila probablemente está agotada. Instale una
nueva pila.
Quite las pilas si no usa el aparato.
Mantenga el mando a distancia lejos de agua porque no es estanco.
Fig. 1
El submarino funciona con una pila alcalina 1.5V R03.
Introduzca la pila correctamente en el compartimiento.
1. Abra el submarino quitando la cola.
2. Introduzca la pila 1.5V R03. ¡Controle la polaridad!
3. Coloque la cola en su lugar.
Colocando la cola, verifique si los anillos de impermeabilidad (partes negras en
la fig. 4) se quedan en su lugar. De lo contrario, podría penetrar agua en el
submarino.
•
•
•
No gire o incline la cola para quitarla ; podría dañar los anillos de
impermeabilidad (fig. 4 #1).
No apriete en las alas de la cola a fin de no romperlas.
Colocando la cola, verifique si los anillos de impermeabilidad (fig.4 #1) se
quedan en su lugar. De lo contrario, podría penetrar agua en el submarino.
Quite la pila si no usa el aparato.
c.
Fig. 2
Submarino
Fig. 4
•
b. Mando a distancia
1.
2.
3.
4.
5.
6.
7.
Sea lo que sea la operación, el LED (fig.1 #1) se ilumina automáticamente.
Para sumergirse & avanzar: apriete el botón “hacia adelante” (fig.2 #4). Ambas hélices
girarán simultáneamente y el submarino se sumergirá y avanzará a una velocidad normal.
Para avanzar hacia la izquierda: apriete los botones “hacia adelante” (fig.2 #4) y “hacia
la izquierda” (fig.2 #6) simultáneamente ; sólo la hélice derecha girará, y el submarino
avanzará hacia la izquierda.
Para avanzar hacia la derecha: apriete los botones “hacia adelante” (fig.2 #4) y “hacia la
derecha” (fig.2 #7) simultáneamente ; sólo la hélice izquierda girará, y el submarino
avanzará hacia la derecha.
Super inmersión: apriete el botón “super inmersión” (fig.2 #2). Ambas hélices girarán
simultáneamente y el submarino se sumergirá y avanzará de alta velocidad. También es
posible efectuar la super inmersión a la izquierda o a la derecha.
Para dar marcha atrás & subir / volver a la superficie: apriete los botones “hacia atrás”
(fig.2 #5). Ambas hélices girarán simultáneamente y el submarino subirá lentamente y
dará marcha atrás a una velocidad normal.
Para dar marcha atrás hacia la izquierda: apriete los botones “hacia atrás” (fig.2 #5) y
“hacia la izquierda” (fig.2 #6) simultáneamente ; sólo la hélice derecha girará, y el
submarino avanzará hacia la izquierda.
Para dar marcha atrás hacia la derecha: apriete los botones “hacia atrás” (fig.2 #5) y
“hacia la derecha” (fig.2 #7) simultáneamente ; sólo la hélice izquierda girará, y el
submarino avanzará hacia la derecha.
b.
a. Submarino
1.
2.
3.
4.
5.
a.
El mando a distancia funciona con 2 pilas alcalinas 1.5V R03.
Introduzca las pilas correctamente.
1. Abra el compartimiento de pilas del mando a distancia.
2. Introduzca las dos pilas 1.5V R03. ¡Controle la
polaridad!
Asegúrese de que las conexiones estén correctas.
3. Cierre la tapa del compartimiento de pilas.
4. Atornille la antena en el mando a distancia.
Extienda la antena completamente.
•
2.
3.
5.
Fig. 3
Las pilas no están incluidas.
Funciona con tres pilas alcalinas 1.5V R03 (2 para el mando a distancia, 1 para el
submarino).
•
•
•
•
•
Preparaciones
Ajuste de la flotabilidad del submarino
Según el entorno donde usa el submarino, puede añadir o quitar las bolas de plomo
por el agujero de la cabina (fig.1 #3) para ajustar la capacidad para flotar y la
inmersión del submarino para una fácil operación.
Cierre el agujero de la cabina con p.ej. papel o arcilla de modelar antes de
sumergirse a fin de evitar que el agua entre en la cabina o que las bolas salgan de la
cabina.
Operación
6.
Cuidado
•
•
•
•
•
•
Mantenga las bolas de plomo fuera del alcance de niños.
No toque las hélices mientras que giran.
Es posible usar el submarino en agua claro, como una pecera, un baño o un
pequeño estanque. No úselo en piscinas, ríos o en el agua del mar.
La calidad del agua puede afectar el funcionamiento y la duración de vida del
submarino. Úselo en agua claro sin agentes químicos. Respete la temperatura de
trabajo de 10 a 40°C.
Siempre mantenga el interior del submarino seco. Si se llegara a mojar, séquelo
inmediatamente.
El mando a distancia no es estanco. Si usa el mando a distancia podría dañarlo.
Quita las pilas del submarino y del mando a distancia si no usar el TRC3.
Usa el TRC3 lejos de aparatos con ondas radioeléctricas.
7.
Especificaciones
•
•
a. Mando a distancia
Frecuencia de transmisión
40.68MHz
Alimentación
1 pila alcalina 1.5V R03
Ajustes
Botones hacia adelante, hacia atrás, hacia la izquierda,
hacia la derecha, super inmersión
Alcance de transmisión
1-3 metros, según el entorno
Dimensiones (Lo x An x Al)
80 x 31 x 60mm (sin antena)
b. Submarino
Alimentación
Duración de vida de las pilas
Dimensiones (Lo x An x Al)
Profundidad de inmersión
Temperatura de trabajo
2 pilas alcalinas 1.5V R03
150 minutes en continu
73.5 x 61 x 37.5mm
60cm
10→40°C
Se pueden modificar las especificaciones y el contenido de este manual sin previo
aviso