1
MOUNTING THE MONITOR
VERTICAL / HORIZONTAL MOUNTING
The speakers are normally delivered for vertical
mounting. Designed for nearfield monitoring, this studio monitor requires shorter distance than traditional
monitors from its location to your ears, which means
the reverberation time and general acoustics of the
listening room are less critical. Hard surfaces will,
however, reflect the higher frequencies, therefore try
to avoid putting this monitor close to side walls. The
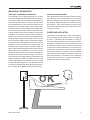
control surface of your mixing console may also pose
a problem. To minimize control surface reflections,
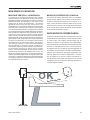
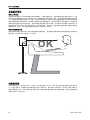
position your monitor as shown in the figure below,
using the meter bridge or rear panel to block sound
from both drivers reaching the control surface. Make
sure that there is nothing between your ears and the
speakers. If your console has no meter bridge, try
positioning the monitor higher or further behind the
desk. Active series is designed to be used in both the
upright and horizontal position. If you want to place
two Active series horizontally, it is recommended you
put the HF drivers on the outer edge. The low frequencies of this unit will generally sound better if the
cabinet is against a wall. If possible, provide a rigid
surface (eg.shelf) that is separate from the mixing
console and other equipment. The speakers should
roughly form a 60 degree angle at the listening position, and should be angled towards the listener(s).
P5A / P6A / P8A
CONSOLE TOP MOUNTING
If the active studio monitor series are used for console
top mounting, it is recommended not to mount the
speakers directly on the console; instead, position
the speaker slightly behind the console by using
floor stand or wall mount behind the console. This
prevents the reflection from the console surface from
coloring the sound.
OVERLOAD INDICATOR
The speaker is provided with one bi-colored indicator on the bottom right corner of the horn. When lit
in green, it indicates that the speaker is ready for
use. The indicator lighting up in red means that the
amplifier is overload or the driver protection circuit
is activated. In either cases, reduce the signal level
so that the red LED stops blinking. If the red indicator stays on constantly, it means that the amplifier
thermal protection is activated. Let the amplifier
cool down and check that the ventilation at the rear
side of the speaker is not blocked. There should be
a clearance of more than 4 inches (10cm) between
speaker rear and any solid surface.