1
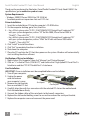
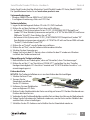
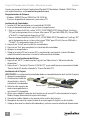
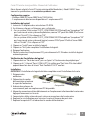
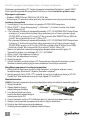
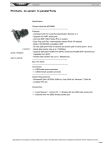
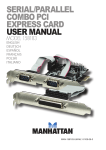
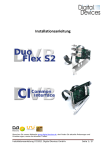
SERIAL/PARALLEL
COMBO
PCI CARD
USER MANUAL
MODEL 158251
manhattan-products.com
Important: Read before use. Importante: Leer antes de usar.
MAN-158251-UM-ML1-0213-05-0
Serial/Parallel Combo PCI Card • User Manual
English
Thank you for purchasing the Manhattan® Serial/Parallel Combo PCI Card, Model 158251. For
specifications, go to manhattan-products.com.
System Requirements
• Windows 2000/XP/Server 2003/Vista/7/8 32/64 bit
• 2 available punch-out expansion slots and 1 PCI slot
Driver Installation
1. Insert the included driver CD into the computer’s CD-ROM drive.
2. On the computer desktop, go to Start, then Run.
3. •For a 32-bit system, enter “D:\PCI_IO\MCS9865\XX\PCISetup32.exe” (replacing “XX”
with your system designation, such as “XP” for Win 2000, XP and Server 2003 or
“Vista32”). Then click “OK.”
•For a 64-bit system, enter “D:\PCI_IO\MCS9865\XX\PCISetup64.exe” (replacing “XX”
with your system designation, such as “XP64” for XP-x64 and Server 2003-x64 or
“Vista64”). Then click “OK.”
4. Click “Install” to install the drivers.
5. Click “Exit” to complete the driver installation.
6. Shut down the computer.
7. Place the PCI card into the PCI slot, then power on the system. Windows will automatically
start installing the driver software.
Verification of Driver Installation
1. Right-click on “My Computer,” then click “Manage” and “Device Manager.”
2. Click on “+” in front of “Ports (COM & LPT)” and confirm that “High-Speed PCI Serial Port” is
listed twice and that “PCI ECP Parallel Port” is listed once.
Card Installation
IMPORTANT: Driver installation must be completed before card installation.
1. Turn off your computer.
2. Unplug the power
cord and remove
your computer’s cover.
Serial ports
3. Remove two slot brackets
Parallel port
from an available PCI slot.
4. Carefully align the card’s bus connector with the selected PCI slot on the motherboard.
Push the board down firmly.
5. Connect the ribbon cables of the serial ports to the board’s connectors.
6. Replace the slot bracket holding screws to secure the card and the serial port bracket.
7. Replace the computer cover and reconnect the power cord.
2
ENGLISH
Serial/Parallel Combo PCI Karte • Handbuch
Deutsch
Vielen Dank für den Kauf der Manhattan Seriell/Parallel Combo PCI Karte, Modell 158251.
Die Spezifikationen finden Sie auf manhattan-products.com.
®
Systemanforderungen
• Windows 2000/XP/Server 2003/Vista/7/8 32/64 bit
• 2 verfügbare Erweiterungs-Slots und 1 PCI-Slot
Treiberinstallation
1. Legen Sie die beiliegende Treiber-CD in Ihr CD-/DVD-Laufwerk.
2. Klicken Sie auf dem Desktop auf Start, dann auf Ausführen.
3. •Auf einem 32-bit-System, geben Sie ein “D:\PCI_IO\MCS9865\XX\PCISetup32.exe”
(wobei “XX” Ihrer Betriebssystemversion entspricht, z. B. “XP” für Win 2000, XP und Server
2003 oder “Vista32”). Dann klicken Sie auf “OK”.
•Auf einem 64-bit-System, enter “D:\PCI_IO\MCS9865\XX\PCISetup64.exe” (wobei “XX”
Ihrer Betriebssystemversion entspricht, z. B. “XP64” für XP-x64 und Server 2003-x64 oder
“Vista64”). Dann klicken Sie auf “OK.”
4. Klicken Sie auf “Install”, um die Treiber zu installieren.
5. Klicken Sie auf “Exit”, um die Treiberinstallation abzuschließen.
6. Schalten Sie den Computer aus.
7. Setzen Sie Karte in den PCI-Slot ein, dann schalten Sie den PC wieder ein. Windows
installiert den Treiber automatisch.
Überprüfung der Treiberinstallation
1. Rechtsklicken Sie auf “Arbeitsplatz”, dann auf “Verwalten”, dann “Gerätemanager.”
2. Klicken Sie auf das “+” vor “Anschlüsse (COM & LPT)” und prüfen Sie, dass “Serieller
Hochgeschwindigkeits-PCI-Anschluss” zweimal und “PCI ECP Paralleler Anschluss” o. ä.
einmal eingetragen ist.
Einbau der Karte
WICHTIG: Die Treiberinstallation muss vor dem Einbau der Karte erfolgen.
1. Schalten Sie Ihren PC aus.
2. Trennen Sie das
Stromkabel und öffnen
Sie das PC-Gehäuse.
Serielle Ports
3. Entfernen Sie zwei Slotblenden
Paralleler Port
eines verfügbaren PCI-Slots.
4. Richten Sie die Steckkontakte der Karte vorsichtig auf einem PCI-Slot des Mainboards aus.
Drücken die Karte fest ein.
5. Verbinden Sie die Flachbandkabel der seriellen Ports mit den Anschlüssen des Motherboards.
6. Setzen Sie die Schrauben des Slotblechs wieder ein, um die Karte und das Slotblech des
seriellen Ports sicher zu befestigen.
7. Schließen Sie das PC-Gehäuse und schließen Sie das Stromkabel wieder an.
DEUTSCH
3
Tarjeta PCI Combo Serie/ Paralelo • Manual del usuario Español
Gracias por comprar la Tarjeta Combo Serial/Paralela PCI Manhattan®, Modelo 158251. Para
más especificaciones, visite manhattan-products.com.
Requerimientos de Sistema
• Windows 2000/XP/Server 2003/Vista/7/8 32/64 bit
• 2 ranuras disponible de expansión y una ranura PCI
Instalación de Controlador
1. Inserte el CD del controlador en la unidad de CD-ROM.
2. En el escritorio del ordenador, vaya a Inicio y luego Ejecutar.
3. •Para un sistema de 32 bits, teclee “D:\PCI_IO\MCS9865\XX\PCISetup32.exe” (sustituya
“XX” por la designacion de sus sistema, tales como “XP” para Win 2000, XP y Server 2003
o “Vista32”). A continuación haga clic en “OK.”
•Para un sistema de 64-bit, teclee “D:\PCI_IO\MCS9865\XX\PCISetup64.exe” (ustituya “XX”
por la designacion de sus sistema, tales como “XP64” para XP-x64 y Server 2003-x64 o
“Vista64”). A continuación haga clic en “OK.”
4. Haga clic en “Install” para instalar los controladores.
5. Haga clic en “Exit” para completar la instalación del controlador.
6. Apague su computadora.
7. Coloque la tarjeta PCI en la ranura PCI, a continuación, encienda el sistema. Windows
automáticamente comenzar a instalar el software del controlador.
Verificación de la Instalación del Driver
1. Haga clic en “Mi PC”, a continuación, haga clic en “Administrar” y “Administrador de
dispositivos.”
2. Haga clic en “+” frente los “Puertos (COM & LPT)” y que confirme que se encuentre listado
“Puerto Serial PCI de alta velocidad” y “Puerto Paralelo PCI” .
Instalación de la Tarjeta
IMPORTANTE: La instalación del controlador debe ser completado antes de la instalar la tarjeta.
1. Apague la computadora.
2. Desconecte el cable de
alimentación y retire la
cubierta de su ordenador.
Puertos serial
3. Retire los dos soportes de
Puerto paralelo
ranura correspondiente a
una ranura PCI disponible.
4. Alinee con cuidado el conector de la tarjeta con la ranura PCI seleccionada en la tarjeta
Madre. Empuje firmemente la tarjeta hacia abajo.
5. Conecte los cables ribbon en los puertos de la seriales de la tarjeta.
6. Reemplace de nuevo los soporte sobre la ranura asegure la tarjeta con los tornillos.
7. Coloque de nuevo la cubierta del ordenador y vuelva a conectar elcable de alimentación.
4
ESPAÑOL
Carte PCI mixte série/parallèle • Manuel de l’utilisateur Français.
Merci d’avoir acheté la Carte PCI mixte série/parallèle Manhattan , Model 158251. Vous
trouvez les spécifications sur manhattan-products.com.
®
Configuration requise
• Windows 2000/XP/Server 2003/Vista/7/8 32/64 bit
• 2 emplacements d‘extension disponibles et 1 emplacement PCI
Installation du logiciel
1. Insérez le CD de pilote dans votre lecteur CD-ROM.
2. Sur le bureau, cliquez sur Démarrer, puis sur Exécuter.
3. •Sur un système 32-bit, entrez “D:\PCI_IO\MCS9865\XX\PCISetup32.exe” (remplacez “XX”
par la version de votre système d’exploitation, comme “XP” pour Win 2000, XP et Server
2003 ou “Vista32”). Puis cliquez sur “OK”.
•Sur un système 64-bit, entrez “D:\PCI_IO\MCS9865\XX\PCISetup64.exe” (remplacez “XX”
par la version de votre système de logiciel, comme “XP64” pour XP-x64 et Server 2003x64 ou “Vista64”). Puis cliquez sur “OK.”
4. Cliquez sur “Install” pour installer le logiciel.
5. Cliquez sur “Exit” pour compléter l’installation du logiciel.
6. Éteignez l’ordinateur.
7. Placez la carte dans l’emplacement PCI, puis démarrez le PC. Windows installe le logiciel
automatiquement.
Vérification de l’installation du logiciel
1. Cliquez-droit sur “Poste de travail,” puis sur “gérer” et “Gestionnaire de périphérique.”
2. Cliquez sur le “+” devant “Ports (COM & LPT)” et vérifiez que “Port Série PCIe Haut débit”
apparaît deux fois dans la liste et “Port Parallèle PCI ECP” une fois.
Installation
IMPORTANT: L’installation du logiciel doit être complétée avant l’installation de la carte.
1. Éteignez votre
ordinateur.
2. Débranchez le cordon
d’alimentation et enlevez
Ports série
le capot de l’ordinateur.
Port parallèle
3. Enlevez deux plaques de
recouvrement pour un emplacement PCI disponible.
4. Alignez les connecteurs de bus délicatement sur l’emplacement sélectionné de la carte mère.
Appuyez fermement sur la carte
5. Connectez les câbles ruban des ports série aux connecteurs de la carte mère.
6. Replacez les vis de fixation pour sécuriser la carte et l’équerre du port série.
7. Replacez le capot du PC et rebranchez le cordon d’alimentation.
FRANÇAIS
5
Karta PCI szeregowa/równoległa Combo • Instrukcja Użytkownika
Polski
Dziękujemy za zakup Karty PCI Combo szeregowo/równoległej Manhattan®, model 158251.
Pełną specyfikację produktu znajdziecie Państwo na stronie manhattan-products.com.
Wymagania systemowe
• Windows 2000/XP/Server 2003/Vista/7/8 32/64-bity
• Wolne złącze PCI oraz dwa wolne prześwity do mocowania na tylnym panelu obudowy
Instalacja sterowników
1. Umieść płytę CD ze sterownikami w napędzie CD/DVD-ROM komputera.
2. Kliknij „START” > „Wszystkie programy” > „Akcesoria” > „Uruchom” (można użyć skrótu:
klawisz „Windows”+R).
3. • Dla systemów 32-bitowych wprowadź komendę: Y:\PCI_IO\MCS9865\XX\PCISetup32.exe
(w miejsce „Y” wstaw właściwą literę, którą oznaczony jest w Twoim systemie napęd
CD/DVD-ROM; w miejsce „XX” wstaw „XP” dla systemów Win 2000/XP/Server 2003 lub
„Vista32” dla systemów Win Vista/7). Kliknij „OK”.
• Dla systemów 64-bitowych wprowadź komendę: Y:\PCI_IO\MCS9865\XX\PCISetup64.exe
(w miejsce „Y” wstaw właściwą literę, którą oznaczony jest w Twoim systemie napęd
CD/DVD-ROM; w miejsce „XX” wstaw „XP64” dla systemów Win XP 64-bit/Server 2003
64-bit lub „Vista64” dla systemów Win Vista 64-bit/7 64-bit). Kliknij „OK”.
Możesz też odszukać sterowniki przeglądając bezpośrednio zawartość płyty CD.
Sterowniki znajdują się w katalogu „PCI_IO” > „MCS9865”.
4. Kliknij „Install”, aby rozpocząć instalację.
5. Kliknij „Exit” po zakończeniu instalacji.
6. Wyłącz komputer.
7. Umieść kontroler w wolnym złączu PCI. Po ponownym włączeniu komputera system
Windows automatycznie wykryje nowe urządzenie i zainstaluje sterowniki.
Weryfikacja poprawności instalacji sterowników
1. Kliknij prawym klawiszem myszki na „Mój Komputer”, a następnie wybierz z menu
kontekstowego „Właściwości”. Wybierz „Menadżer urządzeń”.
2. Rozwiń pozycję „Porty COM i LPT” i sprawdź, czy na liście znajduje się pozycja „PCI ECP
Paralell Port” oraz dwukrotnie pozycja „High-Speed PCI Serial Port”.
Montaż kontrolera
UWAGA: Przed przystąpieniem do montażu kontrolera należy zainstalować sterowniki z płyty CD.
1. Wyłącz komputer.
2. Odepnij kabel zasilający i
zdejmij pokrywę obudowy.
3. Usuń dwie zaślepki na tylnym
Porty szeregowe
panelu obudowy odpowiadające
Port równoległy
wybranemu złączu PCI.
4. Umieść kontroler w złączu PCI i delikatnie dociśnij, aby właściwe dopasować styki.
5. Podepnij taśmy portów szeregowych do złącz na płycie kontrolera.
6. Przykręć oba śledzie mocujące do obudowy.
7. Zamknij pokrywę obudowy i podłącz kabel zasilający.
6
POLSKI
Scheda Combo Seriale/Parallela PCI • Manuale d’istruzione
Italiano
Grazie per aver scelto la scheda PCI Combo Seriale/Parallela Manhattan , Modello 158251.
Per ulteriori specifiche, visita il sito manhattan-products.com.
®
Requisiti di sistema
• Windows 2000/XP/Server 2003/Vista/7/8 32/64 bit
• 2 slot di espansione disponibili e 1 slot PCI
Installazione dei Driver
1. Inserire l’incluso CD contenente i driver nel lettore del computer.
2. Sulla desktop del computer, andare su Start, quindi Run.
3. •Per un sistema a 32-bit, inserire “D:\PCI_IO\MCS9865\XX\PCISetup32.exe” (sostituendo “XX”
con la designazione del vostro computer, come “XP” per Win 2000, XP e Server 2003 o
“Vista32”). Quindi cliccare “OK.”
•Per un sistema a 64-bit, inserire “D:\PCI_IO\MCS9865\XX\PCISetup64.exe” (sostituendo
“XX” con la designazione del vostro computer, come “XP64” per XP-x64 e Server 2003-x64
o “Vista64”). Quindi cliccare “OK.”
4. Cliccare “Install” per installare i driver.
5. Cliccare “Exit” per completare l’installazione dei driver.
6. Spegnere il computer.
7. Posizionare la scheda PCI nello slot PCI, quindi alimentare il sistema. Windows
automaticamente farà partire l’installazione dei driver.
Verifica dell’installazione dei Driver
1. Cliccare con il tasto destro del mouse su “My Computer,” quindi cliccare “Manage” e “Device
Manager.”
2. Cliccare su “+” di fronte a “Ports (COM & LPT)” e confermare che “High-Speed PCI Serial Port”
è elencata due volte e che “PCI ECP Parallel Port” è elencata una volta.
Installazione della scheda
IMPORTANTE: L’instrallazione dei driver deve essere completata prima dell’installazione della
scheda.
1. Spegnere il computer.
2. Scollegare il cavo di
alimentazione e rimuovere
Porte seriali
il coperchio del computer.
3. Rimuovere le due staffe dallo slot PCI disponibile. Porta parallela
4. Allineare con cura il connettore del bus della scheda con lo slot PCI selezionato sulla
motherboard. Premere la scheda delicatamente ma con fermezza.
5. Collegare I cavi piatti delle porte seriali ai connettori della scheda.
6. Assicurare la scheda e la staffa della porta seriale con le viti di fissaggio.
7. Riposizionare il coperchio del computer e ricollegare il cavo di alimentazione.
ITALIANO
7
WASTE ELECTRICAL & ELECTRONIC EQUIPMENT
Disposal of Electric and Electronic Equipment
(applicable in the European Union and other European countries with separate collection systems)
ENGLISH
This symbol on the product or its packaging indicates that this product shall not be treated as household waste.
Instead, it should be taken to an applicable collection point for the recycling of electrical and
electronic equipment. By ensuring this product is disposed of correctly, you will help prevent
potential negative consequences to the environment and human health, which could otherwise
be caused by inappropriate waste handling of this product. If your equipment contains easily
removable batteries or accumulators, dispose of these separately according to your local
requirements. The recycling of materials will help to conserve natural resources. For more
detailed information about recycling of this product, contact your local city office, your household waste
disposal service or the shop where you purchased this product. In countries outside of the EU: If you wish
to discard this product, contact your local authorities and ask for the correct manner of disposal.
DEUTSCH
Dieses auf dem Produkt oder der Verpackung angebrachte Symbol zeigt an, dass dieses Produkt nicht mit
dem Hausmüll entsorgt werden darf. In Übereinstimmung mit der Richtlinie 2002/96/EG des Europäischen
Parlaments und des Rates über Elektro- und Elektronik-Altgeräte (WEEE) darf dieses Elektrogerät nicht
im normalen Hausmüll oder dem Gelben Sack entsorgt werden. Wenn Sie dieses Produkt entsorgen
möchten, bringen Sie es bitte zur Verkaufsstelle zurück oder zum Recycling-Sammelpunkt Ihrer Gemeinde.
ESPAÑOL
Este símbolo en el producto o su embalaje indica que el producto no debe tratarse como residuo doméstico.
De conformidad con la Directiva 2002/96/CE de la UE sobre residuos de aparatos eléctricos y electrónicos
(RAEE), este producto eléctrico no puede desecharse con el resto de residuos no clasificados. Deshágase
de este producto devolviéndolo a su punto de venta o a un punto de recolección municipal para su
reciclaje.
FRANÇAIS
Ce symbole sur Ie produit ou son emballage signifie que ce produit ne doit pas être traité comme un
déchet ménager. Conformément à la Directive 2002/96/EC sur les déchets d’équipements électriques
et électroniques (DEEE), ce produit électrique ne doit en aucun cas être mis au rebut sous forme de
déchet municipal non trié. Veuillez vous débarrasser de ce produit en Ie renvoyant à son point de
vente ou au point de ramassage local dans votre municipalité, à des fins de recyclage.
ITALIANO
Questo simbolo sui prodotto o sulla relativa confezione indica che il prodotto non va trattato come un rifiuto
domestico. In ottemperanza alla Direttiva UE 2002/96/EC sui rifiuti di apparecchiature elettriche ed
elettroniche (RAEE), questa prodotto elettrico non deve essere smaltito come rifiuto municipale misto. Si
prega di smaltire il prodotto riportandolo al punto vendita o al punto di raccolta municipale locale per un
opportuno riciclaggio.
POLSKI
Jeśli na produkcie lub jego opakowaniu umieszczono ten symbol, wówczas w czasie utylizacji nie wolno
wyrzucać tego produktu wraz z odpadami komunalnymi. Zgodnie z Dyrektywą Nr 2002/96/WE w sprawie
zużytego sprzętu elektrycznego i elektronicznego (WEEE), niniejszego produktu elektrycznego nie wolno
usuwać jako nie posortowanego odpadu komunalnego. Prosimy o usuniecie niniejszego produktu
poprzez jego zwrot do punktu zakupu lub oddanie do miejscowego komunalnego punktu zbiórki
odpadów przeznaczonych do recyklingu.
8
WARRANTY INFORMATION
ENGLISH: For warranty information, go to manhattan-products.com/warranty.
DEUTSCH: Garantieinformationen finden Sie unter manhattan-products.com/warranty.
ESPAÑOL: Si desea obtener información sobre la garantía, visite manhattan-products.com/warranty.
FRANÇAIS: Pour consulter les informations sur la garantie, visitez manhattan-products.com/warranty.
POLSKI: Informacje dotyczące gwarancji znajdują się na stronie manhattan-products.com/warranty.
ITALIANO: Per informazioni sulla garanzia, accedere a manhattan-products.com/warranty.
En México: Póliza de Garantía Manhattan — Datos del importador y responsable ante el consumidor
IC Intracom México, S.A.P.I. de C.V. • Av. Interceptor Poniente # 73, Col. Parque Industrial La Joya, Cuautitlán
Izcalli, Estado de México, C.P. 54730, México. • Tel. (55)1500-4500
La presente garantía cubre los siguientes productos contra cualquier defecto de fabricación en sus
materiales y mano de obra.
A. Garantizamos los productos de limpieza, aire comprimido y consumibles, por 60 dias a partir de la fecha
de entrega, o por el tiempo en que se agote totalmente su contenido por su propia función de uso,
lo que suceda primero.
B. Garantizamos los productos con partes móviles por 3 años.
C. Garantizamos los demás productos por 5 años (productos sin partes móviles), bajo las siguientes
condiciones:
1. Todos los productos a que se refiere esta garantía, ampara su cambio físico, sin ningún cargo para
el consumidor.
2. El comercializador no tiene talleres de servicio, debido a que los productos que se garantizan no
cuentan con reparaciones, ni refacciones, ya que su garantía es de cambio físico.
3. La garantía cubre exclusivamente aquellas partes, equipos o sub-ensambles que hayan sido instaladas
de fábrica y no incluye en ningún caso el equipo adicional o cualesquiera que hayan sido adicionados
al mismo por el usuario o distribuidor.
Para hacer efectiva esta garantía bastará con presentar el producto al distribuidor en el domicilio donde
fue adquirido o en el domicilio de IC Intracom México, S.A.P.I. de C.V., junto con los accesorios contenidos
en su empaque, acompañado de su póliza debidamente llenada y sellada por la casa vendedora
(indispensable el sello y fecha de compra) donde lo adquirió, o bien, la factura o ticket de
compra original donde se mencione claramente el modelo, número de serie (cuando aplique) y
fecha de adquisición. Esta garantía no es válida en los siguientes casos: Si el producto se hubiese
utilizado en condiciones distintas a las normales; si el producto no ha sido operado conforme a los
instructivos de uso; o si el producto ha sido alterado o tratado de ser reparado por el consumidor o
terceras personas.
9
REGULATORY STATEMENTS
FCC Class B
This equipment has been tested and found to comply with the limits for a Class B digital device, pursuant
to Part 15 of Federal Communications Commission (FCC) Rules. These limits are designed to provide
reasonable protection against harmful interference in a residential installation. This equipment generates,
uses and can radiate radio frequency energy and, if not installed and used in accordance with the instructions, may cause harmful interference to radio communications. However, there is no guarantee
that interference will not occur in a particular installation. If this equipment does cause harmful
interference to radio or television reception, which can be determined by turning the equipment
off and on, the user is encouraged to try to correct the interference by one or more of the following
measures:
• Reorient or relocate the receiving antenna.
• Increase the separation between the equipment and the receiver.
• Connect the equipment to an outlet on a circuit different from the receiver.
• Consult the dealer or an experienced radio/TV technician for help.
CE / R&TTE
English: This device complies with the requirements of R&TTE Directive 1999/5/EC.
The Declaration of Conformity for this product is available at:
Deutsch: Dieses Gerät enspricht der Direktive R&TTE Direktive 1999/5/EC.
Die Konformitätserklärung für dieses Produkt finden Sie unter:
Español: Este dispositivo cumple con los requerimientos de la Directiva R&TTE 1999/5/EC.
La declaración de conformidad para este producto esta disponible en:
Français: Cet appareil satisfait aux exigences de la directive R&TTE 1999/5/CE.
La Déclaration de Conformité pour ce produit est disponible à l’adresset :
Polski: Urządzenie spełnia wymagania dyrektywy R&TTE 1999/5/EC.
Deklaracja zgodności dostępna jest na stronie internetowej producenta:
Italiano: Questo dispositivo è conforme alla Direttiva 1999/5/EC R&TTE.
La dichiarazione di conformità per questo prodotto è disponibile al:
manhattan-products.com
All trademarks and trade names are the property of their respective owners.
Alle Marken und Markennamen sind Eigentum Ihrer jeweiligen Inhaber.
Todas las marcas y nombres comerciales son propiedad de sus respectivos dueños.
Toutes les marques et noms commerciaux sont la propriété de leurs propriétaires respectifs.
Wszystkie znaki towarowe i nazwy handlowe należą do ich właścicieli.
Tutti i marchi registrati e le dominazioni commerciali sono di proprietà dei loro rispettivi proprietari.
North & South America
IC Intracom Americas
550 Commerce Blvd.
Oldsmar, FL 34677
USA
10
Asia & Africa
IC Intracom Asia
Far Eastern Technology Center
7-F No. 125, Section 2, Da Tong Rd.
Shijr, Taipei
Taiwan, ROC
Europe
IC Intracom Europe
Löhbacher Str. 7
D-58553 Halver
Germany
11
© IC Intracom. All rights reserved.
Manhattan is a trademark of IC Intracom, registered in the U.S. and other countries.