1
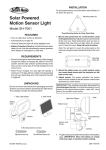
Angled 50˚
Roof Mount
Wall Mount
Angled 50˚
Do Not Mount Under Eaves
Mounted Solar Panel
Note: Solar panel should be mounted as shown above when
installed (depending upon type of installation). After adjusting
solar panel, tighten the thumbscrew on the bottom of the solar
panel.
3. Adjust sensor. For proper operation, the sensor head must be
rotated so that the sensor controls face downward as shown
below.
2. Mount Light Fixture. Attach the battery case to a solid surface
using two round-head screws and the keyholes on the back of
the case.
Note: Use the included mounting template to help mark the
mounting hole locations.
5 ¾"
IMPORTANT: The controls must face downward to avoid
damage from rain. If controls face upward, move sensor to
the original down position, rotate 180°, then raise to the
position shown below.
Light Joint Clamps
Mounting
Holes (2)
Light
Battery Case
Sensor
Solar Panel
Sensor Joint
Clamp
Solar Panel
Wire
Controls
Light Fixture
4. Plug the solar panel cable into the bottom of the battery case.
IMPORTANT: Allow the battery to charge with 3 to 7 days of
full sunshine before testing. To verify battery is charged,
slide the ON-TIME switch to test. Wait 2 minutes for sensor to
warm up. If light comes on when motion is detected after
warm up period, battery is charged and ready for use. If light
does not come on, slide the ON-TIME to OFF. Recheck the
light the next day.
Wall Mounted Light
Note: Light fixture and sensor should be mounted as shown above
when installed (depending upon type of installation).
2