1
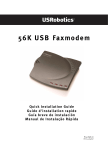
Quick Installation
Guide (this guide)
802.11g Wireless USB Adapter
Installation Guide
Installation
CD-ROM
USR5420
one (1) USB cable
Package Contents:
802.11g
Wireless USB
Adapter
Troubleshooting
Guide
You must install your software and drivers before you physically connect the
802.11g Wireless USB Adapter.
Note: For the most updated information, visit: http://www.usr.com/support You can also
refer to the User Guide on the U.S. Robotics Installation CD-ROM for more detailed
information.
802.11g Wireless USB Adapter Installation
Prepare for software installation
Turn on your desktop or laptop computer. Type your password if you are prompted to do
so.
Attention Windows 2000 and XP Users: Before you install the 802.11g Wireless
USB Adapter, Windows 2000 users must have Service Pack 4 installed and
Windows XP users must have Service Pack 1 installed on your computer. If you
do not have the appropriate Service Pack for your operating system installed, the 802.11g
Wireless USB Adapter software will not be properly installed and the adapter will not
function correctly. Go to www.windowsupdate.com to download the correct Service Pack.
Note: Be sure to find out what letter your CD-ROM drive uses before you begin installing your
new product. You will need to know this to properly install your software.
Note: During the Installation procedure, you may be prompted for your Windows Operating
system CD-ROM. Make sure you have it available in case you need it.
part number: R24.0460.00
Printed in Taiwan
1
Install your software and drivers
Insert your U.S. Robotics Installation CD-ROM into your CD-ROM drive.
Note: If your CD-ROM does not automatically launch, click Windows Start, Run, and type
D:\setup (if your CD-ROM drive uses a different letter, type that letter in place of "D") and
click OK.
The Installation CD Graphic User Interface (GUI) will appear on your screen. If prompted,
select your preferred language. Read the license agreement and click Yes.
Click Software. Click 802.11g Wireless USB Adapter Utility and Drivers. Follow the onscreen instructions to finish the installation procedure.*
*Note: You may receive a “Digital Signature Not Found” or “Windows Logo testing” screen. Click Yes or Continue Anyway.
U.S. Robotics has thoroughly tested this driver in conjunction with the supported hardware and has verified compatibility
with Windows 2000, Me, and XP. Because U.S. Robotics wants its customers to take full advantage of the network adapter’s
functionality, it has made the drivers available.
If you are prompted, restart your computer.
You are now ready to connect the 802.11g Wireless USB Adapter. If you had to restart your
computer, wait until it finishes rebooting before proceeding to Step Two.
Connect the 802.11g Wireless USB Adapter to
your computer
Plug the small square end
802.11g Wireless USB Adapter.
2
A
Locate an available USB port on your computer and insert the thin rectangular end
of the included USB cable.
of the included USB cable into the USB port on the
B
Note: Your computer will not detect the 802.11g Wireless USB Adapter if the USB cable is
loose on either end. Make sure the USB cable is fully inserted into the USB port on your
computer and to the USB port on the 802.11g Wireless USB Adapter.
When Windows detects the new hardware, follow the on-screen instructions to complete
the installation procedure.* If you are prompted, restart your computer.
*Note: You may receive a “Digital Signature Not Found” or “Windows Logo testing” screen. Click Yes or Continue Anyway.
U.S. Robotics has thoroughly tested this driver in conjunction with the supported hardware and has verified compatibility
with Windows 2000, Me, and XP. Because U.S. Robotics wants its customers to take full advantage of the network adapter’s
functionality, it has made the drivers available.
Note: If you are prompted at any time for your Windows Operating System CD-ROM,
remove the U.S. Robotics Installation CD-ROM and insert your Windows CD-ROM into the
CD-ROM drive. When all of the files are copied, remove the Windows CD-ROM, and reinsert
the U.S. Robotics Installation CD-ROM.
A
3
Connect the 802.11g Wireless USB Adapter to a
wireless network
You should now see a small icon for the Configuration Utility in the system tray by your
clock on your computer desktop. The Configuration Utility is used to change or verify the
configuration information that relates to your 802.11g Wireless USB Adapter. The
Configuration Utility icon will be colored to indicate the
status of your wireless network: red for disconnected and
green for connected.
Double-click the Configuration Utility icon. When the Configuration Utility launches, you
can either scan for a network to connect to or enter the information for a specific network.
To scan for a network, click the Site Survey tab. Locate the network you want to connect to
in the list, select it, and then click Connect. If you do not see the network in the list, click
Refresh to scan for the network.
If security is enabled in the wireless network you want to connect to or if you want to
manually enter the network information, you will need to set up a profile. For information
about how to do this, refer to the Navigating the Wireless Configuration Utility section of
the User Guide on the Installation CD-ROM.
When you have connected to an existing wireless network, click the Link Status tab. You
will see a picture with a computer, a wireless device in the middle, and an icon representing the Internet. If you see a moving graphic of ones and zeroes moving between all three
icons, you are connected to the wireless network and to the Internet. If you only see ones
and zeroes moving between the computer and the middle wireless device, you are
connected to the wireless network, but not to the Internet.
If you can’t connect to a network, verify your 802.11g Wireless USB Adapter has received
an IP address. Refer to the “I cannot connect to the Internet” step in the Troubleshooting
Guide. If you still can’t connect to a network or if that network has security enabled, refer
to the User Guide on the installation CD-Rom for Configuration and Troubleshooting
information.
Congratulations! You have finished installing the 802.11g Wireless USB Adapter.
For troubleshooting and technical support information, refer to the Troubleshooting
Guide or to the User Guide on the U.S. Robotics Installation CD-ROM.
Register your product
At the Installation CD-ROM interface, click the Support link. Click Registration and Warranty
and then click http://www.usr.com/productreg You can also launch a Web browser and type
in the previous Web address.
B
Guide d'installation
rapide (le présent
guide)
Adaptateur 802.11g Wireless USB Adapter
Guide d'installation
CD-ROM
d'installation
USR5420
Un (1) câble USB
Contenu de la boîte :
802.11g
Wireless USB
Adapter
Guide de
dépannage
Vous devez installer votre logiciel et vos pilotes avant de connecter le 802.11g
Wireless USB Adapter.
Remarque : pour obtenir les informations les plus récentes, rendez-vous sur le site http://
www.usr.com/support. Pour obtenir des informations plus détaillées, vous pouvez
également consulter le guide d'utilisation sur le CD-ROM d'installation U.S. Robotics.
Installation de l'adaptateur 802.11g Wireless USB
Adapter
Préparation à l'installation du logiciel
Allumez votre ordinateur portable ou de bureau. Saisissez votre mot de passe à l'invite.
Pour les utilisateurs de Windows 2000 et XP : avant d'installer le 802.11g
Wireless USB Adapter, vous devez installer sur votre ordinateur le
Service Pack 4 si vous utilisez Windows 2000 ou le Service Pack 1 si vous utilisez
Windows XP. Si vous ne disposez pas du Service Pack adapté à votre système
d'exploitation, le logiciel du 802.11g Wireless USB Adapter ne pourra pas être installé
correctement et l'adaptateur ne fonctionnera pas parfaitement. Rendez-vous sur le site
www.windowsupdate.com pour télécharger le Service Pack adéquat.
Remarque : assurez-vous de connaître la lettre correspondant à votre lecteur CD-ROM
avant de commencer à installer le nouveau produit. Vous en aurez besoin pour effectuer
votre installation.
Remarque : lors de la procédure d'installation, le CD-ROM de votre système d'exploitation
Windows peut vous être demandé. Assurez-vous de l'avoir à portée de main.
Numéro de pièce : R24.0460.00
Imprimé à Taïwan
1
Installation du logiciel et des pilotes
Insérez le CD-ROM d'installation U.S. Robotics dans votre lecteur de CD-ROM.
Remarque : si votre CD-ROM ne se lance pas automatiquement, sélectionnez Démarrer, Exécuter et tapez
D:\setup (ou la lettre correspondant à votre lecteur CD-ROM) puis cliquez sur OK.
L'interface graphique utilisateur (GUI) du CD d'installation apparaîtra à l'écran. Si le programme vous le
demande, sélectionnez votre langue préférée. Lisez l'accord de licence et cliquez sur Yes (Oui).
Cliquez sur Software (Logiciel). Cliquez sur 802.11g Wireless USB Adapter Utility and Drivers (Utilitaire et
pilotes de l'adaptateur 802.11g Wireless USB Adapter). Suivez les instructions qui apparaissent à l'écran
jusqu'à la fin de la procédure d'installation.*
*Remarque : il se peut que le message « Digital Signature Not Found » (Impossible de trouver la signature numérique) ou
l'écran de test affichant le logo Windows apparaisse. Cliquez sur Yes (Oui) ou sur Continue Anyway (Continuer). U.S.
Robotics a procédé à des tests complets sur les équipements pris en charge et s'est assuré de la compatibilité avec
Windows 2000, Me et XP. Les pilotes sont disponibles pour que les clients d'U.S. Robotics puissent tirer pleinement parti
des fonctionnalités de l'adaptateur réseau.
Si le programme vous invite à redémarrer votre ordinateur, faites-le.
Vous êtes maintenant prêt à connecter le 802.11g Wireless USB Adapter. Si vous avez redémarré votre
ordinateur, attendez qu'il soit complètement réactivé avant de passer à l'étape 2.
Connexion de l'adaptateur 802.11g Wireless USB
Adapter à votre ordinateur
3
Connexion de l'adaptateur 802.11g Wireless
USB Adapter à un réseau sans fil
La petite icône de l'utilitaire de configuration doit maintenant apparaître dans la barre système, près de
l'horloge. L'utilitaire de configuration sert à modifier ou à vérifier les informations relatives à la
configuration de votre 802.11g Wireless USB Adapter. La couleur de
l'icône de l'utilitaire de configuration indique l'état de votre réseau
sans fil : rouge pour déconnecté, vert pour connecté.
Double-cliquez sur l'icône de l'utilitaire de configuration. Quand l'utilitaire de configuration se lance, vous
pouvez rechercher un réseau sur lequel vous connecter ou saisir les informations permettant d'identifier
un réseau particulier.
Pour rechercher un réseau, cliquez sur l'onglet Site Survey (Représentation du site). Parcourez la liste
pour trouver le réseau auquel vous voulez vous connecter, sélectionnez-le puis cliquez sur Connect
(Connexion). Si le réseau que vous voulez utiliser n'apparaît pas dans la liste, cliquez sur Refresh
(Actualiser) pour le rechercher.
Si la sécurité du réseau sans fil requis est activée ou si vous préférez saisir manuellement les informations réseau, vous devez créer un profil. Pour plus d'informations sur cette procédure, reportez-vous à la
section « Naviguer dans l'utilitaire de configuration sans fil » du guide d'utilisation sur le CD-ROM
d'installation.
Une fois votre ordinateur connecté à un réseau sans fil existant, cliquez sur l'onglet Link Status (Statut
de la liaison). Vous verrez apparaître trois icônes représentant respectivement un ordinateur, un
périphérique sans fil au milieu et Internet. Si un ensemble de zéros et de uns se déplace entre les trois
icônes, votre ordinateur est bien connecté au réseau sans fil et à Internet. Si l'ensemble de zéros et de
uns se déplace seulement entre l'ordinateur et le périphérique sans fil du milieu, votre ordinateur est
connecté au réseau sans fil, mais pas à Internet.
Si vous ne parvenez pas à vous connecter à un réseau, vérifiez que votre 802.11g Wireless USB Adapter
a bien reçu une adresse IP. Reportez-vous à l'étape « Je n'arrive pas à me connecter à Internet » du
guide de dépannage. Si vous n'arrivez toujours pas à vous connecter à un réseau ou si la sécurité du
réseau requis est activée, reportez-vous au guide d'utilisation du CD-ROM d'installation pour obtenir des
informations sur la configuration et le dépannage.
2
Insérez l'extrémité carrée et étroite
votre 802.11g Wireless USB Adapter.
Félicitations ! Vous avez terminé l'installation du 802.11g Wireless USB Adapter.
du câble USB fourni dans le port USB de
A
Trouvez un port USB libre sur votre ordinateur et insérez-y l'extrémité rectangulaire
et large
du câble USB.
Dans l'interface du CD-ROM d'installation, cliquez sur le lien Support. Cliquez ensuite sur Registration and
Warranty (Enregistrement et garantie) puis sur http://www.usr.com/productreg. Si vous préférez, vous
pouvez aussi saisir cette adresse dans un navigateur Web.
Enregistrer votre produit
Pour obtenir des informations concernant l'assistance et le dépannage, reportez-vous au guide de
dépannage ou au guide d'utilisation se trouvant sur le CD-ROM d'installation U.S. Robotics.
B
Remarque : votre ordinateur ne détectera pas le 802.11g Wireless USB Adapter si le câble
USB n'est pas bien enfoncé. Assurez-vous que le câble USB est inséré complètement dans
le port USB de votre ordinateur et dans celui du 802.11g Wireless USB Adapter.
Quand Windows détecte le nouvel équipement, suivez les instructions à l'écran pour
terminer la procédure d'installation.* Si le programme vous invite à redémarrer votre
ordinateur, faites-le.
*Remarque : il se peut que le message « Digital Signature Not Found » (Impossible de trouver la signature numérique) ou
l'écran de test affichant le logo Windows apparaisse. Cliquez sur Yes (Oui) ou sur Continue Anyway (Continuer). U.S.
Robotics a procédé à des tests complets sur les équipements pris en charge et s'est assuré de la compatibilité avec
Windows 2000, Me et XP. Les pilotes sont disponibles pour que les clients d'U.S. Robotics puissent tirer pleinement parti
des fonctionnalités de l'adaptateur réseau.
Remarque : si le programme vous demande le CD-ROM de votre système d'exploitation
Windows, retirez le CD-ROM d'installation U.S. Robotics et insérez votre CD-ROM Windows
dans le lecteur. Une fois que tous les fichiers sont copiés, retirez le CD-ROM Windows et
réinsérez le CD-ROM d'installation U.S. Robotics.
A
B