1
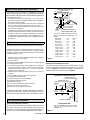
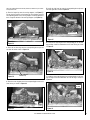
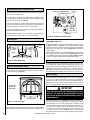
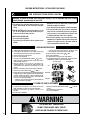
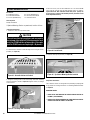
8. Install the front right twig onto the corresponding pin on the right
front log. Align the twig with the indentation on the front right log as
shown in Figure 24.
Right
Front Twig
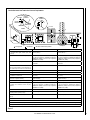
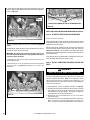
DO NOT PLACE EMBERS ON TOP OF THE BURNER SLOTS.
Figure 26
VERIFY THAT THE GAS LINE HAS BEEN PURGED OF AIR (SEE STEP 10).
Step 12. re-install FRONT GLASS ENCLOSURE PANEL
(Reverse instructions on Step 4)
Figure 24
9. Place the glowing embers on the burner as shown in Figures 25
and 26.
One package of ember material has been included with this log set
You will not need to use the entire bag.
IMPORTANT: The quantity and placement of the ember material can
affect stove performance therefore it is very important that it be placed
as shown in Figures 25 and 26.
a. Unpackage and divide the fine ember material (mineral wool) into
dime-sized fluffy pieces.
b. Distribute the pieces over the top of the front burner ports avoiding
covering the slots (see Figure 26) and filling the area in front of the
forward logs.
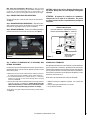
Retrieve the front glass enclosure panel. Visually inspect the gasket
on the backside of the frame. Gasket surface must be clean, free of
irregularities and seated firmly.
With the stove top off, position the glass front enclosure panel into
the front opening with the gasket facing the relief door (reference
Figure 39 on Page 27). Let the bottom of the door frame gently
slide down, then hook the top flange of the glass frame over the top
of the firebox frame.
Fasten the two latches located beneath the firebox floor to the glass
frame vee-flange. Close both the latches securely.
Step 13. TEST ALL CONNECTIONS FOR LEAKS (FACTORY AND
FIELD).
WARNING
Never use an open flame to check for leaks.
Turn on gas supply and test for gas leaks using a gas leak test solution (also
referred to as bubble leak solution). Note: Using a soapy water solution
(50% dish soap, 50% water) is an effective leak test solution but it is not
recommended, because the soap residue that is left on the pipes/fittings can
result in corrosion over time.
Embers
Figure 25
22
A. Light the appliance (refer to the lighting instructions on Page 30).
B. Brush all joints and connections with the gas leak test solution to check for
leaks. If bubbles are formed, or gas odor is detected, turn the gas control
knob (off/pilot/on) to the “OFF” position. Either tighten or refasten the
leaking connection, then retest as described above.
C. When the gas lines are tested and leak free be sure to rinse off the
leak testing solution,
D. Turn on burner then observe the individual tongues of flame on the burner.
Make sure all ports are open and producing flame evenly across the
burner. If any ports are blocked, or partially blocked, clean out the ports.
NOTE: DIAGRAMS & ILLUSTRATIONS ARE NOT TO SCALE.