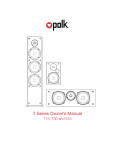
1
Solar Siren | FGGA0401WWE / FGGA04* Series ENGLISH Installation and Operation Manual 2 DEUTSCH Installations- und Bedienungshandbuch 12 NEDERLANDS Installatie- en bedieningshandleiding 22 FRANÇAIS Manuel d'installation et d'utilisation 32 ESPAÑOL Manual de instalación y funcionamiento 42 ITALIANO Manuale di installazione e uso 52 PORTUGUÊS Manual de instalação e funcionamento 62 © Novar Electrical Devices and Systems Limited (a Honeywell Company) 2013 The Arnold Center, Paycocke Road, Basildon, Essex, SS14 3EA (UK) 50083202-001 Rev. A Table of Contents 1 2 Intended use ........................................................................................................................................................................... 3 Safety ...................................................................................................................................................................................... 3 2.1 2.2 3 Description .............................................................................................................................................................................. 3 3.1 3.2 4 5 Configuring the siren ..................................................................................................................................................... 5 Powering up the siren ................................................................................................................................................... 5 Adding a new remote control or remote keypad to the siren ....................................................................................... 6 Mounting the siren to the wall ...................................................................................................................................... 7 Adding a new security detector to the siren ................................................................................................................. 8 Deleting all devices from the siren ................................................................................................................................ 8 Service mode / Operating mode ................................................................................................................................... 8 Operation ................................................................................................................................................................................ 9 6.1 6.1.1 6.1.2 6.2 6.3 6.4 6.5 7 8 9 10 11 Package contents........................................................................................................................................................... 3 Required tools ............................................................................................................................................................... 4 Overview ................................................................................................................................................................................. 4 Installation .............................................................................................................................................................................. 5 5.1 5.2 5.3 5.4 5.5 5.6 5.7 6 Product .......................................................................................................................................................................... 3 Installation ..................................................................................................................................................................... 3 Arming the system......................................................................................................................................................... 9 Instant-arm mode ..................................................................................................................................................... 9 Delay-arm mode ....................................................................................................................................................... 9 Disarming the system .................................................................................................................................................... 9 Personal attack facility .................................................................................................................................................. 9 Device tamper ............................................................................................................................................................... 9 Low-battery condition ................................................................................................................................................. 10 Maintenance ......................................................................................................................................................................... 10 Disposal and recycling ........................................................................................................................................................... 10 EC declaration of conformity................................................................................................................................................. 10 Guarantee ............................................................................................................................................................................. 10 Customer support ................................................................................................................................................................. 11 2 1 Intended use The FGGA0401WWE / FGGA04* Series solar siren is suitable for use with Friedland wireless alarm systems operating at 868 MHz only. The siren uses a high-capacity, rechargeable main battery (NiMH). The solar panel on top of the housing charges the battery during daylight hours. During darkness, only a small amount of energy is required to operate the siren. The siren is supplied with an initial power-up battery (alkaline) to boost the initial power to the siren when the system is first activated until the solar panel charges the rechargeable main battery. The tamper switch will immediately trigger an alarm if any unauthorised attempt is made to interfere with and remove the siren cover. An anti-jamming detection system will generate an alarm if any attempt is made to continuously jam the radio channel used for the system. 2 Safety 2.1 Product 2.2 Keep all safety warnings and instructions for future reference. Obey the local regulations applicable to the installation of the product. Do not attempt to open the devices. Installation 3 3.1 Part Wear safety gloves when drilling into walls. Wear safety glasses when drilling into walls. Make sure that there are no electrical wires and water pipes when drilling into walls. Position ladders onto a level and stable surface and at a safe angle. Description Package contents Description Solar siren Mounting template Part Description Fasteners Initial power-up battery (9V, alkaline) (6LR61 (PP3)) Part Description Rechargeable main battery (6V, NiMH) Quick installation guide 3.2 Required tools Tool 4 Description Ear defenders Tool Description Bradawl Safety gloves Phillips screwdriver (#0 / #1 / #2) Electric drill Spirit level Masonry drill bit (5 mm / 6 mm) Pencil Overview Solar siren 1. 2. 3. 4. 5. 6. 7. 8. 9. 10. 11. Siren Tamper switch Learn button Learn indicator DIP switches Initial power-up battery (9V, alkaline) Rechargeable main battery (6V, NiMH) Power adaptor connection (12V) Battery cover Mounting plate Mounting holes DIP switch 1. 2. 3. 4. 5. 4 Alarm time Anti-jamming detection Alarm sound Beep sound Siren / Control panel 5 5.1 Installation Configuring the siren 1. 2. Remove the screws. Remove the battery cover. 3. Set switch 5 to the required position. 4. Without control panel ON (siren) (single zone) With separate control panel OFF (control panel) Set switch 1 to limit the maximum period for which the external siren will sound. Without control panel (single zone) With separate control panel 5. enabled disabled Set switch 4 to enable or disable the beeps when the siren receives signals from the remote control or the remote keypad. ON OFF 5.2 enabled disabled Set switch 3 to enable or disable the siren during an alarm. ON OFF 7. ON (10 min) / OFF (3 min) Set switch 2 to enable or disable the anti-jamming detection when using the siren without control panel. ON OFF 6. ON (3 min) / OFF (1 min) enabled disabled Powering up the siren Note: If you install the siren for the first time, it will automatically power up in service mode. You cannot switch the siren out of service mode and into operating mode until at least one remote control or remote keypad is linked to it. 1. 2. Connect the initial power-up battery to the connection terminal. Connect the rechargeable main battery to the connection terminal. 5 3. Press the tamper switch. The indicators in the front lens flash several times and then continue to flash alternately every 5 seconds to indicate that the siren is operational. 4. Remove the protective film from the solar panel. Caution: 5.3 Make sure that the solar panel receives sufficient light to maintain the battery charge. 5. a) If switch 5 is set to ON (siren), the siren will operate without control panel (single zone). b) If switch 5 is set to OFF (control panel), the siren will operate with control panel. For linking the siren to the control panel, refer to the Installation and Operation Manual for the alarm system and to the Quick Installation Guide for the siren. Adding a new remote control or remote keypad to the siren If you set up the siren without separate control panel (single zone) for the first time, you must link the siren to a remote keypad or a remote control before adding other devices. The ID code of the remote control or the remote keypad must be learned by the siren. The siren can learn up to 6 remote controls or remote keypads. During setup, the siren will power up in service mode, ready to learn a new remote control or remote keypad. If the siren is in operating mode, refer to the section “Service mode / Operating mode” to switch to service mode. 1 2 Note: 3 Remote control Remote keypad Press and hold the learn button on the siren for 5 seconds to enter learn mode. The siren emits one short beep. The indicators in the front lens and the learn indicator flash slowly. Program the ID code: Press the button. Enter the 4-digit ID code. Press the button. The siren emits two short beeps. The indicators in the front lens and the learn indicator flash quickly. If the remote control or the remote keypad has already been linked or if the maximum number of 6 remote controls or remote keypads are linked, the siren will emit one short beep and exit learn mode. The indicators in the front lens and the learn indicator will go off. Confirm the ID code: Press the Note: button within 15 seconds. Enter the 4-digit ID code and press the button within 15 seconds. The siren emits three short beeps. The indicators in the front lens and the learn indicator come on for 3 seconds and go off. The siren returns to service mode. If the confirmation signal is not received within 15 seconds, the siren will emit one short beep and exit learn mode. The indicators in the front lens and the learn indicator will go off. 1. 2. Install the battery cover. Install the screws. 6 5.4 Mounting the siren to the wall 1. 2. 3. Hold the mounting template in position and mark the positions of the mounting holes. If necessary, use a spirit level. Drill mounting holes (6 mm) into the wall according to the marked positions. Insert a supplied wall plug into each mounting hole. 4. Install the screws (30 mm) into the top mounting holes, leaving approximately 9 mm of the screw protruding. 5. 6. Install the mounting plate. Make sure that the holes in the mounting plate align with the bottom mounting holes. Install the screws (25 mm). 7. Mount the siren to the wall. CAUTION: Make sure that the tamper switch is closed when you mount the siren to the wall. If the tamper switch does not close, the siren will not operate correctly. If necessary, remove the siren again and insert a spacer between the tamper switch plunger and the wall to make sure that the switch closes when you mount the siren to the wall. CAUTION: Before testing or operating the siren, leave it in position for at least 24 hours in order to fully charge the battery. 7 5.5 Adding a new security detector to the siren In order to communicate with the siren, the ID code of the security detector must be learned by the siren. The siren can learn up to 12 security detectors (door/window contact detectors or PIR movement detectors). During setup, the siren will automatically power up in service mode, ready to learn a new security detector. If the siren is in operating mode, refer to the section “Service mode / Operating mode” to switch to service mode. Remote control 1 Note: Note: 3 Note: 5.6 Enter the 4-digit ID code. Press and hold the button for 5 seconds. The siren emits one short beep. The indicators in the front lens and the learn indicator flash slowly. The siren remains in learn mode for 30 seconds. Program the ID code: Press the tamper switch on the security detector. The siren emits two short beeps. The indicators in the front lens and the learn indicator flash quickly. If the confirmation signal is not received within 30 seconds, the siren will exit learn mode. The siren will remain in service mode. If the security detector has already been linked or if the maximum number of 12 security detectors are linked, the siren will emit one short beep and exit learn mode. The indicators in the front lens and the learn indicator will go off. Confirm the ID code: Press the tamper switch on the security detector again within 15 seconds to confirm the ID code. Press and hold the 2 Remote keypad button for 5 seconds. The siren emits three short beeps. The indicators in the front lens and the learn indicator come on for 3 seconds and go off. The siren returns to service mode. If the confirmation signal is not received within 15 seconds, the siren will emit one short beep and exit learn mode. The indicators in the front lens and the learn indicator will go off. Deleting all devices from the siren 1. 2. 3. Switch the siren into service mode using the remote control or the remote keypad. Remove the siren from the wall. Press and hold the learn button for 10 seconds until the siren emits two long beeps and the learn indicator flashes 5 times. The ID codes of all linked devices are erased from memory. The siren remains in service mode. 5.7 Service mode / Operating mode If you install the siren for the first time, it will automatically power up in service mode. Before testing or operating the siren, it must be switched into operating mode. If you use the siren with a control panel, refer to the Installation and Operation Manual for the alarm system. If you use the siren without a control panel, use the remote control or the remote keypad: Remote control 1 Press and hold the Remote keypad Enter the 4-digit ID code. Press and hold the button for 5 seconds. To switch from operating mode into service mode: button for 5 seconds. If you press the button (remote control) or the button (remote keypad), the device will transmit the disarm signal and the siren will emit two normal beeps. The system is disarmed. If you press and hold the button (remote control) or the button (remote keypad) for 5 seconds, the siren will emit two short beeps followed by one long beep. The indicators in the front lens and the learn indicator will flash together with the beeps. The system will return to service mode. Switching from service mode into operating mode: If you press the button (remote control) or the button (remote keypad), the device will transmit the disarm signal. The siren will not respond to the disarm signal, as it is still in service mode. If you press and hold press the button (remote control) or the button (remote keypad) for 5 seconds, the siren will emit one long beep followed by two short beeps. The indicators in the front lens and the learn indicator will flash together with the beeps. The siren will return to operating mode in a disarmed condition. 8 6 Operation This section only describes the operation of the siren when operating without control panel (single zone). 6.1 Arming the system When leaving the premises, the system must be armed. Make sure that the siren is in operating mode. Before arming the system, make sure that all doors and windows are closed and that the available PIR movement detectors are not obstructed. Make sure that animals are restricted to areas not protected by PIR movement detectors. 6.1.1 Instant-arm mode The instant-arm mode will immediately arm the system. If the system is armed, activating any security detector will immediately trigger an alarm. When entering the premises, disarm the system before opening any door or window protected by a door/window contact detector or entering an area protected by a PIR movement detector. In the instant-arm mode, arm and disarm the system from outside the premises using the remote control or the remote keypad. Remote control 1 6.1.2 Remote keypad Enter the 4-digit ID code. Press the button. Press the button. The siren emits one beep. The indicators in the front lens and the learn indicator flash once. Delay-arm mode The delay-arm mode will arm the system with a 15-second entry/exit delay. The siren will emit one beep and another beep after the 15-second delay has expired to allow time to leave the premises before the system is fully armed. When entering the premises by opening any door or window protected by a door/window contact detector or entering an area protected by a PIR movement detector, the system will be triggered and the siren will emit one long beep. However, the alarm will not sound until the 15-second delay has expired. Disarm the system using the remote control or the remote keypad during the 15-second delay. If an alarm occurs, the siren will sound continuously until the set alarm duration time expires. The alarm will stop and the system will re-arm. The alarm lockout feature will prevent the system from re-arming after repeating the process three times. Remote control 1 Press the Remote keypad button. Enter the 4-digit ID code. Press the button or the button. After the 15-second delay has expired, the siren emits one beep. The indicators in the front lens and the learn indicator flash once to indicate the system is fully armed. 6.2 Disarming the system Remote control 1 Note: 6.3 Press the Remote keypad button. Enter the 4-digit ID code. Press the button. The siren emits two beeps. If the system is disarmed and the siren emits ten quick beeps, an alarm has been triggered while the system was armed. Personal attack facility The user can trigger an alarm at any time in the event of threat or danger by activating the personal attack facility. Remote control 1 6.4 Remote keypad Press and hold the button for 3 seconds. Press and hold the Note: On earlier remote control models, slide the personal attach switch. The alarm is triggered. The siren will sound. button or the 3 seconds. button for Device tamper If the battery cover of any device (except remote controls) is removed or if the siren or the remote keypad is removed from the wall, an alarm will occur immediately even if the system is disarmed (unless the siren is in service mode). The alarm will sound until the set alarm time expires or the system is disarmed from the remote control or the remote keypad. 9 6.5 Low-battery condition If you press the button on the remote control or the remote keypad when the siren is at low-battery condition, the siren will emit three short beeps. If a low-battery indicator is activated, the device will continue to operate for up to 2 weeks. Replace the battery as soon as possible. Before replacing the battery, switch the system into service mode. After replacing the battery, switch the system back into operating mode. 7 Maintenance The alarm system requires little maintenance. If you must power down the system completely, switch the system into service mode before removing the siren cover and disconnecting the rechargeable main battery and the initial power-up battery. Make sure that the solar panel is covered with a lightproof material to prevent the solar panel from powering the siren. 1. Clean the solar panel using a soft, damp cloth every 6 months, preferably in spring and autumn. Do not use abrasive, solvent-based or aerosol cleaners. Do not clean the inside of the siren or allow water to enter the siren to make sure that the solar panel keeps receiving all the available light. 2. Do not leave the siren for long periods with the batteries connected, unless the siren is able to receive sufficient light to maintain the battery charge. If the battery charge is not maintained, the rechargeable main battery will run unacceptably low and the siren must be recharged from a 12Vdc/1000mA power supply. Install a new initial power-up battery (9V alkaline, PP3) to make sure that the siren receives sufficient power until the solar panel can recharge the main battery. 3. Do not leave the rechargeable main battery in a discharged state for long periods. The rechargeable main battery has a typical life of 3-4 years and does not require any maintenance. 8 Disposal and recycling The product is classified by the Waste Electrical or Electronic Equipment (WEEE) directive. The product and the batteries of the monitor should not be disposed of with other household or other commercial waste. At the end of its useful life, the packaging and the product should be disposed of via a suitable recycling centre. For information on available facilities, please contact your local authority or retailer from where the product was purchased. 9 EC declaration of conformity Novar ED&S hereby declares that the product is in compliance with the essential requirements and other relevant provisions of the Radio and Telecommunications Terminal Equipment (R&TTE) directive (1995/5/EC). 10 Guarantee Novar ED&S undertakes to replace or repair at its discretion goods, should they become defective within 2 year solely as a result of faulty materials and workmanship. Understandably, if the product has not been installed, operated or maintained in accordance with the instructions, if the product has not been used appropriately or if any attempt has been made to rectify, dismantle or alter the product in any way, the guarantee will be invalidated. The guarantee states Novar ED&S entire liability. The guarantee does not extend to cover consequential loss or damage or installation costs arising from the defective product. The guarantee does not in any way affect the statutory or other rights of a consumer and applies to products installed within the EU only. If an item develops a fault, the product must be returned to the point of sale with: 1. 2. 3. Proof of purchase. Full description of the fault. All relevant batteries (disconnected). 10 11 Customer support For further product information and full installation manuals where applicable go to www.friedlandproducts.com Service Helpline UK & Northern Ireland Monday to Friday 9:00 am - 5:00 pm 0844 736 9149 11 The phone calls are charged at the national rate of the service providers. Inhaltsverzeichnis 1 2 Bestimmungsgemäßer Gebrauch .......................................................................................................................................... 13 Sicherheit .............................................................................................................................................................................. 13 2.1 2.2 3 Beschreibung......................................................................................................................................................................... 13 3.1 3.2 4 5 Konfiguration der Sirene ............................................................................................................................................. 15 Hochfahren der Sirene ................................................................................................................................................ 15 Hinzufügen einer neuen Fernbedienung oder eines neuen Funk-Bedien-/Tastenfeldes zur Sirene ........................... 16 Befestigung der Sirene an der Wand ........................................................................................................................... 17 Hinzufügen eines neuen Melders zur Sirene ............................................................................................................... 18 Löschen aller Geräte aus der Sirene ............................................................................................................................ 18 Servicemodus / Betriebsmodus ................................................................................................................................... 18 Bedienung ............................................................................................................................................................................. 19 6.1 6.1.1 6.1.2 6.2 6.3 6.4 6.5 7 8 9 10 11 Verpackungsinhalt ....................................................................................................................................................... 13 Erforderliche Werkzeuge ............................................................................................................................................. 14 Übersicht ............................................................................................................................................................................... 14 Installation ............................................................................................................................................................................ 15 5.1 5.2 5.3 5.4 5.5 5.6 5.7 6 Produkt ........................................................................................................................................................................ 13 Installation ................................................................................................................................................................... 13 Scharfstellen der Anlage .............................................................................................................................................. 19 Sofort-Scharfstell-Modus ........................................................................................................................................ 19 Scharfstellverzögerungsmodus ............................................................................................................................... 19 Anlage unscharf stellen ............................................................................................................................................... 20 Einrichtung für Panik-Funktion .................................................................................................................................... 20 Sabotagekontakt ......................................................................................................................................................... 20 Schwache Batterie ....................................................................................................................................................... 20 Wartung ................................................................................................................................................................................ 20 Entsorgung und Wiederverwertung ...................................................................................................................................... 21 EG-Konformitätserklärung .................................................................................................................................................... 21 Garantie ................................................................................................................................................................................ 21 Kundenbetreuung ................................................................................................................................................................. 21 12 1 Bestimmungsgemäßer Gebrauch Die Solarsirene der Serie FGGA0401WWE / FGGA04* ist nur für die Verwendung mit Friedland Funk-Alarmanlagen geeignet, die mit 868 MHz arbeiten. Die Sirene arbeitet mit einer wiederaufladbaren Hochleistungsbatterie (NiMH). Das Solarmodul oben auf dem Gehäuse lädt die Batterie bei Tageslicht auf. Bei Dunkelheit ist nur wenig Energie nötig, um die Sirene zu betreiben. Die Sirene wird mit einer Batterie (Alkali) für den Ersthochlauf geliefert, die die anfängliche Energie zur Sirene bereitstellt, wenn die Anlage zum ersten Mal aktiviert wird, bis das Solarmodul die wiederaufladbare Hautbatterie lädt. Der Sabotageschalter löst sofort einen Alarm aus, wenn ein unerlaubter Versuch unternommen wird, den Sirenendeckel zu sabotieren oder zu entfernen. Ein eingebautes Funk-Früherkennungssystem erzeugt einen Alarm, wenn ein Versuch unternommen wird, den für die Anlage verwendeten Funkkanal zu blockieren. 2 Sicherheit 2.1 Produkt 2.2 Bewahren Sie sämtliche Sicherheitshinweise und Anweisungen zur künftigen Bezugnahme auf. Beachten Sie die für die Installation des Produkts geltenden regionalen Richtlinien. Versuchen Sie nicht, die Geräte zu öffnen. Installation 3 3.1 Teil Tragen Sie beim Bohren in Wände Sicherheitshandschuhe. Tragen Sie beim Bohren in Wände eine Schutzbrille. Vergewissern Sie sich beim Bohren in Wände, dass keine elektrischen Leitungen und Wasserrohre vorhanden sind. Stellen Sie Leitern auf ebenem und stabilem Boden und in einem sicheren Winkel auf. Beschreibung Verpackungsinhalt Beschreibung Solarsirene Befestigungsschablone Teil Beschreibung Befestigungsteile Batterie für den Ersthochlauf (9 V, Alkali) (6LR61 (PP3)) Teil Beschreibung Aufladbare Hauptbatterie (6 V, NiMH) Kurzinstallationsanleitung 3.2 Erforderliche Werkzeuge Werkzeug 4 Beschreibung Gehörschutz Werkzeug Beschreibung Vorstecher Sicherheitshandschuhe Kreuzschraubendreher (#0 / #1 / #2) Bohrmaschine Wasserwaage Steinbohrer (5 mm / 6 mm) Bleistift Übersicht Solarsirene 1. 2. 3. 4. 5. 6. 7. 8. 9. 10. 11. Sirene Sabotageschalter Einlerntaste Einlernanzeige DIP-Schalter Batterie für den Ersthochlauf (9 V, Alkali) Wiederaufladbare Hauptbatterie (6 V, NiMH) Netzadapterverbindung (12 V) Batteriedeckel Befestigungsplatte Befestigungslöcher DIP-Schalter 1. 2. 3. 4. 5. 14 Alarmzeit Kanalblockier-Erkennung Alarmton Signalton Sirene / Bedienfeld 5 5.1 Installation Konfiguration der Sirene 1. 2. Entfernen Sie die Schrauben. Entfernen Sie den Batteriedeckel. 3. Stellen Sie den Schalter 5 auf die erforderliche Position. 4. Ohne Bedienfeld AN (Sirene) (Einzelzone) Mit Bedienfeld AUS (Bedienfeld) Stellen Sie Schalter 1 so ein, dass die maximale Dauer, in der die externe Sirene ertönt, begrenzt wird. Ohne Bedienfeld (Einzelzone) Mit Bedienfeld 5. 6. 7. AN (10 min) / AUS (3 min) Stellen Sie Schalter 2 so ein, dass die Funk-Früherkennung aktiviert bzw. deaktiviert wird, wenn die Sirene ohne Bedienfeld verwendet wird. ON [AN] aktiviert OFF [AUS] deaktiviert Stellen Sie Schalter 3 so ein, dass der Sirenen-Ton während eines Alarms aktiviert bzw. deaktiviert ist. ON [AN] aktiviert OFF [AUS] deaktiviert Stellen Sie Schalter 4 so ein, dass die Signaltöne aktiviert bzw. deaktiviert werden, wenn die Sirene Signale von der Fernsteuerung oder dem Funk-Bedien-/Tastenfeld empfängt. ON [AN] OFF [AUS] 5.2 AN (3 min) / AUS (1 min) aktiviert deaktiviert Hochfahren der Sirene Hinweis: Wenn Sie die Sirene das erste Mal installieren, fährt sie automatisch im Servicemodus hoch. Sie können den Servicemodus der Sirene erst abschalten und in den Betriebsmodus wechseln, wenn mindestens eine Fernbedienung oder ein Funk-Bedien-/Tastenfeld mit der Sirene verbunden wird. 15 1. 2. Verbinden Sie die Batterie für den Ersthochlauf mit der Anschlussklemme. Verbinden Sie die wiederaufladbare Hauptbatterie mit der Anschlussklemme. 3. Drücken Sie auf den Sabotageschalter. Die Anzeigen in der vorderen Linse blinken mehrmals und danach alle 5 Sekunden abwechselnd, um darauf hinzuweisen, dass die Sirene in Betrieb ist. 4. Entfernen Sie die Schutzfolie vom Solarmodul. Achtung: 5.3 Vergewissern Sie sich, dass das Solarmodul ausreichend Licht empfängt, um die Batterieladung aufrechtzuerhalten. 5. a) Wird Schalter 5 auf ON (AN) (Sirene) gestellt, arbeitet die Sirene ohne Bedienfeld (Einzelzone). b) Wird Schalter 5 auf OFF (AUS) (Bedienfeld) gestellt, arbeitet die Sirene mit Bedienfeld. Um die Sirene mit dem Bedienfeld zu verbinden, halten Sie sich an das Installations- und Bedienungshandbuch der Alarmanlage sowie an die Kurzinstallationsanleitung der Sirene. Hinzufügen einer neuen Fernbedienung oder eines neuen Funk-Bedien-/Tastenfeldes zur Sirene Wenn Sie die Sirene ohne separates Bedienfeld (Einzelzone) das erste Mal einrichten, müssen Sie sie mit einem Funk-Bedien/Tastenfeld oder einer Fernbedienung verbinden, bevor Sie andere Geräte hinzufügen. Der ID-Code der Fernbedienung oder des Funk-Bedien-/Tastenfeldes muss von der Sirene eingelernt werden. Die Sirene kann bis zu 6 Fernbedienungen oder FunkBedien-/Tastenfelder einlernen. Während der Einrichtung fährt die Sirene im Service-Modus hoch und ist bereit, eine neue Fernbedienung oder ein neues FunkBedien-/Tastenfeld einzulernen. Befindet sich die Sirene im Betriebsmodus, halten Sie sich an Abschnitt "Servicemodus / Betriebsmodus", um in den Servicemodus zu wechseln. 1 2 Hinweis: 3 Fernbedienung Funk-Bedien-/Tastenfeld Drücken und halten Sie 5 Sekunden lang die Einlerntaste an der Sirene, um den Einlernmodus aufzurufen. Die Sirene gibt einen kurzen Signalton ab. Die Anzeigen in der vorderen Linse und die Einlernanzeige blinken langsam. Programmierung des ID-Codes: Geben Sie den 4-stelligen ID-Code ein. Drücken Sie auf Drücken Sie auf die Taste . die Taste . Die Sirene gibt zwei kurze Signaltöne ab. Die Anzeigen in der vorderen Linse und die Einlernanzeige blinken schnell. Falls die Fernbedienung oder das Funk-Bedien-/Tastenfeld bereits verbunden wurde oder falls die maximale Anzahl von 6 Fernbedienungen oder Funk-Bedien-/Tastenfeldern verbunden ist, gibt die Sirene einen kurzen Signalton ab und der Einlernmodus wird beendet. Die Anzeigen in der vorderen Linse und die Einlernanzeige erlöschen. Bestätigung des ID-Codes: Drücken Sie innerhalb von 15 Sekunden auf die Taste Geben Sie den 4-stelligen ID-Code ein und drücken Sie . innerhalb von 15 Sekunden auf die Taste . Die Sirene gibt drei kurze Signaltöne ab. Die Anzeigen in der vorderen Linse und die Einlernanzeige leuchten 3 Sekunden lang auf und erlöschen dann. Die Sirene schaltet wieder in den Servicemodus. 16 Hinweis: 5.4 Falls das Bestätigungssignal nicht innerhalb von 15 Sekunden empfangen wird, gibt die Sirene einen kurzen Signalton ab und beendet den Einlernmodus. Die Anzeigen in der vorderen Linse und die Einlernanzeige erlöschen. 1. 2. Bringen Sie den Batteriedeckel an. Bringen Sie die Schrauben an. 1. Halten Sie die Befestigungsschablone in entsprechender Lage und zeichnen Sie die Positionen der Befestigungslöcher an. Verwenden Sie ggf. eine Wasserwaage. Bohren Sie entsprechend der angezeichneten Positionen Befestigungslöcher (6 mm) in die Wand. Stecken Sie die mitgelieferten Dübel in jedes Befestigungsloch. Befestigung der Sirene an der Wand 2. 3. 4. Bringen Sie die Schrauben (30 mm) in den oberen Befestigungslöchern an und lassen Sie ca. 9 mm der Schrauben herausragen. 5. 6. Bringen Sie die Befestigungsplatte an. Vergewissern Sie sich, dass die Löcher in der Befestigungsplatte mit den unteren Befestigungslöchern ausgerichtet sind. Bringen Sie die Schrauben (25 mm) an. 7. Bringen Sie die Sirene an der Wand an. 17 ACHTUNG: Vergewissern Sie sich, dass der Sabotageschalter geschlossen ist, wenn Sie die Sirene an der Wand anbringen. Falls der Sabotageschalter nicht geschlossen wird, arbeitet die Sirene nicht richtig. Entfernen Sie die Sirene ggf. noch einmal und setzen Sie ein Distanzstück zwischen den Sabotageschalter und die Wand, um sicherzustellen, dass der Schalter beim Montieren der Sirene an der Wand geschlossen wird. ACHTUNG: Lassen Sie die Sirene vor dem Testen oder Betrieb mindestens 24 Stunden in ihrer Position, damit die Batterie vollständig geladen wird. 5.5 Hinzufügen eines neuen Melders zur Sirene Um mit der Sirene kommunizieren zu können, muss der ID-Code des Melders von der Sirene eingelernt werden. Die Sirene kann bis zu 12 Melder (Tür-/Fensterkontakte oder PIR-Bewegungsmelder) einlernen. Während der Einrichtung fährt die Sirene automatisch im Service-Modus hoch und ist bereit, einen neuen Melder einzulernen. Befindet sich die Sirene im Betriebsmodus, halten Sie sich an Abschnitt "Servicemodus / Betriebsmodus", um in den Servicemodus zu wechseln. 1 2 Hinweis: Hinweis: 3 Hinweis: 5.6 1. 2. 3. 5.7 Fernbedienung Funk-Bedien-/Tastenfeld Drücken und halten Sie 5 Sekunden lang die Taste Geben Sie den 4-stelligen ID-Code ein. Drücken und halten Sie 5 Sekunden lang die Taste . . Die Sirene gibt einen kurzen Signalton ab. Die Anzeigen in der vorderen Linse und die Einlernanzeige blinken langsam. Die Sirene verbleibt 30 Sekunden lang im Einlernmodus. Programmierung des ID-Codes: Drücken Sie auf den Sabotageschalter am Melder. Die Sirene gibt zwei kurze Signaltöne ab. Die Anzeigen in der vorderen Linse und die Einlernanzeige blinken schnell. Falls das Bestätigungssignal nicht innerhalb von 30 Sekunden empfangen wird, beendet die Sirene den Einlernmodus. Die Sirene verbleibt im Servicemodus. Falls der Melder bereits verbunden wurde oder die maximale Anzahl von 12 Meldern verbunden sind, gibt die Sirene einen langen Signalton ab und der Einlernmodus wird beendet. Die Anzeigen in der vorderen Linse und die Einlernanzeige erlöschen. Bestätigung des ID-Codes: Drücken Sie innerhalb von 15 Sekunden erneut auf den Sabotageschalter am Melder, um den ID-Code zu bestätigen. Die Sirene gibt drei kurze Signaltöne ab. Die Anzeigen in der vorderen Linse und die Einlernanzeige leuchten 3 Sekunden lang auf und erlöschen dann. Die Sirene schaltet wieder in den Servicemodus. Falls das Bestätigungssignal nicht innerhalb von 15 Sekunden empfangen wird, gibt die Sirene einen kurzen Signalton ab und beendet den Einlernmodus. Die Anzeigen in der vorderen Linse und die Einlernanzeige erlöschen. Löschen aller Geräte aus der Sirene Schalten Sie die Sirene unter Verwendung der Fernsteuerung oder des Funk-Bedien-/Tastenfeldes in den Servicemodus. Entfernen Sie die Sirene von der Wand. Drücken und halten Sie 10 Sekunden lang die Einlerntaste, bis die Sirene zwei lange Signaltöne abgibt und die Einlernanzeige 5 mal blinkt. Die ID-Codes aller verbundenen Geräte werden aus dem Speicher gelöscht. Die Sirene verbleibt im Servicemodus. Servicemodus / Betriebsmodus Wenn Sie die Sirene das erste Mal installieren, fährt sie automatisch im Servicemodus hoch. Vor dem Testen oder in Betrieb nehmen der Sirene muss sie in den Betriebsmodus geschalten werden. Falls Sie die Sirene mit einem Bedienfeld verwenden, halten Sie sich an das Installations- und Bedienungshandbuch der Alarmanlage. Falls Sie die Sirene ohne Bedienfeld einsetzen, verwenden Sie die Fernbedienung oder das Funk-Bedien-/Tastenfeld: 18 Fernbedienung 1 Funk-Bedien-/Tastenfeld Geben Sie den 4-stelligen ID-Code ein. Drücken und halten Sie 5 Sekunden lang die Taste . Umschalten vom Betriebsmodus in den Servicemodus: Drücken und halten Sie 5 Sekunden lang die Taste . Wenn Sie die Taste (Fernbedienung) oder die Taste (Funk-Bedien-/Tastenfeld) betätigen, überträgt das Gerät das Unscharfsignal und die Sirene gibt zwei normale Signaltöne ab. Die Anlage ist unscharf. Wenn Sie die Taste (Fernbedienung) oder die Taste (Funk-Bedien-/Tastenfeld) 5 Sekunden lang drücken und halten, gibt die Sirene zwei kurze Signaltöne und danach einen langen Signalton ab. Die Anzeigen in der vorderen Linse und die Einlernanzeige blinken zusammen mit den Signaltönen. Die Anlage schaltet in den Servicemodus zurück. Umschalten vom Servicemodus in den Betriebsmodus: Wenn Sie die Taste (Fernbedienung) oder die Taste (Funk-Bedien-/Tastenfeld) betätigen, überträgt das Gerät das Unscharfsignal. Die Sirene reagiert nicht auf das Unscharfsignal, da sie sich immer noch im Servicemodus befindet. Wenn Sie die Taste (Fernbedienung) oder die Taste (Funk-Bedien-/Tastenfeld) 5 Sekunden lang drücken und halten, gibt die Sirene einen langen Signalton und danach zwei kurze Signaltöne ab. Die Anzeigen in der vorderen Linse und die Einlernanzeige blinken zusammen mit den Signaltönen. Die Sirene schaltet im unscharfen Zustand in den Betriebsmodus zurück. 6 Bedienung Dieser Abschnitt beschreibt nur die Bedienung der Sirene ohne das Bedienfeld (Einzelzone). 6.1 Scharfstellen der Anlage Wenn Sie das Haus verlassen, muss die Anlage scharfgestellt werden. Vergewissern Sie sich, dass sich die Sirene im Betriebsmodus befindet. Vergewissern Sie sich vor dem Scharfstellen der Anlage, dass alle Türen und Fenster geschlossen sind und dass die verfügbaren PIR-Bewegungsmelder nicht behindert werden. Vergewissern Sie sich, dass Tieren der Zugang zu Bereichen, die nicht durch PIR-Bewegungsmelder geschützt sind, unmöglich gemacht wird. 6.1.1 Sofort-Scharfstell-Modus Mit dem Sofort-Scharfstell-Modus wird die Anlage sofort scharfgestellt. Ist die Anlage scharfgestellt, löst die Aktivierung eines beliebigen Melders sofort einen Alarm aus. Stellen Sie die Anlage unscharf beim Betreten des Hauses, bevor Sie irgendeine Tür oder irgendein Fenster öffnen, das durch einen Tür-/Fensterkontakt geschützt ist oder bevor Sie einen Bereich betreten, der durch einen PIR-Bewegungsmelder geschützt ist. Stellen Sie die Anlage im Sofort-Scharfstell-Modus scharf bzw. unscharf mit der Fernbedienung oder dem Funk-Bedien-/Tastenfeld außerhalb des Hauses. Fernbedienung 1 6.1.2 Funk-Bedien-/Tastenfeld Geben Sie den 4-stelligen ID-Code ein. Drücken Sie auf die Taste . Die Sirene gibt einen Signalton ab. Die Anzeigen in der vorderen Linse und die Einlernanzeige blinken ein Mal. Drücken Sie auf die Taste . Scharfstellverzögerungsmodus Der Scharfstellverzögerungsmodus stellt die Anlage mit einer 15-Sekunden-Ein-/Ausgangsverzögerung scharf. Die Sirene gibt einen kurzen Signalton und einen weiteren Signalton nach Ablauf der 15-Sekunden-Verzögerung ab, um Zeit einzuräumen, das Haus zu verlassen, bevor die Anlage vollständig scharfgestellt wird. Beim Betreten des Hauses durch Öffnen einer Tür oder eines Fensters, das durch einen Tür-/Fensterkontakt geschützt ist oder durch Betreten eines Bereiches, das durch einen PIRBewegungsmelder geschützt ist, wird die Anlage ausgelöst und die Sirene gibt einen langen Signalton ab. Der Alarm ertönt jedoch erst, nachdem die 15-Sekunden-Verzögerung abgelaufen ist. Stellen Sie die Anlage unscharf während der 15-SekundenVerzögerung mit der Fernbedienung oder dem Funk-Bedien-/Tastenfeld. Kommt es zu einem Alarm, ertönt die Sirene ununterbrochen, bis die eingestellte Alarmdauer abgelaufen ist. Der Alarm hört auf und die Anlage wird wieder scharfgestellt. Die Zonensperr-Funktion verhindert, dass die Anlage neu scharfgestellt wird, nachdem der Vorgang drei Mal wiederholt wurde. Fernbedienung 1 Drücken Sie auf die Taste Funk-Bedien-/Tastenfeld Geben Sie den 4-stelligen ID-Code ein. Drücken Sie auf . die Taste oder auf die Taste . Nach Ablauf der 15-Sekunden-Verzögerung gibt die Sirene einen Signalton ab. Die Anzeigen in der vorderen Linse und die Einlernanzeige blinken ein Mal, um darauf hinzuweisen, dass die Anlage vollständig scharfgestellt ist. 19 6.2 Anlage unscharf stellen Fernbedienung 1 Hinweis: 6.3 Funk-Bedien-/Tastenfeld Geben Sie den 4-stelligen ID-Code ein. Drücken Sie auf Drücken Sie auf die Taste . die Taste . Die Sirene gibt zwei Signaltöne ab. Ist die Anlage unscharf und die Sirene gibt zehn schnelle Signaltöne ab, wurde ein Alarm ausgelöst, während die Anlage scharfgestellt war. Einrichtung für Panik-Funktion Der Benutzer kann im Falle einer unmittelbaren Bedrohung oder bei Gefahr jederzeit einen Alarm auslösen, indem er die Einrichtung für die Panik-Funktion aktiviert. Fernbedienung 1 6.4 Funk-Bedien-/Tastenfeld Drücken und halten Sie 3 Sekunden lang die Taste . Drücken und halten Sie 3 Sekunden lang die Taste Hinweis: Verschieben Sie bei früheren oder die Taste . Fernbedienungsmodellen den Schalter für die PanikFunktion. Der Alarm wird ausgelöst. Die Sirene ertönt. Sabotagekontakt Falls der Batteriedeckel eines Geräts (außer Fernbedienung) entfernt wird oder falls die Sirene oder das Funk-Bedien/Tastenfeld von der Wand abgenommen wird, wird sofort ein Alarm ausgelöst, selbst wenn die Anlage unscharf ist (es sei denn, die Sirene befindet sich im Servicemodus). Der Alarm ertönt, bis die eingestellte Alarmzeit abläuft oder die Anlage von der Fernbedienung oder dem Funk-Bedien-/Tastenfeld aus unscharf gestellt wird. 6.5 Schwache Batterie Wenn Sie auf die Taste der Fernbedienung oder des Funk-Bedien-/Tastenfeldes drücken, wenn die Batterie der Sirene schwach ist, gibt die Sirene drei kurze Signaltöne ab. Ist eine Anzeige für eine schwache Batterie aktiviert, läuft das Gerät bis zu 2 Wochen lang weiter. Tauschen Sie die Batterien so bald wie möglich aus. Schalten Sie die Anlage vor dem Austausch der Batterie in den Servicemodus. Schalten Sie die Anlage nach dem Austausch der Batterie wieder in den Betriebsmodus. 7 Wartung Die Alarmanlage benötigt kaum Wartung. Wenn Sie die Anlage komplett herunterfahren müssen, schalten Sie sie in den Servicemodus, bevor Sie den Sirenendeckel entfernen und die wiederaufladbare Hauptbatterie sowie die Batterie für den Ersthochlauf trennen. Vergewissern Sie sich, dass das Solarmodul mit einem lichtdichten Material bedeckt ist, damit das Bedienfeld die Sirene nicht einschaltet. 1. Reinigen Sie das Solarmodul alle 6 Monate mit einem weichen, feuchten Lappen, vorzugsweise im Frühling und Herbst. Verwenden Sie keine scheuernden Reiniger, keine Reiniger auf Lösungsmittelbasis und keine Aerosol-Reiniger. Reinigen Sie nicht das Innere der Sirene und lassen Sie kein Wasser in die Sirene gelangen, um sicherzustellen, dass das Solarmodul das ganze zur Verfügung stehende Licht empfangen kann. 2. Lassen Sie die Batterien der Sirene nicht über längere Zeiträume verbunden, es sei denn, die Sirene ist in der Lage, ausreichend Licht zu empfangen, um die Batterieladung aufrechtzuerhalten. Wird die Batterieladung nicht aufrechterhalten, wird die wiederaufladbare Hauptbatterie tiefentladen und die Sirene muss über das 12 Volt/1000 mAGleichstromnetzteil aufgeladen werden. Installieren Sie eine neue Batterie für den Ersthochlauf (9 V Alkali, PP3), um sicherzustellen, dass die Sirene ausreichend Energie erhält, bis das Solarmodul die Hauptbatterie nachladen kann. 3. Lassen Sie die wiederaufladbare Hauptbatterie nicht über lange Zeiträume im entladenen Zustand. Die wiederaufladbare Hauptbatterie hat normalerweise eine Lebensdauer von 3-4 Jahren und bedarf keinerlei Wartung. 20 8 Entsorgung und Wiederverwertung Das Produkt ist gemäß der Richtlinie für elektrische und elektronische Geräte (WEEE) klassifiziert. Das Produkt und die Batterien des Monitors dürfen nicht über den Hausmüll oder gewerblichen Abfall entsorgt werden. Am Ende der Lebensdauer muss die Verpackung und das Produkt über eine geeignete Wiederverwertungsstelle entsorgt werden. Informationen über die verfügbaren Wiederverwertungsstellen finden Sie bei Ihrer Bezirksverwaltung oder dort, wo Sie das Produkt erworben haben. 9 EG-Konformitätserklärung Novar ED&S erklärt hiermit, dass das Produkt den wesentlichen Anforderungen und anderen relevanten Richtlinien für Funkanlagen und Telekommunikationsendeinrichtungen (R&TTE) entspricht (1995/5/EG). 10 Garantie Novar ED&S führt nach eigenem Ermessen Austausch- oder Reparaturarbeiten durch, falls das Produkt durch Material- oder Verarbeitungsmängel innerhalb eines Zeitraums von 2 Jahren schadhaft wird. Falls das Produkt nicht im Einklang mit den Anweisungen installiert, betrieben oder gewartet wurde, nicht bestimmungsgemäß verwendet wurde oder falls versucht wurde, das Produkt zu reparieren, zu zerlegen oder in irgendeiner Weise zu verändern, erlischt die Garantie selbstverständlich. Die Garantie legt die gesamte Haftung seitens Novar ED&S dar. Die Garantie erstreckt sich nicht auf Folgeverluste, Folgeschäden oder Installationskosten, die durch ein defektes Produkt entstanden sind. Die Garantie berührt in keiner Weise gesetzliche oder andere Rechte eines Verbrauchers und gilt nur für Produkte, die innerhalb der EU installiert wurden. Falls ein Teil fehlerhaft wird, muss das Produkt zur Verkaufsstelle zurückgebracht werden. In diesem Fall wird folgendes benötigt: 1. 2. 3. Kaufbeleg. Vollständige Fehlerbeschreibung. Alle relevanten Batterien (herausgenommen). 11 Kundenbetreuung Weitere Produktinformationen und vollständige Installationshandbücher finden Sie unter www.friedlandproducts.com Service Helpline Deutschland 0180 5 70 10 50 Belgien 02 513 67 39 Montags bis Freitags / Samstags 08:00 - 19:00 / 09:00 - 16:00 Montags bis Freitags 09:00 - 17:00 21 0,14 Euro/Min aus dem deutschen Festnetz. Mobilfunkpreise können davon abweichen. Die Telefonate werden gemäß der nationalen Gebühren der Telefondienstanbieter abgerechnet. Inhoudsopgave 1 2 Beoogd gebruik ..................................................................................................................................................................... 23 Veiligheid............................................................................................................................................................................... 23 2.1 2.2 3 Beschrijving ........................................................................................................................................................................... 23 3.1 3.2 4 5 De sirene configureren ................................................................................................................................................ 25 De sirene opstarten ..................................................................................................................................................... 25 Een nieuwe afstandsbediening of een toetsenpaneel op afstand aan de sirene toevoegen ...................................... 26 De sirene aan de wand monteren ............................................................................................................................... 27 Een nieuwe beveiligingsdetector aan de sirene toevoegen ........................................................................................ 28 Alle apparaten uit de sirene wissen............................................................................................................................. 28 Servicemodus / Bedrijfsmodus .................................................................................................................................... 28 Bediening .............................................................................................................................................................................. 29 6.1 6.1.1 6.1.2 6.2 6.3 6.4 6.5 7 8 9 10 11 Inhoud van het pakket ................................................................................................................................................. 23 Vereist gereedschap .................................................................................................................................................... 24 Overzicht ............................................................................................................................................................................... 24 Installatie............................................................................................................................................................................... 25 5.1 5.2 5.3 5.4 5.5 5.6 5.7 6 Product ........................................................................................................................................................................ 23 Installatie ..................................................................................................................................................................... 23 Het systeem inschakelen ............................................................................................................................................. 29 Directe inschakelmodus.......................................................................................................................................... 29 Vertraagde inschakelmodus ................................................................................................................................... 29 Het systeem uitschakelen ............................................................................................................................................ 29 Persoonlijke aanvalfunctie .......................................................................................................................................... 29 Sabotage van het apparaat.......................................................................................................................................... 30 Batterij bijna leeg ........................................................................................................................................................ 30 Onderhoud ............................................................................................................................................................................ 30 Afvoeren en recyclen ............................................................................................................................................................ 30 EG-conformiteitsverklaring ................................................................................................................................................... 30 Garantie ................................................................................................................................................................................ 31 Klantenservice ....................................................................................................................................................................... 31 22 1 Beoogd gebruik De FGGA0401WWE / FGGA04* serie op zonne-energie werkende sirene is geschikt voor gebruik met Friedland draadloze alarmsystemen die uitsluitend op 868 MHz werken. De sirene werkt op een oplaadbare batterij met een hoog vermogen (NiMH). Het zonnepaneel bovenop de behuizing laadt de batterij bij daglicht op. Als het donker is, vereist de werking van de sirene slechts een kleine hoeveelheid energie. De sirene is voorzien van een opstartbatterij (alkaline) waarmee de sirene kan opstarten als het systeem voor de eerste keer wordt geactiveerd tot het zonnepaneel de oplaadbare batterij heeft opgeladen. De sabotageschakelaar genereert onmiddellijk een alarm als een ongeoorloofde poging wordt gedaan om met de kap van de sirene te knoeien of deze te verwijderen. Een anti-blokkeringsdetectiesysteem genereert een alarm als een poging wordt gedaan om het voor het systeem gebruikte radiokanaal constant te blokkeren. 2 Veiligheid 2.1 Product 2.2 Installatie 3 3.1 Bewaar alle veiligheidswaarschuwingen en instructies, zodat u ze later kunt bekijken. Neem de lokale voorschriften die voor de installatie van het product gelden in acht. Probeer de apparaten niet open te maken. Draag veiligheidshandschoenen tijdens het boren in wanden. Draag een veiligheidsbril tijdens het boren in wanden. Let bij het boren in wanden op eventueel aanwezige elektriciteitsdraden en waterleidingen. Plaats ladders in een veilige hoek op een vlakke en stabiele ondergrond. Beschrijving Inhoud van het pakket Onderdeel Beschrijving Op zonne-energie werkende sirene Montageplaat Onderdeel Beschrijving Bevestigingen Opstartbatterij (9V, alkaline) (6LR61 (PP3)) Onderdeel Beschrijving Oplaadbare batterij (6V, NiMH) Korte installatiehandleiding 3.2 Vereist gereedschap Gereedschap 4 Beschrijving Gehoorbescherming Gereedschap Beschrijving Priem Veiligheidshandschoenen Kruiskopschroevendraaier (#0 / #1 / #2) Elektrische boor Waterpas Boorbit voor metselwerk (5 mm / 6 mm) Potlood Overzicht Op zonne-energie werkende sirene 1. 2. 3. 4. 5. 6. 7. 8. 9. 10. 11. Sirene Sabotageschakelaar Inleerknop Inleerindicator DIP-schakelaars Opstartbatterij (9V, alkaline) Oplaadbare batterij (6V, NiMH) Voedingsadapteraansluiting (12V) Batterijdeksel Montageplaat Montagegaten DIP-schakelaar 1. 2. 3. 4. 5. 24 Alarmtijdsduur Anti-blokkeringsdetectie Alarmsignaal Pieptoon Sirene / Bedieningspaneel 5 5.1 Installatie De sirene configureren 1. 2. Verwijder de schroeven. Verwijder de batterijdeksel. 3. Zet schakelaar 5 in de gewenste stand. Zonder bedieningspaneel (één zone) Met apart bedieningspaneel 4. ON [AAN] (sirene) OFF [UIT] (bedieningspaneel) Stel schakelaar 1 in om de maximumperiode voor het klinken van de externe sirene te beperken. Zonder bedieningspaneel (één zone) Met apart bedieningspaneel 5. ON [AAN] (3 min) / OFF [UIT] (1 min) ON [AAN] (10 min) / OFF [UIT] (3 min) Stel schakelaar 2 in om de anti-blokkeringsdetectie in of uit te schakelen bij gebruik van de sirene zonder bedieningspaneel. ON [AAN] OFF [UIT] 6. 7. Stel schakelaar 3 in om de sirene tijdens een alarm in of uit te schakelen. ON [AAN] ingeschakeld OFF [UIT] uitgeschakeld Stel schakelaar 4 in om de pieptonen als de sirene signalen van de afstandbediening of het toetsenpaneel op afstand ontvangt in of uit te schakelen. ON [AAN] OFF [UIT] 5.2 ingeschakeld uitgeschakeld ingeschakeld uitgeschakeld De sirene opstarten Opmerking: Bij het voor de eerste keer installeren van de sirene zal deze automatisch in de servicemodus opstarten. U kunt de sirene pas uit de servicemodus schakelen als minimaal één afstandsbediening of toetsenpaneel op afstand hieraan is gekoppeld. 1. 2. Sluit de opstartbatterij op de aansluitklem aan. Sluit de oplaadbare batterij op de aansluitklem aan. 25 3. Druk op de sabotageschakelaar. De indicatoren in de lens aan de voorzijde knipperen een paar keer en blijven vervolgens iedere 5 seconden knipperen om aan te geven dat de sirene in bedrijf is. 4. Verwijder de beschermlaag van het zonnepaneel. Let op: 5.3 Controleer of het zonnepaneel voldoende licht krijgt om de oplaadbare batterij op te laden. 5. a) Als schakelaar 5 op ON [AAN] (sirene) staat, werkt de sirene zonder bedieningspaneel (één zone). b) Als schakelaar 5 op OFF [UIT] (bedieningspaneel) staat, werkt de sirene met het bedieningspaneel. Zie voor het koppelen van de sirene aan het bedieningspaneel de Installatie- en Bedieningshandleiding voor het alarmsysteem en de Korte Installatiegids voor de sirene. Een nieuwe afstandsbediening of een toetsenpaneel op afstand aan de sirene toevoegen Als u voor de eerste keer de sirene zonder apart bedieningspaneel (één zone) installeert, moet u voordat u andere apparaten gaat toevoegen de sirene aan een toetsenpaneel op afstand of een afstandsbediening koppelen. De sirene moet de id-code van de afstandsbediening of het toetsenpaneel op afstand inleren. De sirene kan maximaal 6 afstandsbedieningen of toetsenpanelen op afstand inleren. Tijdens de installatie zal de sirene in de servicemodus opstarten, gereed om een nieuwe afstandsbediening of toetsenpaneel op afstand in te leren. Als de sirene in de bedrijfsmodus staat, zie de paragraaf 'Servicemodus / Bedrijfsmodus' om naar de servicemodus te schakelen. 1 2 Opmerking: 3 Afstandsbediening Toetsenpaneel op afstand Houd de inleerknop op de sirene 5 seconden ingedrukt om naar de inleermodus te gaan. De sirene geeft één korte pieptoon. De indicatoren in de lens aan de voorzijde en de inleerindicator knipperen langzaam. De id-code programmeren: Voer de viercijferige id-code in. Druk op de knop Druk op de knop . . De sirene geeft twee korte pieptonen. De indicatoren in de lens aan de voorzijde en de inleerindicator knipperen snel. Als de afstandsbediening of het toetsenpaneel op afstand al gekoppeld is of als het maximumaantal van 6 afstandsbedieningen of toetsenpanelen op afstand zijn gekoppeld, geeft de sirene één korte pieptoon en verlaat de inleermodus. De indicatoren in de lens aan de voorzijde en de inleerindicator gaan uit. De id-code bevestigen: Druk binnen 15 seconden op de knop Opmerking: . Voer de viercijferige id-code in en druk binnen 15 seconden op de knop . De sirene geeft drie korte pieptonen. De indicatoren in de lens aan de voorzijde en de inleerindicator branden gedurende 3 seconden en gaan vervolgens uit. De sirene keert naar de servicemodus terug. Als het bevestigingssignaal niet binnen 15 seconden wordt ontvangen, geeft de sirene één korte pieptoon en verlaat de inleermodus. De indicatoren in de lens aan de voorzijde en de inleerindicator gaan uit. 26 5.4 1. 2. Plaats de batterijdeksel. Plaats de schroeven. 1. Houd de montageplaat in de gewenste stand en markeer de plaatsen van de montagegaten. Maak indien nodig gebruik van een waterpas. Boor op de gemarkeerde plaatsen montagegaten (6 mm) in de wand. Plaats een bijgeleverde plug in ieder montagegat. De sirene aan de wand monteren 2. 3. 4. Plaats de schroeven (30 mm) in de bovenste montagegaten en laat de schroef ongeveer 9 mm uitsteken. 5. 6. Plaats de montageplaat. Controleer of de gaten in de montageplaat met de onderste montagegaten zijn uitgelijnd. Plaats de schroeven (25 mm). 7. Monteer de sirene aan de wand. LET OP: Controleer bij het monteren van de sirene aan de wand of de sabotageschakelaar is gesloten. Als de sabotageschakelaar niet is gesloten, zal de sirene niet naar behoren werken. Verwijder indien nodig de sirene weer en plaats een afstandstuk tussen de plunjer van de sabotageschakelaar en de wand om te verzekeren dat de schakelaar sluit als u de sirene aan de wand monteert. LET OP: Laat de sirene voordat u deze gaat testen of in werking stellen minimaal 24 uur met rust op zijn plaats, zodat de batterij maximaal kan opladen. 27 5.5 Een nieuwe beveiligingsdetector aan de sirene toevoegen Om met de sirene te kunnen communiceren, moet de sirene de id-code van de beveiligingsdetector inleren. De sirene kan maximaal 12 detectoren (deur/raamcontactdetectoren of PIR-bewegingsdetectoren) inleren. Tijdens het installeren zal de sirene in de servicemodus opstarten, gereed om een nieuwe beveiligingsdetector in te leren. Als de sirene in de bedrijfsmodus staat, zie de paragraaf 'Servicemodus / Bedrijfsmodus' om naar de servicemodus te schakelen. Afstandsbediening 1 2 Opmerking: Opmerking: 3 Opmerking: 5.6 1. 2. 3. Toetsenpaneel op afstand Voer de viercijferige id-code in. Houd de knop 5 seconden ingedrukt. De sirene geeft één korte pieptoon. De indicatoren in de lens aan de voorzijde en de inleerindicator knipperen langzaam. De sirene blijft gedurende 30 seconden in de inleermodus. De id-code programmeren: Druk op de sabotageschakelaar op de beveiligingsdetector. De sirene geeft twee korte pieptonen. De indicatoren in de lens aan de voorzijde en de inleerindicator knipperen snel. Als het bevestigingssignaal niet binnen 30 seconden wordt ontvangen, verlaat de sirene de inleermodus. De sirene blijft in de servicemodus. Als de beveiligingsdetector al gekoppeld is of als het maximumaantal van 12 beveiligingsdetectoren is gekoppeld, geeft de sirene één korte pieptoon en verlaat de inleermodus. De indicatoren in de lens aan de voorzijde en de inleerindicator gaan uit. De id-code bevestigen: Druk nogmaals binnen 15 seconden op de sabotageschakelaar op de beveiligingsdetector om de id-code te bevestigen. De sirene geeft drie korte pieptonen. De indicatoren in de lens aan de voorzijde en de inleerindicator branden gedurende 3 seconden en gaan vervolgens uit. De sirene keert naar de servicemodus terug. Als het bevestigingssignaal niet binnen 15 seconden wordt ontvangen, geeft de sirene één korte pieptoon en verlaat de inleermodus. De indicatoren in de lens aan de voorzijde en de inleerindicator gaan uit. Houd de knop 5 seconden ingedrukt. Alle apparaten uit de sirene wissen Schakel de sirene met de afstandsbediening of het toetsenpaneel op afstand naar de servicemodus. Verwijder de sirene van de wand. Houd de inleerknop 10 seconden ingedrukt tot de sirene twee lange pieptonen geeft en de inleerindicator 5 maal knippert. De id-codes van alle gekoppelde apparaten worden uit het geheugen gewist. De sirene blijft in de servicemodus. 5.7 Servicemodus / Bedrijfsmodus Bij het voor de eerste keer installeren van de sirene zal deze automatisch in de servicemodus opstarten. Schakel de sirene voordat u deze gaat testen of in werking stellen naar de bedrijfsmodus. Zie als u de sirene met een bedieningspaneel gebruikt de Installatie- en Bedieningshandleiding voor het alarmsysteem. Gebruik als u de sirene zonder een bedieningspaneel gebruikt de afstandsbediening of het toetsenpaneel op afstand: Afstandsbediening 1 Houd de knop Toetsenpaneel op afstand Voer de viercijferige id-code in. Houd de knop 5 seconden ingedrukt. Van de bedrijfsmodus naar de servicemodus schakelen: 5 seconden ingedrukt. Als u op de knop (afstandsbediening) of de knop (toetsenpaneel op afstand) drukt, verzendt het apparaat het uitschakelsignaal en geeft de sirene twee normale pieptonen. Het systeem wordt uitgeschakeld. Als u de knop (afstandsbediening) of de knop (toetsenpaneel op afstand) 5 seconden ingedrukt houdt, geeft de sirene twee korte pieptonen gevolgd door één lange pieptoon. De indicatoren in de lens aan de voorzijde en de inleerindicator knipperen tegelijkertijd met de pieptonen. Het systeem keert naar de servicemodus terug. Van de servicemodus naar de bedrijfsmodus schakelen: Als u op de knop (afstandsbediening) of de knop (toetsenpaneel op afstand) drukt, verzendt het apparaat het uitschakelsignaal. De sirene reageert niet op het uitschakelsignaal, omdat hij nog steeds in de servicemodus staat. Als u de knop (afstandsbediening) of de knop (toetsenpaneel op afstand) 5 seconden ingedrukt houdt, geeft de sirene één lange pieptoon gevolgd door twee korte pieptonen. De indicatoren in de lens aan de voorzijde en de inleerindicator knipperen tegelijkertijd met de pieptonen. De sirene keert uitgeschakeld naar de bedrijfsmodus terug. 28 6 Bediening Deze paragraaf beschrijft uitsluitend de bediening van de sirene bij werking zonder bedieningspaneel (één zone). 6.1 Het systeem inschakelen Schakel het systeem in als u het pand verlaat. Controleer of de sirene in de bedrijfsmodus staat. Controleer voordat u het systeem inschakelt of alle deuren en ramen zijn gesloten en of de PIR-bewegingsdetectoren niet zijn geblokkeerd. Controleer of dieren vastzitten in ruimten die niet door PIR-bewegingsdetectoren worden bewaakt. 6.1.1 Directe inschakelmodus De directe inschakelmodus schakelt het systeem onmiddellijk in. Als het systeem is ingeschakeld, zal activering van een beveiligingsdetector onmiddellijk een alarm genereren. Schakel als u het pand binnengaat het systeem uit voordat u een door een deur/raamcontactdetector bewaakte deur of raam opent of een door een PIR-bewegingsdetector bewaakte ruimte betreedt. Schakel in de directe inschakelmodus het systeem van buiten het pand met de afstandsbediening of het toetsenpaneel op afstand in en uit. Afstandsbediening 1 Toetsenpaneel op afstand Voer de viercijferige id-code in. Druk op de knop . Druk op de knop . De sirene geeft één pieptoon. De indicatoren in de lens aan de voorzijde en de inleerindicator knipperen eenmaal. 6.1.2 Vertraagde inschakelmodus De vertraagde inschakelmodus schakelt het systeem met 15 seconden binnenkomst/uitgangsvertraging in. De sirene geeft één pieptoon en nog een pieptoon nadat de vertraging van 15 seconden is verstreken, zodat u tijd heeft om het pand te verlaten zonder dat het systeem volledig is ingeschakeld. Bij binnenkomst in het pand wordt het systeem bij het openen van een door een deur/raamcontactdetector bewaakte deur/raam of bij het betreden van een door een PIR-bewegingsdetector bewaakte ruimte geactiveerd. Het alarm zal echter pas na het verstrijken van de vertragingstijd van 15 seconden afgaan. Schakel het systeem tijdens de vertraging van 15 seconden met de afstandsbediening of het toetsenpaneel op afstand uit. In geval van een alarm klinkt de sirene continu tot de ingestelde tijdsduur voor het alarm is verstreken. Het alarm stopt en het systeem wordt weer ingeschakeld. De alarmblokkeringsoptie voorkomt dat het systeem na drie keer herhaling van het proces opnieuw wordt ingeschakeld. Afstandsbediening 1 Druk op de knop Toetsenpaneel op afstand Voer de viercijferige id-code in. Druk op de knop of de knop . De sirene geeft na het verstrijken van de 15 seconden vertraging één pieptoon. De indicatoren in de lens aan de voorzijde en de inleerindicator knipperen eenmaal om aan te geven dat het systeem volledig is ingeschakeld. 6.2 . Het systeem uitschakelen Afstandsbediening 1 Druk op de knop Opmerking: 6.3 Toetsenpaneel op afstand Voer de viercijferige id-code in. Druk op de knop . . De sirene geeft twee pieptonen. Als het systeem bij het uitschakelen tien snelle pieptonen geeft, is een alarm gegenereerd terwijl het systeem werd ingeschakeld. Persoonlijke aanvalfunctie De gebruiker kan in geval van bedreiging of gevaar op ieder moment een alarm genereren door de persoonlijke aanvalfunctie te activeren. Afstandsbediening 1 Toetsenpaneel op afstand Druk de knop 3 seconden in. Houd de knop of de knop Opmerking: Verschuif bij oudere afstandsbedieningen ingedrukt. de persoonlijke aanvalschakelaar. Het alarm wordt gegenereerd. De sirene gaat af. 29 3 seconden 6.4 Sabotage van het apparaat Als de batterijdeksel van een apparaat (met uitzondering van de afstandsbedieningen) wordt verwijderd of als de sirene of het toetsenpaneel op afstand van de wand wordt verwijderd, wordt onmiddellijk een alarm gegenereerd, zelfs als het systeem is uitgeschakeld (tenzij ze sirene in de servicemodus staat). Het alarm klinkt tot de ingestelde alarmtijdsduur is verstreken of tot het systeem via de afstandbediening of het toetsenpaneel op afstand wordt uitgeschakeld. 6.5 Batterij bijna leeg Als u op de knop op de afstandsbediening of het toetsenpaneel op afstand drukt terwijl de batterij van de sirene bijna leeg is, geeft de sirene drie korte pieptonen. Als een indicator voor batterij bijna leeg wordt geactiveerd, zal het apparaat nog maximaal 2 weken werken. Vervang de batterij zo snel mogelijk. Schakel voordat u de batterij gaat vervangen het systeem naar de servicemodus. Schakel na het vervangen van de batterij het systeem terug naar de bedrijfsmodus. 7 Onderhoud Het alarmsysteem vraagt weinig onderhoud. Schakel als u het systeem volledig moet uitschakelen het systeem eerst naar de servicemodus voordat u de kap van de sirene verwijdert en de oplaadbare batterij en de opstartbatterij loskoppelt. Controleer of het zonnepaneel met een lichtafsluitend materiaal is afgedekt, zodat het zonnepaneel de sirene niet kan opladen. 1. Reinig het zonnepaneel iedere 6 maanden met een zachte, vochtige doek, bij voorkeur in het voorjaar en in het najaar. Gebruik geen schurende reinigingsmiddelen op basis van oplosmiddelen of middelen in spuitbussen. Reinig de binnenzijde van de sirene niet en voorkom binnendringing van water in de sirene om te verzekeren dat het zonnepaneel al het beschikbare licht blijft opvangen. 2. Laat de sirene niet voor een lange periode met de batterijen aangesloten, tenzij de sirene voldoende licht kan ontvangen om de batterij opgeladen te houden. Als de batterijlading niet wordt onderhouden, zal de oplaadbare batterij tot een onacceptabel niveau ontladen en moet de sirene via een 12 Vdc/1000 mA voeding worden opgeladen. Plaats een nieuwe opstartbatterij (9V alkaline, PP3) om te verzekeren dat de sirene voldoende voeding krijgt tot het zonnepaneel de oplaadbare batterij weer kan opladen. 3. Laat de oplaadbare batterij niet gedurende een lange periode in ontladen staat. De oplaadbare batterij heeft standaard een levensduur van 3-4 jaar en vereist geen onderhoud. 8 Afvoeren en recyclen Het product is geclassificeerd volgens de richtlijn voor Afgedankte Elektrische en Elektronische Apparatuur (AEEA). Gooi het product en de batterijen van het beeldscherm niet weg bij ander huishoudelijk afval of bedrijfsafval. Voer aan het einde van de levensduur de verpakking en het product via een hiervoor geschikt recyclebedrijf af. Neem voor informatie over beschikbare faciliteiten contact op met de plaatselijke instantie of de leverancier waar u het product heeft gekocht. 9 EG-conformiteitsverklaring Novar ED&S verklaart hierbij dat het product voldoet aan de essentiële eisen en andere relevante bepalingen van de richtlijn voor Radioapparatuur en Telecommunicatie-eindapparatuur (R&TTE - 1995/5/EG). 30 10 Garantie Novar ED&S garandeert dat naar zijn goeddunken goederen worden vervangen of gerepareerd als deze binnen 2 jaar uitsluitend als gevolg van een fout in het materiaal en de fabricage defect raken. Uiteraard komt de garantie te vervallen als het product niet volgens de instructies is geïnstalleerd, bediend of onderhouden, als het product niet op de juiste manier is gebruikt of als een poging is gedaan het product op ongeacht welke wijze te corrigeren, te ontmantelen of te modificeren. De garantie verklaart de gehele aansprakelijkheid van Novar ED&S. De garantie dekt geen vervolgschade of schade of installatiekosten als gevolg van het defecte product. De garantie heeft geen enkele invloed op de wettelijke of andere rechten van een consument en is uitsluitend van toepassing op binnen de EU geïnstalleerde producten. Als een onderdeel een defect ontwikkelt, moet het product naar het verkooppunt worden geretourneerd vergezeld van: 1. 2. 3. Het aankoopbewijs. Een volledige beschrijving van het mankement. Alle relevante batterijen (losgekoppeld). 11 Klantenservice Ga naar www.friedlandproducts.com voor meer productinformatie en volledige installatiehandleidingen, indien van toepassing. Service Helpline Nederland België 034-3592222 02 513 67 39 Maandag t/m vrijdag 09:00 - 17:00 31 De telefoonkosten bedragen het nationale tarief van de dienstverleners. Table des matières 1 2 Usage prévu .......................................................................................................................................................................... 33 Sécurité ................................................................................................................................................................................. 33 2.1 2.2 3 Description ............................................................................................................................................................................ 33 3.1 3.2 4 5 Configuration de sirène ............................................................................................................................................... 35 Mise sous tension de sirène ........................................................................................................................................ 35 Ajout d'un nouveau clavier distant ou d'une nouvelle télécommande à la sirène ...................................................... 36 Montage de la sirène au mur ...................................................................................................................................... 37 Ajout d'un nouveau détecteur de sécurité à la sirène ................................................................................................. 38 Suppression de tous les dispositifs de la sirène ........................................................................................................... 38 Mode entretien / Mode fonctionnement .................................................................................................................... 38 Fonctionnement .................................................................................................................................................................... 39 6.1 6.1.1 6.1.2 6.2 6.3 6.4 6.5 7 8 9 10 11 Contenu de l'emballage ............................................................................................................................................... 33 Outils requis ................................................................................................................................................................ 34 Présentation .......................................................................................................................................................................... 34 Installation ............................................................................................................................................................................ 35 5.1 5.2 5.3 5.4 5.5 5.6 5.7 6 Produit ......................................................................................................................................................................... 33 Installation ................................................................................................................................................................... 33 Activation du système ................................................................................................................................................. 39 Mode activation instantanée .................................................................................................................................. 39 Mode activation retardée ....................................................................................................................................... 39 Désactivation du système ............................................................................................................................................ 39 Fonction d'agression.................................................................................................................................................... 40 Altération de dispositif ................................................................................................................................................ 40 État de batterie faible .................................................................................................................................................. 40 Maintenance ......................................................................................................................................................................... 40 Mise au rebut et recyclage .................................................................................................................................................... 40 Déclaration de conformité CE ............................................................................................................................................... 41 Garantie ................................................................................................................................................................................ 41 Service clientèle .................................................................................................................................................................... 41 32 1 Usage prévu La sirène solaire FGGA0401WWE / FGGA04* Series est compatible avec les systèmes d'alarme sans fil Friedland fonctionnant exclusivement à 868 MHz. La sirène utilise une batterie principale rechargeable (NiMH) haute capacité. Le panneau solaire sur le boîtier recharge la batterie durant la journée. Dans l'obscurité, seule une faible quantité d'énergie est requise pour faire fonctionner la sirène. La sirène est dotée d'une pile (alcaline) pour démarrer la sirène lors de la première activation du système jusqu'à ce que le panneau solaire charge la batterie principale rechargeable. L'interrupteur d'altération déclenche immédiatement une alarme en cas de tentative illicite d'interférence et de retrait du cache de la sirène. Un système de détection antibrouillage génère une alarme en cas de tentative de brouillage continu du canal radio utilisé par le système. 2 Sécurité 2.1 Produit 2.2 Installation 3 Conservez tous les avertissements de sécurité et toutes les instructions pour référence ultérieure. Respectez la réglementation locale applicable à l'installation du produit. Ne tentez pas d'ouvrir les dispositifs. Portez des gants de sécurité pour percer dans les murs. Portez des lunettes de sécurité pour percer dans les murs. Avant de percer dans les murs, assurez-vous de l'absence de fils électrique et de conduites d'eau. Positionnez l'échelle sur une surface stable et de niveau selon un angle sécurisé. Description 3.1 Pièce Contenu de l'emballage Description Sirène solaire Gabarit de montage Pièce Description Fixations Pile (9V, alcaline) (6LR61 (PP3)) Pièce Description Batterie principale rechargeable (6V, NiMH) Guide d'installation rapide 3.2 Outils requis Outil 4 Description Protections auditives Outil Description Pointe à tracer Gants de sécurité Tournevis cruciforme (#0 / #1 / #2) Perceuse électrique Niveau à bulle Foret à béton (5 mm / 6 mm) Crayon Présentation Sirène solaire 1. 2. 3. 4. 5. 6. 7. 8. 9. 10. 11. Sirène Interrupteur d'altération Bouton d'apprentissage Indicateur d'apprentissage Interrupteurs DIP Pile (9V, alcaline) Batterie principale rechargeable (6V, NiMH) Connexion d'adaptateur d'alimentation (12V) Cache de batterie Plaque de montage Orifices de montage Interrupteur DIP 1. 2. 3. 4. 5. 34 Heure d'alarme Détection antibrouillage Son d'alarme Son de bip Sirène / Panneau de commande 5 5.1 Installation Configuration de sirène 1. 2. Retirez les vis. Retirez le cache de batterie. 3. Réglez l'interrupteur 5 sur la position requise. 4. 5. 6. 7. Sans panneau de commande Marche (sirène) (zone unique) Avec panneau de commande Arrêt distinct (panneau de commande) Réglez l'interrupteur 1 pour limiter la durée maximum pendant laquelle la sirène externe retentit. Sans panneau de commande ON (3 min) / OFF (1 min) (zone unique) Avec panneau de commande ON (10 min) / OFF (3 min) distinct Réglez l'interrupteur 2 pour activer ou désactiver la détection antibrouillage en cas d'utilisation de la sirène sans panneau de commande. ON (MARCHE) activé OFF (ARRÊT) désactivé Réglez l'interrupteur 3 pour activer ou désactiver la sirène durant une alarme. ON (MARCHE) activé OFF (ARRÊT) désactivé Réglez l'interrupteur 4 pour activer ou désactiver les bips lorsque la sirène reçoit des signaux d'une télécommande ou d'un clavier distant. ON (MARCHE) OFF (ARRÊT) 5.2 activé désactivé Mise sous tension de sirène Note : Si vous installez la sirène pour la première fois, elle se met automatiquement sous tension en mode entretien. Vous ne pouvez pas faire passer la sirène du mode entretien au mode fonctionnement avant de lui avoir lié au moins une télécommande ou un clavier distant. 1. 2. Connectez la pile à la borne de connexion. Connectez la batterie principale rechargeable à la borne de connexion. 35 3. Appuyez sur l'interrupteur d'altération. Les indicateurs de l'objectif frontal clignotent plusieurs fois puis continuent à clignoter par alternance toutes les 5 secondes afin d'indiquer que la sirène est opérationnelle. 4. Retirez le film protecteur du panneau solaire. Attention : 5.3 Assurez-vous que le panneau solaire reçoit suffisamment de lumière pour préserver la charge de la batterie. 5. a) Si l'interrupteur 5 est sur ON (sirène), la sirène fonctionne sans panneau de commande (zone unique). b) Si l'interrupteur 5 est sur OFF (panneau de commande), la sirène fonctionne avec le panneau de commande. Pour lier la sirène au panneau de commande, consultez le Manuel d'installation et d'utilisation du système d'alarme ainsi que le Guide d'installation rapide de la sirène. Ajout d'un nouveau clavier distant ou d'une nouvelle télécommande à la sirène Si vous configurez la sirène sans panneau de commande distinct (zone unique) pour la première fois, vous devez lier la sirène à un clavier distant ou une télécommande avant d'ajouter d'autres dispositifs. La sirène doit apprendre le code ID de la télécommande ou du clavier distant. La sirène peut apprendre jusqu'à 6 télécommandes ou claviers distants. Durant la configuration, la sirène se met en marche en mode entretien, prête à apprendre le nouveau clavier ou la nouvelle télécommande. Si la sirène est en mode de fonctionnement, consultez la section “Mode entretien / Mode fonctionnement” pour passer en mode entretien. 1 2 Note : 3 Télécommande Clavier distant Appuyez sur le bouton d'apprentissage de la sirène sans le relâcher pendant 5 secondes pour accéder au mode apprentissage. La sirène émet un bip court. Les indicateurs de l'objectif frontal et l'indicateur d'apprentissage clignotent lentement. Programmez le code ID : Saisissez le code ID à 4 chiffres. Appuyez sur le bouton Appuyez sur le bouton . . La sirène émet deux bips courts. Les indicateurs de l'objectif frontal et l'indicateur d'apprentissage clignotent rapidement. Si la télécommande ou le clavier distant a déjà été configuré ou si le nombre maximum de 6 télécommandes ou claviers distants ont déjà été configurés à la sirène, elle émet un bip court et sort du mode apprentissage. Les indicateurs de l'objectif frontal et l'indicateur d'apprentissage s'éteignent. Confirmez le code ID : Appuyez sur le bouton Note : dans les 15 secondes. Saisissez le code ID à 4 chiffres et appuyez sur le bouton dans les 15 secondes. La sirène émet trois bips courts. Les indicateurs de l'objectif frontal et l'indicateur d'apprentissage s'allument pendant 3 secondes puis s'éteignent. La sirène revient au mode entretien. Si le signal de confirmation n'est pas reçu dans les 15 secondes, la sirène émet un bip long et sort du mode apprentissage. Les indicateurs de l'objectif frontal et l'indicateur d'apprentissage s'éteignent. 36 5.4 1. 2. Installez le cache de batterie. Installez les vis. 1. Soutenez le gabarit de montage en position et repérez les positions des orifices de montage. Si nécessaire, utilisez un niveau à bulle. Percez des orifices de montage (6 mm) dans le mur, correspondant aux positions repérées. Insérez une cheville (fournie) dans chaque orifice de montage. Montage de la sirène au mur 2. 3. 4. Installez les vis (30 mm) dans les orifices de montage supérieurs en laissant environ 9 mm de la vis saillir. 5. 6. Installez la plaque de montage. Assurez-vous que les orifices dans la plaque de montage sont alignés avec les orifices de montage inférieurs. Installez les vis (25 mm). 7. Montez la sirène au mur. ATTENTION : Assurez-vous que l'interrupteur d'altération est fermé lorsque vous montez la sirène au mur. Si l'interrupteur d'altération ne se ferme pas, la sirène ne fonctionne pas correctement. Si nécessaire, retirez à nouveau la sirène et insérez une cale entre le piston de l'interrupteur d'altération et le mur afin de vous assurer que l'interrupteur se ferme lorsque vous montez la sirène au mur . ATTENTION : Avant de tester ou d'utiliser la sirène, laissez-la en position pendant au moins 24 heures afin que la batterie soit chargée à fond. 37 5.5 Ajout d'un nouveau détecteur de sécurité à la sirène Afin de communiquer avec le détecteur de sécurité, la sirène doit apprendre son code ID. La sirène peut apprendre jusqu'à 12 détecteurs de sécurité (détecteurs de contact porte/fenêtre ou détecteurs de mouvement PIR). Durant la configuration, la sirène se met automatiquement en marche en mode entretien, prête à apprendre le nouveau détecteur de sécurité. Si la sirène est en mode de fonctionnement, consultez la section “Mode entretien / Mode fonctionnement” pour passer en mode entretien. Télécommande 1 2 Note : Note : 3 Note : 5.6 Clavier distant Saisissez le code ID à 4 chiffres. Appuyez sur le bouton sans le relâcher pendant 5 sans le relâcher pendant 5 secondes. secondes. La sirène émet un bip court. Les indicateurs de l'objectif frontal et l'indicateur d'apprentissage clignotent lentement. La sirène reste en mode apprentissage pendant 30 secondes. Programmez le code ID : Appuyez sur l'interrupteur d'altération sur le détecteur de sécurité. La sirène émet deux bips courts. Les indicateurs de l'objectif frontal et l'indicateur d'apprentissage clignotent rapidement. Si le signal de confirmation n'est pas reçu dans les 30 secondes, la sirène sort du mode apprentissage. La sirène reste en mode entretien. Si le détecteur de sécurité a déjà été configuré ou si le nombre maximum de 12 détecteurs de sécurité ont déjà été configurés à la sirène, elle émet un bip court et sort du mode apprentissage. Les indicateurs de l'objectif frontal et l'indicateur d'apprentissage s'éteignent. Confirmez le code ID : Appuyez à nouveau sur l'interrupteur d'altération du détecteur de sécurité dans les 15 secondes afin de confirmer le code ID. La sirène émet trois bips courts. Les indicateurs de l'objectif frontal et l'indicateur d'apprentissage s'allument pendant 3 secondes puis s'éteignent. La sirène revient au mode entretien. Si le signal de confirmation n'est pas reçu dans les 15 secondes, la sirène émet un bip long et sort du mode apprentissage. Les indicateurs de l'objectif frontal et l'indicateur d'apprentissage s'éteignent. Appuyez sur le bouton Suppression de tous les dispositifs de la sirène 1. 2. 3. Mettez la sirène en mode entretien en utilisant la télécommande ou le clavier distant. Retirez la sirène du mur. Appuyez sur le bouton d'apprentissage sans le relâcher pendant 10 secondes jusqu'à ce que la sirène émette deux bips longs et que l'indicateur d'apprentissage clignote 5 fois. Les codes ID de tous les dispositifs configuré sont effacés de la mémoire. La sirène reste en mode entretien. 5.7 Mode entretien / Mode fonctionnement Si vous installez la sirène pour la première fois, elle se met automatiquement sous tension en mode entretien. Avant de tester ou d'utiliser la sirène, elle doit passer en mode de fonctionnement. Si vous utilisez la sirène avec un panneau de commande, consultez le Manuel d'installation et d'utilisation du système d'alarme. Si vous utilisez la sirène sans panneau de commande, employez la télécommande ou le clavier distant : Télécommande 1 Clavier distant Saisissez le code ID à 4 chiffres. Appuyez sur le bouton Appuyez sur le bouton sans le relâcher pendant 5 sans le relâcher pendant 5 secondes. secondes. Pour passer du mode fonctionnement au mode entretien : Si vous appuyez sur le bouton (télécommande) ou sur le bouton (clavier distant), le dispositif émet le signal de désactivation et la sirène émet deux bips normaux. Le système est désactivé. Si vous appuyez sans le relâcher sur le bouton (télécommande) ou sur le bouton (clavier distant) pendant 5 secondes, la sirène émet deux bips courts suivis d'un bip long. Les indicateurs de l'objectif frontal et l'indicateur d'apprentissage clignotent ensemble avec les bips. Le système revient au mode entretien. 38 Passage du mode entretien au mode fonctionnement : Si vous appuyez sur le bouton (télécommande) ou sur le bouton (clavier distant), le dispositif émet le signal de désactivation. La sirène ne répond pas au signal de désactivation car elle est toujours en mode entretien. Si vous appuyez sans le relâcher sur le bouton (télécommande) ou sur le bouton (clavier distant) pendant 5 secondes, la sirène émet un bip long suivi de deux bips courts. Les indicateurs de l'objectif frontal et l'indicateur d'apprentissage clignotent ensemble avec les bips. La sirène revient au mode fonctionnement dans un état désactivé. 6 Fonctionnement Cette section décrit uniquement le fonctionnement de la sirène fonctionnant sans utiliser le panneau de commande (zone unique). 6.1 Activation du système Lorsque vous abandonnez les lieux, le système doit être activé. Assurez-vous que la sirène est en mode fonctionnement. Avant d'activer le système, assurez-vous que toutes les portes et les fenêtres sont fermées et que les détecteurs de mouvement PIR ne sont pas obstrués. Assurez-vous que les animaux sont enfermés dans des zones non protégées par des détecteurs de mouvement PIR. 6.1.1 Mode activation instantanée Le mode activation instantanée active immédiatement le système. Si le système est activé, l'activation d'un détecteur de sécurité quelconque déclenche immédiatement une alarme. En entrant sur les lieux, désactivez le système avant d'ouvrir une porte ou une fenêtre quelconque protégée par un détecteur de contact porte/fenêtre ou en entrant dans une zone protégée par un détecteur de mouvement PIR. En mode activation instantanée, activez et désactivez le système depuis l'extérieur des lieux en utilisant une télécommande ou un clavier distant. Télécommande 1 6.1.2 Clavier distant Saisissez le code ID à 4 chiffres. Appuyez sur le bouton Appuyez sur le bouton . . La sirène émet un bip. Les indicateurs de l'objectif frontal et l'indicateur d'apprentissage clignotent une fois. Mode activation retardée Le mode activation retardée active le système avec un délai d'entrée/sortie de 15 secondes. La sirène émet un bip puis un autre bip après le délai de 15 secondes afin de vous laisser le temps de quitter les lieux avant que le système ne soit complètement activé. Lorsque vous entrez dans les lieux en ouvrant une porte ou une fenêtre protégée par un détecteur de contact porte/fenêtre ou en entrant dans une zone protégée par un détecteur de mouvement PIR, le système est déclenché et la sirène émet un bip long. Toutefois, l'alarme ne retentit pas tant que le délai de 15 secondes n'a pas expiré. Désactivez le système avec la télécommande ou le clavier distant durant le délai de 15 secondes. En cas d'alarme, la sirène retentit en continu jusqu'à l'expiration de la durée d'alarme définie. L'alarme s'arrête et le système se réactive. La fonction de verrouillage d'alarme empêche la réactivation du système lorsque le processus s'est répété à trois reprises. Télécommande 1 Appuyez sur le bouton Clavier distant Saisissez le code ID à 4 chiffres. Appuyez sur le bouton . ou . Une fois le délai de 15 secondes expiré, la sirène émet 1 bip. Les indicateurs de l'objectif frontal et l'indicateur d'apprentissage clignotent une fois pour indiquer que le système est complètement activé. 6.2 Désactivation du système Télécommande 1 Note : Clavier distant Saisissez le code ID à 4 chiffres. Appuyez sur le bouton . La sirène émet deux bips. Si le système est desactivé et la sirène émet 10 bips rapides, une alarme a été déclenchée pendant que le système était activé. Appuyez sur le bouton . 39 6.3 Fonction d'agression L'utilisateur peut déclencher une alarme à tout moment en cas de menace ou de danger en activant la fonction d'agression. Télécommande 1 6.4 Clavier distant Appuyez sur le bouton sans le relâcher pendant Appuyez sur le bouton ou sans le relâcher 3 secondes. pendant 3 secondes. Note : Sur les anciens modèles de télécommande, glissez l'interrupteur de fixation personnelle. L'alarme est déclenchée. La sirène retentit. Altération de dispositif Si le cache de batterie d'un dispositif quelconque (sauf les télécommandes) est retiré ou si la sirène ou le panneau de commande est retiré du mur, une alarme intervient immédiatement même si le système est désactivé (sauf si le système est en mode entretien). L'alarme retentit pendant la durée définie ou jusqu'à la désactivation du système depuis la télécommande ou le clavier distant. 6.5 État de batterie faible Si vous appuyez sur le bouton de la télécommande ou du clavier distant lorsque la batterie de la sirène est faible, la sirène émet trois bips courts. Si un indicateur de batterie faible est activé, le dispositif continu à fonctionner jusqu'à 2 semaines. Remplacez la batterie aussi vite que possible. Avant de remplacer la batterie, mettez le système en mode entretien. Après avoir remplacé la batterie, remettez le système en mode de fonctionnement. 7 Maintenance Le système d'alarme nécessite peu de maintenance. Si vous devez mettre le système complètement hors tension, mettez-le d'abord en mode entretien avant de retirer le cache de la sirène et de déconnecter la batterie principale rechargeable ainsi que la pile. Assurez-vous que le panneau solaire est couvert avec un matériau opaque afin d'éviter qu'il n'alimente la sirène. 1. Nettoyez le panneau solaire avec un chiffon doux et humide tous les 6 mois, de préférence au printemps et en automne. N'utilisez pas un produit nettoyant abrasif, à base de solvant ou aérosol. Ne nettoyez pas l'intérieur de la sirène et ne laissez pas l'eau s'y infiltrer afin de vous assurer que le panneau solaire continue à recevoir toute la lumière disponible. 2. Ne laissez pas la sirène avec la batterie et la pile connectées pendant des périodes prolongées sauf si elle peut recevoir une lumière suffisante afin de maintenir la batterie chargée. Si la charge de la batterie n'est pas préservée, la batterie principale rechargeable fonctionne à un niveau faible inacceptable et la sirène doit être rechargée avec une alimentation électrique 12VC/1000mA. Installez une nouvelle pile (9V alcaline, PP3) pour vous assurer que la sirène reçoit une alimentation suffisante jusqu'à ce que le panneau solaire recharge la batterie principale. 3. Ne laissez pas la batterie principale rechargeable déchargée pendant une période prolongée. La batterie principale rechargeable présente un cycle de vie normale de 3 à 4 ans et ne nécessite aucune maintenance. 8 Mise au rebut et recyclage Le produit est classifié par la directive DEEE (Déchets d'équipements électriques et électroniques). Le produit et les batteries de l'écran ne doivent pas être mis au rebut avec les déchets domestiques ou les autres déchets commerciaux. À la fin du cycle de vie utile, l'emballage et le produit doivent être mis au rebut dans un centre de recyclage agréé. Pour en savoir plus sur les installations à votre disposition, veuillez contacter les autorités publiques locales ou le revendeur vous ayant vendu le produit. 40 9 Déclaration de conformité CE Novar ED&S déclare ici que le produit est conforme avec les exigences essentielles et les autres dispositions connexes de la directive R&TTE (Équipements hertziens et équipements terminaux de télécommunications) (1995/5/CE). 10 Garantie Novar ED&S s'engage à remplacer ou à réparer, à sa discrétion, les marchandises devenues défectueuses dans les 2 ans du fait de pièces ou d'une main-d'œuvre défaillantes. Bien entendu, si le produit n'a pas été installé, utilisé ou entretenu conformément aux instructions, si le produit n'a pas été utilisé de manière appropriée voire en cas de tentative de correction, de démontage ou de modification du produit, d'une manière quelconque, la garantie est annulée. La garantie énonce l'ensemble des responsabilités de Novar ED&S. La garantie n'est pas étendue afin de couvrir les pertes et dommages conséquents voire les frais d'installation liés à un produit défectueux. La garantie n'affecte aucunement vos droits légaux ou autres en tant que consommateur et s'applique uniquement aux produits installés dans l'UE. Si un élément présente une défaillance, le produit doit être retourné au point de vente avec : 1. 2. 3. Preuve d'achat. Description complète de la défaillance. Toutes les batteries nécessaires (déconnectées). 11 Service clientèle Pour en savoir plus sur le produit et obtenir des manuels d'installation complets, le cas échéant, veuillez visiter www.friedlandproducts.com Service Helpline France 0810 59 60 63 Belgique 02 513 67 39 Lundi à vendredi 09:00 - 17:00 41 Les appels téléphoniques sont facturés au tarif national des prestataires de services. Índice 1 2 Uso previsto .......................................................................................................................................................................... 43 Seguridad .............................................................................................................................................................................. 43 2.1 2.2 3 Descripción ............................................................................................................................................................................ 43 3.1 3.2 4 5 Configuración de la sirena ........................................................................................................................................... 45 Encendido de la sirena................................................................................................................................................. 45 Adición de un nuevo control remoto o teclado remoto a la sirena ............................................................................. 46 Montaje de la sirena en la pared ................................................................................................................................. 47 Adición de un nuevo detector de seguridad a la sirena .............................................................................................. 48 Eliminación de todos los dispositivos de la sirena ....................................................................................................... 48 Modo de servicio / modo de funcionamiento ............................................................................................................. 48 Funcionamiento .................................................................................................................................................................... 49 6.1 6.1.1 6.1.2 6.2 6.3 6.4 6.5 7 8 9 10 11 Contenido del paquete ................................................................................................................................................ 43 Herramientas necesarias ............................................................................................................................................. 44 Perspectiva general ............................................................................................................................................................... 44 Instalación ............................................................................................................................................................................. 45 5.1 5.2 5.3 5.4 5.5 5.6 5.7 6 Producto ...................................................................................................................................................................... 43 Instalación ................................................................................................................................................................... 43 Armado del sistema ..................................................................................................................................................... 49 Modo de armado instantáneo ................................................................................................................................ 49 Modo de armado retardado ................................................................................................................................... 49 Desarmado del sistema ............................................................................................................................................... 49 Función de ataque personal ........................................................................................................................................ 50 Manipulación del dispositivo ....................................................................................................................................... 50 Estado de batería baja ................................................................................................................................................. 50 Mantenimiento ..................................................................................................................................................................... 50 Eliminación y reciclaje ........................................................................................................................................................... 50 Declaración de conformidad CE ............................................................................................................................................ 51 Garantía ................................................................................................................................................................................ 51 Soporte al cliente .................................................................................................................................................................. 51 42 1 Uso previsto La sirena solar FGGA0401WWE / serie FGGA04* es adecuada únicamente para su utilización con sistemas de alarma inalámbricos Friedland que funcionan a 868 MHz. La sirena utiliza una batería principal recargable de alta capacidad (NiMH). El panel solar situado encima de la carcasa carga la batería durante las horas de luz diurna. En la oscuridad, sólo se necesita una pequeña cantidad de energía para hacer funcionar la sirena. La sirena se suministra con una pila de encendido inicial (alcalina) para suministrar la energía inicial a la sirena cuando el sistema se activa por primera vez hasta que el panel solar carga la batería principal recargable. El interruptor de manipulación activará inmediatamente una alarma si se realiza cualquier intento no autorizado de interferir con y retirar la cubierta de la sirena. Un sistema de detección antiatasco generará una alarma si se realiza cualquier intento de atascar de forma continua el canal de radio utilizado para el sistema. 2 Seguridad 2.1 Producto 2.2 Instalación 3 Conserve todas las advertencias de seguridad e instrucciones para su consulta posterior. Respete los reglamentos locales aplicables a la instalación del producto. No intente abrir los dispositivos. Lleve guantes de seguridad al taladrar en paredes. Lleve gafas de seguridad al taladrar en paredes. Asegúrese de que no haya cables eléctricos o tuberías de agua al taladrar en paredes. Coloque las escaleras sobre una superficie nivelada y estable a un ángulo seguro. Descripción 3.1 Pieza Contenido del paquete Descripción Sirena solar Plantilla de montaje Pieza Descripción Elementos de fijación Pila de encendido inicial (9V, alcalina) (6LR61 (PP3)) Pieza Descripción Batería principal recargable (6V, NiMH) Guía de instalación rápida 3.2 Herramientas necesarias Herramienta 4 Descripción Protectores auditivos Herramienta Descripción Punzón Guantes de seguridad Destornillador Phillips (nº 0 / nº 1 / nº 2) Taladro eléctrico Nivel de burbuja Broca para mampostería (5 mm / 6 mm) Lápiz Perspectiva general Sirena solar 1. 2. 3. 4. 5. 6. 7. 8. 9. 10. 11. Sirena Interruptor de manipulación Botón de aprendizaje Indicador de aprendizaje Interruptores DIP Pila de encendido inicial (9V, alcalina) Batería principal recargable (6V, NiMH) Conexión de adaptador de corriente (12V) Cubierta de batería Placa de montaje Orificios de montaje Interruptor DIP 1. 2. 3. 4. 5. 44 Tiempo de alarma Detección antiatasco Sonido de alarma Pitido Sirena / panel de control 5 5.1 Instalación Configuración de la sirena 1. 2. Retire los tornillos. Retire la cubierta de la batería. 3. Sitúe el interruptor 5 en la posición deseada. 4. 5. Sin panel de control ON [ACT.] (sirena) (zona individual) Con panel de control OFF [DESACT.] independiente (panel de control) Ajuste el interruptor 1 para limitar el periodo máximo durante el cual sonará la sirena externa. Sin panel de control ON [ACT.] (3 min.) / (zona individual) OFF [DESACT.] (1 min.) Con panel de control ON [ACT.] (10 min.) / independiente OFF [DESACT.] (3 min.) Ajuste el interruptor 2 para habilitar o deshabilitar la detección antiatasco al utilizar la sirena sin panel de control. ON [ACT.] OFF [DESACT.] 6. 7. Ajuste el interruptor 3 para habilitar o deshabilitar la sirena durante una alarma. ON [ACT.] habilitado OFF [DESACT.] deshabilitado Ajuste el interruptor 4 para habilitar o deshabilitar los pitidos cuando la sirena recibe señales del control remoto o el teclado remoto. ON [ACT.] OFF [DESACT.] 5.2 habilitado deshabilitado habilitado deshabilitado Encendido de la sirena Nota: Cuando instale la sirena por primera vez, ésta se encenderá automáticamente en el modo de servicio. No es posible cambiar la sirena del modo de servicio al modo de funcionamiento hasta que al menos un control remoto o un teclado remoto se haya vinculado a ésta. 1. 2. Conecte la pila de encendido inicial al terminal de conexión. Conecte la batería principal recargable al terminal de conexión. 45 3. Pulse el interruptor de manipulación. Los indicadores de la lente frontal parpadean varias veces y posteriormente siguen parpadeando alternativamente cada 5 segundos para indicar que la sirena está operativa. 4. Retire la película protectora del panel solar. Precaución: 5.3 Asegúrese de que el panel solar reciba suficiente luz para mantener la carga de la batería. 5. a) Si el interruptor 5 está situado en ON [ACT.] (sirena), la sirena funcionará sin panel de control (zona individual). b) Si el interruptor 5 está situado en OFF [DESACT.] (panel de control), la sirena funcionará con panel de control. Para vincular la sirena al panel de control, consulte el Manual de instalación y funcionamiento del sistema de alarma y la Guía de instalación rápida de la sirena. Adición de un nuevo control remoto o teclado remoto a la sirena Si configura la sirena sin panel de control independiente (zona individual) por primera vez, debe vincular la sirena a un teclado remoto o a un control remoto antes de agregar otros dispositivos. La sirena debe aprender el código ID del control remoto o el teclado remoto. La sirena puede aprender hasta 6 controles remotos o teclados remotos. Durante la configuración, la sirena se encenderá en el modo de servicio, lista para aprender un nuevo control remoto o teclado remoto. Si la sirena está en el modo de funcionamiento, consulte la sección "Modo de servicio / modo de funcionamiento" para cambiar al modo de servicio. 1 2 Nota: 3 Control remoto Teclado remoto Pulse y mantenga pulsado el botón de aprendizaje en la sirena durante 5 segundos para acceder al modo de aprendizaje. La sirena emite un pitido corto. Los indicadores de la lente frontal y el indicador de aprendizaje parpadean lentamente. Programe el código ID: Pulse el botón . Introduzca el código ID de 4 dígitos. Pulse el botón . La sirena emite dos pitidos cortos. Los indicadores de la lente frontal y el indicador de aprendizaje parpadean rápidamente. Si el control remoto o el teclado remoto ya se ha vinculado o si se ha vinculado el número máximo de 6 controles remotos o teclados remotos, la sirena emitirá un pitido corto y saldrá del modo de aprendizaje. Los indicadores de la lente frontal y el indicador de aprendizaje se apagarán. Confirme el código ID: Introduzca el código ID de 4 dígitos y pulse el botón en menos de 15 segundos. La sirena emite tres pitidos cortos. Los indicadores de la lente frontal y el indicador de aprendizaje se encienden durante 3 segundos y se apagan. La sirena vuelve al modo de servicio. Si la señal de confirmación no se recibe en menos de 15 segundos, la sirena emitirá un pitido corto y saldrá del modo de aprendizaje. Los indicadores de la lente frontal y el indicador de aprendizaje se apagarán. Pulse el botón Nota: en menos de 15 segundos. 46 5.4 1. 2. Instale la cubierta de la batería. Instale los tornillos. 1. Sujete en posición la plantilla de montaje y marque las posiciones de los orificios de montaje. En caso necesario, utilice un nivel de burbuja. Taladre orificios de montaje (6 mm) en la pared en función de las posiciones marcadas. Inserte uno de los tacos de pared suministrados en cada orificio de montaje. Montaje de la sirena en la pared 2. 3. 4. Instale los tornillos (30 mm) en los orificios de montaje superiores, dejando que sobresalgan aproximadamente 9 mm del tornillo. 5. 6. Instale la placa de montaje. Asegúrese de que los orificios de la placa de montaje se alineen con los orificios de montaje inferiores. Instale los tornillos (25 mm). 7. Monte la sirena en la pared. PRECAUCIÓN: Asegúrese de que el interruptor de manipulación esté cerrado cuando monte la sirena en la pared. Si el interruptor de manipulación no se cierra, la sirena no funcionará correctamente. En caso necesario, retire la sirena de nuevo e inserte un espaciador entre el émbolo del interruptor de manipulación y la pared para asegurarse de que el interruptor se cierre cuando monte la sirena en la pared. PRECAUCIÓN: Antes de probar o hacer funcionar la sirena, déjela en posición durante al menos 24 horas para cargar totalmente la batería. 47 5.5 Adición de un nuevo detector de seguridad a la sirena Para comunicar con la sirena, ésta debe aprender el código ID del detector de seguridad. La sirena puede aprender hasta 12 detectores de seguridad (detectores de contacto de puerta/ventana o detectores de movimiento PIR). Durante la configuración, la sirena se encenderá automáticamente en el modo de servicio, lista para aprender un nuevo detector de seguridad. Si la sirena está en el modo de funcionamiento, consulte la sección "Modo de servicio / modo de funcionamiento" para cambiar al modo de servicio. 1 2 Nota: Nota: 3 Nota: 5.6 Control remoto Teclado remoto Introduzca el código ID de 4 dígitos. Pulse y mantenga Pulse y mantenga pulsado el botón durante pulsado el botón durante 5 segundos. 5 segundos. La sirena emite un pitido corto. Los indicadores de la lente frontal y el indicador de aprendizaje parpadean lentamente. La sirena permanece en el modo de aprendizaje durante 30 segundos. Programe el código ID: Pulse el interruptor de manipulación del detector de seguridad. La sirena emite dos pitidos cortos. Los indicadores de la lente frontal y el indicador de aprendizaje parpadean rápidamente. Si la señal de confirmación no se recibe en menos de 30 segundos, la sirena saldrá del modo de aprendizaje. La sirena permanecerá en el modo de servicio. Si el detector de seguridad ya se ha vinculado o si se ha vinculado el número máximo de 12 detectores de seguridad, la sirena emitirá un pitido corto y saldrá del modo de aprendizaje. Los indicadores de la lente frontal y el indicador de aprendizaje se apagarán. Confirme el código ID: Pulse de nuevo el interruptor de manipulación del detector de seguridad en menos de 15 segundos para confirmar el código ID. La sirena emite tres pitidos cortos. Los indicadores de la lente frontal y el indicador de aprendizaje se encienden durante 3 segundos y se apagan. La sirena vuelve al modo de servicio. Si la señal de confirmación no se recibe en menos de 15 segundos, la sirena emitirá un pitido corto y saldrá del modo de aprendizaje. Los indicadores de la lente frontal y el indicador de aprendizaje se apagarán. Eliminación de todos los dispositivos de la sirena 1. 2. 3. Ponga la sirena en el modo de servicio con el control remoto o el teclado remoto. Retire la sirena de la pared. Pulse y mantenga pulsado el botón de aprendizaje durante 10 segundos hasta que la sirena emita dos pitidos largos y el indicador de aprendizaje parpadea 5 veces. Los códigos ID de todos los dispositivos vinculados se borran de la memoria. La sirena permanece en el modo de servicio. 5.7 Modo de servicio / modo de funcionamiento Cuando instale la sirena por primera vez, ésta se encenderá automáticamente en el modo de servicio. Antes de probar o hacer funcionar la sirena, ésta debe cambiarse al modo de funcionamiento. Si utiliza la sirena con un panel de control, consulte el Manual de instalación y funcionamiento del sistema de alarma. Si utiliza la sirena sin un panel de control, utilice el control remoto o el teclado remoto: Control remoto 1 Teclado remoto Introduzca el código ID de 4 dígitos. Pulse y mantenga Pulse y mantenga pulsado el botón durante pulsado el botón durante 5 segundos. 5 segundos. Para cambiar del modo de funcionamiento al modo de servicio: Si pulsa el botón (control remoto) o el botón (teclado remoto), el dispositivo transmitirá la señal de desarmado y la sirena emitirá dos pitidos normales. El sistema se desarma. Si pulsa y mantiene pulsado el botón (control remoto) o el botón (teclado remoto) durante 5 segundos, la sirena emitirá dos pitidos cortos seguidos de un pitido largo. Los indicadores de la lente frontal y el indicador de aprendizaje parpadearán mientras suenan los pitidos. El sistema volverá al modo de servicio. Cambio del modo de servicio al modo de funcionamiento: Si pulsa el botón (control remoto) o el botón (teclado remoto), el dispositivo transmitirá la señal de desarmado. La sirena no responderá a la señal de desarmado, ya que aún se encuentra en el modo de servicio. 48 Si pulsa y mantiene pulsado el botón (control remoto) o el botón (teclado remoto) durante 5 segundos, la sirena emitirá un pitido largo seguido de dos pitidos cortos. Los indicadores de la lente frontal y el indicador de aprendizaje parpadearán mientras suenan los pitidos. La sirena volverá al modo de funcionamiento en estado desarmado. 6 Funcionamiento Esta sección sólo describe el funcionamiento de la sirena cuando funciona sin panel de control (zona individual). 6.1 Armado del sistema El sistema debe armarse al salir del edificio. Asegúrese de que la sirena esté en el modo de funcionamiento. Antes de armar el sistema, asegúrese de que todas las puertas y ventanas estén cerradas y que los detectores de movimiento PIR no estén obstruidos. Asegúrese de que los animales se encuentren en zonas no protegidas por los detectores de movimiento PIR. 6.1.1 Modo de armado instantáneo El modo de armado instantáneo armará el sistema inmediatamente. Si el sistema está armado, la activación de cualquier detector de seguridad activará inmediatamente una alarma. Al entrar en el edificio, desarme el sistema antes de abrir cualquier puerta o ventana protegida por un detector de contacto de puerta/ventana o al entrar en una zona protegida por un sensor de movimiento PIR. En el modo de armado instantáneo, utilice el control remoto o el teclado remoto para armar y desarmar el sistema desde el exterior del edificio. Control remoto 1 6.1.2 Teclado remoto Introduzca el código ID de 4 dígitos. Pulse el botón Pulse el botón . La sirena emite un pitido. Los indicadores de la lente frontal y el indicador de aprendizaje parpadean una vez. . Modo de armado retardado El modo de armado retardado armará el sistema con un retardo de 15 segundos de entrada/salida. La sirena emitirá un pitido y otro pitido una vez que haya transcurrido el retardo de 15 segundos para dejar tiempo para salir del edificio antes de que el sistema se arme totalmente. Al entrar en el edificio abriendo cualquier puerta o ventana protegida por un detector de contacto de puerta/ventana o al acceder a una zona protegida por un detector de movimiento PIR, el sistema se activará y la sirena emitirá un pitido largo. No obstante, la alarma no sonará hasta que haya transcurrido el retardo de 15 segundos. Puede desarmar el sistema con el control remoto o el teclado remoto durante el retardo de 15 segundos. Si se produce una alarma, la sirena sonará de forma continua hasta que transcurra el tiempo de duración de alarma ajustado. La alarma se detendrá y el sistema se rearmará. La función de bloqueo de alarma evitará que el sistema vuelva a armarse después de repetir el proceso tres veces. Control remoto 1 6.2 Pulse el botón Teclado remoto . Introduzca el código ID de 4 dígitos. Pulse el botón o el botón . Una vez transcurrido el retardo de 15 segundos, la sirena emite un pitido. Los indicadores de la lente frontal y el indicador de aprendizaje parpadean una vez para indicar que el sistema está totalmente armado. Desarmado del sistema Control remoto 1 Nota: Pulse el botón Teclado remoto . Introduzca el código ID de 4 dígitos. Pulse el botón . La sirena emite dos pitidos. Si el sistema está desarmado y la sirena emite diez pitidos rápidos, se ha activado una alarma mientras el sistema estaba armado. 49 6.3 Función de ataque personal El usuario puede activar una alarma en cualquier momento en caso de amenaza o peligro activando la función de ataque personal. Control remoto 1 6.4 Teclado remoto Pulse y mantenga pulsado el botón durante Pulse y mantenga pulsado el botón 3 segundos. durante 3 segundos. Nota: En modelos de control remoto anteriores, deslice el interruptor de ataque personal. La alarma se activa. La sirena sonará. o el botón Manipulación del dispositivo Si la cubierta de la batería de cualquier dispositivo (excepto los controles remotos) se retira o si la sirena o el teclado remoto se retira de la pared, se producirá una alarma inmediatamente incluso si el sistema está desarmado (a menos que la sirena esté en modo de servicio). La alarma sonará hasta que transcurra el tiempo de alarma ajustado o que el sistema sea desarmado desde el control remoto o el teclado remoto. 6.5 Estado de batería baja Si pulsa el botón en el control remoto o el teclado remoto cuando la sirena se encuentra en estado de batería baja, la sirena emitirá tres pitidos cortos. Cuando se activa el indicador de batería baja, el dispositivo seguirá funcionando hasta 2 semanas. Sustituya la batería tan pronto como sea posible. Antes de sustituir la batería, ponga el sistema en el modo de servicio. Después de sustituir la batería, ponga el sistema de nuevo en el modo de funcionamiento. 7 Mantenimiento El sistema de alarma requiere poco mantenimiento. Si tiene que apagar el sistema totalmente, ponga el sistema en modo de servicio antes de retirar la cubierta de la sirena y desconectar la batería principal recargable y la pila de encendido inicial. Asegúrese de que el panel solar esté cubierto con un material opaco para evitar que éste alimente la sirena. 1. Limpie el panel solar con un paño suave y húmedo cada 6 meses, preferiblemente en primavera y otoño. No utilice limpiadores abrasivos, con base de disolvente o en aerosol. No limpie el interior de la sirena ni deje que entre agua en la sirena para asegurarse de que el panel solar sigue recibiendo toda la luz disponible. 2. No deje la sirena con las baterías conectadas durante periodos de tiempo prolongados, a menos que la sirena pueda recibir suficiente luz para mantener la carga de la batería. Si la carga de la batería no se mantiene, la batería principal recargable funcionará a un nivel inaceptablemente bajo y la sirena debe recargarse desde un suministro de alimentación de 12V CC/1000mA. Instale una nueva pila de encendido inicial (alcalina de 9V, PP3) para asegurarse de que la sirena reciba suficiente alimentación hasta que el panel solar pueda recargar la batería principal. 3. No deje la batería principal recargable en un estado de descarga durante periodos prolongados. La batería principal recargable tiene una vida útil típica de 3-4 años y no requiere ningún tipo de mantenimiento. 8 Eliminación y reciclaje El producto aparece en la clasificación de la Directiva de residuos de aparatos eléctricos o electrónicos (RAEE). El producto y las baterías del monitor no deben eliminarse con otros residuos domésticos o comerciales. Al final de su vida útil, el embalaje del producto debe eliminarse a través de un centro de reciclaje adecuado. Si desea información sobre las instalaciones disponibles, contacte con su autoridad local o con el distribuidor a través del cual ha adquirido el producto. 50 9 Declaración de conformidad CE Por la presente Novar ED&S declara que el producto es conforme con los requisitos esenciales y otras disposiciones relevantes de la Directiva sobre equipos radioeléctricos y equipos terminales de telecomunicación (R&TTE) (1995/5/CE). 10 Garantía Novar ED&S se compromete a sustituir o reparar, a su único criterio, las mercancías que resulten defectuosas durante un periodo de 2 años exclusivamente como resultado de defectos de materiales o de fabricación. Comprensiblemente, si el producto no se ha instalado, manejado o mantenido de acuerdo con las instrucciones, si el producto no se ha utilizado correctamente o si se ha intentado rectificar, desmontar o modificar el producto en modo alguno, la garantía quedará invalidada. La garantía establece la totalidad de la responsabilidad de Novar ED&S. La garantía no se extiende para cubrir pérdidas o daños resultantes o costes de instalación derivados del producto defectuoso. La garantía no afecta en modo alguno a los derechos establecidos por ley u otros derechos de un consumidor y es aplicable únicamente a productos instalados en la UE. Si un artículo desarrolla un fallo, el producto debe devolverse al punto de venta con: 1. 2. 3. Prueba de compra. Descripción completa del fallo. Todas las baterías correspondientes (desconectadas). 11 Soporte al cliente Si desea información adicional sobre el producto y manuales de instalación completos, donde corresponda, vaya a www.friedlandproducts.com Service Helpline España Lunes a viernes 09:00 - 17:00 902 430 668 51 Las llamadas telefónicas se cobran a la tarifa nacional de los proveedores de servicios. Indice 1 2 Uso previsto .......................................................................................................................................................................... 53 Sicurezza................................................................................................................................................................................ 53 2.1 2.2 3 Descrizione ............................................................................................................................................................................ 53 3.1 3.2 4 5 Configurazione della sirena ......................................................................................................................................... 55 Avvio della sirena......................................................................................................................................................... 55 Aggiunta di un nuovo telecomando o tastierino remoto alla sirena ........................................................................... 56 Montaggio della sirena sulla parete ............................................................................................................................ 57 Aggiunta di un nuovo rilevatore di sicurezza alla sirena .............................................................................................. 58 Cancellazione di tutti i dispositivi dalla sirena ............................................................................................................. 58 Modalità di servizio / Modalità di funzionamento ...................................................................................................... 58 Utilizzo................................................................................................................................................................................... 59 6.1 6.1.1 6.1.2 6.2 6.3 6.4 6.5 7 8 9 10 11 Contenuto della confezione ........................................................................................................................................ 53 Utensili necessari ......................................................................................................................................................... 54 Panoramica ........................................................................................................................................................................... 54 Installazione .......................................................................................................................................................................... 55 5.1 5.2 5.3 5.4 5.5 5.6 5.7 6 Prodotto ...................................................................................................................................................................... 53 Installazione................................................................................................................................................................. 53 Inserimento del sistema .............................................................................................................................................. 59 Modalità di inserimento immediato ....................................................................................................................... 59 Modalità di inserimento ritardato .......................................................................................................................... 59 Disinserimento del sistema ......................................................................................................................................... 59 Funzione anti-aggressione ........................................................................................................................................... 60 Manomissione del dispositivo ..................................................................................................................................... 60 Batteria scarica ............................................................................................................................................................ 60 Manutenzione ....................................................................................................................................................................... 60 Smaltimento e riciclaggio ...................................................................................................................................................... 60 Dichiarazione di conformità CE ............................................................................................................................................. 61 Garanzia ................................................................................................................................................................................ 61 Assistenza clienti ................................................................................................................................................................... 61 52 1 Uso previsto La sirena solare FGGA0401WWE / serie FGGA04* è adatta all'uso solo con i sistemi di allarme wireless Friedland che funzionano a 868 MHz. La sirena utilizza una batteria principale ricaricabile ad alta capacità (NiMH). Il pannello solare sopra la cassa carica la batteria durante il giorno. Di notte o durante le ore con poca luce, è necessaria una piccola quantità di energia per far funzionare la sirena. La sirena viene fornita con una batteria di avvio iniziale (alcalina) per potenziare l'alimentazione iniziale alla sirena la prima volta che viene avviato il sistema, finché il pannello solare non carica la batteria principale ricaricabile. L'interruttore antimanomissione attiva immediatamente un allarme in caso di tentativo non autorizzato di interferire con il coperchio della sirena o di rimuoverlo. Un sistema di rilevamento anti-disturbo genera un allarme in caso di tentativo ripetuto di disturbare il canale radio utilizzato per il sistema. 2 Sicurezza 2.1 Prodotto 2.2 Installazione 3 Conservare tutti gli avvisi e le istruzioni di sicurezza per consultazioni future. Osservare tutte le normative locali applicabili all'installazione del prodotto. Non tentare di aprire i dispositivi. Indossare guanti di sicurezza durante la perforazione delle pareti. Indossare occhiali di sicurezza durante la perforazione delle pareti. Verificare che le pareti da perforare non contengano fili elettrici e condutture dell'acqua. Posizionare le scale su superfici orizzontali e stabili con un'angolazione sicura. Descrizione 3.1 Parte Contenuto della confezione Descrizione Sirena solare Piastra di montaggio Parte Descrizione Elementi di fissaggio Batteria di avvio iniziale (9 V, alcalina) (6LR61 (PP3)) Parte Descrizione Batteria principale ricaricabile (6 V, NiMH) Guida rapida all'installazione 3.2 Utensili necessari Utensile 4 Descrizione Protezioni auricolari Utensile Descrizione Punteruolo a punta piatta Guanti di sicurezza Cacciavite a croce (n. 0 / n. 1 / n. 2) Trapano elettrico Livella a bolla d'aria Punta per muratura (5 mm / 6 mm) Matita Panoramica Sirena solare 1. 2. 3. 4. 5. 6. 7. 8. 9. 10. 11. Sirena Interruttore antimanomissione Pulsante di apprendimento Indicatore di apprendimento DIP switch Batteria di avvio iniziale (9 V, alcalina) Batteria principale ricaricabile (6 V, NiMH) Connessione adattatore di alimentazione (12 V) Coperchio della batteria Piastrina di montaggio Fori di montaggio DIP switch 1. 2. 3. 4. 5. 54 Periodo di allarme Rilevamento anti-disturbo Suono dell'allarme Segnale acustico Sirena / Pannello di controllo 5 5.1 Installazione Configurazione della sirena 1. 2. Rimuovere le viti. Rimuovere il coperchio della batteria. 3. Impostare l'interruttore 5 sulla posizione desiderata. 4. 5. Senza pannello di controllo ON (sirena) (zona singola) Con pannello di controllo OFF separato (pannello di controllo) Impostare l'interruttore 1 per limitare il periodo massimo durante il quale la sirena esterna suonerà. Senza pannello di controllo ON (3 min) / OFF (1 min) (zona singola) Con pannello di controllo ON (10 min) / OFF (3 min) separato Impostare l'interruttore 2 per attivare o disattivare il rilevamento anti-disturbo quando si utilizza la sirena senza pannello di controllo. ON OFF 6. 7. Impostare l'interruttore 3 per attivare o disattivare la sirena durante un allarme. ON attivata OFF disattivata Impostare l'interruttore 4 per attivare o disattivare il segnale acustico quando la sirena riceve segnali dal telecomando o dal tastierino remoto. ON OFF 5.2 attivato disattivato attivato disattivato Avvio della sirena Nota: la prima volta che si installa la sirena, questa viene automaticamente avviata in modalità di servizio. Non è possibile passare dalla modalità di servizio alla modalità di funzionamento se alla sirena non è collegato almeno un telecomando o un tastierino remoto. 1. 2. Collegare la batteria di avvio iniziale al terminale di connessione. Collegare la batteria principale ricaricabile al terminale di connessione. 55 3. Premere l'interruttore antimanomissione. Gli indicatori nella lente anteriore lampeggiano più volte e quindi continuano a lampeggiare alternatamente ogni 5 secondi a indicare che la sirena è in funzione. 4. Rimuovere la pellicola protettiva dal pannello solare. Attenzione: 5.3 Assicurarsi che il pannello solare riceva luce sufficiente per mantenere la carica della batteria. 5. a) Se l'interruttore 5 è impostato su ON (sirena), la sirena funzionerà senza pannello di controllo (zona singola). b) Se l'interruttore 5 è impostato su OFF (pannello di controllo), la sirena funzionerà con pannello di controllo. Per collegare la sirena al pannello di controllo, vedere il Manuale di installazione e uso del sistema di allarme e la Guida rapida all'installazione della sirena. Aggiunta di un nuovo telecomando o tastierino remoto alla sirena La prima volta che si configura la sirena senza pannello di controllo separato (zona singola), è necessario collegare la sirena a un tastierino remoto o a un telecomando prima di aggiungere altri dispositivi. Il codice identificativo del telecomando o del tastierino remoto deve essere acquisito dalla sirena. La sirena può acquisire fino a 6 telecomandi o tastierini remoti. Durante la configurazione, la sirena si attiva in modalità di servizio, pronta ad acquisire un nuovo telecomando o tastierino remoto. Se la sirena è in modalità di funzionamento, vedere la sezione “Modalità di servizio / Modalità di funzionamento” per passare alla modalità di servizio. 1 2 Nota: 3 Telecomando Tastierino remoto Tenere premuto il pulsante di apprendimento sulla sirena per 5 secondi per attivare la modalità di apprendimento. La sirena emette un breve segnale acustico. Gli indicatori nella lente anteriore e l'indicatore di apprendimento lampeggiano lentamente. Programmare il codice identificativo: Immettere il codice identificativo a 4 cifre. Premere il Premere il pulsante . pulsante . La sirena emette due brevi segnali acustici. Gli indicatori nella lente anteriore e l'indicatore di apprendimento lampeggiano rapidamente. se il telecomando o il tastierino remoto è già stato collegato o se è collegato il numero massimo di 6 telecomandi o tastierini remoti, la sirena emetterà un breve segnale acustico e uscirà dalla modalità di apprendimento. Gli indicatori nella lente anteriore e l'indicatore di apprendimento si spengono. Confermare il codice identificativo: Premere il pulsante Nota: Immettere il codice identificativo a 4 cifre e premere il entro 15 secondi. pulsante entro 15 secondi. La sirena emette tre brevi segnali acustici. Gli indicatori nella lente anteriore e l'indicatore di apprendimento si accendono per 3 secondi e poi si spengono. La sirena ritorna in modalità di servizio. se il segnale di conferma non viene ricevuto entro 15 secondi, la sirena emette un breve segnale acustico ed esce dalla modalità di apprendimento. Gli indicatori nella lente anteriore e l'indicatore di apprendimento si spengono. 3. Riposizionare il coperchio della batteria. 4. Fissare le viti. 56 5.4 Montaggio della sirena sulla parete 1. 2. 3. Tenere in posizione la piastra di montaggio e segnare la posizione dei fori di montaggio. Se necessario, utilizzare una livella. Nella parete praticare fori (6 mm) in base alle posizioni segnate. Inserire un tassello a muro in dotazione in ciascun foro di montaggio. 4. Fissare le viti (30 mm) nei fori di montaggio superiori lasciandole fuoriuscire di circa 9 mm. 5. 6. Installare la piastrina di montaggio. Assicurarsi che i fori sulla piastrina di montaggio combacino con i fori di montaggio inferiori. Fissare le viti (25 mm). 7. Montare la sirena sulla parete. ATTENZIONE: Prima di montare la sirena sulla parete, verificare che l'interruttore antimanomissione sia chiuso. Se l'interruttore non è chiuso, la sirena non funzionerà correttamente. Se necessario, rimuovere di nuovo la sirena e inserire un distanziatore tra lo stantuffo dell'interruttore antimanomissione e la parete per fare in modo che l'interruttore si chiuda quando si monta la sirena sulla parete. ATTENZIONE: Prima di testare o utilizzare la sirena, lasciarla in posizione per almeno 24 ore affinché la batteria venga caricata completamente. 57 5.5 Aggiunta di un nuovo rilevatore di sicurezza alla sirena Per comunicare con la sirena, è necessario che il codice identificativo del rilevatore di sicurezza venga acquisito dalla sirena. La sirena può acquisire fino a 12 rilevatori di sicurezza (rilevatori di contatto per porte/finestre o rilevatori di movimento PIR). Durante la configurazione, la sirena si attiva automaticamente in modalità di servizio, pronta ad acquisire un nuovo rilevatore di sicurezza. Se la sirena è in modalità di funzionamento, vedere la sezione “Modalità di servizio / Modalità di funzionamento” per passare alla modalità di servizio. Telecomando 1 2 Nota: Nota: 3 Nota: 5.6 Tastierino remoto Immettere il codice identificativo a 4 cifre. Tenere premuto il pulsante per 5 secondi. La sirena emette un breve segnale acustico. Gli indicatori nella lente anteriore e l'indicatore di apprendimento lampeggiano lentamente. La sirena rimane in modalità di apprendimento per 30 secondi. Programmare il codice identificativo: Premere l'interruttore antimanomissione sul rilevatore di sicurezza. La sirena emette due brevi segnali acustici. Gli indicatori nella lente anteriore e l'indicatore di apprendimento lampeggiano rapidamente. se il segnale di conferma non viene ricevuto entro 30 secondi, la sirena esce dalla modalità di apprendimento. La sirena rimarrà in modalità di servizio. se il rilevatore di sicurezza è già stato collegato o se è collegato il numero massimo di 12 rilevatori di sicurezza, la sirena emetterà un breve segnale acustico e uscirà dalla modalità di apprendimento. Gli indicatori nella lente anteriore e l'indicatore di apprendimento si spengono. Confermare il codice identificativo: Premere di nuovo l'interruttore antimanomissione sul rilevatore di sicurezza entro 15 secondi per confermare il codice identificativo. La sirena emette tre brevi segnali acustici. Gli indicatori nella lente anteriore e l'indicatore di apprendimento si accendono per 3 secondi e poi si spengono. La sirena ritorna in modalità di servizio. se il segnale di conferma non viene ricevuto entro 15 secondi, la sirena emette un breve segnale acustico ed esce dalla modalità di apprendimento. Gli indicatori nella lente anteriore e l'indicatore di apprendimento si spengono. Tenere premuto il pulsante per 5 secondi. Cancellazione di tutti i dispositivi dalla sirena 1. 2. 3. Portare la sirena in modalità di servizio utilizzando il telecomando o il tastierino remoto. Rimuovere la sirena dalla parete. Tenere premuto il pulsante di apprendimento per 10 secondi finché la sirena non emette due lunghi segnali acustici e l'indicatore di manomissione non lampeggia 5 volte. I codici identificativi di tutti i dispositivi collegati vengono cancellati dalla memoria. La sirena rimane in modalità di servizio. 5.7 Modalità di servizio / Modalità di funzionamento La prima volta che si installa la sirena, questa viene automaticamente avviata in modalità di servizio. Prima di testare o utilizzare la sirena, è necessario portarla in modalità di funzionamento. Se si utilizza la sirena con un pannello di controllo, vedere il Manuale di installazione e uso del sistema di allarme. Se si utilizza la sirena senza pannello di controllo, utilizzare il telecomando o il tastierino remoto: Telecomando 1 Tastierino remoto Immettere il codice identificativo a 4 cifre. Tenere Tenere premuto il pulsante per 5 secondi. premuto il pulsante per 5 secondi. Per passare dalla modalità di funzionamento alla modalità di servizio: Se si premere il pulsante (telecomando) o (tastierino remoto), il dispositivo trasmetterà il segnale di disinserimento e la sirena emetterà due segnali acustici normali. Il sistema viene disinserito. Se si tiene premuto il pulsante (telecomando) o (tastierino remoto) per 5 secondi, la sirena emetterà due brevi segnali acustici seguiti da uno lungo. Gli indicatori nella lente anteriore e l'indicatore di apprendimento lampeggiano mentre vengono emessi i segnali acustici. Il sistema ritorna in modalità di servizio. 58 Passaggio dalla modalità di servizio alla modalità di funzionamento: Se si premere il pulsante (telecomando) o (tastierino remoto), il dispositivo trasmetterà il segnale di disinserimento. La sirena non risponderà al segnale di disinserimento perché è ancora in modalità di servizio. Se si tiene premuto il pulsante (telecomando) o (tastierino remoto) per 5 secondi, la sirena emetterà un lungo segnale acustico seguito da due brevi. Gli indicatori nella lente anteriore e l'indicatore di apprendimento lampeggiano mentre vengono emessi i segnali acustici. La sirena tornerà in modalità di funzionamento mentre è in condizione di disinserimento. 6 Utilizzo In questa sezione viene descritto il funzionamento della sirena solo quando è utilizzata senza pannello di controllo (zona singola). 6.1 Inserimento del sistema Quando si lasciano i locali, il sistema deve essere inserito. Assicurarsi che la sirena sia in modalità di funzionamento. Prima di inserire il sistema, verificare che tutte le porte e le finestre siano chiuse e che non ci siano ostacoli davanti ai rilevatori di movimento PIR disponibili. Accertarsi che gli eventuali animali presenti nei locali si trovino in aree non protette mediante rilevatori di movimento PIR. 6.1.1 Modalità di inserimento immediato La modalità di inserimento immediato inserisce il sistema all'istante. Se il sistema è inserito, l'attivazione di un rilevatore di sicurezza attiverà immediatamente un allarme. Quando si entra nei locali, disinserire il sistema prima di aprire porte o finestre protette mediante un rilevatore di contatto per porte/finestre o prima di accedere a un'area protetta mediante un rilevatore di movimento PIR. In modalità di inserimento immediato, inserire e disinserire il sistema dall'esterno utilizzando il telecomando o il tastierino remoto. Telecomando 1 6.1.2 Tastierino remoto Immettere il codice identificativo a 4 cifre. Premere il Premere il pulsante . pulsante . La sirena emette un segnale acustico. Gli indicatori nella lente anteriore e l'indicatore di apprendimento lampeggiano una volta. Modalità di inserimento ritardato La modalità di inserimento ritardato inserisce il sistema entro 15 secondi dall'ingresso o dall'uscita. La sirena emette un segnale acustico e quindi un altro segnale acustico dopo che è trascorso il ritardo di 15 secondi per lasciare il tempo di abbandonare i locali prima che il sistema sia completamente inserito. Quando si accede ai locali aprendo una porta o una finestra protetta mediante un rilevatore di contatto per porte/finestre o quando si entra in un'area protetta mediante un rilevatore di movimento PIR, il sistema verrà attivato e la sirena emetterà un lungo segnale acustico. Tuttavia, l'allarme non suonerà finché non sono trascorsi i 15 secondi di ritardo. Disinserire il sistema utilizzando il telecomando o il tastierino remoto durante il ritardo di 15 secondi. Se suona un allarme, la sirena continuerà a suonare finché il tempo impostato per l'allarme non è completamente trascorso. L'allarme smetterà di suonare e il sistema verrà reinserito. La funzionalità di blocco dell'allarme impedisce il reinserimento del sistema dopo che questo processo viene ripetuto per tre volte. Telecomando 1 Premere il pulsante Tastierino remoto Immettere il codice identificativo a 4 cifre. Premere il . pulsante o . Trascorsi i 15 secondi di ritardo, la sirena emette un segnale acustico. Gli indicatori nella lente anteriore e l'indicatore di apprendimento lampeggiano una volta a indicare che il sistema è completamente inserito. 6.2 Disinserimento del sistema Telecomando 1 Nota: Premere il pulsante Tastierino remoto Immettere il codice identificativo a 4 cifre. Premere il . pulsante . La sirena emette due segnali acustici. se il sistema è disinserito e la sirena emette dieci rapidi segnali acustici, significa che è stato attivato un allarme mentre il sistema era inserito. 59 6.3 Funzione anti-aggressione Se si sente minacciato o in pericolo, l'utente può attivare un allarme in qualsiasi momento attivando la funzione antiaggressione. Telecomando 1 6.4 Tastierino remoto Tenere premuto il pulsante per 3 secondi. Tenere premuto il pulsante Nota: sui modelli di telecomando precedenti, far scorrere l'interruttore anti-aggressione. L'allarme viene attivato. La sirena suona. o per 3 secondi. Manomissione del dispositivo Se il coperchio della batteria o un dispositivo (ad eccezione del telecomando) viene rimosso, oppure se la sirena o il tastierino remoto viene rimosso dalla parete, viene immediatamente attivato un allarme anche se il sistema è disinserito (a meno che la sirena non sia in modalità di servizio). L'allarme suona finché non è trascorso il tempo impostato per l'allarme o il sistema non viene disinserito mediante il telecomando o il tastierino remoto. 6.5 Batteria scarica Se si preme il pulsante sul telecomando o sul tastierino remoto quando la batteria della sirena è scarica, la sirena emetterà tre brevi segnali acustici. Se si accende l'indicatore di batteria scarica, il dispositivo continuerà a funzionare fino a un massimo di 2 settimane. Sostituire la batteria il più presto possibile. Prima di sostituire la batteria, portare il sistema in modalità di servizio. Dopo aver sostituito la batteria, riportare il sistema in modalità di funzionamento. 7 Manutenzione Il sistema di allarme richiede poca manutenzione. Se è necessario spegnere completamente il sistema, portarlo in modalità di servizio prima di rimuovere il coperchio della sirena e scollegare la batteria principale ricaricabile e la batteria di avvio iniziale. Assicurarsi che il pannello solare sia coperto con un materiale che non lasci passare la luce per evitare il pannello solare fornisca energia alla sirena. 1. Ogni 6 mesi, preferibilmente in primavera e in autunno, pulire il pannello solare con un panno morbido inumidito. Non usare detergenti abrasivi, a base di solventi o spray. Non pulire l'interno della sirena ed evitare che penetri acqua all'interno della sirena assicurandosi che il pannello solare riceva sempre tutta la luce disponibile. 2. Non lasciare la sirena con le batterie collegate per lunghi periodi di tempo, a meno che la sirena non sia in grado di ricevere luce sufficiente per mantenere la carica della batteria. Se la carica della batteria non viene mantenuta, la batteria principale ricaricabile non funzionerà correttamente e la sirena deve essere ricaricata utilizzando un alimentatore di corrente da 12 V CC/1000 mA. Installare una nuova batteria di avvio iniziale (alcalina da 9 V, PP3) per fare in modo che il sistema riceva alimentazione sufficiente finché il pannello solare non carichi la batteria principale. 3. Non lasciare la batteria principale ricaricabile scarica per lunghi periodi di tempo. La batteria principale ricaricabile ha una durata di 3-4 anni e non richiede alcuna manutenzione. 8 Smaltimento e riciclaggio Il prodotto è classificato secondo la direttiva RAEE (Direttiva sullo smaltimento dei rifiuti di apparecchiature elettriche ed elettroniche). Il prodotto e le batterie del monitor non devono essere smaltiti con altri rifiuti domestici o commerciali. Alla fine della vita utile, l'imballaggio e il prodotto devono essere smaltiti tramite un centro di riciclaggio idoneo. Per informazioni sulle strutture disponibili, contattare l'ente locale o il rivenditore presso cui è stato acquistato il prodotto. 60 9 Dichiarazione di conformità CE Con il presente documento, Novar ED&S dichiara che il prodotto è conforme ai requisiti essenziali e ad altre disposizioni pertinenti della direttiva R&TTE (Radio and Telecommunications Terminal Equipment) (1995/5/CE) sulle apparecchiature radio e le apparecchiature terminali di telecomunicazione. 10 Garanzia Novar ED&S si impegna a sostituire o riparare, a propria discrezione, gli articoli che fossero considerati difettosi entro 2 anni, unicamente a causa di difetti di materiali o manodopera. È ovvio che la garanzia decade se il prodotto non viene installato, utilizzato o sottoposto a manutenzione conformemente alle istruzioni, o utilizzato in modo appropriato o se si cerca di modificarlo, smontarlo o alterarlo, in qualunque modo. La garanzia stabilisce tutti i limiti di responsabilità di Novar ED&S. La garanzia non copre perdite o danni conseguenti o costi di installazione risultanti dal prodotto difettoso. La garanzia non inficia in alcun modo i diritti legali o altri diritti del consumatore e si applica esclusivamente ai prodotti installati all'interno dell'Unione europea. In caso di guasto, il prodotto dovrà essere restituito al punto vendita unitamente a: 1. 2. 3. Prova di acquisto. Descrizione completa del guasto. Batterie pertinenti (scollegate). 11 Assistenza clienti Per ulteriori informazioni sul prodotto e i manuali di installazione laddove applicabile accedere al sito www.friedlandproducts.com Assistenza telefonica Italia Lunedì - venerdì 09:00 - 17:00 848 800 235 61 Costo della chiamata in base alle tariffe nazionali dei gestori telefonici. Índice 1 2 Utilização prevista ................................................................................................................................................................. 63 Segurança .............................................................................................................................................................................. 63 2.1 2.2 3 Descrição ............................................................................................................................................................................... 63 3.1 3.2 4 5 Configurar a sirene ...................................................................................................................................................... 65 Ligar a sirene ............................................................................................................................................................... 65 Adicionar um novo controlo remoto ou teclado remoto à sirene ............................................................................... 66 Montar a sirene na parede .......................................................................................................................................... 67 Adicionar um novo detector de segurança à sirene .................................................................................................... 68 Eliminar todos os dispositivos da sirene ...................................................................................................................... 68 Modo de serviço/modo de funcionamento................................................................................................................. 68 Funcionamento ..................................................................................................................................................................... 69 6.1 6.1.1 6.1.2 6.2 6.3 6.4 6.5 7 8 9 10 11 Conteúdo da embalagem ............................................................................................................................................ 63 Ferramentas necessárias ............................................................................................................................................. 64 Descrição geral ...................................................................................................................................................................... 64 Instalação .............................................................................................................................................................................. 65 5.1 5.2 5.3 5.4 5.5 5.6 5.7 6 Produto........................................................................................................................................................................ 63 Instalação .................................................................................................................................................................... 63 Armar o sistema .......................................................................................................................................................... 69 Modo de armação imediata ................................................................................................................................... 69 Modo de armação atrasada .................................................................................................................................... 69 Desarmar o sistema ..................................................................................................................................................... 70 Secção de ataque pessoal ............................................................................................................................................ 70 Violação do dispositivo ................................................................................................................................................ 70 Bateria com pouca carga ............................................................................................................................................. 70 Manutenção .......................................................................................................................................................................... 70 Eliminação e reciclagem ........................................................................................................................................................ 71 Declaração de conformidade CE ........................................................................................................................................... 71 Garantia ................................................................................................................................................................................ 71 Apoio ao cliente .................................................................................................................................................................... 71 62 1 Utilização prevista A sirene sonar FGGA0401WWE/Série FGGA04* é adequada para utilização com os sistemas de alarme sem fios Friedland que funcionam a 868 MHz apenas. A sirene utiliza uma bateria principal recarregável de alta capacidade (NiMH). O painel solar na parte de cima da caixa carrega a bateria durante o dia. Quando não há luz, apenas é necessária uma pequena quantidade de energia para que a sirene funcione. A sirene é fornecida com uma bateria de arranque inicial (alcalina) para alimentar inicialmente a sirene quando o sistema é activado pela primeira vez até que o painel solar carregue a bateria principal recarregável. O interruptor inviolável dispara imediatamente um alarme caso seja feita uma tentativa não autorizada de interferir e retirar a tampa da sirene. Um sistema de detecção anti-obstrução gera um alarme se for feita uma tentativa de obstruir continuamente o canal de rádio utilizado para o sistema. 2 Segurança 2.1 Produto 2.2 Instalação 3 Guarde todas as advertências e instruções para futura referência. Cumpra os regulamentos locais aplicáveis à instalação do produto. Não tente abrir os dispositivos. Utilize luvas de segurança ao perfurar paredes. Utilize óculos de protecção ao perfurar paredes. Certifique-se de que não existem fios eléctricos nem tubagens de água ao perfurar paredes. Posicione os escadotes sobre uma superfície nivelada e estável e num ângulo seguro. Descrição 3.1 Peça Conteúdo da embalagem Descrição Sirene solar Peça Descrição Parafusos Modelo de montagem Bateria de arranque inicial (9 V, alcalina) (6LR61 (PP3)) 63 Peça Descrição Bateria principal recarregável (6 V, NiMH) Guia de instalação rápida 3.2 Ferramentas necessárias Ferramenta 4 Descrição Protectores auditivos Ferramenta Descrição Sovela Luvas de segurança Chave de fendas Phillips (#0/#1/#2) Berbequim eléctrico Nível de bolha de ar Broca para alvenaria (5 mm/6 mm) Lápis Descrição geral Sirene solar 1. Sirene 2. Interruptor inviolável 3. Botão de conhecimento 4. Indicador de conhecimento 5. Interruptores DIP 6. Bateria de arranque inicial (9 V, alcalina) 7. Bateria principal recarregável (6 V, NiMH) 8. Ligação do adaptador de alimentação (12 V) 9. Tampa da bateria 10. Placa de montagem 11. Orifícios de montagem Interruptor DIP 1. 2. 3. 4. 5. 64 Tempo do alarme Detecção anti-obstrução Som de alarme Sinal sonoro Sirene/painel de controlo 5 5.1 Instalação Configurar a sirene 1. 2. Retire os parafusos. Retire a tampa da bateria. 3. Coloque o interruptor 5 na posição necessária. Sem painel de controlo (uma zona) Com painel de controlo separado 4. ON (Ligado) (sirene) OFF (Desligado) (painel de controlo) Defina o interruptor 1 para limitar o período máximo durante o qual a sirene externa soará. Sem painel de controlo (uma zona) Com painel de controlo separado 5. ON (Ligado) (3 min)/ OFF (Desligado) (1 min) ON (Ligado) (10 min)/ OFF (Desligado) (3 min) Defina o interruptor 2 para activar ou desactivar a detecção antiobstrução ao utilizar a sirene sem painel de controlo. ON (Ligado) OFF (Desligado) 6. 7. Defina o interruptor 3 para activar ou desactivar a sirene durante um alarme. ON (Ligado) activado OFF (Desligado) desactivado Defina o interruptor 4 para activar ou desactivar os sinais sonoros quando a sirene receber sinais do controlo remoto ou do teclado remoto. ON (Ligado) OFF (Desligado) 5.2 activado desactivado activado desactivado Ligar a sirene Nota: Ao instalar a sirene pela primeira vez, a mesma liga-se automaticamente no modo de serviço. Não pode retirar a sirene do modo de serviço e colocá-la no modo de funcionamento até que pelo menos um controlo remoto ou teclado remoto esteja ligado à mesma. 1. 2. Ligue a bateria de arranque inicial ao terminal de ligação. Ligue a bateria principal recarregável ao terminal de ligação. 65 3. Prima o interruptor inviolável. Os indicadores na lente frontal ficam intermitentes várias vezes e continuam intermitentes alternadamente a cada 5 segundos para indicar que a sirene está operacional. 4. Retire a película de protecção do painel solar. Advertência: 5.3 certifique-se de que o painel solar recebe luz suficiente para manter a carga da bateria. 5. a) Se o interruptor 5 estiver definido para ON (ligada) (sirene), a sirene funcionará sem painel de controlo (uma zona). b) Se o interruptor 5 estiver definido para OFF (desligada) (painel de controlo), a sirene funcionará com painel de controlo. Para ligar a sirene ao painel de controlo, consulte o Manual de instalação e funcionamento do sistema de alarme e o Guia de instalação rápida da sirene. Adicionar um novo controlo remoto ou teclado remoto à sirene Ao configurar a sirene sem o painel de controlo separado (uma zona) pela primeira vez, tem de ligar a sirene a um teclado remoto ou controlo remoto antes de adicionar outros dispositivos. O código de ID do controlo remoto ou do teclado remoto tem de ser conhecido pela sirene. A sirene pode conhecer até 6 controlos remotos ou teclados remotos. Durante a configuração, a sirene activa-se no modo de serviço, pronta para conhecer um novo controlo remoto ou teclado remoto. Se a sirene estiver no modo de funcionamento, consulte a secção "Modo de serviço/Modo de funcionamento" para passar para o modo de serviço. 1 2 Nota: 3 Controlo remoto Teclado remoto Prima e mantenha premido o botão de conhecimento da sirene durante 5 segundos para entrar no modo de conhecimento. A sirene emite um sinal sonoro curto. Os indicadores na lente frontal e o indicador de conhecimento ficam intermitentes lentamente. Programe o código de ID: Introduza o código de ID de 4 dígitos. Prima o botão Prima o botão . . A sirene emite dois sinais sonoros curtos. Os indicadores na lente frontal e o indicador de conhecimento ficam intermitentes rapidamente. se o controlo remoto ou o teclado remoto já tiver sido ligado ou se estiver ligado o número máximo de 6 controlos remotos ou teclados remotos, a sirene emite um sinal sonoro curto e sai do modo de conhecimento. Os indicadores na lente frontal e o indicador de conhecimento apagam-se. Confirme o código de ID: Prima o botão Nota: Introduza o código de ID de 4 dígitos e prima o botão no espaço de 15 segundos. no espaço de 15 segundos. A sirene emite três sinais sonoros curtos. Os indicadores na lente frontal e o indicador de conhecimento acendem-se durante 3 segundos e apagam-se. A sirene volta ao modo de serviço. se o sinal de confirmação não for recebido no espaço de 15 segundos, a sirene emite um sinal sonoro curto e sai do modo de conhecimento. Os indicadores na lente frontal e o indicador de conhecimento apagam-se. 5. 6. Instale a tampa da bateria. Instale os parafusos. 66 5.4 Montar a sirene na parede 1. 2. 3. Mantenha o modelo de montagem na devida posição e marque as posições dos orifícios de montagem. Se necessário, utilize um nível de bolha de ar. Perfure orifícios de montagem (6 mm) na parede de acordo com as posições marcadas. Insira uma bucha de parede fornecida em cada orifício de montagem. 4. Instale os parafusos (30 mm) nos orifícios de montagem superior, deixando salientes cerca de 9 mm dos parafusos. 5. 6. Instale a placa de montagem. Certifique-se de que os orifícios na placa de montagem estão alinhados com os orifícios de montagem inferiores. Instale os parafusos (25 mm). 7. Monte a sirene na parede. ADVERTÊNCIA: certifique-se de que o interruptor inviolável está fechado quando montar a sirene na parede. Se o interruptor inviolável não se fechar, a sirene não funcionará correctamente. Se necessário, retire a sirene novamente e insira um espaçador entre a haste do interruptor inviolável e a parede para se certificar de que o interruptor se fecha ao montar a sirene na parede. ADVERTÊNCIA: antes de testar ou utilizar a sirene, deixe-a na devida posição durante 24 horas, no mínimo, para carregar totalmente a bateria. 67 5.5 Adicionar um novo detector de segurança à sirene Para comunicar com a sirene, o código de ID do detector de segurança tem de ser conhecido pela sirene. A sirene pode conhecer até 12 detectores de segurança (detectores de contacto de porta/janela ou detectores de movimento PIR). Durante a configuração, a sirene activa-se automaticamente no modo de serviço, pronta para conhecer um novo detector de segurança. Se a sirene estiver no modo de funcionamento, consulte a secção "Modo de serviço/Modo de funcionamento" para passar para o modo de serviço. 1 2 Nota: Nota: 3 Nota: 5.6 1. 2. 3. 5.7 Controlo remoto Teclado remoto Introduza o código de ID de 4 dígitos. Prima e mantenha Prima e mantenha premido o botão durante 5 premido o botão durante 5 segundos. segundos. A sirene emite um sinal sonoro curto. Os indicadores na lente frontal e o indicador de conhecimento ficam intermitentes lentamente. A sirene permanece no modo de conhecimento durante 30 segundos. Programe o código de ID: Prima o interruptor inviolável no detector de segurança. A sirene emite dois sinais sonoros curtos. Os indicadores na lente frontal e o indicador de conhecimento ficam intermitentes rapidamente. se o sinal de confirmação não for recebido no espaço de 30 segundos, a sirene sai do modo de conhecimento. A sirene permanece no modo de serviço. se o detector de segurança já tiver sido ligado ou se estiver ligado o número máximo de 12 detectores de segurança, a sirene emite um sinal sonoro curto e sai do modo de conhecimento. Os indicadores na lente frontal e o indicador de conhecimento apagam-se. Confirme o código de ID: Prima novamente o interruptor inviolável no detector de segurança no espaço de 15 segundos para confirmar o código de ID. A sirene emite três sinais sonoros curtos. Os indicadores na lente frontal e o indicador de conhecimento acendem-se durante 3 segundos e apagam-se. A sirene volta ao modo de serviço. se o sinal de confirmação não for recebido no espaço de 15 segundos, a sirene emite um sinal sonoro curto e sai do modo de conhecimento. Os indicadores na lente frontal e o indicador de conhecimento apagam-se. Eliminar todos os dispositivos da sirene Coloque a sirene no modo de serviço utilizando o controlo remoto ou o teclado remoto. Retire a sirene da parede. Prima e mantenha premido o botão de conhecimento durante 10 segundos até que a sirene emita dois sinais sonoros longos e o indicador de conhecimento fique intermitente 5 vezes. Os códigos de ID de todos os dispositivos ligados são eliminados da memória. A sirene permanece no modo de serviço. Modo de serviço/modo de funcionamento Ao instalar a sirene pela primeira vez, a mesma liga-se automaticamente no modo de serviço. Antes de testar ou utilizar a sirene, a mesma deve ser colocada no modo de funcionamento. Se utilizar a sirene com um painel de controlo, consulte o Manual de instalação e funcionamento do sistema de alarme. Se utilizar a sirene sem painel de controlo, utilize o controlo remoto ou o teclado remoto: 68 1 Controlo remoto Teclado remoto Introduza o código de ID de 4 dígitos. Prima e mantenha Prima e mantenha premido o botão durante 5 premido o botão durante 5 segundos. segundos. Passar do modo de funcionamento para o modo de serviço: Se premir o botão (controlo remoto) ou o botão (teclado remoto), o dispositivo transmite o sinal de desarme e a sirene emite dois sinais sonoros normais. O sistema é desarmado. Se premir e mantiver premido o botão (controlo remoto) ou o botão (teclado remoto) durante 5 segundos, a sirene emite dois sinais sonoros curtos seguidos de um sinal sonoro longo. Os indicadores na lente frontal e o indicador de conhecimento ficam intermitentes em conjunto com os sinais sonoros. O sistema volta ao modo de serviço. Passar do modo de serviço para o modo de funcionamento: Se premir o botão (controlo remoto) ou o botão (teclado remoto), o dispositivo transmite o sinal de desarme. A sirene não responde ao sinal de desarme, uma vez que ainda se encontra no modo de serviço. Se premir e mantiver premido o botão (controlo remoto) ou o botão (teclado remoto) durante 5 segundos, a sirene emite um sinal sonoro longo seguido de dois sinais sonoros curtos. Os indicadores na lente frontal e o indicador de conhecimento ficam intermitentes em conjunto com os sinais sonoros. A sirene volta ao modo de funcionamento em condição desarmada. 6 Funcionamento Esta secção apenas descreve o funcionamento da sirene sem painel de controlo (uma zona). 6.1 Armar o sistema O sistema deve ser armado quando abandonar as instalações. Certifique-se de que o sistema está no modo de funcionamento. Antes de armar o sistema, certifique-se de que todas as portas e janelas estão fechadas e os detectores de movimento PIR disponíveis não estão obstruídos. Certifique-se de que os animais se restringem às áreas não protegidas pelos detectores de movimento PIR. 6.1.1 Modo de armação imediata O modo de armação imediata arma imediatamente o sistema. Se o sistema estiver armado, a activação de qualquer detector de segurança faz disparar imediatamente um alarme. Ao entrar nas instalações, desarme o sistema antes de abrir qualquer porta ou janela protegida por um detector de contacto de porta/janela ou entrar numa área protegida por um detector de movimento PIR. No modo de armação imediata, arme e desarme o sistema a partir do exterior das instalações utilizando o controlo remoto ou o teclado remoto. Controlo remoto 1 6.1.2 Teclado remoto Introduza o código de ID de 4 dígitos. Prima o botão . A sirene emite um sinal sonoro. Os indicadores na lente frontal e o indicador de conhecimento ficam intermitentes uma vez. Prima o botão . Modo de armação atrasada O modo de armação atrasada arma o sistema com um atraso de entrada/saída de 15 segundos. A sirene emite um sinal sonoro e outro sinal sonoro após o atraso de 15 segundos para conceder tempo para abandonar as instalações antes de o sistema estar totalmente armado. Ao entrar nas instalações abrindo qualquer porta ou janela protegida por um detector de contacto de porta/janela ou ao entrar numa área protegida por um detector de movimento PIR, o sistema dispara e a sirene emite um sinal sonoro longo. No entanto, o alarme não soa até que passe o atraso de 15 segundos. Desarme o sistema utilizando o controlo remoto ou o teclado remoto durante o atraso de 15 segundos. Se ocorrer um alarme, a sirene soa continuamente até que o tempo de duração do alarme definido termine. O alarme pára e o sistema é armado novamente. A função de bloqueio do alarme impede que o sistema seja armado novamente após repetir o processo três vezes. Controlo remoto 1 Prima o botão Teclado remoto Introduza o código de ID de 4 dígitos. Prima o botão . ou o botão . Passado o atraso de 15 segundos, a sirene emite um sinal sonoro. Os indicadores na lente frontal e o indicador de conhecimento ficam intermitentes uma vez para indicar que o sistema está totalmente armado. 69 6.2 Desarmar o sistema Controlo remoto 1 Nota: 6.3 Teclado remoto Introduza o código de ID de 4 dígitos. Prima o botão Prima o botão . . A sirene emite dois sinais sonoros. se o sistema for desarmado e a sirene emitir dez sinais sonoros rápidos, foi disparado um alarme enquanto o sistema estava armado. Secção de ataque pessoal O utilizador pode disparar um alarme a qualquer altura em caso de ameaça ou perigo activando a secção de ataque pessoal. Controlo remoto 1 6.4 Teclado remoto Prima e mantenha premido o botão durante 3 Prima e mantenha premido o botão segundos. durante 3 segundos. Nota: nos modelos de controlo remoto anteriores, faça deslizar o interruptor de ataque pessoal. O alarme é disparado. A sirene soa. ou Violação do dispositivo Se a tampa da bateria de qualquer dispositivo (excepto o controlo remoto) for retirada ou se a sirene ou o teclado remoto forem retirados da parede, ocorre um alarme imediatamente, mesmo que o sistema esteja desarmado (a não ser que a sirene esteja no modo de serviço). O alarme soa até que o tempo do alarme definido termine ou o sistema seja desarmado através do controlo remoto ou do teclado remoto. 6.5 Bateria com pouca carga Se premir o botão no controlo remoto ou no teclado remoto quando a sirene tiver a bateria com pouca carga, a sirene emite três sinais sonoros curtos. Se um indicador de bateria com pouca carga for activado, o dispositivo continua a funcionar durante até 2 semanas. Substitua a bateria logo que possível. Antes de substituir a bateria, coloque o sistema no modo de serviço. Após substituir a bateria, coloque o sistema novamente no modo de funcionamento. 7 Manutenção O sistema de alarme necessita de pouca manutenção. Se tiver de desligar completamente o sistema, coloque o sistema no modo de serviço antes de retirar a tampa da sirene e desligar a bateria principal recarregável e a bateria de arranque inicial. Certifique-se de que o painel solar está coberto com um material resistente à luz para impedir que o painel solar alimente a sirene. 1. Limpe o painel solar utilizando um pano macio humedecido a cada 6 meses, de preferência na Primavera e no Outono. Não utilize aerossóis de limpeza abrasivos e à base de solventes. Não limpe o interior da sirene nem permita a entrada de água na sirene para que o painel solar continue a receber toda a luz disponível. 2. Não deixe a sirene com as baterias ligadas durante longos períodos, a não ser que a sirene possa receber luz suficiente para manter a carga da bateria. Se a carga da bateria não for mantida, a bateria principal recarregável fica esgotada e a sirene tem de ser recarregada com uma fonte de alimentação de 12 V CC/1000 mA. Instale uma nova bateria de arranque inicial (9 V alcalina, PP3) para se certificar de que a sirene recebe alimentação suficiente até que o painel solar possa recarregar a bateria principal. 3. Não deixe a bateria principal recarregável descarregada durante longos períodos. A bateria principal recarregável tem uma vida útil normal de 3-4 anos e não exige manutenção. 70 8 Eliminação e reciclagem O produto está classificado pela Directiva relativa a Resíduos de Equipamentos Eléctricos e Electrónicos (REEE). O produto e as baterias do monitor não devem ser eliminados juntamente com outros resíduos domésticos ou comerciais. No fim da respectiva vida útil, a embalagem e o produto devem ser eliminados num centro de reciclagem apropriado. Para obter informações relativas aos locais disponíveis, contacte as autoridades locais ou o revendedor onde adquiriu o produto. 9 Declaração de conformidade CE A Novar ED&S declara, através do presente documento, que o produto cumpre os requisitos essenciais e outras provisões relevantes da Directiva de Equipamentos de Rádio e Equipamentos Terminais de Telecomunicações (R&TTE) (1995/5/CE). 10 Garantia A Novar ED&S compromete-se a substituir ou reparar, a seu critério, produtos, caso se tornem defeituosos, durante um prazo mínimo de 2 anos, em consequência de defeitos de material ou de mão-de-obra. Compreensivelmente, se o produto não tiver sido instalado, utilizado ou mantido de acordo com as instruções, ou se o produto tiver sido usado indevidamente ou se tiver sido encetada qualquer tentativa para o reparar, desmontar ou alterar de alguma forma, a garantia será invalidada. A garantia estabelece a total responsabilidade da Novar ED&S. A garantia não abrange danos ou perdas consequenciais ou custos com a instalação decorrentes do produto defeituoso. A garantia não afecta, de forma alguma, os direitos legais ou outros de um consumidor e aplica-se somente a produtos instalados na UE. Se um item desenvolver uma falha, o produto deve ser devolvido ao ponto de venda acompanhado de: 1. 2. 3. Prova de compra. Descrição completa da falha. Todas as baterias relevantes (desligadas). 11 Apoio ao cliente Para obter mais informações relativas ao produto ou os manuais de instalação completos, caso se apliquem, consulte www.friedlandproducts.com Service Helpline Portugal Segunda-feira - Sexta-feira 09:00 - 17:00 808 202 462 71 As chamadas são taxadas à tarifa nacional dos fornecedores do serviço.