1
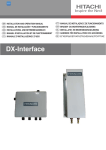
Haibrain X-10 Infrarood-interface type IRIX35
Technische karakteristieken
• Transponeert 38-kHz infraroodsignalen (IR-signalen) afkomstig
van de afstandsbediening naar Haibrain X-10 commando's
via het lichtnet.
• Axiale gevoeligheid: 25 m Bereik (hoek 45°, bereik 7 m)
• Mogelijkheid voor standaard- en omschakel-IR-ontvangst.
• Mogelijkheid voor het aansturen van één door de gebruiker te
definiëren lettercode (16 adressen).
• Ontworpen als op een wand of plafond te bevestigen
component, met de bijgeleverde voedingskabel ook als los
component in een wandcontactdoos toe te passen
• Het infraroodprotocol is compatibel met het bestaande
IR-protocol X-10. Dit betekent dat alle standaard met X-10
compatibele IR-zenders (-afstandsbedieningen) kunnen
worden gebruikt.
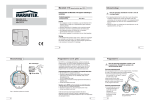
Haibrain X-10
Infrarood-interface type IRIX35
Haibrain X-10 modules
IRIX35
Infraroodsignalen
lichtnetsignaal
Afstandbediening
Haibrain
Home Control
Box
Figuur 1.
Toepassingsopties
Haibrain Home Control Box
De IRIX35 kan worden gebruikt voor het ontvangen van
opdrachten via infrarood (IR), afkomstig van Haibrain X-10
afstandsbedieningen, en het via het lichtnet doorsturen van deze
opdrachten voor het schakelen of dimmen van Haibrain X-10
actoren (zie figuur 1).
Als de IRIX35 wordt gebruikt in combinatie met de Haibrain Home
Control Box, kan de IRIX35 worden gebruikt voor het met een
afstandsbediening activeren van de eerder geprogrammeerde
macro's in de Haibrain Home Control Box.
2
3
Montage
Montage (vervolg)
De IRIX35 kan in principe op 2 manieren worden toegepast:
1. Gemonteerd op een centraaldoos
2. Aangesloten op een wandcontactdoos
Aansluiten van het netsnoer voor toepassing op een
wandcontactdoos
!
Indien u de IRIX35 wilt aansluiten op een wandcontactdoos
moet het meegeleverde netsnoer worden aangesloten.
Let op! Voor u met de montage/installatie begint
moet u zich ervan verzekeren dat de spanning is
afgeschakeld.
Voor het aansluiten van het netsnoer aan de IRIX35 volgt u de
volgende stappen.
• Haal het deksel van de IRIX35 door de schroef aan de
bovenzijde los te draaien.
• Snijdt met een stanleymes voorzichtig de uitsparing aan de
smalle zijde van de montageplaat open zodat het netsnoer
hierdoor gevoerd kan worden.
• Monteer fase en nul aan de kroonsteen en voer de kabel
door het kabelkanaal in de montageplaat.
• Draai de deksel van de IRIX35 weer vast aan de
montageplaat.
Monteren op een centraaldoos
Voor de montage van de IRIX35 op een centraaldoos volgt u de
volgende stappen.
• Haal het deksel van de IRIX35 door de schroef aan de
bovenzijde los te draaien.
• Voer fase en nul door de achterplaat door een opening (A) te
maken in de sticker.
• Schroef de montageplaat met schroeven vast aan de
centraaldoos.
• Sluit fase en nul aan op de kroonsteen van de montageplaat.
• Draai de deksel van de IRIX35 weer vast aan de
montageplaat.
A
Monteren op een centraaldoos.
4
5
6
Standaardmodus of omschakelmodus
Standaardmodus (= standaard instelling)
De IRIX35 kan werken in de standaardmodus of in de
omschakelmodus.
Verzenden
Standaardmodus
In de standaardmodus is de IRIX35 compatibel met bestaande
X-10 IR-zender/ontvangers. De gebruiker moet het
adresnummer en de opdracht afzonderlijk indrukken op de
afstandsbediening.
In de standaardmodus is het afhankelijk van de ontvangen
IR-code welke actie wordt ondernomen.
Verzenden
Huidige status
Resulterende status
AAN
UIT
UIT
AAN
Ontvangstmodus voor één lettercode
De IRIX35 kan uitsluitend signalen van één lettercode ontvangen.
Als er een lettercode in de IRIX35 is geprogrammeerd ("A" t/m "P"),
kan de interface alleen de geprogrammeerde lettercode
ontvangen.
Let op: als er dimmers moeten worden bediend,
raden wij u aan de IRIX35 in de standaardmodus te
laten staan.
9
1 Programmeren van de lettercode
Invoeren in de programmeermodus:
Volg de onderstaande stappen om een lettercode in de IRIX35 te
programmeren:
1. Houd de programmeerschakelaar 3 seconden ingedrukt om
de programmeermodus te activeren. De LED gaat branden.
2. Verzend met een X-10 compatibele zender een setup commando,
een lettercode en een cijfercode, naar de IRIX35 via het lichtnet.
(Bijv. Haibrain Home Control Box of programmeerunit (PRU256).
Lettercode "A" t/m "P" kan worden geprogrammeerd inclusief een
willekeurige cijfercode. Voorbeeld: om lettercode B te
programmeren, verzendt u twee keer B01. De LED knippert twee
keer nadat twee identieke setup commando's (adressen)
ontvangen zijn in de programmeermodus.
LED UIT
Druk de knop
3 - 6 s in
(Alleen in omschakelmodus)
Druk de knop
6 - 9 s in
1
2
Programmeren van de lettercode
Adresinleermodus
LED continu AAN
LED knippert langzaam
(knippert 5 x om de 2 seconden)
Automatisch proces voor
het vaststellen van:
1. De huidige status van
de modules
2. Reactie op groepsopdrachten
Figuur 2.
Druk de programmeerschakelaar in met een puntig
voorwerp.
Het proces kan circa
3 minuten duren
10
UIT
Programmeren van de IRIX35 (vervolg)
Gebruiksmodus
Druk de programmeerschakelaar
kort in, of wacht 60 s
UIT
UIT
*) Bepaald door IRIX35 bij het indrukken van een nummer op de afstandsbediening.
Programmeren van de IRIX35
Verzenden van setup commando
(letter- en cijfercode) (2x)
over het lichtnet
AAN
AAN
AAN/UIT*
Aansluiten van het netsnoer.
8
AAN
UIT
Omschakelmodus
In de omschakelmodus (éénknopsmodus) kan de gebruiker twee
opdrachten (AAN of UIT) versturen met één knop (adresnummer).
Welke opdracht wordt verzonden is afhankelijk van de status van
het bediende object (AAN/UIT) op het moment van schakelen.
Ongeacht hoe lang de knop wordt ingedrukt, wordt er slechts één
opdracht verzonden. Extra opdrachten tot dimmen of feller
worden kunnen worden verzonden als er dim- en brightcommando's worden ontvangen.
7
Resulterende status
AAN
UIT
Omschakelmodus
!
Huidige status
AAN
KIES
Adres
ACTIE
Setup commando
RESULTAAT
LED knippert
A01…P16
2 x adres
2x
!
11
12
LET OP!: Het is niet mogelijk om alleen met de
afstandsbediening de IRIX35 te programmeren. Dit is
alleen mogelijk indien een extra ontvanger voor de
afstandsbediening wordt gebruikt zodat deze de setup
commando's via het lichtnet naar de IRIX35 kan sturen.
Programmeren van de IRIX35 (vervolg)
KIES
Instelling
ACTIE
Setup
commando
Geen IR-omschakeling 2 x Bright
IR-omschakelmodus 2 x Dim
RESULTAAT
Aantal
knipperingen
RESULTAAT
LED knipperingen
inclusief adres 1)
12
5
14 x
7x
X-10 modules
In de IR-omschakelmodus werkt de IRIX35 met tweewegcommunicatie. Dit betekent dat, wanneer u de IRIX35 de eerste
keer activeert, de IRIX35 de huidige status moet detecteren (AAN
of UIT) van alle 16 geïnstalleerde modules in dezelfde lettercode.
De IRIX35 moet ook detecteren of de module reageert op
groepscommando's. Deze scan kan automatisch worden verwerkt
als u de inleermodus activeert.
De standaardinstelling is vetgedrukt. Alle instellingen kunnen afzonderlijk worden
geprogrammeerd.
1
) De som van het aantal keren knipperen voor de lettercode en het setup commando.
Adresinleermodus
De inleermodus kan worden ingeschakeld door the programmeerknop 6 tot 9 seconden ingedrukt te houden (LED knippert
langzaam, knippert 5 x om de 2 seconden).
3. Als u de IR-omschakelmodus wilt programmeren, dient u met
een X-10 compatibele zender een "DIM"-opdracht naar
de IRIX35 te verzenden via het lichtnet. (Bijv. Haibrain Home
Control Box of programmeerunit ( PRU256).
4. Druk kort op de programmeerschakelaar of wacht 60 seconden
om de programmeermodus te verlaten en terug te keren naar
de normale gebruiksmodus.
!
Dit is een automatisch proces dat één keer moet worden
uitgevoerd na de installatie van alle geprogrammeerde modules.
Alleen modules die reageren op statusverzoeken kunnen
worden gedetecteerd . In deze modus detecteert de IRIX35
welke actoren aanwezig zijn in de geprogrammeerde lettercode.
Dit is noodzakelijk om de IRIX35 in staat te stellen de status van
elke module te volgen als zij reageren op de groepscommando's
All Units Off, All Lights On en All Lights Off. Als de status van
één of meer modules met een groepscommando is gewijzigd, is
de volgende verzonden code automatisch tegenovergesteld aan
de vorige. Dit detectie proces waarbij de lampen automatisch
worden in- en uitgeschakeld, duurt circa 3 minuten. Tijdens dit
proces zal de LED continu langzaam kort knipperen. Wanneer de
LED stopt met knipperen, is het proces voltooid. Na deze
procedure keert de IRIX35 terug in de gebruiksmodus.
2 Automatische detectie van de status van de Haibrain
Met het volgende setup commando kan de omschakelmodus
worden geprogrammeerd wanneer de programmeermodus actief is.
!
Let op: activeer deze modus alleen als de IRIX35
zich in de IR-omschakelmodus bevindt!
!
In de inleermodus verzendt de IRIX35 diverse commando's om
vast te stellen welke externe adressen (binnen de
geprogrammeerde lettercode) reageren op groepscommando's.
Let op: de IRIX35 verzendt alleen de geprogrammeerde lettercode van de IRIX35, ongeacht de
lettercode-instelling van de afstandsbediening.
13
14
15
Technische gegevens
Installatiewijzen
• De IRIX35 is ontworpen voor:
- installatie op een standaard 50-mm inbouwdoos of
- installatie onder een centraaldoos of
- bevestiging op een wand (met de meegeleverde
voedingskabel).
• Het infrarood "oog" moet daarbij zoveel mogelijk in het zicht
van de afstandsbediening zitten.
!
Let op: automatisch omschakelen verhoogt niet
alleen het comfort, maar kent ook een aantal
gevaren. Mensen kunnen erdoor schrikken, of
kleding die over een elektrische verwarmingsbron
wordt geplaatst, kan vlam vatten. Wees u altijd
bewust van deze gevaren en neem de vereiste
voorzorgsmaatregelen.
• Het product dient slechts te worden geopend voor montagedoeleinden. Wij adviseren u de montage te laten uitvoeren
door een getrainde en gecertificeerde Haibrain X-10 dealer.
• Indien het bijgeleverde netsnoer wordt toegepast dienen de
draadeinden tot aan de isolatie in het kroonsteentje te worden
gemonteerd. Er mag geen blank koper zichtbaar zijn.
• Stel de IRIX35 nooit bloot aan direct zonlicht. De infrarode
lichtbestanddelen van de zon kunnen de werking van uw
16
Let op: Tijdens dit automatische proces mag er
geen communicatie over het lichtnet plaatsvinden.
Componenten die dit proces kunnen storen, zoals
computerinterfaces, bewegingssensoren enz.
moeten worden losgekoppeld van de netspanning
voordat de inleermodus wordt geactiveerd.
Bedien tijdens dit proces geen schakelaars!
systeem nadelig beïnvloeden
• Monteer de IRIX35 op voldoende afstand van hoogfrequent
verlichting zoals spaarlampen en TL- en PL-verlichting.
• Om kortsluiting te voorkomen, mag dit product uitsluitend
binnenshuis en uitsluitend op droge plaatsen worden gebruikt.
Stel de componenten niet bloot aan regen of vocht. Gebruik
het product niet in de buurt van een bad, zwembad enz.
• Stel de componenten van uw systemen niet bloot aan
extreem hoge temperaturen of felle lichtbronnen.
• Sluit het product pas aan op de netspanning nadat u hebt
gecontroleerd of de netspanning gelijk is aan de waarden op
de identificatielabels. Sluit nooit een beschadigd netsnoer aan.
Neem in dat geval contact op met uw leverancier.
• Open het product niet: het apparaat bevat onderdelen die
onder spanning staan. Het product mag uitsluitend gerepareerd
en onderhouden worden door een erkende reparateur.
• Bij onjuist gebruik of als u het product zelf hebt geopend,
gewijzigd of gerepareerd, vervalt elke vorm van garantie.
Haibrain aanvaardt geen enkele aansprakelijkheid bij onjuist
gebruik van het product of als het product wordt gebruikt voor
andere dan de gespecificeerde doeleinden. Haibrain aanvaardt
geen enkele aansprakelijkheid voor schade die de wettelijke
productaansprakelijkheid te boven gaat.
Productkenmerken
Netspanning
Max. opgenomen vermogen
Omgevingstemperatuur
Infraroodfrequentie
Beveiligingsklasse
Beveiligingstype
17
18
Normen:
230 V AC, 50 Hz
<2W
0 tot 40 °C
38 kHz (NEC-compatibel protocol)
Klasse II, Dubbel geïsoleerd
IP 40 bij montage op de wand of
plafond
IP 20 bij ophangen aan de wand.
IEC 60950
Behuizing
Afmetingen (H x B x D)
Kleur
120 x 80 x 30 mm
RAL9001
Voedingskabel
Afmeting
Kleur
lengte 1,5 m
wit
Opsporen en verhelpen van storingen
Klacht:
Oorzaak:
Oplossing:
Oorzaak:
Oplossing:
Oorzaak:
Oplossing:
Opsporen en verhelpen van storingen (vervolg)
LED knippert niet als ik op de afstandsbediening druk.
De batterijen van de afstandsbediening zijn (bijna) leeg.
Vervang de batterijen van de afstandsbediening.
De afstandsbediening staat niet in de Infrarood-modus.
Stel de afstandsbediening als IR-zender in.
De infrarood-signalen komen niet over.
Verklein de afstand tussen zender en ontvanger.
Nadat de batterijen van de afstandsbediening vervangen
zijn kan ik niets meer bedienen.
Oorzaak: De batterijen van de afstandsbediening zitten verkeerd om of
maken onvoldoende contact.
Oplossing: Controleer of de batterijen juist geplaatst zijn.
Af en toe moet ik twee keer op de afstandsbediening
drukken voordat een module schakelt of opdracht
uitgevoerd wordt.
Oorzaak: De IRIX35 staat in de IR-omschakelmodus geprogrammeerd en de
adresinleermodus is niet goed uitgevoerd.
Oplossing: Voer deze adresinleermodus opnieuw uit.
Klacht:
Klacht:
Als ik de lamp wil dimmen, schakelt de lamp in of uit, in
plaats van te dimmen nadat ik op een cijfer van de
afstandsbediening heb gedrukt.
Oorzaak: De IRIX35 staat in de IR-omschakelmodus.
Oplossing: Zet de IRIX35 in de standaardmodus.
Klacht:
De infrarood ontvanger werkt alleen als de
afstandsbediening op korte afstand van de infrarood
ontvanger wordt gebruikt.
Oorzaak: De batterijen van de afstandsbediening zijn
(bijna) leeg.
Oplossing: Vervang de batterijen van de afstandsbediening.
Oorzaak: De zon of hoogfrequent (TL) verlichting schijnt direct in de
infrarood ontvanger en stoort de infrarood ontvanger.
Oplossing: Verplaats de infrarood ontvanger en zorg ervoor dat deze niet
direct aan zonlicht of deze verlichtingsbron wordt blootgesteld.
Klacht:
De adresinleermodus kan niet goed worden uitgevoerd.
Opdrachten afkomstig van andere (Haibrain X-10) componenten
worden over het lichtnet verzonden en verstoren het inleer proces
van de infrarood ontvanger.
Oplossing: Schakel alle andere (Haibrain X-10) componenten zoals bijvoorbeeld bewegingsmelders, computerinterface, Home Control Box,
enz. uit zodat deze niet kunnen zenden over het lichtnet tijdens
het inleerproces. Bedien gedurende dit proces geen schakelaars.
Klacht:
Oorzaak:
De modules in de woning schakelen niet als ik op de
afstandbediening druk.
Oorzaak: De IRIX35 staat op een verkeerde lettercode ingesteld.
Oplossing: Stel de ontvanger in op de juiste lettercode.
Klacht:
19
20
21
Ongestoorde werking van het Haibrain X-10 systeem
Elektronische apparaten en systemen kunnen gevoelig zijn voor
signalen van andere apparaten, die elektromagnetische storing
veroorzaken. Binnen de Europese Unie zijn afspraken gemaakt over
de immuniteit (gevoeligheid) van de apparatuur voor signalen en
ook de emissie (storing) van deze apparatuur. Als de apparaten/
toepassingen in een omgeving voldoen aan de daarvoor geldende
normen, zullen ze elkaar niet storen (ze zijn dan "Elektro Magnetisch
Compatibel").
Voor residentiële omgevingen, waar het huisautomatiseringssysteem Haibrain X-10 wordt toegepast, is de Europese norm voor
immuniteit vastgelegd in de EN 61000-6-1. Apparatuur die voldoet
aan deze norm is bestand tegen de elektromagnetische emissie van
overige apparaten die voldoen aan de Europese norm EN 61000-6-3
(residentiële omgevingen). Ervaring heeft geleerd dat in woonhuizen
apparatuur kan voorkomen dat een EMC-emissie-niveau heeft
boven de in EN 61000-6-3 vastgestelde niveaus. Deze apparatuur
kan de correcte werking van de Haibrain X-10 modules verstoren.
De immuniteit van de Haibrain X-10 inbouwmodules is om die reden
opgewaardeerd en gelijkwaardig geworden aan de EN 61000-6-2,
de strengere Europese norm voor immuniteit in industriële
omgevingen.
Copyrights
Copyright and all other proprietary rights in the
content (including but not limited to model numbers, software, audio, video, text
and photographs) rests with Haibrain B.V. Any use of the Content, but without
limitation, distribution, reproduction, modification, display or transmission without
the prior written consent of Haibrain is strictly prohibited. All copyright and other
proprietary notices shall be retained on all reproductions.
Haibrain X-10 is niet verantwoordelijk voor het disfunctioneren
van het Haibrain X-10 systeem als gevolg van in het gebouw
aanwezige apparatuur met emissiewaardes boven de
maximale toegestane niveaus zoals die gelden in residentiële,
commerciële en lichtindustriële omgevingen en zijn vastgelegd
in de EN 61000-6-3.
Toepassing
Residentieel
Commercieel
Licht-industrieel
Geldende Europese norm
Haibrain X-10 huis
automatisering*
Immuniteit van
de apparatuur
61000-6-1
Immuniteit- en
emissienorm
Compatibel/
voldoet
Emissie van
de apparatuur
61000-6-3
* Voorwaarde daarbij is dat het gehele Haibrain X-10 systeem wordt
geïnstalleerd volgens de geldende instructies door een gecertificeerde
en getrainde Haibrain X-10 dealer.
Desalniettemin dient het toepassinggebied van Haibrain
X-10 beperkt te blijven tot residentiële omgevingen.
22
20324 - 20100929
23
Haibrain X-10 Infrared interface type IRIX35
Technical characteristics
• Transposes 38 kHz InfraRed (IR) signals from the remote
control device into Haibrain X-10 commands on the power
line.
• Axial sensitivity: 25 mtr. range (edge 45°, 7 m. range).
• Possibility for standard and "toggle" IR receipt.
• Possibility to control one user definable letter code
(16 addresses).
• Designed as an wall- or ceiling mountable unit or for
stand-alone use.
• The infrared protocol is compatible with the existing
X10 IR-protocol. This means that all standard X10 compatible
IR remote transmitters (controls) can be used.
Haibrain X-10
Infrared interface type IRIX35
Haibrain X-10 modules
IRIX35
Infrared
signals
Lighting
circuit
signal
Remote control
Haibrain
Home Control
Box
Application options
Figure 1.
The IRIX35 can be used to receive infra red-commands (IR) from
Haibrain X-10 remote controls and send them over the power
line to switch or dim Haibrain X-10 actuators (see figure 1).
Haibrain Home Control Box
If the IRIX35 is used in combination with the Haibrain Home
Control Box. The IRIX35 can be used to activate the previously
programmed macros in the Haibrain Home Control Box, using a
remote control device.
26
27
Assembly
Assembly (cont'd.)
In principle, the IRIX35 can be used in two ways:
1. Fitted to a distribution box.
2. Connected to a wall socket.
Connecting the power cord for use in a wall socket
!
If you wish to connect the IRIX35 to a wall socket, you must
connect the power cord provided.
Note: Switch off the power before starting the
assembly!
To connect the power cord to the IRIX35, follow the steps
below.
• Remove the cover of the IRIX35 by loosening the screw
at the top.
• Use a Stanley knife to carefully cut open the recess on the
narrow side of the mounting plate so that the power cord
can be fed through.
• Fit live and neutral to the connector and feed the cable
through the cable channel in the mounting plate.
• Firmly tighten the cover of the IRIX35 to the mounting
plate again.
Fitting to a distribution box
To fit the IRIX35 to a distribution box, follow the steps below.
• Remove the cover of the IRIX35 by loosening the screw at
the top.
• Feed live and neutral through the rear plate by making an
opening through the sticker covering the mounting plate.
• Firmly screw the mounting plate with screws to the
distribution box.
• Connect live and neutral to the connector of the
mounting plate.
• Firmly tighten the cover of the IRIX35 to the mounting
plate again.
A
Fitting to a distribution box.
28
29
30
Standard mode or toggle mode
Standard mode (= default setting)
The IRIX35 can run in the standard mode or the toggle mode.
Send
Standard mode
In standard mode the IRIX35 is compatible with existing
X10 IR-transceivers. The user must press separately the address
number and the command on the remote control.
In the standard mode it depends on the IR-code received which
action is taken.
31
Send
OFF
OFF
Current state
Result state
ON
OFF
OFF
ON
*) Determined by IRIX35 when pressing a number on the remote control.
Single letter code receiving mode
The IRIX35 can only receive signals of a single letter code.
If the letter code of the IRIX35 is programmed to any letter code
("A" to "P") the interface will only receive and forward the
programmed letter code.
Note: When controling dimmers is required we
recommend to leave the IRIX35 in the standard
mode.
32
33
1 Programming the lettercode
Entering in the programming mode:
To program a letter code into the IRIX35 please follow the next
steps:
1. Activate the programming mode by keeping the programming
switch pressed for 3 seconds. The LED will now lit.
2. Send Setup command, a letter code and a number code,
through the power line by an X-10 compatible transmitter to
the IRIX35. (E.g. Haibrain Home Control Box or Programming
Unit (PRU256)). Letter code "A" to "P" may be programmed
inclusive an arbitrary number code. For example, to program
letter code B, send B01 twice. The LED will blink twice after
receipt of two identical setup commands
(Address) in the program mode.
LED OFF
Press button
3-6s
(Only for toggle mode)
Press button
6-9s
1
2
Programming the letter code
Address learn mode
LED continuous ON
LED blinks slowly
(flashes 5 x every 2 seconds)
Automatic process
to determine:
1. Current state of modules
2. Reaction to group
commands
Figure 1.
Press the programming switch in with a pointed object.
CHOOSE
Address
ACTION
Setup Command
RESULT
LED flashes
A01…P16
2 x Address
2x
Proces can take
aproximately 3 minutes
!
34
OFF
Programming the IRIX35 (cont'd.)
Operation mode
Shortly press program switch
or wait 60 s
ON
ON
ON/OFF*
Programming of the IRIX35
Send setup command
(letter and number code) (2x)
ON
OFF
Toggle mode
In toggle mode (one button mode) the user can send two
commands (ON or OFF) with one button (address number).
Which command is transmitted, depends on the present state
of the controlled object (ON/OFF). Independent of how long a
button is pressed; only one command will be transmitted.
Additional dim- or bright-commands can be transmitted if
receiving Dim- or Bright signals.
!
Result state
ON
OFF
Toggle mode
Connecting of the power cord.
Current state
ON
35
36
Note: It is not possible to program the IRIX35 with
a remote control only. To program the IRIX35 with
the remote control an additional remote control
receiver is required to send the setup commands
over the power line to the IRIX35.
Programming the IRIX35 (cont'd.)
2 Auto detect the state of the two-way Haibrain X-10
By means of the next setup commands it is possible to program
the toggle mode when you are in the programming mode.
CHOOSE
Setting
ACTION
Setup Command
RESULT
Blink code
RESULT
LED flashes
including Address 1)
No IR-toggle
IR-toggle mode
2 x Bright
2 x Dim
12
5
14 x
7x
In the IR-toggle mode the IRIX35 operates with two-way
communication. This means that, when you activate the IRIX35
for the first time, the IRIX35 needs to detect the actual status
(ON or OFF) of all 16 installed modules in the same letter code.
The IRIX35 also needs to detect if the module reacts to group
commands. This scan can automatically be processed when you
activate the learn mode.
Bold is default setting. All settings can be programmed separately.
1
) The sum of the blinks of the letter code and the setup command.
Address Learn Mode
3. If you wish to program the IR-toggle mode please send a
"DIM" command to the IRIX35, through the power line by an
X-10 compatible transmitter to the IRIX35. (E.g. Haibrain
Home Control Box or Programming Unit (PRU256)).
4. Shortly press the programming switch or wait 60 seconds to
leave the programming mode and return to the normal
operation mode.
!
which must be carried out one time after installation of all
programmed modules. Only two-way modules can be detected
(responding to status request). In this mode the IRIX35 detects
which actuators are present in the programmed letter code. This
is necessary to enable the IRIX35 to follow the status of each
module when responding to group commands All Units Off, All
Lights On and All Lights Off. If the status of one ore more
modules has changed by means of a group command the next
transmitted code will be automatically reversed.
This process in which the lights will be switched ON and OFF
automatically will last for approximately 3 minutes. During this
process the LED will continuously show short blinks. Do not
switch or transmit any code over the power line during this
process. After the LED stops blinking the process is completed.
After this procedure the IRIX35 will revert to the operation
mode.
modules
The learn mode can be enabled by pressing the program button
between 6…9 seconds (LED blinks slowly, flash 5 x every
2 seconds).
!
Note: The IRIX35 will only transmit the
programmed letter code of the IRIX35.
Independently of the letter code setting of the
remote control.
Note: This mode must be entered only, if the IRIX35
is programmed in "IR-toggle mode"!
!
In learn mode the IRIX35 will transmit several commands to see
which external addresses (within the programmed letter code)
will respond to group commands. This is an automated process,
37
38
39
Technical data
Installation methods
• The IRIX35 is designed to be:
- installed on a standard 50 mm junction box or
- installed below a (ceiling) distribution box or
- mounted on a wall (using supplied power cable).
• The infrared "eye" must be in the line of sight of the remote
control as much as possible.
!
Note: Automatic switching does not just increase
the level of comfort, a number of hazards are also
involved. People may be surprised, or clothing
placed over an electrical heat source may ignite.
Always be aware of these hazards and take the
necessary precautions.
• The product must only be opened for installation purposes.
We advise you to have the product installed by a trained and
certified Haibrain X-10 dealer.
• If the mains lead supplied is used, the wire ends must be
installed up to the insulation in the connector. There must not
be any bare copper visible.
• Never expose the IRIX35 to direct sunlight. Infrared light
components from the sun could seriously affect the operation
of your system.
40
Note: All transmitters which can disturb this
automated process like Computer Interfaces,
Movement sensors etc. must be switched off from
the mains before starting the learn mode!
Do not operate any switches during this process.
• Install the IRIX35 at a sufficient distance from high frequency
lighting such as energy-efficient lamps and fluorescent and
compact fluorescent lighting.
• To prevent short circuits, this product should only be used
inside and only in dry spaces. Do not expose the components
to rain or moisture. Do not use the product close to a bath,
swimming pool etc.
• Do not expose the components of your systems to extremely
high temperatures or bright light sources.
• Only connect the product to the mains after checking
whether the mains voltage is the same as the values on the
identification tags. Never connect a power cord when it is
damaged. In that case, please contact your supplier.
• Do not open the product: the device contains live parts. The
product should only be repaired or serviced by a qualified
repairman
• In case of improper usage or if you have opened, altered and
repaired the product yourself, all guarantees expire. Haibrain
X-10 does not accept responsibility in the case of improper
usage of the product or when the product is used for
purposes other than specified. Haibrain X-10 does not accept
responsibility for additional damage other than covered by the
legal product responsibility.
Product characteristics
Mains voltage
Max. power consumption
Ambient temperature
Infrared frequency
Protection class
Type of protection
41
42
Standards:
230 Vac, 50 Hz
<2W
0 to 40 °C
38 kHz (NEC compatible protocol)
Class II, Double insulated
IP 40 with installation on the wall or
ceiling
IP 20 with installation on the wall.
IEC 60950
Housing
Dimension (H x W x D)
Color
120 x 80 x 30 mm
RAL9001
Power cable
Dimension
Color
Length 1.5 m
White
Troubleshooting
Problem:
Cause:
Solution:
Cause:
Solution:
Cause:
Solution:
Troubleshooting (cont'd.)
LED does not flash when I press the remote control.
The remote control batteries are (almost) flat.
Replace the batteries.
The remote control is not in the Infrared mode.
Switch the remote control to IR transmitter.
The infrared signals are not received.
Reduce the distance between transmitter and receiver.
Problem:
Cause:
Solution:
Problem:
Problem:
Cause:
Solution:
Cause:
Solution:
The infrared receiver only works when the remote control
is used at a short distance from the infrared receiver.
The remote control batteries are (almost) flat.
Replace the batteries.
The sun or high frequency (fluorescent) lighting is shining directly
onto the infrared receiver and interfering with the infrared receiver.
Move the infrared receiver and ensure that it is not directly
exposed to the sun or this lighting source.
Cause:
Solution:
Problem:
Cause:
Solution:
43
After the remote control batteries are replaced, I cannot
operate anything.
The remote control batteries are incorrectly positioned or make
insufficient contact.
Check if the batteries are correctly positioned.
Problem:
When I want to dim the lamp, the lamp switches on or off
instead of dimming after I have pressed a number on the
remote control.
The IRIX35 is in the IR-toggle mode.
Switch the IRIX35 to the standard mode.
Problem:
Cause:
Cause:
Solution:
Solution:
The modules in the house do not switch when I press the
remote control.
The IRIX35 is set to an incorrect letter code.
Switch the receiver to the correct letter code.
Now and then, I have to press the remote control twice
before a module switches or carries out a command.
The IRIX35 is programmed to the IR-toggle mode and does not
perform "Address Learn Mode" well.
Carry out "Address Learn Mode" again.
The "Address Learn Mode" cannot be performed well.
Commands from other (Haibrain X-10) components are
transmitted via the lighting circuit and disrupt the learning
process of the infrared receiver.
Switch all other (Haibrain X-10) components off, such as
movement sensors, computer interface and Home Control Box etc.,
so that they cannot transmit via the lighting circuit during the
learning process. Do not operate any switches during this process.
44
45
Undisturbed functioning of Haibrain X-10 automation
Electrical equipment and systems can be sensitive to signals from
other equipment, which causes electro magnetic disturbance. In
the European Union, countries agreed upon laws for the immunity
(sensitivity) of signals of other equipment as well as equipment
emission (disturbance). When equipment or applications in a certain
surrounding comply with the valid standards, they will not disturb
each other's operations (they are called "Electro Magnetic
Compatible").
For residential surroundings, where the home automation system
Haibrain X-10 is being applied, the European standard for immunity
is standardised in EN 61000-6-1. Equipment that complies with this
standard is resistant to electro magnetic emission of other equip
ment, which complies with the European standard EN 61000- 6-3
for residential surroundings. Experience has shown that in domestic
surroundings, equipment is being used which has an EMC-emission
level that is above the levels stated in EN 61000-6-3. This equip
ment can disturb the correct functioning of the Haibrain X-10
modules. The immunity of the Haibrain X-10 built-in modules is
therefore revaluated and equivalent to EN 61000-6-2 (the more
severe European standard for immunity in industrial surroundings).
Copyrights
Copyright and all other proprietary rights in the
content (including but not limited to model numbers, software, audio, video, text
and photographs) rests with Haibrain B.V. Any use of the Content, but without
limitation, distribution, reproduction, modification, display or transmission without
the prior written consent of Haibrain is strictly prohibited. All copyright and other
proprietary notices shall be retained on all reproductions.
Haibrain X-10 is therefore not responsible for the disfunctioning
of the Haibrain X-10 system as a consequence of equipment in
the building with emission levels that exceed the maximum
allowed levels set as standard for residential, commercial and
semi-industrial surroundings stated in EN 61000-6-3.
Application area
Residential
Commercial
Semi-industrial
Valid European Standard
Haibrain X-10
home automation*
Immunity of
equipment
Emission of
equipment
Immunity and
emission standards
61000-6-1
61000-6-3
Compatible/
meets the
requirements
* Condition is that the total Haibrain X-10 system is installed in accordance
with valid instructions supplied by a certified and trained Haibrain X-10
dealer.
Nevertheless, the application area for Haibrain X-10 will
remain restricted to residential areas.
20324 - 20100929
46
47