1
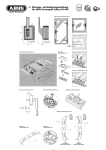
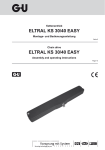
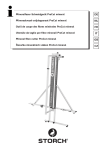
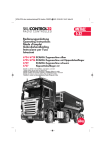
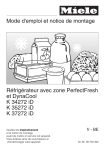
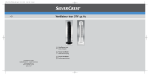
FAS97 | Montage- und Bedienungsanleitung für ABUS Fenster-Scharnierseiten-Sicherung
FAS97 | ABUS Installation and operation instructions for ABUS window hinge security device
FAS97 | Manuel d’installation et d’utilisation pour sécurité latérale de paumelles de fenêtre
Abb./fig./schéma/ afb./ill. 1a
FAS97 | Montage-en gebruiksaanwijzing voor ABUS raam-scharnierzijbeveiliging
FAS97 | Istruzioni di montaggio ed uso della sicura per cerniere di finestre
Abb./fig./schéma/ afb./ill. 1b
Gebruik BA- of IM100 chemisch anker
min. 22
Houten- metaal- of kunststof kozijnen
met staal versterking
kunststof kozijnen zonder
staal versterking
zonder ABUS BA- of IM100
chemisch anker
Diese Anleitung ist wie folgt untergliedert:
103
I. Allgemeine Hinweise
II.Einsatzmöglichkeit
III.Packungsinhalt
145
54
These instructions are organised in the following sections:
IV. Werkzeug
V. Montageanleitung
VI.Bedienung
I. General instructions
II. Possible uses
III. Pack contents
min. 8
max. 9,9
FTS
Abb./fig./schéma/ afb./ill. 2b
I. Indications d’ordre général
I. Algemene instructies
I. Istruzioni generali
La sécurité latérale de paumelles de fenêtre FAS97 satisfait aux exigences de
contrôle sévères des normes DIN 18104-1 et VdS 2536. Le certificat DIN indique que
FAS97 a obtenu la qualification «anti-effraction DIN». FAS97 offre en plus une protection contre les intrusions par effraction dans votre logement. Selon la norme
DIN 18104-1, il est recommandé de monter une protection complémentaire par
mètre de hauteur de fenêtre, à gauche comme à droite (par fenêtre). La police et
les compagnies d’assurance le recommandent également.
FTS97 is SKG gecertificeerd volgens BRL 3104_Hang en sluitwerk.
La sicura per cerniere di finestre FAS97 è conforme ai severi requisiti di controllo
della DIN 18104-1 e della VdS 2536. Con la DIN Certco essa è certificata come «ANTISCASSO conf. DIN». La FAS97 garantisce una protezione in più a difesa della Vostra
casa. Secondo DIN 18104-1 si consiglia di montare per ogni metro di altezza della
finestra, una sicura supplementare sul lato destro e una sul lato sinistro (per ogni
finestra). Anche la polizia e le compagnie d’assicurazione consigliano tali misure.
Optimum protection can be achieved by proceeding according to these installation and operation instructions. To prevent the risk of overtightening, the fastening
screws should by screwed in using a suitable tool and tightened by hand. Only
use ABUS fastening material.
Pour un effet de protection optimal, suivez les instructions de ce manuel
d’installation et d’utilisation. Afin d’éviter un serrage abusif, vissez et serrez les
vis de fixation à la main et avec un outillage adéquat. Utilisez exclusivement des
accessoires ABUS.
The manufacturer does not assume any liability for possible injuries or damages
caused during installation and/or by incorrect handling!
Le fabricant n’assume aucune responsabilité pour d’éventuels blessures ou dégâts
causés pendant l’installation et/ou par suite de manipulations inappropriées!
L’habitat doit être accessible de l’extérieur afin de l’ouvrir au moyen d’une clé.
FTS
Ein Zugang des gesamten Objektes muss von außen mittels Schlüssel zu öffnen sein.
II. Possible use
II. Einsatzmöglichkeit
FAS97 is mounted on the hinge side of the window or French door and is suitable
for all common windows/French doors opening to the inside with turn or turnand-tilt hardware (fig. 2a + 2b). The lock can be fitted to wood, PVC or aluminium. The windows/French doors can open to the right or left.
Bei schlechten Befestigungsmöglichkeiten (Weichholz- oder Kunststofffenster)
sollten mehrere Sicherungen und zusätzlich Befestigungsmittel (Befestigungsanker
oder Verbundmörtel) eingesetzt werden. Hierzu verwenden Sie bitte den ABUSBefestigungsanker BA (Kunststoff-, Weichholz-, Alufenster) oder alternativ das
ABUS-Befestigungsset IM100 (Kunststofffenster). Siehe SKG-Tabelle. Zu IM100
benötigen Sie einen geeigneten Verbundmörtel. ABUS BA und ABUS IM100 sowie
Verbundmörtel sind im Handel erhältlich.
FAS
FAS
FTS
Die in Abb. 2a+2b zusätzlich gezeigten ABUS-Produkte sind ebenfalls im Handel erhältlich.
Abb./fig./schéma/ afb./ill. 3
III. Packungsinhalt (Abb. 3)
1
4
3
2
• 1 Rahmenleiste inkl. Klappbügel
• 1 Satz Unterlagen für Rahmenleiste (1 x 1 mm, 2 x 2 mm)
• 1 Abdeckhaube
• 1 Schließblech
• 1 Satz Unterlagen für Schließblech (1 x 1 mm, je 2 x 1,5 mm, 2 mm, 5 mm)
• Schrauben: 3 Stück 5,5 x 50 mm, 2 Stück 4,8 x 50 mm, 2 Stück 4,8 x 32 mm,
3 Stück 4,8 x 15 mm
• 3 Stopfen
IV. Montagewerkzeug
• Kreuzschlitzschraubendreher
• Bohrmaschine
• Feile, Säge zum Kürzen der Schrauben, ggf. Schraubstock
Bohrtabelle
FAS97_Montageanleitung_390117_141029.indd 1-6
7
FAS97 is always mounted to the inside, with the casement plate on the window
casement and the frame strip on the frame.
In poor fixture conditions (soft or hollow or foam base and PVC windows with and
without metal inlay and wooden windows) and/or good possibilities for intrusion
from the outside, more security devices and additional fastenings should be used
(composite mortar or fixing bolts). If the frame itself is too weak for sensible retrofitting, it may be necessary for example to reinforce the frame. To do so, please
use the ABUS fixing bolt BA or alternatively for PVC frames, the ABUS fastening set
IM100. See SKG Table. For IM100 you need a suitable composite mortar. ABUS BA
and ABUS IM100 are available from retail stores together with composite mortar.
The ABUS products also shown in fig. 2a + 2b (FO400 and FOS550) shown in
fig. 2a + 2b are also available from retail stores.
III. Pack contents (fig. 3)
• 1 frame strip incl. hinged bar
• 1 closing plate (1 x 1 mm, 2 x 2 mm)
• 1 cover cap
• 1 set shims for frame strip
• 1 set shims for locking plate (1 x 1 mm, 2 x 1.5 mm, 2 mm, 5 mm each)
• Screws: 3 each 5.5 x 50 mm, 2 each 4.8 x 50 mm, 2 each 4.8 x 32 mm,
3 each 4.8 x 15 mm
• 3 hole cover
II. Application
FAS97 est monté sur le côté des paumelles de la fenêtre ou de la porte-fenêtre
et convient pour toutes les fenêtres/portes-fenêtres courantes, ouvrant vers
l’intérieur et pourvues de quincaillerie ouvrante ou oscillo-battante avec
commande d’une seule main (schéma 2a + 2b). L’installation peut être effectuée
sur des châssis en bois, en PVC ou en aluminium. Les fenêtres/portes-fenêtres
peuvent s’ouvrir à gauche ou à droite.
FAS97 est monté en principe du côté intérieur, la gâche sur l’ouvrant et la platine
de fixation sur le dormant.
En cas de possibilités de fixation défavorables (fenêtres en bois ou en PVC),
plusieurs sécurités et des fixations supplémentaires (ancre de fixation ou mortier)
doivent être prévues. Pour cela, utilisez l’ancre de fixation ABUS BA (pour fenêtres
en PVC, en bois ou en aluminium) ou l’ensemble de fixations ABUS IM100 (pour
fenêtres en PVC). Voir tableau SKG. Pour IM100, un mortier approprié est requis.
ABUS BA et ABUS IM100 ainsi que le mortier de fixation sont disponibles dans le
commerce.
Les produits ABUS complémentaires illustrés en schéma 2a + 2b (FO400 et FOS550)
sont également disponibles dans le commerce.
III. Liste de colisage (schéma 3)
• 1 platine de fixation avec arceau rabattable
• 1 ensemble d’entretoises pour platine de fixation 1 x 1 mm, 2 x 2 mm
• 1 coiffe PVC
• 1 gâche
• 1 ensemble d’entretoises pour gâche chacun (1 x 1 mm, 2 x 1,5 mm, 2 mm, 4 mm, 5 mm)
• Vis: 3 pièces de 5,5 x 50 mm, 2 pièces de 4,8 x 50 mm, 2 pièces de 4,8 x 32 mm,
3 pièces de 4,8 x 15 mm
• 3 bouchons
IV. Installation tools
IV. Outillage de montage
• Phillips screwdriver
• Drill
• Saw, file for shortening the screws, possibly vice
• Tournevis cruciforme
• Perceuse
• Lime, scie pour raccourcir les vis, éventuellement taraudeuse
Drilling table
Tableau de perçage
De FTS97 biedt bescherming tegen onbevoegd binnendringen van uw
woning. Op kunststof zonder staal versterking dient u deze scharnierbeveiliger
in combinatie met ABUS BA- of IM 100 bevestigingsanker te monteren (schroefgat
B), conform de bijgevoegde handleidingen. Deze zijn optioneel in de handel
verkrijgbaar. Bij IM100 heeft u een passend chemisch mortel nodig, bijv. Fischer,
Hilti of vergelijkbaar.
De in afb. 2 extra getoonde ABUS producten zijn eveneens in de handel verkrijgbaar.
Si può ottenere una protezione ottimale, procedendo secondo queste istruzioni di
montaggio ed uso. Le viti di fissaggio, per evitarne un serraggio eccessivo,devono
essere avvitate con un utensile adatto e poi serrate a mano. Impiegare esclusivamente materiale di fissaggio ABUS.
Optimale veiligheid wordt bereikt door nauwkeurig opvolgen van deze montageen gebruiksaanwijzing. Om overbelasting of doldraaien van de bevestigingsschroeven te vermijden, draait u handmatig en met passend gereedschap de
schroeven vast.
Per eventuali ferimenti e/o danni, che si verificano durante il montaggio e/o per
maneggio indebito, il produttore non si assume alcuna responsabilità!
Voor eventueel verwondingen en/of schade tijdens montage en/of door ondeskundig gebruik ontstaan, aanvaardt de fabrikant geen aansprakelijkheid!
La FAS97 viene montata sul lato della cerniera della finestra o della porta-finestra
ed è adatta per tutte le normali finestre e porte-finestre che si aprono verso
l’interno, con guarnizioni metalliche girevoli o girevoli- a bilico (ill. 2a + 2b). Si
può montare la FAS97 su legno, plastica o alluminio. Le finestre/porte-finestre
possono aprirsi verso destra o verso sinistra.
Di solito la FAS97 viene montata all’interno, la lamiera del battente sul battente
della finestra ed il listello del telaio sul telaio.
Se le possibilità di fissaggio sono scadenti (sottofondo morbido o vuoto o riempito con espanso e finestre in plastica con o senza inserto metallico e finestre in
legno) e le possibilità di effrazione dall’esterno sono buone, si dovrebbero utilizzare più sicure e mezzi di fissaggio supplementari (malta o avvitamento passante
o bullone di fissaggio). Se i telai stessi sono troppo deboli, per poterli allestire
adeguatamente in un secondo tempo, potrebbe essere consigliabile rinforzare,
per esempio, i telai stessi.
Allo scopo utilizzare per favore il bullone di fissaggio ABUS BA o come alternativa,
nel caso di telai in plastica, il kit di fissaggio ABUS IM100. Vedi tabella SKG. Per
lo IM100 serve una malta adatta. ABUS BA e ABUS IM100 come anche la malta si
possono acquistare.
II. Toepassingsmogelijkheid
De FAS97 wordt aan de scharnierzijde gemonteerd en is geschikt voor alle naar
binnen draaiende ramen en deuren met draai/kip-beslag (afb. 1a+b).Montage
mogelijk op hout, kunststof of aluminium. Montage voorwaarden, zie SKG tabel.
Rechts of links draaiend. Hoewel de bediening van de vergrendeling van onderof van bovenaf plaats kan vinden wordt in deze montage- en bedieningsinstrictie
uitgegaan van een bediening van onderaf.
De FAS97 wordt uitsluitend aan de binnenzijde gemonteerd; de raamplaat op het
raam of deur en de kozijnlijst op het kozijn.
III. Verpakkingsinhoud (afb. 3)
• 1 kozijnlijst incl. klapbeugel
• 1 sluitplaat (1 x 1 mm, 2 x 2 mm)
• 1 afdekkap
• 1 set onderleggers voor kozijnlijst
• 1 set onderleggers voor sluitplaat
• 1 (elk 1 x 1 mm, 2 x 1,5 mm, 2 mm, 5 mm)
• Schroeven: 3 stuks 5,5 x 50 mm, 2 stuks 4,8 x 32 mm, 2 stuks 4,8 x 50 mm,
3 stuks 4,8 x 15 mm
• 3 dopjes
IV. Montagegereedschap
• Kruiskopschroevendraaier
• Boormachine
• Vijl, zaag voor het inkorten van de schroeven, evt. bankschroef
II. Possibilità di impiego
I prodotti ABUS mostrati inoltre nel’ill. 2a + 2b (FO400 e FOS550) sono anche
reperibili in commercio.
III. Contenuto della confezione (ill. 3)
• listello del telaio incl. staffa a cerniera
• 1 lamiera di chiusura (1 x 1 mm, 2 x 2 mm)
• 1 coperchietto
• 1 skit di spessori per listello del telaio
• 1 kit di spessori per la lamiera di chiusura (ciascuno 1 x 1 mm, 2 x 1,5 mm, 2 mm, 5 mm)
• Viti: 3 viti da 5,5 x 50 mm, 2 viti da 4,8 x 50 mm, 2 viti da 4,8 x 32 mm
3 viti da 4,8 x 15 mm
• 3 tapi
IV. Attrezzi da montaggio
• cacciavite a stella
• trapano
• sega, lime per accorciare le viti, in caso una morsa
Boortabel
Für Schrauben Ø
In Holz und Kunststoff
ohne Metalleinlage
Bohrer Ø
In Alu und Kunststoff
mit Metalleinlage
Bohrer Ø
For screws Ø
In wood and PVC
without metal inlay
drill bit Ø
in aluminium and PVC
with metal inlay
drill bit Ø
pour vis de Ø
dans châssis bois et PVC
sans armature métalique
foret Ø
dans châssis aluminium
et PVC avec armature
métallique foret Ø
voor schroeven Ø
in hout en kunststof
zonder metalen kern
boor Ø
in aluminium en kunststof met metalen kern
boor Ø
5,5 mm
4 mm
4,5 mm
5,5 mm
4 mm
4.5 mm
5,5 mm
4 mm
4,5 mm
5,5 mm
4 mm
4,5 mm
4,8 mm
3,5 mm
3,5 mm
4.8 mm
3.5 mm
3.5 mm
4,8 mm
3,5 mm
3,5 mm
4,8 mm
3,5 mm
3,5 mm
5
6
Istruzioni generali
IV. Attrezzi
Possibilità d´impiego
V. Istruzioni di montaggio
Contenuto della confezione VI. Uso
The window hinge security device FAS97 is recognised as complying with the
strict test requirements of DIN 18104-1 and VdS 2536. FAS97 is certified by DIN
Certco as “BURGLAR RETARDANT DIN tested”. FAS97 offers additional protection
from unauthorised intruders in your rooms. DIN 18104-1 recommends that an
additional security device should be fitted on the left and right for every meter
in height (per window). The police and insurance companies also give the same
recommendation.
FAS97 wird grundsätzlich auf der Innenseite montiert, das Flügelblech auf dem
Fensterflügel und die Rahmenleiste auf dem Rahmen.
FTS
Queste istruzioni si suddividono nel modo seguente:
I.
II.
III.
I. General instructions
FAS97 wird auf der Scharnierseite des Fensters oder der Fenstertür montiert und
eignet sich für alle gängigen nach innen öffnende Fenster/Fenstertüren mit
Einhand-Dreh- oder Dreh-Kipp-Beschlägen (Abb. 2a+2b). Die Montage kann auf
den Werkstoffen Kunststoff, Holz oder Alu erfolgen. Die Fenster/Fenstertüren
können nach rechts oder links öffnen.
min. 7,5
FAS
Deze gebruiksaanwijzing is als volgt onderverdeeld:
I. Algemene instructies
IV. Gereedschap
II. Toepassingsmogelijkheid V. Montageaanwijzing
III. Verpakkingsinhoud
VI. Bediening
Die Fenster-Scharnierseiten-Sicherung FAS97 ist nach den strengen Prüfanforderungen der DIN 18104-1 und VdS 2536 anerkannt. Durch DIN Certco ist FAS97
zertifiziert „EINBRUCHHEMMEND DIN-geprüft“. FAS97 bietet zusätzlich Schutz gegen
unberechtigtes Eindringen in ihre Räume. Gemäß DIN 18104-1 wird empfohlen,
dass pro 1 Meter Fensterhöhe rechts und links jeweils eine Zusatzsicherung montiert
wird (pro Fenster). Polizei und Versicherer empfehlen dieses ebenfalls.
Für eventuell auftretende Verletzungen bzw. Schäden, die bei der Montage und/
oder durch unsachgemäße Handhabung entstehen, übernimmt der Hersteller
keine Haftung!
Abb./fig./schéma/ afb./ill. 2a
Ce manuel comporte les chapitres suivants:
I. Conseils d’ordre général IV. Outillage
II. Champ d’application
V. Instructions de montage
III. Liste de colisage
VI. Utilisation
I. Allgemeine Hinweise
Die optimale Schutzwirkung erreichen Sie, wenn Sie entsprechend dieser Montageund Bedienungsanleitung vorgehen. Die Befestigungsschrauben sollten zur
Vermeidung von Überdrehung mit einem geeigneten Werkzeug eingeschraubt und
von Hand angezogen werden. Ausschließlich ABUS-Befestigungsmaterial einsetzen.
15
IV. Tools
V. Installation instructions
VI. Operation
in combinatie met ABUS
BA- of IM100 chemisch anker
Tabella di trapanazioni
per viti Ø
in legno e plastica
senza inserto metallico
punta da trapano Ø
in alluminio e plastica
con inserto metallico
punta da trapano Ø
5,5 mm
4 mm
4,5 mm
4,8 mm
3,5 mm
3,5 mm
29.10.14 09:44
Abb./fig./schéma/ afb./ill. 4a
V. Montageanleitung:
V. Installation instructions:
V. Instructions de montage:
V. Montageaanwijzing:
V. Istruzioni per il montaggio:
Wichtige Hinweise:
• Before installation, please check the setting of the window or French door.
Indications importantes:
Belangrijke instructies:
• Vor der Montage prüfen Sie bitte die Einstellung des Fensters. Stellen Sie sicher,
dass sich das Fenster/die Fenstertür einwandfrei öffnen und schließen lässt.
• If necessary, readjust the fittings so that the window (French door) opens and
closes perfectly.
• Avant l‘installation, contrôlez l’ouverture de la fenêtre. Assurez-vous que la
fenêtre/porte-fenêtre ouvre et ferme parfaitement.
Avvertenze importanti:
Prima del montaggio verificare per favore la regolazione della finestra risp. della
porta finestra.
• Messen Sie auch nach, ob die in Abb. 1b angegebenen Mindestmaße an Ihrem
Fenster/Ihrer Fenstertür vorhanden sind.
• Also check whether your window/French door complies with the minimum
dimensions shown in fig. 1b.
• Vérifiez si votre fenêtre/porte-fenêtre comporte les dimensions minimales
indiquées en schéma 1b.
• Voor de montage dient u de instelling van het raam resp. van de glazen deur te
controleren. Stel evt. de beslagen opnieuw in, zodat het raam (de glazen deur)
correct opengaat en sluit.
• Die Bohrlochtiefen bzw. die Schraubenlängen müssen auf die örtlichen Gegebenheiten abgestimmt werden.
• The depths of the drilled holes and screw lengths must be adjusted to the local
conditions.
• Les profondeurs de perçage ou les longueurs de vis doivent être adaptées aux
conditions locales.
4
•A
ustreten des Bohrers bzw. der Schrauben auf der Rückseite vermeiden!
Ggf. mit Bohranschlag arbeiten oder die vorhandenen Schrauben kürzen.
• Avoid the drill or screws from coming out at the back! Possibly work with drill
stopper or shorten the existing screws.
• Evitez le dépassement de perçage ou de vis sur la face arrière! Utilisez le cas
échéant une butée de perçage ou raccourcissez les vis de fixation.
3
• Beim Bohren keine beweglichen Teile, Dichtungen oder Glasscheiben verletzen.
• When drilling, do not damage any moving parts, seals or glass panes.
Montage:
FAS97 wird entsprechend Abb. 2a, 2b + 3a auf der Scharnierseite montiert.
Installation:
FAS 97 should be fitted to the hing side as shown in fig. 2a, 2b+3a.
• Lors du perçage, évitez d’endommager les éléments mobiles, les joints ou les
vitres.
1. Achtung!
Die Drehpunkte der Fensterscharniere und der FAS 97 müssen übereinstimmen
(Abb. 4a)! Hierzu Klappbügel (1) (Abb. 4a) auf den Rahmen auflegen, ausrichten
und gegebenenfalls mit Unterlagen (2) ausgleichen. Bohrungen (A) vorbohren
(s. Bohrtabelle) und Klappbügel (1) mit Schrauben 5,5 x 50 mm anschrauben.
Mittlere Bohrung (B) vorbohren (s. Bohrtabelle) und Schraube 5,5 x 50 mm
einschrauben.
max. 9,9 mm
22 mm
2
5
1
Abb./fig./schéma/ afb./ill. 4b
Abb./fig./schéma/ afb./ill. 5
1
A
5c
B
5b
4
A
5a
www.abus.com
FAS97_Montageanleitung_390117_141029.indd 7-12
• De boorgatdiepten resp. de schroeflengten moeten op de plaatselijke omstandigheden worden afgestemd.
• Voorkom dat de boor resp. de schroeven er aan de achterkant uitsteken! Evt.
met booraanslag werken of de aanwezige schroeven inkorten.
• Bij het boren geen beweeglijke delen, dichtingen of ruiten beschadigen.
Installation:
FAS 97 est monté du côté des paumelles de fenêtre comme illustré en schéma 2a,
2b+3a.
Montage:
FAS 97 dient overeenkomstig afb. 2a, 2b + 3a aan de scharnierzijde te worden
gemonteerd.
1. C aution!
The pivot points of the window hinge and FAS 97 must coincide! To do so, place
the hinged bar (1) (see fig. 4a) on the frame, align and line with shims (2) if
necessary. Pre-drill holes (A) (see drilling table) and screw on hinged bar (1) with
screws 5.5 x 50 mm. Pre-drill middle hole (B) (see drilling table) and use
screws 5.5 x 50 mm.
1. Attention!
Les points de pivotement des paumelles de fenêtre et de FAS 97 doivent correspondre (schéma 4a).Pour ce faire, positionnez l’arceau (1) (schéma 4a) sur le
châssis,alignez-le et ajustez le cas échéant avec des entretoises (2). Préforez les
fixations (A) (voir tableau de perçage) et fixez l’arceau (1) avec des vis de 5,5 x
50 mm. Préforez la fixation centrale (B) (voir tableau de perçage) et fixez avec
une vis de 5,5 x 50 mm.
2. K
lappbügel (1) aufschwenken und Schließblech (4) mit den Krallen in den
Klappbügel (1) einsetzen. Klappbügel (1) zurückschwenken lassen. Nocken (4a)
des Schließbleches (4) sollen mittig in den ovalen Löchern (1a) des Klappbügels
(1) sichtbar sein und ein freies Schwenken des Klappbügels (1) zulassen. In dieser
Stellung das Schließblech (4) mit Unterlagen (5) ausgleichen, bis der Spalt zwischen
Schließblech (4) und Klappbügel (1) ca. 1 mm beträgt. Schließblech (4) mittig
(Bohrung 5a) vorbohren (s. Bohrtabelle) und mit Schraube 4,8 x 15 mm verschrauben.
2. Swivel the hinged bar (1) open and insert locking plate (4) with the claws in the
hinged bar (1). Let the hinged bar (1) swing back. The cams (4a) of the locking
plate (4) should be visible in the middle of the oval holes (1a) of the hinged
bar (1) and allow for the hinged bar (1) to swivel freely. In this position, use the
shims (4) to line the locking plate (5). The gap between the locking plate
(4) and hinged bar (1) should be 1 mm. Pre-drill locking plate (4) in the middle
(hole 5a) (see drilling table) and screw in firmly using screw 4.8 x 15 mm.
2. Relevez l’arceau (1) et posez la gâche (4) avec la griffe dans l’arceau (1). Rabattez
l’arceau (1). Les plots (4a) de la gâche (4) doivent être visibles dans les évidements
ovales de l’arceau (1) et permettre le libre mouvement de l’arceau (1). Ajustez la
hauteur de la gâche avec des entretoises (5) dans cette position. L’espacement
entre la gâche (4) et l’arceau (1) doit être max. d’1 mm. Préforez au centre (fixation
5a) de la gâche (4) (voir tableau de perçage) et fixez avec des vis de 4,8 x 15 mm.
1. Let op!
De draaipunten van de raamscharnieren en FAS 97 moeten overeenstemmen!
Hiervoor de klapbeugel (1) (zie afb. 4a) op het kozijn leggen, uitlijnen en eventueel
met onderleggers (2) compenseren. Boringen (A) voorboren (zie boortabel) en
klapbeugel (1) met schroeven 5,5 x 50 mm vastschroeven. Middelste boring
(B) voorboren (zie boortabel) en schroef 5,5 x 50 mm er indraaien.
Opm. indien kunststof zonder staal versterking; ABUS anker incl. M6 bevesti-
ging toepassen.
Funktionen prüfen:
Checking the functions:
Contrôlez le bon fonctionnement:
Prüfung der Kippfunktion
• Klappbügel bei geschlossenem Fenster aufschwenken. Klappbügel wird durch
Federdruck offen gehalten (Feder eventuell nachbiegen).
• Fenster kippen und wieder schließen. Der Klappbügel soll dabei automatisch
wieder verriegeln.
Checking the tilting function:
• Swivel the hinged bar open with the window closed. Hinged bar engages.
• Tilt the window and close again. The hinged bar should swivel back automatically.
Contrôle de la fonction d’entrebâillement
• Relevez l’arceau avec la fenêtre en position fermée. L’arceau est maintenu
ouvert par un ressort (recourbez éventuellement le ressort).
• Basculez et refermez la fenêtre. L’arceau doit s’enclencher automatiquement.
Checking the turning function:
Contrôle de la fonction d’ouverture
• Ouvrez et refermez la fenêtre.
Prüfung der Drehfunktion:
• Fenster öffnen und schließen.
Abb./fig./schéma/ afb./ill. 6w
• Meet ook na, of de in afb. X aangegeven minimum-afmetingen aan uw raam/
uw glazen deur aanwezig zijn.
Bei Funktionsstörungen Drehpunkte, Unterlagenstärken und Schließblechposition
überprüfen und ggf. korrigieren.
3. Löcher 5b und 5c soweit wie möglich vom Klappbügel (1) entfernt vorbohren
(s. Bohrtabelle) und entsprechend der Unterlagenstärke das Schließblech (4)
mit Schrauben 4,8 x 15/32/50 mm verschrauben.
• Open and close the window.
In the case of malfunctions, check the pivot points, shim thickness and locking
plate position, and correct if necessary.
3. P
re-drill holes 5b and 5c as far as possible away from the hinged bar (1) (see
drilling table) and screw the locking plate (4) with screws 4.8 x 15/32/50 mm,
depending on the shim thickness.
En cas d’anomalie de fonctionnement, contrôlez et corrigez selon les besoins les
points de pivotement, les épaisseurs d’entretoises et la position de la gâche.
3. P
réforez les fixations 5b et 5c à la distance maximale possible de l’arceau (1)
(voir tableau de perçage) et fixez la gâche (4) en fonction de l’épaisseur des
entretoises avec des vis de 4,8 x 15/32/50 mm.
2. K lapbeugel (1) omhoog zwenken en sluitplaat (4) met de klauwen in de
klapbeugel (1) plaatsen. De klapbeugel (1) laten terugzwenken. De nokken
(4a) van de sluitplaat (4) dienen in het midden in de ovale gaten (1a) van
de klapbeugel (1) zichtbaar te zijn en het vrije zwenken van de klapbeugel
(1) mogelijk te maken. In deze positie de sluitkast (4) met opvulplaatjes (5)
uitvullen tot de ruimte tussen sluitkast en klapbeugel ca. 1 mm is. Sluitplaat (4)
in het midden (boring 5a) voorboren (zie boortabel) en met schroef 4,8 x 15 mm
vastschroeven.
Functies controleren:
Controle van de kipfunctie:
• Klapbeugel bij gesloten raam openzwenken. Klapbeugel klikt vast.
• Raam kantelen en weer sluiten. De klapbeugel moet daarbij weer automatisch
vorgrendelen.
Controle van de draaifunctie:
• Raam openen en sluiten.
Bij functiestoringen de draaipunten, onderlegdikten en sluitplaatpositie controleren
en evt. corrigeren.
3. G
aten 5b en 5c zo ver mogelijk van de klapbeugel (1) verwijderd voorboren (zie
boortabel) en overeenkomstig de onderlegdikte de sluitplaat (4) met schroeven
4,8 x 15/32/50 mm vastschroeven.
• Se necessario registrare nuovamente i ferramenti affinché la finestra (la portafinestra) si chiuda e si apra perfettamente.
• Verificare anche che le misure minime indicate nell’ill.1b esistano nelle vostre
finestre/porte-finestre.
• Le profondità per trapanare i fori, risp. le lunghezze delle viti devono essere
adattate alle condizioni particolari.
• Evitare che la punta del trapano risp. la vite fuoriesca dall’altra parte! Se necessario lavorare con arresto del trapano o accorciare le viti.
• Quando si trapana, non danneggiare parti mobili, guarnizioni o vetri.
Montaggio: La FAS 97 dovrebbe essere montata sul lato della cerniera cpnf. ill. 2a,
2b + 3a.
1. A
ttenzione!
I punti di rotazione della cerniera della finestra e FAS 97 devono coincidere!
Allo scopo mettere la staffa a cerniera (1) (vedi ill. 4a) sul telaio, allinearlal e se necessario
compensare con spessori (2).Trapanare i fori (A) (vedi tabella trapanazioni)
e avvitare la staffa a cerniera (1) con viti 5,5 x 50 mm. Trapanare il foro centrale
(B) (vedi tabella trapanazioni) e avvitare vite 5,5 x 50 mm.
2. Aprire la staffa a cerniera (1) e inserire la lamiera di chiusura con le graffe nella
staffa a cerniera (1). Far richiudere la staffa a cerniera (1). I naselli (4a) della
lamiera di chiusura (4) devono essere visibili al centro nei fori ovali della staffa
a cerniera (1) che essa possa essere girata liberamente. In questa posizione
compensare la lamiera di chiusura (4) con spessori (5) affinché la fessura fra
lamiera di chiusura (4) e staffa a cerniera (1) sia di ca. 1 mm. Fare il foro per la
lamiera di chiusura (4) al centro (foro 5a) (vedi tabella trapanazioni e avvitare
con vite 4,8 x 15 mm.
Controllare il funzionamento:
Controllare il ribaltamento:
• Aprire con finestra chiusa la staffa a cerniera. La staffa a cerniera si innesta
• Ribaltare la finestra e chiudere di nuovo. Il aletto dovrebbe agganciarsi
automaticamente.
Controllare la rotazione:
• Aprire e chiudere la finestra.
Se il funzzionamento è disturbato, verificare punti di rotazione, altezza degli
spessori e posizione della lamiera di chiusura e se necessario correggere.
3. Trapanare i fori 5 b e c il piú lontano possibile dalla staffa a cerniera (1) (vedi
tabella trapanazioni e avvitare la lamiera di chiusura (2), adeguatamente
all´altezza degli spessori con viti 4,8 x 15/32/50 mm.
Achtung:
Je länger die Schrauben, desto besser die Befestigung.
Note:
The longer the screws, the better the fastening.
Attention:
Plus les vis sont longues, meilleure est la fixation.
Let op:
Hoe langer de schroeven, des te beter de bevestiging.
Attenzione:
quanto più lunghe le viti, tanto migliore il fissaggio.
4. Abdeckhaube seitlich aufschieben (Abb. 6).
4. Push on the cover from the side (see fig. 6).
4. Faites coulisser la coiffe PVC latéralement (schéma 6).
4. Afdekkap aan de zijkant er opschuiven (zie afb. 6).
4. Infilare il coperchietto dal lato (vedi ill. 6)
5. Wichtig:
Alle Funktionsprüfungen wiederholen (s. zwischen 3 und 4).
5. Important:
Repeat all function tests (see between 3 and 4).
5. Important:
Répétez tous les contrôles de fonctionnement (voir 3 et 4).
5. B
elangrijk:
Alle functiecontroles herhalen (zie tussen 3 en 4).
5. Importante:
Ripetere il controllo di tutti i funzionamenti (vedi fra 3 e 4).
6. Stopfen in ovale Klappbügellöcher drücken (Abb. 6).
6. Press hole covers into oval holes in hinge bar (fig. 6).
6. Introudire les bouchons dans les trous de l’arceau (schéma 6).
6. Dopjes in de ovale klapbeugelgaten drukken (afb. 6).
6. Spingere i tapi nei bucchi ovali del aletto (vedi ill. 6).
VI. Bedienung
VI. Operation
VI. Utilisation
VI. Bediening
VI. Uso
FAS 97 wird in die normale Betätigung des Fensters einbezogen. Für normale
Drehöffnung ist keine weitere Betätigung notwendig. Zum Kippen des Fensters
muss der Klappbügel aufgeschwenkt werden. Beim Schließen des Fensters wird
die Sicherung dann wieder automatisch aktiviert.
FAS 97 is integrated in the normal operation of the window. No other operation
is required when turning the window to open normally. To tilt the window, the
hinged bar must be swivelled open until it engages. To close the window, the
security device is then automatically activated again.
FAS 97 est intégré dans les manipulations normales de la fenêtre. Pour une ouverture battante normale, aucune intervention complémentaire n’est requise. Pour
basculer la fenêtre en position d’entrebâillement, l’arceau doit être relevé. Lors
du coulissement latéral de la fenêtre, la sécurité est réactivée automatiquement.
FAS 97 wordt in de normale bediening van het raam geïntegreerd. Voor normale
draaiopening is geen verdere bediening noodzakelijk. Voor het kippen van het
raam moet de klapbeugel worden open gezwenkt totdat deze vergrendeld. Bij het
sluiten van het raam wordt de beveiliging dan weer automatisch geactiveerd.
La FAS 97 viene azionata con il normale azionamento della finestra. Per la normale
apertura a rotazione non serve altro. Per aprire a ribalta la finestra , la staffa a
cerniera deve essere aperta fino a che innesta. Chiudendo la finestra, la sicura si
attiva automaticamente.
Bitte überprüfen Sie nach jedem Verschließen des Fensters, ob die Sicherung
richtig eingerastet ist.
Every time after you close the window, please check that the security device has
engaged.
Après chaque fermeture de la fenêtre, assurez-vous que la sécurité est engagée
correctement.
Controleer a.u.b. telkens na het sluiten van het raam of de beveiliging correct
vergrendeld is.
Per favore, dopo ogni volta che si è chiusa la finestra, controllare se la sicura si sia
innestata correttamente.
S ubject to technical alterations.
No liability for mistakes and printing errors.
ABUS | D 58292 Wetter | Germany
©
Technische wijzigingen voorbehouden.
Geen aansprakelijkheid voor vergissingen en drukfouten.
©
ABUS | D 58292 Wetter | Germany
390117 | 09/2014
Abb./fig./schéma/ afb./ill. 3a
29.10.14 09:44