1
VEGA
WIRELESS
ITALIANO
AVVERTENZE PER L’INSTALLATORE
OBBLIGHI GENERALI PER LA SICUREZZA
ATTENZIONE! È importante per la sicurezza delle persone seguire
attentamente tutta l’istruzione. Una errata installazione o un errato
uso del prodotto può portare a gravi danni alle persone.
1.
2.
3.
4.
5.
6.
7.
8.
9.
10.
11.
12.
13.
14.
15.
16.
17.
18.
19.
20.
21.
22.
23.
24.
25.
26.
27.
Leggere attentamente le istruzioni prima di iniziare l’installazione del prodotto.
I materiali dell’imballaggio (plastica, polistirolo, ecc.) non devono essere lasciati alla
portata dei bambini in quanto potenziali fonti di pericolo.
Conservare le istruzioni per riferimenti futuri.
Questo prodotto è stato progettato e costruito esclusivamente per l’utilizzo indicato in
questa documentazione. Qualsiasi altro utilizzo non espressamente indicato potrebbe
pregiudicare l’integrità del prodotto e/o rappresentare fonte di pericolo.
GENIUS declina qualsiasi responsabilità derivata dall’uso improprio o diverso da quello
per cui l’automatismo è destinato.
Non installare l’apparecchio in atmosfera esplosiva: la presenza di gas o fumi
infiammabili costituisce un grave pericolo per la sicurezza.
Gli elementi costruttivi meccanici devono essere in accordo con quanto stabilito
dalle Norme EN 12604 e EN 12605.
Per i Paesi extra-CEE, oltre ai riferimenti normativi nazionali, per ottenere un livello di
sicurezza adeguato, devono essere seguite le Norme sopra riportate.
GENIUS non è responsabile dell’inosservanza della Buona Tecnica nella costruzione delle chiusure da motorizzare, nonché delle deformazioni che dovessero
intervenire nell’utilizzo.
L’installazione deve essere effettuata nell’osservanza delle Norme EN 12453 e EN
12445. Il livello di sicurezza dell’automazione deve essere C+D.
Prima di effettuare qualsiasi intervento sull’impianto, togliere l’alimentazione elettrica
e scollegare le batterie.
Prevedere sulla rete di alimentazione dell’automazione un interruttore onnipolare con
distanza d’apertura dei contatti uguale o superiore a 3 mm. È consigliabile l’uso di
un magnetotermico da 6A con interruzione onnipolare.
Verificare che a monte dell’impianto vi sia un interruttore differenziale con soglia
da 0,03 A.
Verificare che l’impianto di terra sia realizzato a regola d’arte e collegarvi le parti
metalliche della chiusura.
L’automazione dispone di una sicurezza intrinseca antischiacciamento costituita
da un controllo di coppia. E’ comunque necessario verificarne la sogli di intervento
secondo quanto previsto dalle Norme indicate al punto 10.
I dispositivi di sicurezza (norma EN 12978) permettono di proteggere eventuali
aree di pericolo da Rischi meccanici di movimento, come ad Es. schiacciamento,
convogliamento, cesoiamento.
Per ogni impianto è consigliato l’utilizzo di almeno una segnalazione luminosa nonché
di un cartello di segnalazione fissato adeguatamente sulla struttura dell’infisso, oltre
ai dispositivi citati al punto “16”.
GENIUS declina ogni responsabilità ai fini della sicurezza e del buon funzionamento
dell’automazione, in caso vengano utilizzati componenti dell’impianto non di
produzione GENIUS.
Per la manutenzione utilizzare esclusivamente parti originali GENIUS.
Non eseguire alcuna modifica sui componenti facenti parte del sistema d’automazione.
L’installatore deve fornire tutte le informazioni relative al funzionamento manuale
del sistema in caso di emergenza e consegnare all’Utente utilizzatore dell’impianto
il libretto d’avvertenze allegato al prodotto.
Non permettere ai bambini o persone di sostare nelle vicinanze del prodotto
durante il funzionamento.
L’applicazione non può essere utilizzata da bambini, da persone con ridotte capacità fisiche, mentali, sensoriali o da persone prive di esperienza o del necessario
addestramento.
Tenere fuori dalla portata dei bambini radiocomandi o qualsiasi altro datore di impulso, per evitare che l’automazione possa essere azionata involontariamente.
Il transito tra le ante deve avvenire solo a cancello completamente aperto.
L’utente utilizzatore deve astenersi da qualsiasi tentativo di riparazione o d’intervento
e deve rivolgersi solo ed esclusivamente a personale qualificato GENIUS o centri
d’assistenza GENIUS.
Tutto quello che non è previsto espressamente in queste istruzioni non è permesso.
as specified in the Standards indicated at point 10.
16. The safety devices (EN 12978 standard) protect any danger areas against mechanical
movement Risks, such as crushing, dragging, and shearing.
17. Use of at least one indicator-light is recommended for every system, as well as a
warning sign adequately secured to the frame structure, in addition to the devices
mentioned at point “16”.
18. GENIUS declines all liability as concerns safety and efficient operation of the automated system, if system components not produced by GENIUS are used.
19. For maintenance, strictly use original parts by GENIUS.
20. Do not in any way modify the components of the automated system.
21. The installer shall supply all information concerning manual operation of the system
in case of an emergency, and shall hand over to the user the warnings handbook
supplied with the product.
22. Do not allow children or adults to stay near the product while it is operating.
23. The application cannot be used by children, by people with reduced physical, mental,
sensorial capacity, or by people without experience or the necessary training.
24. Keep remote controls or other pulse generators away from children, to prevent the
automated system from being activated involuntarily.
25. Transit through the leaves is allowed only when the gate is fully open.
26. The User must not in any way attempt to repair or to take direct action and must solely
contact qualified GENIUS personnel or GENIUS service centres.
27. Anything not expressly specified in these instructions is not permitted.
FRANÇAIS
CONSIGNES POUR L’INSTALLATEUR
RÈGLES DE SÉCURITÉ
ATTENTION! Il est important, pour la sécurité des personnes, de suivre
à la lettre toutes les instructions. Une installation erronée ou un
usage erroné du produit peut entraîner de graves conséquences
pour les personnes.
1.
2.
3.
4.
5.
6.
7.
8.
9.
10.
11.
12.
13.
14.
15.
16.
ENGLISH
17.
IMPORTANT NOTICE FOR THE INSTALLER
GENERAL SAFETY REGULATIONS
18.
ATTENTION! To ensure the safety of people, it is important that you read
all the following instructions. Incorrect installation or incorrect use
of the product could cause serious harm to people.
1.
2.
3.
4.
5.
6.
7.
8.
9.
10.
11.
12.
13.
14.
15.
Carefully read the instructions before beginning to install the product.
Do not leave packing materials (plastic, polystyrene, etc.) within reach of children
as such materials are potential sources of danger.
Store these instructions for future reference.
This product was designed and built strictly for the use indicated in this documentation. Any other use, not expressly indicated here, could compromise the good
condition/operation of the product and/or be a source of danger.
GENIUS declines all liability caused by improper use or use other than that for which
the automated system was intended.
Do not install the equipment in an explosive atmosphere: the presence of inflammable gas or fumes is a serious danger to safety.
The mechanical parts must conform to the provisions of Standards EN 12604 and
EN 12605.
For non-EU countries, to obtain an adequate level of safety, the Standards mentioned
above must be observed, in addition to national legal regulations.
GENIUS is not responsible for failure to observe Good Technique in the construction
of the closing elements to be motorised, or for any deformation that may occur
during use.
The installation must conform to Standards EN 12453 and EN 12445. The safety level
of the automated system must be C+D.
Before attempting any job on the system, cut out electrical power and disconnect
the batteries.
The mains power supply of the automated system must be fitted with an all-pole
switch with contact opening distance of 3mm or greater. Use of a 6A thermal breaker
with all-pole circuit break is recommended.
Make sure that a differential switch with threshold of 0.03 A is fitted upstream of
the system.
Make sure that the earthing system is perfectly constructed, and connect metal parts
of the means of the closure to it.
The automated system is supplied with an intrinsic anti-crushing safety device
consisting of a torque control. Nevertheless, its tripping threshold must be checked
19.
20.
21.
22.
23.
24.
25.
26.
Lire attentivement les instructions avant d’installer le produit.
Les matériaux d’emballage (matière plastique, polystyrène, etc.) ne doivent pas
être laissés à la portée des enfants car ils constituent des sources potentielles
de danger.
Conserver les instructions pour les références futures.
Ce produit a été conçu et construit exclusivement pour l’usage indiqué dans cette
documentation. Toute autre utilisation non expressément indiquée pourrait compromettre l’intégrité du produit et/ou représenter une source de danger.
GENIUS décline toute responsabilité qui dériverait d’usage impropre ou différent de
celui auquel l’automatisme est destiné.
Ne pas installer l’appareil dans une atmosphère explosive: la présence de gaz ou de
fumées inflammables constitue un grave danger pour la sécurité.
Les composants mécaniques doivent répondre aux prescriptions des Normes EN
12604 et EN 12605.
Pour les Pays extra-CEE, l’obtention d’un niveau de sécurité approprié exige non
seulement le respect des normes nationales, mais également le respect des
Normes susmentionnées.
GENIUS n’est pas responsable du non-respect de la Bonne Technique dans la construction des fermetures à motoriser, ni des déformations qui pourraient intervenir
lors de l’utilisation.
L’installation doit être effectuée conformément aux Normes EN 12453 et EN 12445.
Le niveau de sécurité de l’automatisme doit être C+D.
Couper l’alimentation électrique et déconnecter la batterie avant toute intervention sur l’installation.
Prévoir, sur le secteur d’alimentation de l’automatisme, un interrupteur omnipolaire
avec une distance d’ouverture des contacts égale ou supérieure à 3 mm. On recommande d’utiliser un magnétothermique de 6A avec interruption omnipolaire.
Vérifier qu’il y ait, en amont de l’installation, un interrupteur différentiel avec un
seuil de 0,03 A.
Vérifier que la mise à terre est réalisée selon les règles de l’art et y connecter les
pièces métalliques de la fermeture.
L’automatisme dispose d’une sécurité intrinsèque anti-écrasement, formée d’un
contrôle du couple. Il est toutefois nécessaire d’en vérifier le seuil d’intervention
suivant les prescriptions des Normes indiquées au point 10.
Les dispositifs de sécurité (norme EN 12978) permettent de protéger des zones
éventuellement dangereuses contre les Risques mécaniques du mouvement, comme
l’écrasement, l’acheminement, le cisaillement.
On recommande que toute installation soit doté au moins d’une signalisation lumineuse, d’un panneau de signalisation fixé, de manière appropriée, sur la structure
de la fermeture, ainsi que des dispositifs cités au point “16”.
GENIUS décline toute responsabilité quant à la sécurité et au bon fonctionnement
de l’automatisme si les composants utilisés dans l’installation n’appartiennent pas
à la production GENIUS.
Utiliser exclusivement, pour l’entretien, des pièces GENIUS originales.
Ne jamais modifier les composants faisant partie du système d’automatisme.
L’installateur doit fournir toutes les informations relatives au fonctionnement manuel du
système en cas d’urgence et remettre à l’Usager qui utilise l’installation les “Instructions
pour l’Usager” fournies avec le produit.
Interdire aux enfants ou aux tiers de stationner près du produit durant le fonctionnement.
Ne pas permettre aux enfants, aux personennes ayant des capacités physiques,
mentales et sensorielles limitées ou dépourvues de l’expérience ou de la formation
nécessaires d’utiliser l’application en question.
Eloigner de la portée des enfants les radiocommandes ou tout autre générateur
d’impulsions, pour éviter tout actionnement involontaire de l’automatisme.
Le transit entre les vantaux ne doit avoir lieu que lorsque le portail est complètement ouvert.
L’utilisateur doit s’abstenir de toute tentative de réparation ou d’intervention et
doit s’adresser uniquement et exclusivement au personnel qualifié GENIUS ou aux
centres d’assistance GENIUS.
27. Tout ce qui n’est pas prévu expressément dans ces instructions est interdit.
ESPAÑOL
ADVERTENCIAS PARA EL INSTALADOR
REGLAS GENERALES PARA LA SEGURIDAD
ATENCION! Es sumamente importante para la seguridad de las
personas seguir atentamente las presentes instrucciones. Una
instalación incorrecta o un uso impropio del producto puede
causar graves daños a las personas.
1.
2.
Lean detenidamente las instrucciones antes de instalar el producto.
Los materiales del embalaje (plástico, poliestireno, etc.) no deben dejarse al alcance
Fig. 1
Fig. 4
Fig. 2
Fig. 5
Fig. 3
Fig. 6
Fig. 7
Fig. 8
Fig. 9
AVVERTENZE
pag.2
1. DESCRIZIONE E CARATTERISTICHE TECNICHE
pag.2
2. DIMENSIONI
pag.2
3. INSTALLAZIONE
pag.2
4. COLLEGAMENTI ELETTRICI
pag.2
5. MESSA IN FUNZIONE
pag.2
6. RICERCA GUASTI
pag.3
DICHIARAZIONE CE DI CONFORMITÁ
Fabbricante:
Indirizzo:
Dichiara che:
•
GENIUS S.p.A.
Via Padre Elzi, 32 - 24050 - Grassobbio- Bergamo - ITALIA
Il dispositivo di protezione attiva opto-elettronico mod. VEGA WIRELESS
è conforme ai requisiti essenziali di sicurezza delle seguenti direttive CEE:
• 2006/95/CE Direttiva Bassa Tensione
• 2004/108/CE direttiva Compatibilità Elettromagnetica
Nota aggiuntiva:
Questo prodotto è stato sottoposto a test in una configurazione tipica omogenea (tutti prodotti di costruzione GENIUS
S.p.A.)
Grassobbio, 01 Dicembre 2008
L’Amministratore Delegato
D. Gianantoni
Note per la lettura dell’istruzione
Leggere completamente questo manuale di installazione prima di iniziare l’installazione del prodotto.
Il simbolo
Il simbolo
evidenzia note importanti per la sicurezza delle persone e l’integrità dell’automazione.
richiama l’attenzione su note riguardanti le caratteristiche od il funzionamento del prodotto.
1
ITALIANO
INDICE
ITALIANO
VEGA WIRELESS
3. INSTALLAZIONE
AVVERTENZE
È importante per la sicurezza delle persone seguire
attentamente tutta l’istruzione.
Per un corretto funzionamento, posizionare il Ricevitore e
il Trasmettitore allineati.
Una errata installazione o un errato uso del prodotto
può portare a gravi danni alle persone
Il Ricevitore della coppia VEGA WIRELESS ha due possibili
tipologie d’installazione:
1. A parete con guaina ad incasso (Fig. 2).
Leggere attentamente le istruzioni prima di iniziare
l’installazione del prodotto e conservarle per
riferimenti futuri
2. A parete con tubo/guaina esterni (Fig. 3).
• Eseguire le predisposizioni per i collegamenti elettrici.
• Fissare il corpo del ricevitore utilizzando viti e tasselli
1. DESCRIZIONE E CARATTERISTICHE
TECNICHE
idonei.
Il Trasmettitore della coppia VEGA WIRELESS ha la possibilità di essere alimentato tramite la batteria interna (Fig.
4) oppure tramite collegamento filare.
La coppia di fotocellule autoallineanti VEGA WIRELESS è
composta da un trasmettitore ed un ricevitore a raggi
infrarossi sincronizzati a quattro canali selezionabili.
Il Trasmettitore alimentato a batteria necessita del solo
fissaggio a parete o su colonnetta.
La fotocellula VEGA WIRELESS è un dispositivo ausiliario
alla sicurezza.
Qualora il Trasmettitore utilizzi l’alimentazione filare,
seguire le stesse tipologie d’installazione indicate nelle
figure 2 e 3.
L’oscuramento del fascio luminoso, provoca il cambiamento di stato del ricevitore, il quale invia il segnale di
fotocellula impegnata tramite contatto a relè.
4. COLLEGAMENTI ELETTRICI
Il Trasmettitore della coppia è alimentato a batteria ma
può anche essere alimentato tramite il collegamento
filare.
Eseguire i collegamenti elettrici sulle morsettiere del
ricevitore come indicato in Fig. 5.
La selezione del canale di trasmissione permette di
installare sullo stesso impianto fino a 4 coppie di VEGA
WIRELESS eliminado il rischio di interferenze tra una
coppia e l’altra.
Qualora si intenda effettuare il controllo FAIL
SAFE con Trasmettitore alimentato a batteria,
collegare il morsetto FAIL SAFE (-TX FSW) delle
schede elettroniche GENIUS al morsetto MENO
( – ) del Ricevitore fotocellula.
12 - 24 V~.
12 - 24 Vdc
Alimentazione
Assorbimento RX
30 mA
Assorbimento TX
40 µA a Batteria
5 mA a 24 Vdc
Tipo e Durata batteria tx
CR2 DA 3 V
da 2 a 3 anni 햲
Portata massima
15 m
Grado di protezione
IP54
Tempo rilevamento ostacolo
Automatica
Angolo di autoallineamento
+/- 7° (15 m)
+/- 13° (5 m.)
Tramissione segnale
Temperatura di funzionamento
Nel caso si alimenti il Trasmettitore tramite collegamento
filare seguire le indicazioni in Fig. 6.
I morsetti di alimentazione del Trasmettitore
possono essere collegati ad una tensione di 12
o 24 Volt sia continua (DC) che alternata ( ~ ).
All’accensione del Trasmettitore e del Ricevitore i rispettivi
led DL2 si accendono per 1 secondo.
40 ms
Modalità di allineamento
Installazione
I morsetti di alimentazione del Ricevitore possono
essere collegati ad una tensione di 12 o 24 Volt
sia continua (DC) che alternata ( ~ ).
5. MESSA IN FUNZIONE
Prima di chiudere la coppia di fotocellule con i rispettivi
coperchi, è indispensabile selezionare il canale di trasmissione e controllarne il funzionamento attraverso i LED di
segnalazione presenti sul Ricevitore.
4 canali selezionabili
-20...+55 °C
SELEZIONE CANALE DI TRASMISSIONE
a parete o su colonnetta
Alimentare le fotocellule e selezionare il canale di trasmissione PREMENDO E MANTENEDO PREMUTO PER 5 SECONDI
il pulsante P1 (Fig. 7).
La durata della batteria può variare in funzione della
carica della batteria impiegata, della sua tipologia e
delle condizioni ambientali/installative.
햲
Al termine dei 5 secondi il led DL2 in figura 7 lampeggerà
un numero di volte pari al canale impostato per poi
spegnersi 1 secondo e ripetere la segnalazione. Dopo
aver completato 3 segnalazioni del canale impostato la
procedura è terminata ed il canale è memorizzato.
2. DIMENSIONI
Le dimensioni del Trasmettitore e del Ricevitore sono le
medesime e sono riportate in Figura 1.
Durante questa visualizzazione è possibile cambiare il
canale di trasmissione: tramite la pressione del pulsante
P1 si selezionano in successione i quattro canali.
Controllare il numero di lampeggi del led DL2 per determinare quale canale si è selezionato:
2
= Canale 1
2 lampeggi
= Canale 2
ON
3 lampeggi
= Canale 3
Lampeggio
4 lampeggi
= Canale 4
Lento
DL 3 Allineamento
Impostare lo stesso canale sia sul ricevitore che sul
trasmettitore.
OFF
Durante la visualizzazione del canale impostato la coppia di fotocellule è inattiva ed il suo
contatto è quindi APERTO. Attendere il termine
della visualizzazione per operare con l’automazione.
ON
OFF
DL 1 Alimentazione
OFF
Alimentazione assente
DL 1 Alimentazione
Alimentazione filare presente
Alimentazione filare assente, funzionamento a batteria
DL 2 Canale di Trasmissione
Normale Funzionamento
Visualizzazione del canale di traLampeggio Lento
smissione
OFF
DL 2 Canale di Trasmissione e Carica Batteria TX
ON
Batteria TX OK
Lampeggio Lento
Indicazione canale di trasmissione
Completare l’installazione chiudendo le fotocellule
appena installate con l’apposito coperchio a quattro
viti, avendo cura di posizionare il separatore in gomma
(indicato in Fig. 2, 3 rif. 햲 ) così da garantire il corretto
grado di isolamento IP.
Lampeggio VeloBatteria TX in esaurimento
ce
OFF
Allineamento assente o Fotocellula
impegnata
Di seguito sono riportati gli stati ed il significato dei led a
bordo del Trasmettitore; fare riferimento alla figura 9 per
individuarne la posizione.
Di seguito sono riportati gli stati ed il significato dei led
a bordo del Ricevitore; fare riferimento alla figura 8 per
individuarne la posizione.
Alimentazione presente
Allineamento non corretto
CONTROLLO DEI LED DI SEGNALAZIONE TX
CONTROLLO DEI LED DI SEGNALAZIONE RX
ON
Allineamento OK
Batteria TX scarica o Fotocellula
impegnata
6. RICERCA GUASTI
Di seguito è riportato un aiuto per l’individuazione e la risoluzione di particolari condizioni sul funzionamento delle
fotocellule.
Per una lista completa delle situazioni di errore/guasto fare riferimento all’istruzione dell’apparecchiatura elettronica
utilizzata per movimentare l’applicazione.
CONDIZIONE
CAUSA/PROBLEMA
- Mancanza di allineamento
SUGGERIMENTO
- Controllare la selezione del canale
di trasmissione.
Il cancello non si muove. i led DL2 e - Trasmettitore non alimentato
- Controllare l’alimentazione degli eleDL3 del Ricevitore sono spenti.
menti della coppia di fotocellulle.
- Errata scelta del canale di trasmissione.
- Controllare l’allineamento della
coppia.
Il led DL2 del Ricevitore lampeggia.
- Sostituire la batteria interna del
Trasmettitore.
Alimentazione del Trasmettitore non
- In caso di alimentazione filare del
corretta.
Trasmettitore controllarne il valore di
tensione.
Il led DL3 del Ricevitore lampeggia.
Le fotocellule non sono correttamente - Regolare l’allineamento delle foallineate.
tocellule.
3
ITALIANO
1 lampeggio
INDEX
ENGLISH
WARNINGS
page.5
1. DESCRIPTION AND TECHNICAL SPECIFICATIONS
page.5
2. DIMENSIONS
page.5
3. INSTALLATION
page.5
4. ELECTRICAL CONNECTIONS
page.5
5. START-UP
page.5
6. TROUBLESHOOTING
page.6
CE DECLARATION OF CONFORMITY
GENIUS S.p.A.
Manufacturer:
Address:
Via Padre Elzi, 32 - 24050 - Grassobbio- Bergamo - ITALY
The opto-electronic active protection device mod. VEGA WIRELESS,
Declares that:
•
conforms to the essential safety requirements of the following EEC directives:
• 2006/95/EC Low Voltage directive.
• 2004/108/EC Electromagnetic Compatibility Directive.
Additional information:
This product underwent a test in a typical uniform configuration (all products manufactured by GENIUS S.p.A.).
Grassobbio, 10-10-2007
Managing Director
D. Gianantoni
Notes on reading the instruction
Read this installation manual to the full before you begin installing the product.
The symbol
The symbol
indicates notes that are important for the safety of persons and for the good condition of the
automated system.
draws your attention to the notes on the characteristics and operation of the product.
4
VEGA WIRELESS
WARNINGS
3. INSTALLATION
For the safety of people, it is important that all the
instructions be carefully observed
For correct operation, the positions of the Receiver and
Transmitter should be aligned.
Incorrect installation or incorrect use of the product
could cause serious harm to people.
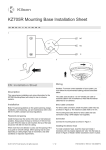
The Receiver of the XP15 W pair of photocells can be
installed in two possible ways:
1. On wall with the sheath walled in (Fig. 2).
Carefully read the instructions before beginning
to install the product and keep them for future
reference.
tions.
1. DESCRIPTION AND TECHNICAL
SPECIFICATIONS
• Fix
the body of the receiver using the appropriate
screws and rawlplugs.
The pair of self-aligning photocells, XP15 W, is composed
of an infrared transmitter and receiver synchronised to
four selectable channels.
The Transmitter of the XP15 W pair of photocells can be
powered by an internal battery (Fig. 4) or can also be
powered from the mains supply.
The XP15 W photocell is an auxiliary safety device.
The battery-powered Transmitter only requires fixing, either
on wall or column.
Darkening the light beam produces a change of state
of the receiver, which sends the signal of the photocell
involved by means of a relay contact.
If the Transmitter is powered from the mains supply,
follow the same types of installation indicated in figures
2 and 3.
The transmitter of the pair is powered by a battery but it
can also be powered from the mains supply.
4. ELECTRICAL CONNECTIONS
Selection of the transmission channel permits up to 4
pairs of XP15 W photocells to be installed on the same
unit, eliminating the risk of interference between one
pair and another.
The power supply terminals of the Receiver can
be connected to a 12 or 24 Volt supply, either
direct (DC) or alternating current ( ~ ).
12 - 24 V~.
12 - 24 Vdc
Power supply
Absorbed current RX
30 mA
Absorbed current TX
40 µA with Battery
5 mA at 24 Vdc
Type and Life of battery TX
CR2 , 3 V
from 2 to 3 years 쐃
Maximum range
15 m
Protection class
IP54
Method of alignment
automatic
Self-alignment angle
+/- 7° (15 m)
+/- 13° (5 m.)
Transmission of signal
4 selectable channels
Operating ambient temperature
f it is intended to perform the FAIL SAFE check
with a battery-powered Transmitter, connect
the FAIL SAFE (-TX FSW) terminal of the FAAC
control boards to the MINUS ( – ) terminal of
the photocell Receiver.
If the Transmitter is mains powered, follow the indications
in Fig. 6.
The power supply terminals of the Transmitter can
be connected to a 12 or 24 Volt source, either
direct (DC) or alternating ( ~ ) current.
40 ms
Obstacle detection time
Installation
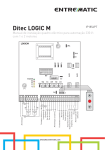
Make the electrical connections to the terminal boards
of the receiver as indicated in Fig. 5.
On switching on the Transmitter and the Receiver, the
respective DL2 LEDs will light up for 1 second.
-20 ... +55 °C
5. START-UP
on wall or column installation
Before closing the pair of photocells with their respective
closing plugs, it is indispensable to select the transmission
channel and check its functioning through the indicator
LEDs located on the Receiver.
The battery life can vary depending on the charge of
the battery used, its type and installation/environmental
conditions.
햲
SELECTION OF THE TRANSMISSION CHANNEL
Power up the photocells and select the transmission
channel by pressing button P1 and keeping it pressed
for 5 seconds (fig. 7).
2. DIMENSIONS
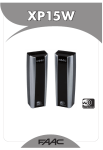
The Transmitter and Receiver are the same size and are
shown in Figure 1.
At the end of the 5 seconds, the DL2 LED in figure 7 will
flash the number of times corresponding to the channel
set, then switching itself off for 1 second before repeating the process. After completing 3 indications of the
channel set, the procedure terminates and the channel
is memory stored.
Whilst this is displaying, it is possible to change the transmission channel: by pressing button P1, the four channels
are selected in succession.
5
ENGLISH
2. On wall with an external tube/sheath (Fig. 3).
• Carry out the preparations for the electrical connec-
Check the number of flashes of the DL2 LED to determine
which channel has been selected:
1 flash
= Channel 1
2 flashes
= Channel 2
3 flashes
= Channel 3
4 flashes
= Channel 4
DL 3 Alignment
Alignment OK
Slow flashing
Alignment not correct
OFF
Non-alignment or Photocell engaged
CHECKING THE INDICATOR LEDs FOR THE TX
Set the same channel on both receiver and transmitter.
ENGLISH
ON
The states and significance of the LEDs on the Transmitter
are shown below; refer to figure 9 to find their position.
Whilst the channel set is being displayed, the
pair of photocells is inactive and its contact is
therefore OPEN. Wait for the end of the display
to operate the automated system.
DL 1 Power supply
CHECKING THE INDICATOR LEDS FOR THE RX
ON
Mains power supply on
OFF
Mains power supply off, battery
operation
The states and significance of the LEDs on the Receiver are
shown below; refer to figure 8 to find their position.
DL 2 Transmission channel
DL 1 Power supply
ON
Power on
OFF
Power off
DL 2 Transmission channel and charge of the TX battery
ON
Indication of transmission channel
Rapid flashing
TX Battery almost discharged
OFF
TX battery flat or Photocell engaged
Normal Operation
Slow flashing
Display of the transmission channel
Complete the installation by closure of the photocells just
installed with the appropriate four-screw closing plug,
being careful to position the rubber separator (indicated
in figs. 2, 3 ref. 햲) so as to ensure the correct degree of
IP insulation.
TX Battery OK
Slow flashing
OFF
6. TROUBLESHOOTING
Help with the identification and resolution of particular conditions regarding operation of the photocells is given
below.
For a complete list of the error/breakdown situations, refer to the instructions for the control unit used to move the
application.
CONDITION
CAUSE/PROBLEM
- Non-alignment
SUGGESTION
- Check the selection of the transmission channel.
- The Transmitter is not receiving
The gate does not move. The DL2 and
power
- Check the power supply to the pair
DL3 Receiver LEDs are off.
of photocells.
- Incorrect choice of transmission
channel.
- Check the alignment of the pair.
The DL2 Receiver LED flashes.
- Replace the battery inside the
Incorrect power supply to the Tran- Transmitter.
smitter.
- If the Transmitter is mains powered,
check the voltage.
The DL3 Receiver LED flashes
The photocells are not correctly ali- - Adjust the alignment of the phogned.
tocells.
6
INDEX
AVERTISSEMENTS
page.8
page.8
2. DIMENSIONS
page.8
3. INSTALLATION
page.8
4. CONNEXIONS ÉLECTRIQUES
page.8
5. MISE EN FONCTION
page.8
6. IDENTIFICATION DES PANNES
page.9
FRANÇAIS
1. DESCRIPTION ET CARACTÉRISTIQUES TECHNIQUES
DÉCLARATION CE DE CONFORMITÉ
Fabricant:
GENIUS S.p.A.
Adresse:
Via Padre Elzi, 32 - 24050 - Grassobbio- Bergamo - ITALIE
Déclare que:
Le dispositif de protection active opto-électronique mod. VEGA WIRELESS,
• est conforme aux exigences essentielles de sécurité des directives CEE suivantes:
• 2006/95/CE directive Basse Tension.
• 2004/108/CE directive Compatibilité Électromagnétique.
Note supplémentaire:
Ce produit a été testé dans une configuration typique homogène (tous les produits sont fabriqués par GENIUS
S.p.A.)
Grassobbio, le 10-10-2007
L’Administrateur Délégué
D. Gianantoni
Remarques pour la lecture de l’instruction
Lire ce manuel d’installation dans son ensemble avant de commencer l’installation du produit.
Le symbole
Le symbole
souligne des remarques importantes pour la sécurité des personnes et le parfait état de
l’automatisme.
attire l’attention sur des remarques concernant les caractéristiques ou le fonctionnement du
produit.
7
VEGA WIRELESS
AVERTISSEMENTS
3. INSTALLATION
Il est important pour la sécurité des personnes de
suivre attentivement toute l’instruction.
Pour un fonctionnement correct, positionner le Récepteur
et l’Émetteur en les alignant.
Une installation ou un usage erronés du produit
peut provoquer de sérieuses blessures aux
personnes.
Le Récepteur de la paire de photocellules XP15 W peut
être installé de deux façons:
1. Installation murale avec gaine et à encastrer (Fig.
2).
Lire attentivement les instructions avant de commencer l’installation du produit et les conserver
pour toute référence future.
2. Installation murale avec tuyau/gaine externes
(Fig. 3).
• Réaliser
1. DESCRIPTION ET CARACTÉRISTIQUES
TECHNIQUES
ques.
• Fixer le corps du récepteur avec des vis et des tasseaux
adéquats.L’Émetteur de la paire de photocellules XP15
W peut être alimenté par l’intermédiaire de la batterie
interne (Fig. 4) ou d’une connexion filaire.
La paire de photocellules à alignement automatique
XP15 W est composée d’un émetteur et d’un récepteur
à rayons infrarouges synchronisés à quatre canaux
sélectionnables.
FRANÇAIS
les dispositions pour les connexions électri-
L’émetteur alimenté par une batterie exige uniquement
une fixation murale ou sur colonnette.
La photocellule XP15 W est un dispositif auxiliaire à la
sécurité.
Si l’Émetteur utilise l’alimentation filaire, suivre les types
d’installation illustrés dans les figures 2 et 3.
L’obscurcissement du faisceau lumineux provoque le
changement d’état du récepteur qui envoie le signal de
photocellule engagée à travers un contact à relais.
4. CONNEXIONS ÉLECTRIQUES
L’Émetteur de la paire de photocellules est alimenté à
batterie ou par l’intermédiaire d’une connexion filaire.
Réaliser les connexions électriques sur les borniers du
récepteur d’après la Fig. 5.
La sélection du canal de transmission permet de monter
sur la même installation jusqu’à 4 paires de XP15 W en
éliminant le risque d’interférences entre deux paires.
Les bornes d’alimentation du Récepteur peuvent
être connectées à une tension de 12 ou 24 Volt
continue (CC) ou alternative ( ~ ).
Absorption RX
30 mA
Absorption TX
40 µA à Batterie
5 mA à 24 Vcc
Type et durée batterie tx
IP54
Temps de détection obstacle
40 ms
Modalité d’alignement
automatique
Angle d’alignement automatique
+/- 7° (15 m)
+/- 13° (5 m.)
Température de Fonctionnement
Les bornes d’alimentation de l’Émetteur peuvent
être connectées à une tension de 12 ou 24 Volt
continue (CC) ou alternative ( ~ ).À la mise sous
tension de l’Émetteur et du Récepteur, les LEDs
DL2 respectives s’allument pendant 1 seconde.
15 m
INDICE de protection
Transmission signal
Si l’on alimente l’Émetteur par l’intermédiaire d’une connexion filaire, suivre les indications de la Fig. 6.
CR2 de 3 V
de 2 à 3 ans 햲
Portée maximale
Installation
Si l’on souhaite effectuer le contrôle FAIL SAFE
lorsque l’Émetteur est alimenté par une batterie, connecter la borne FAIL SAFE (-TX FSW) des
platines électriques FAAC à la borne MENO ( _ )
du Récepteur de la photocellule.
12 - 24 V~.
12 - 24 Vcc
Alimentation
5. MISE EN FONCTION
Avant de fermer la paire de photocellules avec les
couvercles respectifs, il est indispensable de sélectionner
le canal de transmission et d’en contrôler le fonctionnement à travers les LEDs de signalisation présentes sur le
Récepteur.
4 canaux sélectionnables
-20 +55 °C
murale ou sur colonnette
SÉLECTION DU CANAL DE TRANSMISSION
La durée de la batterie peut varier en fonction de l’état
de charge de la batterie utilisée, de son type et des
conditions ambiantes/d’installation.
햲
Mettre les photocellules sous tension et sélectionner le
canal de transmission en appuyant sur le bouton-poussoir
P1: le maintenir enfoncé pendant 5 secondes (fig. 7).
Au bout des 5 secondes, la LED DL2 illustrée dans la figure
7 clignotera un nombre de fois égal au canal sélectionné
puis s’éteindra pendant 1 seconde et répétera la signalisation. Après 3 signalisations du canal sélectionné, la
procédure est terminée et le canal est mémorisé.
2. DIMENSIONS
Les dimensions de l’Émetteur et du Récepteur sont les
mêmes et sont indiquées dans la Figure 1.
Durant cet affichage, on peut changer le canal de
transmission: en appuyant sur le bouton-poussoir P1, on
sélectionne consécutivement les quatre canaux.
Contrôler le nombre de clignotements de la LED DL2 pour
8
déterminer le canal qu’on a sélectionné:
2 clignotements
DL 3 Alignement
= Canal 1
ON
= Canal 2
3 clignotement
= Canal 3
4 clignotement
= Canal 4
Sélectionner le même canal sur le récepteur et sur
l’émetteur.
Alignement OK
Clignotement Lent
Alignement incorrect
OFF
Alignement absent ou Photocellule
engagée
CONTRÔLE DES LEDS DE SIGNALISATION TX
On indique ci-après les états et la signification des LEDs sur
l’Émetteur; voir la Figure 9 pour en identifier la position.
Durant l’affichage du canal sélectionné, la paire
de photocellules est inactive et son contact est
donc OUVERT. Attendre la fin de l’affichage pour
opérer avec l’automatisme.
DL 1 Alimentation
CONTRÔLE DES LEDS DE SIGNALISATION RX
On indique ci-après les états et la signification des LEDs
sur le Récepteur; voir la Figure 8 pour en identifier la
position.
ON
Alimentation filaire présente
OFF
Alimentation filaire absente, fonctionnement à batterie
DL 2
DL 1 Alimentation
ON
Alimentation présente
OFF
Alimentation absente
Fonctionnement Normal
Clignotement
Affichage du canal de transmission
Lent
DL 2 Canal de Transmission et Chargeur de Batterie TX
ON
Batterie TX OK
Clignotement Lent
Indication du canal de transmission
Achever l’installation en fermant les photocellules qu’on
vient d’installer avec le couvercle à quatre vis, en veillant
à positionner le séparateur en caoutchouc (indiqué dans
les fig. 2, 3 réf. 햲) de manière à garantir le bon degré
d’isolation IP.
Clignotement RaBatterie TX déchargée
pide
OFF
Canal de Transmission
OFF
Batterie TX déchargée ou Photocellule engagée
6. IDENTIFICATION DES PANNES
On fournit ci-après une aide pour l’identification et la solution de conditions particulières sur le fonctionnement des
photocellules.
Pour une liste complète des situations d’erreur/panne, voir l’instruction de l’armoire électronique utilisée pour actionner
l’application.
CONDITION
CAUSE/PROBLÈME
CONSEIL
- Contrôler la sélection du canal de
transmission
- Absence de l’alignement
Le portail ne s’actionne pas, les LEDs
- Émetteur pas sous tension
- Contrôler l’alimentation des éléments
DL2 et DL3 du Récepteur sont éteinde la paire de photocellules.
tes
- Choix erroné du canal de transmission.
- Contrôler l’alignement de la paire de
photocellules.
La LED DL2 du Récepteur clignote.
La LED DL3 du Récepteur clignote.
Alimentation incorrecte
- Remplacer la batterie interne de
l’Émetteur.
- En cas d’alimentation filaire de
l’Émetteur, en contrôler la valeur de
tension.
de l’Émetteur
Les photocellules ne sont pas
correctement alignées.
9
- Contrôler l’alignement des photocellules.
FRANÇAIS
1 clignotement
ÍNDICE
ESPAÑOL
ADVERTENCIAS
pág.11
1. DESCRIPCIÓN Y CARACTERÍSTICAS TÉCNICAS
pág.11
2. DIMENSIONES
pág.11
3. INSTALACIÓN
pág.11
4. CONEXIONES ELÉCTRICAS
pág.11
5. PUESTA EN FUNCIONAMIENTO
pág.11
6. GUÍA PARA LA LOCALIZACIÓN DE AVERÍAS
pág.12
DECLARACIÓN CE DE CONFORMIDAD
GENIUS S.p.A.
Fabricante:
Dirección:
Via Padre Elzi, 32 - 24050 - Grassobbio- Bergamo - ITALIA
Declara que:
El dispositivo de protección activa optoelectrónico mod. VEGA WIRELESS
• cumple con los requisitos esenciales de seguridad de las siguientes directivas CEE:
• 2006/95/CE directiva de Baja Tensión.
• 2004/108/CE directiva de Compatibilidad Electromagnética.
Nota adicional:
El presente producto ha sido sometido a ensayos en una configuración típica uniforme (todos los productos han sido
fabricados por GENIUS S.p.A.).
Grassobbio, 10-10-2007
El Administrador Delegado
D. Gianantoni
Notas para la lectura de las instrucciones
Leer completamente este manual antes de empezar la instalación del producto.
El símbolo
destaca notas importantes para la seguridad de las personas y la integridad de la automación.
El símbolo
evidencia notas sobre las características o el funcionamiento del producto.
10
VEGA WIRELESS
ADVERTENCIAS
3. INSTALACIÓN
Para un correcto posicionamiento, coloque el receptor
y el transmisor alineados.
Atención! Para poder garantizar la seguridad personal, es importante seguir atentamente todas
las instrucciones.
El receptor de la pareja XP15 W puede instalarse de dos
modos diferentes:
La instalación incorrecta o el uso inapropiado
del producto pueden provocar graves daños
personales.
1. En pared con vaina para empotrar (Fig. 2).
2. En pared con tubo/vaina externos (Fig. 3).
Lea detenidamente las instrucciones antes de
instalar el producto y guárdelas para futuras
consultas.
• Realice
las predisposiciones para las conexiones
eléctricas.
• Fije el cuerpo del receptor utilizando tornillos y tacos
adecuados.El transmisor del par XP15 W tiene la posibilidad de ser alimentado mediante la batería interna
(Fig. 4) o bien mediante conexión alámbrica.
1. DESCRIPCIÓN Y CARACTERÍSTICAS
TÉCNICAS
El transmisor alimentado con batería sólo requiere fijación
en la pared o en la columna.
El par de fotocélulas con autoalineación XP15 W está
compuesto por un transmisor y por un receptor de
rayos infrarrojos sincronizados con cuatro canales seleccionables.
Si el transmisor utiliza la alimentación alámbrica, realice
la instalación siguiendo las indicaciones de las figuras
2 y 3.
La fotocélula XP15 W es un dispositivo auxiliar para la
seguridad.
4. CONEXIONES ELÉCTRICAS
El oscurecimiento del haz luminoso hace que cambie el
estado del receptor, el cual envía la señal de fotocélula
ocupada mediante contacto de relé.
Realice las conexiones eléctricas en las regletas de bornes del receptor, tal y como se indica en la Fig 5.
El transmisor del par de fotocélulas está alimentado con
batería, pero también puede alimentarse con conexión
alámbrica.
La selección del canal de transmisión permite instalar
en el mismo equipo hasta cuatro pares de XP15 W, por
lo que se elimina el riesgo de interferencias entre un
par y el otro.
Alimentación
12 - 24 V~.
12 - 24 Vdc
Absorción RX
30 mA
Absorción TX
40 µA con Batería
5 mA a 24 Vdc
Tipo y Duración batería tx
IP54
Tiempo de detección del
obstáculo
5. PUESTA EN FUNCIONAMIENTO
40 ms
Modalidad de alineación
automática
Ángulo de autoalineación
+/- 7° (15 m)
+/- 13° (5 m.)
Instalación
Los bornes de alimentación del transmisor pueden estar conectados a una tensión de 12 ó 24
Voltios, tanto continua (DC) como alterna ( ~
).Cuando se enciende el transmisor y el receptor,
los respectivos diodos DL2 se encienden durante
1 segundo.
15 m
Grado de protección
Temperatura de funcionamiento
Si el transmisor está alimentado por medio de conexión
alámbrica, siga las indicaciones de la Fig. 6.
CR2 de 3 V
de 2 a 3 años 햲
Capacidad máxima
Transmisión de la señal
Si se desea efectuar el control FAIL SAFE con
transmisor alimentado con batería, conecte el
borne FAIL SAFE (-TX FSW) de las tarjetas electrónicas FAAC al borne MENOS ( – ) del receptor
fotocélula.
Antes de cerrar el par de fotocélulas con sus respectivas
tapas, es indispensable seleccionar el canal de transmisión y comprobar el funcionamiento mediante los
DIODOS de señalización presentes en el receptor.
4 canales seleccionables
SELECCIÓN DEL CANAL DE TRANSMISIÓN
Alimente las fotocélulas y seleccione el canal de transmisión presionando y manteniendo presionado durante
5 segundos el pulsador P1 (fig.7).
-20 +55 °C
en pared o en columna
햲
La duración de la batería puede variar en función
de la carga de la batería utilizada, de su tipo y de las
condiciones ambientales y de instalación.
Transcurridos los 5 segundos, el diodo DL2 que puede
verse en la figura 7 destellará un número de veces igual
al canal programado, para apagarse seguidamente
durante 1 segundo y repetir la señalización. Después
de haber completado 3 señalizaciones del canal programado, el procedimiento ha terminado y el canal ya
está memorizado.
2. DIMENSIONES
El transmisor y el receptor tienen las mismas dimensiones
y se indican en la Figura 1.
Durante esta visualización se puede cambiar el canal de
transmisión: presionando el pulsador P1 se seleccionan
en sucesión los cuatro canales.
11
ESPAÑOL
Los bornes de alimentación del receptor pueden
estar conectados a una tensión de 12 ó 24 Voltios, tanto continua (DC) como alterna ( ~ ).
Compruebe el número de destellos del diodo DL2 para
determinar qué canal se ha seleccionado:
DL 3 Alineación
ON
1 destello = Canal 1
2 destellos = Canal 2
3 destellos = Canal 3
Alineación OK
Destello Lento
Alineación incorrecta
OFF
Alineación ausente o Fotocélula
ocupada
4 destellos = Canal 4
CONTROL DE LOS DIODOS DE SEÑALIZACIÓN TX
Programe el mismo canal tanto en el receptor como
en el transmisor.
Seguidamente se indican los estados y el significado de
los diodos instalados en el transmisor; consulte la figura
9 para ver la posición.
Durante la visualización del canal programado, la pareja de fotocélulas está inactiva y su
contacto está, por lo tanto, ABIERTO. Espere
que finalice la visualización para operar con el
automatismo.
DL 1 Alimentación
ON
CONTROL DE LOS DIODOS DE SEÑALIZACIÓN RX
OFF
Seguidamente se indican los estados y el significado de
los diodos instalados en el receptor; consulte la figura 8
para ver la posición
Alimentación presente
OFF
Alimentación ausente
Destello Lento
Indicación del canal de transmisión
Destello Rápido
Batería TX casi agotada
OFF
Batería TX agotada o Fotocélula
ocupada
ESPAÑOL
Batería TX OK
funcionamiento con batería
OFF
Funcionamiento normal
Destello lento
Visualización del canal de transmisión
Complete la instalación cerrando las fotocélulas que se
acaban de instalar con su correspondiente tapa con cuatro tornillos, prestando atención a colocar el separador de
goma (indicado en la fig. 2, 3 ref. 햲 ) a fin de garantizar el
correcto grado de aislamiento IP.
DL 2 Canal de Transmisión y Carga Batería TX
ON
Alimentación alámbrica ausente,
DL 2 Canal de Transmisión
DL 1 Alimentación
ON
Alimentación alámbrica presente
6. GUÍA PARA LA LOCALIZACIÓN DE AVERÍAS
Seguidamente se incluye una ayuda para localizar y resolver especiales condiciones sobre el funcionamiento de
las fotocélulas.
Para una lista completa de las situaciones de error/avería remítase a las instrucciones del equipo electrónico utilizado
para mover la aplicación.
CONDICIÓN
CAUSA/PROBLEMA
SUGERENCIA
- Compruebe la selección del canal
de transmisión.
- Falta alineación
La cancela no se mueve. los diodos
- Transmisor no alimentado
- Compruebe la alimentación de los
DL2 y DL3 del Receptor están apaelementos del par de fotocélulas.
gados
- Incorrecta selección del canal de
- Compruebe la alineación del par de
transmisión.
fotocélulas.
El diodo DL2 del receptor
- Sustituya la batería interna del
transmisor.
destella.
Alimentación del transmisor incor- En caso de alimentación alámbrica
recta.
del transmisor, compruebe el valor
de tensión.
El diodo DL3 del receptor destella.
Las fotocélulas no están correctamen- - Regule la alineación de las fote alineadas.
tocélulas.
12
INHALT
HINWEISE
Seite.14
1. BESCHREIBUNG UND TECHNISCHE DATEN
Seite.14
2. ABMESSUNGEN
Seite.14
3. MONTAGE
Seite.14
4. ELEKTRISCHE ANSCHLÜSSE
Seite.14
5. INBETRIEBNAHME
Seite.14
6. STÖRUNGSSUCHE
Seite.15
Hersteller:
GENIUS S.p.A.
Adresse:
Via Padre Elzi, 32 - 24050 - Grassobbio- Bergamo – ITALIEN
Erklärt, dass:
Die optisch-elektronische Vorrichtung für den aktiven Schutz, Mod. VEGA WIRELESS
• den wesentlichen Sicherheitsbestimmungen der folgenden EWG-Richtlinien entspricht:
• 2006/95/EG Niederspannungsrichtlinie.
• 2004/108/EG Richtlinie zur elektromagnetischen verträglichkeit.
Zusätzliche Anmerkungen:
Dieses Produkt wurde in einer typischen, homogenen Konfiguration getestet (alle von GENIUS S.p.A. hergestellten
Produkte).
Grassobbio, 10-10-2007
Geschäftsführer
D. Gianantoni
Hinweise zu den Anleitungen
Vor der Installation des Produkts sind die Installationsanweisungen vollständig zu lesen.
Mit dem Symbol
Mit dem Symbol
sind wichtige Anmerkungen für die Sicherheit der Personen und den störungsfreien Betrieb der
Automation gekennzeichnet.
wird auf Anmerkungen zu den Eigenschaften oder dem Betrieb des Produkts verwiesen.
13
DEUTSCH
CE KONFORMITÄTSERKLÄRUNG
VEGA WIRELESS
HINWEISE
3. MONTAGE
Für den einwandfreien Betrieb sind Empfänger und Sender
zueinander ausgerichtet zu positionieren.
Achtung! Für die Sicherheit der Personen sind diese
Anweisungen vollständig aufmerksam zu befolgen.
Der Empfänger des Paars XP15 W kann auf zwei verschiedene Arten montiert werden:
Die falsche Installation oder die unsachgemäße
Anwendung des Produkts können schwere
Personenschäden verursachen.
1. an der Wand mit einem im Mauerwerk eingelassenen
Mantel (Abb. 2)
2. an der Wand mit externem Rohr/Mantel (Abb. 3).
Vor der Installation des Produkts sind die Anweisungen aufmerksam zu lesen und dann für
zukünftiges Nachschlagen aufzubewahren.
• Die
Vorbereitungen für die elektrischen Anschlüsse
vornehmen.
• Den Körper des Empfängers mit geeigneten Schrauben
1. BESCHREIBUNG UND
TECHNISCHE DATEN
und Dübeln befestigen.Der Sender des Paars XP15 W
kann über die integrierte Batterie (Abb. 4) oder über
eine Drahtverbindung gespeist werden.
Das selbstausrichtende Fotozellenpaar VEGA WIRELESS
besteht aus einem Sender und einem Empfänger mit
Infrarotstrahlen, die miteinander synchronisiert sind, mit
vier auswählbaren Kanälen.
Der batteriegespeiste Sender muss nur an der Wand oder
an einem Pfosten befestigt werden.
Falls der Sender über eine Drahtverbindung gespeist wird,
ist die Montage gemäß Abb. 2 und 3 vorzunehmen.
Bei der Fotozelle XP15B handelt es sich um eine Hilfsvorrichtung für die Sicherheit.
4. ELEKTRISCHE ANSCHLÜSSE
Die Verdunkelung des Lichtbündels verursacht die Zustandsveränderung des Empfängers, der das Signal Fotozelle
belegt über den Relaiskontakt sendet.
Die elektrischen Anschlüsse auf den Klemmenleisten
des Empfängers gemäß den Angaben in Abb. 5 vornehmen.
Der Sender des Paars ist batteriegespeist, kann aber auch
über die Kabelverbindung gespeist werden.
Die Versorgungsklemmen des Empfängers
können an eine Spannungsversorgung von 12
oder 24 V sowohl mit Dauerspannung (DC) als
auch mit Wechselspannung ( ~ ) angeschlossen
werden.
Durch die Auswahl des Sendekanals können unter
Vermeidung des Risikos von Interferenzen zwischen den
einzelnen Paaren bis zu vier Paar XP 15 auf derselben
Anlage installiert werden.
Stromaufnahme Empfänger
(mA)
Stromaufnahme Sender
DEUTSCH
Typ und Dauer Senderbatterie
30 mA
40 µA mit Batterie
5 mA bei 24 Vdc
15 m
Schutzart
IP54
Zeitraum für die Erfassung
eines Hindernisses
automatisch
Selbstausrichtungswinkel
+/- 7° (15 m)
+/- 13° (5 m.)
Betriebstemperatur
Die Versorgungsklemmen des Senders können an
eine Spannungsversorgung von 12 oder 24 Volt
sowohl mit Dauerspannung (DC) als auch mit
Wechselspannung ( ~ ) angeschlossen werden.
Beim Einschalten von Sender und Empfänger
leuchten die LED DL2 für 1 Sekunde auf.
40 ms
Ausrichtung
Signalübertragung
Bei Speisung des Senders über Drahtverbindung sind die
Anweisungen in Abb. 6 zu befolgen.
CR2 zu 3 V
2 bis 3 Jahre 햲
Maximale Reichweite (m)
Montage
Wenn die FAIL-SAFE-Kontrolle mit batteriegespeistem Sender durchgeführt werden soll, die
FAIL-SAFE-Klemme (TX FSW) der elektronischen
FAAC-Karten and die MINUS-Klemme ( _ ) des
Fotozellenempfängers anschließen.
12 - 24 V~.
12 - 24 Vdc
Versorgung
5. INBETRIEBNAHME
Bevor das Fotozellenpaar mit den jeweiligen Deckeln
verschlossen wird, müssen der Sendekanal ausgewählt
und die Funktionstüchtigkeit über die Anzeige-LED am
Empfänger geprüft werden.
4 auswählbare Kanäle
-20 +55 °C
Wand oder Pfosten
AUSWAHL DES SENDEKANALS
Die Dauer der Batterie hängt von der Ladung der
eingesetzten Batterie, ihrem Typ und den Umgebungs/Installationsbedingungen ab.
햲
Die Fotozellen mit Strom versorgen und zur Auswahl
des Sendekanals die Taste P1 (Abb. 5) FÜR 5 SEKUNDEN
DRÜCKEN.
Nach Ablauf der 5 Sekunden blinkt die LED DL2 (Abb. 7)
mit Blinksignalen entsprechend dem eingestellten Kanal,
erlischt dann für 1 Sekunde und wiederholt dann die Signalisierung. Nach 3 Signalisierungen für den eingestellten
Kanal ist der Vorgang abgeschlossen, und der Kanal ist
eingespeichert.
2. ABMESSUNGEN
Sender und Empfänger haben die gleichen Abmessungen (angegeben in Abbildung 1.
Während dieser Anzeige kann der Sendekanal geändert
werden: Durch Drücken der Taste P1 werden nacheinan14
der die vier Kanäle ausgewählt.
DL 3 Ausrichtung
Die Zahl der Blinksignale der LED DL2 überprüfen, um
festzustellen, welcher Kanal ausgewählt wurde:
1 Blinksignal
= Kanal 1
2 Blinksignale
= Kanal 2
3 Blinksignale
= Kanal 3
4 Blinksignale
= Kanal 4
ON
OFF
Nachfolgend sind die Zustände und die Bedeutung der
LED am Sender aufgeführt. Für die Position wird auf die
Abbildung 9 verwiesen.
Während der Anzeige des eingestellten Kanals ist
das Fotozellenpaar wirkungslos und sein Kontakt
ist daher OFFEN. Für den Betrieb der Automation
abwarten, bis die Anzeige abgeschlossen ist.
KONTROLLE DER ANZEIGE-LED DES EMPFÄNGERS
DL 1 Versorgung
ON
Drahtversorgung ein
OFF
Drahtversorgung aus, Batteriespeisung
Nachfolgend sind die Zustände und die Bedeutung der
LED am Empfänger aufgeführt. Für die Position wird auf
die Abbildung 8 verwiesen.
DL 2 Sendekanal
OFF
DL 1 Versorgung
Versorgung ein
OFF
Versorgung aus
Blinksignal
langsam
Batterie Sender OK
Blinksignal langAnzeige Sendekanal
sam
Blinksignal schnell
Batterie Sender fast leer
OFF
Batterie Sender leer oder otozelle
belegt
Normalbetrieb
Anzeige des Sendekanals
Die Montage abschließen und hierzu die soeben montierten Fotozellen mit dem entsprechenden Deckel mit vier
Schrauben verschließen und dabei darauf achten, dass
die Gummiteilung (siehe Abb. 2, 3 Bez. 햲) eingesetzt wird,
um die korrekte Schutzart zu gewährleisten.
DL 2 Sendekanal und Batterieladegerät Sender
ON
nicht ausgerichtet oder Fotozelle
belegt
KONTROLLE DER ANZEIGE-LED DES SENDERS
Denselben Kanal sowohl am Empfänger als auch
am Sender einstellen.
ON
Ausrichtung OK
Blinksignal langnicht korrekt ausgerichtet
sam
Für eine komplette Liste der Fehler/Störungen wird auf die Anweisungen des zur Bewegung der Anwendung verwendeten elektronischen Steuergeräts verwiesen
ZUSTAND
URSACHE/PROBLEM
- nicht ausgerichtet
Das Tor bewegt sich nicht, die LED DL2
und DL3 des Empfängers leuchten - Sender nicht gespeist
nicht auf
- falscher Sendekanal ausgewählt.
EMPFEHLUNG
- die Auswahl des Sendekanals überprüfen
- die Speisung der Elemente des Fotozellenpaars überprüfen
- die Ausrichtung der Fotozellen überprüfen.
- die integrierte Batterie des Senders
auswechseln
Die LED DL2 des Empfängers blinkt
Versorgung des Senders nicht korrekt
Die LED DL3 des Empfängers blinkt
Die Fotozellen sind nicht korrekt au- die Fotozellen korrekt ausrichten.
sgerichtet.
15
- bei Drahtversorgung des Senders
den Spannungswert der Versorgung
kontrollieren.
DEUTSCH
6. STÖRUNGSSUCHE
Nachfolgend ist eine Hilfe für die Erkennung und Behebung besonderer Zustände beim Betrieb der Fotozellen aufgeführt.
INHOUDSOPGAVE
WAARSCHUWINGEN
pag.17
1. BESCHRIJVING EN TECHNISCHE EIGENSCHAPPEN
pag.17
2. AFMETINGEN
pag.17
3. INSTALLATIE
pag.17
4. ELEKTRICITEITSAANSLUITINGEN
pag.17
5. INBEDRIJFSTELLINGA
pag.17
6. GEBREKEN OPSPOREN
pag.18
EG-VERKLARING VAN OVEREENSTEMMING
GENIUS S.p.A.
Fabrikant:
Adres:
Via Padre Elzi, 32 - 24050 - Grassobbio - Bergamo - ITALIE
Verklaart dat:
De actieve optisch-elektronische beveiligingsinrichting mod. VEGA WIRELESS
• in overeenstemming is met de fundamentele veiligheidseisen van de volgende EEG-richtlijnen:
• 2006/95/EG Laagspanningsrichtijn.
• 2004/108/EG richtlijn Elektromagnetische Compatibiliteit.
Aanvullende opmerking:
Dit product is getest in een specifieke homogene configuratie (alle door GENIUS S.p.A. vervaardigde producten).
Grassobbio, 10-10-2007
De Algemeen Directeur
NEDERLANDS
D. Gianantoni
Opmerkingen voor het lezen van de instructies
Lees deze installatiehandleiding aandachtig door alvorens te beginnen met de installatie van het product.
Het symbool
Het symbool
is een aanduiding voor belangrijke opmerkingen voor de veiligheid van personen en om het automatische
systeem in goede staat te houden.
vestigt de aandacht op opmerkingen over de eigenschappen of de werking van het product.
16
VEGA WIRELESS
3. INSTALLATIE
WAARSCHUWINGEN
Zet, voor een correcte werking, de Zender en de Ontvanger op één lijn.
Let op! Het is van belang voor de veiligheid van
personen dat deze instructies in hun geheel
zorgvuldig wordt opgevolgd.
De Ontvanger van het paar XP15 W heeft twee installatiemogelijkheden:
Een foutieve installatie of foutief gebruik van het product kan leiden tot ernstig persoonlijk letsel.
1. Wandmodel met ingebouwde buis (Fig. 2).
2. Wandmodel met externe buis/hoes (Fig. 3).
Lees de instructies aandachtig door alvorens te
beginnen met de installatie van het product,
en bewaar ze om ze in de toekomst te kunnen
raadplegen.
• Voer de voorbereidingen voor de elektrische aansluitingen uit.
• Zet de behuizing van de Ontvanger vast met behulp
van geschikte schroeven en pluggen.De Zender van
het paar XP15 W kan worden gevoed door een interne
batterij (Fig. 4) of door een kabelverbinding.
1. BESCHRIJVING EN TECHNISCHE
EIGENSCHAPPEN
Het paar zelfuitlijnende fotocellen XP15 W bestaat uit een
zender en ontvanger met gesynchroniseerde infraroodstralen op vier selecteerbare kanalen.
De Zender met batterijvoeding hoeft enkel aan de wand
of op het zuiltje te worden bevestigd.
Als de Zender kabelvoeding gebruikt, moet hetzelfde
soort installatie worden uitgevoerd als aangegeven in
de figuren 2 en 3.
De fotocel XP15 W is een hulpinrichting bij de beveiliging.
Als de lichtstraal wordt bedekt, heeft dit tot gevolg dat
de status van de ontvanger wordt gewijzigd, die via een
relaiscontact het signaal “fotocel bezet” verstuurt.
4. ELEKTRICITEITSAANSLUITINGEN
Sluit de elektriciteitsdraden aan op het klemmenblok van
de zender, zoals aangegeven in Fig. 5.
De Zender van het paar heeft batterijvoeding maar kan
ook worden gevoed door een kabelverbinding.
De voedingsklemmen van de Ontvanger kunnen worden aangesloten met een spanning
van 12 of 24 Volt, zowel gelijkstroom (DC) als
wisselstroom ( ~ ).
Doordat het zendkanaal kan worden gekozen, kunnen
op dezelfde installatie tot 4 paren XP15 W worden geïnstalleerd, waardoor het risico van interferentie tussen het
ene paar en het andere wordt geëlimineerd.
Als u de controle FAIL SAFE wilt uitvoeren met
de Zender op batterijvoeding, sluit dan de klem
FAIL SAFE (-TX FSW) van de elektronische kaarten
FAAC op de klem MIN ( – ) van de Ontvangerfotocel aan.
12 - 24 V~.
12 - 24 Vdc
Opname RX
30 mA
Opname TX
40 µA op batterij
5 mA bij 24 Vdc
Type en Levensduur batterij tx
CR2 van 3 V
van 2 tot 3 jaar *
Als de Zender met een kabelverbinding wordt gevoed,
volg dan de aanwijzingen in Fig. 6.
De voedingsklemmen van de Zender kunnen worden aangesloten met een spanning
van 12 of 24 Volt, zowel gelijkstroom (DC) als
wisselstroom ( ~ ).Wanneer de Zender en de
Ontvanger worden ingeschakeld, lichten de
bijbehorende leds DL2 1 seconde op.
15 m
Maximaal vermogen
IP54
Beschermingsgraad
40 ms
Tijd detectie obstakel
Wijze van uitlijning
automatisch
Hoek zelfuitlijning
+/- 7° (15 m)
+/- 13° (5 m.)
5. INBEDRIJFSTELLINGA
4 selecteerbare kanalen
lvorens het paar fotocellen met de bijbehorende dekplaatjes te sluiten, moet eerst het zendkanaal worden geselecteerd en de werking daarvan worden gecontroleerd
d.m.v. de signaleringsleds op de Ontvanger.
Transmissie signaal
Werkingstemperatuur
Installatie
-20 ... +55 °C
aan de wand of op een
zuiltje
SELECTIE ZENDKANAAL
De levensduur van de batterij kan variëren afhankelijk
van hoe ver de gebruikte batterij is opgeladen, het type
batterij en de omgevings-/installatiecondities.
햲
Schakel de voeding naar de fotocellen in en selecteer
het zendkanaal door de knop P1 IN TE DRUKKEN EN 5
SECONDEN INGEDRUKT TE HOUDEN (fig. 7).
Na de 5 seconden begint de led DL2 in figuur 7 even
vaak te knipperen als het nummer van het kanaal dat
is ingesteld, om vervolgens 1 seconde te doven en de
signalering te herhalen. Na het ingestelde kanaal 3 keer
te hebben gesignaleerd, is de procedure voltooid en is
het kanaal in het geheugen opgeslagen.
2. AFMETINGEN
De Zender en de Ontvanger hebben dezelfde afmetingen, die zijn weergegeven in Figuur 1.
Tijdens deze weergave kan van zendkanaal worden
gewisseld: door op de knop P1 te drukken worden achtereenvolgens de vier kanalen geselecteerd.
17
NEDERLANDS
Voeding
Controleer hoe vaak de led DL2 knippert om te bepalen
welk kanaal is geselecteerd:
DL 3 Uitlijning
ON
Uitlijning OK
1 keer knipperen
= Kanaal 1
2 keer knipperen
= Kanaal 2
K n i p p e r t La n g Fotocellen niet goed uitgelijnd
zaam
3 keer knipperen
= Kanaal 3
OFF
4 keer knipperen
= Kanaal 4
CONTROLE VAN DE SIGNALERINGSLEDS TX
Stel hetzelfde kanaal zowel op de ontvanger als op
de zender in.
Hieronder zijn de status en de betekenis weergegeven
van de leds op de Zender; zie figuur 9 om de positie
te vinden.
Tijdens de weergave van het ingestelde kanaal
is het paar fotocellen inactief, en is het contact
daarvan dus OPEN. Wacht tot het einde van de
weergave om het automatisch systeem te bedienen.CONTROLE VAN DE SIGNALERINGSLEDS
RX
DL 1 Voeding
Hieronder zijn de status en de betekenis weergegeven
van de leds op de Ontvanger; zie figuur 8 om de positie
te vinden.
ON
Kabelvoeding aanwezig
OFF
Geen kabelvoeding, werking op
batterijen
DL 2 Zendkanaal
DL 1 Voeding
OFF
ON
Voeding aanwezig
Knippert
OFF
Geen voeding
Langzaam
DL 2 Zendkanaal en Batterijoplader TX
ON
Niet uitgelijnd of Fotocel bezet
Normale werking
Weergave van het zendkanaal
Voltooi de installatie door de zojuist geïnstalleerde fotocellen te sluiten met het speciale dekplaatje dat met vier
schroeven wordt bevestigd, en zorg er daarbij voor dat
de rubberen scheiding (aangegeven in fig. 2, 3 ref. 햲 )
goed op zijn plaats zit, om de correcte IP-isolatiegraad
te garanderen
Batterij TX OK
K n i p p e r t La n g Aanduiding zendkanaal
zaam
Knippert Snel
Batterij TX bijna leeg
OFF
Batterij TX leeg of Fotocel bezet
6. GEBREKEN OPSPOREN
Hieronder staan een aantal tips om bepaalde situaties bij de werking van de fotocellen op te sporen en te verhelpen.
Raadpleeg de instructies van de elektronische apparatuur die wordt gebruikt om de structuur te bewegen voor een
complete lijst van problemen/gebreken.
SITUATIE
OORZAAK/PROBLEEM
NEDERLANDS
- Fotocellen niet uitgelijnd
De poort beweegt niet, de leds DL2 en
- Geen voeding Zender
DL3 van de Ontvanger zijn gedoofd.
- Verkeerd zendkanaal gekozen.
De led DL2 van de Ontvanger knipVoeding van de Zender niet correct.
pert.
SUGGESTIE
- Controleer welk zendkanaal is geselecteerd.
- Controleer de voeding van de elementen van het paar fotocellen.
- Controleer of het paar fotocellen is
uitgelijnd.
- Vervang de interne batterij van de
Zender.
- Als de Zender kabelvoeding heeft,
controleer dan de spanningswaarde.
De led DL3 van de Ontvanger knip- De fotocellen zijn niet goed uitge- - Zorg dat de fotocellen worden
pert
lijnd.
uitgelijnd.
18
3.
4.
5.
6.
7.
8.
9.
10.
11.
12.
13.
14.
15.
16.
17.
18.
19.
20.
21.
22.
23.
24.
25.
26.
27.
de los niños, ya que constituyen fuentes potenciales de peligro.
Guarden las instrucciones para futuras consultas.
Este producto ha sido proyectado y fabricado exclusivamente para la utilización
indicada en el presente manual. Cualquier uso diverso del previsto podría perjudicar
el funcionamiento del producto y/o representar fuente de peligro.
GENIUS declina cualquier responsabilidad derivada de un uso impropio o diverso
del previsto.
No instalen el aparato en atmósfera explosiva: la presencia de gas o humos inflamables constituye un grave peligro para la seguridad.
Los elementos constructivos mecánicos deben estar de acuerdo con lo establecido
en las Normas EN 12604 y EN 12605.
Para los países no pertenecientes a la CEE, además de las referencias normativas
nacionales, para obtener un nivel de seguridad adecuado, deben seguirse las
Normas arriba indicadas.
GENIUS no es responsable del incumplimiento de las buenas técnicas de fabricación
de los cierres que se han de motorizar, así como de las deformaciones que pudieran
intervenir en la utilización.
La instalación debe ser realizada de conformidad con las Normas EN 12453 y EN
12445.
El nivel de seguridad de la automación debe ser C+D.
Quiten la alimentación eléctrica y desconecten las baterías antes de efectuar
cualquier intervención en la instalación.
Coloquen en la red de alimentación de la automación un interruptor omnipolar con
distancia de apertura de los contactos igual o superior a 3 mm. Se aconseja usar un
magnetotérmico de 6A con interrupción omnipolar.
Comprueben que la instalación disponga línea arriba de un interruptor diferencial
con umbral de 0,03 A.
Verifiquen que la instalación de tierra esté correctamente realizada y conecten las
partes metálicas del cierre.
La automación dispone de un dispositivo de seguridad antiaplastamiento constituido
por un control de par. No obstante, es necesario comprobar el umbral de intervención
según lo previsto en las Normas indicadas en el punto 10.
Los dispositivos de seguridad (norma EN 12978) permiten proteger posibles áreas
de peligro de Riesgos mecánicos de movimiento, como por ej. aplastamiento,
arrastre, corte.
Para cada equipo se aconseja usar por lo menos una señalización luminosa así
como un cartel de señalización adecuadamente fijado a la estructura del bastidor,
además de los dispositivos indicados en el “16”.
GENIUS declina toda responsabilidad relativa a la seguridad y al buen funcionamiento de la automación si se utilizan componentes de la instalación que no sean
de producción GENIUS.
Para el mantenimiento utilicen exclusivamente piezas originales GENIUS
No efectúen ninguna modificación en los componentes que forman parte del
sistema de automación.
El instalador debe proporcionar todas las informaciones relativas al funcionamiento
del sistema en caso de emergencia y entregar al usuario del equipo el manual de
advertencias que se adjunta al producto.
No permitan que niños o personas se detengan en proximidad del producto
durante su funcionamiento.
La aplicación no puede ser utilizada por niños, personas con reducida capacidad
física, mental, sensorial o personas sin experiencia o la necesaria formación.
Mantengan lejos del alcance los niños los telemandos o cualquier otro emisor de
impulso, para evitar que la automación pueda ser accionada involuntariamente.
Sólo puede transitarse entre las hojas si la cancela está completamente abierta.
El usuario debe abstenerse de intentar reparar o de intervenir directamente, y
debe dirigirse exclusivamente a personal cualificado GENIUS o a centros de
asistencia GENIUS.
Todo lo que no esté previsto expresamente en las presentes instrucciones debe
entenderse como no permitido
2.
3.
4.
5.
6.
7.
8.
9.
10.
11.
12.
13.
14.
15.
16.
17.
19.
20.
21.
22.
23.
24.
25.
26.
27.
sehen sind, sind nicht zulässig
NEDERLANDS
WAARSCHUWINGEN VOOR DE INSTALLATEUR
ALGEMENE VEILIGHEIDSVOORSCHRIFTEN
LET OP! Het is belangrijk voor de veiligheid dat deze hele instructie
zorgvuldig wordt opgevolgd. Een onjuiste installatie of foutief
gebruik van het product kunnen ernstig persoonlijk letsel
veroorzaken.
1.
2.
3.
4.
5.
6.
7.
8.
DEUTSCH
9.
HINWEISE FÜR DEN INSTALLATIONSTECHNIKER
ALLGEMEINE SICHERHEITSVORSCHRIFTEN
10.
ACHTUNG! Um die Sicherheit von Personen zu gewährleisten, sollte die
Anleitung aufmerksam befolgt werden. Eine falsche Installation
oder ein fehlerhafter Betrieb des Produktes können zu schwerwiegenden Personenschäden führen.
1.
18.
Bevor mit der Installation des Produktes begonnen wird, sollten die Anleitungen
aufmerksam gelesen werden.
Das Verpackungsmaterial (Kunststoff, Styropor, usw.) sollte nicht in Reichweite von
Kindern aufbewahrt werden, da es eine potentielle Gefahrenquelle darstellt.
Die Anleitung sollte aufbewahrt werden, um auch in Zukunft Bezug auf sie nehmen
zu können.
Dieses Produkt wurde ausschließlich für den in diesen Unterlagen angegebenen
Gebrauch entwickelt und hergestellt. Jeder andere Gebrauch, der nicht ausdrücklich
angegeben ist, könnte die Unversehrtheit des Produktes beeinträchtigen und/oder
eine Gefahrenquelle darstellen.
Die Firma GENIUS lehnt jede Haftung für Schäden, die durch unsachgemäßen oder
nicht bestimmungsgemäßen Gebrauch der Automatik verursacht werden, ab.
Das Gerät sollte nicht in explosionsgefährdeten Umgebungen installiert werden: das
Vorhandensein von entflammbaren Gasen oder Rauch stellt ein schwerwiegendes
Sicherheitsrisiko dar.
Die mechanischen Bauelemente müssen den Anforderungen der Normen EN 12604
und EN 12605 entsprechen.
Für Länder, die nicht der Europäischen Union angehören, sind für die Gewährleistung
eines entsprechenden Sicherheitsniveaus neben den nationalen gesetzlichen
Bezugsvorschriften die oben aufgeführten Normen zu beachten.
Die Firma GENIUS übernimmt keine Haftung im Falle von nicht fachgerechten Ausführungen bei der Herstellung der anzutreibenden Schließvorrichtungen sowie bei
Deformationen, die eventuell beim Betrieb entstehen.
Die Installation muß unter Beachtung der Normen EN 12453 und EN 12445 erfolgen.
Die Sicherheitsstufe der Automatik sollte C+D sein.
Vor der Ausführung jeglicher Eingriffe auf der Anlage sind die elektrische Versorgung
und die Batterie abzunehmen.
Auf dem Versorgungsnetz der Automatik ist ein omnipolarer Schalter mit Öffnungsabstand der Kontakte von über oder gleich 3 mm einzubauen. Darüber hinaus
wird der Einsatz eines Magnetschutzschalters mit 6A mit omnipolarer Abschaltung
empfohlen.
Es sollte überprüft werden, ob vor der Anlage ein Differentialschalter mit einer
Auslöseschwelle von 0,03 A zwischengeschaltet ist.
Es sollte überprüft werden, ob die Erdungsanlage fachgerecht augeführt wurde. Die
Metallteile der Schließung sollten an diese Anlage angeschlossen werden.
Die Automation verfügt über eine eingebaute Sicherheitsvorrichtung für den Quetschschutz, die aus einer Drehmomentkontrolle besteht. Es ist in jedem Falle erforderlich,
deren Eingriffsschwelle gemäß der Vorgaben der unter Punkt 10 angegebenen
Vorschriften zu überprüfen.
Die Sicherheitsvorrichtungen (Norm EN 12978) ermöglichen den Schutz eventueller
Gefahrenbereiche vor mechanischen Bewegungsrisiken, wie zum Beispiel Quetschungen, Mitschleifen oder Schnittverletzungen.
Für jede Anlage wird der Einsatz von mindestens einem Leuchtsignal empfohlen
sowie eines Hinweisschildes, das über eine entsprechende Befestigung mit dem
Aufbau des Tors verbunden wird. Darüber hinaus sind die unter Punkt “16” erwähnten
Vorrichtungen einzusetzen.
Die Firma GENIUS lehnt jede Haftung hinsichtlich der Sicherheit und des störungsfreien
Betriebs der Automatik ab, soweit Komponenten auf der Anlage eingesetzt werden,
die nicht im Hause GENIUS hergestellt urden.
Bei der Instandhaltung sollten ausschließlich Originalteile der Firma GENIUS verwendet werden.
Auf den Komponenten, die Teil des Automationssystems sind, sollten keine Veränderungen vorgenommen werden.
Der Installateur sollte alle Informationen hinsichtlich des manuellen Betriebs des
Systems in Notfällen liefern und dem Betreiber der Anlage das Anleitungsbuch, das
dem Produkt beigelegt ist, übergeben.
Weder Kinder noch Erwachsene sollten sich während des Betriebs in der unmittelbaren
Nähe der Automation aufhalten.
Die Anwendung darf nicht von Kindern, von Personen mit verminderter körperlicher,
geistiger, sensorieller Fähigkeit oder Personen ohne Erfahrungen oder der erforderlichen Ausbildung verwendet werden.
Die Funksteuerungen und alle anderen Impulsgeber sollten außerhalb der Reichweite von Kindern aufbewahrt werden, um ein versehentliches Aktivieren der
Automation zu vermeiden.
Der Durchgang oder die Durchfahrt zwischen den Flügeln darf lediglich bei vollständig
geöffnetem Tor erfolgen.
Der Benutzer darf direkt keine Versuche für Reparaturen oder Arbeiten vornehmen
und hat sich ausschließlich an qualifiziertes Fachpersonal GENIUS oder an Kundendienstzentren GENIUS zu wenden.
Alle Vorgehensweisen, die nicht ausdrücklich in der vorliegenden Anleitung vorge-
11.
12.
13.
14.
15.
16.
17.
18.
19.
20.
21.
22.
23.
24.
25.
26.
27.
Lees de instructies aandachtig door alvorens te beginnen met de installatie van
het product.
De verpakkingsmaterialen (plastic, polystyreen, enz.) mogen niet binnen het bereik
van kinderen worden gelaten, want zij vormen een mogelijke bron van gevaar.
Bewaar de instructies voor raadpleging in de toekomst.
Dit product is uitsluitend ontworpen en gebouwd voor het doel dat in deze documentatie wordt aangegeven. Elk ander gebruik, dat niet uitdrukkelijk wordt vermeld, zou
het product kunnen beschadigen en/of een bron van gevaar kunnen vormen.
GENIUS aanvaardt geen enkele aansprakelijkheid voor schade die ontstaat uit
oneigenlijk gebruik of ander gebruik dan waarvoor het automatische systeem
is bedoeld.
Installeer het apparaat niet in een explosiegevaarlijke omgeving: de aanwezigheid
van ontvlambare gassen of dampen vormt een ernstig gevaar voor de veiligheid.
De mechanische bouwelementen moeten in overeenstemming zijn met de bepalingen van de normen EN 12604 en EN 12605.
Voor niet-EEG landen moeten, om een goed veiligheidsniveau te bereiken,
behalve de nationale voorschriften ook de bovenstaande normen in acht worden
genomen.
GENIUS is niet aansprakelijk als de regels der goede techniek niet in acht genomen
zijn bij de bouw van het sluitwerk dat gemotoriseerd moet worden, noch voor
vervormingen die zouden kunnen ontstaan bij het gebruik.
De installatie dient te geschieden in overeenstemming met de normen EN 12453 en EN
12445. Het veiligheidsniveau van het automatische systeem moet C+D zijn.
Alvorens ingrepen te gaan verrichten op de installatie moet de elektrische voeding
worden weggenomen en moeten de batterijen worden afgekoppeld.
Zorg op het voedingsnet van het automatische systeem voor een meerpolige
schakelaar met een opening tussen de contacten van 3 mm of meer. Het wordt
geadviseerd een magnetothermische schakelaar van 6A te gebruiken met
meerpolige onderbreking.
Controleer of er bovenstrooms van de installatie een differentieelschakelaar is
geplaatst met een limiet van 0,03 A.
Controleer of de aardingsinstallatie vakkundig is aangelegd en sluit er de metalen
delen van het sluitsysteem op aan.
Het automatische systeem beschikt over een intrinsieke beveiliging tegen inklemming, bestaande uit een controle van het koppel. De inschakellimiet hiervan dient
echter te worden gecontroleerd volgens de bepalingen van de normen die worden
vermeld onder punt 10.
De veiligheidsvoorzieningen (norm EN 12978) maken het mogelijk eventuele gevaarlijke gebieden te beschermen tegen Mechanische gevaren door beweging, zoals
bijvoorbeeld inklemming, meesleuren of amputatie.
Het wordt voor elke installatie geadviseerd minstens één lichtsignaal te gebruiken
alsook een waarschuwingsbord dat goed op de constructie van het hang- en
sluitwerk dient te worden bevestigd, afgezien nog van de voorzieningen die genoemd zijn onder punt “16”.
GENIUS aanvaardt geen enkele aansprakelijkheid voor wat betreft de veiligheid en de
goede werking van het automatische systeem, als er in de installatie gebruik gemaakt
wordt van componenten die niet door GENIUS zijn geproduceerd.
Gebruik voor het onderhoud uitsluitend originele GENIUS-onderdelen.
Verricht geen wijzigingen op componenten die deel uitmaken van het automatische systeem.
De installateur dient alle informatie te verstrekken over de handbediening van het
systeem in noodgevallen, en moet de gebruiker van de installatie het bij het product
geleverde boekje met aanwijzingen overhandigen.
De toepassing mag niet worden gebruikt door kinderen, personen met lichamelijke,
geestelijke en sensoriele beperkingen, of door personen zonder ervaring of de
benodigde training.
Sta het niet toe dat kinderen of volwassenen zich ophouden in de buurt van het
product terwijl dit in werking is.
Houd radio-afstandsbedieningen of alle andere impulsgevers buiten het bereik
van kinderen, om te voorkomen dat het automatische systeem onopzettelijk kan
worden aangedreven.
Ga alleen tussen de vleugels door als het hek helemaal geopend is.
De gebruiker mag zelf geen pogingen ondernemen tot reparaties of andere directe
ingrepen, en dient zich uitsluitend te wenden tot gekwalificeerd en geautoriseerd
GENIUS-personeel of een erkend GENIUS-servicecentrum.
Alles wat niet uitdrukkelijk in deze instructies wordt aangegeven, is niet toegestaan
Le descrizioni e le illustrazioni del presente manuale non sono impegnative. GENIUS si riserva il diritto, lasciando inalterate le caratteristiche essenziali dell’apparecchiatura, di apportare in qualunque momento e senza impegnarsi
ad aggiornare la presente pubblicazione, le modifiche che essa ritiene convenienti per miglioramenti tecnici o per
qualsiasi altra esigenza di carattere costruttivo o commerciale.
The descriptions and illustrations contained in the present manual are not binding. GENIUS reserves the right, whils
leaving the main features of the equipments unaltered, to undertake any modifications to holds necessary for either
technical or commercial reasons, at any time and without revising the present publication.
Les descriptions et les illustrations du présent manuel sont fournies à titre indicatif. GENIUS se réserve le droit d’apporter
à tout moment les modifications qu’elle jugera utiles sur ce produit tout en conservant les caractéristiques essentielles,
sans devoir pour autant mettre à jour cette publication .
Las descripciones y las ilustraciones de este manual no comportan compromiso alguno. GENIUS se reserva el derecho, dejando inmutadas las características esenciales de los aparatos, de aportar, en cualquier momento y sin
comprometerse a poner al día la presente publicación, todas las modificaciones que considere oportunas para el
perfeccionamiento técnico o para cualquier otro tipo de exigencia de carácter constructivo o comercial.
Die Beschreibungen und Abbildungen in vorliegendem Handbuch sind unverbindlich. GENIUS behält sich das Recht
vor, ohne die wesentlichen Eigenschaften dieses Gerätes zu verändern und ohne Verbindlichkeiten in Bezung auf
die Neufassung der vorliegenden Anleitungen, technisch bzw, konstruktiv / kommerziell bedingte Verbesserungen
vorzunehmen.
De beschrijvingen in deze handleiding zijn niet bindend. GENIUS behoudt zich het recht voor op elk willekeurig moment
de veranderingen aan te brengen die het bedrijf nuttig acht met het oog op technische verbeteringen of alle mogelijke
andere productie- of commerciële eisen, waarbij de fundamentele eigenschappen van het apparaat gehandhaafd
blijven, zonder zich daardoor te verplichten deze publicatie bij te werken.
Timbro rivenditore: / Distributor’s stamp: / Timbre de l’agent: / Sello del revendedor: / Fachhändlerstempel: /
Stempel dealer:
Via Padre Elzi, 32
24050 - Grassobbio
BERGAMO-ITALY
tel. 0039.035.4242511
fax. 0039.035.4242600
[email protected]
www.geniusg.com
00058I0800 Rev.0