1
1
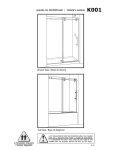
installation du joint / gasket installation
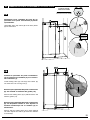
1A
6
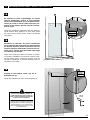
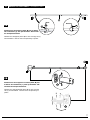
En utilisant la boite d’emballage en carton
comme plateforme, insérer le joint inférieur
de la porte coulissante (17) à la porte coulissante (6). Cela se fait à l’aide d’un bloc protecteur et un maillet. Prenez note de l’orientation du joint.
Using the cardboard packaging box as platform,
install bottom door gasket (17) onto door panel
(6) using a block and a mallet. Notice the gasket
orientation.
1A
6
INTÉRIEUR DE
LA DOUCHE
INTERIOR
SHOWER SIDE
17
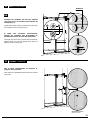
1B
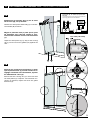
Introduire le panneau de porte coulissante
(6) à l’intérieur de la douche afin de simplifier
les étapes à suivre. Poser le panneau sur une
surface plane et matelassée comme une serviette ou un carton. Cela évite tout dommage
au panneau ou la base.
Place door panel (6) inside the shower to simplify following installation procedures. Ensure placing the panel onto a cushioned surface, such as
a towel or cardboard, to prevent damage either to
the panel or the base.
1B
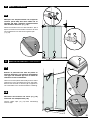
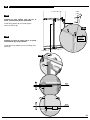
Installer le joint latéral court (10) sur le
panneau fixe (7).
10
INTÉRIEUR DE
LA DOUCHE
INTERIOR
SHOWER SIDE
Install short gasket (10) onto the fixed panel (7).
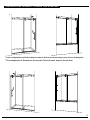
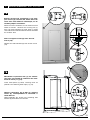
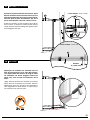
THE INSTALLATION SHOWN IS BASED ON
PLUMB FINISHED WALLS AND A LEVELLED
BASE. IF THESE CONDITIONS ARE NOT MET,
PLEASE ADJUST ACCORDINGLY.
L’INSTALLATION ILLUSTRÉE EST BASÉE SUR
DES MURS FINIS D’APLOMB ET UNE BASE DE
DOUCHE NIVELÉE. SI CES CONDITIONS NE
SONT PAS PRÉSENTÉES, VEUILLEZ AJUSTER
EN CONSÉQUENCE.
Court
SHORT
7
6