1
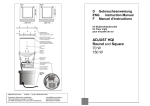
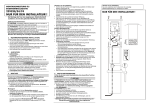
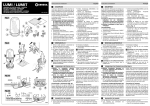
Technische Illustration D ENG F Technical Illustrations L'illustration technique Edelstahlblende fine steel shield panneau es acier spécial Gebrauchsanweisung Instruction Manual Manuel d'instructions Haltering für Schutzglas retaining ring of protective glass la verre de protection Schutzglas mit Dichtung protective glass with gasket verre de protectiion avec joint für Bodeneinbauleuchte for Floor Light pour encastré dans le sol Leuchtmittel, bulb, lumière Gusstopf, cast-iron casing, boîte en fonte ADJUST QRB Stellbügel adjustment bow boucle néglable Leuchtmittelhalter bulb holding device support dela lampe Trafo, transformer, transformateur Netzanschlussklemme connection clamp connection PG-Verschraubung screw joint(PG) raccord fileté(PG) 15° 15° Kunstoffeinbautopf plastic casing boîte plastique 227090/92A 11/2003 by SLV Elektronik GmbH Technische Änderungen vorbehalten. Technical Details are subject to change. Les détails techniques sont sujet à des changements. Vervielfältigung verboten ! Duplication prohibited ! Reproduction interdite! D F GEBRAUCHSANWEISUNG FÜR ADJUST QRB 1. Bestimmungsgemäße Verwendung: Dieses Produkt dient nur Beleuchtungszwecken und darf: nur mit einer Spannung von 230V/50HZ betrieben werden. keinen starken mechanischen Beanspruchungen oder starker Verschmutzung ausgesetzt werden. nach einer feuchten oder verschmutzenden Lagerung erst nach einer Zustandsprüfung betrieben werden. Sollten diese zuvor genannten Punkte nicht eingehalten werden, so kann es zum Kurzschluss oder elektrischen Schlag kommen. Insérer les deux vis une deuxième fois - sans les serrer fermément. Mettre la lampe sur le culot. Positionner la lampe comme souhaitée avec prudence. La lampe peut être inclinée à 15 degrés au maximum. D’ailleurs, le support de la lampe peut être tournée à 90 degrés – de manière horizontale. Ensuite, serrer les deux vis du support de lampe. Puis, la boîte de la lampe doit être fermément vissée à la boîte en fonte - moyennant les deux vis. Mettre le joint et le verre de protection sur la boîte en fonte . Faites attention à la position correcte du joint. Fixer la bague de support à l’aide de quatre vis. (la bague large doit être mise dans une position vers le haut). Installer le panneau en acier spécial sur la bague - moyennant les trois vis à six pans creux. 4. Informations pour l’exploitant 2. Technische Daten: Betriebsspannung: Schutzklasse: Maße: Leuchtmittel: Gewicht: Importeur: Utilisez le luminaire uniquement dans le cas où il fonctionne correctement. Dans le cas contraire, éteindrez tout de suite le luminaire et ne l’utilisez qu’après avoir fait appel à un professionnel. pri. 230V/50Hz sec. 12 V IP 67 Ø x H: 19 cm x 13 cm QRB 111, max. 50W 2,6 kg SLV Elektronik GmbH C’est à dire, dans les cas où : des dommages sont visibles le produit ne fonctionne pas le produit dégage des fumées épaisses, le produit surchauffe (la surchauffe est reconnaissable à son bruit de grésillement) IP 67: Schutz gegen Eindringen von Staub – Schutz gegen zeitweiliges Untertauchen in Wasser. Toute autre réparation sur l'installation ou sur son alimentation ne doit être effectuée que par un professionnel. Attention: Rappelons qu'un choc électrique peut être mortel! 3. Montage Achtung: Verwenden Sie nur Teile, die mit dem Produkt mitgeliefert oder definitiv als Zubehör beschrieben werden! Andernfalls kann die Anlage, als auch das Produkt nicht ausreichend sicher sein! Schalten Sie die Stromversorgung bzw. die Anschlussleitung spannungsfrei, bevor Sie jegliche Arbeiten vornehmen! a) Comment éviter les problèmes et les risques d’incendies: Ne fixez rien sur le luminaire : Prévoir une libre circulation de l’air : ne pas couvrir Changez tout de suite les verres de protection endommagés Montageort: Achten Sie darauf, dass das Produkt auf einem stabilen, ebenen, kippfesten Untergrund montiert wird. Der Mindestabstand zur angestrahlten Fläche, wie auf dem Typenschild des Strahlers angegeben: Ne laissez pas les enfants jouer avec des produits électriques sans surveillance! Ils ne sont pas toujours capables d’estimer les dangers causés par l’électricité. ... 1,0 m Quoi faire quand une lampe est défectueuse ou ne fonctionne plus ? Besondere Vorsicht gilt bei leicht entzündlichen Gegenständen oder elektrischen Leitungen. D’abord éteindrez le luminaire, puis changez l’ampoule. Attention : Faites d’abord refroidir la lampe – sinon - il y a des risques de brûlures au contact de la surface brûlante. Ne remplacez que par des ampoules ayant les mêmes caractéristiques techniques (culot, tension électrique, puissance) car toute autre sorte d’ampoule pourrait endommager le luminaire. Benutzen Sie als Erdkabel nur ein biegsames dreipoliges Kabel aus Neoprengummi vom Typ H07RN-F, Durchmesser 8,5 –12 mm. Keine PVC-Kabel benutzen. b) einzelne Montageschritte Nehmen Sie das Produkt aus der Verpackung. Lösen Sie die drei Inbusschrauben auf der Edelstahlblende und nehmen diese ab. Lösen Sie die vier Schrauben auf dem Haltering des Schutzglases. Entfernen Sie den Haltering des Schutzglases und das Schutzglas mit der Dichtung. Papiermanschette um den Leuchtmitteltopf ist nur Transportbedingt beigefügt und muß unbedingt entfernt werden.Lösen Sie nun die zwei Schrauben am oberen Rand des Gusstopfes, um diesen aus dem Kunststoffeinbautopf herauszunehmen. Führen Sie das Erdkabel durch eine der Öffnungen des Kunstoffeinbautopfes. Verankern Sie den Kunstoffeinbautopf fest im Erdreich. Lösen Sie im Gusstopf die zwei Schrauben des Leuchtmittelhalters und nehmen diesen vorsichtig heraus, dabei achten Sie darauf, dass sich keine Kabel lösen. 1 Opération 5. D’autres points à respecter: Eteindrez le luminaire avant d’effectuer des travaux de nettoyage ou d’entretien, ou bien, d’autres travaux sur le luminaire ou sur les composants (à faire réaliser par un professionnel). 6 F 1. A utiliser comme indiqué : Ce produit ne sert qu’à éclairer: il est prévu pour une tension de 230V/ 50Hz. il ne doit être exposé ni aux efforts mécaniques importants ni à un encrassement important il ne doit être utilisé qu’après examen si le produit a été stocké dans un entrepôt humide ou sale. Un non-respect de ces points peut causer un court-circuit ou une décharge électrique! 2. Informations techniques: Tension d'alimentation: Classe de protection Lampes: Dimensions: Poids: Importateur: pri. 230V / 50Hz sec. 12V IP 67 QRB 111, max.50W Ø x H: 19 cm x 13 cm 2,6 kg SLV Elektronik GmbH IP 67: Protection contre la pénétration de poussière et protection contre une immersion temporaire. 3. D MANUEL D'INSTRUCTIONS POUR ADJUST QRB Assemblage Attention: Utilisez seulement des pièces qui ont été livrées avec le produit ou qui sont uniquement décrites comme accessoires ! Sinon, l’installation ainsi que le produit ne peuvent pas être garantis. Mettez l’alimentation électrique ou le raccordement au secteur hors tension avant de travailler! a) Lieu d'installation Fixez le luminaire sur une surface stable pour éviter des accidents. Le spot doit être placé à distance de la surface à éclairer, au maximum comme indiqué ... 1,0 m Soyez prudent avec les matières inflammables sur l'étiquette du spot: (comme rideaux etc.) ou des lignes électriques. Utilisez comme câble enterré seulement un câble souple et à trois conducteurs de néoprène de type H07RN-F, calibre 8,5 – 12mm. Pas de PVC-cables! b) Etapes successives pour installer le luminaire Sortir le produit dans son emballage. Dévisser les trois vis à six pans creux fixées sur le panneau en acier spécial et les retirer. Dévisser les quatre vis fixées à la bague de support du verre de protection. Enlever la bague de support et le verre protecteur du joint. Il faut absolument enlever le manchon en papier autour de la boîte de la lampe car il ne sert qu’à la protection pendant le transport. Ensuite, dévisser les deux vis sur le bord supérieur de la boîte en fonte insérée dans une boîte plastique, et enlever celle-là de la dernière. Diriger le câble à travers l’ouverture de la boîte plastique. Fixer cette boîte fermément. Dévisser les deux vis de l’appui de la lampe et les enlever prudemment. Faitez attention à ne pas détacher es câbles. Raccord électrique: Pour réaliser le raccord électrique du câble diriger ce dernier à travers le raccord fileté (PG) situé sur la partie inférieure de la boîte en fonte. Connectez le fil électrique noir ou brun (la phase) du réseau électrique de la maison à la borne L et le fil électrique bleu (fil neutre) du réseau électrique de la maison à la borne N. Le fil électrique vert et jaune (la masse) doit être vissé fermement sur la borne reliée à la terre . Puis insérer le support de la lampe dans la boîte en fonte. Attention : les câbles ne doivent pas être coincés dans les composants. 5 Elektrischer Anschluss : Zum Anschluss des Erdkabels führen Sie dieses durch die am unteren Teil des Gusstopfes befindliche PG-Verschraubung. Verbinden Sie das schwarze oder braune Kabel (Außenleiter) des Erdkabels mit der Klemme L und das blaue Kabel (Neutralleiter) des Erdkabels mit der Klemme N. Das grün-gelbe Kabel (Schutzleiter) des Erdkabels wird mit der Erdungsklemme der Anschlussklemme fest verschraubt. Setzen Sie nun den Leuchtmittelhalter wieder in den Gusstopf ein. Achten Sie darauf, dass keine Kabel zwischen den Bauteilen eingeklemmt werden. Setzen Sie die zwei Schrauben wieder ein ohne diese vollständig festzuziehen. Stecken Sie jetzt das Leuchtmittel auf die Fassung am Stellbügel des Leuchtmittelhalters. Bringen Sie das Leuchtmittel vorsichtig in die gewünschte Position. Dazu kann das Leuchtmittel nach max. 15° geneigt werden. Zusätzlich lässt sich der Leuchtmittelhalter horizontal um 90° drehen. Ziehen Sie jetzt die zwei Schrauben des Leuchtmittelhalters fest. Der Leuchtmitteltopf muss wieder mit dem Gusstopf mittels der beiden Schrauben fest verschraubt werden. Legen Sie nun das Schutzglas mit der Dichtung auf den Gusstopf. Achten Sie auf den richtigen Sitz der Dichtung. Befestigen Sie jetzt den Haltering(der breite Rand muss nach oben zeigen) mit den vier Schrauben. Montieren Sie zuletzt wieder die Edelstahlblende mit den drei Inbusschrauben auf den Haltering. 4. Betrieb: Informationen für den Betreiber: Betreiben Sie das Produkt nur, wenn dies in Ordnung ist. Im Fehlerfall schalten Sie das Produkt sofort aus und betreiben es erst wieder nach Überprüfung durch einen ElektroFachmann. Dies ist der Fall, wenn: sichtbare Beschädigungen auftreten. das Produkt nicht arbeitet. es qualmt, dampft, oder bei hörbaren Knistergeräuschen. eine Überhitzung zu erkennen ist. Reparaturen des Produktes oder Arbeiten an netzspannungsführenden Teilen dürfen nur Fachkräfte des Elektrohandwerks vornehmen. Achtung: Hier besteht sonst Lebensgefahr durch elektrischen Schlag. So vermeiden Sie Störungen und Brandgefahren: Befestigen Sie nichts an dem Produkt! Leuchte nicht abdecken beschädigte Schutzgläser sofort tauschen Lassen Sie Kinder nicht unbeaufsichtigt mit elektrischen Produkten spielen! Kinder können Gefahren im Umgang mit elektrischer Energie nicht immer richtig einschätzen Was ist zu tun, wenn ein Leuchtmittel defekt ist oder nicht funktioniert? Schalten Sie erst das Produkt spannungsfrei, bevor Sie das Leuchtmittel (Lampe) austauschen. Vorsicht: Lassen Sie nach vorangegangenem Betrieb erst das Leuchtmittel abkühlen – andernfalls besteht wegen der heißen Oberfläche Verletzungsgefahr. Ersetzen Sie nur Leuchtmittel mit den gleichen Daten wie Sockel, Spannung und Wattage. Jede andere Art von Leuchtmittel kann zu Beschädigungen der Leuchte führen. 5. Was ist sonst noch zu beachten? Schalten Sie erst das gesamte Produkt spannungsfrei, bevor Sie... Reinigungs- oder Pflegearbeiten ausführen irgendwelche Arbeiten an dem Produkt oder deren Komponenten vornehmen (Elektro-Fachmann) 2 ENG ENG INSTRUCTION MANUAL FOR ADJUST QRB Connect the black or blue cable (live conductor) of the earth lead with clamp L and the blue cable (neutral lead) of the earth lead with clamp N. The green-yellow cable (protective lead) of the earth lead will then be firmly screwed to the earth clamp of the connection clamp. Then insert the light holding device into the cast-iron casing again. Make sure that cables are not squeezed into the components. Insert the two screws again without tightening them altogether. Put the light onto the socket of the adjustment bow of the light holding device. Bring the light into the position to be chosen with the necessary care. In order to realise such a position the light can be inclined up to 15° at the utmost. In addition, the light holding device can be horizontally turned by 90°. Then tighten the two screws of the light holding device. The light casing must then be firmly screwed to the cast-iron casing by using the two screws. Put the protective glass with the gasket onto the cast-iron casing . Pay attention to the proper position of the gasket. Fix the retaining ring with the four screws. (the wide edge must be brought into an upward position) Finally install the fine steel shield onto the retaining ring with the three socket head screws. 1. Use as directed: This product only serves lighting purposes and may: only to be used with a voltage of 230V/50Hz. not be exposed to strong mechanical loads or to strong contamination. only be installed and operated after a condition inspection if the product is dirty or has been moistened through storage. If these points named above are not adhered to, a short circuit or electrical shock can occur. 2. Technical Data: Operating voltage: pri.: 230V/50Hz sec.: 12V Safety Class: IP 67 Bulb: QRB 111, max. 50W Dimensions: Ø x H: 19 cm x 13 cm Weight: 2,6 kg Importeur: SLV Elektronik GmbH IP 67: Protection against dust(dust-tight) and temporary submersion in water. 4. Information for the user: Operate the product only if it is working correctly. Switch off the product with a malfunction immediately and operate it again only after examination by an electrical specialist. This is the case, when: visible damages appear. the product does not work. smoke, steam or crackling sounds appear. an overheating is recognisable. Repairs of the product or work on mains voltage-prominent sections may only be carried out by qualified electricians. Attention: Here exists mortal danger from an electric shock! 3. Assembly: Attention: Use only parts, which belong to the product! Otherwise the product or the installation might not be sufficiently safe. Switch off the power of the mains supply line or respectively of the connection lead before doing any works. a) Assembly place: The product should be placed at least so far from the illuminated surface, as indicated as minimum distance on the type plate of the spot. How to avoid failure and fire risk: ... 1,0 m Pay special caution to easily inflammable objects or electric connections. Ensure that the power is switched off, prior to connecting the system to the power supply. According to the regulations in law, the electrical connection has to be done by a qualified electrician. Use as earth lead only a three-pole neoprene cable of type H07RN-F, diameter : 8,512mm. Do not use PVC cables. b) Operation: Do not fasten or hang anything on the product! Provide free air circulation - cover nothing! Replace damaged protection glasses inmmedeately Never let children play unsupervised with electric products! Children can not always estimate dangers in dealing with electric energy correctly. Single steps to install our product Take the product out of its packaging. Loosen the three socket head screws on the fine steel shield and remove them. Loosen the four screws on the retaining ring of the protective glass. Remove the retaining and the protective glass with the gasket. The paper collar around the light casing is only enclosed for transport purposes and has to be removed by all means. Then - loosen the two screws on the upper edge of the cast-iron casing which has been fitted into a plastic casing and take it out of the latter. Direct the earth cable through an opening of the plastic casing. Fix the plastic casing firmly into the earth. Loosen the two screws of the light holding device in the cast-iron casing and remove them carefully. Make sure that cables are not disconnected. Electrical connection: In order to realise the electrical connection of the earth lead - direct it though the PG- screw joint - located at the lower part of the cast-iron casing. 3 What is to do if a bulb is defect or does not work? Disconnect the product from power, before you exchange the bulbs. Caution: Let the bulb cool down first before replacement – otherwise considerable risk of injury exists because of the hot surface. Replace the bulbs only with bulbs of the same data like socket, power and capacity. Every other sort of bulb can lead to damages of the light. 5. What else has to be considered? Disconnect the product from power, before you… clean or maintain the product. do any works on the product or its components (electric expert). 4