1
(Original instructions)
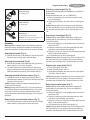
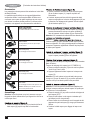
Small brush (Orange)
For cleaning kitchens.
Small brush (Green)
For cleaning toilets.
Small Squeegee
For cleaning galss doors and windows.
Warning! Do not use the window squeegee on cold
glass. It may cause the glass to break.
Assembly
Warning! Before attempting any of the following operations,
make sure that the appliance is switched off and unplugged
and that the appliance is cold and does not contain any water.
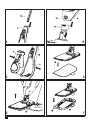
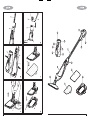
Attaching the handle (Fig. A)
u
Slide the bottom end of the handle (10) into the top end of
the steam mop body (9) until it clicks into place.
Attaching the steam head (Fig. B)
Slide the bottom end of the steam mop body (9) onto the
steam head (11) until it clicks into place.
u The steam head can be removed from the Steam mop
body by pressing the steam head release button (18) and
pulling the steam mop body (9) off the steam head (11).
ENGLISH
Attaching a cleaning pad (Fig. D)
Replacement cleaning pads are available from your Black &
Decker dealer:Steam head cleaning pad - cat. no. FSMP20-XJ).
u Place a cleaning pad (12) on the floor with the ‘hook &
loop’ side facing up.
u Lightly press the steam mop down onto the cleaning pad
(12).
Caution! Always place your steam mop on the resting mat
(13) with the handle (10) in the upright position when stationary and make sure the steam mop is turned off when not in
use.
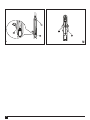
Removing a cleaning pad (Fig. E)
Caution! Always wear suitable shoes when changing the
cleaning pad on your steam mop. Do not wear slippers or
open toed footwear.
u Return the handle (10) to the upright position and turn the
steam mop ‘OFF’.
u Place the steam mop on the resting mat and wait until it
cools down. (approximately five minutes)
u Place the front of your shoe onto the cleaning pad removal
tab (20) and press down firmly.
u Lift the steam mop up off the cleaning pad.
Caution! Always place the steam mop on the resting mat (13)
with the handle (10) in the upright position when stationary
and make sure the steam mop is turned off when not in use.
u
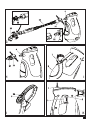
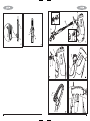
Attaching the hand held stean cleaner (Fig. C)
Holding the back of the steam mop body (9) Push the
hand held steam cleaner (5) firmly into the stem mop body
(9) until it clicks into place.
Caution! Always ensure the handle command lights up to
confirm the unit is docked.
Warning! Inspect that the seal (22 Fig. G) on the steam nozzle (4) before fitting the hand held steam mop to the steam
mop body. If the seal is missing or damaged then please
contact your nearest authorised repair agent. Do not use the
appliance.
u
Removing the hand held stean cleaner (Fig. C)
u
Push the release button (19) down and pull the hand held
steam cleaner (5) away from the steam mop body
Attaching the carpet glider (Fig. F)
Place carpet glider on the floor.
Attach a claening pad to the unit.
u Lightly press the steam mop down onto the carpet glider
(14) until it clicks into place.
Caution! Always place the steam mop on the resting mat (13)
with the handle (10) in the upright position when stationary
and make sure the steam mop is turned off when not in use.
u
u
Removing the carpet glider (Fig. F)
Caution! Always wear suitable shoes when changing the
carpet glider on your steam mop. Do not wear slippers or
open toed footwear.
u Return the handle (10) to the upright position and turn the
steam mop ‘OFF’.
u Place the steam mop on the resting mat and wait until it
cools down. (approximately five minutes)
u Place the front of your shoe onto the carpet glider removal
tab (21) and press down firmly.
u Lift the steam mop up off the carpet glider (14).
Caution! Always place the steam mop on the resting mat (13)
with the handle (10) in the upright position when stationary
and make sure the steam mop is turned off when not in use.
7