1
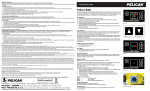
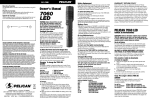
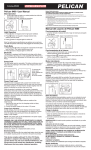
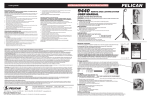
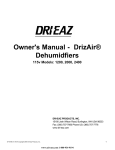
CAT. #7060 Mounting Template Use template below to mount to wall or any flat surface, using #10 screws. Owner’s Manual Plantilla de montaje Utiliza la plantilla de más abajo para montar el producto en una pared u otra superficie plana, con tornillos del nº 10. Gabarit de montage Utiliser le gabarit fourni ci-contre pour monter le produit sur un mur ou sur une surface plane quelconque en utilisant les vis nº 10. WARNING: Before disassembling any part of the 7060 LED flashlight, ensure that the flashlight has not been operating for five (5) minutes. During operation, the LED module can become extremely hot and may cause injury if touched. Flashlight Operation 1.74” LINTERNAS CON LA GARANTÍA LIMITADA DE EXCELENCIA DE POR VIDA DE PELICAN Pelican Products, Inc., ofrece una garantía de por vida en sus linternas contra roturas o defectos de fabricación. Esta garantía no cubre la lámpara ni las pilas. Las reclamaciones de garantía de cualquier clase se considerarán nulas en caso de que el producto haya sufrido alteraciones, daños o modificaciones físicas de cualquier tipo, se haya hecho un uso incorrecto, abusivo o negligente o haya sufrido accidentes. En Australia: véase http://www.pelican.com/warranty Para obtener toda la información relativa a la garantía, véase http://www.pelican.com/warranty. La garantía de por vida no cubre las maletas rotomoldeadas, los productos del AALG ni la parte de tejido de las mochilas. TORCHES GARANTIE D’EXCELLENCE À VIE LIMITÉE DE PELICAN Pelican Products, Inc. garantit à vie ses torches contre la casse et les défauts de fabrication. Cette garantie ne couvre pas l’ampoule ou les piles. Toute demande de prise en charge sous garantie, de quelque nature que ce soit, sera refusée si le produit a été transformé, endommagé ou physiquement modifié d’une façon ou d’une autre, ou encore sujet à un traitement abusif, une mauvaise utilisation, une négligence ou un accident.En Australie : voir http://www.pelican.com/warranty Pour une version complète et détaillée de la garantie, voir http://www.pelican.com/warranty. La garantie à vie ne couvre pas les valises rotomoulées, les produits AALG et la partie en tissu des sacs à dos. The 7060 LED is a high performance flashlight for use by professionals. This flashlight comes equipped with a high output LED pre-focused lamp that emits a strong tight beam of white light. There is no need to focus the 7060 LED. DO NOT SHINE THIS FLASHLIGHT DIRECTLY INTO ANY PERSON’S EYES: THIS MAY RESULT IN INJURY. Your 7060 LED battery pack comes to you partially charged and needs to be fully charged prior to use. MOMENTARY 1. G ently depress the button for momentary operation. Press once for high, press again within .5 second to change from high to low 2. C ONSTANT ON Single Click for High Triple Click (within .5 second) for low 3. LIGHT-OFF – Press the button to turn OFF. To Attach the Power Cord to the Charger Base 1. R otate the charger so that the base is facing towards you. 2. T ake the right angled plug from the power transformer and push the metal end into the socket (the transformer socket is located in a pocket in the base). 3. Feed the cord into the channel leading from the pocket. 4. Attach the Power Cord to the electrical supply. NOTE: The Charger LED will turn red when the power is supplied. Charging To charge the 7060 LED: HARGER C The charger is capable of charging the battery pack in under 5 hours. The LED Charge Lights will indicate where the battery is in the charge cycle as follows: Solid Red = 7060 Not Connected Flashing Red Light = 7060 Charging Solid Green Light = 7060 Fully Charged There is no need to fully discharge the 7060 LED before charging the battery. Charging can occur whenever required and the 7060 LED can be left indefinitely in the charger housing without fear of over-charging. 23215 Early Ave. • Torrance, CA 90505 (310) 326-4700 • FAX (310) 326-3311 • www.pelican.com 7063-311-001 5-5117 Rev A © 2011 PELICAN PRODUCTS OC/12 All trademarks are registered and/or unregistered trademarks of Pelican Products, Inc., its subsidiaries and/or affiliates. To Charge: 1. Turn off the 7060 LED. 2. S nap the 7060 LED into the arms of the charger with the switch facing towards you and the round charger contacts engage with the 7060 LED contacts. The LED will turn from a SOLID RED to a FLASHING RED to indicate the charging cycle. 3. W hen the LED turns SOLID GREEN the battery pack is fully charged. NOTE: A flashing green LED indicates a charging problem. Remove the flashlight from the charger and clean the charging contacts. If the problem persists, please return the flashlight for warranty related repair. Battery Replacement After approximately 500 full charge/discharge cycles, the LI-ION battery stick will no longer hold a charge and must be replaced. The battery stick is available wherever Pelican flashlights are sold or directly from Pelican Products Customer Service. To replace the battery stick: 1. Unscrew the tail switch located at the rear of the 7060 LED. 2. Remove the battery stick. 3. Insert the new battery stick following the direction on the battery decal. 4. Replace the tail switch & tighten it all the way down. NOTE: Please act responsibly when disposing of the LI-ION Battery Stick. This part is recyclable and should not be disposed of in the municipal waste system. Please check with your local waste disposal authority for information. Battery Care • Do not over discharge your flashlight in an attempt to reduce a “memory” condition. This practice is unnecessary as modern LI-ION batteries, when used in flashlights such as the 7060 LED are highly unlikely to develop this condition. In addition, deep discharging of the batteries may cause the batteries to vent potentially dangerous gases and electrolytes. O-ring Maintenance Check closely for cuts, scratches, or otherwise damaged O-ring or mating lens lip surface. Remove any dirt or foreign matter from O-ring sealing surfaces. Keep threads, O-ring groove and insidelip of lens lubricated with silicone grease. See Warranty information for replacement of O-ring. Charger Mounting The 7060 LED Charger Base can be permanently mounted in most positions (except upside-down) in vehicles. Two mounting holes are provided to enable attachment using #10 screws. The right angle plug must be connected before the charger can be mounted (see above). Vehicle Installation The 7060 LED charger can be permanently installed in most vehicles and this operation should be performed by a professional auto technician. The charger should not be installed upside-down since certain conditions may cause the 7060 LED to be ejected from the charger. When installing the charger, ensure that the Direct Wiring Rig is connected to an ignition key-switched line. The high amperage draw of this charger may drain the vehicle’s battery if connected directly to the battery. NO APUNTE LA LINTERNA DIRECTAMENTE A LOS OJOS DE OTRA PERSONA, YA QUE PODRÍA PROVOCARLE LESIONES. La batería de la linterna 7060 LED se entrega parcialmente cargada y debe cargarse por completo antes de su uso. 1. UNTUAL P Pulsar suavemente el botón para utilizar la linterna puntualmente. Pulsar una vez para rendimiento alto, pulsar de nuevo al instante para pasar de alto a bajo. 2. ENCENDIDO CONTINUO Un solo clic para rendimiento alto. Triple clic (en Segundo .5) para bajo. 3. APAGAR LINTERNA Pulsar el botón para apagar la linterna. Para conectar el cable de alimentación a la base de cargador: 1. H aga girar el cargador de modo que la base apunte hacia usted. 2. T ome el conector en ángulo recto del transformador de corriente y conecte el extremo metálico en el enchufe situado en un pequeño compartimento de la base. 3. H aga pasar el cable por el canal que llega hasta el compartimento. 4. Enchufe el cable de alimentación a una toma de corriente. NOTA: El LED rojo del cargador se encenderá al recibir corriente. Carga: Para cargar la linterna 7060 LED: CARGADOR El cargador puede cargar la batería en menos de 5 horas. Las luces de carga indican en qué ciclo de carga se encuentra la batería: Luz roja fija = la linterna 7060 no está conectada Luz roja parpadeante = la linterna 7060 está en proceso de carga Luz verde fija = la linterna 7060 está completamente cargada No es necesario que la batería de la linterna 7060 LED se haya descargado por completo antes de volver a cargarla. El proceso de carga puede realizarse siempre que sea necesario y la linterna 7060 LED puede dejarse de forma indefinida en el cargador sin miedo a que se sobrecargue. Para cargar la linterna: 6057F 110V TRANSFORMER FOR CHARGER 6061F DIRECT WIRING RIG FOR CHARGER 7070DESK/DASH SMART CHARGER BASE UNIT 8056F 12V PLUG-IN CHARGER CORD FOR CHARGER 7069 REPLACEMENT LI-ION BATTERY PACK 7052 YW TRAFFIC WAND (Yellow) 7052 OR TRAFFIC WAND (Orange) 1. Apague la linterna 7060 LED. 2. C oloque la linterna 7060 LED en el soporte del cargador con el interruptor mirando hacia usted, de modo que los contactos del cargador encajen con los contactos de la linterna 7060 LED. El indicador LED pasará de ROJO FIJO a ROJO PARPADEANTE, lo cual indica que el proceso de carga ha comenzado. 3. C uando el indicador LED se ilumine de color VERDE FIJO, la batería ya estará cargada. PELICAN 7060 LED Cambio de la batería REPLACEMENT PARTS CAT. # DESCRIPTION MANUAL DE INSTRUCCIONES ADVERTENCIA: Antes de desmontar cualquier pieza de la linterna 7060 LED, asegúrese de que ésta no se haya usado durante por lo menos cinco (5) minutos. Durante su uso, el módulo LED puede calentarse mucho y causar lesiones por contacto. Uso de la linterna El modelo 7060 LED es una linterna de alto rendimiento para uso profesional. Viene equipada con una lámpara preenfocada LED de gran potencia que emite un intenso haz de luz blanca. No es necesario enfocar la linterna 7060 LED. NOTA: Si el indicador LED emite una luz verde parpadeante, quiere decir que se ha producido un error de carga. Retire la linterna del cargador y limpie los contactos de carga. Si el problema persiste, envíe a reparar la linterna de acuerdo con la garantía. Al cabo de unos 500 completo ciclos de carga y descarga, la batería de ión litio dejará de funcionar correctamente y deberá cambiarse. Puede adquirir otra batería en cualquier establecimiento donde se vendan linternas Pelican o directamente a través del Servicio de Atención al Cliente de Pelican Products. Para sustituir la batería, haga lo siguiente: 1. 2. 3. 4. Desenrosque el interruptor trasero de la linterna 7060 LED. Retire la batería. Introduzca la nueva batería en el sentido indicado. Vuelva a colocar el interruptor trasero y enrósquelo bien. NOTA: Deseche la batería de ión litio de forma responsable, ya que es una pieza reciclable y no debe arrojarse a la basura. Si desea más información, consulte a las autoridades locales competentes. Cuidado de la batería No es preciso descargar totalmente la batería de la linterna para evitar el llamado “efecto memoria”. Esta práctica resulta innecesaria, ya que es muy poco probable que las baterías de ión litio modernas desarrollen dicho efecto cuando se usan en linternas como la 7060 LED. Además, si la batería se descarga demasiado puede que emita gases y electrolitos potencialmente peligrosos. Mantenimiento del anillo de sellado Compruebe que el anillo de sellado y la superficie de contacto de la lente no presenten cortes, arañazos u otros daños. Elimine cualquier partícula de polvo o suciedad de la superficie de los anillos de sellado. Mantenga lubricadas las roscas, la ranura del anillo de sellado y la parte interior de la lente con grasa de silicona. Lea la información de la garantía sobre la sustitución del anillo de sellado. Instalación del cargador La base de cargador de la linterna 7060 LED puede instalarse de forma permanente en un vehículo en casi todas las posiciones (excepto en posición invertida). La base dispone de dos orificios para poder fijarla fácilmente con tornillos del número 10. El conector en ángulo recto debe conectarse antes de instalar el cargador (véase lo anterior). Instalación en vehículos El cargador de la linterna 7060 LED puede instalarse de forma permanente en la mayoría de los vehículos. Esta operación debe llevarla a cabo un mecánico profesional. El cargador no debe instalarse en posición invertida, ya que la linterna 7060 LED podría salirse del cargador. Al instalar el cargador, asegúrese de que el kit de conexión directa esté conectado a una línea conmutada con la llave de contacto, ya que el elevado amperaje que utiliza el cargador podría agotar la batería del vehículo si se conecta directamente a la misma PIEZAS DE RECAMBIO Nº DE CAT. # DESCRIPCIÓN 6057F TRANSFORMADOR DE 110V PARA CARGADOR 6061F KIT DE CONEXIÓN DIRECTA PARA CARGADOR 7070 BASE DE CARGADOR 8056F CABLE PARA CARGADOR DE 12V 7069 BATERÍA DE IÓN LITIO DE RECAMBIO 7052 YW CONO DE TRÁFICO (amarillo) 7052 OR CONO DE TRÁFICO (naranja) PELICAN 7060 LED MANUEL D’INSTRUCTIONS AVERTISSEMENT : Avant de démonter une partie, quelle qu’elle soit, de la torche LED 7060, assurezvous qu’elle n’ait pas fonctionné depuis cinq (5) minutes. Lors du fonctionnement, le module LED peut devenir très chaud et peut provoquer des blessures en cas de contact. Fonctionnement de la torche La LED 7060 est une torche haute performance destinées aux professionnels. Cette torche est équipée d’une ampoule LED pré centrée à émission élevée qui émet un puissant faisceau concentré de lumière blanche. La mise au point de la LED 7060 n’est pas nécessaire. N’ORIENTEZ PAS CETTE TORCHE DIRECTEMENT DANS LES YEUX D’UNE PERSONNE : CECI RISQUE DE PROVOQUER DES BLESSURES. La batterie de votre LED 7060 est en partie chargée lors de la livraison. Il est nécessaire de la charger entièrement avant l’utilisation. 1. M OMENTANÉ Appuyez doucement sur l’interrupteur pour une utilisation momentanée. Appuyez une fois pour un éclairage fort, appuyez deux fois au sein de 0,5 seconde pour un éclairage faible. 2. M ARCHE EN CONTINU Appuyez une fois pour un éclairage fort. Appuyez trois fois (au sein de 0,5 seconde) pour un éclairage faible. 3. A RRÊT Appuyer sur l’interrupteur pour éteindre la torche. Fixer le cordon d’alimentation à labase du chargeur 1. Tournez le chargeur de manière à ce que la base soit face à vous. 2. Prenez la prise à angle droit du transformateur et insérez l’extrémité métallique dans la prise (la prise du transformateur se trouve dans une ouverture sur la base). 3. Placez le cordon dans le canal sortant de l’ouverture. 4. Branchez le cordon d’alimentation sur le secteur. REMARQUE : La LED du chargeur devient rouge lorsque l’appareil est sous tension. Chargement Charger la LED 7060 : CHARGEUR Le chargeur est capable de charger le bloc-batteries en moins de 5 heures. La LED indique la progression du cycle de chargement comme suit : Rouge fixe Rouge clignotant Vert fixe = 7060 Non connecté = 7060 En cours de chargement = 7060 Entièrement chargée Il n’est pas nécessaire de laisser la LED 7060 se décharger entièrement avant de charger la batterie. Le chargement peut se faire lorsque cela est nécessaire et la LED 7060 peut rester indéfiniment dans le chargeur sans crainte d’un chargement excessif. Pour effectuer le chargement : 1. Eteignez la LED 7060. 2. Placez la LED 7060 dans le chargeur, l’interrupteur vers vous et les contacts du chargeur insérés dans les contacts de la LED 7060. La LED passe d’un voyant ROUGE FIXE à un voyant ROUGE CLIGNOTANT afin d’indiquer le cycle de chargement. 3. L orsque la couleur de la LED passe au VERT FIXE, la batterie est entièrement chargée. REMARQUE : Une LED vert clignotant indique un problème de chargement. Retirez la torche du chargeur et nettoyez les contacts de chargement. Si le problème persiste, veuillez renvoyer la torche pour une réparation sous garantie. Remplacement de la batterie Après environ 500 full cycles de chargement/déchargement, la batterie LI-ION ne tient plus la charge et doit être remplacée. La batterie est disponible dans tous les endroits où sont vendues les torches Pelican ou directement auprès du service clients de Pelican Products. Pour remplacer la batterie : 1. 2. 3. 4. D évissez l’interrupteur d’allumage situé à l’arrière de la LED 7060. Retirez la batterie. Insérez la nouvelle batterie en suivant le sens indiqué. Remplacez l’interrupteur d’allumage & insérez-le entièrement. REMARQUE : Ayez une attitude responsable lorsque vous jetez la batterie LI-ION. Cette partie est recyclable et ne doit pas être jetée avec les déchets ordinaires. Veuillez consulter les autorités compétentes pour plus d’informations. Précautions avec la batterie Ne déchargez pas trop votre torche pour essayer de réduire un état de “mémoire” Cette pratique n’est pas nécessaire étant donné que les batteries LI-ION modernes, lorsqu’elles sont utilisées avec des torches telles que la LED 7060, ont peu de risques de présenter cet état. De plus, une décharge profonde des batteries risque de provoquer une libération de gaz et électrolytes potentiellement dangereux. Maintenance du joint torique Vérifiez attentivement l’absence de coupures, égratignures ou autres dommages sur le joint torique ou la surface de contact de la lentille. Enlevez la poussière ou toute matière étrangère présente sur les surfaces d’étanchéité du joint torique. Il est important que les filetages, la rainure du joint torique et l’intérieur de la lentille soient lubrifiés avec de la graisse de silicone. Reportez-vous aux informations relatives à la garantie pour le remplacement du joint torique. Installation du chargeur La base du chargeur de la LED 7060 peut être installé de façon permanente dans la plupart des positions (excepté à l’envers) dans les véhicules. Deux trous de montage permettent la fixation à l’aide de vis #10. La prise à angle droit doit être branchée avant l’installation du chargeur (voir ci-dessus). Installation dans un véhicule Le chargeur de la LED 7060 peut être installé dans la plupart des véhicules de manière permanente. Cette installation doit être effectuée par un technicien auto professionnel. Le chargeurne doit pas être installé à l’envers étant donné que dans certains cas laLED 7060 peut être éjectée du chargeur. Lors de l’installation du char-geur, assurez-vous que le dispositif de câblage direct est branché à une ligne d’allumage à clé. Le débit en ampères élevé de ce char-geur risque de vider la batterie du véhicule s’il est branché directement sur la batterie. PIECES DE RECHANGE CAT. # DESCRIPTION 6057F TRANSFORMATEUR 110V POUR CHARGEUR 6061F DISPOSITIF DE CABLAGE DIRECT POUR CHARGEUR 7070 UNITE DE BASE DU CHARGEUR POUR BUREAU/TABLEAU DE BORD 8056F CORDON DE CHARGEMENT 12V POUR CHARGEUR 7069 BLOC BATTERIES LI-ION DE RECHANGE 7052 JN BATON LUMINEUX POUR LA CIRCULATION (Jaune) 7052 OR BATON LUMINEUX POUR LA CIRCULATION (Orange) Battery Safety Information WARNING: HANDLE AND STORE BATTERIES PROPERLY TO AVOID INJURY OR DAMAGE BATTERIES CAN BE DANGEROUS! Most battery issues arise from improper handling of batteries, and particularly from the use of damaged or counterfeit batteries. Please review the information below to avoid serious injury and/or damage to your property. Rechargeable Batteries 1. Hazardous location safety approvals for explosive environments are only valid for the Pelican battery pack that is supplied with the light. 2. For replacement battery packs only use the approved Pelican battery pack for the model of the light that you are using. The use of other battery packs will invalidate the safety approval. 3. Lights should only be charged in a non-hazardous location. 4. Lights should only be charged using the Pelican charger base that is supplied with the light. 5. Do not charge with alkaline batteries installed in the light. Attempting this can cause internal gas or heat generation resulting in venting, explosion or possibly fire. 6. Deep discharge of the rechargeable battery may cause batteries to vent potentially dangerous gasses and electrolytes. Always dispose of all batteries properly at an approved battery recycling center. Información sobre seguridad de las pilas AVISO: MANIPULAR Y GUARDAR LAS PILAS CON PRECAUCIÓN PARA EVITAR DAÑOS LAS PILAS PUEDEN SER PELIGROSAS. La mayoría de los problemas relacionados con las pilas surgen al utilizarlas incorrectamente y, sobre todo, al emplear pilas falsas o en mal estado. Consultar la información siguiente para evitar daños personales o en el producto. Pilas recargables 1. Los certificados de seguridad para zonas peligrosas en entornos explosivos solo se aplican al paquete de pilas Pelican que se suministra con la linterna. 2. P ara cambiar los paquetes de pilas utilizar únicamente las pilas Pelican homologadas para el modelo de linterna correspondiente. El uso de otros paquetes de pilas anulará el certificado de seguridad. 3. No cargar la linterna en zonas peligrosas. 4. Cargar la linterna únicamente en la base de cargador Pelican que se suministra con la linterna. 5. No cargar la linterna con las pilas alcalinas dentro; podría generarse gas o calor en el interior, que podría emanar y provocar una explosión o un incendio. 6. Si las pilas recargables se descargan demasiado rápido pueden originarse fugas de gases peligrosos y electrolitos. Desechar las pilas en un centro de reciclado homologado. Informations relatives à la sécurité des piles AVERTISSEMENT : MANIPULER ET RANGER CORRECTEMENT LES PILES, AFIN D’ÉVITER TOUT RISQUE DE LÉSION CORPORELLE OU DE DOMMAGE MATÉRIEL LES PILES PEUVENT ÊTRE DANGEREUSES ! La plupart des problèmes liés aux piles sont dus à une manipulation incorrecte, en particulier à l’utilisation de piles endommagées ou contrefaites. Lire attentivement les informations ci-dessous, afin d’éviter tout risque de lésion corporelle et/ou de dommage matériel de vos produits. Piles rechargeables 1. Les agréments de sécurité de sites dangereux pour les environnements explosifs sont valables uniquement pour le bloc-piles Pelican fourni avec le système d’éclairage. 2. Pour remplacer le bloc-piles, utiliser uniquement un bloc-piles Pelican homologué pour le modèle du système d’éclairage utilisé. L’utilisation d’autres piles risque d’invalider l’agrément de sécurité. 3. Le système d’éclairage doit être rechargé uniquement dans un site non dangereux. 4. Le système d’éclairage doit être rechargé uniquement à l’aide de la base-chargeur Pelican fournie avec le système d’éclairage. 5. Ne pas recharger lorsque des piles alcalines sont installées dans le système d’éclairage. Dans le cas contraire, cela pourrait entraîner une production interne de gaz ou de chaleur, provoquant un dégazage, une explosion ou éventuellement un incendie. 6. Un déchargement important des piles rechargeables peut provoquer un dégazage potentiellement dangereux et une fuite de l’électrolyte. Toujours mettre au rebut toutes les piles correctement dans un centre de recyclage des piles agréé. PELICAN LIMITED LIFETIME GUARANTEE OF EXCELLENCE Pelican Products, Inc. guarantees its lights for a lifetime against breakage or defects in workmanship. This guarantee does not cover the lamp or batteries. Pelican will either repair or replace any defective product, at our sole option. TO THE EXTENT PERMITTED BY LAW, THE REMEDIES HEREBY PROVIDED SHALL BE THE EXCLUSIVE AND SOLE REMEDY OF THE PURCHASER. TO THE EXTENT PERMITTED BY LAW: (A) THIS WAR-RANTY IS IN LIEU OF ALL WARRANTIES, EXPRESS OR IMPLIED, INCLUDING, BUT NOT LIMITED TO, THE IMPLIED WARRANTIES OF MERCHANTABILITY AND FITNESS FOR A PARTICULAR PURPOSE; AND (B) ALL OTHER IMPLIED WARRANTIES AND ANY LIABILITY NOT BASED UPON CONTRACT ARE HERBY DISCLAIMED AND EXCLUDED. TO THE EXTENT PERMITTED BY LAW, IN NO EVENT SHALL PELICAN BE LIABLE FOR ANY INDIRECT, PUNITIVE, INCIDENTAL OR CONSEQUENTIAL DAMAGES, OR SPECIAL DAMAGES, REGARDLESS OF WHETHER A CLAIM FOR SUCH DAMAGES IS BASED ON WARRANTY, CONTRACT, NEGLIGENCE OR OTHERWISE. To the extent permitted by law, in no event shall Pelican’s liability to the purchaser for damages hereunder exceed the purchase price of the product in respect of which damages are claimed. To make a warranty claim, the purchaser must contact Pelican Products, Inc. at 23215 Early Avenue, Torrance, CA 90505 or [email protected], or by calling 1-800-473-5422, extension 5. Any warranty claims shall be made by the purchaser as soon as practicable. The purchaser must obtain a return authorization number from Pelican Customer Service prior to returning any product, and is responsible for paying for all warranty freight costs. If Pelican determines that any returned product is not defective, within the terms of this warranty, the purchaser shall pay Pelican all costs of handling, return freight and repairs at Pelican’s prevailing rates. All warranty claims of any nature are barred if the flashlight has been altered, damaged or in any way physically changed, or subjected to abuse, misuse, negligence or accident. Some states and countries do not allow limitations on how long an implied warranty lasts or the exclusion or limitation of incidental or consequential damages, so the above limitation or exclusion may not apply to you. This warranty gives you specific legal rights, and you may have other rights which vary from state to state and country to country. In Australia: The benefits provided to you under this warranty are in addition to your rights and remedies as a consumer under the Competition and Consumer Act 2010 (Cth). Nothing in this warranty limits the rights or obligations of a party under provisions of the Competition and Consumer Act 2010 (Cth) in relation to the supply to consumers of goods which cannot be limited, modified or excluded. If applicable, our goods come with guarantees that cannot be excluded under the Australian Consumer Law. You are entitled to a replacement or refund for a major failure and compensation for any other reasonably foreseeable loss or damage. You are also entitled to have the goods repaired or replaced if the goods fail to be of acceptable quality and the failure does not amount to a major failure. If you are not a consumer under the Competition and Consumer Act 2010 (Cth), then your rights may be limited. To make a warranty claim, the purchaser must contact Pelican Products Australia, Suite 2.33, West Wing, Platinum Bldg., Erina NSW 2250, Tel: +612 4367 7022. Any warranty claims shall be made by the purchaser as soon as practicable. The purchaser must obtain a return authorization number from Pelican Customer Service prior to returning any product, and is responsible for paying for all warranty freight costs. If Pelican determines that any returned product is not defective, within the terms of this warranty, the purchaser shall pay Pelican all costs of handling, return freight and repairs at Pelican’s prevailing rates. In the event that Pelican determines that any returned product is defective, within the terms of this warranty, Pelican shall pay the purchaser all reasonable costs of the purchaser in making claim under this warranty. Lifetime Guarantee does not cover Roto Molded cases, AALG products or fabric portion of backpacks. Refer to www.pelican.com/warranty for full details.