1
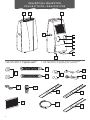
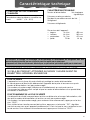
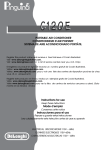
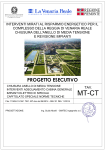
PAC T100P / T110P
PORTABLE AIR-CONDITIONER
CONDITIONNEUR D’AIR PORTATIF
SISTEMA DE AIRE ACONDICIONADO PORTÁTIL
CONDIZIONATORE D’ARIA
Register this product on-line and receive a free trial issue of Cook's Illustrated.
Visit www.prodregister.com/delonghi.
Visit www.delonghi.com for a list of service centers near you. (U.S. Only)
Enregistrez ce produit en ligne et recevez un numéro gratuit de Cook's Illustrated.
Visitez www.prodregister.com/delonghi.
Visitez www.delonghi.com pour y voir une liste des centres de réparation proches de chez vous.
(É.-U. uniquement)
Registre este producto en línea y reciba un ejemplar gratis de Cook's Illustrated.
Visite www.prodregister.com/delonghi.
Visite www.delonghi.com para ver la lista de centros de servicios cercanos a usted. (Solamente
en los Estados Unidos)
Registra questo prodotto "on-line" per ricevere una copia omaggio della rivista.
Visita www.prodregister.com/delonghi.
Visita www.delonghi.com per una lista dei centri di servizio a te piu vicini. (Solo negli Stati Uniti)
Instructions for use
Keep these instructions
Mode d'emploi
Conservez cette notice
Instrucciones para el uso
Repase y guarde estas instrucciones
Istruzioni per l’uso
Leggere e conservare queste istruzioni
ELECTRICAL SPECIFICATIONS 115V ~ 60Hz
DONNEES ELECTRIQUES 115V~60Hz
CARACTERISTICAS ELECTRICAS 115V ~ 60Hz
CARATTERISTICHE ELETTRICHE 115V~60Hz
DESCRIPTION • DESCRIPTION
D E S C R I P TC I Ó N • D E S C R I Z I O N E
2
7
1
4
5
6
9
8
10
3
• See description at page 3 for english
• Véase d e s c r i p c i ó n a l a pág 35 para español
•
•
Vo i r d é s c r i p t i o n à l a p a g e 1 9 p o u r l e Fra n ç a i s
Ve d i d e s c r i z i o n e a p a g i n a 5 1 p e r l ’ i t a l i a n o
12
14
11
13
19
15
22
16
BOO
ST
SWING
20
SPEED
17
18
21
23
2
IMPORTANT SAFEGUARDS
• Use this appliance only as described in this instruction manual.
As with any electrical appliance, the instructions aim to cover as many eventualities as possible.
Caution and common sense should be used when operating and installing this air conditioner.
• This appliance has been manufactured to cool and dehumidify domestic environments and
should not be used for other purposes.
• It is dangerous to alter or modify the unit's characteristics in any way.
• The appliance must be installed in line with the relevant national legislation.
• Should repairs be necessary, contact the nearest authorized De’Longhi Repair Service Center.
Unauthorized De’Longhi servicing can be dangerous.
• This appliance is to be used by adults only; keep away from children.
• In the case that the power cord becomes damaged, this must be substituted only by specialized personnel authorized by the manufacturer.
• Always ensure the appliance is grounded. If you have any doubts check with a qualified electrician.
• We strongly discourage the use of an extension cord due to potential safety hazards. For temporary situations, use only CSA certified and UL Listed 3-wire grounded extension cord, rated
15 A, 125 V.
• Before cleaning or maintenance operations, always unplug the unit from the outlet.
• Do not pull on or place strain on the power cord when moving the appliance.
• The appliance should not be installed where the atmosphere may contain combustible gases,
oil or sulphur, or near heat sources.
• Do not rest hot or heavy objects on the appliance.
• Clean the filters at least once a week.
• Avoid using heaters near the unit.
• The unit should be transported in a vertical position. If this is not possible secure the unit at an
angle, do not lie it horizontally.
• Before transporting the appliance, completely empty the internal circuit of water by pressing
the MODE and SPEED buttons simultaneously for a few seconds without removing the tank.
Then empty the tank.
• After transportation, wait at least 1 hour before switching the unit on.
• Use the appliance as described in this instruction manual only. As with all electrical equipment,
whilst the instructions aim to cover as many eventualities as possible. Caution and common
sense should be applied when operating and installing this appliance.
• At the end of its working life, consign the appliance to a specialist collection centre.
• The packaging materials can be recycled. You are therefore recommended to place them in
the special containers for differentiated waste collection.
SAVE THESE INSTRUCTIONS
DESCRIPTION
1 air outlet grille
2
3
4
5
6
7
8
9
10
11
control panel
castors
handles
air exhaust hose housing
condenser air intake grille
evaporator air intake grille with dust filter
condensate tank
continuous condensate drain connection
power cable
2 flange caps
12
13
14
15
16
17
18
19
20
21
22
23
air exhaust hose
2 window outlets
suckers (only on some models)
castor locks
remote control
single hole window bracket
double holes window bracket
air inlet hose
3M® electrostatic filter
continuous drain hose with coupling
suckers with velcro (only on some models)
Window bracket without holes (only on
some models)
3
What are the Pinguino
portable air conditioners?
D
uring the summer, you feel comfortable at a temperature of between 75 and 81°F (24 and
27°C) with a relative humidity of about 50%.
An air conditioning unit removes excess moisture and heat from the room where it is located.
Compared with installed models, portable air conditioning units have the advantage that they
can be moved from one room to another in the home or be transported from one building to
another.
Hot air from the room is passed through a
coil cooled by refrigerant gas.
Excess heat and moisture are
removed before the air
is re-emitted into the room.
In single unit models (as this model),
a small part of this air is used to
cool the refrigerant gas and
then, when hot and damp,
is discharged outside.
4
Installing your por table
air-conditioner
ELECTRICAL CONNECTIONS
Before plugging the appliance into the electrical socket, check that:
• the power supply corresponds to the value indicated on the rating plate on the back of the appliance;
• the socket and electrical circuit are adequate for the appliance;
• the socket matches the plug. If this is not the case, have the plug replaced;
• the socket is adequately grounded.
Failure to follow these important safety instructions absolves the manufacturer of all liability.
The power cord must be replaced by a qualified professional only.
The instructions below will enable you to prepare your air conditioning unit for operation as efficiently as possible.
Before use, make sure the air intake and outlet grilles are unobstructed.
NON PERMANENT INSTALLATION
Just a few simple steps and your comfort is
ensured with Pinguino:
• Fit the air exhaust hose (11) in the housing (5)
at the back of the appliance. Insert it as
shown in figure A.
In order to improve the performance of the
appliance in air conditioning and boost
(super-conditioning) modes, you can also fit
the intake hose accessory (19) in its housing in
the back of the appliance as shown in figure
A1. This step is optional.
1
A
bracket by using the pin then lower the window onto the bracket. Insert the window
outlet (13) of the exhaust hose (12) into the
slot, then connect the hose to the air conditioner (fig. B and B1).
Thanks to the locking pins, it’s possible to use
the window bracket also for sliding windows.
Position the hole of the bracket so to allow a
correct installation of the exhaust hose.
B
B1
2
A1
• Fit the window outlets (13) to the end of
the hose (12/19).
• Place the air conditioning unit near a window or French window.
• Make sure the air exhaust hose is unobstructed.
If you have a very large window, in order to
cover your window aperture, use the additional window bracket without holes (23)
extending it to the desired dimension, then
fix the bracket by using the pins provided
(see figure) When extracting the window
bracket and joining the two pieces pay
attention you do not cover the hole or holes
Keep air hoses as short and free of curves as possible to avoid constrictions.
3
Sash window
For optimum results:
• If you have a sash window, place the
bracket (17) or (18) according to your
needs, on the window sill, extend the
bracket fully within the window frame, fix the
2
1
5
Installing your por table
air-conditioner
4.17 inches (106 mm)
French window
Open the French window slightly and position
the outlet (13) .
Use the suction pads (14) or (22) (depending on
models) to hold the two parts of the window
together (fig. D and D1).
2
1
in the window
pane
F
in the wooden
kickboard of a
French window
in the wall: you are
recommended to
insulate the section of wall using
suitable insulation.
D
Keep the air hoses as short and free of
curves as possible to avoid constrictions.
• Fit the flange accessory (11) provided in
the hole
• Fit the hose (12/19) in the housing at the
back of the appliance (fig. A / A1 page 5).
• Fit the end of the hose (12/19) to the flange (11) as shown in fig. G.
G
D1
MAX 39.37 inches
MAX100 cm
SEMI-PERMANENT INSTALLATION
If required, the Pinguino can also be installed
semi-permanently (Fig. E and E1).
MIN 13.77 inches
MIN 35 cm
11.8
11,8 inches
30 cm
es
inch
cm
11.8
E
es
inch
cm
30
30
11,8 inches
30 cm
E1
Proceed as follows:
• Drill a hole in an outside wall or through a
window pane.
Respect the height and dimensions of the
hole given in figures F and G.
6
When the hose (12/19) is not fitted, the drilled
hole can be closed with the flange cap (11).
NOTE.
When installing the air conditioning unit semipermanently, you should leave a door slightly
open (as little as 1/2 inches (1 cm) ) to guarantee correct ventilation.
Control panel
THE CONTROL PANEL
V
T
U
P
S R Q
MN
O
L
I
H
G
A
F EDC
B
Z
DESCRIPTION OF THE CONTROL PANEL
A ON/Stand-by button
B MODE selection button
Air conditioning, dehumidifying, air purifying/fan, Smart.
C Air conditioning mode indicator light
D Dehumidifying mode indicator light
E Fan mode with air filtration indicator light
F “Sleep” function indicator light (can be selected from remote control only)
G Increase temperature/humidity/programmed operating time button
H Timer button
I Timer in operation indicator light
L Display visualising temperature/humidity values set and operating time
M Temperature indicator light
N Humidity indicator light
O BOOST button
P Reduce temperature/humidity/programmed operating time button
Q/R/S/T Fan speed and AUTO mode indicator lights
U Fan SPEED selection button
V Grille flaps SWING button
Z “Smart” function (indicator lights C/D/E)
Note: The SWING button (V) moves the grille flaps to distribute the cool air uniformly in the room.
When the button (V) is pressed once and the flaps have begun moving alternately forwards and
backwards, pressing the button again will lock the flaps in their current position.
Pressing the button again will restart the flaps moving forwards and backwards.
When the appliance is turned off, they will close irrespective of their position.
7
Operation
Depending on the model, the temperature in the display is shown in °C or in °F , however all the
drawings show anly °C.
TURNING THE APPLIANCE ON
Plug the appliance into the socket. Two lines appear on the
display indicating that the appliance is in standby. You can control the appliance with the remote control (see page 11) or with the
control panel.
OPERATION WITH CONTROL PANEL
Press the ON/STAND BY button (A). When turned on, the air conditioning unit starts operating in the same mode as when it was turned off.
Press the MODE (B) button until the indicator light corresponding
to the required mode lights up:
Indicator light (C):
air-conditioning mode
Indicator light (D):
dehumidifying mode
Indicator light (E) :
fan mode with air filtration
Indicator light (C-D-E) together: smart mode
After selection, the flaps open at a preset angle.
When the air conditioner is turned off, the flaps will close.
AIR-CONDITIONING MODE
Ideal for hot humid weather when you need to cool and dehumidify the room.
To set the operation of the appliance correctly, press the + (G) or
- (P) buttons until the desired temperature is displayed.
78
Then select the fan speed by pressing the SPEED button (U) until the
indicator light corresponding to the required fan speed lights up
MAX: the air conditioning unit operates at maximum to reach
the required temperature as rapidly as possible
MED: reduces noise levels but still maintains a good level of
comfort
MIN:
for silent operation
AUTO: the appliance automatically selects the most suitable
fan speed in relation to the temperature set on the digital display.
The most suitable temperature for the room during the summer
varies from 75° - 81° F (24 to 27°C).
You are recommended, however, not to set a temperature
excessively lower than the outside temperature.
DEHUMIDIFYING
Ideal for reducing humidity in spring and autumn, during rainy spells
or in damp rooms. Place the appliance in the room without fitting
the air exhaust hose (12) and the intake hose (19). After selecting
dehumidifying mode, the light (D) comes on. Press the “+“ or “-“ buttons until the required humidity level is displayed. At the same time,
the Auto fan light comes on as the appliance automatically selects
the most appropriate speed. Water is removed from the air and collected in the tank at the back of the air conditioner (8).
8
50
Operation
When full, the appliance shuts down and
(tank full) appears
on the display. The tank must be extracted and emptied (fig. H).
Once emptied, replace the tank: the appliance starts up again.
The accessory continuous drain hose (21) enables the condensate
produced to be eliminated without requiring the tank to be emptied periodically. Fit the hose with the rapid coupling (21) as shown
in fig. I.
NB: In order for the continuous drain function to operate correctly,
make sure the accessory is fully connected to the coupling. To
release, press the drain connection (9).
H
FAN MODE WITH AIR FILTRATION
Adjust fan speed by pressing the SPEED button (U) as described for
the air-conditioning mode.
Remember that the higher the speed, the more air is filtered. If you
select "Min" speed, less air is filtered but the appliance is also less
noisy. In this mode, Auto cannot be selected.
The fan speed selected will be displayed.
1 PUS
H
2
"3M Filtrete" air purifying filter
I
This is ideal for dusty rooms. In addition to removing dust, the 3M FiltreteTM electrostatic air purifying filter also captures the smallest
drain connection
impurities (down to 0.003 mm), such as cigarette smoke.
To use the air purifying filter:
A) Remove the intake grille (7).
B) Remove the filter (20) from the packaging.
C) Use the two plastic edges to attach the filter to the hooks on the dust filter inside the intake
grille.
D) Replace the grille on the appliance.
When removing the evaporator air intake grille (7), do not touch the evaporator’s metallic wings
because they are very sharp and they could be dangerous.
SMART MODE
In “SMART” mode the air conditioner unit decides the best way to operate, to guarantee maximum comfort.
Press the MODE button repeatedly until all three indicator lights, (C/D/E), on the control panel
come on. The word
appears on the display.
Note: in “SMART” mode, temperature is controlled automatically. However, if the required temperature has not yet been reached, it can be reduced or increased by a maximum of 4°F
(approx. 2°C) by pressing the
buttons on the remote control.
The appliance will automatically set the operating mode (air conditioning or fan/air purifying) and
optimum speed.
BOOST MODE
Press the
button (O) to set the “BOOST” mode.
In this mode, the appliance operates at maximum air conditioning power, rapidly cooling the
room. The
symbol is displayed and fan speed is at maximum.
AUTOMATIC SLEEP MODE
This mode can be activated by the remote control only.
For more information, see the paragraph "AUTOMATIC SLEEP FUNCTION" on the remote control
(page 14).
When this function is activated, the SLEEP indicator light (F) on the control panel comes on.
9
Operation
SETTING THE TIMER
The timer can be used to delay appliance start up or shut down. This avoids wasting electricity by
optimizing operating periods
How to program delayed start up
• Plug the appliance into a socket and press the ON/STAND BY (A) button, then select the required operating mode and other settings (temperature, fan speed, etc).
• Press the ON/STAND BY (A) button again to place the appliance in standby mode.
• Press the timer button (H). The two centre segments flash on the display.
• Use the “+” (G) o “-” (P) buttons to set the number of hours delay before the appliance comes
on. The setting is increased or decreased by an hour at a time; however, when the buttons are
held down for more than two seconds, the time runs rapidly up to a maximum of 24 hours. Wait
a few seconds for the data to be acquired.
• The indicator light (I) flashes until the appliance starts up.
• You can set the appliance to come on with a delay of up to 24 hours.
• To cancel the timer setting, press the timer button (H), and use the “-” button (P) to set the time
to “00”. The indicator light (I) will stop flashing.
How to program delayed shut down
• Delayed shut down can be programmed in any operating mode.
• Press the timer button (H). The two centre segments flash on the display.
• Use the “+” (G) o “-” (P) button to set the number of hours delay before the appliance goes
off.
The setting is increased or decreased by an hour at a time; however, when the buttons are
held down for more than two seconds, the time runs rapidly up to a maximum of 24 hours. Wait
a few seconds for the data to be acquired.
• The indicator light (I) flashes until the appliance shuts down.
• To cancel the timer setting, press the timer button (H), and use the “-” button (P) to set the time
to zero. The indicator light (I) will stop flashing.
10
The remote control
Depending on the model, the temperature in the display is shown in °C or in °F , however all the
drawings show anly °C.
THE REMOTE CONTROL
Inserting/replacing batteries (included)
• Remove the back cover (see figure).
• Insert two new batteries (not rechargeable) making sure the (+) and (-) are in the
correct positions.
• Replace the back cover.
NB: Alkaline batteries should be used (LR03
AAA type).
1
2
When replacing or disposing of the remote
control, the batteries must be removed and
disposed of according to the legislation in
force, being harmful to the environment.
Warning:
Do not mix old and new batteries. Do not mix
alkaline, standard (carbon-zinc) or rechargeable (nickel-cadmium) batteries.
Do not dispose of batteries in fire: batteries
may explode or leak.
If the remote control is not be used for a certain length of time, remove the batteries.
CORRECT USE
• Aim the remote control at the signal receiver on the air-conditioner.
• Maximum distance: around 23 ft. (7
metres) (without obstacles between the
remote control and the receiver).
• The remote control should be handled
with extreme care: without dropping it,
without exposing it to direct sunlight or
near sources of heat.
11
Description of the remote control
THE REMOTE CONTROL
A. MODE button
Selects the operating mode (air conditioning, dehumidification, air filtration, smart).
B. Buttons for SETTING THE ROOM TEMPERATURE
Set room temperature or program the
timer.
%RH
I
H
A
BOO
ST
B
G
C. SPEED button
Sets fan speed to automatic, high,
medium or low in sequence.
D. SWING button
Activates the motorized lowers.
B
F
SWING
SPEED
E. TIMER button
Sets or cancels the timer.
F. SLEEP button (
)
Sets or cancels the automatic SLEEP function.
THE DISPLAY
E
D
C
Signal transmission
Air-conditioning indicator
Dehumidifying indicator
Air filtration indicator
BOOST indicator
SMART indicator
SLEEP indicator
Automatic fan speed
High fan speed
Medium fan speed
Low fan speed
Used to set the temperature in SMART
mode (see page 14 for further information)
12
G. SMART button (
)
When this button is pressed, the appliance
automatically establishes the most suitable operating mode for maximum
comfort.
H. BOOST button (
)
Starts or stops rapid cooling. In the rapid
cooling mode, the fan operates at high
speed with the temperature automatically set to 64°F (18°C).
I.
ON/STAND BY button
Press this button to turn the appliance on
and in stand by.
NB: the settings are displayed even when
the air conditioner is in stand by.
Remote control functions
AIR-CONDITIONING MODE
• Press the
button to turn the appliance on.
• The
symbol flashes on the display and a beep indicates that
the air-conditioning unit is on.
• Press the MODE button a number of times until the air-conditioning symbol
appears on the display.
• Now set the temperature using the
buttons.
• To select fan speed, press the SPEED button repeatedly until the
required fan speed is selected (automatic, high, medium, low).
NB: in air-conditioning mode, the appliance automatically removes
excess moisture from the atmosphere.
F
75
DEHUMIDIFYING
• Activate this function when humidity is high.
• Press the
button to turn the appliance on. The
symbol flashes on the display and a beep indicates that the air conditioner
has started up.
• Press the MODE button a number of times until the dehumidifying
symbol
appears on the display.
• Set the required humidity level using the
buttons.
• In dehumidifying mode, fan speed is selected by the appliance
automatically.
• Place the appliance in the room without fitting the air exhaust hose.
60
%RH
FAN MODE WITH AIR FILTRATION
In humid but not particularly hot days, the fan function alone may
be adequate.
• Press the
button. The symbol flashes on the display and a
“beep” indicates that the air-conditioning unit is on.
• Press the MODE button a number of times until the fan symbol
appears on the display.
• Once purifying mode has been selected, press the SPEED button
until the required speed is reached (low, medium, high).
BOOST FUNCTION
“BOOST” function is used to obtain rapid cooling. The fan is set to
high speed and the temperature is automatically set to 64°F (18°C).
To select “BOOST” function, proceed as follows:
• Press the
button to turn the appliance on. The symbol
flashes on the display and a “beep” indicates that the air-conditioning unit is on.
• Press the BOOST button to set the function. The symbol
is
displayed.
• To go back to the previous mode, press the BOOST button again.
With the “BOOST” function activated, the display on the control
panel shows
.
SMART FUNCTION
In “SMART” function, the air-conditioning unit decides the best way
to operate to guarantee maximum comfort.
• Press the
button to turn the appliance on. The symbol
flashes on the display and a “beep” indicates that the air-conditioning unit is on.
• Press the SMART button. The appliance functions automatically
13
Remote control functions
and the
symbol appears on the display.
NB: in “SMART” function, the temperature is controlled automatically. However, if the required temperature has not yet been reached,
it can be reduced or increased by a maximum of 4°F (approx. 2°C)
by pressing the
buttons.
The appliance automatically establishes the operating mode (airconditioning, fan, heating) and the optimum fan speed.
With the “SMART” function activated the display on the control
panel shows
and the three indicator lights (C/D/E) will come on.
SLEEP FUNCTION
The automatic “SLEEP” function is ideal for the night-time as it enables operation of the air-conditioning unit in the air-conditioning
mode to be gradually reduced until it shuts down completely (after
eight hours).
To select “SLEEP” function, proceed as follows:
• Press the
button to turn the appliance on.
• The symbol
flashes on the display and a “beep” indicates
that the air-conditioning unit is on.
• Press the MODE button a number of times until the symbol
of
the function required appears on the display.
• Then select the required temperature by pressing the
buttons.
• Now press the SLEEP button to set the night function. The
symbol is displayed. With the “SLEEP” function activated, the fan
operates at low speed.
On the control panel the indicator light (F) comes on.
Press the SLEEP button again to go back to the previous mode.
79
The SLEEP function maintains the room temperature at the optimum level, avoiding
excessive increases or drops in the temperature, with silent operation.
The flow of air decreases, while the room temperature varies gradually according to the
comfort requirements: increases of approx. 2°F (approx.1°C) after 60 minutes and approx.
4°F (approx.2°C) after 2 hours (it switches off altogether after eight hours).
PROGRAMMING THE TIMER
The timer can be used to delay appliance start up or shut down.
This avoids wasting electricity by optimising operating periods.
Programming shut-down
• With the air-conditioning unit on, press the TIMER button. The time
is displayed and the “h” symbol flashes. Set the time when you
want the appliance to go off using the
buttons (from 30
minutes to 24 hours). During the first ten hours, you can select half
hour intervals. For times greater than ten hours, one hour intervals
can be selected.
• Press the TIMER button again to confirm the selection. A countdown of the time left is displayed.
• At the end of the set time the appliance switches off automatically.
• To cancel the set time, press the TIMER button again. You will
hear a “beep”.
Programming start-up
• With the air-conditioning unit off, press the TIMER button. The time
is displayed and the “h” symbol flashes. Set the time when you
want the appliance to come on using the
buttons (from 30
minutes to 24 hours). During the first ten hours, you can select half
hour intervals. For times greater than ten hours, one hour intervals
can be selected.
• Press the TIMER button again to confirm the selection.
• At the end of the set time the appliance switches on automatically.
• To cancel the set time, press the TIMER button again. You will
hear a “beep”.
14
18
F
Self diagnosis/Troubleshooting
SELF DIAGNOSIS
The appliance has a self diagnosis system to identify a number of malfunctions.
IF THE DISPLAY SHOWS …
pf
FI
…WHAT SHOULD YOU DO?
LOW TEMPERATURE
(frost prevention)
When
appears on the display, the ice prevention device has
been triggered.
The appliance starts up again automatically when the defrosting process is
completed.
PROBE FAILURE
(sensor damaged)
If this is displayed, contact your service centre.
FULL TANK
Empty the tank on the back of the appliance and replace it correctly.
The continuous drain hose is not connected correctly or is obstructed and
the air conditioner is draining into the tank.
FAILURE 1
If this is displayed, contact your service centre.
TROUBLESHOOTING
PROBLEM
CAUSE
REMEDY
The air conditioning
unit does not start
•
•
•
no electricity
it is not plugged into the socket
the safety device has tripped
•
•
•
restore electricity
plug into the socket
reset the safety plug ( see pag. 17)
The air conditioning
unit works for a
short time only
•
the air exhaust hose or the intake hose has a
constriction
the air exhaust hose or the intake hose is
blocked
•
•
position the exhaust hose or
the intake hose correctly
check there are no obstacles
obstructing air discharge or the
intake hose
there are tight bends in the air exhaust hose
or the intake hose
•
eliminate the tight bends
The air conditioning •
unit works, but does •
not cool the room
•
•
•
window open
there are heat sources in the room (lamp,
etc)
the exhaust hose is detached
air filters clogged
Inadequate size of the room (too large)
•
•
close the window
eliminate the heat source
•
•
connect the exhaust hose
clean or replace the filters
Particular odour in
the room
air filter clogged
•
clean or replace the filter
it is normal for the compressor to start after
three minutes
•
wait for three minutes
•
•
•
The air conditioning •
unit does not operate for about three
minutes after turning
it on.
/ P F/ /F I
appears on the
display
•
See "Self-diagnosis" section
15
Tips
To get the best from your air conditioning unit,
follow these recommendations:
• close the windows and doors in the room to
be air conditioned.
• Never use the appliance in very damp
rooms (laundries for example).
• Never use the appliance outdoors.
The only exception is when the appliance is
installed through a hole in the wall.
In this case, you are recommended to
leave a slight draught through a door or
window to guarantee correct ventilation.
close blinds or curtains
close doors and windows
• Protect the room from direct exposure to
the sun by partially closing curtains and/or
blinds to make the appliance much more
economical to run;
• Never rest objects of any kind on the air
conditioning unit;
• Never obstruct the air intakes (6 and 7) or
outlet (1) grilles;
• Make sure there are no heat sources in the
room.
do not
cover the
appliance
16
• Make sure the air conditioning unit is on a
level floor. If necessary, place the two
castor locks (15) under the front wheels
(3).
3M® ELECTROSTATIC FILTER
To use the 3M® electrostatic filter, remove it
from the packaging and attach it to the dust
filter by inserting the two plastic profiles on the
3M® filter onto the tabs on the dust filter (see
figure).
Reposition the assembled filters in the grill and
replace in the appliance.
When removing the evaporator air intake
grille (7), do not touch the evaporator’s
metallic wings because they are very sharp
and they could be dangerous.
Cleaning and Maintenance
Before cleaning or maintaining, turn the
appliance off by pressing the ON/STAND BY
button (A) or button (I) on the remote control
and always unplug the appliance from the
socket.
CLEANING THE CABINET
You should clean the appliance with a slightly
damp cloth then dry with a dry cloth.
For safety reasons, never wash the air conditioning unit with water.
Precautions
Never use petrol, alcohol or solvents to clean
the appliance.
Never spray insecticide liquids or similar.
CLEANING THE FILTERS
To keep your air conditioning unit working efficiently, you should clean the dust filter every
week of operation.
The filter is housed in the intake grille.
When removing the evaporator air intake
grille (7), do not touch the evaporator’s
metallic wings because they are very sharp
and they could be dangerous.
To clean the filters, proceed as follows
1. Remove the intake grille by rotating
outwards (Fig. L).
Use a vacuum cleaner to remove the dust
collected on the filter.
If the dust filter is very dirty, immerse in warm
water and rinse a number of times.
The water should never be hotter than 105 °F
(40°C).
After washing, leave the filter to dry.
To replace, put the filters back in the intake
grille then attach the intake grille to the
appliance.
Do not wash the 3M® ectrostatic filter when it
is worn-out: change it with a new filter.
START OF SEASON CHECKS
Make sure the power cord and plug are
undamaged and properly grounded.
Follow the installation instructions precisely.
END OF SEASON OPERATIONS
Place the appliance in stand-by.
To completely empty the internal circuit of
water, press the MODE and SPEED buttons
simultaneously for a few seconds without
removing the tank (8).
.
1 PU
SH
2
L
2. Remove the dust filter by detaching it from
the grille (Fig. M). Remove 3M® electrostatic filter if it is mounted.
3M® electrostatic
filter
dust filter
intake
grille
N
The water in the internal circuit will drain into
the tank (8) or through the continuous drain
hose (21) if connected (Fig. N)
Make sure the other end of the hose is near a
suitable drain.
When completely drained, disconnect the
continuous drain hose.
Clean the filters and dry thoroughly before
putting them back.
M
17
Technical specification
TECHNICAL SPECIFICATION
LIMIT CONDITIONS
Room temperature range of the air-conditioned space
64-95°F (18 - 35°C)
Power supply
voltage
Max. power input
during air conditioning
Refrigerant
Cooling capacity
Appliance dimensions:
• width
18.6 inc.
• height
36.8 inc.
• depth
16.1 inc.
• weight
75 Lbs
see rating plate
“
“
“
495
940
410
34
mm
mm
mm
kg
Transport, filling, cleaning, recovery and disposal of refrigerant should be performed by a
technical service centre appointed by the manufacturer only.
The appliance should be disposed of by a specialist centre appointed by the manufacturer only.
NEVER TURN THE APPLIANCE UPSIDE DOWN OR ON ITS SIDE.
IF THIS OCCURS, WAIT AT LEAST 1 HOURS BEFORE TURNING THE
APPLIANCE ON
SAFETY PLUG
The appliance is fitted with a safety plug to protect the power cable.
If power is cut off, unplug from the mains and make sure the power cable is undamaged.
If the cable is damaged, call the service center immediately.
If power cuts off frequently and the power cable is undamaged, contact a qualified electrician.
OPERATION OF THE SAFETY PLUG
If the safety device incorporated in the plug trips and cuts off the power supply, check
that the power cable and plug are not damaged.
If the power cable is undamaged, to restore operation press the "RESET" button.
To verify correct operation of the plug, press the "TEST" button periodically and make sure
the appliance disconnects. If this is not the case, contact the service center.
To restore operation, press the "RESET" button.
18
Limited Warranty
De’Longhi is the distributor of Kenwood home appliances.
This warranty applies to all home appliances with De’Longhi or Kenwood brand names.
FOR CONTIGUOUS UNITED STATES ONLY
Limited Warranty
We warrant each De’Longhi AIR CONDITIONER to be free from defects in material and workmanship. From the purchase date, our obligation under this warranty is to provide one (1) year free
parts and labor on the entire AIR CONDITIONER, with an additional four (4) years free on any part
of the sealed system consisting of the compressor, evaporator, condenser and factory connected
refrigerant tubing. Labor and all other parts during the additional four (4) year warranty are to be
paid by the owner. All AIR CONDITIONERS in need of repair are to be shipped to an authorized
De’Longhi service center at the owner’s expense, and De’Longhi will then incur the return shipping costs. After the first five (5) years of ownership, all expenses (all parts, labor and shipping) are
to be paid by the owner of the unit. This warranty shall apply only if the AIR CONDITIONER is used
in accordance with the factory directions that accompany it, and on an Alternating Current (AC)
circuit. This warranty is in lieu of all other warranties and representations, expressed or implied, and
all other obligations or liabilities on our part. We do not authorize any other person or company
to assume for us any liability in connection with the sale or use of our AIR CONDITIONER. This warranty shall not apply to any AIR CONDITIONER that has been repaired or altered outside our factory nor shall it apply to any AIR CONDITIONER that has been subjected to misuse, negligence or
accidents.
If repairs become necessary, see contact information below:
U.S. Residents:
Please contact our toll free hotline at 1-800-322-3848 or log onto our website at
www.delonghi.com.
For all accessories, spare parts or replacement parts, please contact our parts division at 1-800865-6330.
CANADA Residents:
Please contact our toll free hotline at 1-888-335-6644 or log onto our website at
www.delonghi.com.
Other countries:
Please visit: www.delonghi.com.
19
MESURES DE
PROTECTION IMPORTANTES
• Utilisez cet appareil en suivant exclusivement ce manuel d’instructions.
Comme pour tous les appareils électriques, ces instructions visent à traiter autant de situations
que possible.
Vous devez faire preuve de bon sens et de prudence lors de l’utilisation et de l’installation de
ce conditionneur d’air.
• Cet appareil a été conçu pour refroidir et déshumidifier les locaux domestiques et n’est pas
destiné à un tout autre usage.
• Il est dangereux d’altérer ou de modifier d’une façon quelconque les caractéristiques de cet appareil.
• L’appareil doit être installé selon les normes en vigueur dans le pays de destination.
• Pour d’éventuelles réparations, contactez le Centre de service après vente De’Longhi agréé le plus
près de chez vous. Les réparations effectuées par un personnel non-agréé peuvent être risquées.
• Cet appareil doit être utilisé par des adultes exclusivement; gardez hors de la portée des enfants.
• Si le cordon d’alimentation est endommagé, il doit être remplacé par un personnel spécialisé
autorisé par le fabricant exclusivement.
• L’appareil doit toujours être relié à une mise à la terre. Si vous avez des doutes, vérifiez avec
un électricien qualifié.
• Évitez d’utiliser des rallonges pour le cordon d’alimentation pour des raisons de sécurité. En cas
de besoin, utilisez exclusivement des rallonges à trois fils à 15 A et 125 V, avec mise à la terre,
reconnues UL et certifiées CSA.
• Avant le nettoyage ou l’entretien, débranchez l’appareil.
• Ne tirez pas sur le cordon pour déplacer l’appareil.
• N'installez pas l'appareil dans des locaux où l'air peut contenir du gaz, de l'huile ou du soufre,
ni à proximité de sources de chaleur.
• Ne placez pas d’objets chauds ou lourds sur l’appareil.
• Nettoyez les filtres au moins une fois par semaine.
• Évitez d’utilisez des appareils de chauffage à proximité de l’appareil.
• L’appareil doit être transporté en position verticale ou à la limite en angle, mais ne le transportez jamais à l'horizontal.
• Avant de transporter l’appareil, videz complètement l’eau du circuit interne en appuyant sur les
touches MODE et SPEED en même temps pendant quelques secondes sans retirer le réservoir.
• Après le transport, attendez au moins 1 heure avant de remettre l’appareil en marche.
• Utilisez cet appareil en suivant exclusivement ce manuel d’instructions. Comme pour tous les
appareils électriques, ces instructions visent à traiter autant de situations que possible. Vous
devez faire preuve de bon sens et de prudence lors de l’utilisation et de l’installation de ce
conditionneur d’air.
• Au terme de la durée de fonctionnement, recyclez l’appareil dans un centre de recyclage
spécialisé.
• Les matériaux d’emballage sont recyclables. Il est donc recommandé de les déposer dans les
contenants prévus à cet effet.
CONSERVEZ LES PRESENTES INSTRUCTIONS
PRODUIT À USAGE DOMESTIQUE UNIQUEMENT
DESCRIPTION
1 air outlet grille
2
3
4
5
6
7
8
9
10
11
20
panneaux de commande
roulettes
poignées
logement du tuyau d’évacuation d’air
grille d’aspiration du condenseur à air
grille d’aspiration de l’évaporateur à air
avec filtre à poussière
réservoir de condensas
raccord du tuyau d’écoulement continu
cordon d’alimentation
2 bouchons de la bride
12 tuyau d’évacuation d'air
13 2 embouts de fenêtre
14 ventouses (seulement sur certains modèles)
15 cale-roulettes
16 télécommande
17 traverse avec 1 fente
18 traverse avec 2 fentes
19 tuyau d’admission d’air
20 filtre électrostatique 3M®
21 tuyau d'écoulement continu avec raccord
22 ventouse avec Velcro (seulement sur cer
tains modèles)
23 traverse sans fente (seulement sur certains
modèles)
Les conditionneurs d’air Pinguino
P
endant les mois d’été, les conditions de confort sont atteintes avec une température comprise entre 75 et 81°F (24°C et 27°C) et avec une humidité relative
d’environ 50%.
Un appareil de conditionnement de l’air élimine l’humidité et la chaleur de la pièce dans laquelle il est
placé.
Comparés aux modèles à installation fixe, les
conditionneurs d’air portables présentent
l’avantage de pouvoir être déplacés non
seulement d’une pièce à l’autre dans
la maison, mais aussi d’un édifice à
l’autre.
L’air chaud de votre pièce passe,
sous l’effet du gaz réfrigérant, à
travers une batterie de refroidissement
où il cède la chaleur et l’humidité en excès avant d’être réintroduit dans la
pièce.
Dans les modèles monobloc (comme ce modèle), une petite partie de
cet air est utilisée pour
refroidir le gaz réfrigérant ; ensuite, une fois
chaude et humide, elle
est évacuée vers l’extérieur.
21
Installation du conditionneur
d’air por tatif
BRANCHEMENTS ÉLECTRIQUES
Avant de brancher la fiche dans la prise électrique, vérifiez que:
• la tension correspond à celle indiquée sur la plaque signalétique au dos de l’appareil ;
• la prise et le circuit électrique peuvent supporter la charge requise;
• la prise correspond à la fiche de l’appareil. Sinon faites-la remplacer.
• la prise est convenablement mise à la terre.
Le fabricant décline toute responsabilité en cas de non-respect de ces instructions de sécurité importantes.
Le cordon d’alimentation doit être remplacé par un professionnel qualifié seulement
Vous trouverez ici-bas les instructions nécessaires à la préparation du fonctionnement de votre
conditionneur d’air.
Avant d’utiliser l’appareil, assurez-vous que les grilles d’admission et de sortie d’air ne sont pas
obstruées.
rieur du cadre de la fenêtre, attachez la traINSTALLATION TEMPORAIRE
verse en utilisant la goupille, puis abaissez la
Seulement quelques étapes simples et Pinguifenêtre sur la traverse. Insérez l’embout de
no assure votre confort :
fenêtre (13) du tuyau d'évacuation (12) dans
• Réglez le tuyau d’évacuation d’air (11) dans le
la fente et raccordez ensuite le tuyau au
logement correspondant (5) à l’arrière de
conditionneur d’air (fig. B and B1).
l’appareil. Insérez-le tel qu’illustré à la figure A.
Afin d’améliorer le rendement de l’appareil
Grâce aux goupilles de verrouillage, il est
dans les modes conditionnement et boost
aussi possible d’utiliser l’embout de la fenêtre
(super conditionnement), vous pouvez égalepour glisser les fenêtres. Positionnez le trou de
ment insérer le tuyau d’admission d’air (19)
la traverse afin de permettre une installation
dans son logement à l’arrière de l’appareil tel
adéquate du tuyau d’évacuation.
qu’illustré à la figure A1.
Cette étape est optionnelle.
B
B1
1
A
2
A1
• Réglez les embouts de fenêtre (13) à l’extrémité des tuyaux (12/19).
• Placez le conditionneur d’air près d’une
fenêtre ou d’une porte-fenêtre.
• Assurez-vous que le tuyau d’évacuation
d’air n’est pas obstrué.
Si vous possédez des fenêtres de grandes dimensions, utilisez la traverse sans fente (23) (si fournie)
pour couvrir l’ouverture de votre fenêtre en la
déployant à la grandeur désirée, puis bloquez-la
avec les goupilles (voir la figure ci-dessous). Faites
attention de ne pas couvrir le trou ou les trous de
la bouche de la fenêtre.
Gardez les tuyaux d’air aussi courts et droits
que possible pour éviter les étranglements.
3
Fenêtre à guillotine
Pour de meilleurs résultats :
• Si vous possédez une fenêtre à guillotine, placez la traverse (17) ou (18) conformément
à vos besoins, sur l’appui de la fenêtre,
déployez complètement la traverse à l'inté22
2
1
Installation du conditionneur
d’air por tatif
4.17 inches (106 mm)
Fenêtre à deux volets
Ouvrez légèrement la fenêtre et positionnez
l’embout (13). Utilisez les ventouses (14) ou
(22) (selon les
modèles) pour maintenir les deux parties de
la fenêtre ensemble (fig. D et D1).
2
1
dans la vitre
F
D
dans le mur :
Nous conseillons
d’isoler la partie
murale en utilisant les matériaux d’isolation
adéquats.
dans le socle en
bois de la portefenêtre
Gardez les tuyaux d’air aussi courts et
droits que possible pour éviter les étranglements.
• Réglez la bride (11) fournie dans le trou
• Réglez le tuyau (12/19) dans le logement
correspondant à l’arrière de l’appareil
(fig. A / A1 page 22).
• Réglez l’extrémité du tuyau (12/19) à la
bride (11) tel qu’illustré à la fig. G.
D1
G
MAX 39.37 inches
MAX100 cm
INSTALLATION SEMI-PERMANENTE
Si vous le désirez, Pinguino peut également
être installé de manière semi permanente
(Fig. E et E1).
MIN 13.77 inches
MIN 35 cm
11.8
11,8 inches
30 cm
es
inch
cm
11.8
E
es
inch
cm
30
30
11,8 inches
30 cm
E1
Procédez comme suit:
• Percez un trou dans un mur extérieur ou à
travers la vitre.
Respectez la hauteur et les dimensions du
trou données aux figures F et G.
Quand le tuyau (12/19) n’est pas en place, le
trou percé peut être fermé avec le bouchon
de la bride (11).
REMARQUE
Pendant l’installation du conditionneur d'air
de manière semi permanente, vous devez
laisser une porte légèrement ouverte (aussi
peu que 1/2 pouce (1 cm)) pour assurer une
bonne ventilation.
23
Panneau de commande
PANNEAU DE COMMANDE
V
T
U
P
S R Q
MN
O
L
I
H
G
A
F EDC
B
Z
DESCRIPTION DU PANNEAU DE COMMANDE
A Touche ON/OFF et Stand-By (veille)
B Touche de sélection du MODE
Conditionnement d’air, déshumidification, filtration/ventilation, Smart.
C Témoin du mode conditionnement d’air
D Témoin du mode déshumidification
E Témoin du mode ventilation avec filtration
F Témoin de la fonction " Sleep " (peut être sélectionnée à partir de la télécommande seulement)
G Touche d'augmentation de la température/de l’humidité/du temps de fonctionnement programmé
H Touche Timer (minuterie)
I Témoin de la minuterie en fonction
L Écran pour l’affichage de la température/humidité réglée et temps de fonctionnement
M Témoin de la température
N Témoin de l’humidité
O Touche BOOST
P Touche de réduction de la température/de l’humidité/du temps de fonctionnement programmé
Q/R/S/T Témoins de la vitesse du ventilateur et du mode AUTO
U Touche de sélection de la vitesse du ventilateur (SPEED)
V Touche SWING des volets de la grille
Z Fonction " Smart " (témoins C/D/E)
REMARQUE : La touche SWING (V) déplace les volets de la grille pour distribuer l’air frais uniformément dans la pièce.
Quand la touche (V) est enfoncée une fois et que les volets commencent à bouger alternativement d’en avant en arrière, appuyer de nouveau sur la touche verrouillera les volets dans leur
position actuelle.
Appuyer sur la touche une autre fois redémarre les mouvements des volets.
Quand l’appareil est éteint, ils se ferment peu importe leur position.
24
Fonctionnement
Selon le modèle, la température à l'écran s’affiche en °C ou en °F. Cependant, toutes les représentations graphiques dans le manuel sont en °F.
METTRE L’APPAREIL EN MARCHE
Branchez l’appareil dans la prise. Deux lignes s’affichent à l’écran indiquant que l’appareil est en veille. Vous pouvez contrôler l’appareil avec la télécommande (voir la page ??) ou avec
le panneau de commande
FONCTIONNEMENT DEPUIS LE PANNEAU DE COMMANDE
Appuyez sur la touche ON/STAND BY (A). Une fois en marche, le conditionneur d’air commence à fonctionner au mode dans lequel il a
été éteint. Appuyez sur la touche MODE (B) jusqu’à ce que le témoin
correspondant au mode désiré s’allume :
Témoin (C):
Mode conditionnement d’air
Témoin (D):
Mode déshumidification
Témoin (E) :
Mode ventilation avec filtration
Témoins (C-D-E) ensemble: mode Smart
Après la sélection, les volets s’ouvrent à un angle préréglé.
Quand le conditionneur d’air est éteint, les volets ferment.
MODE CONDITIONNEMENT D’AIR
Idéal pour la température chaude et humide quand vous désirez
rafraîchir et déshumidifier la pièce.
Pour régler l’appareil en fonction, appuyez sur les touches + (G)
or - (P)jusqu'à ce que la température désirée s’affiche.
78
Puis, sélectionnez la vitesse du ventilateur en appuyant sur la touche SPEED (U) jusqu’à ce que le témoin correspondant à la vitesse désirée s’allume.
MAX: Le conditionneur d’air fonctionne au maximum pour
atteindre la température aussi rapidement que possible.
MED:
réduit le niveau du bruit, mais maintient un niveau de
confort agréable
MIN:
pour un fonctionnement silencieux
AUTO: l’appareil choisit automatiquement la vitesse du ventilateur
la plus adéquate selon la température réglée à l’écran.
La température convenable pour une pièce pendant l'été varie
entre 75° - 81° F (24 à 27°C).
Nous conseillons toutefois de ne pas régler la température excessivement basse comparée à la température extérieure.
MODE DÉSHUMIDIFICATION
Idéal pour réduire l'humidité au printemps et en automne, pendant
les jours de pluie ou dans les pièces humides. Placez l’appareil dans
la pièce sans régler le tuyau d’évacuation d’air (12) et le tuyau d’admission (19). Le témoin (D) s’allume quand le mode déshumidification
est sélectionné. Appuyez sur les touches “+“ ou“-“ jusqu’à ce que le
niveau d’humidité désiré s’affiche. En même temps, le témoin du
ventilateur Auto AUTO s’allume alors que l’appareil choisit automatiquement la vitesse appropriée. L’eau est prélevée de l’air et accumulée dans le réservoir à l’arrière du conditionneur d’air (8).
50
25
Fonctionnement
L’appareil s’éteint et
(tank full) s’affiche à l’écran quand vous
devez vider le réservoir. TRetirez alors le réservoir et videz-le (fig. H).
Once emptied, replace the tank: the appliance starts up again.
Replacez-le une fois vidé: l’appareil se remet en marche. Le tuyau
d'écoulement continu (21) permet au condensas produit d'être éliminé sans réservoir à vider régulièrement. Réglez le tuyau avec la
prise rapide (21) tel qu’illustré à la fig. I.
NB: Afin que la fonction d’écoulement continu fonctionne correctement, assurez-vous que l’accessoire est complètement raccordé
à la prise. Pour le libérer, appuyez sur le raccord d'écoulement (9).
H
MODE VENTILATION AVEC FILTRATION
Réglez la vitesse du ventilateur en appuyant sur la touche SPEED
(U) tel que décrit au mode conditionnement d’air.
N’oubliez pas que plus la vitesse est grande, plus la quantité d'air
filtré est grande. Si vous sélectionnez la vitesse "Min" moins d’air est
filtré, mais l’appareil est également moins bruyant. Dans ce mode,
Auto ne peut pas être sélectionné.
La vitesse du ventilateur sélectionnée s’affiche.
1 PUS
H
2
I
Filtre de purification d’air " 3M Filtrete "
Idéal pour les pièces poussiéreuses. De plus, pour éliminer la poussière, le filtre de purification d’air électrostatique 3M Filtrete MC raccord d’écoulement
capte aussi les plus petites impuretés (aussi petites que 0,003 mm)
telles que la fumée de cigarette.
Pour utiliser le filtre de purification d’air :
A) Déposez la grille d’aspiration (7).
B) Retirez le filtre (20) de l’emballage.
C) Utilisez les deux extrémités de plastique pour attacher le filtre aux crochets sur le filtre à poussière à l’intérieur de la grille d’aspiration.
D) Replace the grille on the appliance.
Lors du retrait de la grille d’aspiration de l’évaporateur d’air (7), ne touchez pas aux ailes métalliques de l’évaporateur parce qu'elles sont très pointues et pourraient être dangereuses.
MODE SMART
Au mode “SMART” le conditionneur d’air choisit le meilleur fonctionnement afin d’assurer le maximum de confort.
Appuyez sur la touche MODE plusieurs fois jusqu’à ce que les trois témoins (C/D/E), sur le panneau de commande s'allument. Le mot
s’affiche à l’écran.
Remarque: au mode “SMART” la température est contrôlée automatiquement. Cependant, si la
température désirée n’est pas atteinte, elle peut être réduite ou augmentée d’un maximum de
4°F (environ 2°C) en appuyant sur les touches
sur la télécommande.
L’appareil règle automatiquement le mode de fonctionnement (conditionnement de l’air ou
ventilation/purification de l’air) et la vitesse optimale.
MODE BOOST
Appuyez sur la touche
(O) pour régler le mode “BOOST”.
Au mode Boost, l'appareil fonctionne à une puissance maximum de conditionnement d'air pour
rafraîchir la pièce rapidement. Le symbole
s'affiche et la vitesse du ventilateur est au maximum.
MODE SLEEP AUTOMATIQUE
Ce mode peut être activé à l’aide de la télécommande seulement. Pour en savoir plus, consultez le paragraphe "FONCTION SLEEP" de la télécommande (page 31).
Quand cette fonction est activée, le témoin SLEEP (F) sur le panneau de commande s’allume.
26
Fonctionnement
PROGRAMMATION DE LA MINUTERIE
La minuterie peut être utilisée pour différer la mise en marche ou l'arrêt de l'appareil. Ceci permet
d’optimiser les périodes de fonctionnement en économisant l’électricité.
Comment programmer le démarrage différé
• Branchez l’appareil dans la prise et appuyez sur la touche ON/STAND BY (A) sélectionnez ensuite le
mode de fonctionnement désiré et les réglages suivants (température, vitesse du ventilateur, etc.).
• Appuyez sus la touche ON/STAND BY (A) une autre fois pour mettre l’appareil au mode
standby (veille).
• Appuyez sur la touche Timer (H). Les deux segments du centre clignotent à l'écran.
• Utilisez les touches “+” (G) ou “-” (P) ) pour régler le nombre d'heures à passer avant que l'appareil se mette en marche. Le réglage est augmenté ou réduit d'une heure à la fois; toutefois,
quand les touches sont enfoncées pendant plus de deux secondes, le temps défile rapidement jusqu'à un maximum de 24 heures. Patientez pendant quelques secondes afin que les
données soient enregistrées.
• Le témoin (I) clignote jusqu'à ce que l'appareil se mette en marche.
• Vous pouvez régler l’appareil jusqu'à un maximum de 24 heures en différé.
• Pour annuler le réglage de la minuterie, appuyez sur la touche Timer (H), et utilisez la touche
“-” (P) pour régler l'heure à “00”. Le témoin (I) arrête de clignoter.
Comment programmer l’arrêt différé
• L’arrêt différé peut être programmé dans n’importe quel mode.
• Appuyez sur la touche Timer (H). Les deux segments du centre clignotent à l'écran.
• Utilisez les touches “+” (G) ou “-” (P) pour régler le nombre d'heures à passer avant que l'appareil s’éteigne.
Le réglage est augmenté ou réduit d'une heure à la fois; toutefois, quand les touches sont
enfoncées pendant plus de deux secondes, le temps défile rapidement jusqu'à un maximum
de 24 heures. Patientez pendant quelques secondes afin que les données soient enregistrées.
• Le témoin (I) clignote jusqu'à ce que l'appareil s’éteigne
• Pour annuler le réglage de la minuterie, appuyez sur la touche (H), et utilisez la touche “-” (P)
pour remettre l'heure à zéro. Le témoin (I) arrête de clignoter.
27
La télécommande
Selon le modèle, la température à l'écran s’affiche en °C ou en °F. Cependant, toutes les représentations graphiques dans le manuel sont en °F.
LA TÉLÉCOMMANDE
Insertion/remplacement des piles (fournies)
• Retirez le couvercle arrière (voir figure).
• Insérez deux nouvelles piles (non rechargeables) en vous assurant que le (+) et le
(-) sont dans la bonne position.
• Refermez le couvercle.
NB: Alkaline batteries should be used (LR03
AAA type).
Lors du remplacement ou de l’élimination
de la télécommande, les piles doivent être
retirées et éliminées conformément aux
lois en vigueur, étant donné qu’elles sont
nuisibles à l'environnement.
Avertissement:
Ne combinez pas des piles neuves avec des
piles usées. Ne combinez pas de piles alcalines, standards (carbone zinc) ou rechargeables (nickel cadmium).
Ne jetez pas de piles dans le feu : elles pourraient exploser ou s’écouler.
Si la télécommande n’est pas utilisée pendant une longue période, retirez les piles.
UTILISATION ADÉQUATE
• Dirigez la télécommande vers le récepteur
signaux du conditionneur d’air.
• Distance maximum: près de 23 pieds (7
metres) (without obstacles between the
remote control and the receiver).
• La télécommande doit être manipulée
avec soin : évitez de la laisser tomber, de
l'exposer à la lumière directe du soleil ou
de la laisser près des sources de chaleur.
28
1
2
Description de la télécommande
LA TÉLÉCOMMANDE
A. Touche MODE
Sélectionne le mode de fonctionnement
(conditionnement d’air, déshumidification, filtration de l’air, smart).
B. Touches pour le RÉGLAGE DE LA TEMPÉRATURE DE LA PIÈCE
Règle la vitesse du ventilateur à automatique, élevée, moyenne ou basse.
%RH
I
A
H
C. Touche SPEED
Règle la vitesse du ventilateur à automatique, élevée, moyenne ou basse
BOO
ST
B
G
B
F
SWING
E
SPEED
D
C
L’ÉCRAN
Signal de transmission
Témoin du conditionneur d’air
Témoin déshumidification
Témoin de filtration d’air
Témoin BOOST
Témoin SMART
D. Touche SWING
Active les volets motorisés.
E. Touche TIMER
Règle ou annule la minuterie.
F. Touche SLEEP (
)
Règle ou annule la fonction automatique
SLEEP.
G. Touche SMART (
)
Quand cette touche est enfoncée, l’appareil établit automatiquement le mode
de fonctionnement approprié pour le
maximum de confort.
H. Touche BOOST (
)
Démarre ou arrête le rafraîchissement. En
mode de rafraîchissement rapide, le ventilateur fonctionne à la vitesse élevée
avec la température automatiquement
réglée à 64°F (18°C).
Témoin SLEEP
Vitesse du ventilateur automatique
Vitesse du ventilateur élevée
Vitesse du ventilateur moyenne
Vitesse du ventilateur basse
I.
Touche ON/STAND BY
Appuyez sur cette touche pour mettre
l’appareil en marche ou en veille.
NB: Les réglages s'affichent même quand
le conditionneur d’air est en veille.
Utilisé pour régler la température en
mode SMART (voir page 30 pour en
savoir plus)
29
Fonctions de la télécommande
MODE CONDITIONNEMENT D’AIR
• Appuyez sur la touche
pour mettre l’appareil en marche.
• Le symbole
clignote sur l’écran et un bip signale que le conditionneur d'air est en marche.
• Appuyez sur la touche MODE un certain nombre de fois jusqu’à ce
que le symbole de conditionnement d’air
s’affiche à l’écran.
• Réglez ensuite la température en utilisant les touches
.
• Pour sélectionner la vitesse du ventilateur, appuyez sur la touche
SPEED à plusieurs reprises jusqu'à ce que la vitesse du ventilateur
désirée soit sélectionnée (automatique, élevée, moyenne, basse).
NB : au mode de conditionnement d’air, l’appareil prélève automatiquement l’excès d’humidité de l’atmosphère.
F
75
MODE DÉSHUMIDIFICATION
• Activez cette fonction quand le niveau d'humidité est élevé.
• Appuyez sur la touche
pour mettre l’appareil en marche. Le
symbole
clignote à l’écran et un bip signale que le conditionneur d'air est en marche.
• Appuyez sur la touche MODE à plusieurs reprises jusqu’à ce que
le symbole de déshumidification
s’affiche à l’écran.
• Réglez le niveau d’humidité désiré en utilisant les touches
.
• En mode déshumidification, la vitesse du ventilateur est automatiquement sélectionnée par l’appareil.
• Placez l’appareil dans la pièce sans régler le tuyau d’évacuation d’air.
MODE VENTILATION AVEC FILTRATION
Pendant les jours humides, mais pas particulièrement chauds, la
fonction du ventilateur peut être suffisante.
• Appuyez sur la touche
button. Le symbole
fclignote à l’écran et un bip signale que le conditionneur d'air est en marche.
• Appuyez sur la touche MODE à plusieurs reprises jusqu’à ce que
le symbole du ventilateur
s’affiche à l’écran.
• Une fois que le mode purification est sélectionné, appuyez sur la touche
SPEED jusqu’à ce que la vitesse soit atteinte (basse, moyenne, élevée).
FONCTION BOOST
La fonction " BOOST " est utilisée pour obtenir un rafraîchissement
rapide. Le ventilateur est réglé à la vitesse élevée et la température est automatiquement réglée à 64°F (18°C).
Pour sélectionner la fonction " BOOST ", procédez comme suit
• Appuyez sur la touche
pour mettre l’appareil en marche.
Le symbole
clignote à l’écran et un bip signale que le conditionneur d'air est en marche.
• Appuyez sur la touche BOOST pour régler la fonction. Le symbole
s’affiche.
• Pour revenir au mode précédent, appuyez sur la touche BOOST
une deuxième fois. Quand la fonction “BOOST”est activée, l’écran sur le panneau de commande affiche
.
FONCTION SMART
Au mode " Smart " le conditionneur d’air choisit le meilleur fonctionnement afin d’assurer le maximum de confort.
• Appuyez sur la touche
pour mettre l’appareil en marche. Le
symbole
clignote à l’écran et un bip signale que le conditionneur d'air est en marche.
• Appuyez sur la touche SMART. L'appareil fonctionne automatiquement et le symbole
s'affiche à l'écran.
NB : au mode " SMART ", la température est contrôlée automatiquement. Cependant, si la température désirée n’est pas atteinte,
elle peut être réduite ou augmentée d’un maximum de 4°F (environ
30
60
%RH
Remote control functions
2°C) en appuyant sur les touches
.
L’appareil règle automatiquement le mode de fonctionnement
(conditionnement de l’air, ventilation, chauffage) et la vitesse du
ventilateur optimale.
Lorsque la fonction " SMART " est activée,
s'affiche à l'écran du
panneau de commande et les trois témoins (C/D/E) s'allument.
FONCTION SLEEP
La fonction automatique " SLEEP " est idéale pour la nuit puisqu’elle
permet le fonctionnement du conditionneur d’air en mode de conditionnement d’air réduisant graduellement jusqu’à ce que l’appareil s’éteigne complètement (après huit heures).
Pour sélectionner la fonction " SLEEP ", procédez comme suit:
• Appuyez sur la touche
pour mettre l’appareil en marche.
• Le symbole l
clignote à l’écran et un bip signale que le conditionneur d'air est en marche.
• Appuyez sur la touche MODE à plusieurs reprises jusqu’à ce que
le symbole de la fonction désirée
s’affiche à l’écran.
• Sélectionnez ensuite la température désirée en appuyant sur les
touches
.
• Appuyez ensuite sur la touche SLEEP pour régler la fonction de
nuit. Le symbole
ss’affiche. Lorsque la fonction " SLEEP " est
activée, le ventilateur fonctionne à basse vitesse.
Le témoin (F) s'allume sur le panneau de commande. .
Appuyez sur la touche SLEEP une deuxième fois pour revenir au
mode précédent.
79
F
La fonction SLEEP maintient la température de la pièce au niveau optimal, en évitant
les augmentations ou les réductions de température excessives silencieusement.
Le débit d’air baisse alors que la température de la pièce varie graduellement
conformément aux exigences de confort : augmente d’environ 2°F (environ 1°C) après
60 minutes et d’environ 4°F (environ 2°C) après 2 heures (il s’éteint après huit heures).
PROGRAMMATION DE LA MINUTERIE
La minuterie peut être utilisée pour différer le démarrage ou l'arrêt
de l'appareil. Ceci permet d’optimiser les périodes de fonctionnement en économisant l’électricité.
Programmation de l’arrêt
• une fois l’appareil en marche. L’heure s'affiche et le symbole "h"
clignote. Réglez l’heure à laquelle vous désirez que l’appareil
s’éteigne en utilisant les touches
(de 30 minutes à 24 heures). Pendant les premières 10 heures, vous pouvez sélectionner
des intervalles de 30 minutes. Pour les heures plus avancées, des
intervalles d'une heure peuvent être sélectionnés.
• Appuyez sur la touche TIMER une autre fois pour confirmer la
sélection. Un décompte du temps restant s’affiche.
• Au terme de l’heure réglée l’appareil s’éteint automatiquement.
• Appuyez sur la touche TIMER une autre fois pour annuler l’heure
réglée. Un bip se fait entendre.
Programmation du démarrage
• Appuyez sur la touche TIMER button. une fois l’appareil en marche.
L’heure s'affiche et le symbole "h" clignote. Réglez l’heure à laquelle
vous désirez que l’appareil se mette en marche en utilisant les touches
(de 30 minutes à 24 heures). Pendant les premières 10 heures,
vous pouvez sélectionner des intervalles de 30 minutes. Pour les heures
plus avancées, des intervalles d'une heure peuvent être sélectionnés.
• Appuyez sur la touche TIMER une autre fois pour confirmer la
sélection.
• Au terme de l’heure réglée l’appareil se mets en marche automatiquement.
• Appuyez sur la touche TIMER une autre fois pour annuler l’heure
réglée. Un bip se fait entendre.
18
31
Autodiagnostic
AUTODIAGNOSTIC
L’appareil possède un système d’autodiagnostic pour identifier certaines défectuosités
SI L'ÉCRAN AFFICHE …
… QUE DEVEZ-VOUS FAIRE ?
LOW TEMPERATURE
(température basse)
(prévention du gel)
Quand
s’affiche à l’écran, le dispositif de prévention de glace est
déclenché.
L’appareil se remet en marche automatiquement quand le dégivrage est
terminé
PROBE FAILURE
(panne du capteur)
(capteur endommagé)
Si cela s'affiche, contactez votre centre de service après-vente
FULL TANK (réservoir
plein)
Videz le réservoir à l’arrière de l’appareil et replacez-le correctement.
Le tuyau d’écoulement continu n’est pas raccordé correctement ou est
obstrué et le conditionneur d’air s'écoule dans le réservoir.
FAILURE 1 (PANNE 1)
Si cela s'affiche, contactez votre centre de service.
pf
FI
DÉPANNAGE
PROBLÈME
CAUSE
SOLUTION
Le conditionneur
•
d’air ne se mets pas •
•
en marche
il n'y a pas d'électricité
il n’est pas branché dans la prise.
le dispositif de sûreté a chuté
Le conditionneur
d’air fonctionne
pendant un court
moment seulement
le tuyau d’évacuation d’air ou d’admission a •
un étranglement
le tuyau d’évacuation d’air ou d’admission
est bloqué
•
rétablissez l’électricité
branchez l’appareil dans la prise
réinitialisez la fiche de sûreté
•
il y a des plis serrés dans le tuyau d’évacuation d’air et d’admission d’air
•
positionnez le tuyau d’évacuation d’air ou d’admission correctement
vérifiez qu’il n’y a pas d’obstacle obstruant le tuyau d'évacuation ou d'admission
éliminez les plis serrés
Le conditionneur
d’air fonctionne,
mais ne rafraîchit
pas la pièce
•
•
il y a une fenêtre ouverte
il y a des sources de chaleur dans la pièce
(lampe, etc.).
le tuyau d'évacuation est détaché
les filtres à air sont obstrués
grandeur de la pièce incorrecte (trop grande)
•
•
fermez la fenêtre
éliminez la source de chaleur
•
•
branchez le tuyau d’évacuation
nettoyez ou remplacez les filtres
Odeur particulière
dans la pièce
•
les filtres à air sont obstrués
•
nettoyez ou remplacez le filtre
Le conditionneur
•
d’air ne fonctionne
pas avant 3 minutes
après l’avoir mis en
marche
il est normal que le compresseur se mette en
marche après 3 minutes
•
attendez pendant 3 minutes
•
/ P F/ /F I
s’affichent à l’écran
Consultez la section " Autodiagnostic "
32
•
•
•
•
•
•
•
•
Conseils
Pour optimiser le rendement de votre conditionneur, suivez les recommandations suivantes:
• Fermez les fenêtres et les portes dans la
pièce à conditionner.
• N’utilisez jamais l’appareil dans des pièces
très humides (buanderie par exemple).
• N’utilisez jamais l’appareil à l’extérieur.
La seule exception est quand l’appareil est
installé à travers un trou dans le mur.
Dans ce cas, vous devez laisser une mince
ouverture à travers une porte ou une fenêtre pour assurer une bonne ventilation. •
Fermez les rideaux ou les stores
Fermez les portes et les fenêtres
Évitez que la lumière directe du soleil
pénètre dans la pièce en fermant partiellement les rideaux et/ou les stores pour
que l’appareil fonctionne plus économiquement;
• Ne posez jamais d’objet quelconque sur le
conditionneur d'air;
• N’obstruez jamais les grilles d’aspiration
d’air (6 et 7) ou d’évacuation (1).
• Assurez-vous qu’il n’y a pas de sources de
chaleur dans la pièce.
• Assurez-vous que le conditionneur d’air est
sur un plancher plat. Placez deux caleroulettes (15) sous les roues avant (3) si
nécessaire.
FILTRE ÉLECTROSTATIQUE 3M®
Pour utiliser le filtre électrostatique 3M®, retirez-le de l’emballage et attachez-le au filtre
de poussière en insérant les deux profils en
plastique sur le filtre 3M® sur les onglets du filtre à poussière (voir figure).
Repositionnez les filtres assemblés sur la grille
et replacez-la dans l’appareil.
Lors du retrait de la grille d’aspiration de l’évaporateur d’air (7), ne touchez pas aux ailes
métalliques de l’évaporateur parce qu'elles
sont très pointues et pourraient être dangereuses.
Ne recouvrez
pas l’appreil
33
Nettoyage et entretien
Avant le nettoyage et l’entretien, éteignez
l’appareil en appuyant sur la touche
ON/STAND BY (A) ou la touche (I) de la télécommande et débranchez toujours l’appareil
de la prise.
NETTOYAGE DU CABINET
Nettoyez l’appareil avec un linge légèrement
humide puis séchez avec un linge sec.
Pour des raisons de sécurité, ne nettoyez
jamais le conditionneur d’air avec de l’eau.
Précautions
N’utilisez pas d’essence, d’alcool ou de solvants pour nettoyer l’appareil.
Ne vaporisez jamais d’insecticides ou de liquides semblables sur l’appareil.
CLEANING THE FILTERS
Pour que le conditionneur d’air fonctionne
efficacement, vous devez : nettoyer le filtre à
poussière chaque semaine d’utilisation.
Le filtre est abrité dans la grille d’aspiration.
Lors du retrait de la grille d’aspiration de l’évaporateur d’air (7), ne touchez pas aux ailes
métalliques de l’évaporateur parce qu'elles
sont très pointues et pourraient être dangereuses.
2. Retirez le filtre à poussière en le détachant
de la grille (Fig. M). Retirez le filtre électrostatique 3M® s’il est installé.
Si le filtre à poussière est très sale, immergez-le
dans l’eau chaude et rincez-le plusieurs fois.
If the dust filter is very dirty, immerse in warm
water and rinse a number of times.
L’eau ne doit pas être plus chaude que 105 °F
(40°C).
Après le nettoyage, laissez le filtre sécher.
Pour le remplacer, replacez les filtres sur la grille d'aspiration puis, attachez la grille d'aspiration à l'appareil.
Ne nettoyez pas le filtre électrostatique 3M®
quand il est usé : changez-le par un nouveau
filtre.
VÉRIFICATIONS EN DÉBUT DE SAISON
Assurez-vous que le cordon d'alimentation et
que la fiche ne sont pas endommagés et
qu’ils sont convenablement mis à la terre.
Suivez les instructions d’installation à la lettre.
OPÉRATIONS DE FIN DE SAISON
Réglez l’appareil en veille.
Pour vider complètement l’eau du circuit
interne, appuyez sur les touches MODE et
.
1 PU
SH
2
L
Pour nettoyer les filtres, procédez comme suit
1. Déposez la grille d’aspiration en la tournant
vers l’extérieur (Fig. L).
Filtre 3M® électrostatique
filtre à poussière
grille d’aspiration
M
34
N
SPEED en même temps pendant quelques
secondes sans retirer le réservoir (8).
The water in the internal circuit will drain into
the tank (8) or through the continuous drain
hose (21) if connected (Fig. N)
Make sure the other end of the hose is near a
suitable drain.
Une fois complètement vide, débranchez le
tuyau d'écoulement continu.
Nettoyez les filtres et séchez complètement
avant de les remettre en place.
Caractéristique technique
CONDITIONS DE FONCTIONNEMENT
CONSEILLÉES
Température dans la pièce en conditionnement
64-95°F (18 - 35°C)
CARACTÉRISTIQUE TECHNIQUE
Tension d’alimentation
Voir la plaque
signalétique
Puissance maximum admise
Pendant le conditionnement de l’air
Réfrigérant
Puissance réfrigérante
“
“
“
Dimensions de l’appareil :
• largeur
18.6 inc.
• hauteur
36.8 inc.
• profondeur
16.1 inc.
• poids
75 Lbs
mm
mm
mm
kg
495
940
410
34
Le transport, la charge, le nettoyage, la récupération et l’élimination du réfrigérant doit être
exclusivement effectué par un centre de service agréé par le fabricant.
L’appareil soit être exclusivement éliminé par un personnel spécialisé agréé par le fabricant.
NE TOURNEZ JAMAIS L’APPAREIL À L’ENVERS OU SUR LE CÔTÉ.
SI CELA SE PRODUIT, ATTENDEZ AU MOINS 1 HEURE AVANT DE
REMETTRE L’APPAREIL EN MARCHE
FICHE DE SÛRETÉ
L’appareil est muni d'une fiche de sûreté qui protège le cordon d'alimentation.
En cas de panne d’électricité, débranchez l’appareil de la prise et assurez-vous que le
cordon d’alimentation n’est pas endommagé.
Si le cordon est endommagé, téléphonez immédiatement au centre de service.
Si le courant est fréquemment coupé et que le cordon d’alimentation est en parfait état,
contactez un électricien.
FONCTIONNEMENT DE LA FICHE DE SÛRETÉ
Si le dispositif de sûreté incorporé dans la fiche se déclenche et coupe l’alimentation, vérifiez que le cordon d’alimentation et la fiche ne sont pas endommagés.
Si le cordon n’est pas endommagé, pour restaurer le fonctionnement, appuyez sur la touche " RESET ".
Pour vérifiez le bon fonctionnement de la fiche, appuyez sur la touche " TEST " régulièrement et assurez-vous que l’appareil se débranche. Si tel n’est pas le cas, contactez le centre de service. Pour restaurer le fonctionnement, appuyez sur la touche " RESET ".
35
Garantie limitée
De’Longhi est le distributeur de électroménagers de marque Kenwood. Cette garantie s’applique à tous les électroménagers portant les marques De’Longhi ou Kenwood.
RÉSERVÉ UNIQUEMENT AUX ÉTATS-UNIS CONTIGUS
Garantie limitée
Nous garantissons que chaque CLIMATISEUR de DeLonghi est exempt de défauts de matériau et
de fabrication. À compter de la date d’achat, notre obligation selon cette garantie est d’offrir
une (1) année de pièces de rechange et de main-d’œuvre gratuites sur le CLIMATISEUR entier,
avec quatre (4) années supplémentaires de pièces de rechange gratuites pour le système scellé
consistant en le compresseur, l’évaporateur, le condenseur et les tubes frigorifiques connectés à
l’usine. La main-d’œuvre et toutes les autres pièces pendant les quatre (4) années supplémentaires de garantie doivent être payées par le propriétaire. Tout CLIMATISEUR devant être réparés
doit être expédié à un centre de réparation autorisé de DeLonghi aux frais du propriétaire et
D_Longhi encourra alors les frais du transport de retour. Après les cinq (5) premières années de
possession, tous les frais (pour les pièces de rechange, la main-d’œuvre et le transport) devront
être payés par le propriétaire de l’appareil. Cette garantie ne s’appliquera que si le CLIMATISEUR
est utilisé conformément aux instructions de l’usine qui l’accompagnent et sur un circuit électrique à courant alternatif (c.a.). Cette garantie remplace toute autre garantie et représentation,
explicite ou implicite, et toute autre obligation ou responsabilité de notre part. Nous n’autorisons
aucune autre personne ou société à assumer, en notre nom, des obligations associées à la vente
ou l’utilisation de notre CLIMATISEUR. Cette garantie ne s’appliquera ni aux CLIMATISEURS qui ont
été réparés ou modifiés en dehors de notre usine ni aux CLIMATISEURS qui ont fait l’objet d’une
mauvaise utilisation, d’une négligence ou d’accidents.
Si des réparations sont nécessaires, consultez les coordonnées ci-dessous:
Résidents des É.-U. :
Veuillez appeler, sans frais, notre ligne téléphonique au 1-800-322-3848 ou visitez notre site Web à
www.delonghi.com.
Pour tous les accessoires, des pièces détachées ou des pièces de rechange, veuillez contacter
notre service des pièces détachées au 1-800-865-6330.
Résidents des CANADA. :
Veuillez appeler, sans frais, notre ligne téléphonique au 1-888-335-6644 ou visitez notre site Web à
www.delonghi.com.
Résidents en outres pays:
Visitez notre site Web à www.delonghi.com.
36