1
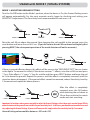
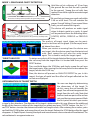
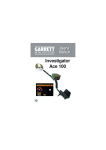
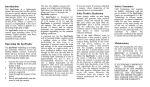
QUICK
USER GUIDE
www.makrodetector.com
USAGE with MODE 1 (VISUAL SYSTEM)
MODE 1: ADJUSTING GROUND SETTING
Turn the On/Off button to the Mode 1 position; when the device is On, the Ground Setting screen
will appear automatically. For the most accurate results, begin by checking and setting your
SENSITIVITY adjustment. The Sensitivity level recommended for new users is 8.
40 cm
3 cm
Reset
Raise the coil 40 cm above the ground. Now, keeping the coil parallel to the ground, press the
reset button and lower the coil to 3 cm. (If you fail to raise the coil 40 cm above and begin by first
pressing RESET, the subsequent operation of the metal detector will not be accurate.)
or
40 cm
Reset
3 cm
If there is ground effect on device, this effect will be seen on the “GROUND EFFECT” bars as shown
in the figure. To remove this effect, If the device receives “-” effects, raise the coil 40 cm and press
“-” key; if the effect is “+”, press “+” key for a while and then press RESET button and lower the coil
to 3 cm above the ground. Repeat this process until the effect is completely removed (until the
signal on device disappears). If the ground effect cannot be removed, reduce Sensitivity Level by
1 increment and repeat the above process.
3 cm
10 cm
After the effect is completely
removed, press the OK button
while lowering the coil down to
10 cm. Now switch to the search
mode and start searching.
Important: In locations where you are not able to adjust the Ground Settings, either there exists a metal target OR the
mineral structure in the ground is not suitable for your sensitivity level. In this case, you should move to another area and
retry adjusting the Ground Settings. If you are still unsuccessful, simply reduce the sensitivity level by 1 increment.
Ground Setting value would be between -201 and +201.
MODE 1: SEARCH AND CAVITY DETECTION
RIGHT
Hold the coil at a distance of 10 cm from
the ground. Be sure that the coil is parallel
to the ground. Sweep the coil with slow
motions from left to right for accurate target
detection.
Ensure that coil is always remained parallel to the ground during searches.
Be sure that you keep your search coil within
3-40 cm at all times. This will maintain the
proper Ground Setting. If you exceed these
limits, you will receive false signals.
WRONG
The device will produce an audio signal
when it detects metal or a cavity. A signal
will be produced from the following items:
CAVITIES, METAL, FERROUS or PRECIOUS
Failing to keep the coil in a position parallel to the ground may cause faulty results.
bars.
The analysis of target signal shape can be monitored in real time on the graph (Oscilloscope) located above these bars.
When you receive a warning from the device over
any target, take the device away from that point and
reset. Next sweep the coil over the same target
again. This is done to verify the target signal.
TARGET ANALYSIS
To obtain an analysis of the target detected during your search, take
the coil away from the target after it is located and then press the
RESET button.
Press and hold down the SCAN key and slowly sweep the coil over
the target again. After moving the coil away from the area above the
target, release the SCAN key.
Now, the device will present an ANALYSIS REPORT to you. In this
report, the type of metal and the effect of target reflected on the
surface are displayed.
DETERMINATION OF TARGET DEPTH
You can now begin by determining
the dimensions of the target. To
do this, move the coil towards the
target. You will want to approach the
target from the coil’s side. Note that
the front and rear parts of the coil are
not used during measurement. Mark
the first points at which you receive
a signal in four directions. The diameter of the target is determined in this way. Measure the width and
length of the frame or outline of the target that you obtain and press “DEPTH” button. Use the “+”, “-”
and “OK” buttons to enter the determined width and length values. After entering these values, press
and hold the SCAN button and sweep the coil over the target. Release the SCAN button after the signal
disappears. A Depth Report showing the depth and measurement values entered will be obtained. The
value obtained is an approximate one.
USAGE with MODE 2 (AUDIO SYSTEM)
This mode can be used only when the Mode 2 compatible search coils are attached.
Turn the On/Off button to the Mode 2 position. When the device is turned on, the opening sound
will play and after approximately 10 seconds, the device will be ready to use, accompanied by the
active audio alert.
MODE 2: GROUND SETTING
GROUND SETTING
GROUND SETTING
5 cm
Bring Ground Setting to position 1. Sweep the coil to the right and to the left at 5 cm above the
ground. If the device receives any interference, you will want to remove it. Simply increase the
Ground Setting level in small increments while sweeping the coil at the same time. At the point
where the sound is quiet you have achieved the optimal balance. Now, your Ground Setting is
complete.
If the Ground Setting is still not balanced at position 10, you will need to reduce the sensitivity
level incrementally and repeat the above steps. If you still receive intense effects from the ground
even when sensitivity is reduced, then the soil may be rich with the mineral iron. In this case, try
adjusting Ground Setting again after bringing Ferrous and Mineral Adjustment to Beach & Mineral
and the Ferrous Adjustment to 10.
NOTE: You may need to readjust Sensitivity and Ground Settings where effects from ground or
environment vary.
After the Ground Setting passes the red marked area, depth loss may occur for precious metals
other than gold. When the Ground Setting is at position 10, the device will not sense ferrous and
precious metals except gold. Therefore, if you are also searching for precious metals, you should
keep Ground Setting between the blue and the orange areas. If the Ground Setting cannot match
within these areas, you can enable it to match by simply reducing the sensitivity level. The recommended Ground Setting level is 4-6.
5 cm
Target
Target
MODE 2: SEARCH and METAL DETECTION
You must have the Ground Setting and Sensitivity adjustments set properly for an effective search. Be
sure to keep the search coil parallel to the ground and at a distance of 5 cm above the ground. Use a
slow and methodical search pattern and sweep the coil from left to right.
Mode 2 is a motion operating mode. With this in mind, the coil should be kept in motion to enable the
device to detect metals. If you keep the coil still over the target, it will not detect the metal.
The device will produce a sound alert when it detects metal. To confirm the target, sweep the coil over
the same target to check whether you receive the same signal. A good signal will be repeatable.