1
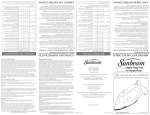
Features
oF
Your ClassiC iron
1. Spray Mist Release
CaraCtéristiques
7
6
1. Orifice d’atomisation
5
2. Covered Water Fill Hole
du Fer Classique
4
2. Orifice de remplissage à volet
3. Steam Dial
3. Variateur de vapeur
4. Spray Mist Button
4. Bouton d’atomisation
3
5. Shot of Steam® Button
5. Bouton de survapeur Shot of SteamMD
2
6. Power Indicator Light
6. Voyant d’alimentation
7. 360° Tangle-Free Swivel Cord
7. Cordon articulé 360°, non emmêlant
1
8. Fabric Select Dial
8. Cadran de sélection des textiles
9. Maximum Fill Line
9. Repère de remplissage maximal
10. Self Clean Button
10. Bouton d’autonettoyage
11. See-Through Water Reservoir
8
12. Soleplate
12
11
10
11. Réservoir translucide
12. Semelle
9
Visit www.sunbeam.ca for an Ironing Guide and Ironing Tips
Voyez le guide et les conseils de repassage au www.sunbeam.ca
to fIll
the
WateR ReseRvoIR (use tap water)
1. Make sure the iron is unplugged. Set the Steam Dial to (Dry) and the Fabric
Select Dial to MIN.
2. Lift the Water Fill Hole Cover.
3. Fill an easy-pour measuring cup with tap water and pour water into iron water
reservoir. Do not fill water reservoir beyond maximum fill level.
WARNING: To prevent the risk of burns, be careful when filling a hot iron with
water. Hot metal parts, hot water and steam can cause injuries.
dRy IRonIng
1. Make sure the Steam Dial is turned to the (Dry) setting.
2. Plug the cord into a 120-Volt AC outlet.
3. Turn the large Fabric Select Dial to the fabric setting you desire. Allow the iron
to heat for 2 minutes. While the iron is heating, make sure it is sitting on its
heel rest on a stable, protected surface.
damage the cord.
stoRIng youR IRon
1. Turn off iron following instructions above. Allow the iron to cool.
2. If you do not use your iron on a daily basis, empty the water reservoir after
each use for a longer iron life. To do so, unplug the iron, turn the iron upside
down, open the fill hole cover, and allow water to flow from the fill hole. Shake
the iron gently to remove trapped water drops.
3. Loosely loop the power cord around the heel rest and store the iron on its heel rest.
IMPORTANT: Wrapping the cord around the iron too tightly can damage
the cord.
maIntaInIng youR classIc IRon
cleanIng the soleplate: turn off iron following instructions above. Clean the
soleplate if starch or other residue accumulate.
to clean the soleplate: allow the iron to cool and then wipe it with a soft,