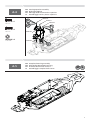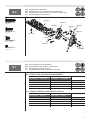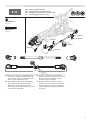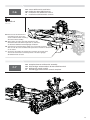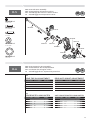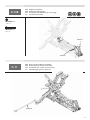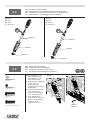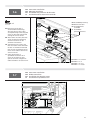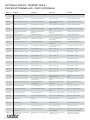
1
TM
NOTICE
All instructions, warranties and other collateral documents are subject to change at the sole discretion of Horizon Hobby, LLC.
For up-to-date product literature, visit http://www.horizonhobby.com and click on the support tab for this product.
MEANING OF SPECIAL LANGUAGE
WARNING: Procedures, which if not properly followed, create the probability of property damage, collateral damage,
and serious injury OR create a high probability of superficial injury.
WARNING: Read the ENTIRE instruction manual to become familiar with the features of the product before
operating. Failure to operate the product correctly can result in damage to the product, personal property and cause
serious injury.
This is a sophisticated hobby product and NOT a toy. It must be operated with caution and common sense and requires some
basic mechanical ability. Failure to operate this Product in a safe and responsible manner could result in injury or damage to
the product or other property. This product is not intended for use by children without direct adult supervision. Do not use
with incompatible components or alter this product in any way outside of the instructions provided by Horizon Hobby, LLC.
This manual contains instructions for safety, operation and maintenance. It is essential to read and follow all the instructions
and warnings in the manual, prior to assembly, setup or use, in order to operate correctly and avoid damage or serious injury.
SAFETY PRECAUTIONS AND WARNINGS
Read and follow all instructions and safety precautions before use. Improper use can result in fire, serious injury and damage
to property.
Components
Batteries
Small Parts
Engines and some electronic
components can become hot while
in use. Do not touch parts until cool.
Should any compatibility questions exist,
please refer to the product instructions,
the component instructions or contact
Horizon Hobby, LLC.
Always follow the manufacturer’s
instructions when using and disposing
of any batteries. Mishandling
or improper storage may result in fire
causing serious injury or damage.
This kit includes small parts and should
not be left unattended near children as
choking and serious injury could result.
Safe Operating Recommendations
•
Inspect your model before every run to make sure it is track worthy.
•
Be aware of any other radio frequency user who may present an interference problem.
•
Always be courteous and respectful of other users of your selected driving area.
•
Choose an area clear of obstacles and large enough to safely accommodate your driving activity.
•
Make sure this area is clear of friends and spectators prior to running your vehicle.
•
Be aware of other activities in the vicinity of your path that could cause potential conflict.
Important Safety Notes
•
Select an area for assembly that is away from the reach of small children. Some parts in this vehicle are
small and can be swallowed by children, causing choking and possible internal injury; PLEASE USE CAUTION!
•
The shock fluid and greases supplied should be kept out of children’s reach. They are not intended for human consumption!
•
Exercise care when using any hand tools, sharp instruments, or power tools during construction.
•
Carefully read all manufacturer’s warnings and cautions for any chemicals, glues, or paints that may be used for assembly
and operating purposes.
Age Recommendation: Not for Children under 14 years. This is not a toy.
2
HINWEIS
Alle Anweisungen, Garantien und dazugehörigen Dokumente können ohne Ankündigung von Horizon Hobby LLC
geändert werden. Eine aktuelle Version ersehen Sie bitte im Support Feld unter: http://www.horizonhobby.com.
ERKLÄRUNG DER BEGRIFFE
WARNUNG: Wenn diese Verfahren nicht korrekt befolgt werden, ergeben sich wahrscheinlich Sachschäden,
Kollateralschäden und schwere Verletzungen ODER mit hoher Wahrscheinlichkeit oberflächliche Verletzungen.
WARNUNG: Lesen Sie sorgfältig die gesamte Bedienungsanleitung durch und machen sich vor dem Betrieb mit dem
Produkt vertraut. Falscher und oder nicht sachgemäßer Umgang kann zu Beschädigungen am Produkt, eigenen und fremden
Eigentum und ernsthaften Verletzungen führen. Bitte beachten Sie, dass dieses Produkt ein hoch entwickeltes Hobby Produkt
und kein Spielzeug ist. Es erfordert bei dem Betrieb.
Aufmerksamkeit und grundlegende mechanische Fähigkeiten. Falscher, nicht sachgemäßer Umgang kann zu Beschädigungen
an eigenem oder fremden Eigentum oder zu Verletzungen an sich selbst oder Dritter führen. Verwenden Sie das Produkt nicht
mit inkompatiblen Komponenten oder verändern es in jedweder Art ausserhalb der von Horizon Hobby, LLC vorgegebenen
Anweisungen. Dieses Produkt ist nicht für den Gebrauch von Kindern ohne direkte Aufsicht durch ihre Eltern bestimmt.
Die Bedienungsanleitung enthält Anweisungen und wichtige Informationen für die Sicherheit und Betrieb. Es ist daher
notwendig, allen darin enthaltenen Anweisungen und Warnungen Folge zu leisten und diese Anleitung vor dem
Zusammenbau und Inbetriebnahme sorgfältig durch zu lesen.
SICHERHEITSHINWEISE UND WARNUNGEN
Bitte lesen und befolgen Sie allen Anweisungen und Sicherheitswarnungen. Nicht sachgemäßer oder falscher Gebrauch kann
zu Feuer, schweren Verletzungen oder Beschädigungen an Eigentum führen.
Komponenten
Akkus
Kleinteile
Einige elektrische Komponenten
können während des Betriebs heiß
werden. Fassen Sie diese Teile nicht an
bevor sie abgekühlt sind. Verwenden
Sie diese Teile nur mit geeigenten
Komponenten. Sollten Sie Fragen zur
Kompatibilität haben, sehen Sie bitte
in der Bedienungsanleitung nach oder
kontakten den Service von Horizon
Hobby.
Befolgen Sie zum Betrieb und zur
Entsorgung immer die Anweisungen
des Herstellers. Falscher oder nicht
sachgemäßer Umgang kann zu
Feuer , ernsten Verletzungen und
Sachbeschädigung führen.
Dieser Bausatz enthält Kleinteile und
darf nicht in der Nähe von Kleinkindern
gelangen, da die Gefahr von Verschlucken
und ernsthaften Verletzungen besteht.
Empfehlungen Zum Sicheren Betrieb
•
Bitte überpüfen Sie vor dem Einsatz ob das Modell sich in einem einwandfreien Zustand befindet.
•
Stellen Sie sicher dass kein anderer Fahrer auf der gleichen Frequenz wie sie fährt.
•
Gehen Sie höflich und respektvoll mit anderen Fahrern auf ihrer Strecke um.
•
Suchen Sie sich einen Platz der groß genug und frei von Hindernissen ist.
•
Stellen Sie sicher, dass die Fahrstrecke frei von Freunden und Zuschauern ist.
•
Haben Sie evtl. andere Aktivitäten im Blick die auf der Strecke zum Konflikt führen könnten.
Wichtige Sicherheitshinweise
•
Wählen Sie für den Zusammenbau einen Ort außerhalb der Reichweite von kleinen Kindern. Einige Bauteile in diesem Fahrzeug
sind klein und können von Kindern verschluckt werden, was Erstickungen und mögliche innere Verletzungen auslösen kann;
BITTE GEBEN SIE ACHT!
•
Die im Lieferumfang enthaltene Stoßdämpferflüssigkeit und Fette sollten außerhalb der Reichweite von Kindern aufbewahrt
werden. Sie sind nicht für den menschlichen Verzehr bestimmt!
•
Seien Sie achtsam, wenn Sie Handwerkzeuge, scharfe Instrumente oder Elektrowerkzeuge während dem Aufbau verwenden.
•
Lesen Sie gründlich alle Warn- und Sicherheitshinweise des Herstellersfür jegliche Chemikalien, Kleber oder Lacke,
die für den Zusammenbau oder Betriebszwecke eventuell verwendet werden.
Nicht geeignet für Kinder unter 14 Jahren. Dies ist kein Spielzeug.
3
REMARQUE
Toutes les instructions, garanties et autres documents sont modifiables à la seule discrétion de Horizon Hobby, LLC.
Pour des documents à jour sur les produits, vous pouvez consulter http://www.horizonhobby.com et cliquer sur
l’onglet de support de ce produit.
SIGNIFICATION DE CERTAINS TERMES SPÉCIFIQUES
AVERTISSEMENT : Procédures qui, si elles ne sont pas suivies correctement, peuvent entraîner des dégâts matériels, des
dommages collatéraux et des blessures graves OU engendrer une probabilité élevée de blessure superficielle.
AVERTISSEMENT: Lisez la TOTALITE du manuel d’utilisation afin de vous familiariser avec les caractéristiques du
produit avant de l’utiliser. Une utilisation incorrecte du produit peut causer des dommages au produit lui-même, aux biens
voire entraîner des blessures graves.
Ceci est un produit de loisirs perfectionné et NON PAS un jouet. Il doit être manipulé avec prudence et bon sens et requiert
quelques aptitudes de base à la mécanique. L’incapacité à manipuler ce produit de manière sûre et responsable peut provoquer
des blessures ou des dommages au produit ou à d’autres biens. Ce produit n’est pas destiné à être utilisé par des enfants sans
la surveillance directe d’un adulte. N’essayez pas de modifier ou d’utiliser ce produit avec des composants incompatibles hors
des instructions fournies par Horizon Hobby, LLC. Ce manuel comporte des instructions de sécurité, de mise en oeuvre
et d’entretien. Il est capital de lire et de respecter toutes les instructions et avertissements du manuel avant le montage,
le réglage ou l’utilisation afin de manipuler le Produit correctement et d’éviter les dommages ou les blessures graves.
PRÉCAUTIONS ET AVERTISSEMENTS LIÉS
À LA SÉCURITÉ
Lisez et respectez toutes les instructions et précautions de sécurité avant utilisation. L’utilisation incorrecte peut entraîner un incendie,
des blessures graves et des dommages aux biens.
Eléments
Batteries
Petites pièces
Certains composants électroniques
peuvent être très chauds pendant
l’utilisation. Ne touchez pas les pièces
avant qu’elles aient refroidi. N’utilisez
qu’avec des composants compatibles. Pour
toute question de compatibilité, consultez
les instructions concernant le produit,
celles concernant le composant ou prenez
contact avec Horizon Hobby, LLC.
Toujours suivre les consignes du fabricant
quand vous utilisez et manipulez des
batteries. Une mauvaise manipulation
des batteries Li-Po peut provoquer un
incendie causant des dégâts et des
blessures graves.
Ce kit contient de petites pièces qui
ne doivent pas être laissées à la portée
des enfants sous peine d’étouffement
ou de blessure grave.
Recommandations de sécurité d’utilisation
•
Contrôlez votre modèle avant chaque utilisation pour vous assurer qu’il est en état de rouler.
•
Prenez garde à tout autre utilisateur de fréquence radio pouvant créer des problèmes d’interférences.
•
Restez toujours courtois et respectueux des autres utilisateurs sur le lieu choisi pour la conduite.
•
Choisissez une zone sans obstacles et suffisamment grande pour accueillir en toute sécurité les évolutions de conduite.
•
Assurez-vous que cette zone est dégagée de tous amis et spectateurs avant le démarrage de votre véhicule.
•
Prenez garde aux autres activités dans le voisinage de votre trajectoire pouvant créer des conflits potentiels.
Notes de Securité Importantes
•
Pour le montage, choisissez une zone hors de portée des enfants en bas âge. Certaines pièces de ce véhicule sont très petites et
peuvent être avalées par des enfants, provoquant un étouffement et des blessures internes. AGISSEZ AVEC PRECAUTION!
•
Le fluide et les graisses destinés aux amortisseurs doivent être tenus hors de portée des enfants. Ils ne sont pas destinés à la
consommation humaine!
•
Faites attention lorsque vous utilisez des outils à main, des instruments coupants ou des outils électriques lors de la construction.
•
Lisez attentivement tous les avertissements du fabricant concernant les produits chimiques, les colles ou les peintures pouvant
être utilisés pour le montage ou l’utilisation.
14 ans et plus. Ceci n’est pas un jouet.
4
AVVISO
Tutte le istruzioni, garanzie e altri documenti allegato sono soggetti a cambiamenti a totale discrezione di Horizon Hobby, LLC.
Per una letteratura aggiornata sul prodotto si prega di visitare il sito http://www.horizonhobby.com e cliccare sul tab di
riferimento per questo prodotto.
SIGNIFICATO DEI TERMINI PARTICOLARI
AVVERTENZA: Procedure che, se non debitamente seguite, espongono alla possibilità di danni alla proprietà fisica o possono
comportare una elevata possibilità di provocare ferite superficiali.
AVVERTENZA: Leggere TUTTO il manuale di istruzioni e familiarizzare con le caratteristiche del prodotto, prima di
farlo funzionare. Un utilizzo scorretto del prodotto può causare danni al prodotto stesso, alle persone o alle cose, causando
gravi lesioni.
Questo è un prodotto sofisticato di hobbistica e NON è un giocattolo. Esso deve essere manipolato con cautela, con giudizio
e richiede delle conoscenze basilari di meccanica. L’utilizzo improprio o irresponsabile del modello potrebbe causare lesioni,
danni al prodotto stesso o nei confronti di terzi. Questo prodotto non è concepito per essere usato dai bambini senza la diretta
supervisione di un adulto. Non usare componenti non compatibili o alterare il prodotto in nessuna maniera al di fuori delle
istruzioni fornite da Horizon Hobby, LLC. Questo manuale contiene le istruzioni per la sicurezza, l’utilizzo e la manutenzione
del prodotto. È fondamentale leggere e seguire tutte le istruzioni e le avvertenze nel manuale prima di montare, impostare
o usare il prodotto, al fine di usarlo correttamente e di evitare danni.
PRECAUZIONI PER LA SICUREZZA E AVVERTENZE
Leggere e seguire le istruzioni e le precauzioni di sicurezza prima dell’uso. Un utilizzo improprio può risultare in un incendio, in gravi
lesioni o danni a cose.
Componenti
Batterie
Minuterie
Alcuni componenti elettronici possono
diventare caldi durante il loro uso.
Non toccarli finché non si raffreddano.
Usare solo componenti compatibili. Se
ci sono delle domande in relazione alla
compatibilità bisogna riferirsi alle istruzioni
del prodotto, alle istruzioni dei componenti
o contattare Horizon Hobby, LLC.
Seguire sempre le istruzioni del
produttore quando si smaltiscono le
batterie. Se si manipolano le batterie LiPo in maniera errata si può verificare un
incendio, serie lesioni e danni.
Il kit include delle minuteria e non
deve essere lasciato incustodito vicino
ai bambini, che potrebbero inghiottirli
e farsi davvero male.
Raccomandazioni per un utilizzo sicuro
•
Controllare il modello prima di ogni corsa per vedere se funziona correttamente.
•
Essere al corrente di altri utenti con frequenze radio che potrebbero interferire.
•
Essere sempre cortesi e rispettosi verso gli altri utenti della pista di guida.
•
Scegliere un’area senza ostacoli abbastanza grande per consentirvi di guidare in sicurezza.
•
Accertarsi che quest’area sia priva di persone e spettatori, prima di guidare il veicolo.
•
Essere consapevoli di altre attività vicine al percorso che possono causare potenziali conflitti.
Note Importanti di Sicurezza
•
Scegliere un’area per il montaggio che non sia facilmente raggiungibile dai bambini. Alcuni pezzi di questo veicolo sono piccoli
e possono essere inghiottiti dai bambini causando soffocamento e possibili lesioni agli organi interni; PRESTARE ATTENZIONE!
•
L’olio e il grasso per gli ammortizzatori dovrebbero essere tenuti lontani dalla portata dei bambini. Tali elementi non
sono commestibili!
•
Durante il montaggio, prestare attenzione quando si usano utensili, strumenti affilati o alimentati da energia elettrica.
•
Leggere attentamente tutti gli avvertimenti e i consigli dettati dal produttore relativi alle sostanze chimiche, alla colla,
agli smalti e a tutti gli elementi di montaggio e di funzionamento del veicolo.
Almeno 14 anni. Non è un giocattolo.
5
WELCOME TO TEAM LOSI RACING
Thank you for selecting the new Team Losi Racing® 8IGHT-T E™ 3.0 racing Truggy. The 8IGHT-T E 3.0 is a result of 30 years of eating, breathing and sleeping RC racing.
Everything we’ve done has led us to this moment. Every race we’ve won. Every vehicle we’ve designed. It all helped us create the 8IGHT-T E 3.0. Based on the championship
winning 8IGHT™ 3.0 platform, we combined the most durable chassis features of our successful Truggy and all the cutting edge power system features of our Electric Buggy to
create an RC vehicle that will blow your minds and rock your spirit! The 8IGHT-T E 3.0 is destined to turn the E-Truggy class on its head!
Good luck and good racing,
Team Losi Racing
DE Willkommen bei Team Losi Racing
Vielen Dank, dass Sie sich für den Team Losi Racing 8IGHT-T-E 3.0 als Ihren neuen Racing Truggy entschieden haben. Der 8IGHT-T-E 3.0 ist das Ergebnis von 30 Jahren
intensivster Beschäftigung mit RC. All unser Tun führt uns zu diesem Moment. Jedes Rennen, das wir gewonnen haben. Jedes Fahrzeug, das wir entworfen haben. Basierend auf
der erfolgreichen 8IGHT 3.0 Plattform haben wir die besten Chassis Features unseres siegreichen Truggys mit einem Hochleistungsantrieb kombiniert, der die E-Truggy Klasse
revolutionieren wird.
Viel Glück und ein gutes Rennen,
Team Losi Racing
FR Bienvenue chez Team Losi Racing
Nous vous remercions d’avoir choisi le nouveau Truggy de compétition 8IGHT-T-E 3.0. Ce modèle est le fruit de 30 années d’une totale implication dans le monde de la RC. Chaque
course que nous avons remporté, chaque véhicule que nous avons conçu, toutes nos expériences menées jusqu’à présent, nous ont aidé a créer le 8IGHT-T E 3.0. Basé sur le châssis
8IGHT 3.0 remportant de nombreux championnats, nous avons associé le châssis ultra-résistant de notre célèbre Truggy avec la technologie de notre buggy électrique pour créer un
véhicule RC qui va balayer tous les préjugés !
Cette plateforme ne ressemble à aucune autre et elle va révolutionner le monde de la RC.
Bonne chance et bonnes courses !
Team Losi Racing
IT Benvenuto nel Team Losi Racing
Grazie di aver scelto il nuovo truggy Team Losi Racing 8IGHT-T E 3.0. La 8IGHT-T E 3.0 è il risultato di 30 anni dedicati alle corse RC. Tutto quello che abbiamo raggiunto sulle piste
di tutto il mondo ci ha portato a questo risultato, lo sviluppo della 8IGHT-T E 3.0. Sulla base della comprovata piattaforma 8IGHT 3.0, abbiamo combinato la robustezza del Truggy
con la potenza del buggy elettrico, per creare un veicolo RC che supererà tutte le vostre aspettative. La 8IGHT-T E 3.0 è stata costruita per rivoluzionare la classe dei Truggy elettrici!
Buona fortuna e buona corsa,
Team Losi Racing
6
REGISTER YOUR TEAM LOSI RACING PRODUCT ONLINE
Register your Team Losi Racing product online at TLRACING.com and follow the product registration link to stay connected.
DE Registrieren Sie Ihr Team Losi Racing Produkt online
Registrieren Sie Ihr Produkt online bei TLRACING.com, und folgen Sie dem Link zur Produktregistrierung, um auf dem Laufenden
zu bleiben mit Team Losi Racing.
FR Enregistrez votre produit Team Losi Racing en ligne
Enregistrez votre produit auprès de la Team Losi Racing sur la page TLRACING.com
IT Registrazione online del prodotto Team Losi Racing
Registrando online il prodotto a TLRACING.com e seguire il link di registrazione del prodotto per essere sempre aggiornati
con Team Losi Racing.
KIT/MANUAL ORGANIZATION
The kit is composed of different bags marked A through H. Each bag contains all of the parts necessary to complete a particular
section of the kit. Some of these bags have sub-assembly bags within them. It is essential that you open only one bag at a time and
follow the correct assembly sequence. It is helpful to read through the instructions for an entire bag prior to beginning assembly.
For your convenience, the hardware identification of each hardware item used is located to the left of each step. The silhouette
of each part is 1:1 (actual size). To check a part, hold it against the silhouette until the correct part is identified.
DE Kit/Manual Organisation
Der Kit umfasst verschiedene Beutel, die mit A bis H beschriftet sind. Jeder Beutel enthält alle erforderlichen Bauteile für einen
bestimmten Teil des Kits. Einige dieser Beutel enthalten wiederum kleinere Beutel. Öffnen Sie unbedingt jeweils nur einen Beutel, und
folgen Sie den Montageschritten in der korrekten Reihenfolge. Es wird empfohlen, dass Sie sich die Anweisungen für einen ganzen
Beutel durchlesen,bevor Sie mit der Montage beginnen.
Zur Vereinfachung finden Sie die Identifizierung der verwendeten Kleinteile links neben jedem Schritt. Die Silhouette der
einzelnen Teile ist 1:1 (Originalgröße). Um zu überprüfen, ob Sie das richtige Teil haben, halten Sie es gegen die Silhouette.
FR Organisation du Kit/Manuel
Le kit se compose de différents sachets, marqués de A à H. Chaque sachet contient toutes les pièces nécessaires pour réaliser une
section donnée du kit. Certains de ces sachets comportent des sachets de sous-assemblage. Il est essentiel que vous n’ouvriez qu’un
sachet à la fois et que vous suiviez la bonne séquence d’assemblage. Il est utile de lire l’intégralité des instructions correspondantes
au sachet avant de commencer l’assemblage.
Par commodité, l’identification de chaque élément utilisé se situe à gauche de chaque étape. La silhouette de chaque pièce
est à l’échelle 1:1 (taille réelle). Pour contrôler une pièce, placez-la sur les silhouettes jusqu’à l’identifier correctement.
IT Kit / manuale Organizzazione
Il kit è composto da diverse buste, contrassegnate con le lettere da A a H. Ogni busta contiene tutti i componenti necessari per
completare la sezione corrispondente del kit. Alcune di queste buste contengono delle buste di sub-assemblaggio. È fondamentale
aprire solo una busta per volta e seguire la sequenza di assemblaggio corretta. Prima di iniziare l’assemblaggio è opportuno leggere
attentamente le istruzioni dell’intera busta.
Per maggiore comodità, a sinistra di ciascun passaggio è indicata l’identificazione di ciascun componente meccanico utilizzato.
La sagoma di ogni parte è 1:1 (dimensioni effettive). Per il controllo di ciascun un componente, posizionarlo sulla sagoma e
verificare che sia quello corretto.
7
ICON KEY / SYMBOLSCHLÜSSEL / LÉGENDE DES ICÔNES /
RIFERIMENTO ICONA
ENGLISH
DEUTSCH
FRANÇAIS
ITALIANO
Apply TLR-Lok™ Threadlock
- TLR76004
TLR-Lok auftragen
Appliquer du
frein filet TLR-Lok
Applicare TLR-Lok
Apply High Pressure
Black Grease - TLR77000
Schwarzes Hochdruckfett auftragen
Appliquer de la graisse
haute pression noire
Applicare grasso nero
ad alta pressione
Apply CA Glue
CA-Kleber auftragen
Appliquer de la colle CA
Applicare colla CA
Apply Clear Grease
Farbloses Schmierfett auftragen
Appliquer de la graisse
Clear Grease (transparente)
Applicare grasso trasparente
Degrease with Motor Spray
-DYN5500
Mit Motorspray
entfetten
Dégraisser au nettoyant moteur
Togliere il grasso con lo spray per
motori
Fill With Silicone Oil
Mit Silikonöl füllen
Remplir d’huile silicone
Riempire con olio al silicone
Pay Special
Attention
Besonders aufpassen
Faire particulièrement
attention
Prestare molta attenzione
Cut/Trim
Schneiden/
Abgleichen
Couper/ébavurer
Tagliare / regolare
Ensure Free
Movement
Leichtgängigkeit
sicherstellen
Vérifier la liberté
de mouvement
Assicurare un
movimento libero
Ensure Free Rotation
Freigängigkeit
sicherstellen
Vérifier la libre rotation
Assicurare una rotazione libera
Ensure Proper
Orientation
Passende Ausrichtung sicherstellen
Vérifier l’orientation correcte
Assicurare un corretto orientamento
Push Firm
Fest drücken
Pousser fermement
Spingere forte
Side Shown
Seite dargestellt
Côté présenté
Mostrato lateralmente
LL
RR
Assemble Other
Side the Same
Andere Seite gleich
zusammenbauen
Monter l’autre côté
à l’identique
Assemblare l’altro
Lo stesso per l’altro lato
x2
Repeat/Build Multiple
Wiederholen/
mehrfachbauen
Répéter/assembler
plusieurs fois
Ripetere/costruire multiplo
Screw Partially
Provisorisch anschrauben
Visser partiellement
Avvitare parzialmente
DO NOT OverTighten/Snug Tight
KEINESFALLS zu stark/bis
zum Anschlag anziehen
NE PAS serrer excessivement (serrer
juste assez)
NON stringere troppo
(stringere sufficientemente)
Tighten
Festziehen
Serrer
Stringere
TLR-LOK
GLUE
CLEAR
GREASE
OIL
CUT
L
8
TOOLS REQUIRED \ ERFORDERLICHE WERKZEUGE \
OUTILS NÉCESSAIRES \ UTENSILI NECESSARI
ENGLISH
DEUTSCH
FRANÇAIS
ITALIANO
.050” Hex Wrench
0,050-Zoll-Inbusschlüssel
Clé hexagonale, 1,27 mm
Chiave esagonale da 0,050”
1.5mm Hex Wrench
1,5 mm-Inbusschlüssel
Clé hexagonale, 1,5 mm
Chiave esagonale da 1,5 mm
1/16” Hex Wrench
1/16”-Inbusschlüssel
Clé hexagonale, 1/16””
Chiave esagonale da 1/16”
5/64” Hex Wrench
5/64”-Inbusschlüssel
Clé hexagonale, 5/64”
Chiave esagonale da 5/64”
3/32” Hex Wrench
3/32”-Inbusschlüssel
Clé hexagonale, 3/32”
Chiave esagonale da 3/32”
Body Scissors
Lexanschere
Ciseaux à lexan
Corpo forbici
Needle-Nose Pliers
Spitzzange
Pince à bec
Pinze a becchi lunghi
Regular Pliers
Normale Zange
Pince ordinaire
Pinze normali
Hobby Knife
Hobbymesser
Cutter
Cutter da modellismo
Completed Kit Specifications
20.08 in (560.7mm)
Overall Length\Gesamtlänge\Longueur totale\Lunghezza totale del telaio
14.9–15.1 in (379-383mm)
Wheelbase\Radstand\Empattement\Interasse
16.4 in (417mm)
Front Track Width\Spurbreite vorne\Largeur de la voie avant\Larghezza zona anteriore
16.4 in (417mm)
Rear Track Width\Spurbreite hinten\Largeur de la voie arrière\Larghezza zona posteriore
7.3 in (185mm)
Overall Height\Höhe\Hauteur totale\Altezza generale
A-1
EN
DE
FR
IT
Steering Link Assembly
Zusammenbau des Lenkgestänges
Assemblage de la tringlerie de direction
Assemblaggio rinvii sterzo
4.5mm
LOSA9168
LOSA6306 x 1
LOSA6306
4-40 x 3/16”
58.34mm
LOSA6044 x 2
rod ball ends
LOSA6256 x 1
LOSA6045
4-40 x 1/2”
LOSA6045 x 1
LOSA6256
5-40 x 7/8”
9
A-2
EN
DE
FR
IT
Servo Saver Assembly
Zusammenbau des Servo Savers
Montage du sauve-servo
Assemblaggio salva servo
LOSA6256
LOSA4406
LOSA6256 x 1
4-40 x 1/2”
LOSA6306 x 1
TLR-LOK
4-40 x 3/16”
LOSA4406
LOSA6306
TLR244005
EN Tighten the servo saver
nut all the way down,
then back off 51/2 turns.
DE Ziehen Sie die Mutter des
Servo Savers fest an und
drehen Sie sie dann 51/2
Umdrehungen zurück.
FR Serrez complètement la
bague du sauve servo,
puis desserrez-la de 51/2
tours et demi.
TLR244006
TLR244005
IT Stringere completamente
il dado del salvaservo,
poi tornare indietro
di 5 giri e 1/2.
LOSA4406
LOSA4406
A-3
EN
DE
FR
IT
Battery Stay
Akkuhalter
Support de batterie
Supporto batteria
LOSA6204 x 3
TLR241010
TLR241012
4-40 x 1/2”
LOSA6270 x 6
5-40 x 3/8”
LOSA6302
LOSA6271 x 4
5-40 x 1/2”
TLR241011
LOSA6302 x 3
LOSA4408
5-40 x 1/4”
LOSA6271
LOSA6270
TLR-LOK
10
A-4
EN
DE
FR
IT
Steering/Top Plate Assembly
Befestigungsplatte
Montage de direction/renfort supérieur
Assemblaggio sterzo / piastra superiore
LOSA6278
LOSA6271
LOSA6271 x 1
LOSA6278
5-40 x 1/2”
TLR-LOK
LOSA6278 x 2
5-40 x 1/2”
TLR241003
LOSA6946 x 4
6 x 10 x 3mm
A-5
TLR-LOK
LOSA6946
EN
DE
FR
IT
Completed Steering Assembly
Vollständige Baugruppe Lenkung
Ensemble de direction terminé
Assemblaggio completo dello sterzo
LL
RR
L
11
B-1
EN
DE
FR
IT
Ring Gear Assembly
Zusammenbau des Tellerrads
Montage du planétaire
Assemblaggio corona dentata
LOSA3518 x 1
2.5 x 12.80mm
1
LOSA6948 x 1
3
LOSA4452
F 8 x 14 x 4mm
LOSA3553
LOSA3518
LOSA6948
2
LOSA4452 x 2
TLR242011
14 x 17 x 0.1mm
LOSA3505
4
LOSA3502
B-2
EN
DE
FR
IT
Differential Case Assembly
Zusammenbau des Differenzialgehäuses
Assemblage du corps de différentiel
Assemblaggio alloggiamento diff
LOSA3518 x 1
1
2.5 x 12.80mm
LOSA3553
3
LOSA6948 x 1
F 8 x 14 x 4mm
LOSA6948
LOSA3518
2
LOSA3500
LOSA3505
4
LOSA3502
12
EN
DE
FR
IT
B-3
Complete Differential Assembly
Vollständiger Zusammenbau des Differenzials
Différentiel complet
Assemblaggio completo diff
LOSA3500
LOSA3500 x 4
M3 x 12mm
LOSA3505
LOSA3502
OI L
EN Fill with 10,000 wt oil just
above the planetary gear.
DE Mit 10,000 WT ÖL bis zum
Planetengetriebe füllen.
FR Remplir d’huile 10,000
wt jusqu’au-dessus
des satellites.
IT Riempire con olio
10,000 wt fino sopra
l’ingranaggio planetario.
EN Tighten the diff
scews in this order.
1
3
DE Differenzialschrauben
in dieser Reihenfoge
festiehen.
FR Serrez les vis
du diférentiel
dans cet ordre.
4
2
IT Stringere le viti del
differenziale in
questo ordine.
13
B-4
LOSA6947 x 2
5 x 11 x 4mm
LOSA6273 x 2
5-40 x 7/8”
EN
DE
FR
IT
Front Differential Installation
Einbau des Frontdifferenzials
Assemblage de la transmission avant
Montaggio differenziale anteriore
LOSA6296
EN To prevent fine dust from entering
the gearbox, apply a thin bead of
grease along the edge of the
entire gear case.
TLR242013
3
DE Tragen Sie einen dünnen Streifen
Fett entlang der Kanten des
Gehäuses - wie abgebildet auf, um zu verhindern,
LOSA6947
dass feiner Staub in
TLR242011
das Getriebe
gelangt.
4
LOSA6947
2
1
6
LOSA6240 x 2
LOSA6273
5-40 x 1/2”
FR Afin d’éviter que de la poussière
fine pénètre à l’intérieur du boîtier
de différentiel, appliquez un fin
bourrelet de graisse sur toute la
longueur de la jonction.
5
LOSA6296 x 1
F 8-32 x 1/8”
TLR242013
LOSA6240
B-5
TLR242003
TLR-LOK
EN
DE
FR
IT
IT Per evitare che le polveri sottili entrino
nella scatola ingranaggi, applicare un
leggero strato di grasso lungo il bordo
di giunzione della scatola ingranaggi.
Front Spindle & CV Assembly
Zusammenbau von Vorderachse u. CV
Montage des fusées et cardans avant
Assemblaggio alberino anteriore & CV
LL
RR
L
LOSA3586
LOSA6298 x 1
C 8-32 x 1/8”
1
LOSA3518 x 1
LOSA3523
2.5 x 12.80mm
LOSA3522
LOSA3518 x 1
2
TLR244003
4
3 x 17mm
LOSA3518
6
3
LOSA6945 x 1
8 x 14 x 4mm
LOSA3518
LOSA6298
LOSA6953
5
LOSA6945
7
LOSA3530
LOSA6953 x 1
1/2” x 3/4”
14
TLR-LOK
B-6
EN
DE
FR
IT
Spindle/Carrier Assembly
Zusammenbau von Achsschenkel und Radträger
Assemblage fusée/étrier porte fusée sur triangle avant
Assemblaggio perno/semiasse
LL
RR
L
TLR244017
LOSA6263 x 2
TLR244016
8-32 x 3/4”
TLR244001
LOSA6266
LOSA6266 x 2
5
8-32 x 5/8”
TLR245000
2
TLR244007
TLR244003
4
LOSA1701
1
TLR245000 x 1
5
10-32 x 7.50mm
LOSA6263
3
LOSA6251 x 2
LOSA6251
C 5-40 x 3/16”
B-7
EN
DE
FR
IT
EN
Front Suspension Arm Assembly
Zusammenbau des vorderen Querlenkers
Installation des triangles avant
Assemblaggio braccio sospensione anteriore
L
FRONT KICK-UP ANGLE ADJUSTMENT
Outer Front Brace
DE
LL
RR
Inner Front Brace
Total Kick-Up
Insert Position
Insert Number
Insert Position
Insert Number
Up
1°
Down
1°
+2°
Up
0.5°
Down
0.5°
+1°
Middle
0°
Middle
0°
0°
Down
0.5°
Up
0.5°
-1°
Down
1°
Up
1°
-2°
WINKEL EINSTELLUNG FRONT KICK-UP
Halter Aussen
Halter Innen
Gesamt Kick-Up
Einsatz Position
Einsatz Nr.
Einsatz Position
Einsatz Nr.
Oben
1°
Unten
1°
+2°
Oben
0.5°
Unten
0.5°
+1°
Mitte
0°
Mitte
0°
0°
Unten
0.5°
Oben
0.5°
-1°
Unten
1°
Oben
1°
-2°
15
FR
IT
RÉGLAGE DE L’ANGLE D’ANTI-PLONGÉE AVANT
Renfort avant extérieur
Renfort avant intérieur
Position de l’insert
Numéro de l’insert
Position de l’insert
Numéro de l’insert
Angle d’antiplongée total
Haut
1°
Bas
1°
+2°
Haut
0.5°
Bas
0.5°
+1°
Milieu
0°
Milieu
0°
0°
Bas
0.5°
Haut
0.5°
-1°
Bas
1°
Haut
1°
-2°
REGOLAZIONE ANGOLO ANTERIORE
Supporto esterno anter.
Supporto interno anter.
Posizione inserim.
Numero inserim.
Posizione inserim.
Numero inserim.
Angolo totale
superiore
1°
inferiore
1°
+2°
superiore
0.5°
inferiore
0.5°
+1°
centrale
0°
centrale
0°
0°
inferiore
0.5°
superiore
0.5°
-1°
inferiore
1°
superiore
1°
-2°
LOSA6272
LOSA6272 x 4
5-40 x 3/4”
LOSA1754
LOSA1756
TLR244011
LOSA6272
16
LOSA1754
LOSA1756
B-8
EN
DE
FR
IT
Sway Bar Assembly
Zusammenbau des Querlenkers
Montage de la barre stabilisatrice
Assemblaggio barra antitorsione
LOSA6204 x 1
LL
RR
L
LL
L
LOSA1750
4-40 x 1/2”
LOSA6204
LOSA6254 x 4
2-56 x 1/4”
LOSA6297
LOSA6227 x 2
C 4-40 x 1/8”
LOSA6297 x 2
LOSA6227
LOSA6254
LOSA1750
(2.3mm)
F 5-40 x 1/8”
B-9A
EN
DE
FR
IT
Tie Rod/Shock Tower Assembly
RR
Zusammenbau Spurstange / Dämpferbrücke
Installation du support d’amortisseurs et de la biellette de carrossage
Assemblaggio tirante/supporto ammortizz.
TLR244019
LOSA6302
LOSA6286 x 4
5-40 x 5/8”
LOSA4453
LOSA6286
LOSA6282 x 1
5-40 x 7/8”
LOSA6048
LOSA6546
LOSA6302 x 1
LOSA6282
LOSA6049
5-40 x 1/4”
LOSA6047
142.0mm
EN Be sure to install the assembled Tie
Rod onto the car with the groove
(next to the center square section)
on the driver’s left side for easier
adjustment later.
DE Bitte unbedingt die
zusammengebaute Spurstange mit
der Nut (neben dem Mittelstück)
zur leichteren späteren Justierung
auf der linken Seite des Fahrers auf
dem Auto anbringen.
FR Prenez soin d’installer la biellette
en plaçant la rainure (située à
côté du carré) du côté gauche
du véhicule afin de faciliter
les futurs réglages.
IT Bisogna installare sull’auto il
tirante montato con la scanalatura
(vicino alla sezione quadrata
centrale) rivolta verso sinistra
per poterlo regolare facilmente
in seguito.
17
B-9B
EN
DE
FR
IT
Shock Mount Assembly
Zusammenbau Dämpferhalter
Montage des entretoises d’amortisseurs
Assemblaggio supporto ammortizzatore
TLR243000
LOSA6311 x 1
LL
RR
LOSA6311
L
LOSA4433
8-32 x 11/32”
LOSA6302 x 1
LOSA6256
5-40 x 1/4”
LOSA6280 x 1
5-40 x 1”
LOSA6302
LOSA6256 x 2
4-40 x 1/2”
LOSA6280
18
B-10
EN
DE
FR
IT
Steering Rod Assembly
Zusammenbau der Lenkstange
Assemblage des biellettes de direction
Assemblaggio tirante sterzo
LL
RR
L
LOSA6302 x 1
5-40 x 1/4”
LOSA6282 x 1
5-40 x 7/8”
LOSA6046
LOSA6050
LOSA6302
LOSA6547
LOSA6282
LOSA6050
140.0mm
EN Be sure to install the assembled Tie Rod
onto the car with the groove (next to the
center square section) on the driver’s left
side for easier adjustment later.
FR Prenez soin d’installer la biellette en
plaçant la rainure (située à côté du carré)
du côté gauche du véhicule afin de
faciliter les futurs réglages.
DE Bitte unbedingt die zusammengebaute
Spurstange mit der Nut (neben dem
Mittelstück) zur leichteren späteren
Justierung auf der linken Seite des Fahrers
auf dem Auto anbringen.
IT Bisogna installare sull’auto il tirante
montato con la scanalatura (vicino alla
sezione quadrata centrale) rivolta verso
sinistra per poterlo regolare facilmente
in seguito.
19
B-11
EN
DE
FR
IT
Front Clip Assembly
Zusammenbau des Frontclips
Installation du train avant
Assemblaggio clip anteriore
LOSA6279
LOSA6262 x 4
4
8-32 x 1/2”
LOSA6279 x 2
5-40 x 3/4”
1
2
3
LOSA6262
LOSA4453
TLR241005
B-12
EN
DE
FR
IT
Steering Rod Assembly
Zusammenbau Lenkstange
Installation des biellettes de direction
Montaggio tirante sterzo
LL
RR
LOSA6272 x 1
5-40 x 3/4”
LOSA6272
20
L
B-13
EN
DE
FR
IT
Completed Front End Assembly
Fertigstellung des Vorderwagens
Assemblage du train avant terminé
Assemblaggio parte anteriore completato
21
C-1
EN
DE
FR
IT
Spur Gear Assembly
Montage Stirnrad
Assemblage de la couronne
Gruppo corona
1
TLR242008
LOSA6948
LOSA6948 x 1
F 8 x 14 x 4mm
LOSA3554
LOSA3518 x 1
2.5 x 12.80mm
LOSA3502
2
TLR242008 x 1
3
8 x 10 x 0.9mm
LOSA3505
LOSA3505 x 1
4
LOSA3518
LOSA3552
O-Ring, 6 x 10mm
C-2
EN
DE
FR
IT
Differential Case Assembly
Zusammenbau des Differenzialgehäuses
Assemblage du corps de différentiel
Assemblaggio alloggiamento diff
1
TLR242008
LOSA6948
LOSA6948 x 1
F 8 x 14 x 4mm
LOSA3554
LOSA3500
LOSA3518 x 1
2.5 x 12.80mm
LOSA3502
TLR242008 x 1
3
2
8 x 10 x 0.9mm
LOSA3518
LOSA3505
LOSA3505 x 1
O-Ring, 6 x 10mm
22
4
C-3
EN
DE
FR
IT
Complete Differential Assembly
vollständiger Zusammenbau des Differenzials
Ensemble différentiel complet
Assemblaggio completo diff
LOSA3500
LOSA3500 x 4
M3 x 12mm
LOSA3505
LOSA3502
EN Fill with 10,000 wt oil just
above the planetary gear.
OI L
DE Mit 10,000 WT ÖL bis zum
Planetengetriebe füllen.
FR Remplir d’huile 10,000
wt jusqu’au-dessus
des satellites.
IT Riempire con olio
10,000 wt fin sopra al
l’ingranaggio planetario.
EN Tighten the diff
scews in this order.
1
3
DE Differenzialschrauben
in dieser Reihenfoge
festiehen.
FR Serrez les vis
du diférentiel
dans cet ordre.
IT Stringere le viti del
differenziale in
questo ordine.
4
2
23
C-4
EN
DE
FR
IT
Center Differential
Zusammenbau von Zentraldifferenzial
Installation du différentiel central
Assemblaggio differenziale centrale
LOSA6277
TLR-LOK
LOSA6277 x 4
5-40 x 3/8”
TLR242008 x 2
8 x 10 x 0.9mm
TLR241004
TLR242007
TLR242008
TLR242008
LOSA4420
C-5
EN
DE
FR
IT
Front Center Dogbone Assembly
Montage Zentralwelle
Installation du cardan central avant
Assemblaggio giunto cardanico centrale anteriore
TLR242001
24
C-6
EN
DE
FR
IT
Center Differential Installation
Einbau des Zentraldifferenzials
Installation du différentiel central
Installazione differenziale centrale
LOSA6262 x 4
8-32 x 1/2”
EN Ensure that the driveshaft is
inserted into the slot of the
center outdrive while installing
the Center Diff assembly.
DE Bitte stellen Sie sicher, dass die Achswelle in die
Zentralknochenaufnahme eingesetzt ist, während
Sie die Zentraldifferenzial-Baugruppe einbauen.
TLR-LOK
FR Contrôlez que l’extrémité du cardan est correctement insérée
dans la noix de sortie du différentiel quand vous installez le différentiel
sur le châssis.
IT Accertarsi che l’albero di trasmissione centrale sia inserito nella
fessura del trascinatore centrale quando si installa il gruppo
del differenziale centrale.
C-7
EN
DE
FR
IT
LOSA6262
Completed Center Differential Assembly
Vollständiger Zusammenbau des Zentraldifferenzials
Différentiel central installé
Assemblaggio differenziale centrale completo
25
D-1
EN
DE
FR
IT
Ring Gear Assembly
Zusammenbau des Tellerrads
Montage du planétaire
Assemblaggio corona dentata
1
LOSA3518
LOSA6948 x 1
3
F 8 x 14 x 4mm
LOSA3553
LOSA3518 x 1
2.5 x 12.80mm
2
LOSA6948
LOSA3505
TLR242012
4
LOSA3502
D-2
EN
DE
FR
IT
Differential Case Assembly
Zusammenbau des Differenzialgehäuses
Assemblage du corps de différentiel
Assemblaggio scatola differenziale
1
LOSA3518
LOSA6948 x 1
F 8 x 14 x 4mm
LOSA3553
3
LOSA3518 x 1
2.5 x 12.80mm
LOSA6948
2
LOSA3500
LOSA3505
4
LOSA3502
26
D-3
EN
DE
FR
IT
Complete Differential Assembly
vollständiger Zusammenbau des Differenzials
Différentiel complet
Assemblaggio completo diff
LOSA3500
LOSA3500 x 4
M3 x 12mm
LOSA3505
LOSA3502
EN Fill with 7000 wt oil just
above the planetary gear.
OI L
DE Mit 7000 WT ÖL bis zum
Planetengetriebe füllen.
FR Remplir d’huile 7000
wt jusqu’au-dessus
des satellites.
IT Riempire con olio
7000 wt appena
l’ingranaggio planetario.
EN Tighten the diff
scews in this order.
1
3
DE Differenzialschrauben
in dieser Reihenfoge
festiehen.
FR Serrez les vis
du diférentiel
dans cet ordre.
4
2
IT Stringere le viti del
differenziale in
questo ordine.
27
D-4
EN
DE
FR
IT
Rear Differential Installation
Zusammenbau des Heckdifferenzials
Assemblage de la transmission arrière
Installazione differenziale posteriore
EN To prevent fine dust from entering the
gearbox, apply a thin bead of grease
along the edge of the entire gear case.
LOSA6947 x 2
5 x 11 x 4mm
TLR-LOK
DE Tragen Sie einen dünnen Streifen Fett
entlang der Kanten des Gehäuses - wie
abgebildet - auf, um zu verhindern, dass
feiner Staub in das Getriebe gelangt.
LOSA4454
TLR242003
LOSA6296
3
4
5
LOSA4452 x 1
1
14 x 17 x 0.1mm
LOSA6947
2
LOSA4452
TLR242013
TLR242012
LOSA6947
LOSA4452
LOSA6273
LOSA4452 x 3
14 x 17 x 0.25mm
LOSA4454
6
FR Afin d’éviter que de la poussière
TLR242013
LOSA6273 x 2
fine pénètre à l’intérieur du boîtier
de différentiel, appliquez un fin
bourrelet de graisse sur toute
la longueur de la jonction.
7
5-40 x 7/8”
IT Per evitare che le polveri sottili
LOSA6296 x 1
entrino nella scatola ingranaggi,
applicare un leggero strato di grasso
lungo il bordo di giunzione della
scatola ingranaggi.
F 8-32 x 1/8”
EN
DE
FR
IT
28
GEAR MESH
Left Side Shims
Right Side Shims
.010”
0
0
.025”
2
2
ZAHNFLANKENSPIEL
Unterlegscheiben links
Unterlegscheiben rechts
.010”
0
0
.025”
2
2
ENTRE-DENT DES PIGNONS
Cales de positionnement du
côté gauche
Cales de positionnement
du côté droit
.010”
0
0
.025”
2
2
INGRANAGGIO
Distanziale lato sinistro
Distanziale lato destro
.010”
0
0
.025”
2
2
D-5
EN
DE
FR
IT
Rear Hub & CV Assembly
Zusammenbau Hinterachse und CV
Assemblage des fusées et cardans arrière
Assemblaggio mozzo posteriore & CV
LL
RR
L
LOSA6296 x 1
F 8-32 x 1/8”
LOSA3518 x 1
2.5 x 12.80mm
LOSA3586
1
LOSA3523
2
LOSA3518 x 1
3 x 17mm
4
LOSA6945
3
LOSA3518
LOSA6945 x 1
LOSA3518
LOSA3522
6
8 x 14 x 4mm
LOSA6953
LOSA6296
5
LOSA1731
LOSA6953 x 1
D-6
7
TLR-LOK
1/2” x 3/4”
EN
DE
FR
IT
LOSA3530
Rear Suspension Arm Assembly
Zusammenbau des Heckquerlenkers
Installation des triangles arrière
Assemblaggio bracci sospensione posteriore
LL
RR
L
EN
REAR TOE-IN ADJUSTMENT
REAR ANTI-SQUAT ADJUSTMENT
Insert Position
Insert Number
Total Toe-In
Insert Position
Insert Number
Total Anti-Squat
Inside
1
2°
Up
1
4°
Inside
0.5
2.5°
Up
0.5
3.5°
Middle
0
3°
Middle
0
3°
Outside
0.5
3.5°
Down
0.5
2.5°
Outside
1
4°
Down
1
2°
DE
SPUREINSTELLUNG HINTEN
Einsatz Position Einsatz Nr.
ANTI SQUAT EINSTELLUNG HINTEN
Vorspur
Einsatz Position
Einsatz Nr.
Anti Squat
Innen
1
2°
Oben
1
4°
Innen
0.5
2.5°
Oben
0.5
3.5°
Mitte
0
3°
Mitte
0
3°
Aussen
0.5
3.5°
Unten
0.5
2.5°
Aussen
1
4°
Unten
1
2°
29
FR
RÉGLAGE DU
PINCEMENT ARRIÈRE
RÉGLAGE DE L’ANTI-CABRAGE
Position de
l’insert
Numéro de
l’insert
Pincement
arrière total
Position de
l’insert
Numéro de
l’insert
Anti-cabrage
total
Intérieur
1
2°
Haut
1
4°
Intérieur
0.5
2.5°
Haut
0.5
3.5°
Milieu
0
3°
Milieu
0
3°
Extérieur
0.5
3.5°
Bas
0.5
2.5°
Extérieur
1
4°
Bas
1
2°
IT
REGOLAZIONE
CONVERGENZA POSTERIORE
REGOLAZIONE
ANTI-SQUAT POSTERIORE
Posizione
inserim.
Numero inserim. Convergenza
tot.
Posizione
inserim.
Numero inserim.
Anti-Squat tot.
Interno
1
2°
Superiore
1
4°
Interno
0.5
2.5°
Superiore
0.5
3.5°
Centrale
0
3°
Centrale
0
3°
Esterno
0.5
3.5°
Inferiore
0.5
2.5°
Esterno
1
4°
Inferiore
1
2°
LL
RR
L
LOSA6274
LOSA6302 x 2
L 5-40 x 1/4”
LOSA1755
LOSA1759
TLR245000 x 1
LOSA1756
10-32 x 7.50mm
LOSA6302
TLR244012
LOSA6272 x 2
5-40 x 3/4”
TLR244011
LOSA6272
LOSA6274 x 2
LOSA1756
TLR245000
LOSA6302
5-40 x 1-7/8”
TLR244018
30
LOSA4453
D-7
EN
DE
FR
IT
Sway Bar Assembly
Zusammenbau des Querstabilisator
Installation de la barre stabilisatrice
Assemblaggio barra oscillante
LL
RR
L
LOSA1750
LOSA6204 x 2
4-40 x 1/2”
LOSA6204
LOSA1750
(2.3mm)
LOSA6254 x 4
2-56 x 1/4”
LOSA6227
LOSA6227 x 2
LOSA6297
C 4-40 x 1/8”
LOSA4453
LOSA1750
LOSA6297 x 2
LOSA6254
F 5-40 x 1/8”
DE Bauen Sie die Kugelpfanne des
Querstabilisators auf dessen
Gestängezug ein, bis das Ende des
Zuges bündig mit der Kugelpfanne
- wie oben abgebildet - abschließt.
EN Install the Sway Bar Ball onto the
Sway Bar Wire until the end of
the wire is flush with the ball
as pictured above.
D-8
EN
DE
FR
IT
FR Installez la rotule de barre
stabilisatrice sur la tige de barre
stabilisatrice jusqu’à ce qu’elle
soit à fleur de la rotule (figure cidessus).
IT Inserire le sfere nella barra
oscillante finché il filo è allineato
con la parte superiore della sfera,
come si vede nel disegno qui sopra.
Wing Mount Assembly
Zusammenbau Dämpferbrücke - Flügelhalter
Assemblage du support d’aileron
Assemblaggio supporto alettone
LOSA4435
LOSA6279 x 8
5-40 x 3/4”
LOSA6279
LOSA4435
LOSA6311 x 2
LOSA6302
8-32 x 11/32”
LOSA6279
LOSA6302 x 2
5-40 x 1/4”
LOSA4435
LOSA6278
TLR243000
TLR244010
LOSA4424
TLR244020
31
D-9
EN
DE
FR
IT
Rear Shock Tower Installation
Einbau der Stoßdämpferbrücke hinten
Installation du support d’amortisseurs arrière
Installazione supporto ammortizzatori poster.
LOSA6280
LOSA6302 x 1
L 5-40 x 1/4”
LOSA6278
LOSA6278 x 2
5-40 x 1/2”
LOSA6302
LOSA6280 x 2
5-40 x 1”
TLR241003
D-10A
EN
DE
FR
IT
Tie Rod Installation
Einbau der Spurstange
Installation des biellettes de carrossage
Installazione tirante
LL
RR
L
LOSA6545
LOSA6302 x 1
L 5-40 x 1/4”
LOSA6282
LOSA6302
LOSA6282 x 1
LOSA6047
LOSA6048
5-40 x 7/8”
LOSA6049
145.5mm
32
D-10B
EN
DE
FR
IT
Tie Rod Installation
Einbau der Spurstange
Installation des biellettes de carrossage
Installazione tirante
LL
RR
L
LOSA6302 x 1
L 5-40 x 1/4”
LOSA6282 x 1
5-40 x 7/8”
LOSA6302
LOSA6282
D-11
EN
DE
FR
IT
Rear Center Dogbone Assembly
Zusammenbau hintere Achswelle
Installation du cardan central arrière
Assemblaggio giunto cardanico
TLR242014
33
D-12
EN
DE
FR
IT
Rear Clip Assembly
Zusammenbau der Hinterachse
Installation du train arrière
Assemblaggio clip posteriore
LOSA6262 x 4
8-32 x 1/2”
LOSA6302
LOSA6271 x 2
5-40 x 1/2”
LOSA6302 x 2
L 5-40 x 1/4”
EN Ensure that the dogbone is inserted into the slot of
the center outdrive while installing the Rear Clip assembly.
DE Bitte stellen Sie sicher, dass die Achswelle in die
Zentralknochenaufnahme eingesetzt ist, wenn
Sie die Zentraldifferenzial-Baugruppe einbauen.
FR Contrôlez que l’extrémité du cardan est correctement
insérée dans la noix de sortie du différentiel central quand
vous installez le train arrière sur le châssis.
IT Accertarsi che il giunto cardanico sia inserito nella sede del
trascinatore centrale quando si installa il gruppo clip posteriore.
34
LOSA6271
LOSA6262
D-13
EN
DE
FR
IT
Completed Rear Assembly
Abgeschlossener Heckzusammenbau
Train arrière installé
Assemblaggio posteriore completato
35
E-1
EN
DE
FR
IT
Shock Assembly
Stossdämpfer
Assemblage des amortisseurs
Assemblaggio ammortizzatore
1. Clean the 2-56 x 1/4” Button Head Screw and apply TLR-LOK adhesive to the threads.
2. Install the larger shock piston washer on each shock shaft before the piston is
installed, then install the Shock Piston on the front shock shaft and the shock piston
on the rear shock shaft. After installing the pistons, install the smaller of the two
washers on top of the piston. Then install the 2-56 x 1/4” Button Screw into the
Shock Shaft with a .050” Allen Wrench.
3. Place a drop of Shock Oil into the bottom of the Shock Body to lubricate
the Shock Seals.
4. Thread the Shock Shaft into the Shock End using pliers. Use caution when threading
the Shock Ends onto the Shafts. Avoid gouging or scratching the Shock Shaft while
gripping the Shock Shaft with pliers by placing the edge of a towel over the shaft,
then gripping the portion of the shaft covered by the towel. This method
will work very well to protect the Shock Shafts from damage.
5. Ensure the Shaft is fully extended when filling the shock.
6. Fill the Front Shock Body with 37.5 wt Shock Oil and the Rear Shock Body
with 37.5 wt until the oil is to the top of the body.
7. “Work” the Shock Shaft up and down 8 times. This will release the air bubbles
trapped beneath the piston. Place the filled shock, in the upright position,
off to the side for a few minutes until the air bubbles escape from the oil.
8. Once all the air bubbles are out of the oil, gently place the Shock Bladder
onto the shock as shown. Some oil should “bleed” from the shock.
9. Screw the Shock Cap onto the Body until some resistance is felt.
10. Slowly push the Shock Shaft up. This will bleed excess oil from the shock.
11. Tighten the cap all the way down using the shock tools included in your vehicle.
12. Move the Shock Shaft up and down. The shaft should be easy to push up into the
body of the shock. If increased pressure is felt towards the top, there is too much oil in
the shock. Loosen the Shock Cap and “bleed” the shock as done previously.
13. Make sure each pair (front/rear) Shocks have the same rebound and compression. This
is checked by holding one shock in each hand horizontally and pushing them together
by the Shock End. Watch carefully to ensure that both compress evenly. Now release
both shocks and again watch carefully as they should rebound
the same.
14. Install the Shock Adjustment Nut O-ring into the Shock Adjustment Nut
before installing the Nut onto the Shock Body.
1. Reinigen Sie die 2-56 x 1/4”Inbusschraube und geben TLR-LOK auf das Gewinde.
2. Setzen Sie die größere Unterlegscheibe vor der Montage des Kolbens auf die
Kolbenstange. Montieren Sie dann den Kolben an der Vorderseite (Oberseite) der
Kolbenstange. Setzen Sie danach die kleinere der beiden Unterlegscheiben auf die
Oberseite des Kolbens. Schrauben Sie dann die 2-56 x 1/4 Inbusschraube mit einem
.050 Inbusschlüssel fest.
3. Geben Sie einen Tropfen Stoßdämpferöl unten in das Dämpfergehäuse um die
Dämpfderdichtungen zu schmieren.
4. Drehen Sie mit einer Zange die Kugelendpfanne auf den Kolben. Achten Sie bitte
dabei darauf mit der Zange die Kugelendpfanne nicht zu beschädigen. Wickeln Sie
den Kolben dazu in ein Taschentuch und halten dieses beim drehen fest. Diese
Methode schützt den Kolben sehr gut vor Kratzer und Beschädigungen.
5. Achten Sie darauf, dass der Kolben vollständig ausgefahren ist wenn Sie den
Stoßdämpfer füllen.
6. Füllen Sie die vorderen Stoßdämpfergehäuse mit 37.5wt Öl und die hinteren mit
37.5wt Öl bis zur Oberkante auf.
7. Bewegen Sie den Kolben 8 Mal rauf und runter. Damit lösen Sie Luftblasen die sich
am Kolben festgesetzt haben. Stellen Sie den gefüllten Stoßdämpfer aufrecht hin.
8. Sind alle Blasen aus dem Öl ausgetreten, setzen Sie vorsichtig die
Volumenausgleichskappe auf. Dabei wird etwas Öl austreten.
9. Schrauben Sie die Stoßdämpferendkappe auf das Gehäuse bis sie etwas
Wiederstand spüren.
10. Bewegen Sie den Kolben vorsichtig nach oben. Das läßt überschüssiges Öl austreten.
11. Ziehen Sie die Stoßdämpferkappe mit dem Werkzeug aus dem Lieferumfang fest.
Der Kolben sollte dabei in unterster Position sein.
12. Bewegen Sie den Kolben rauf und runter, der Kolben sollte sich leicht bewegen.
Sollte der Kolben sehr schwer nach oben gehen befindet sich zuviel Öl im
Stoßdämpfer. Lösen Sie dann die Stoßdämpferkappe und lassen etwas
Öl austreten wie vorher schon getan.
13. Stellen Sie bitte sicher, dass jedes Paar den gleichen Wiederstand / Kompression hat.
Dieses können Sie einfach überprüfen in dem Sie je einen Stoßdämpfer in die Hand
nehmen und beide Kolben gleichzeitig herunterdrücken. Achten Sie darauf ob
beide Kolben die gleiche Kompression benötigen und die gleiche Zeit um
wieder auszufahren.
14. Setzen Sie den O-Ring in die Einstellmutter ein bevor Sie diese auf das
Dämpfergehäuse aufdrehen.
1. Nettoyez la vis BTR 2-56 x 1/4” et appliquez du frein filet TLR-LOK sur les filets.
2. Installez la rondelle la plus large sur chaque tige d’amortisseur avant d’installer le
piston, puis installez les pistons de sur les tiges des amortisseurs avant et les
pistons de sur les tiges des amortisseurs arrière. Après avoir installé les pistons,
veuillez poser les rondelles dessus, puis serrez les vis à tête bombées 2-56 x 1/4”
dans les tiges d’amortisseurs en utilisant une clé BTR 0.050”.
3. Placez une goutte d’huile à amortisseur dans le bas du corps d’amortisseur pour
lubrifier les joints.
4. Vissez les tiges d’amortisseur dans les chapes en utilisant une pince. Evitez de rayer
ou de marquer les tiges d’amortisseurs quand vous les maintenez avec la pince.
Placez un chiffon sur la tige et maintenez-la à cet endroit avec la pince, cette méthode
permet de protéger les tiges.
5. Contrôlez que la tige est sortie au maximum quand vous remplissez les amortisseurs.
6. Remplissez les corps des amortisseurs avant avec de l’huile 37.5wt et les arrières avec
de l’huile 37.5wt, les corps doivent être remplis jusqu’en haut.
7. Faites coulissez 8 fois les tiges de haut en bas. Cela permet d’évacuer les bulles
d’air coincées sous les pistons. Laissez reposer les amortisseurs en position
verticale jusqu’à ce que toutes les bulles d’air se soient échappées de l’huile.
8. Une fois que les bulles sont évacuées, placez les membranes comme sur l’illustration.
Une petite quantité d’huile va s’échapper de l’amortisseur.
9. Vissez les bouchons sur les amortisseurs jusqu’à sentir de la résistance.
10. Rentrez lentement la tige dans l’amortisseur pour évacuer l’excès d’huile.
11. Serrez les bouchons d’amortisseurs avec les outils fournis.
12. Déplacez la tige de haut en bas. La tige doit rentrer facilement dans l’amortisseur.
Si la pression augmente quand vous poussez la tige, cela signifie qu’il y a trop d’huile
dans l’amortisseur. Desserrez le bouchon et purgez-le comme précédemment.
13. Contrôlez que chaque paire d’amortisseurs (avant/arrière) ont le même rebond et la
même compression. Cela se vérifie en tenant horizontalement un amortisseur dans
chaque main et en les appuyant l’un contre l’autre par leurs chapes. Contrôlez qu’ils
se compressent de la même façon. Maintenant relâchez la pression et contrôlez que
le rebond est identique entre les deux amortisseurs.
14. Installez le joint torique dans les bagues de réglage des amortisseurs avant
de les visser sur les corps des amortisseurs.
36
1. Pulire la vite a testa tonda 2-56 x 1/4 e applicare adesivo TLR-LOK sul filetto.
2. Inserire la rondella più grande del pistone ammortizzatore su ogni albero prima di
montare il pistone, poi installare il pistone da sull’albero dell’ammortizzatore anteriore
e quello da sull’albero dell’ammortizzatore posteriore. Dopo aver installato i pistoni,
inserire la più piccola delle due rondelle sulla parte alta del pistone. Poi installare la
vite con testa tonda da 2-56 x 1/4” nell’albero dell’ammortizzatore con una chiave
Allen da 0,050”.
3. Mettere una goccia di olio per ammortizzatori nella parte inferiore del corpo
ammortizzatore per lubrificare le guarnizioni.
4. Avvitare con cura l’alberino ammortizzatore nel terminale usando delle pinze. Evitare
di graffiare o danneggiare l’albero ammortizzatore mettendo uno straccio nel punto in
cui lo si prende con la pinza. In questo modo si evita di danneggiare l’alberino.
5. Quando si riempie l’ammortizzatore accertarsi che l’albero sia completamente estratto.
6. Riempire il corpo dell’ammortizzatore fino all’orlo con olio apposito, quello anteriore
con olio 37.5wt e quello posteriore con 37.5wt.
7. Mandare avanti-indietro l’albero dell’ammortizzatore per 8 volte. Questo serve per
liberare le bolle d’aria intrappolate sotto al pistone. Posizionare l’ammortizzatore
pieno in verticale per qualche minuto, per dar modo alle bolle d’aria di uscire dall’olio.
8. Quando tutte le bolle d’aria sono uscite dall’olio, inserire delicatamente la
vescica dentro all’ammortizzatore come illustrato. Un po’ di olio spurgherà
dall’ammortizzatore.
9. Avvitare il tappo dell’ammortizzatore sul corpo finché non si nota una certa resistenza.
10. Spingere in su lentamente l’albero dell’ammortizzatore; questo farà uscire
dall’ammortizzatore l’olio in eccesso.
11. Stringere il tappo completamente in basso usando l’apposito attrezzo fornito nel kit.
12. Muovere in su e in giù l’albero dell’ammortizzatore. Dovrebbe essere facile spingere
l’albero all’interno dell’ammortizzatore. Se si nota un aumento di pressione verso la
parte alta, vuol dire che c’è troppo olio all’interno dell’ammortizzatore. Allentare il
tappo per far trafilare l’olio in eccesso, come già fatto prima.
13. Accertarsi che ogni paio di ammortizzatori (anteriore/posteriore) abbia lo
stesso rimbalzo e la stessa compressione. Questo si può verificare tenendo un
ammortizzatore in orizzontale per ogni mano e spingendoli insieme da una estremità.
Bisogna verificare attentamente che entrambi abbiano la stessa pressione. Ora
rilasciare entrambi gli ammortizzatori verificando di nuovo che abbiano la stessa forza
di rilascio.
14. Installare l’o-ring di regolazione nel dado, prima di installare il dado sul corpo
dell’ammortizzatore.
LOSA6255
LOSA6255 x 1
TLR-LOK
2-56 x 1/4”
TLR243014
TLR243012
front, 4 x 1.2mm,
4 x 1.3mm
TLR243001
TLR243004
TLR243011
rear, 8 x 1.3mm
TLR243014 x 1
LOSA5421
3 x 7 x 0.40mm
TLR243024
TLR243013
TLR243024 x 2
TLR243008 - front
TLR243026 - rear
OI L
O-Ring, Seal
TLR243024
TLR243024
TLR243003 - front
TLR243025 - rear
TLR243006
LOSA5435
TLR243005
37
E-2
EN
DE
FR
IT
Shock Boot and Assembly
Zusamenbau von Stoßdämpfermanschette und Feder
Installation des chaussettes et des ressorts d’amortisseur
Preparazione e assemblaggio ammortizzatore
EN Front
EN Rear
DE Front
DE Heck
FR Avant
FR Arrière
IT Anteriore
IT Posteriore
TLR243032
TLR243032
TLR243027
TLR243028
TLR243009
TLR243009
E-3
LOSA6350 x 1
#4 washer
LOSA6302 x 1
L 5-40 x 1/4”
LOSA6279 x 1
5-40 x 3/4”
LOSA6284 x 1
5-40 x 20mm Left Hand Screw
38
EN
DE
FR
IT
Front Shock Installation
Einbau der Frontstoßdämpfer
Installation des amortisseurs avant
Installazione ammortizzatore anteriore
EN Use LOSA6284 on the
right suspension arm.
Use LOSA6279 on the
left suspension arm.
DE Verwenden Sie LOSA6284
auf der rechten
Aufhängung und
LOSA6279 auf der linken
Aufhängung.
LL
RR
LOSA6350
LOSA6302
LOSA5435
FR Utilisez la vis LOSA6284
sur le triangle droit.
Utilisez la vis LOSA6279
sur le triangle gauche.
IT Usare LOSA6284 sul
braccio della sospensione
destra. Usare LOSA6279
sul braccio della
sospensione sinistra.
LOSA6279
LOSA6284
L
E-4
LOSA6350 x 1
#4 washer
LOSA6302 x 1
L 5-40 x 1/4”
LOSA6279 x 1
5-40 x 3/4”
LOSA6284 x 1
EN
DE
FR
IT
Rear Shock Installation
Einbau der Heckstoßdämpfer
Installation des amortisseurs arrière
Installazione ammortizzatore posteriore
EN Use LOSA6284 on the
left suspension arm. Use
LOSA6279 on the right
suspension arm.
L
LL
RR
L
LOSA5435
LOSA6350
DE Verwenden Sie
LOSA6279 auf der
rechten Aufhängung
und LOSA6284 auf der
linken Aufhängung.
LOSA6302
FR Utilisez la vis LOSA6284
sur le triangle gauche.
Utilisez la vis LOSA6279
sur le triangle droit.
IT Usare LOSA6284 sul
braccio della sospensione sinistra. Usare
LOSA6279 sul braccio della
sospensione destra.
5-40 x 20mm Left Hand Screw
E-5
LL
RR
LOSA6279
LOSA6284
EN
DE
FR
IT
Droop Setting
Stoßdämpfereinstellung
Réglage du drop
Impostazione escursione
EN Front
EN Rear
DE Front
DE Heck
FR Avant
FR Arrière
IT Anteriore
IT Posteriore
DROOP
128.0mm
DROOP
116.0mm
39
E-6
EN
DE
FR
IT
Complete Shock Assembly
Vollständige Stoßdämpferbaugruppe
Amortisseurs installés
Assemblaggio completo ammortizzatori
F-1
EN
DE
FR
IT
Chassis Guard Installation
Einbau des Chassis-Schutzes
Installation des bavettes de protection
Installazione protezione telaio
TLR245001 x 4
5-40 x 1/4”
TLR245001
TLR245002 x 43
5-40 x 1/4”
TLR-LOK
TLR245002
40
F-2
EN
DE
FR
IT
Servo Installation
Servoeinbau
Installation des servos
Installazione servi
LOSA4003
LOSA6256 x 4
4-40 x 1/2”
LOSA4002
LOSA6256
LOSA6350
LOSA6350 x 4
#4 washer
LOSA6299 x 1
5-40 x 1/8”
LOSA6299
TLR241004
EN
DE
FR
IT
F-3
Radio Tray Assembly
Einbau RC-Box
Assemblage de la boîte radio
Assemblaggio piastra radio
LOSA6256 x 3
4-40 x 1/2”
LOSA6256
LOSA6256
TLR241004
41
EN
DE
FR
IT
F-4
Optional Steering Servo/Receiver Installation
Optionales Lenkservo / Empfängereinbau
Support optionnel Récepteur/Servo
Servocomando sterzo optional/Installazione ricevitore
LOSA4003
LOSA6256 x 4
4-40 x 1/2”
LOSA4002
LOSA6256
LOSA6350 x 4
#4 washer
LOSA6350
LOSA6299 x 1
5-40 x 1/8”
LOSA6299
TLR241004
EN
DE
FR
IT
F-5
LOSA6271 x 4
5-40 x 1/2”
LOSA6271
42
Radio Tray Installation
Einbau RC-Box
Installation de la boite radio
Installazione piastra radio
F-6
EN
DE
FR
IT
Servo Arm Installation
Montage Servohorn
Installation du palonnier de direction
Installazione braccetto servocomando
EN Assembled previously
TLR5901 x 1
DE Bereits montiert
M3 x 6mm
TLR-LOK
EN Ensure the servo gear is
centered before attaching
the Servo Horns. This is best
accomplished by connecting the
servos to the radio system and
setting the trim to center.
FR Précédemment
assemblé
IT Assemblata
precedentemente
DE Bitte stellen Sie sicher, dass das
Servo mit der Fernsteuerung
zentriert ist bevor Sie das
Servohorn aufsetzten.
FR Contrôlez que les servos sont
bien au neutre avant d’installer
les bras. La meilleure méthode
pour le faire est d’alimenter les
servos via la radio et d’avoir les
trims au neutre.
IT Prima di attaccare le
squadrette accertarsi che il
servo sia centrato. Per fare
questo conviene collegarlo al
radiocomando e centrare il trim.
F-7
EN
DE
FR
IT
LOSA99040 - 23S SPM/Air
LOSA99041 - 23 JR
LOSA99042 - 24 Hitec
LOSA99043 - 25 Futaba
Servo Arm Installation
Einbau Servohorn
Installation des bras de servos
Installazione squadrette servi
90º
43
F-8
44
EN
DE
FR
IT
Completed Radio Tray Installation
Vollständige Montage RC Box
Platine radio installée
Installazione completa supporto radio
G-1
EN
DE
FR
IT
Motor Assembly
Motormontage
Assemblage moteur
Assemblaggio motore
TLR245003 x 2
M4 x 8
TLR-LOK
TLR242015
TLR-LOK
TLR245003
G-2
EN
DE
FR
IT
Motor Assembly Installation
Motoreinbau
Installation du moteur
Installazione gruppo motore
TLR5933 x 1
M3 x 12
TLR5933
TLR6352 x 1
TLR-LOK
3.2 x 7 x 0.5mm
TLR6352
45
G-3
EN
DE
FR
IT
Speed Control Installation
Einbau des Reglers
Installation du contrôleur
Installazione controllo velocità
G-4
EN
DE
FR
IT
Battery Strap Installation
Montage der Akkuschlaufen
Installation de sangles de batterie
Installazione fascia batteria
EN Temporarily remove
the Battery Stay
from the chassis to
facilitate battery strap
installation.
DE Entfernen Sie
vorübergehend
den Akkuhalter aus
dem Chassis um die
Akkuschlaufen zu
montieren.
FR Retirez temporairement
le support de batterie
du châssis pour faciliter
l’installation des
sangles.
IT Togliere
momentaneamente il
supporto batteria dal
telaio per facilitare
l’installazione della
fascia fissa batteria.
46
TLR241013
H-1
EN
DE
FR
IT
Wickerbill Assembly
Zusammenbau Wickerbill
Assemblage de l’aileron
Assemblaggio Wickerbill
LOSA6306
1
LOSA6306 x 4
4-40 x 3/16” lock nut
TLR240003
LOSA6234 x 4
LOSA6234
4-40 x 1/4”
TLR8202
TLR240001
TLR240001
2
H-2
EN
DE
FR
IT
Wheel Nut Assembly
Radmutternmontage
Pose des écrous de roues
Assemblaggio dado ruota
TLR3538
TLR8202
TLR3538
47
H-3
48
EN
DE
FR
IT
Completed Chassis
Fertigstellung des Fahrgestells
Châssis assemblé
Telaio completato
Standard Kit Setup
4-20-15
Differentials
Front: x Standard
2º Toe Out
39mm
-1º
15º
Standard Hex
2.3mm
Smart
10,000 wt
8 Hole Split 1.2/1.3mm/37.5 wt
White 5.8 lbs.
116mm
Long
Up
2
2/Inside
x
10,000 wt
Kick Shims, 1 up front, 1 down rear
x
3º
4º
42mm
-2º
Back
Standard Hex
2.3mm
8 Hole /1.3mm/37.5 wt
Grey 5.8 lbs
128mm
2/B
2/Middle
7000 wt
Wing Type:
Wing Spacer: x
Wicker Bill: x
x
Electronics
Radio: DX4R
Servo:
S6280
Timing Advance: 0
Throttle/Brake Expo: 25%
Pinion:14
Servo Expo: 25%
Spur: 45
Throttle/Brake EPA:
Initial Brake:
Motor: Orion VST2-2100kV
Drag Brake:
ESC:
5%
100/70
Battery: 4S 6000MaH
Orion Vortex R8XPro
Throttle Profile: Fwd/Brk-0
49
Differentials
Front: Standard
Smart
Wing Type:
Wing Spacer:
Wicker Bill:
Electronics
Radio:
Timing Advance:
Servo:
Throttle/Brake Expo:
Pinion:
Servo Expo:
Spur:
Throttle/Brake EPA:
Initial Brake:
Motor:
Drag Brake:
Battery:
ESC:
Throttle Profile:
50
Differentials
Front: Standard
Smart
Wing Type:
Wing Spacer:
Wicker Bill:
Electronics
Radio:
Timing Advance:
Servo:
Throttle/Brake Expo:
Pinion:
Servo Expo:
Spur:
Throttle/Brake EPA:
Initial Brake:
Motor:
Drag Brake:
Battery:
ESC:
Throttle Profile:
51
52
LOSA3553
LOSA6948
LOSA3500
LOSA3501
LOSA3505
LOSA3518
LOSA6227
LOSA6254
LOSA6302
LOSA6297
LOSA6286
TLR244011
LOSA6273
LOSA1750
LOSA6272
LOSA1754
LOSA1756
LOSA5435
LOSA6256
LOSA6350
LOSA6240
TLR241005
LOSA6272
LOSA3502
LOSA3518
LOSA3501
LOSA3505
TLR242011
LOSA6948
LOSA3553
LOSA3500
LOSA243000
LOSA6311
LOS6204
TLR242000
LOSA6263
LOSA6279
LOSA6284
LOSA6947
TLR244016
LOSA1701
TLR244001
TLR244017
TLR244007
LOSA6302
LOSA3518
LOSA6298
LOSA3522
LOSA6280
LOSA6047
LOSA6546
LOSA6302
LOSA6047
LOSA6945
LOSA6251
TLR244003
LOSA6282
LOSA6050
LOSA3518
LOSA3523
LOSA6048
LOSA6282
LOSA6272
LOSA3586
LOSA6953
LOSA6266
LOSA6547
LOSA1754
LOSA1756
TLR242002
TLR8202
LOSA6046
LOSA6947
TLR242011
TLR242000
LOSA6273
LOSA6296
LOSA4433
TLR242003
TLR244019
LOSA4453
TLR245000
TLR8202
TLR3538
LOSA3530
LOSA6049
LOSA6302
REPLACEMENT PARTS / ERSATZTEILE / PIÈCES DE RECHANGE / PEZZI DI RICAMBIO
LOSA5435
TLR243009
TLR243027
TLR243005
TLR243006
TLR243032
LOSA5421
TLR243013
TLR243013
TLR243024
TLR243003
TLR243008
TLR243012
TLR243014
LOSA6255
TLR243004
TLR243001
53
LOSA3505
LOSA3552
LOSA3554
LOSA6948
TLR242008
LOSA3500
LOSA3505
LOSA3501
LOSA3518
LOSA3502
LOSA4406
TLR244021
LOSA4406
LOSA6946
LOSA4453
TLR241003
LOSA6279
TLR244005
TLR241004
LOSA6271
LOSA6256
LOSA4408
LOSA6946
LOSA6050
LOSA6262
LOSA6302
LOSA6271
LOSA4406
LOSA6271
LOSA6302
LOSA6350
LOSA6946
LOSA6045
LOSA6306
LOSA6272
LOSA6256
TLR241004
LOSA6306
LOSA9168
LOSA6256
LOSA6045
LOSA6262
TLR241004
TLR242008
LOSA4420
TLR245003
LOSA6278
LOSA4406
LOSA4406
LOSA6050
LOSA6272
TLR244006
TLR244005
LOSA99040
LOSA99041
LOSA99042
LOSA99043
LOSA3518
LOSA3501
LOSA3505
TLR242008
LOSA6948
LOSA3554
LOSA3500
TLR242015
LOSA6277
TRL5933
LOSA6271
TLR241003
LOSA6271
TLR245001
TLR241004
LOSA6299
LOSA6256
LOSA6262
TLR242007
TLR6352
TLR241001
TLR245001
TLR241001
LOSA6270
LOSA6270
TLR241013
LOSA4002
LOSA4003
TLR241010
TLR241011
TLR245002
LOSA6262
TLR241012
54
LOSA3500
LOSA3502
LOSA3553
LOSA6948
LOSA3505
LOSA3501
LOSA3518
LOSA3518
LOSA3501
LOSA6296
LOSA6947
LOSA1759
LOSA6272
LOSA6947
LOSA6302
LOSA6350
LOSA4414
LOSA3522
LOSA3518
LOSA6047
LOSA6296
LOSA3530
LOSA3518
LOSA6278
LOSA6280
TLR3538
LOSA6282
LOSA6302
LOSA6204
TLR254000
LOSA6953
LOSA6945
LOSA1731
LOSA6302
LOSA6227
LOSA6254
LOSA6254
LOSA6254
LOSA6302
TLR244012
LOSA1750
LOSA4453
LOSA6234
TLR240001
LOSA1750
LOSA6279
TLR244018
TLR244011
LOSA1756
LOSA1759
LOSA6274
TLR8202
LOSA6306
LOSA4435
LOSA6280
LOSA6273
LOSA4435
LOSA1750
TLR244010
LOSA4450
LOSA6282
LOSA4454
LOSA6545
LOSA4452
LOSA3523
LOSA3586
LOSA7156
LOSA4450
LOSA6048
LOSA6302
TLR242012
LOSA4454
LOSA4452
LOSA6278
LOSA4435
LOSA6279
TLR240001
TLR8202
LOSA6280
LOSA6278
LOSA6302
LOSA5435
TLR243000
TLR244020
LOSA6311
LOSA4424
TLR8202
TLR242003
TLR243005
TLR241003
TLR242014
LOSA6271
LOSA6302
LOSA3505
LOSA3505
TLR242012
LOSA6948
LOSA3553
LOSA3500
TLR240003
LOSA5435
TLR243009
TLR243028
TLR243005
TLR243006
TLR243032
LOSA5421
TLR243024
TLR243025
TLR243026
TLR243014
TLR243011
LOSA6255
TLR243004
TLR243001
TLR243013
Part #
English
Deutsch
Français
Italiano
LOSA1701
Front Suspension Arm Bushings:
8B, 8T
Buchse für Querlenker vorne: 8B, 8T
8B/8T - Paliers de triangles avant
Boccole braccio sospensione
anteriore: 8B, 8T
LOSA1731
Rear Hub Carriers: 8B 2.0
Radträger hinten: 8B 2.0
8B 2.0 - Fusées arrière
Guide mozzi posteriori: 8B 2.0
LOSA1750
Sway Bar Set: 8B, 8T
Stabilisator Set: 8B, 8T
8B/8T - Jeu de barres anti-roulis (6) +
rotules et chapes
Set barra oscillante: 8B, 8T
LOSA1754
Adjustable Front Hinge Pin Brace w/
Inserts: 8B/T
Querlenkerhalter vorne einstellbar mit
Alu-Einsätze: 8B/8T
8B/8T - Cales de pincement avant
réglable en aluminium avec inserts
Supporto regolabile perno cerniera
anteriore c/inserti: 8B/T
LOSA1755
Adjustable Rear Hinge Pin Brace w/
Inserts: 8B/T
Losi Querlenkehalter hinten
einstellbar mit Einsätze: 8B/8T
8B/8T - Cales de pincement arrière
réglable en aluminium avec inserts
Supporto regolabile perno
cerniera posteriore c/inserti: 8B/T
LOSA1756
Adjustable Hinge Pin Brace Inserts:
8B/T
Einsätze für Querlenkerhalter: 8B/8T
8B/8T - Jeu d’inserts pour cales de
pincement
Inserti supporto regolabile perno
cerniera: 8B/T
LOSA1759
LRC Adjustable Hinge Pin Braces w/
Inserts: 8B/T2.0
Querlenkerhalter hinten einstellbar m.
Einsätze LRC: 8B/T2.0
8B/8T/8B 2.0/8 EU - Cales
de pincement réglables
avec inserts
Supporti regolabili LRC perno
cerniera c/inserti: 8B/T2.0
LOSA3500
Diff Housing F/R/C: 8B,8T
Diff-Gehäuse F/Z/H: 8B,8T
8B/8T - Corps de diff F/R/C
Scatola diff. A/P/C: 8B,8T
LOSA3501
Diff Shims, 6 x 11 x .2mm:
8B 2.0 (12)
Diff-Unterlegscheiben
6 x 11 x .2mm: 8B 2.0:
8B 2.0 - Cales de différentiel 6 x 11
x .2mm
Rasamenti diff., 6 x 11 x .2mm:
8B 2.0 (12)
LOSA3502
Diff Ger & Shaft Set: 8B,8T
Diff Zahnr. u. Wellen Set: 8B, 8T
8B/8T - Pignon & axes de diff
Set ingr. e albero diff.: 8B,8T
LOSA3505
Diff Seal Set: 8B,8T,LST,XXL,MB
Diff-Dichtungs Set: 8B, 8T, LST, XXL,
MB
8B/8T/LST/ XXL/MB Jeu de joints de différentiel
Set sigillante diff.: 8B,8T,LST,XXL,MB
LOSA3518
Drive Pin Set: 8B/T
Mitnehmerstift: 8B/8T
8B/8T - Set de
diverses goupilles
Set perno trasmissione: 8B/T
LOSA3522
F/R CV Driveshaft Axles (2): 8B,8T
F/H CV Antriebsachse (2): 8B/8T
8B/8T - Axes de cardans
F/R CV(2)
F/R CV Assi trasmissione (2): 8B,8T
LOSA3523
F/R CV Driveshaft Coupling Set: 8B,8T
F/H CV Antriebsachse
Coupling Set: 8B /8T
8B/8T - Coupleurs de cardans F/R CV
(2) + goupilles (3)
Set accoppiamento trasmissione:
8B,8T
LOSA3530
Wheel Hexes (Pr) Hard Ano: 8B,8T
Radmitnehmer (Pr) gehärtet: 8B/8T
8B/8T - Hexagone de jantes anodisé
dur (2)
Esagoni (Pr) anodizzati ruote: 8B,8T
LOSA3552
Center Diff 45T Spur Gear: 8E
Hauptzahnrad 45Z: 8E
Couronne de différentiel
central 45T : 8E
Ingranaggio diff. centrale 45T: 8E
LOSA3553
Fr/R HD Lightened Outdrive Set (2):
8B/8T
Antriebsklauenset Leicht (2): 8B, 8T
8B/8T - Noix de cardan
allégées HD (2)
Fr/R HD Set bicchierino alleggerito
(2): 8B/8T
LOSA3554
Center HD Lightened Outdrive Set
(2): 8B/8T
Losi Antriebsklauen für Mitteldiff,
Leichtbau (2): 8B/8T
Noix de cardans allégées HD (2)
Set bicchierino alleggerito centrale HD
(2): 8B/8T
LOSA3586
FR/R CV Driveshafts (2): 8T 2.0
Antriebswellenset vorne/hinten: 8T
2.0
8T 2.0 - Tiges de
cardans CVD av/arr. (2)
FR/R CV Semiassi (2): 8T 2.0
LOSA4002
Antenna Kit
Losi Antennen Kit
Tube d’antenne avec fixations
Antenna Kit
LOSA4003
Antenna Caps
Antennen Kappen
Capuchons d’antenne (8)
Tappi Antenna
LOSA4406
Steering Bellcrank Plastic& Servo
Saver: 2.0
Lenkhebel Kunststoff & Servo Saver:
2.0
8B 2.0 - Palonnier de direction,
renvois & Sauve servo
Squadrette plastica sterzo e salva
servo: 2.0
LOSA4408
Steering Post Set: 8B,8T
Lenkhebelhalter: 8B,8T
8B/8T - Pivot de direction (2)
Set supporti sterzo: 8B,8T
LOSA4420
Center Diff Mount & Brace Set: 8B
2.0
Mitteldiffbock/Hauptzahnradschutz
Set: 8B 2.0
8B 2.0 - Support de diff
cent. & entretoises
Set supporti e montanti diff centrale:
8B 2.0
LOSA4424
Body Posts & Tank Mounts: 8B, 8T
Karosserie Halter und Tank
Befestigung: 8B/ 8T
8B/8T - Plots de carrosseries &
support de réservoir
Supporti carrozzeria e montanti
serbatoio: 8B, 8T
LOSA4433
Body Posts: 8T 2.0
Losi Karosserie Halter: 8T 2.0
8T 2.0 - Plots de carrosserie
Supporti carrozzeria: 8T 2.0
LOSA4435
Wing Mount Set: 8B, 8T
Losi: Halter Flügel: 8B, 8T
8B/8T - Support d’aileron complet
Set montanti alettone: 8B, 8T
LOSA4450
Rear Gearbox Set: 8B 2.0
Getriebebox hinten 8B 2.0
8B 2.0 - Carter de
différentiel arr.
Set riduttore posteriore: 8B 2.0
LOSA4452
Gear Box Shims (20): 8B 2.0
Losi Unterlegscheiben
Getriebebox (20) B 2.0
8B 2.0 - Rondelles de calage
Rasamenti riduttore (20): 8B 2.0
LOSA4453
Chassis Spacer/Cap Set: 8B 2.0
Distanz- und Befestigungsset: 8B 2.0
8B 2.0 - Diverses entretoises en
plastique
Set distanziali telaio: 8B 2.0
LOSA4454
R Gearbox Bearing Inserts, Aluminum
Lagerschalen hinten,
Aluminium 8B/8T 2.0
8B/8T 2.0 - Inserts de Roulements de
diff arr. en aluminium + cales
R Inserti alluminio cuscinetti riduttore
55
56
Part #
English
Deutsch
Français
Italiano
LOSA5421
15mm Shock Caps Bottom (2): 8B,8T
Endkappen unten, für 15mm
Stoßdämpfer: 8B, 8T
8B/8T - Bouchons inférieurs 15mm (2)
15mm Tappi inferiori ammortizzatore
(2): 8B,8T
LOSA6045
HD Steering Link Set: 8B 2.0
Anschluss Lenkgestänge: 8B 2.0
Biellette de direction renforcée
Set collegamenti sterzo HD: 8B 2.0
LOSA6046
4mm Rod End Set (8): 8B,8T
Kugelpfanne: 8B, 8T
8B/8T - Chapes 4mm (8)
Set terminali rinvii 4mm (8): 8B,8T
LOSA6047
5mm Rod End Set: 8B, 8T
5mm Kugelpfannen Set: 8B, 8T
8B/8T - Chapes 5mm (8)
Set terminali rinvii 5mm: 8B, 8T
LOSA6048
Suspension Balls 8.8mm Flanged:
8B,8T
Kugelkopf m. Flansch 8.8mm: 8B, 8T
8B/8T - Rotules épaulées 8.8mm (4)
Sfere flangiate 8,8mm per
sospensioni: 8B,8T
LOSA6049
Suspension Balls 8.8mm: 8B, 8T
Kugelkopf m. Flansch: 8B, 8T
8B/8T - Rotules 8.8mm (4)
Sfere sospensioni 8.8mm: 8B, 8T
LOSA6050
Steering Ball Set 6.8mm: 8B,8T
Kugelkopf Lenkung: 8B, 8T
8B/8T - Rotules de direction 6.8mm
(2 paires)
Set sfere sterzo 6.8mm: 8B,8T
LOSA6204
4-40 x 1/2 Socket Head Screw
4-40 x 1/2
Zylinderkopfschrauben
Vis chc 4-40 x 1/2 (10)
4-40 x 1/2 Vite testa brugola
LOSA6227
Hardened Set Screws, 4-40
5-40 x 3/8
Rundkopfschrauben (8)
Vis sans tête 4-40 (10)
Set viti indurite, 4-40
LOSA6234
Button Head Screw, 4-40 x 1/4
Rundkopfschrauben/
4-40 x 1/4
Vis à tête bombée 4-40x1/4
Viti testa tonda, 4-40 x 1/4
LOSA6240
5-40 x 1/2 Cap Head Screw (8)
Losi 5-40 x 1/2
Zylinderkopfschrauben (8)
Vis chc 5-40 x 1/2 vis (8)
5-40 x 1/2 Viti testa a brugola (8)
LOSA6251
5-40 x 3/16" Set Screw (10)
5-40 x 3/16”
Madenschraube (10)
Vis sans tête 5-40 x 3/16” (10)
5-40 x 3/16" Grani (10)
LOSA6254
2-56 x 1/4" Cap Head Screws (10)
2-56 x 1/4
Zylinderkopfschrauben (10)
Vis chc 2-56 x 1/4 (10)
2-56 x 1/4" Viti testa a brugola (10)
LOSA6255
2-56 x 1/4" Button Head Screw (10)
2-56 x 1/4
Rundkopfschrauben (10)
Vis tête bombée 2-56 x 1/4 (10)
2-56 x 1/4" Vite a testa tonda (10)
LOSA6256
4-40 x 1/2 Button Head Screw (6)
4-40 x 1/2
Rundkopfschrauben (6)
Vis tête bombée
4-40 x 1/2 (6)
4-40 x 1/2 Vite a testa tonda (6)
LOSA6262
8-32 x 1/2" FH Screws (10)
8-32 x 1/2
Flachkopfschrauben (10)
Vis à tête fraisée
8-32 x 1/2 (10)
8-32 x 1/2" Viti FH (10)
LOSA6263
8-32 x 3/4" BH Screws (8)
8-32 x 3/4
Rundkopfschrauben (8)
Vis tête bombée
8-32 x 3/4 (8)
8-32 x 3/4" Viti BH (8)
LOSA6266
8-32 x 5/8" BH Screws
8-32 x 5/8
Rundkopfschrauben
Vis tête bombée
8-32 x 5/8” (8)
8-32 x 5/8" Viti BH
LOSA6270
5-40 x 3/8" Flat Head Screws (10)
5-40 x 3/8
Flachkopfschrauben (10)
Vis à tête fraisée
5-40 x 3/8 (10)
5-40 x 3/8" Viti a testa piatta (10)
LOSA6271
5-40 x 1/2" FH Screws (10)
Losi 5-40 x 1/2
Flachkopfschrauben (10)
Vis à tête fraisée
5-40 x 1/2 (10)
5-40 x 1/2" Viti a testa piatta (10)
LOSA6272
5-40 x 3/4" FH Screws (10)
5-40 x 3/4
Flachkopfschrauben (10)
Vis à tête fraisée
5-40 x 3/4 (10)
5-40 x 3/4" Viti a testa piatta (10)
LOSA6273
5-40 x 7/8" FH Screws (4)
5-40 x 7/8
Flachkopfschrauben (4)
Vis à tête fraisée
5-40 x 7/8 (10)
5-40 x 7/8" Viti a testa piatta (4)
LOSA6274
5-40 x 1-7/8" FH Screws (2)
5-40 x 1 7/8
Flachkopfschrauben (2)
Vis à tête fraisée longues 5-40 x 1
7/8 (2)
5-40 x 1-7/8" Viti a testa piatta (2)
LOSA6277
5-40 x 3/8" BH Screws (8)
5-40 x 3/8
Rundkopfschrauben (8)
Vis tête bombée
5-40 x 3/8 (8)
5-40 x 3/8" Viti a testa tonda (8)
LOSA6278
5-40 x 1/2" BH Screws (8)
5-40 x 1/2
Rundkopfschrauben (8)
Vis tête bombée
5-40 x 1/2 (8)
5-40 x 1/2" Viti a testa tonda (8)
LOSA6279
5-40 x 3/4" BH Scrws (8)
5-40 x 3/4
Rundkopfschrauben (8)
Vis tête bombée
5-40 x 3/4 (8)
5-40 x 3/4" Viti a testa tonda (8)
LOSA6280
5-40 x 1" BH Screws (4)
5-40 x 1
Rundkopfschrauben (4)
Vis tête bombée
5-40 x 1 (4)
5-40 x 1" Viti a testa tonda (4)
LOSA6282
5-40 x 7/8: BH Screws
5-40 x 7/8
Rundkopfschrauben
Vis tête bombée
5-40 x 7/8
5-40 x 7/8: Viti a testa tonda
LOSA6284
5-40 x 20mm BHS, Left Hand Thread
8B
Losi 5-40 x 20mm
Rundkopfschrauben Linksgewinde
(10)
Vis CHC pas inverse
5-40 x 20mm (10)
5-40 x 20mm Viti a testa tonda,
filetto sinistro 8B
LOSA6296
8-32 x 1/8 Flat Point Set Screw (8)
8-32 x 1/8 Madenschraube-8
Vis pointeau bout plat
8-32 x 1/8 (8)
8-32 x 1/8 Grani a punta piatta (8)
LOSA6297
5-40 x 1/8 Flat Point Set Screw (8)
5-40 x 1/8 Madenschraube 8
Vis pointeau bout plat
5-40 x 1/8 (8)
5-40 x 1/8 Grani a punta piatta (8)
Part #
English
Deutsch
Français
Italiano
LOSA6298
8-32 x 1/8 Cup Point Set Screw (8)
8-32 x 1/8 Madenschraube (8)
Vis pointeau bout cuvette 8-32 x
1/8 (8)
8-32 x 1/8 Grani a punta tonda (8)
LOSA6299
5-40 x 1/8 Cup Point Set Screw (8)
5-40 x 1/8 Madenschraube (8)
Vis pointeau bout cuvette 5-40 x
1/8 (8)
5-40 x 1/8 Grani a punta tonda (8)
LOSA6302
5-40 Locking Nuts, Steel
Stoppmmuter 5-40 Stahl (4)
Ecrou Frein acier
5-40 (4)
5-40 Dadi autobloccanti, acciaio
LOSA6306
4-40 Aluminum Mini-Nuts (10)
4-40 Aluminium Mi niMuttern (10)
Mini écrou frein 4-40 (10)
4-40 Mini dadi alluminio (10)
LOSA6311
8-32 Steel Lock Nuts (10)
8-32 Stahl Stopmutter (10)
8-32 acier Nylstop (10)
8-32 Dadi autobloccanti, acciaio (10)
LOSA6350
#4 and 1/8" Hardened Washers
Unterlegscheiben #4
and 1/8 gehärtet
Rondelles #4 et 1/8
#4 and 1/8" Rondelle indurite
LOSA6545
Turnbuckles, 5 x 115mm w/Ends
Gewindestift L/R,
5 x 115mm m E.
Biellettes 5mm x 115mm
avec rotules
Tenditori, 5 x 115mm c/terminali
LOSA6546
Turnbuckles, 5 x 107mm w/Ends
Gewindestift L/R,
5 x 107mm m. E
Biellettes 5mm x 107mm avec rotules
Tenditori, 5 x 107mm c/terminali
LOSA6547
Turnbuckles, 4mm x 114mm w/Ends
Gewindestift L/R
4mm x 114mm m. E.
Biellettes 4mm x 114mm avec rotules
Tenditori, 4mm x 114mm c/terminali
LOSA6945
8x14x4 Rubber Sealed BB (4)
8 x 14 x 4 Kugellager gekapselt (4)
Roulements étanches
8 x 14 x 4 (4)
8x14x4 Cuscinetti sigillati (4)
LOSA6946
6x10x3 Rubber Sealed BB (4)
6 x 10 x 3 Kugellager gekapselt (4)
Roulements étanches
6 x 10 x 3 (4)
6x10x3 Cuscinetti sigillati (4)
LOSA6947
5x11x4 Rubber Sealed BB (4)
5 x 11 x 4 Kugellager gekapselt (4)
Roulements étanches
5 x 11 x 4 (4)
5x11x4 Cuscinetti sigillati (4)
LOSA6948
8x14x4 Flanged Rubber Seal BB (4)
8 x 14 x 4 Kugellager (4)
Roulements étanches
8 x 14 x 4 (4)
8x14x4 Cuscinetti sigillati flangiati (4)
LOSA6953
1/2 x 3/4 Rubber Sealed BB
1/2 x 3/4 Kugellager gekapselt
Roulements étanches
1/2 x 3/4 (2)
1/2 x 3/4 Cuscinetti sigillati
LOSA9168
Throttle/Brake Link Set: 8B 2.0
Brems u. Gasgestänge Set: 8B 2.0
8B 2.0 - Tringlerie gaz/frein
Set collegamenti motore/freno: 8B 2.0
LOSA99040
Metal Sx Arm Inserts, 23S Spline,
AIR (2)
Metall Servohorneinsatz/23S Spline/
Airtronics (2)
Insert 23s Aitronics en métal pour
bras de servo (2)
Inserti metallo bracci servi, 23S
scanalature, AIR (2)
LOSA99041
Metal Sx Arm Inserts, 23 Spline, JR (2)
Metall Servohorneinsatz/
23 Spline/JR (2)
Insert 23s JR en métal pour bras de
servo (2)
Inserti metallo bracci servi, 23
scanalature, JR (2)
LOSA99042
Metal Sx Arm Inserts, 24 Spline,
HRC (2)
Metall Servohorneinsatz/
24 Spline/Hitec (2)
Insert 24s Hitec en métal pour bras
de servo (2)
Inserti metallo bracci servi, 24
scanalature, HRC (2)
LOSA99043
Metal Sx Arm Inserts, 25 Spline, FUT
(2)
Metall Servohorneinsatz/
25 Spline/Futaba (2)
Insert 25s Futaba en métal pour bras
de servo (2)
Inserti metallo bracci servi, 25
scanalature, FUT (2)
TLR240001
Wing, Black 8IGHT Buggy 3.0
Spoiler Schwarz: 8IGHT 3.0
8B 3.0 - Aileron noir
Alettone nero 8IGHT Buggy 3.0
TLR240003
Wickerbill Set (2): 8IGHT 3.0
Abrisskante Set (2): TLR 8IGHT 3.0
Set de rajout d’aileron (2) : 8IGHT 3.0
Set fissaggio alettone (2): 8 3.0
TLR240006
Body, Clear: 8IGHT-T E 3.0
Karosserie transparent Set: TLR
8IGHT-T-E 3.0
Carrosserie transparente :
8IGHT-T E 3.0
Carrozzeria trasparente: 8T-E 3.0
TLR241001
Side Guards: 8E & 8T E 3.0
Seitenschützer: TLR 8IGHT-T-E 3.0
Bavettes latérales : 8E & 8T E 3.0
Protezioni laterali: 8E, 8T-E 3.0
TLR241003
Chassis Braces, Top Plate: 8E 3.0
Chassishalter oben: 8E.3.0
Renforts de châssis et platine
supérieure : 8E 3.0
Puntalini telaio, coperchio
superiore: 8E 3.0
TLR241004
Servo Mount, Top Brace: 8e 3.0
Servohalter Oberteil: 8E 3.0
Support de servo, renfort de diff
central : 8E 3.0
Supporto servocomandi e
montanti superiori: 8E 3.0
TLR241005
Front Bumper: 8E 3.0
Stoßfänger vorne: 8E 3.0
8E 3.0 - Pare choc avant
Paraurto anteriore: 8E 3.0
TLR241008
Battery Foam: 8E 3.0
Schaumstoff für Akkubox: 8E 3.0
Cales en mousse pour batterie :
8E 3.0
Espanso batteria: 8E 3.0
TLR241010
Chassis: 8IGHT-T E 3.0
Chassis: 8IGHT-T E 3.0
Châssis : 8IGHT-T E 3.0
Telaio: 8T-E 3.0
TLR241011
Foam Chassis Inserts: 8IGHT-T E 3.0
Schaumstoff Chassiseinsätze:
8IGHT-T E 3.0
Inserts en mousse : 8IGHT-T E 3.0
Inserti in espanso telaio: 8T-E 3.0
TLR241012
Battery Tray: 8IGHT-T E 3.0
Akkuhalter: 8IGHT-T E 3.0
Support de batterie : 8IGHT-T E 3.0
Vano batteria: 8T-E 3.0
TLR241013
Battery Straps (3): 8E & 8TE 3.0
Akkuschlaufen (3) : 8E &
8IGHT-T E 3.0
Sangles de batterie (3) : 8E & 8TE 3.0
Fascie batteria (3): 8E, 8T-E 3.0
57
58
Part #
English
Deutsch
Français
Italiano
TLR242000
Front Gear Box Set: 8B 3.0
Getriebekasten Vorne: TLR 8IGHT 3.0
8B 3.0 - Boitier
de transmission avant
Set riduttore anteriore: 8B 3.0
TLR242002
Center Dogbone: 8B 3.0 (rear), 8E
3.0 (front)
Antriebsknochen vorne/hinten:
TLR 8IGHT 3.0
Cardan central : 8B 3.0 (arrière),
8E 3.0 (avant)
Cardano centrale: 8B 3.0 (post.),
8E 3.0 (ant.)
TLR242003
Coupler Outdrive: 8B 3.0
Kupplungsstück für
Antriebsklaue (2): 8IGHT 3.0
8B 3.0 - Noix d’accouplement
de cardan (2)
Accoppiatore bicchierino: 8B 3.0
TLR242007
Motor Mount: 8E 3.0
Motorhalter: 8E 3.0
Support moteur : 8E 3.0
Supporto motore: 8E 3.0
TLR242008
Shim and Spacer Set: 8E 3.0
Unterlegscheiben und
Distanzringe : 8E 3.0
Set de rondelles de calage : 8E 3.0
Set spessori e distanziatori: 8E 3.0
TLR242011
Fr Ring & Pinion Gears: 8T 3.0
Kegelrad vorne u. Ritzelset: 8T 3.0
8T 3.0 - Couronne et pignon de diff
av
Anello ant. e pignoni: 8T 3.0
TLR242012
Rr Ring & Pinion Gears: 8T 3.0
Kegelrad hinten u. Ritzelset: 8T 3.0
8T 3.0 - Couronne et pignon de diff
arr
Anello post. e pignoni: 8T 3.0
TLR242014
Rear Center Dogbone: 8IGHT-T E 3.0
Antriebsknochen mitte /hinten:
TLR 8IGHT 3.0
Cardan central arrière : 8IGHT-T E 3.0
Cardano centrale post.: 8T-E 3.0
TLR242015
Motor Adapter, M4 Screw:
8E & 8TE 3.0
Motor Adapter, M4 Schraube :
8E & 8TE 3.0
Adaptateur moteur, vis M4 :
8E & 8TE 3.0
Adattatore motore, vite M4: 8E,
8T-E 3.0
TLR243000
Shock Stand-off Set (2): 8B 3.0
Stehbolzen für Dämpferbefestigung
(2): 8IGHT 3.0
8B 3.0 - Entretoises d´amortisseurs (2)
Set stand-off ammortizzatore (2):
8B 3.0
TLR243001
16mm Shock Cap (2): 8B 3.0
16mm Dämpferkappe (2): 8B 3.0
8B 3.0 - Bouchons d´amortisseurs (2)
16mm cappuccio ammort. (2): 8B 3.0
TLR243003
16mm Shock Body Set, RR (2): 8B 3.0
16mm Dämpfergehäuse Hinten (2):
8B 3.0
8B 3.0 - Corps
d´amortisseurs arrière (2)
16mm Set corpo ammort., RR (2):
8B 3.0
TLR243004
16mm Shock Bladders (4): 8B 3.0
16mm Dämpfermembrane (4): 8/B 3.0 8B 3.0 - Membranes d´amortisseurs
(4)
16mm membrane ammort. (4): 8B 3.0
TLR243005
16mm Shock Nut & O-Ring: 8B 3.0
Dämpfermutter und
Dichtringe: 8B 3.0
8B 3.0 - Bagues d’amortisseurs et
joints toriques (4)
16mm dado ammort. e o-ring: 8B 3.0
TLR243006
16mm Shock Nut O-Rings (4): 8B 3.0
Dichtring für
Dämpfermutter (4): 8B 3.0
8B 3.0 - Ecrou et joints toriques (4)
16mm dado ammort. e o-ring (4):
8B 3.0
TLR243008
16mm Shock Shaft, TiCn, RR: 8B 3.0
Kolbenstange hinten 4mm x 59.5mm
TiCn: 89B 3.0
8B 3.0 - Tige d´amortisseur arrière
Ti-Cn 4 x 59,5mm (1)
16mm albero ammort., TiCn, RR:
8B 3.0
TLR243009
Shock Cup (4): 8IGHT Buggy 3.0
Kugelpfanne für Dämpfer: 3.0
8B 3.0 - Coupelle d´amortisseurs (4)
Coppa ammort. (4): 8IGHT Buggy 3.0
TLR243011
16mm Shock Piston, 1.3mm (2):
8B 3.0
16mm Kolbenplatte 1.3mm (2):
TLR 8IGHT 3.0
Piston d’amortisseur 16mm,
1.3mm (2) : 8B 3.0
16mm pistone ammortizz.,
1,3mm (2): 8B 3.0
TLR243012
16mm Shock Piston, Split (2): 8B 3.0
16mm Kolbenplatte Split (2):
TLR 8IGHT 3.0:
Piston d’amortisseur mixte
16mm (2) : 8B 3.0
16mm pistone ammortizz.,
split (2): 8B 3.0
TLR243013
16mm Shock Guide & Bushing: 8B
3.0
Dämpferschutz und Hülsen (8): 8B 3.0
8B 3.0 - Palier et guide d´amortisseur
(4)
16mm guida ammort. e boccole:
8B 3.0
TLR243014
16mm Shock Piston Washer (8): 8B
3.0
U-Scheibe für Kolbenplatte (8): 8B 3.0
8B 3.0 - Rondelle de piston
d´amortisseur
16mm rondella pistone ammort. (8):
8B 3.0
TLR243024
X-Ring, 8, Lower Cap Seals, 4: All 8
X Ringe (8), Dichtung
Stoßdämpferendkappe
unten (4) alle 8IGHT
Joint en X et de bouchon inférieur
d’amortisseurs (4)
X-Ring, 8, Guarnizione tappo
inferiore, 4: All 8
TLR243025
16mm Shock Body Set, RR (2): 8T 3.0
Stoßdämpfergehäuse
hinten 16mm (2): 8T 3.0
8T 3.0 - Corps d´amortisseurs arrière
(2)
16mm set corpo ammort., RR (2):
8T 3.0
TLR243026
16mm Shock Shaft, TiCn, RR: 8T 3.0
Stoßdämpferkolben 4mm x 76, Ti-Cn
hinten: 8T 3.0
8T 3.0 - Tige d´amortisseur arrière
Ti-Cn (1)
16mm albero ammort., Ti-Cn, RR:
8T 3.0
TLR243027
16mm Fr Shock Spring Set 3pr: 8T 3.0
16mm Stoßdämpferfederset vorne
(3Pr): 8T 3.0
8T 3.0 - Ressort d’amortisseurs avant
16mm, 3 paires
16mm set molla ammort. ant. 3pr:
8T 3.0
TLR243028
16mm Rr Shock Spring Set 3pr: 8T
3.0
16mm Stoßdämpferfederset hinten
(3Pr): 8T 3.0
8T 3.0 - Ressort d’amortisseurs arrière
16mm, 3 paires
16mm set molla ammort. post. 3pr:
8T 3.0
TLR243032
16mm Shock Boot Set (8): 8T 3.0
16mm Stoßdämpfermanschetten
Set (8): 8T 3.0
Chaussettes d’amortisseurs
16mm (8) : 8T 3.0
16mm set protezione stelo
ammortizz. (8): 8T 3.0
TLR244001
Front Suspension Arm Bushings (4):
8B 3.0
Buchsen für Querlenker
Vorne (4): 8B 3.0
8B 3.0 - Paliers de triangles avant (4)
Boccole bracci sosp. anter. (4): 8B 3.0
TLR244003
Front Spindle Set: 8B 3.0
Lenkhebel: 8B 3.0
8B 3.0 - Jeu de fusées avant (2)
Set fusi anter.: 8B 3.0
TLR244005
Steering Rack Set, BB, Short/Long: 3.0
Lenksatz vorne kurz/lang 3:0
8B 3.0 - Barres d’Ackerman, courte/
longue avec roulements
Set cremagliera sterzo, BB, corto/
lungo: 3.0
TLR244007
Hinge Pins, 4x21mm, TiCn (2):8B 3.0
Hinge Pins 4 x 21mm Ti-Cn (2): 8B
3.0
8B 3.0 - Axes de fusées
en titane 4x21mm (2)
Perni cerniere, 4x21mm, TiCn (2):8B
3.0
Part #
English
Deutsch
Français
Italiano
TLR244010
Wing Spacer Set, .250 .500: 8B 3.0
Distanzhülsen für Flügel .250/.500:
8B 3.0
8B 3.0 - Entretoises d´aileron, .250
et .500
Set distanziale alettone, .250 .500:
8B 3.0
TLR244011
Hinge Pin, 4x66mm, TiCn (2): 8B 3.0
Hinge Pins 4 x 66mm
Ti-Cn (2): 8B 3.0
8B 3.0 - Axes de suspension en Ti-Cn
4x66mm (2)
Perni cerniere, 4 x 66mm, Ti-Cn (2):
8B 3.0
TLR244012
Outer Hinge Pins, 3.5, TiCn (2): 8B 3.0
Hinge Pins aussen 3,5mm (2): 8B 3.0
8B 3.0 - Axes de suspension
extérieurs, 3.5mm (2)
Perni cerniera esterna, 3.5, TiCn (2):
8B 3.0
TLR244016
Front Spindle Carrier, 15 Deg: 8T 3.0
TLR 8T 3.0 Lenkhebelträger 15°:
8T 3:0
8T3.0 - Etrier porte fusée 15°
Guida fuso anter., 15 Deg: 8T 3.0
TLR244017
Front Suspension Arm Set: 8T 3.0/2.0
Querlenkersatz vorne:
8T 3.0/2.0
8T 2.0/3.0 - Triangles de suspension
avant
Set bracci sosp. anter.: 8T 3.0/2.0
TLR244018
Rear Suspension Arm Set: 8T 3.0/2.0
Querlenkersatz hinten:
8T 3.0
8T 2.0/3.0 - Triangles de suspension
arrière
Set bracci sosp. poster.: 8T 3.0/2.0
TLR244019
Front Shock Tower, Alum: 8T 3.0
Dämpferbrücke vorne
Aluminium: 8T 3.0
8T 3.0 - Support d’amortisseurs avant
en aluminium
Torre ammort. anter., allum.: 8T 3.0
TLR244020
Rear Shock Tower, Alum: 8T 3.0
Dämpferbrücke hinten Aluminium:
8T 3.0
8T 3.0 - Support d’amortisseurs
arrière en aluminium
Torre ammort. poster., allum.: 8T 3.0
TLR244021
Servo Saver Top, Aluminum: All
8IGHT/T
Servo Saver Aluminium:
alle 8IGHT/T
8B/8T - Bras de sauve-servo en
aluminium
Parte sup. salva servo, allum.: All
8IGHT/T
TLR245000
Droop Screw (4): 8B 3.0
Ausfederungsbegrenzer (4): 8B 3.0
8B 3.0 - Butée (4)
Vite abbassamento (4): 8B 3.0
TLR245001
5-40 x 1/4” FH Screws (10)
TLR Flachkopfschraube
5-40 x 1/4 (10)
Vis FH 5-40 x 1/4” (10)
5-40 x 1/4” viti a testa piatta (10)
TLR245002
5-40 x 1/4” Buttonhead Screws (10)
TLR 5-40 x 1/4’’ BH Schrauben (10)
Vis à tête bombée 5-40 x 1/4” (10)
5-40 x 1/4” viti a testa bombata (10)
TLR245003
M4 x 8 SH Screws (10)
TLR M4 x 8mm SH Schrauben (10)
Vis SH M4 x 8 (10)
M4 x 8 viti a brugola (10)
TLR244006
Ackerman Shoulder Screw (2): 8B 3.0
TLR 8IGHT 3.0: Ackerman
Schraubensatz (2)
Vis épaulée de barre
d’Ackerman (2) : 8B 3.0
Viti Ackerman (2): 8B 3.0
TLR3538
Covered 17mm Wheel Nuts, Alum:
8B/8T
Radmutter geschlossen 17mm: 8B/8T
8B/8T 2.0 -Ecrou de roue fermé 17mm Dadi ruote 17mm ricoperti, allum.:
en aluminium (4)
8B/8T
TLR5281
Silicone Diff Fluid, 7000CS
Silikonöl 7000 CS
Graisse silicone pour
différentiel, 7000CS
Fluido silicone diff., 7000CS
TLR5282
Silicone Diff Fluid, 10,000CS
Silikonöl 10000 CS
Graisse silicone pour
différentiel, 10000CS
Fluido silicone diff., 10,000CS
TLR74009
Silicone Shock Oil, 37.5wt, 2oz
TLR Silikon Dämpferöl, 37.5wt, 2oz
Huile silicone pour amortisseur,
37.5, 60ml
Olio silicone ammortizz., 37,5wt, 2oz
TLR76004
TLR LOK, Threadlock, Blue
TLR Schraubensicherungslack Blau
Frein filet bleu TLR-Lok
TLR LOK, frenafiletti, blu
TLR77000
High-Pressure Black Grease, 8cc
High-Pressure Fett Schwarz/8cc
Graisse noire haute pression 8cc
Grasso nero, alta pressione, 8cc
TLR8202
Body Clips, Black (12): 22
TLR Karosserieklammern Schwarz
(12): 22
Clips de carrosserie noir (12)
Clips carrozzeria, nere (12): 22
59
OPTIONAL PARTS / DIVERSE TEILE /
PIECES OPTIONNELLES / PARTI OPZIONALI
60
Part #
English
Deutsch
Français
Italiano
DYN2517
Body Scissors: Curved/Straight
Dynamite Lexanschere halb gebogen
Ciseaux à lexan : courbé/droit
Forbici per carrozzeria: curve/diritte
DYN2950
Multi Hex Wrench Set
Multi-Norm Inbusschlüssel Set
Set de tournevis BTR
Set chiave multipla esagonale
DYN3050
Machined Nut Driver Set (4 pc) US
Steckschlüsselset 4 Stück Zoll
Set de Tournevis usinés p/écrous
6 pans US (4 pc)
Set chiave dadi fresata (4 pc) US
DYN3070
Machined Hex Driver Set (4) US
Alu Inbusschlüssel US 4 Stück
Set de Tournevis usinés Hexag (4) US
Set chiave esagonale fresata
DYN3097
Suspension Arm Reamer 4mm
Reibaale für Querlenker 4mm
Alésoir de triangle de suspension
4mm
Alesatore bracci sospensione 4mm
LOSA1732
Rear Hub Carriers, Aluminum:
8B, 8T 2.0
Radträger hinten Aluminium:
8B/ 8T 2.0
8B/8T 2.0 - Fusées arrières en
aluminium
Guide fusi poster., allum.: 8B, 8T 2.0
LOSA1751
Sway Bar Set: 8B 2.0
Stabilisator Set: 8B 2.0
8B 2.0 - Set de barre anti-roulis
Set barra oscillante: 8B 2.0
LOSA3551
46T Steel Spur Gear, Center Diff,
8IGHT 2.0/3.0
Hauptzahnrad 46Z: 8B/8T:
Couronne centrale métal 46T :
8IGHT 2.0/3.0
Corona in acciaio, 46T, diff.
centrale: 8 2.0, 3.0
LOSA3561
44T Spur Gear, Plastic: 8E/T E
Hauptzahnrad 44Z,: 8B/8T
Couronne centrale plastique
44T : 8E/T E
Corona, plastica, 44T: 8E, 8T-E
LOSA3562
45T Spur Gear, Plastic: 8E/T-E 3.0
45T Hauptzahnrad/ Kunststoff: 8E 2.0
Couronne centrale plastique
45T : 8E/T E 3.0
Corona, plastica, 45T: 8E, 8T-E 3.0
LOSA3571
1.0 Module Pitch Pinion, 11T: 8E
Ritzel 11Z Modul 1 : 8E
Pignon 11T, M1 : 8E
Pignone Mod. 1, 11T: 8E
LOSA3572
1.0 Module Pitch Pinion, 12T: 8E
Ritzel 12Z Modul 1 : 8E
Pignon 12T, M1 : 8E
Pignone Mod. 1, 12T: 8E
LOSA3573
1.0 Module Pitch Pinion, 13T: 8E
Ritzel 13Z Modul 1 : 8E
Pignon 13T, M1 : 8E
Pignone Mod. 1, 13T: 8E
LOSA3574
1.0 Module Pitch Pinion, 14T: 8E
Ritzel 14Z Modul 1 : 8E
Pignon 14T, M1 : 8E
Pignone Mod. 1, 14T: 8E
LOSA3575
1.0 Module Pitch Pinion, 15T: 8E
Ritzel 15Z Modul 1 : 8E
Pignon 15T, M1 : 8E
Pignone Mod. 1, 15T: 8E
LOSA3576
1.0 Module Pitch Pinion, 16T: 8E
Ritzel 16Z Modul 1 : 8E
Pignon 16T, M1 : 8E
Pignone Mod. 1, 16T: 8E
LOSA3577
1.0 Module Pitch Pinion, 17T: 8E
Ritzel 17Z Modul 1 : 8E
Pignon 17T, M1 : 8E
Pignone Mod. 1, 17T: 8E
LOSA3578
1.0 Module Pitch Pinion, 18T: 8E
Ritzel 18Z Modul 1 : 8E
Pignon 18T, M1 : 8E
Pignone Mod. 1, 18T: 8E
LOSA4440
Front Top Brace, Aluminum: 8B,8T
Chassishalter vorne Alu.: 8B, 8T
8B/8T - Renfort de châssis supérieur
avant en aluminium
Supporto superiore anteriore, allum.:
8B,8T
LOSA6140
8IGHT Screw/Nut Assortment Box
8IGHT Schrauben und Muttern im
Sortimentskasten
8B - Boite d’assortiment de vis et
d’écrous
8IGHT Scatola assortimento viti/dadi
LOSA6929
8IGHT/T Bearing Box with Bearings
8IGHT/T Kugellagersatz im
Sortimentskasten
8B/8T - Boite à roulements avec
roulements
8IGHT/T Scatola cuscinetti con
cuscinetti
LOSA99030
Servo Arm, Aluminum: JR
Servo Arm/Aluminium: JR
Bras de servo en aluminium JR
Bracci servo, alluminio: JR
LOSA99031
Servo Arm, Aluminum: KO/Air
Servo Arm/Aluminium: KO/AIR
Bras de servo en aluminium KO/
Airtronics
Bracci servo, alluminio: KO/Air
LOSA99032
Servo Arm, Aluminum: FUT
Servo Arm/Aluminium: FUT
Bras de servo en aluminium Futaba
Bracci servo, alluminio: FUT
LOSA99033
Servo Arm, Aluminum: Hitec
Losi Servo Arm/Aluminium: Hitec
Bras de servo en aluminium Hitec
Bracci servo, alluminio: Hitec
LOSA99172
Camber Gauge
Sturzlehre
Jauge de carrossage
Misuratore camber
LOSA99173
Ride Height Gauge
Höhenmesser
Cale de garde au sol
Misuratore altezza da terra
LOSA99174
Car Stand: 8IGHT/T
Fahrzeugständer: 8IGHT/T
8B/8T - Support de stand
Supporto auto: 8IGHT/T
LOSA99176
Precision Tire Balancer with
Balancing Clay
Präzisionsreifenwuchtgerät
Equilibreur de roue de précision avec
pâte d’équilibrage
Bilanciatore di precisione per gomme
con materiale per bilanciamento
LOSB4604
17mm Wheel Wrench Anodized Alum:
LST2, Mug, 8B, 8T
LST2/MUG/8B/8T: 17mm Radschlüssel
Alu
LST2/8B/8T - Clé de roue 17mm en
aluminium anodisé
17mm Chiave ruote allum.
anodizzato: LST2, Mug, 8B, 8T
Part #
English
Deutsch
Français
Italiano
TLR240002
Wing, White 8IGHT 3.0
TLR 8IGHT 3.0 Spoiler Weiß
8B 3.0 - Aileron blanc
Alettone bianco 8IGHT 3.0
TLR242004
Wheel Hexes, +1mm Wider (4): 8IGHT
Buggy 3.0
Radmitnehmer 1mm verbreitert (4):
8IGHT Buggy 3.0
8B 3.0 - Hexagones +1mm (4)
Esagoni ruote 1mm più larghi (4):
8IGHT Buggy 3.0
TLR243030
16mm Shock Pistons Tapered 1.4/1.5:
8T/E 3.0
16mm 1,4/1,5mm
Stoßdämpferkolbenset: 1.4/1.5:
8T/E 3.0
8T/E 3.0 - Pistons coniques
1.4/1.5mm
16mm pistoni ammort. conici 1.4/1.5:
8T/E 3.0
TLR344001
Aluminum Front Spindle Set:
8IGHT/T/E/3.0
Alu Spindle vorne 8IGHT/T/E 3.0
Fusées avant en aluminium :
8IGHT/T/E/3.0
Set spindle ant.: 8T, 8T-E 3.0
TLR3501
Differential Shaft Set, Aluminum (6):
8B, 8T 2.0
Diff Achskreuz, Aluminium: TLR 8B,
8T 2.0
8B/8T 2.0 - Jeu de goupilles de
cardan en aluminium (6)
Set albero differenziale, alluminio (6):
8B, 8T 2.0
TLR3538BL
Covered 17mm Wheel Nuts, Alum,
Black: 8/T 2.0
Radmutter geschlossen 17mm Schwarz: 8B/8T 2.0 - Ecrou de roue fermé
8B/8T 2.0
17mm en aluminium anodisé noir (4)
Dadi ruote 17mm rivestiti, allum. neri:
8/T 2.0
TLR5277
Silicone Diff Fluid, 1000CS
Silikonöl 1000 CS
Graisse silicone pour différentiel,
1000CS
Fluido silicone diff, 1000CS
TLR5278
Silicone Diff Fluid, 2000CS
Silikonöl 2000 CS
Graisse silicone pour différentiel,
2000CS
Fluido silicone diff, 2000CS
TLR5279
Silicone Diff Fluid, 3000CS
Silikonöl 3000 CS
Graisse silicone pour différentiel,
3000CS
Fluido silicone diff, 3000CS
TLR5280
Silicone Diff Fluid, 5000cs
Silikonöl 5000 CS
Graisse silicone pour différentiel,
5000CS
Fluido silicone diff, 5000cs
TLR5283
Silicone Diff Fluid, 15,000cs
Silikonöl 15000 CS
Graisse silicone pour différentiel,
15000CS
Fluido silicone diff, 15,000cs
TLR5284
Silicone Diff Fluid, 20,000CS
Silikonöl 20000 CS
Graisse silicone pour différentiel,
20000CS
Fluido silicone diff, 20,000CS
TLR5285
Silicone Diff Fluid, 30,000CS
Silikonöl 30000 CS
Graisse silicone pour différentiel,
30000CS
Fluido silicone diff, 30,000CS
TLR5286
Silicone Diff Fluid, 50,000CS
Silikonöl 50000 CS
Graisse silicone pour différentiel,
50000CS
Fluido silicone diff, 50,000CS
TLR6019
Ballstud/Hub Spacer Set, Alum: 22
Distanzringe für Kugelkopf Aluminum:
22
22 - Set d’entretoises de rotules
Set distanziale perno sferico/mozzo,
allum.: 22
TLR74000
Silicone Oil, 15wt, 2oz
Silikon Dämpferöl, 15wt, 2oz
Huile silicone d’amortisseur, 15wt,
60 ml
Olio silicone, 15wt, 2oz
TLR74001
Silicone Oil, 17.5wt, 2oz
Silikon Dämpferöl, 17.5 wt, 2oz
Huile silicone d’amortisseur, 17.5wt,
60 ml
Olio silicone, 17.5wt, 2oz
TLR74002
Silicone Oil, 20wt, 2oz
Silikon Dämpferöl, 20 wt, 2 oz
Huile silicone d’amortisseur, 20wt,
60 ml
Olio silicone, 20wt, 2oz
TLR74003
Silicone Oil, 22.5wt, 2oz
TLR Silikon Dämpferöl, 22.5wt, 2oz
Huile silicone d’amortisseur, 22.5wt,
60 ml
Olio silicone, 22.5wt, 2oz
TLR74004
Silicone Oil, 25wt, 2oz
Silikon Dämpferöl, 25wt, 2 oz
Huile silicone d’amortisseur, 25wt,
60 ml
Olio silicone, 25wt, 2oz
TLR74005
Silicone Oil, 27.5wt, 2oz
Silikon Dämpferöl, 27.5wt, 2oz
Huile silicone d’amortisseur, 27.5wt,
60 ml
Olio silicone, 27.5wt, 2oz
TLR74006
Silicone Oil, 30wt, 2oz
Silikon Dämpferöl, 30wt, 2oz
Huile silicone d’amortisseur, 30wt,
60 ml
Olio silicone, 30wt, 2oz
TLR74007
Silicone Oil, 32.5wt, 2oz
Silikon Dämpferöl, 32.5 wt, 2 oz
Huile silicone d’amortisseur, 32.5wt,
60 ml
Olio silicone, 32.5wt, 2oz
TLR74008
Silicone Oil, 35wt, 2oz
Silikon Dämpferöl, 35wt, 2oz
Huile silicone d’amortisseur, 35wt,
60 ml
Olio silicone, 35wt, 2oz
TLR74009
Silicone Oil, 37.5wt, 2oz
Silikon Dämpferöl, 37.5wt, 2oz
Huile silicone d’amortisseur, 37.5wt,
60 ml
Olio silicone, 37.5wt, 2oz
TLR74010
Silicone Oil, 40wt, 2oz
Silikon Dämpferöl, 40wt, 2oz
Huile silicone d’amortisseur, 40wt,
60 ml
Olio silicone, 40wt, 2oz
TLR74011
Silicone Oil, 42.5wt, 2oz
Silikon Dämpferöl, 42.5wt, 2oz
Huile silicone d’amortisseur, 42.5wt,
60 ml
Olio silicone, 42.5wt, 2oz
TLR74012
Silicone Oil, 45wt, 2oz
Silikon Dämpferöl, 45wt, 2oz
Huile silicone d’amortisseur, 45wt,
60 ml
Olio silicone, 45wt, 2oz
TLR74019
Shock Oil 6Pk, 17.5, 22.5, 27.5, 32.5,
37.5, 42.5 2oz
Stoßdämpferöl 6Pk, 17.5, 22.5, 27.5,
32.5, 37.5, 42.5 2oz
Assortiment huile silicone
d’amortisseur en 60 ml, 17.5, 22.5,
27.5, 32.5, 37.5, 42.5
Olio ammortizzatore 6Pk, 17.5, 22.5,
27.5, 32.5, 37.5, 42.5 2oz
TLR74020
Shock Oil 6Pk, 20, 25, 30, 35, 40,
45, 2oz
Stoßdämpferöl 6Pk, 20, 25, 30, 35,
40, 45, 2oz
Assortiment huile silicone
d’amortisseur en 60 ml, 20, 25, 30,
35, 40, 45
Olio ammortizzatore 6Pk, 20, 25, 30,
35, 40, 45, 2oz
61
62
Part #
English
Deutsch
Français
Italiano
TLR76000
Tire Glue, Standard
Reifenkleber Standard
Colle à pneus standard
Colla gomme, standard
TLR76001
Tire Glue, Thin
Reifenkleber Dünn
Colle à pneus fine
Colla gomme, fluida
TLR76002
Off-Road Tire Gluing Kit
Offroad Reifenklebeset
Kit de collage de pneus TT
Kit incollaggio gomme fuoristrada
TLR76004
TLR Lok, Threadlock, Blue
Schraubensicherungslack Blau
Frein filet bleu TLR-Lok
TLR Lok, frenafiletti, blu
TLR77000
High-Pressure Black Grease, 8cc
High-Pressure Fett Schwarz/8cc
Graisse haute pression noire, 8cc
Grasso alta pressione nero, 8cc
TLR77002
Shock O-Ring Grease, 8cc
Fett 8cc O-Ring
Graisse pour joints toriques, 8cc
Grasso o-ring ammort., 8cc
TLR8300
TLR Sticker Sheet
Dekorbogen
Planche de décoration TLR
Foglio adesivi TLR
TLR99004
TLR Embroidered Cargo Bag
TLR Tasche
Sac Cargo TLR
TLR Borsa trasporto con ricamo
TLR99014
TLR Foam Pit Mat
TLR Schraubermatte Schaum
Tapis TLR en mousse
TLR Tappetino in gomma piuma
TLR99101
Shock Shaft Pliers
TLR Zange für Dämpferkolbenstange
Pince pour tige d’amortisseur
Pinze albero ammort.
TLR99102
Turnbucle Wrench, 22, 8B, 8T
TLR Stellschlüssel für Gewindestift,
3.5, 4, 5mm
Clé à biellettes
Chiave per tenditore, 22, 8B, 8T
LIMITED WARRANTY
What this Warranty Covers
Horizon Hobby, LLC, (Horizon) warrants to the original purchaser that the product purchased (the “Product”) will be free from defects in materials and workmanship at the date of
purchase.
What is Not Covered
This warranty is not transferable and does not cover (i) cosmetic damage, (ii) damage due to acts of God, accident, misuse, abuse, negligence, commercial use, or due to improper
use, installation, operation or maintenance, (iii) modification of or to any part of the Product, (iv) attempted service by anyone other than a Horizon Hobby authorized service center,
(v) Product not purchased from an authorized Horizon dealer, (vi) Product not compliant with applicable technical regulations, or (vii) use that violates any applicable laws, rules, or
regulations.
OTHER THAN THE EXPRESS WARRANTY ABOVE, HORIZON MAKES NO OTHER WARRANTY OR REPRESENTATION, AND HEREBY DISCLAIMS ANY AND ALL IMPLIED WARRANTIES,
INCLUDING, WITHOUT LIMITATION, THE IMPLIED WARRANTIES OF NON-INFRINGEMENT, MERCHANTABILITY AND FITNESS FOR A PARTICULAR PURPOSE. THE PURCHASER
ACKNOWLEDGES THAT THEY ALONE HAVE DETERMINED THAT THE PRODUCT WILL SUITABLY MEET THE REQUIREMENTS OF THE PURCHASER’S INTENDED USE.
Purchaser’s Remedy
Horizon’s sole obligation and purchaser’s sole and exclusive remedy shall be that Horizon will, at its option, either (i) service, or (ii) replace, any Product determined by Horizon to
be defective. Horizon reserves the right to inspect any and all Product(s) involved in a warranty claim. Service or replacement decisions are at the sole discretion of Horizon. Proof of
purchase is required for all warranty claims. SERVICE OR REPLACEMENT AS PROVIDED UNDER THIS WARRANTY IS THE PURCHASER’S SOLE AND EXCLUSIVE REMEDY.
Limitation of Liability
HORIZON SHALL NOT BE LIABLE FOR SPECIAL, INDIRECT, INCIDENTAL OR CONSEQUENTIAL DAMAGES, LOSS OF PROFITS OR PRODUCTION OR COMMERCIAL LOSS IN ANY WAY,
REGARDLESS OF WHETHER SUCH CLAIM IS BASED IN CONTRACT, WARRANTY, TORT, NEGLIGENCE, STRICT LIABILITY OR ANY OTHER THEORY OF LIABILITY, EVEN IF HORIZON HAS
BEEN ADVISED OF THE POSSIBILITY OF SUCH DAMAGES. Further, in no event shall the liability of Horizon exceed the individual price of the Product on which liability is asserted. As
Horizon has no control over use, setup, final assembly, modification or misuse, no liability shall be assumed nor accepted for any resulting damage or injury. By the act of use, setup
or assembly, the user accepts all resulting liability. If you as the purchaser or user are not prepared to accept the liability associated with the use of the Product, purchaser is advised
to return the Product immediately in new and unused condition to the place of purchase.
Law
These terms are governed by Illinois law (without regard to conflict of law principals). This warranty gives you specific legal rights, and you may also have other rights which vary
from state to state. Horizon reserves the right to change or modify this warranty at any time without notice.
WARRANTY SERVICES
Questions, Assistance, and Services
Your local hobby store and/or place of purchase cannot provide warranty support or service. Once assembly, setup or use of the Product has been started, you must contact your
local distributor or Horizon directly. This will enable Horizon to better answer your questions and service you in the event that you may need any assistance. For questions or
assistance, please visit our website at www.horizonhobby.com, submit a Product Support Inquiry, or call the toll free telephone number referenced in the Warranty and Service
Contact Information section to speak with a Product Support representative.
Inspection or Services
If this Product needs to be inspected or serviced and is compliant in the country you live and use the Product in, please use the Horizon Online Service Request submission process
found on our website or call Horizon to obtain a Return Merchandise Authorization (RMA) number. Pack the Product securely using a shipping carton. Please note that original
boxes may be included, but are not designed to withstand the rigors of shipping without additional protection. Ship via a carrier that provides tracking and insurance for lost or
damaged parcels, as Horizon is not responsible for merchandise until it arrives and is accepted at our facility. An Online Service Request is available at http://www.horizonhobby.
com/content/_service-center_render-service-center. If you do not have internet access, please contact Horizon Product Support to obtain a RMA number along with instructions for
submitting your product for service. When calling Horizon, you will be asked to provide your complete name, street address, email address and phone number where you can be
reached during business hours. When sending product into Horizon, please include your RMA number, a list of the included items, and a brief summary of the problem. A copy of
your original sales receipt must be included for warranty consideration. Be sure your name, address, and RMA number are clearly written on the outside of the shipping carton.
NOTICE: Do not ship LiPo batteries to Horizon. If you have any issue with a LiPo battery, please contact the appropriate
Horizon Product Support office.
Warranty Requirements
For Warranty consideration, you must include your original sales receipt verifying the proof-of-purchase date. Provided warranty
conditions have been met, your Product will be serviced or replaced free of charge. Service or replacement decisions are at the sole discretion of Horizon.
Non-Warranty Service
Should your service not be covered by warranty, service will be completed and payment will be required without notification
or estimate of the expense unless the expense exceeds 50% of the retail purchase cost. By submitting the item for service you are agreeing
to payment of the service without notification. Service estimates are available upon request. You must include this request with your item submitted for service. Non-warranty
service estimates will be billed a minimum of ½ hour of labor. In addition you will be billed for return freight. Horizon accepts money orders and cashier’s checks, as well as Visa,
MasterCard, American Express, and Discover cards. By submitting any item to Horizon for service, you are agreeing to Horizon’s Terms and Conditions found on our website http://
www.horizonhobby.com/content/_service-center_render-service-center.
ATTENTION: Horizon service is limited to Product compliant in the country of use and ownership. If received, a non-compliant
Product will not be serviced. Further, the sender will be responsible for arranging return shipment of the un-serviced
Product, through a carrier of the sender’s choice and at the sender’s expense. Horizon will hold non-compliant Product for a
period of 60 days from notification, after which it will be discarded.
63
GARANTIE UND SERVICE INFORMATIONEN
Warnung
Ein ferngesteuertes Modell ist kein Spielzeug. Es kann, wenn es falsch eingesetzt wird, zu erheblichen Verletzungen bei Lebewesen und Beschädigungen an Sachgütern führen.
Betreiben Sie Ihr RC-Modell nur auf freien Plätzen und beachten Sie alle Hinweise der Bedienungsanleitung des Modells wie auch der Fernsteuerung.
Garantiezeitraum
Exklusive Garantie Horizon Hobby LLC (Horizon) garantiert, dass dasgekaufte Produkt frei von Material- und Montagefehlern ist. Der Garantiezeitraum entspricht den gesetzlichen
Bestimmung des Landes, in dem das Produkt erworben wurde. In Deutschland beträgt der Garantiezeitraum 6 Monate und der Gewährleistungszeitraum 18 Monate nach dem
Garantiezeitraum.
Einschränkungen der Garantie
(a) Die Garantie wird nur dem Erstkäufer (Käufer) gewährt und kann nicht übertragen werden. Der Anspruch des Käufers besteht in der Reparatur oder dem Tausch im
Rahmen dieser Garantie. Die Garantie erstreckt sich ausschließlich auf Produkte, die bei einem autorisierten Horizon Händler erworben wurden. Verkäufe an dritte werden
von dieser Garantie nicht gedeckt. Garantieansprüche werden nur angenommen, wenn ein gültiger Kaufnachweis erbracht wird. Horizon behält sich das Recht vor, diese
Garantiebestimmungen ohne Ankündigung zu ändern oder modifizieren und widerruft dann bestehende Garantiebestimmungen.
(b) Horizon übernimmt keine Garantie für die Verkaufbarkeit des Produktes, die Fähigkeiten und die Fitness des Verbrauchers für einen bestimmten Einsatzzweck des Produktes. Der
Käufer allein ist dafür verantwortlich, zu prüfen, ob das Produkt seinen Fähigkeiten und dem vorgesehenen Einsatzzweck entspricht.
(c) Ansprüche des Käufers ¬ Es liegt ausschließlich im Ermessen von Horizon, ob das Produkt, bei dem ein Garantiefall festgestellt wurde, repariert oder ausgetauscht wird. Dies sind
die exklusiven Ansprüche des Käufers, wenn ein Defekt festgestellt wird.
Horizon behält sich vor, alle eingesetzten Komponenten zu prüfen, die in den Garantiefall einbezogen werden können. Die Entscheidung zur Reparatur oder zum Austausch liegt
nur bei Horizon. Die Garantie schließt kosmetische Defekte oder Defekte, hervorgerufen durch höhere Gewalt, falsche Behandlung des Produktes, falscher Einsatz des Produktes,
kommerziellen Einsatz oder Modifikationen irgendwelcher Art aus.
Die Garantie schließt Schäden, die durch falschen Einbau, falsche Handhabung, Unfälle, Betrieb, Service oder Reparaturversuche, die nicht von Horizon ausgeführt wurden aus.
Ausgeschlossen sind auch Fälle die bedingt durch (vii) eine Nutzung sind, die gegen geltendes Recht, Gesetze oder Regularien verstoßen haben. Rücksendungen durch den Käufer
direkt an Horizon oder eine seiner Landesvertretung bedürfen der Schriftform.
Schadensbeschränkung
Horizon ist nicht für direkte oder indirekte Folgeschäden, Einkommensausfälle oder kommerzielle Verluste, die in irgendeinem Zusammenhang mit dem Produkt stehen
verantwortlich, unabhängig ab ein Anspruch im Zusammenhang mit einem Vertrag, der Garantie oder der Gewährleistung erhoben werden. Horizon wird darüber hinaus keine
Ansprüche aus einem Garantiefall akzeptieren, die über den individuellen Wert des Produktes hinaus gehen. Horizon hat keinen Einfluss auf den Einbau, die Verwendung oder
die Wartung des Produktes oder etwaiger Produktkombinationen, die vom Käufer gewählt werden. Horizon übernimmt keine Garantie und akzeptiert keine Ansprüche für in der
folge auftretende Verletzungen oder Beschädigungen. Mit der Verwendung und dem Einbau des Produktes akzeptiert der Käufer alle aufgeführten Garantiebestimmungen ohne
Einschränkungen und Vorbehalte.
Wenn Sie als Käufer nicht bereit sind, diese Bestimmungen im Zusammenhang mit der Benutzung des Produktes zu akzeptieren, werden Sie gebeten, dass Produkt in unbenutztem
Zustand in der Originalverpackung vollständig bei dem Verkäufer zurückzugeben.
Sicherheitshinweise
Dieses ist ein hochwertiges Hobby Produkt und kein Spielzeug. Es muss mit Vorsicht und Umsicht eingesetzt werden und erfordert einige mechanische wie auch mentale
Fähigkeiten. Ein Versagen, das Produkt sicher und umsichtig zu betreiben kann zu Verletzungen von Lebewesen und Sachbeschädigungen erheblichen Ausmaßes führen. Dieses
Produkt ist nicht für den Gebrauch durch Kinder ohne die Aufsicht eines Erziehungsberechtigten vorgesehen. Die Anleitung enthält Sicherheitshinweise und Vorschriften sowie
Hinweise für die Wartung und den Betrieb des Produktes. Es ist unabdingbar, diese Hinweise vor der ersten Inbetriebnahme zu lesen und zu verstehen. Nur so kann der falsche
Umgang verhindert und Unfälle mit Verletzungen und Beschädigungen vermieden werden.
Fragen, Hilfe und Reparaturen
Ihr lokaler Fachhändler und die Verkaufstelle können eine Garantiebeurteilung ohne Rücksprache mit Horizon nicht durchführen. Dies gilt auch für Garantiereparaturen. Deshalb
kontaktieren Sie in einem solchen Fall den Händler, der sich mit Horizon kurz schließen wird, um eine sachgerechte Entscheidung zu fällen, die Ihnen schnellst möglich hilft.
Wartung und Reparatur
Muss Ihr Produkt gewartet oder repariert werden, wenden Sie sich entweder an Ihren Fachhändler oder direkt an Horizon.
Rücksendungen / Reparaturen werden nur mit einer von Horizon vergebenen RMA Nummer bearbeitet. Diese Nummer erhalten Sie oder ihr Fachhändler vom technischen Service.
Mehr Informationen dazu erhalten Sie im Serviceportal unter www. Horizonhobby.de oder telefonisch bei dem technischen Service von Horizon.
Packen Sie das Produkt sorgfältig ein. Beachten Sie, dass der Originalkarton in der Regel nicht ausreicht, um beim Versand nicht beschädigt zu werden. Verwenden Sie einen
Paketdienstleister mit einer Tracking Funktion und Versicherung, da Horizon bis zur Annahme keine Verantwortung für den Versand des Produktes übernimmt. Bitte legen Sie dem
Produkt einen Kaufbeleg bei, sowie eine ausführliche Fehlerbeschreibung und eine Liste aller eingesendeten Einzelkomponenten. Weiterhin benötigen wir die vollständige Adresse,
eine Telefonnummer für Rückfragen, sowie eine Email Adresse.
Garantie und Reparaturen
Garantieanfragen werden nur bearbeitet, wenn ein Originalkaufbeleg von einem autorisierten Fachhändler beiliegt, aus dem der Käufer und das Kaufdatum hervorgeht. Sollte sich
ein Garantiefall bestätigen wird das Produkt repariert oder ersetzt. Diese Entscheidung obliegt einzig Horizon Hobby.
Kostenpflichtige Reparaturen
Liegt eine kostenpflichtige Reparatur vor, erstellen wir einen Kostenvoranschlag, den wir Ihrem Händler übermitteln. Die Reparatur wird erst vorgenommen, wenn wir die Freigabe
des Händlers erhalten. Der Preis für die Reparatur ist bei Ihrem Händler zu entrichten. Bei kostenpflichtigen Reparaturen werden mindestens 30 Minuten Werkstattzeit und die
Rückversandkosten in Rechnung gestellt. Sollten wir nach 90 Tagen keine Einverständniserklärung zur Reparatur vorliegen haben, behalten wir uns vor, das Produkt zu vernichten
oder anderweitig zu verwerten.
ACHTUNG: Kostenpflichtige Reparaturen nehmen wir nur für Elektronik und Motoren vor. Mechanische Reparaturen,
besonders bei Hubschraubern und RC-Cars sind extrem aufwendig und müssen deshalb vom Käufer selbst vorgenommen
werden.
64
GARANTIE ET RÉPARATIONS
Durée de la garantie
Garantie exclusive - Horizon Hobby, LLC (Horizon) garantit que le Produit acheté (le « Produit ») sera exempt de défauts matériels et de fabrication à sa date d’achat par l’Acheteur.
La durée de garantie correspond aux dispositions légales du pays dans lequel le produit a été acquis. La durée de garantie est de 6 mois et la durée d’obligation de garantie de 18
mois à l’expiration de la période de garantie.
Limitations de la garantie
(a) La garantie est donnée à l’acheteur initial (« Acheteur ») et n’est pas transférable. Le recours de l’acheteur consiste en la réparation ou en l‘échange dans le cadre de cette
garantie. La garantie s’applique uniquement aux produits achetés chez un revendeur Horizon agréé. Les ventes faites à des tiers ne sont pas couvertes par cette garantie. Les
revendications en garantie seront acceptées sur fourniture d’une preuve d’achat valide uniquement. Horizon se réserve le droit de modifier les dispositions de la présente garantie
sans avis préalable et révoque alors les dispositions de garantie existantes.
(b) Horizon n’endosse aucune garantie quant à la vendabilité du produit ou aux capacités et à la forme physique de l’utilisateur pour une utilisation donnée du produit. Il est de la
seule responsabilité de l’acheteur de vérifier si le produit correspond à ses capacités et à l’utilisation prévue.
(c) Recours de l’acheteur – Il est de la seule discrétion d‘Horizon de déterminer si un produit présentant un cas de garantie sera réparé ou échangé. Ce sont là les recours exclusifs
de l’acheteur lorsqu’un défaut est constaté.
Horizon se réserve la possibilité de vérifier tous les éléments utilisés et susceptibles d’être intégrés dans le cas de garantie. La décision de réparer ou de remplacer le produit est
du seul ressort d’Horizon. La garantie exclut les défauts esthétiques ou les défauts provoqués par des cas de force majeure, une manipulation incorrecte du produit, une utilisation
incorrecte ou commerciale de ce dernier ou encore des modifications de quelque nature qu’elles soient.
La garantie ne couvre pas les dégâts résultant d’un montage ou d’une manipulation erronés, d’accidents ou encore du fonctionnement ainsi que des tentatives d’entretien ou de
réparation non effectuées par Horizon. Les retours effectués par le fait de l’acheteur directement à Horizon ou à l’une de ses représentations nationales requièrent une confirmation
écrite.
Limitation des dommages
Horizon ne saurait être tenu pour responsable de dommages conséquents directs ou indirects, de pertes de revenus ou de pertes commerciales, liés de quelque manière que ce soit
au produit et ce, indépendamment du fait qu’un recours puisse être formulé en relation avec un contrat, la garantie ou l’obligation de garantie. Par ailleurs, Horizon n’acceptera pas
de recours issus d’un cas de garantie lorsque ces recours dépassent la valeur unitaire du produit. Horizon n’exerce aucune influence sur le montage, l’utilisation ou la maintenance
du produit ou sur d’éventuelles combinaisons de produits choisies par l’acheteur. Horizon ne prend en compte aucune garantie et n‘accepte aucun recours pour les blessures ou les
dommages pouvant en résulter. Horizon Hobby ne saurait être tenu responsable d’une utilisation ne respectant pas les lois , les règles ou règlementations en vigueur.
En utilisant et en montant le produit, l’acheteur accepte sans restriction ni réserve toutes les dispositions relatives à la garantie figurant dans le présent document. Si vous n’êtes
pas prêt, en tant qu’acheteur, à accepter ces dispositions en relation avec l’utilisation du produit, nous vous demandons de restituer au vendeur le produit complet, non utilisé et
dans son emballage d’origine.
Indications relatives à la sécurité
Ceci est un produit de loisirs perfectionné et non un jouet. Il doit être utilisé avec précaution et bon sens et nécessite quelques aptitudes mécaniques ainsi que mentales.
L’incapacité à utiliser le produit de manière sûre et raisonnable peut provoquer des blessures et des dégâts matériels conséquents. Ce produit n’est pas destiné à être utilisé
par des enfants sans la surveillance par un tuteur. La notice d’utilisation contient des indications relatives à la sécurité ainsi que des indications concernant la maintenance et le
fonctionnement du produit. Il est absolument indispensable de lire et de comprendre ces indications avant la première mise en service. C’est uniquement ainsi qu’il sera possible
d’éviter une manipulation erronée et des accidents entraînant des blessures et des dégâts. Horizon Hobby ne saurait être tenu responsable d’une utilisation ne respectant pas les
lois , les règles ou règlementations en vigueur.
Questions, assistance et réparations
Votre revendeur spécialisé local et le point de vente ne peuvent effectuer une estimation d’éligibilité à l’application de la garantie sans avoir consulté Horizon. Cela vaut également
pour les réparations sous garantie. Vous voudrez bien, dans un tel cas, contacter le revendeur qui conviendra avec Horizon d’une décision appropriée, destinée à vous aider le plus
rapidement possible.
Maintenance et réparation
Si votre produit doit faire l’objet d’une maintenance ou d‘une réparation, adressez-vous soit à votre revendeur spécialisé, soit directement à Horizon. Emballez le produit
soigneusement. Veuillez noter que le carton d‘emballage d’origine ne suffit pas, en règle générale, à protéger le produit des dégâts pouvant survenir pendant le transport. Faites
appel à un service de messagerie proposant une fonction de suivi et une assurance, puisque Horizon ne prend aucune responsabilité pour l’expédition du produit jusqu’à sa
réception acceptée. Veuillez joindre une preuve d’achat, une description détaillée des défauts ainsi qu’une liste de tous les éléments distincts envoyés. Nous avons de plus besoin
d’une adresse complète, d’un numéro de téléphone (pour demander des renseignements) et d’une adresse de courriel.
Garantie et réparations
Les demandes en garantie seront uniquement traitées en présence d’une preuve d’achat originale émanant d’un revendeur spécialisé agréé, sur laquelle figurent le nom de
l’acheteur ainsi que la date d’achat. Si le cas de garantie est confirmé, le produit sera réparé Cette décision relève uniquement de Horizon Hobby.
Réparations payantes
En cas de réparation payante, nous établissons un devis que nous transmettons à votre revendeur. La réparation sera seulement effectuée après que nous ayons reçu la confirmation
du revendeur. Le prix de la réparation devra être acquitté au revendeur. Pour les réparations payantes, nous facturons au minimum 30 minutes de travail en atelier ainsi que les frais
de réexpédition. En l’absence d’un accord pour la réparation dans un délai de 90 jours, nous nous réservons la possibilité de détruire le produit ou de l’utiliser autrement.
ATTENTION: nous n’effectuons de réparations payantes que pour les composants électroniques et les moteurs. Les réparations
touchant à la mécanique, en particulier celles des hélicoptères et des voitures radiocommandées, sont extrêmement
coûteuses et doivent par conséquent être effectuées par l’acheteur lui-même.
65
GARANZIÁ
Periodo di garanzia
Garanzia esclusiva - Horizon Hobby, LLC, (Horizon) garantisce che i prodotti acquistati (il “Prodotto”) sono privi di difetti relativi ai materiali e di eventuali errori di montaggio. Il
periodo di garanzia è conforme alle disposizioni legali del paese nel quale il prodotto è stato acquistato. Tale periodo di garanzia ammonta a 6 mesi e si estende ad altri 18 mesi
dopo tale termine.
limiti della garanzia
(a) La garanzia è limitata all’acquirente originale (Acquirente) e non è cedibile a terzi. L’acquirente ha il diritto a far riparare o a far sostituire la merce durante il periodo di questa
garanzia. La garanzia copre solo quei prodotti acquistati presso un rivenditore autorizzato Horizon. Altre transazioni di terze parti non sono coperte da questa garanzia. La prova di
acquisto è necessaria per far valere il diritto di garanzia. Inoltre, Horizon si riserva il diritto di cambiare o modificare i termini di questa garanzia senza alcun preavviso e di escludere
tutte le altre garanzie già esistenti.
(b) Horizon non si assume alcuna garanzia per la disponibilità del prodotto, per l’adeguatezza o l’idoneità del prodotto a particolari previsti dall’utente. è sola responsabilità
dell’acquirente il fatto di verificare se il prodotto è adatto agli scopi da lui previsti.
(c) Richiesta dell’acquirente – spetta soltanto a Horizon, a propria discrezione riparare o sostituire qualsiasi prodotto considerato difettoso e che rientra nei termini di garanzia.
queste sono le uniche rivalse a cui l’acquirente si può appellare, se un prodotto è difettoso.
Horizon si riserva il diritto di controllare qualsiasi componente utilizzato che viene coinvolto nella rivalsa di garanzia. Le decisioni relative alla sostituzione o alla riparazione
avvengono solo in base alla sono a discrezione di Horizon. Questa garanzia non copre dei danni superficiali o danni per cause di forza maggiore, uso errato del prodotto, un utilizzo
che viola qualsiasi legge, regolamentazione o disposizione applicabile, negligenza, uso ai fini commerciali, o una qualsiasi modifica a qualsiasi parte del prodotto.
Questa garanzia non copre danni dovuti ad una installazione errata, ad un funzionamento errato, ad una manutenzione o un tentativo di riparazione non idonei a cura di soggetti
diversi da Horizon. La restituzione del prodotto a cura dell’acquirente, o da un suo rappresentante, deve essere approvata per iscritto dalla Horizon.
Limiti di danno
Horizon non si riterrà responsabile per danni speciali, diretti, indiretti o consequenziali; perdita di profitto o di produzione; perdita commerciale connessa al prodotto,
indipendentemente dal fatto che la richiesta si basa su un contratto o sulla garanzia. Inoltre la responsabilità di Horizon non supera mai in nessun caso il prezzo di acquisto del
prodotto per il quale si chiede la responsabilità. Horizon non ha alcun controllo sul montaggio, sull’utilizzo o sulla manutenzione del prodotto o di combinazioni di vari prodotti.
Quindi Horizon non accetta nessuna responsabilità per danni o lesioni derivanti da tali circostanze. Con l’utilizzo e il montaggio del prodotto l’utente acconsente a tutte le
condizioni, limitazioni e riserve di garanzia citate in questa sede.
Qualora l’utente non fosse pronto ad assumersi tale responsabilità associata all’uso del prodotto, si suggerisce di
di restituire il prodotto intatto, mai usato e immediatamente presso il venditore.
Indicazioni di sicurezza
Questo è un prodotto sofisticato di hobbistica e non è un giocattolo. Esso deve essere manipolato con cautela, con giudizio e richiede delle conoscenze basilari di meccanica e delle
facoltà mentali di base. Se il prodotto non verrà manipolato in maniera sicura e responsabile potrebbero risultare delle lesioni, dei gravi danni a persone, al prodotto o all’ambiente
circostante. Questo prodotto non è concepito per essere usato dai bambini senza una diretta supervisione di un adulto. Il manuale del prodotto contiene le istruzioni di sicurezza, di
funzionamento e di manutenzione del prodotto stesso. È fondamentale leggere e seguire tutte le istruzioni e le avvertenze nel manuale prima di mettere in funzione il prodotto. Solo
così si eviterà un utilizzo errato e di preverranno incidenti, lesioni o danni.
Domande, assistenza e riparazioni
Il vostro negozio locale e/o luogo di acquisto non possono fornire garanzie di assistenza o riparazione senza previo colloquio con Horizon. questo vale anche per le riparazioni in
garanzia. Quindi in tale casi bisogna interpellare un rivenditore, che si metterà in contatto subito con Horizon per prendere una decisione che vi possa aiutare nel più breve tempo
possibile.
Manutenzione e riparazione
Se il prodotto deve essere ispezionato o riparato, si prega di rivolgersi ad un rivenditore specializzato o direttamente ad Horizon. il prodotto deve essere Imballato con cura. Bisogna
far notare che i box originali solitamente non sono adatti per effettuare una spedizione senza subire alcun danno. Bisogna effettuare una spedizione via corriere che fornisce una
tracciabilità e un’assicurazione, in quanto Horizon non si assume alcuna responsabilità in relazione alla spedizione del prodotto. Inserire il prodotto in una busta assieme ad una
descrizione dettagliata degli errori e ad una lista di tutti i singoli componenti spediti. Inoltre abbiasmo bisogno di un indirizzo completo, di un numnero di telefono per chiedere
ulteriori domande e di un indirizzo e-mail.
Garanzia a riparazione
Le richieste in garanzia verranno elaborate solo se è presente una prova d’acquisto in originale proveniente da un rivenditore specializzato autorizzato, nella quale è ben visibile la
data di acquisto. Se la garanzia viene confermata, allora il prodotto verrà riparato o sostituito. Questa decisione spetta esclusivamente a Horizon Hobby.
Riparazioni a pagamento
Se bisogna effettuare una riparazione a pagamento, effettueremo un preventivo che verrà inoltrato al vostro rivenditore. La riparazione verrà effettuata dopo l’autorizzazione da
parte del vostro rivenditore. La somma per la riparazione dovrà essere pagata al vostro rivenditore. Le riparazioni a pagamento avranno un costo minimo di 30 minuti di lavoro e in
fattura includeranno le spese di restituzione. Qualsiasi riparazione non pagata e non richiesta entro 90 giorni verrà considerata abbandonata e verrà gestita di conseguenza.
ATTENZIONE: Le riparazioni a pagamento sono disponibili solo sull’elettronica e sui motori. Le riparazioni a livello meccanico,
soprattutto per gli elicotteri e le vetture RC sono molto costose e devono essere effettuate autonomamente dall’acquirente.
66
WARRANTY AND SERVICE CONTACT INFORMATION
GARANTIE UND SERVICE KONTAKTINFORMATIONEN
COORDONNÉES DE GARANTIE ET RÉPARATIONS
GARANZIA E REVISIONA INFORMAZIONI PER I CONTATTI
Country
of Purchase
United States of America
Horizon Hobby
Phone Number /
Email Address
Address
Horizon Service Center
(Repairs and Repair Requests)
servicecenter.horizonhobby.com/RequestForm/
4105 Fieldstone Rd
Champaign, Illinois, 61822 USA
Horizon Product Support
(Product Technical Assistance)
www.quickbase.com/db/
bghj7ey8c?a=GenNewRecord
888-959-2305
Sales
[email protected]
888-959-2305
United Kingdom
Service/Parts/Sales:
Horizon Hobby Limited
[email protected]
+44 (0) 1279 641 097
Units 1-4 Ployters Rd
Staple Tye
Harlow, Essex
CM18 7NS, United Kingdom
Germany
Horizon Technischer Service
Christian-Junge-Straße 1
25337 Elmshorn, Germany
Sales: Horizon Hobby GmbH
[email protected]
+49 (0) 4121 2655 100
France
Service/Parts/Sales:
Horizon Hobby SAS
[email protected]
+33 (0) 1 60 18 34 90
11 Rue Georges Charpak
77127 Lieusaint, France
China
Service/Parts/Sales:
Horizon Hobby - China
[email protected]
+86 (021) 5180 9868
Room 506, No. 97 Changshou Rd.
Shanghai, China 200060
EN Instructions for disposal of WEEE by users in the
European Union
This product must not be disposed of with other waste. Instead, it
is the user’s responsibility to dispose of their waste equipment by
handing it over to a designated collections point for the recycling of
waste electrical and electronic equipment. The separate collection and
recycling of your waste equipment at the time of disposal will help to
conserve natural resources and ensure that it is recycled in a manner
that protects human health and the environment. For more information about where
you can drop off your waste equipment for recycling, please contact your local city
office, your household waste disposal service or where you purchased the product.
DE Anweisungen zur Entsorgung von Elektro- und
Elektronik-Altgeräten für Benutzer in der Europäischen
Union
Dieses Produkt darf nicht zusammen mit anderem Abfall entsorgt
werden. Stattdessen ist der Benutzer dafür verantwortlich,
unbrauchbare Geräte durch Abgabe bei einer speziellen Sammelstelle
für das Recycling von unbrauchbaren elektrischen und elektronischen
Geräten zu entsorgen. Die separate Sammlung und das Recycling
von unbrauchbaren Geräten zum Zeitpunkt der Entsorgung hilft,
natürliche Ressourcen zu bewahren und sicherzustellen, dass Geräte auf eine Weise
wiederverwertet werden, bei der die menschliche Gesundheit und die Umwelt geschützt
werden. Weitere Informationen dazu, wo Sie unbrauchbare Geräte zum Recycling
abgeben können, erhalten Sie bei lokalen Ämtern, bei der Müllabfuhr für Haushaltsmüll
sowie dort, wo Sie das Produkt gekauft haben.
FR Instructions relatives à l’élimination des D3E pour les
utilisateurs résidant dans l’Union Européenne
IT Istruzioni per lo smaltimento di RAEE da parte di utenti
dell’Unione Europea
Ce produit ne doit pas être éliminé avec d’autres déchets. Il est de la
responsabilité de l’utilisateur d’éliminer les équipements rebutés en
les remettant à un point de collecte désigné en vue du recyclage des
déchets d’équipements électriques et électroniques. La collecte et le
recyclage séparés de vos équipements usagés au moment de leur mise
au rebut aideront à préserver les ressources naturelles et à assurer
le recyclage des déchets de manière à protéger la santé humaine et l’environnement.
Pour plus d’informations sur les points de collecte de vos équipements usagés en
vue du recyclage, veuillez contacter votre mairie, votre service de collecte des ordures
ménagères ou le magasin dans lequel vous avez acheté le produit.
Questo prodotto non deve essere smaltito assieme ai rifiuti domestici.
È responsabilità dell’utente lo smaltimento di tali rifiuti, che devono
essere portati in un centro di raccolta predisposto per il riciclaggio di
rifiuti elettrici e apparecchiature elettroniche. La raccolta differenziata
e il riciclaggio di tali rifiuti provenienti da apparecchiature nel
momento dello smaltimento aiuteranno a preservare le risorse
naturali e garantiranno un riciclaggio adatto a proteggere il benessere dell’uomo
e dell’ambiente. Per maggiori informazioni sui punti di riciclaggio si invita a contattare
l’ufficio locale competente, il servizio di smaltimento rifiuti o il negozio presso il quale
è stato acquistato il prodotto.
67
TLR04006
ENGINEERED
IN CALIFORNIA
Created 05/15 47742
©2015 Horizon Hobby, LLC. Team Losi Racing, TLR, 8IGHT, 8IGHT-E, TLR-Lok and the Horizon Hobby logo are trademarks or registered trademarks of Horizon Hobby, LLC.
Horizon Hobby, LLC.
Horizon Hobby Limited
Horizon Hobby GmbH
Horizon Hobby – China
4105 Fieldstone Road,
Units 1-4 Ployters Rd
Christian-Junge-Straße 1
Room 506, No. 97 Changshou Rd
Champaign, IL 61822 USA
Staple Tye, Harlow, Essex
25337 Elmshorn, Germany
Shanghai, China 200060
CM18 7NS, United Kingdom
800-0519