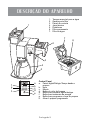
1
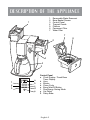
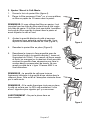
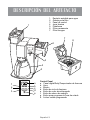
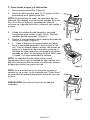
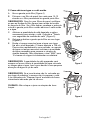
C. Adding Water and Ground Coffee
1. Open the brew basket drawer (Figure 4).
2. Place a 10–12 cup paper basket-style filter or the
permanent filter into the brew basket.
NOTE: If using paper filters, it is important that the
sides of the filter fit flush against the side of the filter
basket. If filter collapse occurs, dampen the filter
before placing in the filter basket and adding ground
coffee and water.
3. Add the desired amount of coffee and gently shake
to level the coffee. See the Suggested Coffee
Measurement Chart (Figure 5).
Figure 4
4. Slide the brew basket back into place (Figure 6).
5. Fill the removable water reservoir with cold, fresh
water to the desired capacity (1 cup equals 148 mL).
For easy and accurate filling, the water markings on
the removable water reservoir show the amount of
water needed to make the corresponding desired
number of cups. Do not fill past the “10-cup MAX line”
or water will flow out of the coffee maker.
NOTE: The amount of coffee brewed will always be
slightly less than the amount of water poured in the water
reservoir. This is due to the minimum absorption of water
by the coffee grounds.
Figure 5
NOTE: If the thermal carafe is not in place then the coffee
maker will not brew. The brew now “Colar Ahora” LED will
flash to signal that there is an error.
CAUTION: Do not place the thermal carafe in the
dishwasher.
Figure 6
English-7